Deploy a .NET Container with AWS Fargate
Heads up... this blog post is old!
For an updated version of this blog post, see How to Deploy a .NET Container with AWS ECS Fargate.

In the last article I wrote, I showed you how to host a serverless .NET application using AWS Lambda. In the article, we talked about the history of serverless and how companies are using these types of technology to simplify the process of delivering APIs and functionality faster than traditional methods. There are some problems that will start to arise in this type of application when you need more capability than your standard HTTP protocols GET, POST, PUT, DELETE, etc. A great example of this is Web Sockets.
Note: In May 2025, the Okta Integrator Free Plan replaced Okta Developer Edition Accounts, and the Okta CLI was deprecated.
We preserved this post for reference, but the instructions no longer work exactly as written. Replace the Okta CLI commands by manually configuring Okta following the instructions in our Developer Documentation.
Understanding Containers vs Virtual Machines
Around 2013, a product was released called Docker, and with it began a shift of how we think about hosting applications and managing infrastructure. Infrastructure teams and operations have been leveraging Virtual Machines with great success for decades, so you may be tempted to think “isn’t this just a virtual machine?” In spirit, yes, in application no.
To talk about containers we have to talk about Virtual Machines. A virtual machine is a virtual representation of a computer all the way from its boot process to loading a full operating system. This provides a lot of flexibility because you get to have fine-grained control over an entire virtual computer, but it has all the pitfalls of a full computer as well. The Operating System has to be maintained, patched, and updated; disks have to be managed, and all manner of operational overhead goes into their care and feeding. Notably, they are also very large because of the fact that an entire OS has to go on them. So when you start a Virtual Machine you have to go through the entire boot sequence of a traditional computer.
These are the 3 components that containers hope to solve. Ease of management, size, and speed to start. There are others but for simplicity, we’ll focus on those 3 as I feel (IMHO) they are the most relevant to business processes. Containers differ from a traditional virtual machine in one major way. They do not have an actual Operating System. This may come as a surprise to you, even if you might have dabbled with containers before. Containers instead have an abstraction of an operating system that provides hooks into the host operating system using standards and conventions supplied by the container system.
The de facto standard is Docker for all practical purposes, but just for clarity others do exist. This standardization is where the notion of a container comes from. In shipping there use to be no standardization and this made transporting items difficult because you have to figure out how to hold each item on a boat, a train, a truck. Containers provided a standard format for transport “you can put whatever you want inside the container so long as it opens this way, can bolt down this way, and are one of these dimensions.” this made the logistical process of moving real-world item much more simplified. In this same way standardizing the way a container interacts with its host OS to delegate the responsibility for the execution of tasks simplifies management of the part that is important the application.
Hosting Containers with AWS Fargate
Now that we have a better idea of what makes a container different from a virtual machine how does this solve our 3 problems?
First, it makes management easier by being able to write build scripts to create a stable repeatable representation of the host needed in order to do the body of work needed by the application. Second, since the container is ultimately hosted by an OS, that OS can enforce company policy and security policies so at worst any container can only do at most that much. As an example, if the host OS only allows traffic inbound from a specific subnet and port the container can’t override that as it is bound ultimately by the networking rules of the host OS.
This kind of management reliability continues into data management, memory management, and any other policies that need to be enforced. This ultimately creates a great deal of business agility as operations can reliability open the doors to developers knowing that they have some established rails. As for size without the need for a full OS, your container images are often only a few MB, vs many GB. On the topic of speed since there isn’t a full boot cycle the container can effectively start up as fast as the hosted application can start.
The difficulty with containers moves further up the abstraction chain (as is the style of such things) than with Virtual Machines. The challenge comes down to how to network and manage container images across many resources so that you can treat a set of computing as one homogeneous unit. Fortunately, there are a lot of solutions to this with products like Kubernetes, Mesos, Rancher, Docker Swarm, and others. But with this, you are ultimately back to having to manage a fleet of computers along with all the management overhead that goes along with it.
This is the sweet spot of AWS Fargate. Fargate gives you networking abstractions across a virtual network known as a VPC (Virtual Private Cloud.) This network abstraction is built right into the heart of AWS and is well vetted for any type of workload including high-security government workloads. Fargate takes this a step further by also abstracting away the machine management as well. You can set up traditional clusters and manage your own machines if you want, but by leveraging Fargate you simplify one more part of your process. Ultimately our goal with using cloud vendors in the first place is to let them be really good at infrastructure management so we can be really good at managing our business.
Time to jump into it and try it out using .NET containers with AWS Fargate!
AWS Fargate + .NET Steps to Success
What you’ll need to continue are the following:
- Basic knowledge of .NET
- Visual Studio Code or Visual Studio 2019
- An Okta Developer Account (free forever, to handle your OAuth needs)
- An AWS account (we’ll be using a free tier product)
- AWS Toolkit for Visual Studio
- AWS CLI V2
- Docker Desktop for Windows
This tutorial assumes you already have Docker Desktop up and running.
Requirements
So what do you want to build? To keep things simple so we can see the value in using something other than standard HTTP protocols, I’ll use SignalR to build a very basic chat application.
- Secure: Only logged-in clients should be able to use the chat functionality
- Chat users name must come from their validated identity
- Real-time
To achieve this I am going to use 4 technologies:
- Okta for identity management
- .NET to host the application
- SignalR to provide the socket management abstraction
- Vue to provide the rendering for the front-end
Authentication for Your .NET AWS Fargate Chat App
Authentication is important in any application, but doubly so when you need to depend on who someone is. I use to roll all my own security services, but I don’t anymore because there are too many threat verticals and too much for me to care to manage. I’d rather delegate that responsibility to another company that can focus solely on those concerns so I can focus completely on my business. I personally like using Okta for this purpose. I work with clients with many applications across many languages and vendors, Okta makes it really easy to incorporate all of them into one management pipeline to delegate access to those who need it and shut down access across the entire suite of applications if a bad actor gets a set of credentials.
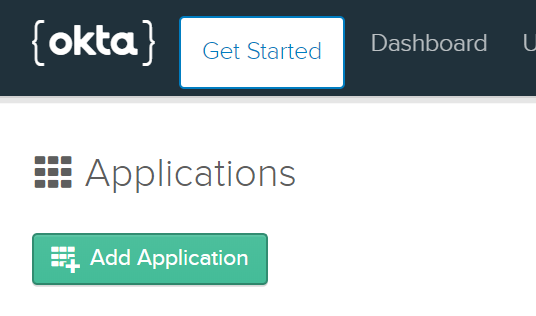
If you don’t already have one, signup for a developer account at https://developer.okta.com - sign-up is easy and non-intrusive. Once you have your Okta org (account) URL sent to your email, log in to the developer portal. Click on Applications.

You’ll need to create an application in Okta that will be used for your chat app. To continue, click Add Application.
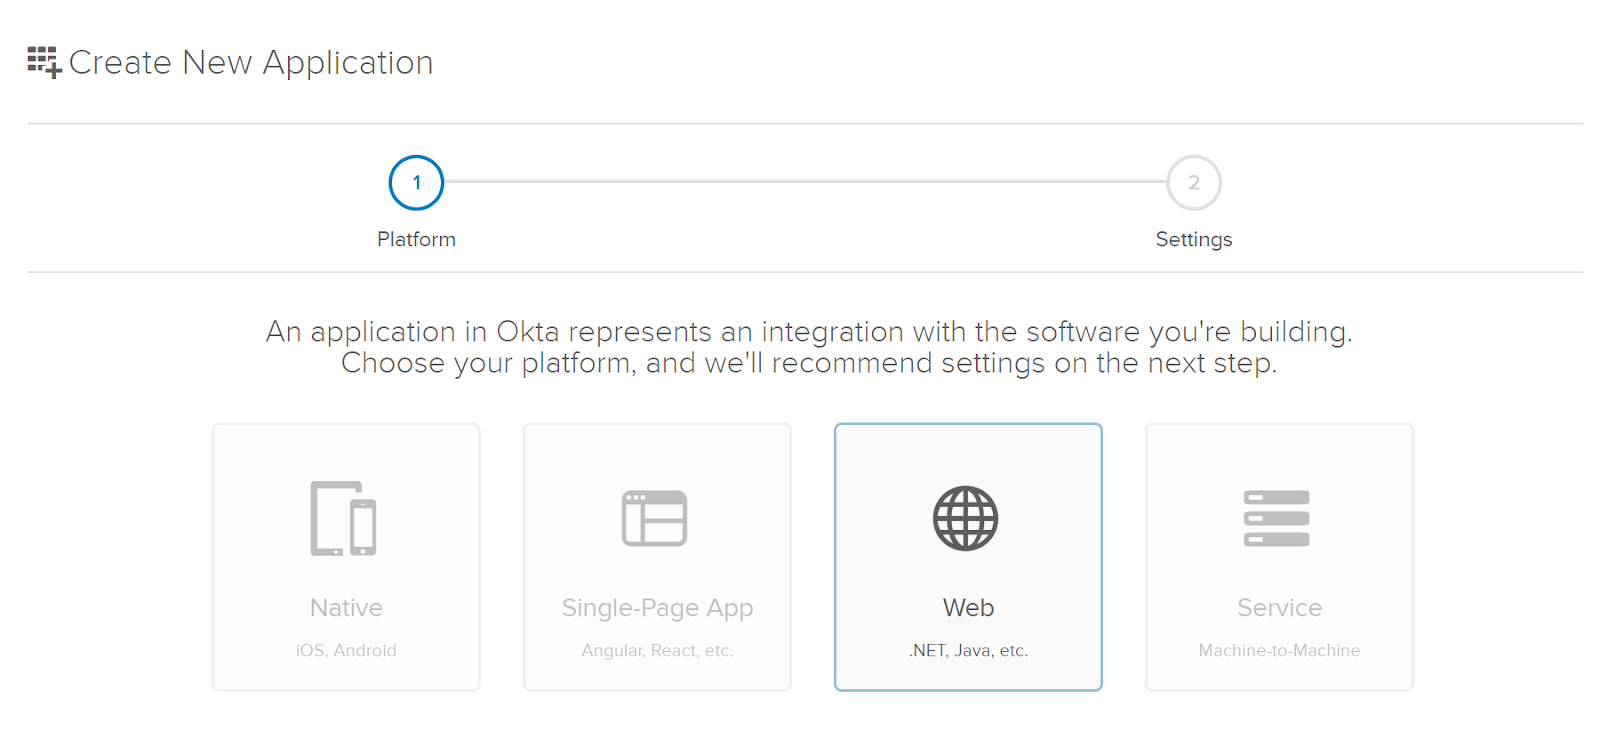
Click Web as the type of application you want to build. Then Next.
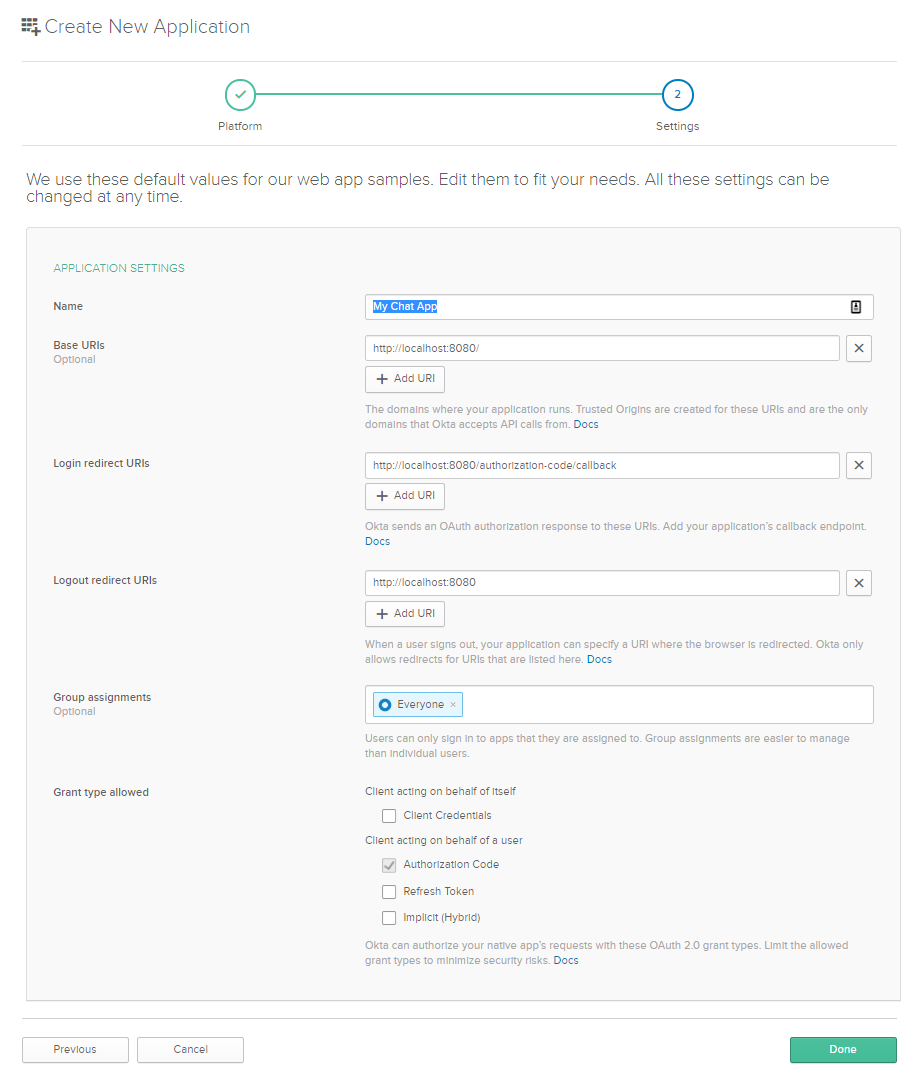
I’m going to name mine My Chat App leave the addresses as their defaults for the time being as you don’t yet know what your addresses will be. Click Done.
Leave this tab up in your browser because you’ll need it later. With your application configured in Okta, now you’ll need a host for your application.
Note: To test out your chat application, don’t forget to manually add a second user to your Okta org to use for that purpose.
Setup a .NET Core Web Application
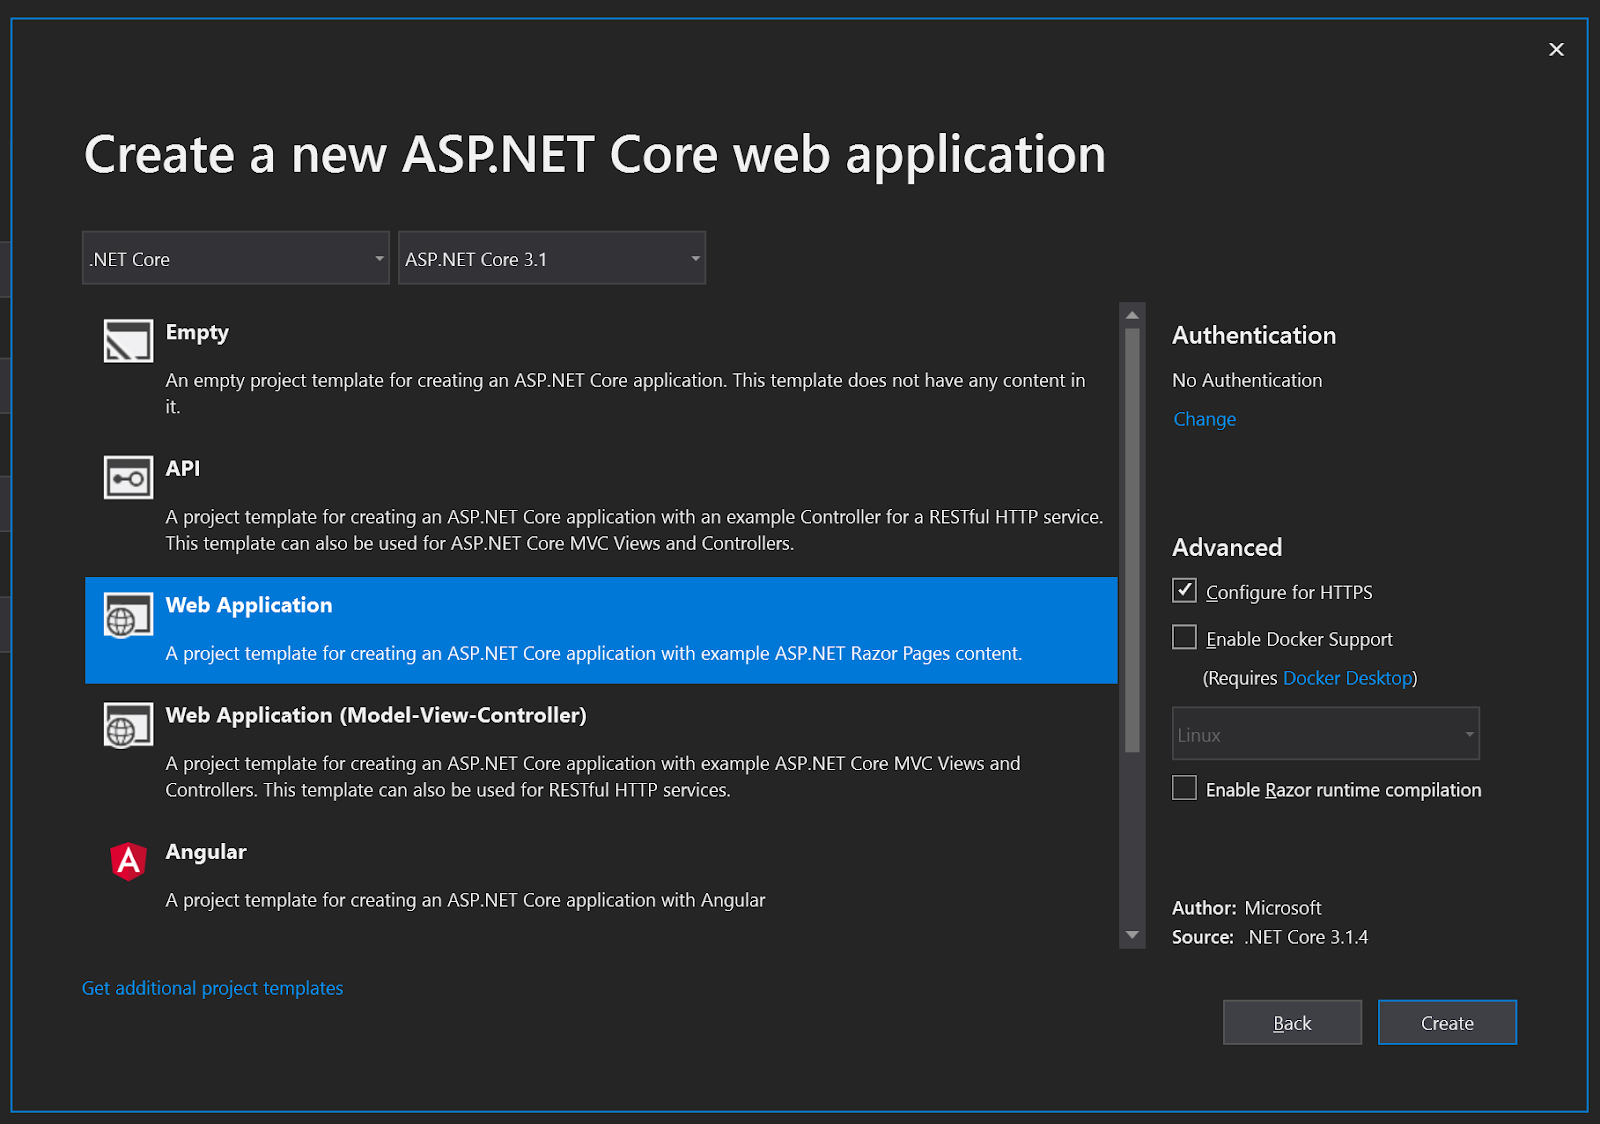
Open Visual Studio and start a new project. Make the type ASP.NET Core Web Application

I’m calling mine Okta.Blog.Chat but please feel free to call your application anything you’d like.
After naming your application you will get the multi-selection window to select what type of ASP.NET application you want to create. Select the default of Web Application.
First, set up your Okta application credentials by opening appsettings.json and add the following to the JSON object after AllowedHosts:
"OktaSettings": {
  "OktaDomain": "{yourOktaDomain}",
  "ClientId": "{yourOktaClientID}",
  "ClientSecret": "{yourOktaClientSecret}"
}
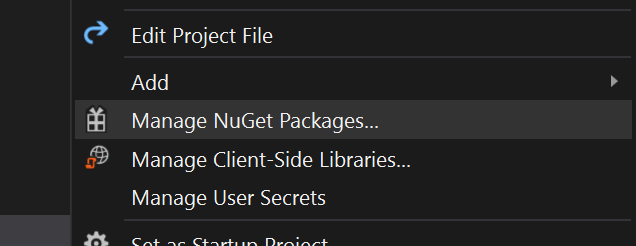
Now you’ll need to add the authentication library. Right-click on the project and click Manage NuGet Packages.
Search for Okta.AspNetCore and install version 3.1.1 - the latest version as of writing this article.

Now modify Startup.cs to use the Okta authentication provider.
Modify the method ConfigureServices(IServiceCollection services) to look like the code below. I’ve commented out a line that we will use later for authorization.
public void ConfigureServices(IServiceCollection services)
{
    var oktaMvcOptions = new OktaMvcOptions()
    {
        OktaDomain = Configuration["OktaSettings:OktaDomain"],
        ClientId = Configuration["OktaSettings:ClientId"],
        ClientSecret = Configuration["OktaSettings:ClientSecret"],
        Scope = new List<string> { "openid", "profile", "email" },
    };

    services.AddAuthentication(options =>
    {
        options.DefaultAuthenticateScheme = CookieAuthenticationDefaults.AuthenticationScheme;
        options.DefaultSignInScheme = CookieAuthenticationDefaults.AuthenticationScheme;
        options.DefaultChallengeScheme = OktaDefaults.MvcAuthenticationScheme;
    })
    .AddCookie()
    .AddOktaMvc(oktaMvcOptions);

    services.AddRazorPages()
    .AddRazorPagesOptions(options =>
    {
        //options.Conventions.AuthorizePage("/Chat");
    });
    services.AddSignalR();
}
This is going to add the authentication provider and set the page Chat as an authorized page as well as add SignalR support.
Next, modify the method Configure(IApplicationBuilder app, IWebHostEnvironment env) to look like the code below. I’ve commented out a line that we will use later during our SignalR Setup.
public void Configure(IApplicationBuilder app, IWebHostEnvironment env)
{
    if (env.IsDevelopment())
    {
        app.UseDeveloperExceptionPage();
    }
    else
    {
        app.UseExceptionHandler("/Error");
        // The default HSTS value is 30 days. You may want to change this for production scenarios, see https://aka.ms/aspnetcore-hsts.
        app.UseHsts();
    }

    app.UseHttpsRedirection();
    app.UseStaticFiles();

    app.UseRouting();

    app.UseAuthentication();
    app.UseAuthorization();

    app.UseEndpoints(endpoints =>
    {
        endpoints.MapRazorPages();
        //endpoints.MapHub<ChatHub>("/chathub");
    });
}
The key difference here is app.UseAuthentication();.
Next, create a new folder called Hubs and a new class file in that folder called ChatHub.cs this will provide our chat back-end.
using Microsoft.AspNetCore.SignalR;
using System.Threading.Tasks;

namespace Okta.Blog.Chat.Hubs
{
    public class ChatHub : Hub
    {
        public async Task SendMessage(string message)
        {
            if (this.Context.User.Identity.IsAuthenticated)
                await Clients.All.SendAsync("ReceiveMessage", this.Context.User.Identity.Name, message);
        }
    }
}
You’ll see in this ChatHub we’ve made use of the users’ authentication status. This way even if someone knows the back-end is SignalR we’ve mitigated their ability to use the system unless explicitly authenticated. Any additional authorization logic could go here as well.
A few more housekeeping tasks to go.
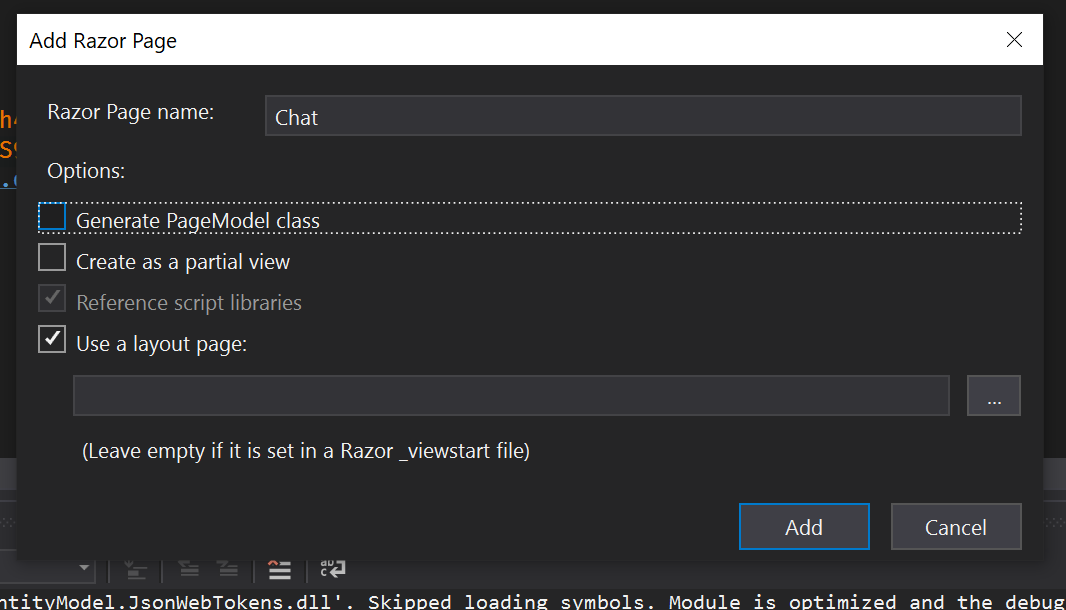
Next, you need to make sure you have the pages you need. Go ahead and delete the page Privacy.cshtml and add a new page name Chat.cshtml.
Edit Shared/_Layout.cshtml and modify the second nav item from this:
<a class="nav-link text-dark" asp-area="" asp-page="/Privacy">Privacy</a>
To this:
<a class="nav-link text-dark" asp-area="" asp-page="/Chat">Chat</a>
At this point, if you build it your application should run and you should be able to navigate to the chat page that just has the heading “Chat”. Make sure that runs successfully before moving onto the next step.
Add Docker Support to Your .NET Chat Application
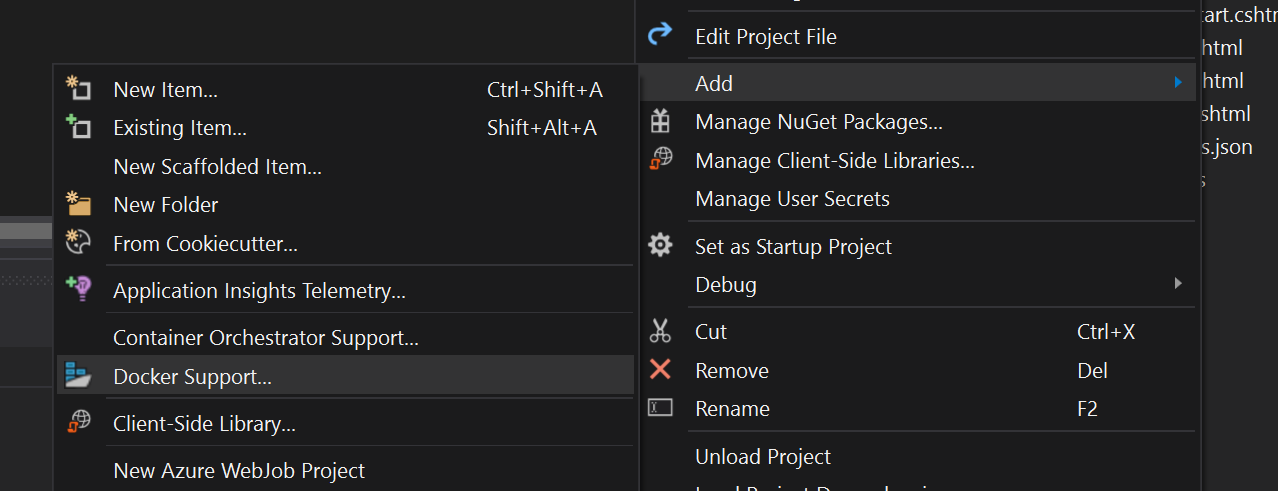
Before you add the chat functionality, add the Docker support. Visual Studio makes this super easy. Right-click your application and click Add Docker Support.
Click Linux as the image type. For most cloud hosting providers, Linux is going to be what you will typically use unless you are managing your own container hosting cluster. this will add a docker file that looks like this:
FROM mcr.microsoft.com/dotnet/core/aspnet:3.1-buster-slim AS base
WORKDIR /app
EXPOSE 80
EXPOSE 443

FROM mcr.microsoft.com/dotnet/core/sdk:3.1-buster AS build
WORKDIR /src
COPY ["Okta.Blog.Containers/Okta.Blog.Containers.csproj", "Okta.Blog.Containers/"]
RUN dotnet restore "Okta.Blog.Containers/Okta.Blog.Containers.csproj"
COPY . .
WORKDIR "/src/Okta.Blog.Containers"
RUN dotnet build "Okta.Blog.Containers.csproj" -c Release -o /app/build

FROM build AS publish
RUN dotnet publish "Okta.Blog.Containers.csproj" -c Release -o /app/publish

FROM base AS final
WORKDIR /app
COPY --from=publish /app/publish .
ENTRYPOINT ["dotnet", "Okta.Blog.Containers.dll"]
What is going on is we are exposing 2 ports: port 80 and 443 then building our application and publishing it to its final directory. At the end, we call ENTRYPOINT point which translates to “run dotnet with our published DLL” - nothing crazy, right? The FROM keywords are using other built docker files as base images to build our image from so all the work of installing dotnet etc, is already done.
In your debug toolbar you’ll see you now have the ability to debug right into a running container.
If you press F5 or click the play button you’ll start running your app in a Docker Container.

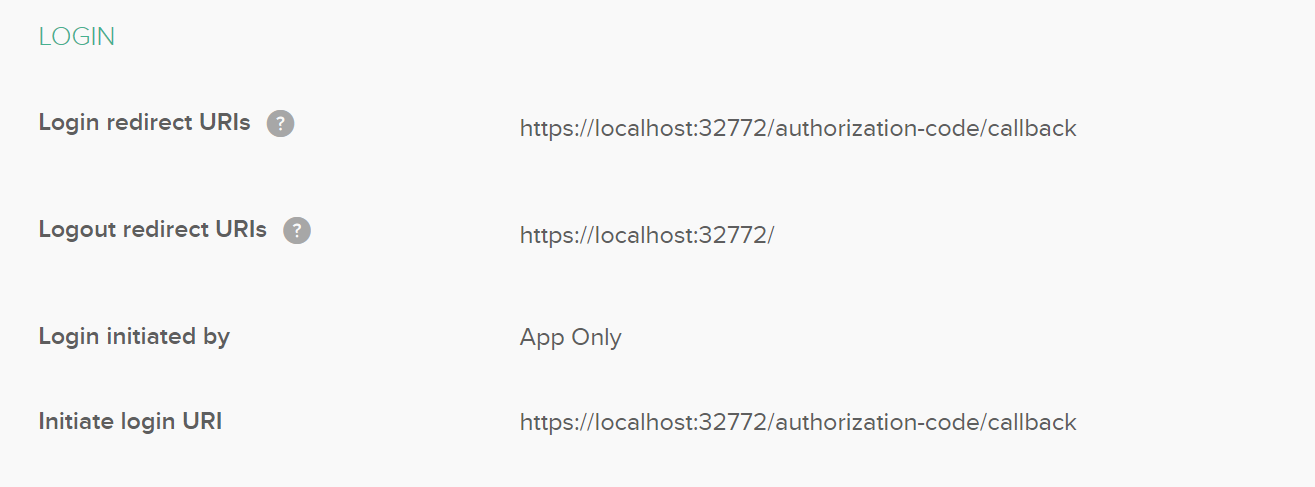
Adjust Okta Settings to Authorize Your Chat App
With your app now running in a docker container let’s adjust our authentication settings with the port number provided locally. In my case that is https://localhost:32772/. Open the Okta developer tab you had open earlier and edit your settings to match this port:
Modify Setup.cs and uncomment the following line.
options.Conventions.AuthorizePage("/Chat");
Try running the application and you should see that to open chat you’ll be redirected to the Okta Single Sign-On portal and redirected back. You are now successfully authenticated.
Add Chat Functionality with a CDN
I’ll be using Vue for state management since you can take as little or as much as you want. Sometimes it feels like you gotta buy the whole farm just to get a little milk these days when it comes to developing front-end technologies but I like that with Vue I can start with a CDN script tag and use it for a single component, a single page, or dive deep with a robust build system on Node. For this exercise, we’ll be using a CDN hosted script.
But first, you need to finish one thing on the back-end.
Since you have created your ChatHub.cs open Startup.cs and uncomment the following line
endpoints.MapHub<ChatHub>("/chathub");
Now modify the Chat.cshtml file to look like this:
@page

<div id="chatApp">
    <div class="container">
        <div class="row">
            <div class="col-2">Message</div>
            <div class="col-4">
                <input type="text" v-model="message" id="message" />
                <input type="button" v-on:click.stop.prevent="sendMessage" id="sendButton" value="Send Message" />
            </div>
        </div>
    </div>
    <div class="row">
        <div class="col-12">
            <hr />
        </div>
    </div>
    <div class="row">
        <div class="col-6">
            <ul id="messagesList">
                <li v-for="(item, index) in chatLog" :key="index">
                    {{ item.User }} - {{ item.Message }}
                </li>
            </ul>
        </div>
    </div>
</div>
<script src="~/js/signalr/dist/browser/signalr.js"></script>
<script src="https://unpkg.com/vue/dist/vue.min.js"></script>
<script>
    var connection = new signalR.HubConnectionBuilder().withUrl("/chatHub").build();

    document.addEventListener('DOMContentLoaded', function () {
        new Vue({
            el: '#chatApp',
            data: {
                isConnected: false,
                message: "",
                chatLog: []
            },
            created: function () {
                var vm = this;
                connection
                    .on("ReceiveMessage", function (user, message) {
                        vm.recieveMessage(user, message);
                    });

                connection
                    .start()
                    .then(function () {
                        vm.isConnected = true;
                    })
                    .catch(function (err) {
                        return console.error(err.toString());
                    });

            },
            methods: {
                recieveMessage: function (user, message) {
                    this.chatLog.push({
                        User: user,
                        Message: message
                    })
                },
                sendMessage: function () {
                    var vm = this;
                    connection
                        .invoke("SendMessage", vm.message)
                        .then(function () { vm.message = "" })
                        .catch(function (err) {
                            return console.error(err.toString());
                        });
                }
            }
        })
    })
</script>
I don’t want to discuss everything going on here, but I do want to highlight a few things.
The connection to the ChatHub uses the endpoint you set earlier:
var connection = new signalR.HubConnectionBuilder().withUrl("/chatHub").build();
The state is stored in the data setting for our Vue app. There are 3 properties in use. A flag to let us know if it is connected, the message that is currently being typed, and a chat log.
data: {
    isConnected: false,
    message: "",
    chatLog: []
},
Your app has 2 methods: recieveMessage and sendMessage.
When recieveMessage is called it just appends an object to the chat log with the user and the message.
When sendMessage is called we use the SignalR connection to invoke “SendMessage” and pass along our message properties. Once the message is sent we blank it out so a new message can be filled.
recieveMessage: function (user, message) {
    this.chatLog.push({
        User: user,
        Message: message
    })
},
sendMessage: function () {
    var vm = this;
    connection
        .invoke("SendMessage", vm.message)
        .then(function () { vm.message = "" })
        .catch(function (err) {
            return console.error(err.toString());
        });
}
When the app is created a hook is added for “ReceiveMessage” that calls the ViewModel recieveMessage method that was described previously.
Then the connection to the hub is started and if successful isConnected is set to true.
var vm = this;
connection
    .on("ReceiveMessage", function (user, message) {
        vm.recieveMessage(user, message);
    });

connection
    .start()
    .then(function () {
        vm.isConnected = true;
    })
    .catch(function (err) {
        return console.error(err.toString());
    });
Lastly, for the front end, you need to set up the SignalR client library.
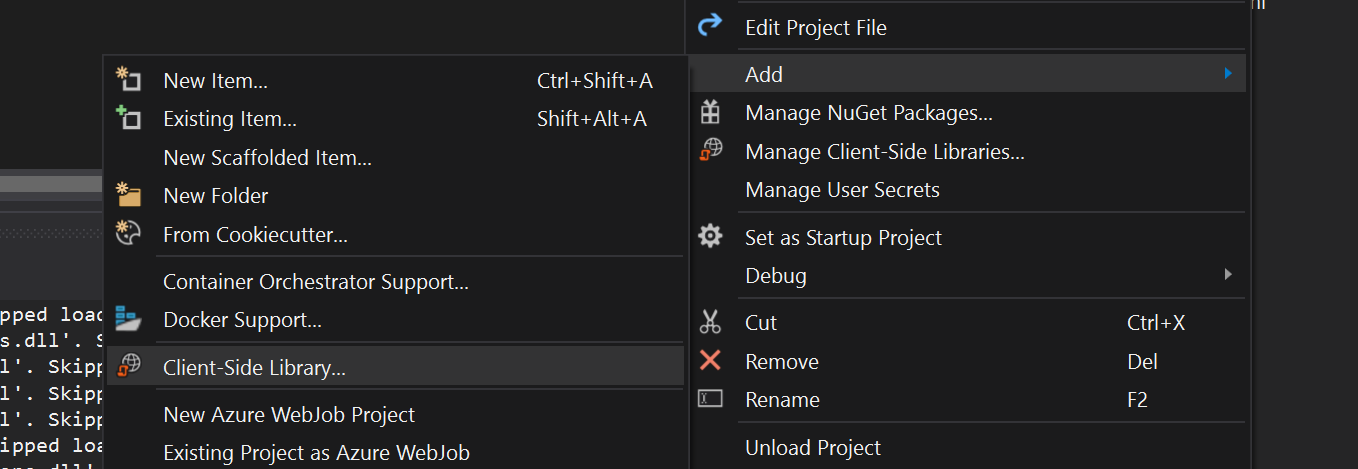
Right-click the project and select Add then click Client-Side Library.
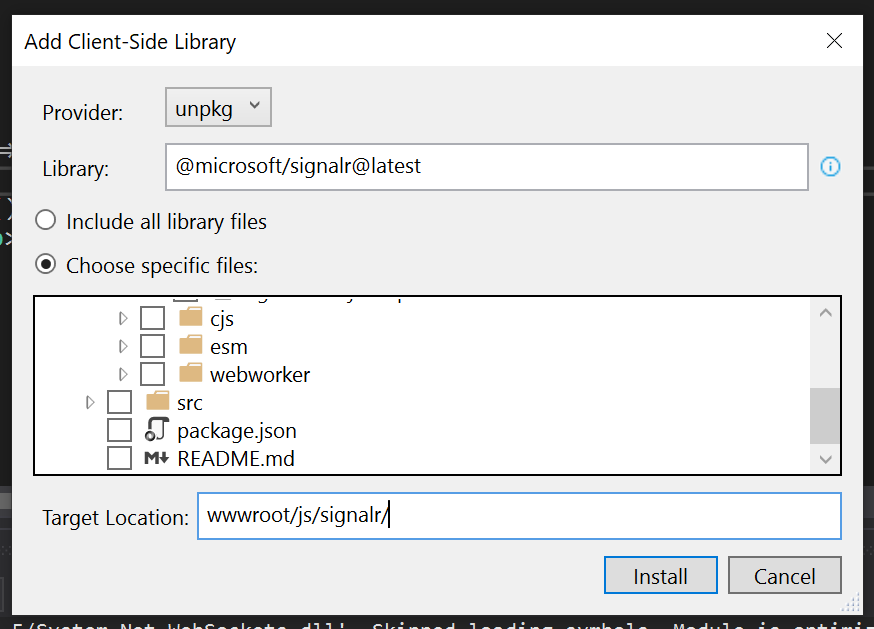
For the provider select unpkg For the Library select @microsoft/signalr@latest Select dist/browser/signalr.js and dist/browser/signalr.min.js as the files you need. The rest is unnecessary for our purposes. Set the target location as wwwroot/js/signalr/.
If you run your application at this point you’ll have a secured chat application running in a container!
Deploy Your .NET Chat Application to AWS
Now that the chat application is complete it’s time to deploy it. First, we need to build the docker image and deploy it to AWS to be used. AWS has private container repositories via its Elastic Container Registry (ECR) product.
Login to your AWS console and navigate to ECR.
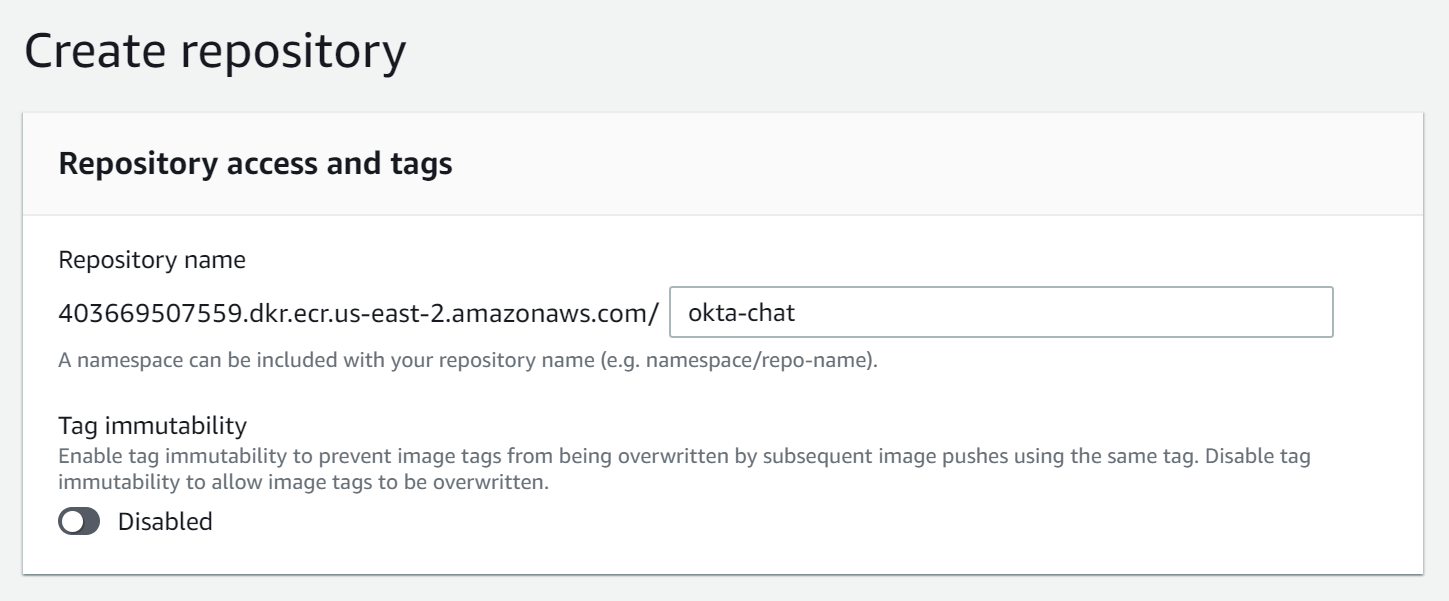
Click Create Repository.

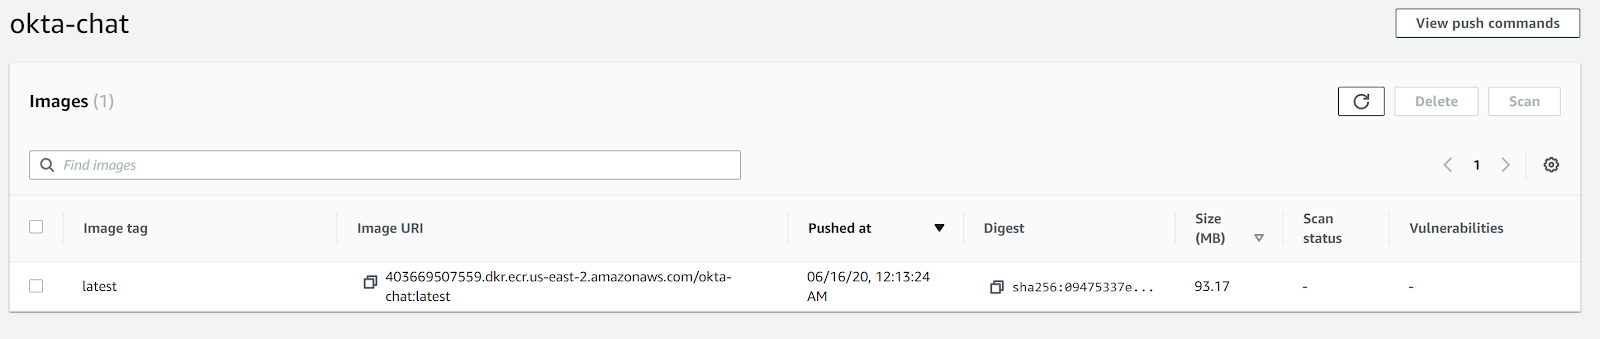
Name your repository. In my case, I’m going with okta-chat. Then click Create Repository at the bottom of the wizard.
Navigate to okta-chat and click View push command this has all the steps you’ll need to build your image with one minor change. Step 2 currently says docker build -t okta-chat . this needs to be modified to docker build -t okta-chat -f “{repoLocation}\okta.blog.chat\okta.blog.chat\dockerfile” “{repoLocation}\okta.blog.chat”
Replace {repoLocation} with whatever your root directory is including the drive.
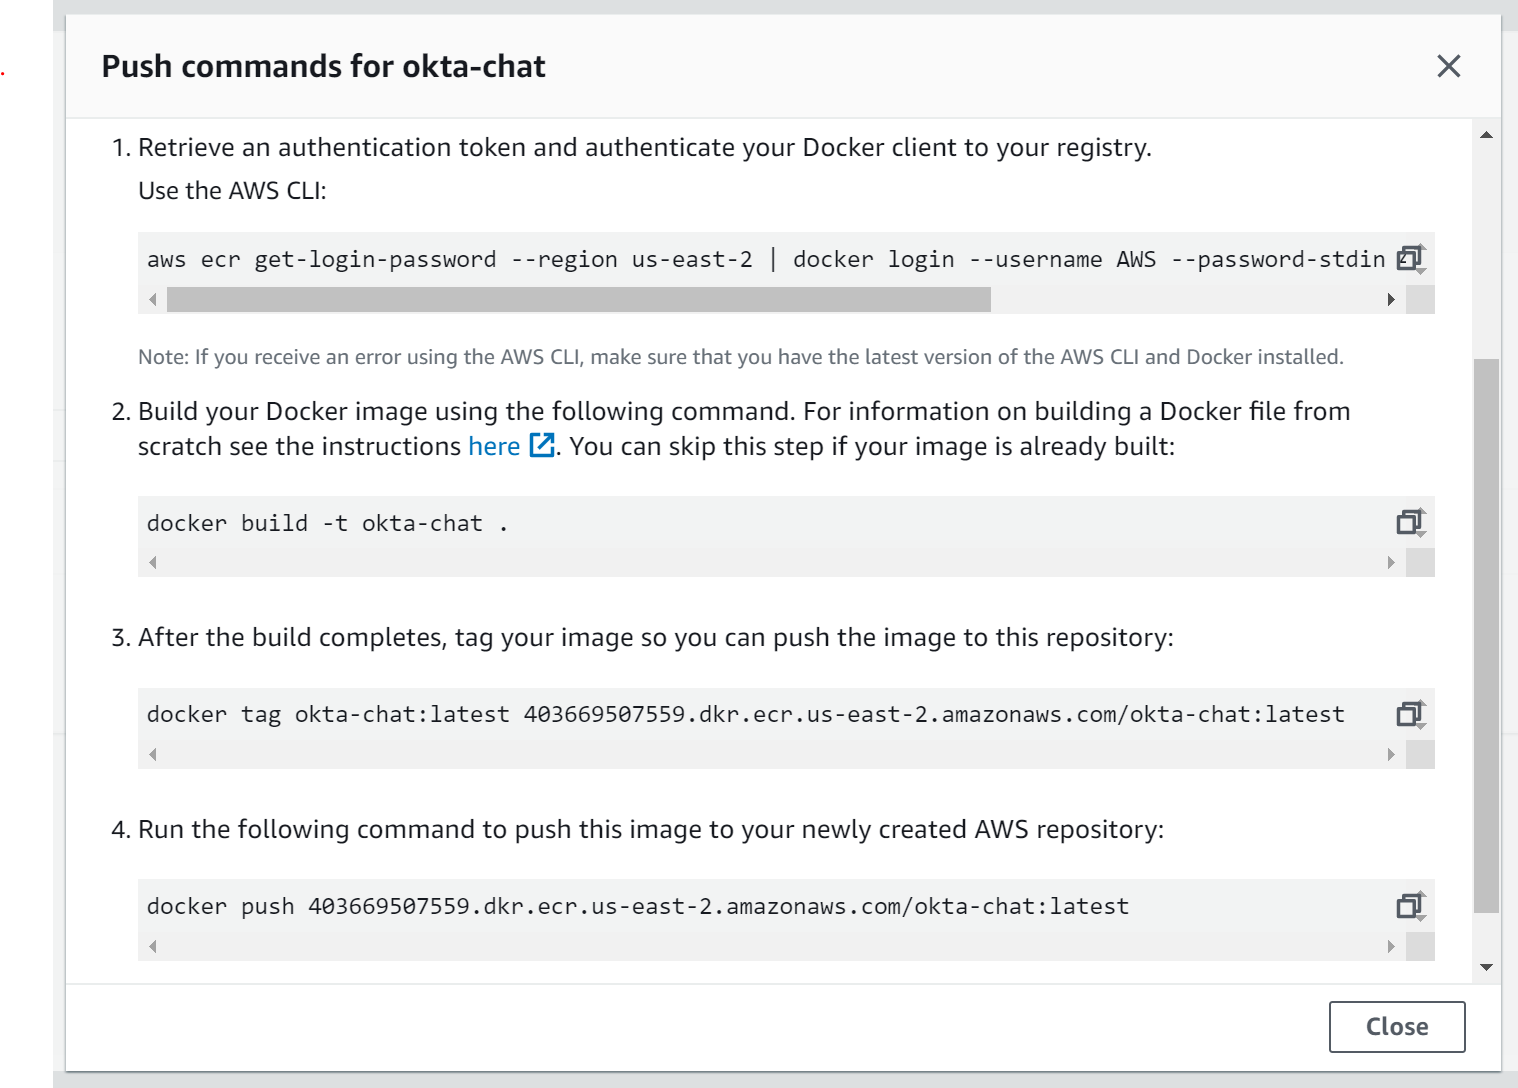
Select the copy button in the URI column next to your image and save that for later. This is the path to your image.
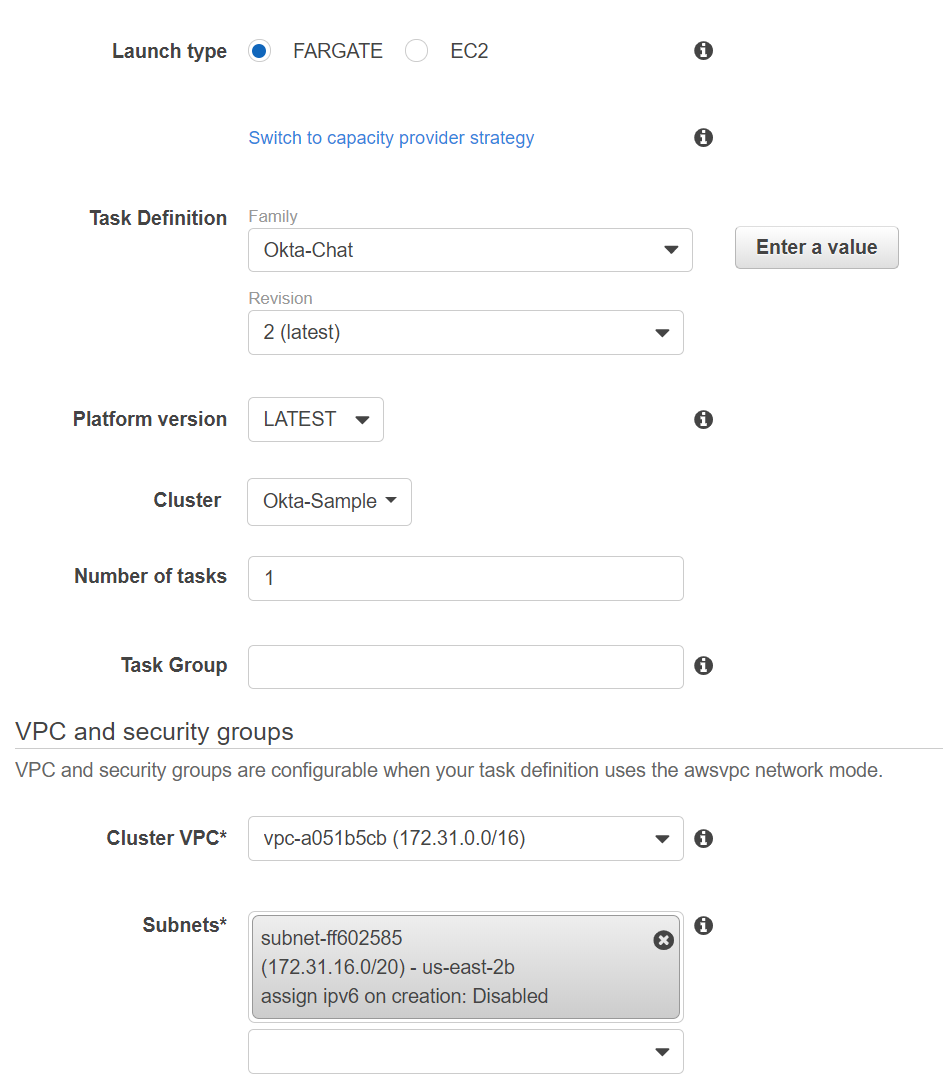
Now set up your Fargate cluster.
On the left menu click Clusters then click the blue Create Cluster button.
From the options click Networking Only.
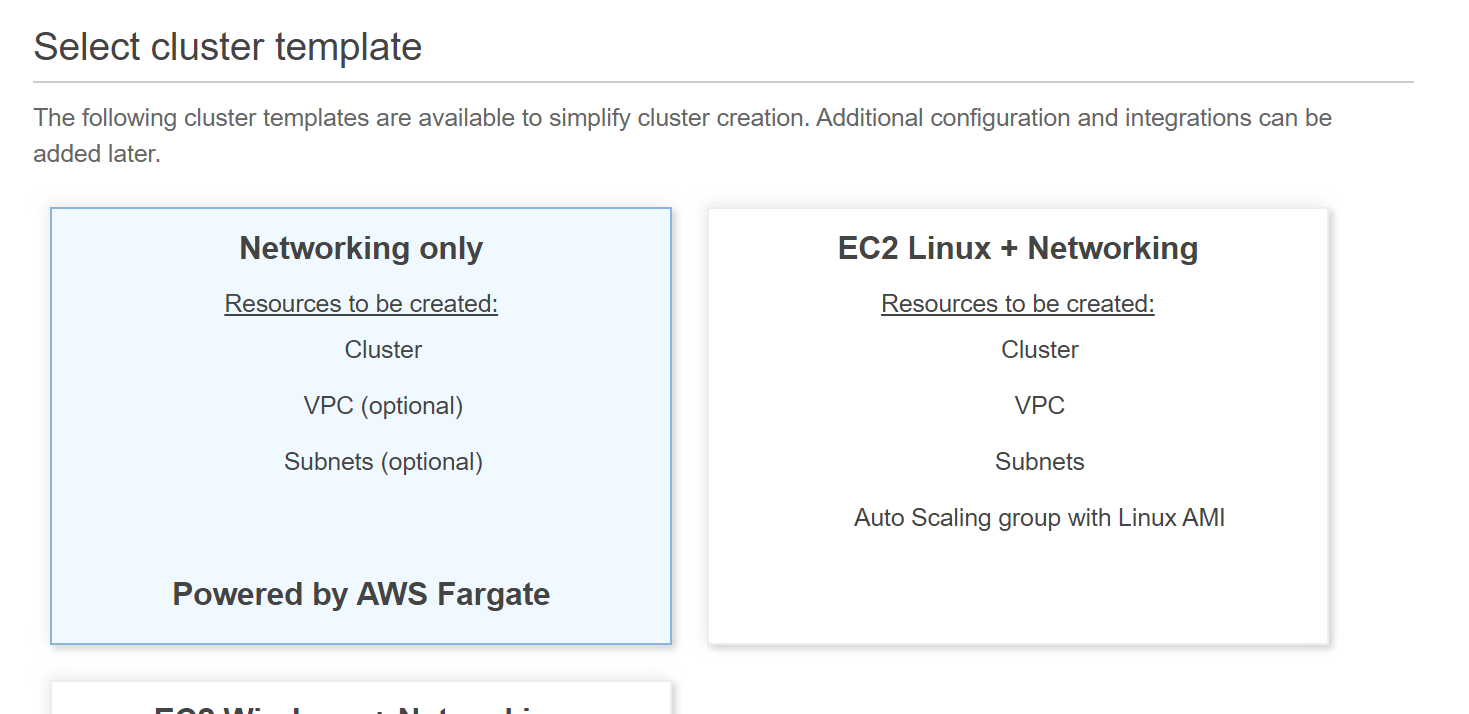
I named my cluster Okta-Sample, name yours then click Create on the following screen click View Cluster.
Now that the cluster is set-up you’ll need to create a task for your image to run as.
Click Task Definitions on the left menu and click Create new Task Definition.
For launch type select FARGATE.
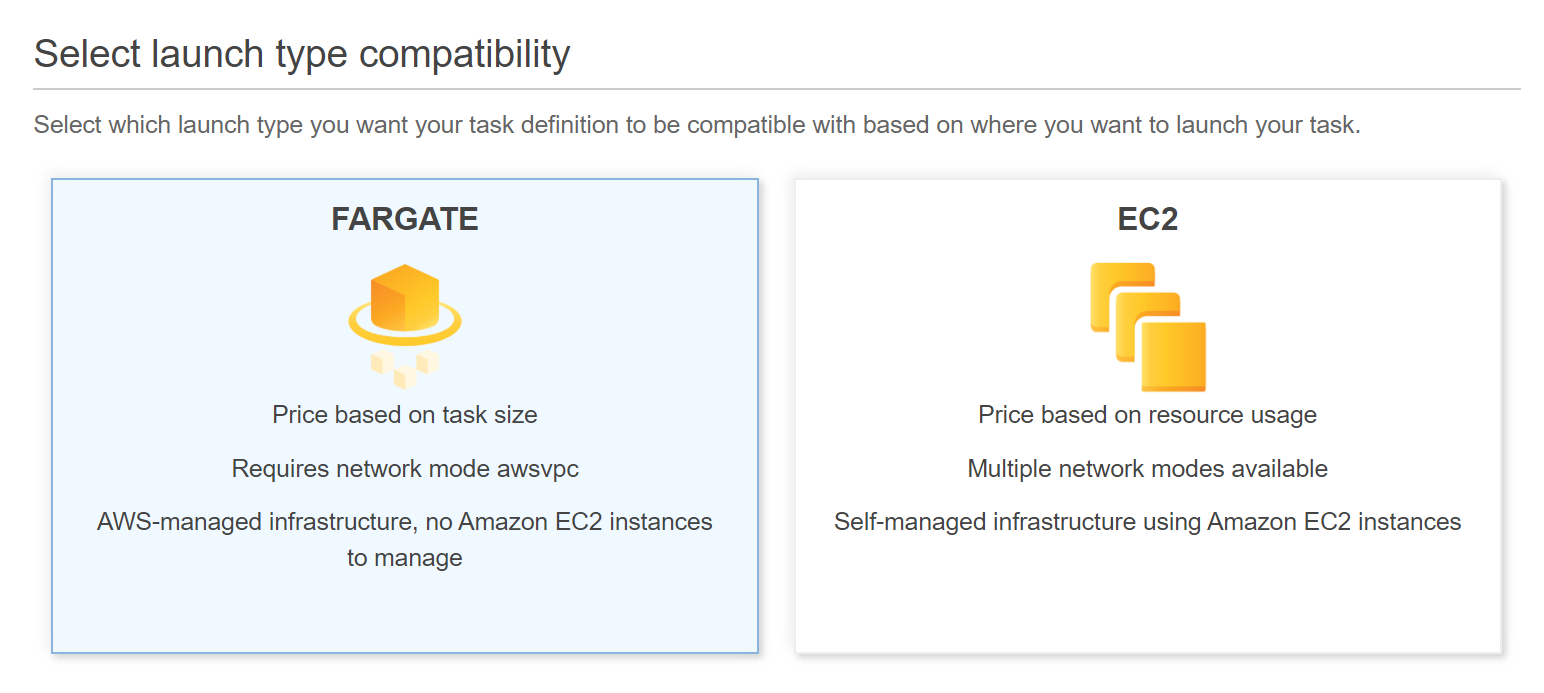
For the Task Definition Name I named mine Okta-Chat.
Set the Task memory (GB) to .5 GB. Set the Task CPU to .25.
.NET Core applications are very efficient as are containers. For many applications, you’ll find you can serve a lot of requests with smaller boxes than you might typically be accustomed to.
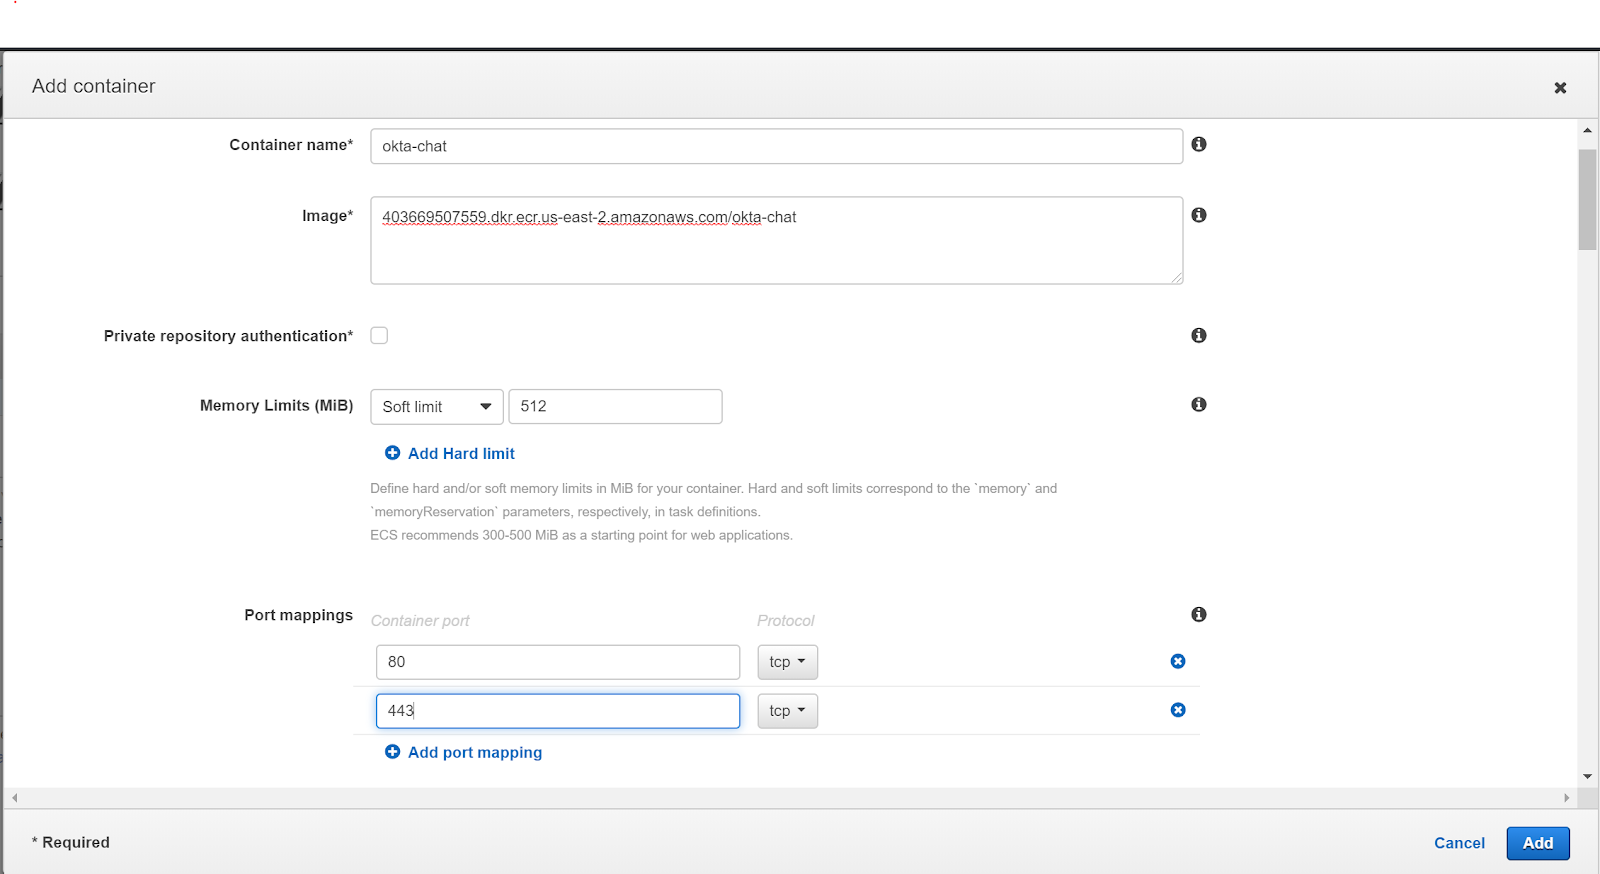
Now you need to define the image you want to use. Click Add Container.
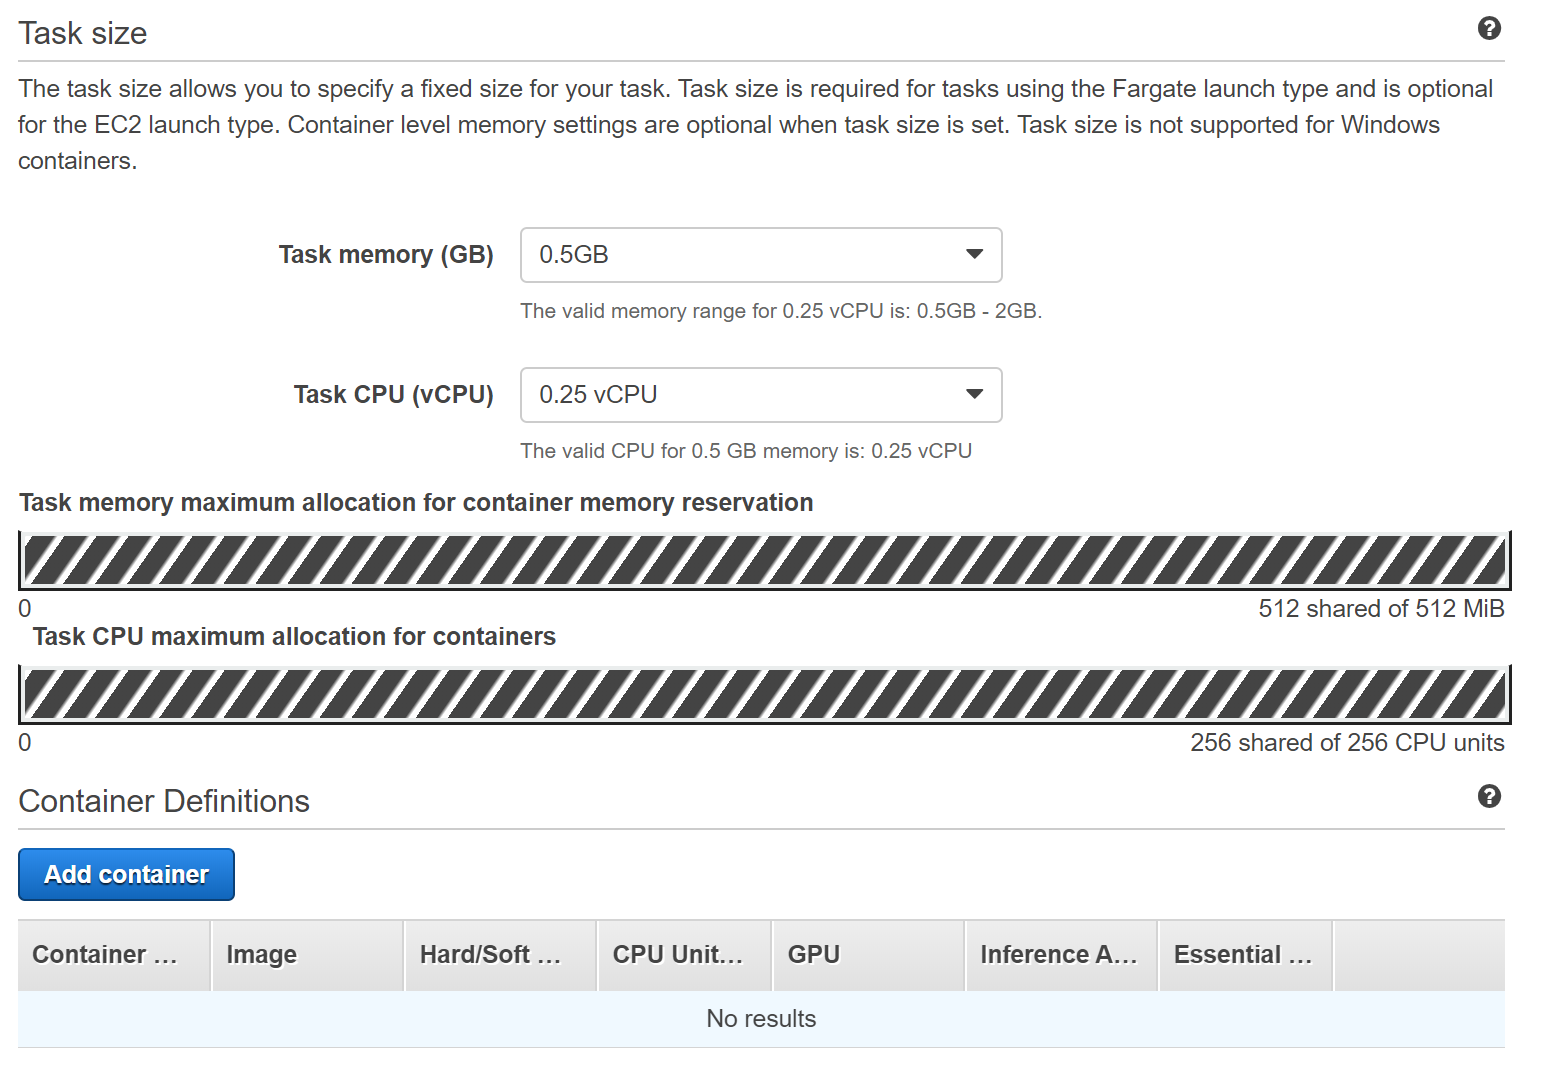
I’ll name the container the same thing okta-chat.
For the Image you’ll need the path you copied from the repository earlier.
Set the soft limit to 512, and add port 80 and 443.
Go back to your cluster and click on the Tasks tab then click Run new Task.

Click Switch to launch type and select FARGATE.
Select your default VPC and Subnet then click Run Task.
You’ll be taken back to your cluster. Select the Task you created by clicking its id. Make note of its public IP, you’ll need that to adjust your Okta application settings.
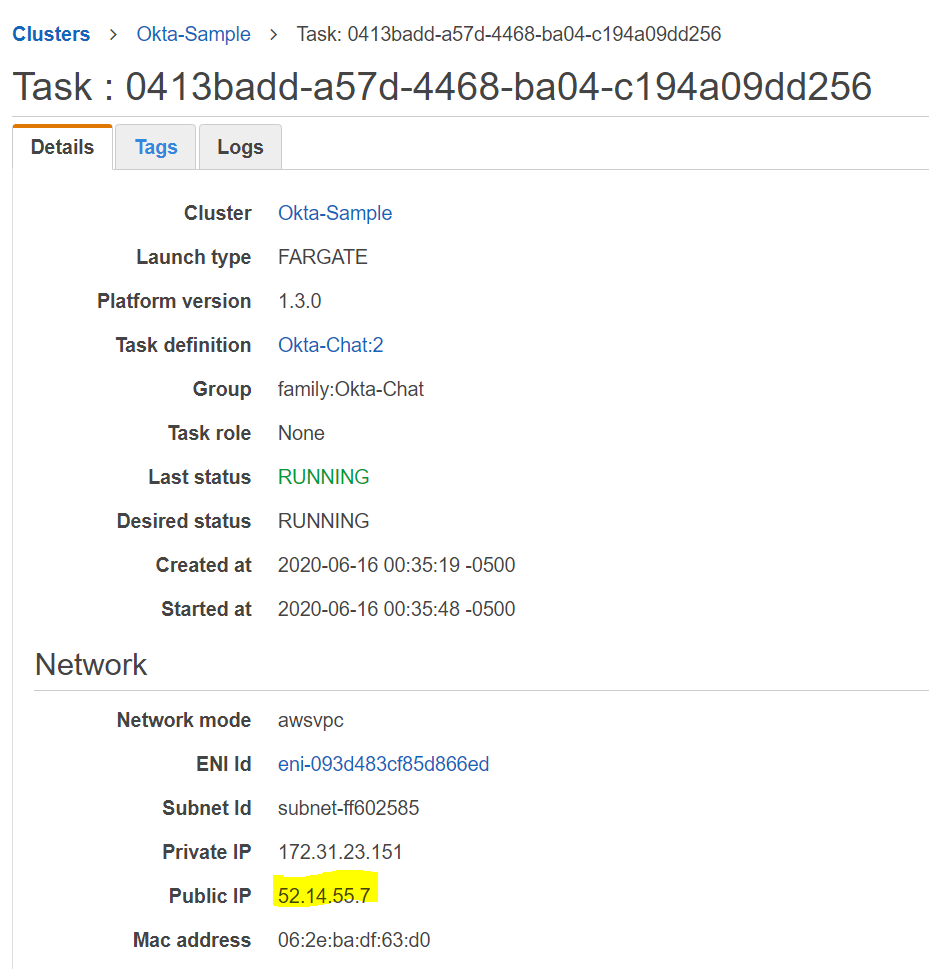
In your Okta Developer Portal, edit your application and login and logout URI with the IP address from your running Task as shown.
Now if you navigate to your applications IP address you’ll see you are now the proud owner of a fully functional, secured, chat application running in a container.
Recap
Whew, that was a ride! Good job on making your new chat application. What can we take away from this?
- Serverless is good for HTTP request/response, but other protocols need something different
- Containers are more lightweight than a Virtual Machine, but come with their own challenges
- A Docker file is just the instructions to build your application, what ports to expose, and launch it
- Fargate makes the hosting of containers easier since you don’t have to manage the host machine infrastructure.
- SignalR makes real-time communication easier by abstracting most of the heavy lifting
- Vue can be used for state management without taking on additional build and development pipeline
- Okta makes securing any type of .NET web application easy
- There is no reason to have an insecure site!
Check the code out on GitHub here.
Learn More about AWS, .NET, and Authentication
If you are interested in learning more about security and .NET check out these other great articles:
- The Most Exciting Promise of .NET 5
- ASP.NET Core 3.0 MVC Secure Authentication
- 5 Minute Serverless Functions Without an IDE
- Create Login and Registration in Your ASP.NET Core App
- Build Secure Microservices with AWS Lambda and ASP.NET Core
- Build a CRUD App with ASP.NET Core and Typescript
- Build a GraphQL API with ASP.NET Core
Want to be notified when we publish more awesome developer content? Follow @oktadev on Twitter, subscribe to our YouTube channel, or follow us on LinkedIn. If you have a question, please leave a comment below!
Okta Developer Blog Comment Policy
We welcome relevant and respectful comments. Off-topic comments may be removed.