Build a CRUD App with ASP.NET Core and TypeScript

There are a lot of things for .NET developers to love about TypeScript. It has strong typing that .NET Developers are used to and the ability to use the latest JavaScript features. Since it is just a superset of JavaScript, the cost to switch is almost nothing. Getting Visual Studio to transpile the TypeScript when it builds your ASP.NET Core app is pretty simple as well.
In this tutorial, you will build an ASP.NET Core app with client-side scripting done in TypeScript. You’ll build a simple CRUD app and use TypeScript for client-side validation. You will also learn how to get TypeScript into the build process of an ASP.NET Core application so that your TypeScript is automatically converted to normal JavaScript.
Ready to learn how to use TypeScript in Visual Studio 2017? Let’s get started!
Note: In May 2025, the Okta Integrator Free Plan replaced Okta Developer Edition Accounts, and the Okta CLI was deprecated.
We preserved this post for reference, but the instructions no longer work exactly as written. Replace the Okta CLI commands by manually configuring Okta following the instructions in our Developer Documentation.
Create an ASP.NET MVC Project
In Visual Studio, go to File > New > Project…, select the Visual C# project category and then select ASP.NET Core Web Application. Name your project AspNetCoreTypeScript and click OK.
I will use an ASP.NET Core 2.2 template for this project. If you don’t see that option, you can run the Visual Studio Installer to get an updated version of Visual Studio.
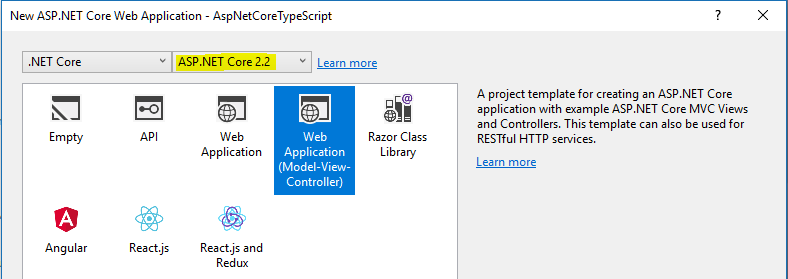
Select the Web Application (Model-View-Controller) project template and click OK.
If you run the project, you will see a page like this:
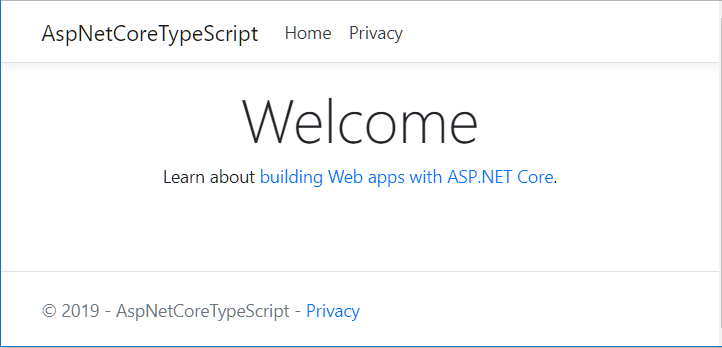
If you happened to use an older template, you’ll see something a bit different, but you should be able to complete most of this tutorial regardless.
Now let’s add some TypeScript to this project.
Add TypeScript to Your ASP.NET Core App
Before you add any TypeScript files to your project, you need to configure TypeScript. You do this with a tsconfig.json file. To create this file, right click on your project and select Add > New Item…. Either search for TypeScript or navigate to ASP.NET Core > Web in the left panel. Then select the TypeScript JSON Configuration File item and click Add.
Now you should have a tsconfig.json file in the root project folder. This is what the file looks like after I made a few changes:
{
  "compileOnSave": true,
  "compilerOptions": {
    "noImplicitAny": false,
    "noEmitOnError": true,
    "removeComments": false,
    "sourceMap": true,
    "target": "es5",
    "outDir": "wwwroot/js/"
  },
  "exclude": [
    "node_modules",
    "wwwroot"
  ]
}
First I added "compileOnSave": true as a root property, so that every time I save a TypeScript file, the corresponding JavaScript file will be regenerated. I also added "outDir": "wwwroot/js/" to the compiler options. Now the TypeScript compiler will put all the generated JavaScript files in this folder.
Make sure your tsconfig.json matches the one above and save your changes.
Now add a folder named TypeScript to your project. The name of the folder is not important. It just must not be one of the folders excluded in the tsconfig.json file. Right click on this folder and select Add > New Item…. Select the TypeScript File item, name the file home.ts, and click Add.
Let’s add some plain old JavaScript in this file and see what happens. Add:
alert('Hello World');
Now save the file. You should see home.js appear in the wwwroot/js folder. If you open it, this is what you will see:
alert('Hello World');
//# sourceMappingURL=home.js.map
Other than the reference to the source map (which is nested below the .js file), it looks identical to our .ts file. TypeScript is just JavaScript with some extra features.
Now let’s do something a little more interesting. Here is some code to find the first h1 tag on the page and change the title. Replace the code in home.ts with this:
let titleEl = document.querySelector('h1');
titleEl.innerText = 'Hello from TypeScript';
If you save the file and examine the regenerated home.js file, you will see one small change. The const keyword was changed to var because your tsconfig.json file specified that the TypeScript compiler should generate ES5-compatible JavaScript.
Now let’s test this generated JavaScript in a browser. First, add this code to the bottom of Views\Home\Index.cshtml in order to include the generated JavaScript file on the home page:
@section Scripts {
    <script src="~/js/home.js"></script>
}
Then run the project again. The title of the home page should have changed to Hello from TypeScript. Having fun yet?
Build a CRUD App with ASP.NET Core
Now that you have a little TypeScript coding under your belt, you can create a CRUD app with ASP.NET Core and use TypeScript for your client-side scripting needs.
Your assignment is to create a simple application to manage varieties of apples for an apple wholesaler. This application needs to prevent spam-bots from creating bogus entries in the database, so you will use TypeScript to verify that a real human is submitting the create apple variety form.
You’ll use the scaffolding built into Visual Studio to create this CRUD application in no time at all. Start by creating a data model for your apple varieties. You should already have a Models folder in your project, so add a class named Apple.cs to that folder. Paste in this code:
namespace AspNetCoreTypeScript.Models
{
    public class Apple
    {
        public int Id { get; set; }
        public string Variety { get; set; }
    }
}
Now right-click on the Controllers folder and select Add > New Scaffolded Item…. Select MVC Controller with views, using Entity Framework and click Add.
On the next screen, select the Apple model for the Model class, and then click on the + button next to Data context class to create an Entity Framework data context.
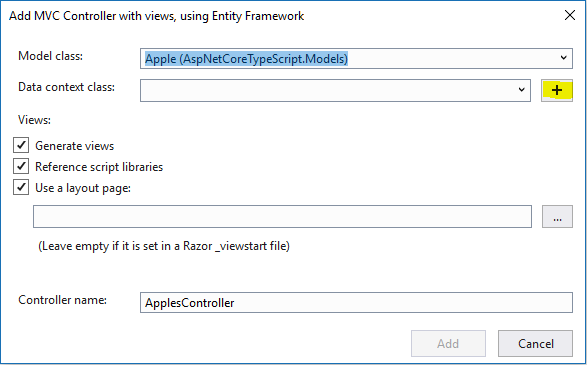
Accept the default type (AspNetCoreTypeScript.Models.AspNetCoreTypeScriptContext) and click Add. Then click Add to create the controller, views, and everything else.
Now add a menu item to the application so that you can easily navigate to the list of apple varieties. Find the Views\Shared\_Layout.cshtml and add a menu item between the Home and Privacy menu items, like this:
<li class="nav-item">
    <a class="nav-link text-dark" asp-area="" asp-controller="Apples" asp-action="Index">Apples</a>
</li>
If you run the application now, you’ll get an error if you go to the apples page. That’s because you haven’t created the database yet. Let’s do that now.
Open up the Package Manager Console in Visual Studio and issue this command:
Add-Migration "Initial"
That will create a Migrations folder in your solution with the necessary code to create the database. To create the database, run:
Update-Database
Now that the database has been created, you can run the app again. Make sure you can create, edit, and delete an apple variety.
TypeScript Spam-Bot Check for Your ASP.NET Core App
Now you need to use TypeScript to prevent spam-bots from creating bogus apple varieties. As you do this, you’ll learn a little more about how TypeScript works.
Let’s assume that the bots you are having trouble with all have JavaScript enabled, so you will disable the submit button on the form until the person solves a math challenge. To keep it simple you’ll just require the person to enter an even number into a text box.
First find Views\Apples\Create.cshtml and add a text box and related fields for the spam-bot-check at an appropriate location inside the form:
<div class="form-group">
    <label class="control-label">Enter an even number</label>
    <input class="form-control" id="number-check" />
    <div id="number-check-message"></div>
</div>
In the code above we have a label telling the user to enter an even number, a text box, and a div element where we can show a message to the user.
While you are editing the file, also add a disabled attribute to the submit input control.
Then add <script src="~/js/numberchecker.js"></script> in the Scripts section at the bottom of the file so the page will load the JavaScript file that you will be generating in the next step.
This is what the whole Create.cshtml file looks like after making all of the changes:
@model AspNetCoreTypeScript.Models.Apple

@{
    ViewData["Title"] = "Create";
}

<h1>Create</h1>

<h4>Apple</h4>
<hr />
<div class="row">
    <div class="col-md-4">
        <form asp-action="Create">
            <div asp-validation-summary="ModelOnly" class="text-danger"></div>
            <div class="form-group">
                <label asp-for="Variety" class="control-label"></label>
                <input asp-for="Variety" class="form-control" />
                <span asp-validation-for="Variety" class="text-danger"></span>
            </div>
            <div class="form-group">
                <label class="control-label">Enter an even number</label>
                <input class="form-control" id="number-check" />
                <div id="number-check-message"></div>
            </div>

            <div class="form-group">
                <input type="submit" value="Create" class="btn btn-primary" disabled />
            </div>
        </form>
    </div>
</div>

<div>
    <a asp-action="Index">Back to List</a>
</div>

@section Scripts {
    <script src="~/js/numberchecker.js"></script>
    @{await Html.RenderPartialAsync("_ValidationScriptsPartial");}
}
You may want to run the application again to verify that the text box to enter a number appears and that the Create button is disabled. Of course, you’ll get a file not found error in the console for numberchecker.js since we haven’t generated it yet. Let’s fix that now.
Add the TypeScript SpamBot Check to Your ASP.NET Core App
Create an empty file named numbershecker.ts in the TypeScript folder and save it. Now you should see that numberchecker.js was generated in the wwwroot\js folder.
Now let’s confirm that you can access the values entered into the number-check input control as they are typed. Paste this into numberchecker.ts and save it:
const inputEl = document.getElementById('number-check');

inputEl.addEventListener('keyup', function () {
    console.log(inputEl.value);
});
This is just plain ES6 JavaScript to find the input element and add an event listener to log values as they are typed.
But it doesn’t work. If you examine the JavaScript file that was generated, you will see that it wasn’t updated. What’s going on?
The problem is that while this is valid JavaScript (and therefore valid TypeScript), it has an error in it. Let me say that another way: Just because TypeScript code has errors does not mean it is invalid.
The TypeScript compiler can generate JavaScript from any valid TypeScript, even if there are errors. It didn’t generate an updated JavaScript file is because you told it not to. Take a look at your tsconfig.json file. The noEmitOnError compiler option is set to true. Change it to false and save the file. Then add a comment to numberchecker.ts and save it. Sure enough, this time the corresponding JavaScript file was updated.
Now let’s take a look at that error.
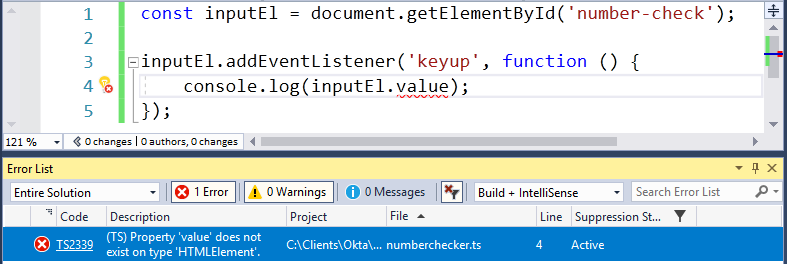
We know that our input element has a value property. Why doesn’t TypeScript know about it?
The TypeScript compiler knows that getElementById will return an HTMLElement, but it does not know exactly what type of element it might return. We need to help out the compiler by specifying the exact type that we are working with (the language is called TypeScript because it adds the power of types to JavaScript).
In this case we need to inform the compiler that we are dealing with an HTMLInputElement. There are two ways you can do this. The first way is like this:
const inputEl = <HTMLInputElement> document.getElementById('number-check');
This is fine, but since TypeScript is sometimes used in JSX (for React projects), the type assertion in angle brackets could be mistaken for an html tag. So here is the preferred syntax:
const inputEl = document.getElementById('number-check') as HTMLInputElement;
Now the TypeScript error is gone because the TypeScript compiler treats inputEl as an HTMLInputElement (whether it is one, in fact, or not).
If you run the project, you will see that values typed into out spam-bot check field are logged to the console.
Now replace the contents of numberchecker.ts with the complete number checking script:
const inputEl = document.getElementById('number-check') as HTMLInputElement;
const messageEl = document.getElementById('number-check-message');
const submitButton = document.querySelector('form input[type="submit"]') as HTMLInputElement;

inputEl.addEventListener('keyup', function () {
    const number = parseInt(inputEl.value);
    let message = '';
    let disable = true;
    if (isNaN(number)) {
        message = 'not  a number';
    }
    else if (number % 2 === 0) {
        message = number + ' is even';
        disable = false;
    }
    else {
        message = number + ' is odd';
    }
    messageEl.innerText = message;
    submitButton.disabled = disable;
});
In Visual Studio you can hover over each variable in this script to see the type that is inferred by the compiler. Those types determine what is considered an error and what isn’t. For example, you will notice that you are able to assign number + ' is even' to the message variable, because when adding a string to a number, the number will be automatically converted to a string. But if you try to assign a number to a variable of type string (like message = number;), you will get an error (it works in JavaScript because the variable is simply changed to a number). TypeScript brings attention to things that might cause runtime errors and allows you to fix them while coding. Pretty neat stuff.
Secure Your ASP.NET Core + TypeScript Application
Imagine that you’ve deployed this database of apple varieties, only to find that the spam-bots are smarter than you thought. You need a better way to protect your application. You could secure it with individual user accounts, but that’s a lot of work, isn’t it?
Actually, no. It is actually quite easy if you outsource the hard parts to an identity provider like Okta. Here is how to secure your .NET Core CRUD app in just a few minutes.
First, sign up for a forever-free Okta developer account (or sign in to {yourOktaDomain} if you already have an account).
Once you’re signed in to Okta, register your client application.
- In the top menu, click on Applications
- Click on Add Application
- Select Web and click Next
- Enter
AspNetCoreTypeScriptfor the Name - Change the Base URIs to the exact URL that your application runs on locally, including the trailing backslash. If it is running on https, make sure that the URI starts with that.
- Change the first of the Login redirect URIs to have the same scheme, host, and port number as above. It should still end with
authorization-code/callback. - Click Done
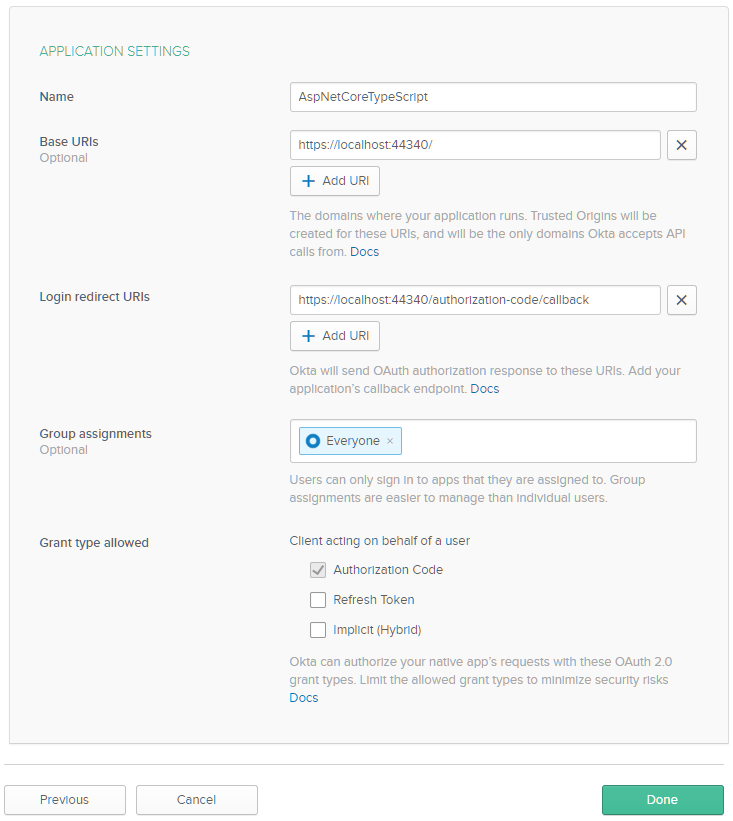
On the next screen, you will see an overview of settings. You need to add one more thing that wasn’t on the previous screen, so click the Edit button at the top of the General Settings section of the page.
Next to Logout redirect URIs click Add URI and enter a URL like https://localhost:{yourPortNumber}/signout/callback where the scheme, hostname, and port are the same ad the other URLs on the page. Then click Save.
Below the General Settings section, you’ll see the Client Credentials section. Note the Client ID and the Client Secret on the next page. You will need them in a moment.
Back in Visual Studio, use the Package Manager Console to install the Okta NuGet package.
Install-Package Okta.AspNetCore -Version 1.1.5
Now add the Okta credentials that you took note of earlier into your appsettings.json file. Be sure that the values match the values in your Okta dashboard exactly. Your Okta Domain is the Org URL displayed in the top left corner of the main Okta Dashboard page.
"Okta": {
  "ClientId": "{OktaClientId}",
  "ClientSecret": "{OktaClientSecret}",
  "Domain": "https://{yourOktaDomain}"
}
Note that in order to keep these secrets out of source control you should move the
ClientIdandClientSecretsettings to your User Secrets file before you commit. You can skip this step since this is just a tutorial.
Now add the following using statements at the top of your Startup.cs file:
using Microsoft.AspNetCore.Authentication.Cookies;
using Okta.AspNetCore;
After that, configure authentication in the ConfigureServices method of Startup.cs. Add the following before services.AddMvc().SetCompatibilityVersion(CompatibilityVersion.Version_2_2);:
services.AddAuthentication(options =>
{
  options.DefaultAuthenticateScheme = CookieAuthenticationDefaults.AuthenticationScheme;
  options.DefaultSignInScheme = CookieAuthenticationDefaults.AuthenticationScheme;
  options.DefaultChallengeScheme = OktaDefaults.MvcAuthenticationScheme;
})
.AddCookie()
.AddOktaMvc(new OktaMvcOptions
{
  OktaDomain = Configuration["Okta:Domain"],
  ClientId = Configuration["Okta:ClientId"],
  ClientSecret = Configuration["Okta:ClientSecret"]
});
The code you added configures your application to use Okta as an identity provider, using the settings you specified in appsettings.json.
Now add the following line the Configure method, above before app.UseMvc();:
app.UseAuthentication();
Finally, add the Authorize attribute to the ApplesController class. Inside ApplesController.cs file add the following using:
using Microsoft.AspNetCore.Authorization;
Above the ApplesController class name add the authorization attribute:
[Authorize]
public class ApplesController : Controller
This code ensures that all requests to this controller are allowed only for authorized users.
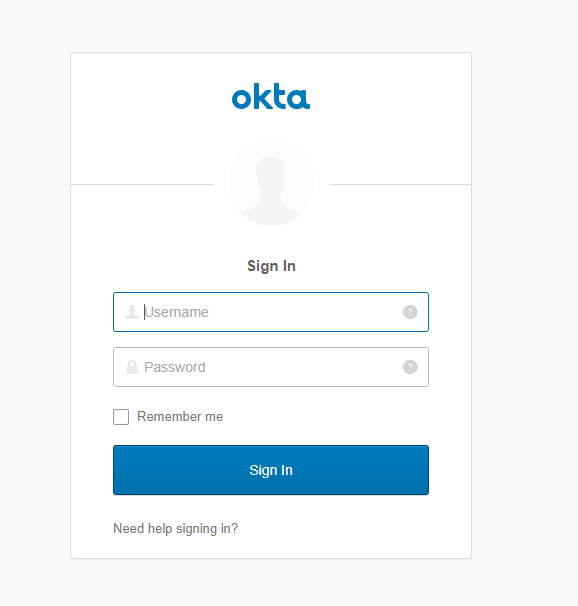
Now when you run the application and navigate to the apple variety management page, you will be prompted to sign in at Okta. If you are still logged into the Okta dashboard, you’ll be signed in automatically. In this case, you can use an incognito tab to verify that unauthenticated users are prompted to sign in.
The sign in screen will look like this:
Add Sign In and Sign Out Links to Your ASP.NET Core MVC + TypeScript Application
Although you were prompted to sign in to your app when you visited a controller with an [Authorize] attribute on it, there still isn’t a good way to sign in and out of your application. You’ll add links for these to the menu now.
First, create a new class inside the Controllers folder named AccountController.cs. Replace the contents of the file with this code:
using Microsoft.AspNetCore.Authentication.Cookies;
using Microsoft.AspNetCore.Mvc;
using Okta.AspNetCore;

namespace OktaMvc.Controllers
{
    public class AccountController : Controller
    {
        public IActionResult Login()
        {
            if (!HttpContext.User.Identity.IsAuthenticated)
            {
                return Challenge(OktaDefaults.MvcAuthenticationScheme);
            }

            return RedirectToAction("Index", "Home");
        }

        [HttpPost]
        public IActionResult Logout()
        {
            return new SignOutResult(new[]
            {
                OktaDefaults.MvcAuthenticationScheme,
                CookieAuthenticationDefaults.AuthenticationScheme
            });
        }
    }
}
The Login method above makes sure that if the user is not already authenticated that the user will be automatically redirected to the login screen.
The Logout method makes sure the user gets signed out from both the Cookie scheme and Okta’s custom scheme.
Now create a file named _LoginPartial.cshtml in the Views\Shared folder and paste in the following code:
<ul class="navbar-nav">
    @if (User.Identity.IsAuthenticated)
    {
        <li class="nav-item">
            <span class="navbar-text">Hello, @User.Identity.Name</span>
        </li>
        <li class="nav-item">
            <form class="form-inline" asp-controller="Account" asp-action="Logout" method="post">
                <button type="submit" class="nav-link btn btn-link text-dark">Log out</button>
            </form>
        </li>
    }
    else
    {
        <li class="nav-item">
            <a class="nav-link text-dark" asp-controller="Account" asp-action="Login">Log in</a>
        </li>
    }
</ul>
Now modify Views\Shared\_Layout.cshtml. Find the following code:
<ul class="navbar-nav flex-grow-1">
    <li class="nav-item">
        <a class="nav-link text-dark" asp-area="" asp-controller="Home" asp-action="Index">Home</a>
    </li>
    <!-- more code here -->
</ul>
Immediately before the ul element shown in the snippet above, add this line:
<partial name="_LoginPartial" />
Now run your application. If you’re still signed in you will see a screen like this:
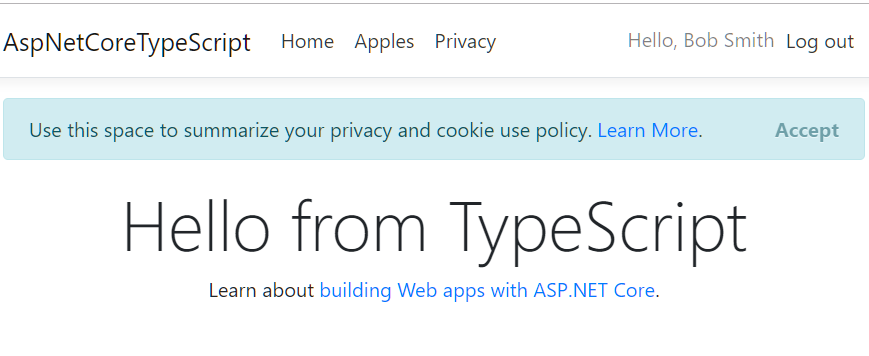
After you make sure you can sign in and out, you’re done!
Learn More About ASP.NET Core CRUD Apps and TypeScript
Interested in learning more about ASP.NET Core, TypeScript, or building secure applications? Check out any of these great resources:
- Add Login to Your ASP.NET Core MVC App
- If It Ain’t TypeScript It Ain’t Sexy
- Build a CRUD App with ASP.NET Core and Angular
To learn more about TypeScript configuration files, take a look at the official documentation.
As always, if you have any questions, please leave a comment below. Don’t forget to follow us on Twitter and Facebook!
Okta Developer Blog Comment Policy
We welcome relevant and respectful comments. Off-topic comments may be removed.