Heroku + Docker with Secure React in 10 Minutes

You’ve built a React app, but now you need to deploy it. What do you do? First, it’s probably best to choose a cloud provider as they’re typically low-cost and easy to deploy to.
Most cloud providers offer a way to deploy a static site. Heroku supports static sites, easily deploys apps with Git, and provides a CLI that developers love. A built React app is just JavaScript, HTML, and CSS. They’re static files that can live on pretty much any web server. In fact, with JSX (HTML in JS) and Styled Components, you could even say it’s just JavaScript!
Docker is the de facto standard to build and share containerized applications. You can use it to package your apps and include many open source web servers to serve up your app. As an added bonus, you can configure the webserver to send security headers that make your app more secure.
Prerequisites:
Table of Contents
- Create a React App
- Why Docker?
- Create a Dockerfile and Nginx Configuration
- Build a Docker Image with Your React App
- Run Your Docker + React App
- Deploy Your React App to Heroku
- Deploy Your Docker + React App to Heroku
- Use Cloud Native Buildpacks to Create Your React + Docker Image
- Deploy Your React + Docker Image to Docker Hub
- Deploy Your React + Docker Image to Heroku
- Learn More About Heroku, Docker, and React
Note: In May 2025, the Okta Integrator Free Plan replaced Okta Developer Edition Accounts, and the Okta CLI was deprecated.
We preserved this post for reference, but the instructions no longer work exactly as written. Replace the Okta CLI commands by manually configuring Okta following the instructions in our Developer Documentation.
Create a React App
Rather than showing you how to build a React app, I’m going to cheat and use one that a colleague of mine already built. To begin, clone the repo.
git clone https://github.com/oktadeveloper/okta-react-styled-components-example.git react-docker
cd react-docker
npm install
This is a React app that uses Styled Components for its CSS and is secured by OpenID Connect (aka OIDC). You can read about how it was created in Build a React App with Styled Components.
Before you begin, you’ll need a free Okta developer account. Install the Okta CLI and run okta register to sign up for a new account. If you already have an account, run okta login.
Then, run okta apps create. Select the default app name, or change it as you see fit.
Choose Single-Page App and press Enter.
Use http://localhost:3000/callback for the Redirect URI and accept the default Logout Redirect URI of http://localhost:3000.
What does the Okta CLI do?
The Okta CLI will create an OIDC Single-Page App in your Okta Org. It will add the redirect URIs you specified and grant access to the Everyone group. It will also add a trusted origin for http://localhost:3000. You will see output like the following when it’s finished:
Okta application configuration:
Issuer:    https://dev-133337.okta.com/oauth2/default
Client ID: 0oab8eb55Kb9jdMIr5d6
NOTE: You can also use the Okta Admin Console to create your app. See Create a React App for more information.
Copy and paste the issuer and client ID into your application’s src/App.js.
function App() {
  return (
    <Router>
      <Security issuer='<yourIssuerURI>'
                clientId='<yourClientId>'
                redirectUri={window.location.origin + '/callback'}
                pkce={true}>
        <SecureRoute path='/' exact={true} component={Calendar}/>
        <Route path='/callback' component={LoginCallback}/>
      </Security>
    </Router>
  );
}
The <> brackets are just placeholders, so make sure to remove them!
Start your app with npm start. You’ll be redirected to Okta to authenticate, then back to your app. If you’re not redirected, it’s because you’re already logged in. Try again in a private window to see the login process.
You’ll see a simple, clean calendar, with today’s date selected.
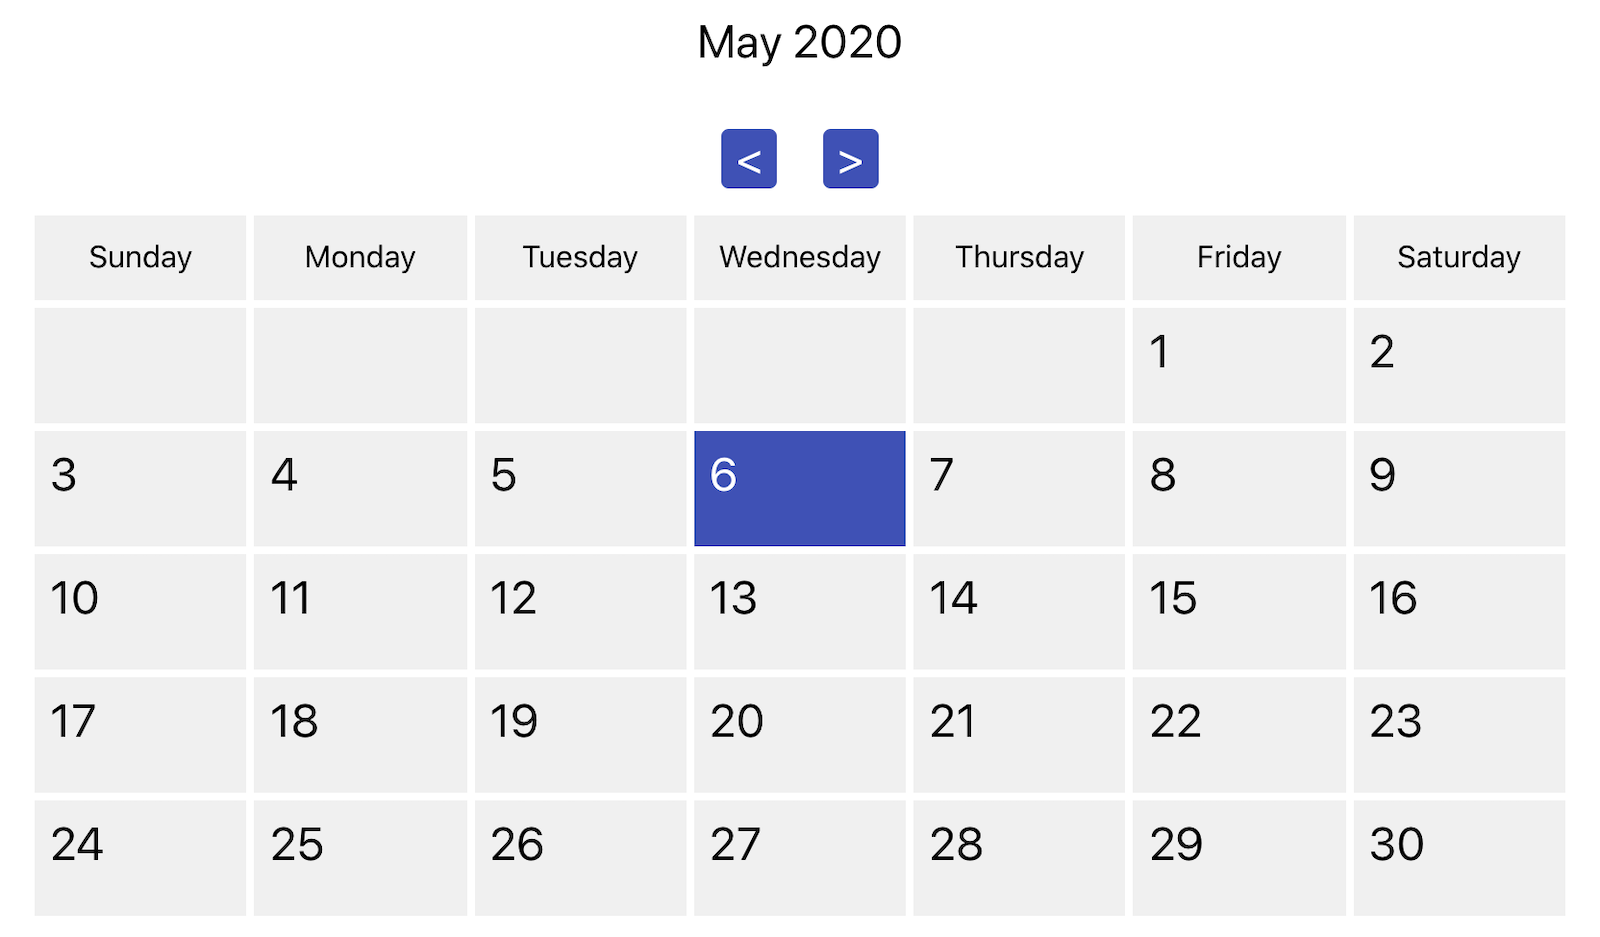
I’ll admit it’s a very simple app, but it’ll do for demonstrating how to containerize with Docker.
Why Docker?
You might ask, “Why Docker? Doesn’t that complicate things”?
Yes, I agree. Doing it with Docker is more complicated than doing a git push with Heroku. However, it also gives you more control in case you really want to complicate things and manage your app with Kubernetes. 😛
Create a Dockerfile and Nginx Configuration
Create a Dockerfile in your root directory.
FROM node:14.1-alpine AS builder

WORKDIR /opt/web
COPY package.json package-lock.json ./
RUN npm install

ENV PATH="./node_modules/.bin:$PATH"

COPY . ./
RUN npm run build

FROM nginx:1.17-alpine
RUN apk --no-cache add curl
RUN curl -L https://github.com/a8m/envsubst/releases/download/v1.1.0/envsubst-`uname -s`-`uname -m` -o envsubst && \
    chmod +x envsubst && \
    mv envsubst /usr/local/bin
COPY ./nginx.config /etc/nginx/nginx.template
CMD ["/bin/sh", "-c", "envsubst < /etc/nginx/nginx.template > /etc/nginx/conf.d/default.conf && nginx -g 'daemon off;'"]
COPY --from=builder /opt/web/build /usr/share/nginx/html
This will build your project and add Nginx as a web server. It’ll also install a version of envsubst that allows you to replace variables with environment variables, and set default values.
Create an nginx.config in the same directory:
server {
    listen       ${PORT:-80};
    server_name  _;

    root /usr/share/nginx/html;
    index index.html;

    location / {
        try_files $$uri /index.html;
    }
}
This file configures Nginx to serve your React app as a SPA (where all routes go to index.html) and run on port 80 unless PORT is defined as an environment variable. There’s two $$ in front of uri to prevent $uri from getting replaced with a blank value.
Build a Docker Image with Your React App
Make sure your Docker daemon is running with docker ps. Then, run the following command to build your Docker image. The react-docker value can be whatever you want to name your image.
docker build -t react-docker .
When the process completes, you’ll see something along the lines of the following message:
Successfully built 3211a1255527
Successfully tagged react-docker:latest
Run Your Docker + React App
You can now run your React app via Docker on port 3000 using the docker run command.
docker run -p 3000:80 react-docker
If you find these
dockercommands hard to remember, you can add a couple of scripts to yourpackage.jsonfile."docker": "docker build -t react-docker .", "react-docker": "docker run -p 3000:80 react-docker"Then you can run them with
npm run dockerandnpm run react-docker.
You’ll likely be logged in automatically.
TIP: If you want to see an example that doesn’t log you in right away, see our Okta React + Okta Hosted Login Example.
Pretty slick, eh?! You dockerized your React app in just a few minutes. 🎉
Deploy Your React App to Heroku
Your app doesn’t really exist until it’s in production, so let’s deploy it to Heroku. First, I’ll show you can do it without Docker.
To begin, you’ll need a Heroku account. Then, install the Heroku CLI.
Open a terminal, log in to your Heroku account, and create a new app.
heroku login
heroku create
You should now have a new heroku Git remote repository. You can confirm this with git remote -v.
Create a static.json file in your root directory with security headers and redirect all HTTP requests to HTTPS.
{
  "headers": {
    "/**": {
      "Content-Security-Policy": "default-src 'self'; script-src 'self' 'unsafe-inline'; style-src 'self' 'unsafe-inline'; img-src 'self' data:; font-src 'self' data:; connect-src 'self' https://*.okta.com;",
      "Referrer-Policy": "no-referrer, strict-origin-when-cross-origin",
      "Strict-Transport-Security": "max-age=63072000; includeSubDomains",
      "X-Content-Type-Options": "nosniff",
      "X-Frame-Options": "DENY",
      "X-XSS-Protection": "1; mode=block",
      "Feature-Policy": "accelerometer 'none'; camera 'none'; microphone 'none'"
    }
  },
  "https_only": true,
  "root": "build/",
  "routes": {
    "/**": "index.html"
  }
}
For static.json to be read, you have to use the Heroku static buildpack.
Commit your changes to Git, add the Node.js + static buildpacks, and deploy your React app.
git commit -am "Configure secure headers and static buildpacks"
heroku buildpacks:set heroku/nodejs
heroku buildpacks:add https://github.com/heroku/heroku-buildpack-static.git
git push heroku master
Once the process completes, open your app in a browser using:
heroku open
You’ll be redirected to Okta and likely see the following error:
The 'redirect_uri' parameter must be an absolute URI that is whitelisted in the client app settings.
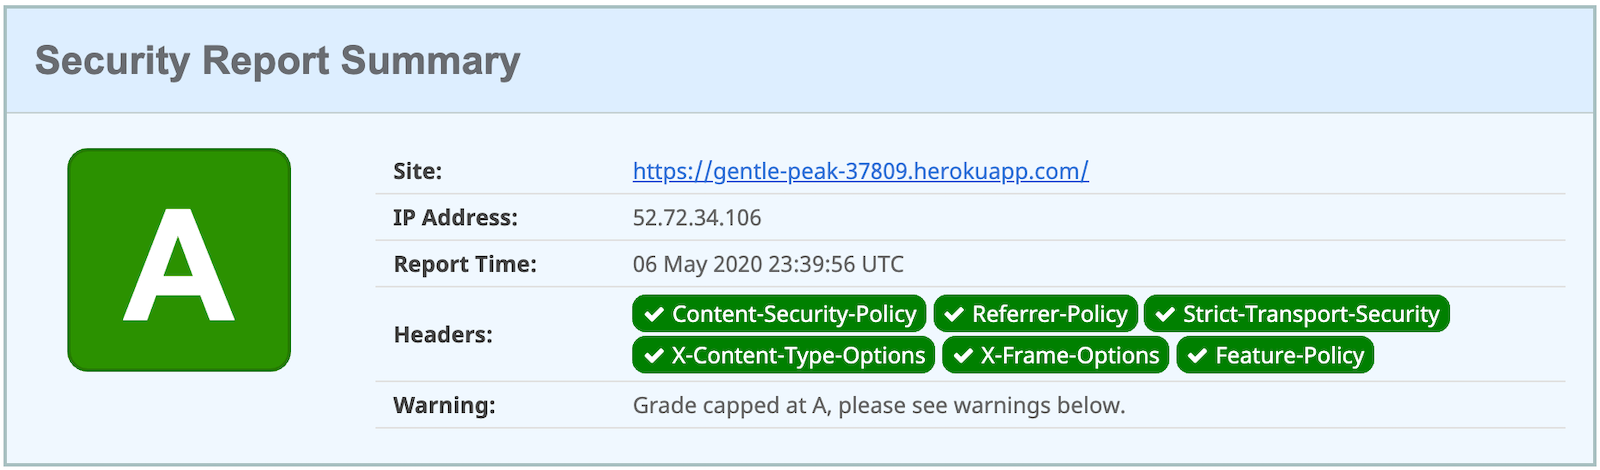
To fix this, you’ll need to modify your Okta app to add your Heroku URL as a Login redirect URI. For example, https://gentle-peak-37809.herokuapp.com/callback. Run okta login and open the resulting URL in your browser. Sign in to the Okta Admin Console and edit your app’s general settings in the Applications section.
You should now be able to log in and see your app running on Heroku! You can verify its security headers are A-OK on https://securityheaders.com.
In this deployment example, buildpacks do all the work for you. However, not every cloud provider has buildpacks. This is where Docker comes in.
Deploy Your Docker + React App to Heroku
Heroku has a couple of slick features when it comes to Docker images. If your project has a Dockerfile, you can deploy your app directly using the Heroku Container Registry.
First, log in to the Container Registry.
heroku container:login
Then, create a new app.
heroku create
Add the Git URL as a new remote to your app.
git remote add docker https://git.heroku.com/<your-app-name>.git
Then, push your Docker image to Heroku’s Container Registry.
heroku container:push web --remote docker
Once the process has completed, release the image of your app:
heroku container:release web --remote docker
And, open the app in your browser:
heroku open --remote docker
You’ll need to add your app’s URI in Okta before you can log in.
Improve Security Headers for Nginx in Docker
If you test your new Nginx in Docker site on securityheaders.com, you’ll get an F.
To solve this, modify your nginx.config to add security headers.
server {
    listen       ${PORT:-80};
    server_name  _;

    root /usr/share/nginx/html;
    index index.html;

    location / {
        try_files $$uri /index.html;
    }

    add_header Content-Security-Policy "default-src 'self'; script-src 'self' 'unsafe-inline'; style-src 'self' 'unsafe-inline'; img-src 'self' data:; font-src 'self' data:; connect-src 'self' https://*.okta.com;";
    add_header Referrer-Policy "no-referrer, strict-origin-when-cross-origin";
    add_header Strict-Transport-Security "max-age=63072000; includeSubDomains";
    add_header X-Content-Type-Options nosniff;
    add_header X-Frame-Options DENY;
    add_header X-XSS-Protection "1; mode=block";
    add_header Feature-Policy "accelerometer 'none'; camera 'none'; microphone 'none'";
}
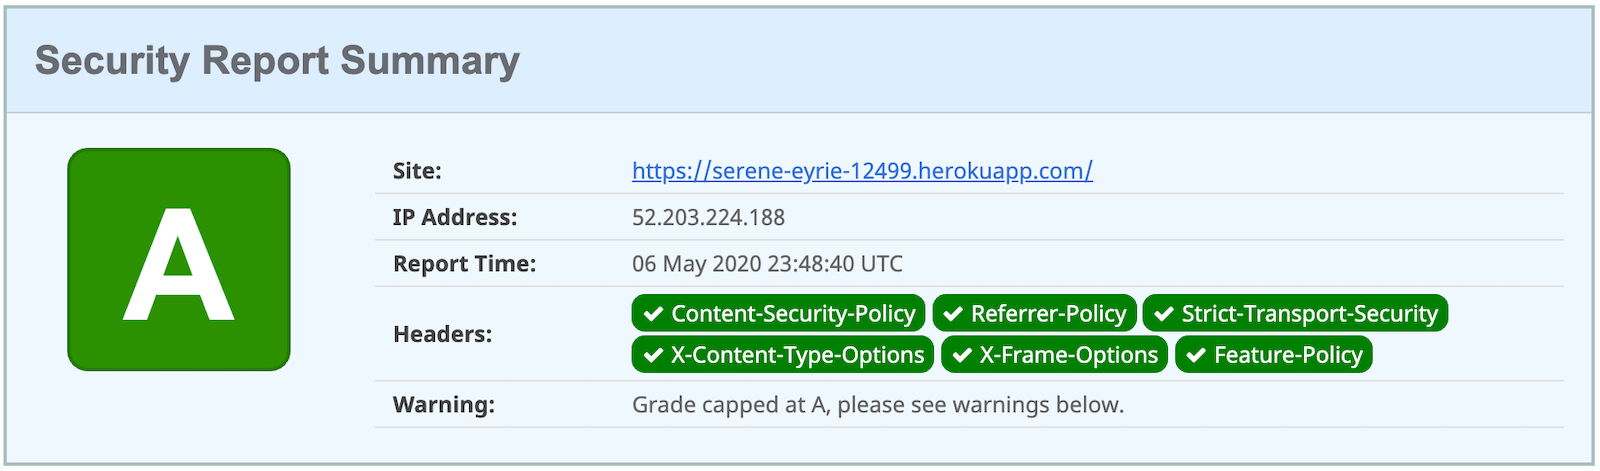
After updating this file, run the following commands:
heroku container:push web --remote docker
heroku container:release web --remote docker
Now you should get an A!
Use Cloud Native Buildpacks to Create Your React + Docker Image
In this post, you learned two ways to deploy your React app to Heroku. The first was to utilize buildpacks and git push. The second was to use Heroku’s Container Registry and heroku container:push + heroku push:release.
Cloud Native Buildpacks is an initiative that was started by Pivotal and Heroku in early 2018. It has a pack CLI that allows you to build Docker images using buildpacks.

My good friend, Joe Kutner, is a Software Architect at Heroku and has been instrumental in making Cloud Native Buildpacks a reality. Joe was formerly the curator of the Java experience at Heroku, is an active committer on the JHipster project, authored The Healthy Programmer, and is a founding member of the Cloud Native Buildpacks core team. His advice when it comes to Docker is “don’t use a Dockerfile if you don’t have to”.
Joe was a big help in figuring out how to create a Docker image with buildpacks, so I credit him with the instructions below.
To begin, install pack. If you’re on a Mac or Linux, you can use Homebrew.
brew tap buildpack/tap
brew install pack
If you’re on Windows, you can install its executable.
In the previous buildpacks example, I used Heroku’s Node.js and static buildpacks.
The Heroku static buildpack isn’t a “Cloud Native” buildpack. It uses the old (pre-cloud-native) API. That means it doesn’t work with pack out of the box.
Luckily, Heroku does offer a cnb-shim you can use to make it work. Joe created a URL–https://cnb-shim.herokuapp.com/v1/heroku-community/static– for Heroku’s static buildpack after converting it with cnb-shim.
You do have to make one change before you can build and run the Docker image locally. Remove the "https_only": true," line from static.json.
Then, use the following command to build a Docker image with Node.js and the static buildpack (a.k.a., the same buildpacks you used on Heroku).
pack build react-pack --builder heroku/buildpacks \
  --buildpack heroku/nodejs,https://cnb-shim.herokuapp.com/v1/heroku-community/static
TIP: You can use pack set-default-builder heroku/buildpacks if you want to get rid of the --builder argument.
Once the process completes, you should be able to run it.
docker run --rm -it --init -p 3000:3000 --env PORT=3000 okta
If you find these pack commands hard to remember, you can add them to your package.json.
"pack": "pack build react-pack --builder heroku/buildpacks --buildpack heroku/nodejs,https://cnb-shim.herokuapp.com/v1/heroku-community/static",
"react-pack": "docker run --rm -it --init -p 3000:3000 --env PORT=3000 react-pack"
Then you can run them with npm run pack and npm run react-pack.
Deploy Your React + Docker Image to Docker Hub
You can easily share your Docker containers by deploying them to a registry, like Docker Hub. If you don’t already have a Docker Hub account, you can create one.
Once you have an account, log in and push your image. In the example below, I’m using react-docker, but you could also use react-pack to deploy the buildpacks version.
docker login
docker image tag react-docker <your-username>/react-docker
docker push <your-username>/react-docker
This will tag it as latest by default. If you want to tag and push a particular version, you can use:
docker image tag react-docker <your-username>/react-docker:1.0
docker push <your-username>/react-docker
Then, someone else could pull and run it using:
docker run -p 3000:80 <your-username>/react-docker
Deploy Your React + Docker Image to Heroku
To deploy an existing image to Heroku you can use docker push. You have to use the following naming convention to tag and push the image.
docker tag <image> registry.heroku.com/<app>/<process-type>
docker push registry.heroku.com/<app>/<process-type>
For example, to deploy the react-pack image, you can do:
docker tag react-pack registry.heroku.com/fierce-eyrie-08414/web
docker push registry.heroku.com/fierce-eyrie-08414/web
heroku container:release web --remote docker
I tried this and noticed that HTTPS wasn’t forced. I had to add "https_only": true back into static.json, then re-push.
Learn More About Heroku, Docker, and React
In this tutorial, you learned how to use Docker to containerize your React application. You can do this manually with docker build or use Heroku’s Container Registry to push and release projects with a Dockerfile. You can also use the pack command to leverage Cloud-Native + Heroku buildpacks when building a container.
You also learned that if you’re using Heroku, its buildpacks make it even easier than Docker. With a simple git push, you can deploy your code and have it built on Heroku’s servers.
You can find the source code for this example on GitHub at oktadeveloper/okta-react-docker-example.
The Okta developer blog and YouTube channel has more information on Docker and React.
- Build Reusable React Components
- How to Move from Consuming Higher-Order Components to React Hooks
- Build a CRUD Application with Kotlin and React
- 📺 Build a Secure Blog with Gatsby, React, and Netlify
- 📺 A Developer’s Guide to Docker
If you liked this tutorial, please follow @oktadev on Twitter or subscribe to our YouTube channel. If you have any questions, please leave a comment below or ping me on Twitter @mraible.
A huge thanks goes to Heroku’s Joe Kutner for his review and detailed feedback.
Matt Raible is a well-known figure in the Java community and has been building web applications for most of his adult life. For over 20 years, he has helped developers learn and adopt open source frameworks and use them effectively. He's a web developer, Java Champion, and Developer Advocate at Okta. Matt has been a speaker at many conferences worldwide, including Devnexus, Devoxx Belgium, Devoxx France, Jfokus, and JavaOne. He is the author of The Angular Mini-Book, The JHipster Mini-Book, Spring Live, and contributed to Pro JSP. He is a frequent contributor to open source and a member of the JHipster development team. You can find him online @mraible and raibledesigns.com.
Okta Developer Blog Comment Policy
We welcome relevant and respectful comments. Off-topic comments may be removed.