How to Move from Consuming Higher-Order Components to React Hooks

Let’s face it. Higher-Order Components (HOCs) allow developers to really take advantage and extend the functionality of their React components, but they can be cumbersome once you have more than one that you want to use within a component. It’s mostly because of the way they’re used. Not only do you have to use a class component in order, but you also use the HOC by wrapping them around your components. Wrapping the component code forces you to either end up with:
export default class withThis(withThat(withTheOther(MyComponent extends Component{
  // your stuff...
})));
Or you can try and make it a little cleaner by:
class MyComponent extends Component{
  // your stuff...
}

export default withThis(withThat(withTheOther(MyComponent)));
Neither is IDEAL, but the second is definitely cleaner. It does have the problem of misleading developers into believing that there aren’t any HOC being used when looking at the top of the file. You’d need to KNOW to look at the bottom of the file to know what HOCs are being used.
React 16.8.0 introduced a new feature called “Hooks” that allows you to “hook” into other components from inside your React components. No need for wrapping!
Note: In May 2025, the Okta Integrator Free Plan replaced Okta Developer Edition Accounts, and the Okta CLI was deprecated.
We preserved this post for reference, but the instructions no longer work exactly as written. Replace the Okta CLI commands by manually configuring Okta following the instructions in our Developer Documentation.
Scaffold a React Application
First, you’ll scaffold a basic React app using the create-react-app package. Instead of installing it globally, you can just use npx for it:
npx create-react-app react-hooks-sample
You can fire up the plain app by running npm start from the command line.
Install some dependencies you’ll need:
npm install @okta/okta-react@1.2.3 @okta/okta-signin-widget@3.2.0 react-router-dom@5.1.2 --save
Once the project is created, change into the directory and fire up your favorite code editor (I’ll be using VS Code). Create a new folder in the src directory called components. Inside of that, create a navigation folder to house your menu component. The navigation component looks like this:
import React from 'react';
import { Link } from 'react-router-dom';

const Navigation = () => (
  <nav>
    <Link to="/">Home</Link>
    <Link to="/profile">Profile</Link>
  </nav>
);

export default Navigation;
Create another folder in components called home and add a Home.js file to it. The contents of the file should be:
import React from "react";

const Home = () => (
  <div>
    Home Page
  </div>
);

export default Home;
Add yet another folder called profile to the components directory and add a Profile.js file with the following code:
import React, { Component } from 'react';

export default class Profile extends Component {
  render(){
    return(
      <div>Profile Page</div>
    );
  }
}
Open the App.js file in the src folder and change its contents to:
import React from "react";
import { BrowserRouter as Router, Route } from "react-router-dom";

import Home from "./components/home/Home";
import Profile from "./components/profile/Profile";
import Navigation from "./components/navigation/Navigation";
import "./App.css";

function App() {
  return (
    <Router>
      <Navigation />
      <Route path="/" exact component={Home} />
      <Route path="/profile" exact component={Profile} />
    </Router>
  );
}

export default App;
Now you should be able to fire up the application and navigate between those two pages.
I know this is an overly simplistic example, but I don’t want anything distrating you from the change from HOCs to React Hooks.
Add Authentication to Your React Application
To demonstrate the move from Higher-Order Components to React Hooks, you’ll start by implementing authentication with Okta using HOC.
If you don’t already have one, you’ll need a free (forever) Okta developer account. You can sign up easily by going to the Developer signup page. Once you’ve created an account and logged in to your dashboard, click on Applications in the top menu, then click on the Add Application button.
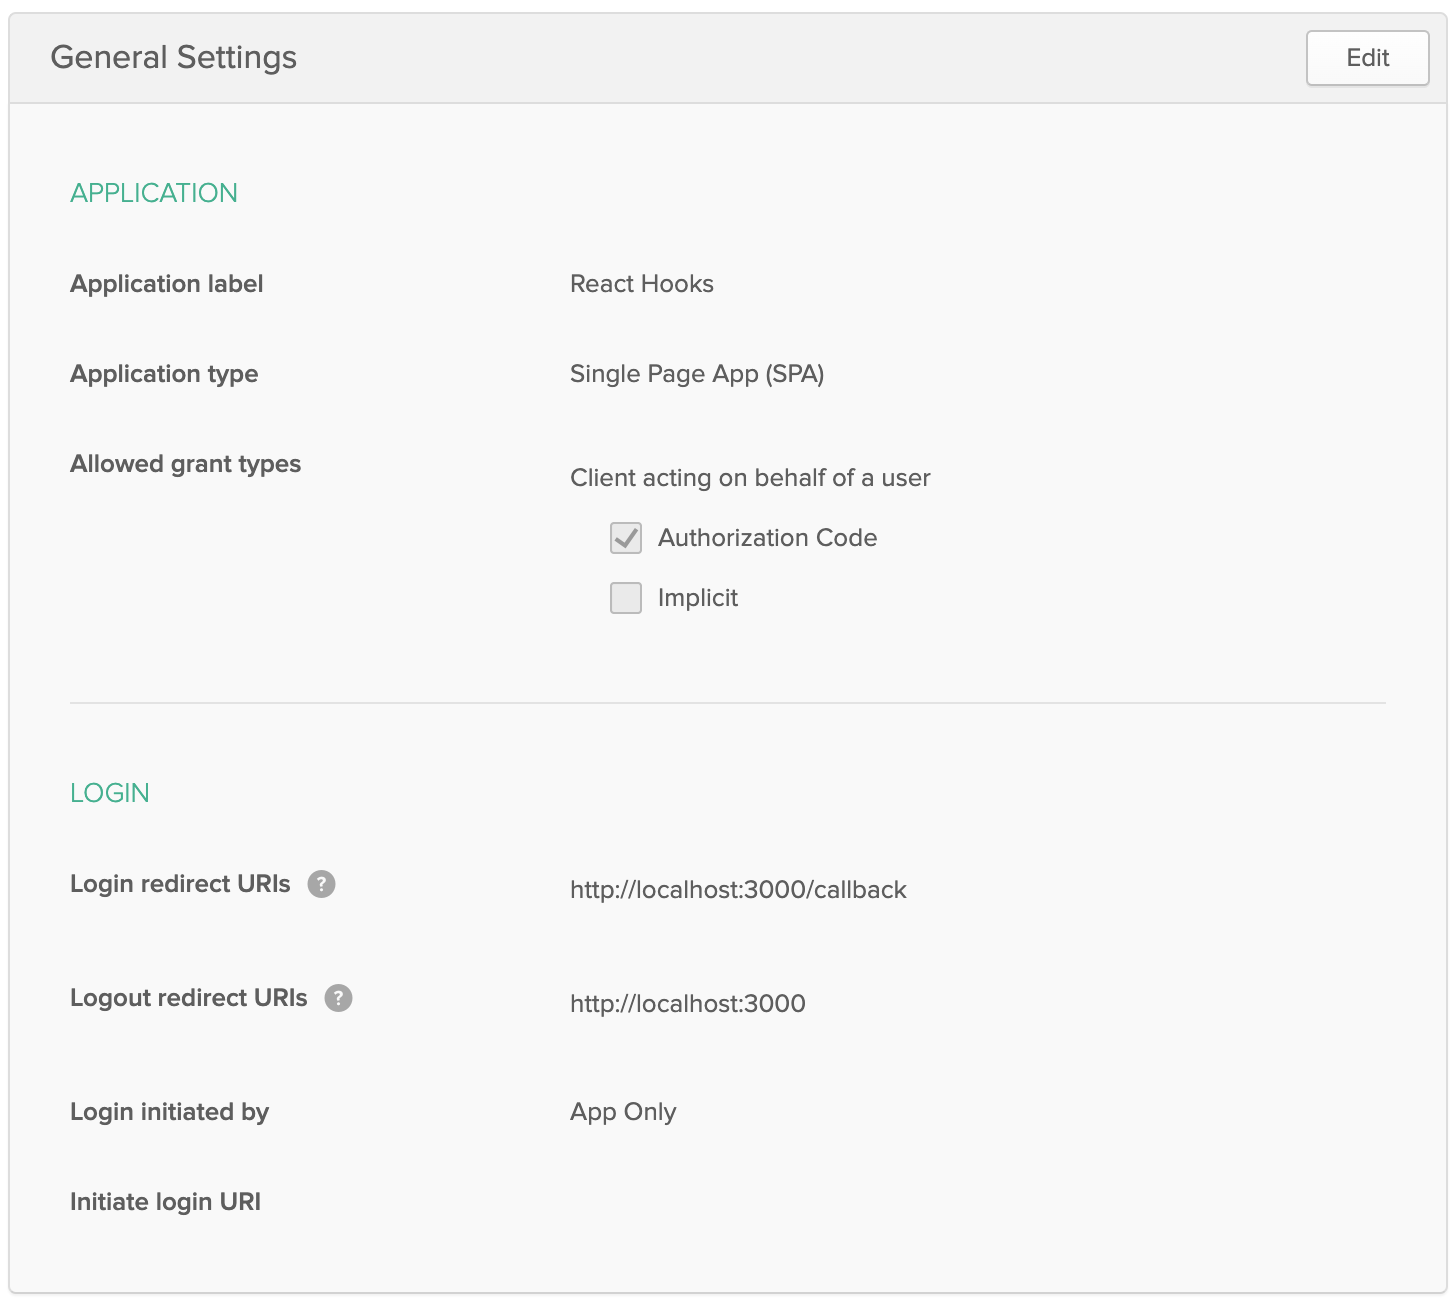
Choose Single-Page App from the platform choices and click Next. Give your application a name and make sure to change all the URIs to use port 3000 instead of port 8080. Make sure Authorization Code is checked in the Grant type allowed section, then click Done. When the application is created, you’ll be on the application settings page. Make sure to copy your Client ID, you’ll need it in just a minute.
Back in your code editor, add a new file in the src folder called config.js with the following contents:
export default {
  oidc: {
    clientId: '<yourClientID>',
    issuer: '<yourOktaOrgURL>/oauth2/default',
    redirectUri: 'http://localhost:3000/callback',
    scopes: ['openid', 'profile', 'email'],
    pkce: true
  }
}
Add your application’s Client ID here as well as you Okta Org URL which can be found at the top of your Dashboard page in Okta.
Now, add a folder to the src/components folder called login with a Login.js file inside. Add the following code to the file:
import React, { Component } from "react";
import * as OktaSignIn from "@okta/okta-signin-widget";
import "@okta/okta-signin-widget/dist/css/okta-sign-in.min.css";

import config from "./../../config";

export default class LoginPage extends Component {
  constructor(props) {
    super(props);

    const { pkce, issuer, clientId, redirectUri, scopes } = config.oidc;
    this.signIn = new OktaSignIn({
      baseUrl: issuer.split("/oauth2")[0],
      clientId,
      redirectUri,
      logo: "/logo192.png",
      i18n: {
        en: {
          'primaryauth.title': 'Sign in to React & Company'
        }
      },
      authParams: {
        pkce,
        issuer,
        display: 'page',
        scopes
      }
    });
  }

  componentDidMount() {
    this.signIn.renderEl(
      { el: '#sign-in-widget' },
      () => { },
      err => {
        throw err;
      }
    );
  }

  componentWillUnmount(){
    this.signIn.remove();
  }

  render() {
    return (
      <div>
        <div id="sign-in-widget" />
      </div>
    );
  }
}
Here, you’ve added a login page that will render Okta’s sign-in widget to the page. This will set up a login for you without much lifting on your part.
Now, secure the profile page’s route and change the profile component to display some basic profile information. Replace the contents of the App.js file with the following:
import React from "react";
import { BrowserRouter as Router, Route } from "react-router-dom";
import { Security, SecureRoute, ImplicitCallback } from "@okta/okta-react";
import config from "./config";

import Home from "./components/home/Home";
import Profile from "./components/profile/Profile";
import Navigation from "./components/navigation/Navigation";
import Login from "./components/login/Login";
import "./App.css";


function customAuthHandler({ history }) {
  history.push("/login");
}

function App() {
  return (
    <Router>
      <Security {...config.oidc} onAuthRequired={customAuthHandler}>
        <Navigation />
        <Route path="/" exact component={Home} />
        <Route path="/login" component={Login} />
        <SecureRoute path="/profile" exact component={Profile} />
        <Route path="/callback" component={ImplicitCallback} />
      </Security>
    </Router>
  );
}

export default App;
Here, you’ve added some components from the @okta/okta-react package to secure your application. The Security tag takes the config.js contents and spreads it into parameters. It also wires up the customAuthHandler (above the component) to handle what to do when there is a need for authentication (like when users try to navigate to a secured route with having logged in). The profile Route was changed to a SecureRoute component and a route for /callback has been added and is being handled by the ImplicitCallback component from the okta-react package.
Compose Using Higher-Order Components
To get to the profile information to display it on the Profile page, you’ll use the withAuth() Higher-Order Component from the okta-react package. Replace the code in the src/components/profile/Profile.js file with:
import React, { Component } from 'react';
import { withAuth } from '@okta/okta-react';

async function checkAuthentication() {
  const authenticated = await this.props.auth.isAuthenticated();
  if (authenticated !== this.state.authenticated) {
    if (authenticated && !this.state.userinfo) {
      const userinfo = await this.props.auth.getUser();
      this.setState({ authenticated, userinfo });
    } else {
      this.setState({ authenticated });
    }
  }
}

export default withAuth(class Profile extends Component {

  constructor(props){
    super(props);
    this.state = {userinfo: null, ready: false};
    this.checkAuthentication = checkAuthentication.bind(this);
  }

  async componentDidMount() {
    await this.checkAuthentication();
    this.applyClaims();
  }

  async componentDidUpdate() {
    await this.checkAuthentication();
    this.applyClaims();
  }

  async applyClaims() {
    if (this.state.userinfo && !this.state.claims) {
      const claims = Object.entries(this.state.userinfo);
      this.setState({ claims, ready: true });
    }
  }

  render(){
    return(
      <div>
        {!this.state.ready && <p>Fetching user profile..</p>}
        {this.state.ready &&
          <div>
            <h1>User Profile</h1>
            <ul>
              {this.state.claims.map((claim) => {
                return <li><strong>{claim[0]}:</strong> {claim[1]}</li>;
              })}
            </ul>
          </div>
        }
      </div>
    );
  }
});
Here, you imported the withAuth HOC from the okta-react package and wrapped the Profile component. This gives you access to the auth prop so you can get things like the isAuthenticated() and getUser() functions. (I’ve separated some of the repeated code into a checkAuthentication() function to reduce code duplication inside the component.) This will check for an authenticated user and get that user’s token information. Then it will get all the user’s claims and add them to the state. Finally, in the render() function it maps the claims to an unordered list for display.
This is all great, but if I need to add another HOC, things start to get a little messy. Particularly when it comes to opening and closing parentheses and curly braces. You could move the wrapping to the bottom with:
export default withAuth(Profile);
That will clean up the punctuation, but removes the signal right at the top that the functions in the withAuth component are available to use here. Developers would have to check the export statement at the bottom to see what functionality is available or to wrap another component around the profile page component.
Convert to React Hooks
To use React Hooks, there are only a few small things to change. First, update to the latest version of Okta’s React SDK:
npm install @okta/okta-react@3.0.1 --save
As part of this upgrade, you’ll need to change ImplicitCallback to LoginCallback in your src/App.js.
import { Security, SecureRoute, LoginCallback } from "@okta/okta-react";
...

function App() {
  return (
    <Router>
      <Security {...config.oidc} onAuthRequired={customAuthHandler}>
        ...
        <Route path="/callback" component={LoginCallback} />
      </Security>
    </Router>
  );
}
Now change the profile.js component to use the React Hooks version of the withAuth Higher-Order Component. Replace the code for the profile page with:
import React, { useState, useEffect } from 'react';
import { useOktaAuth } from '@okta/okta-react';

const Profile = () => {
  const { authState, authService } = useOktaAuth();
  const [ userInfo, setUserInfo ] = useState(null);

  useEffect(() => {
    if(!authState.isAuthenticated) {
      // When user isn't authenticated, forget any user info
      setUserInfo(null);
    } else {
      authService.getUser().then( info => {
        setUserInfo(info);
      });
    }
  }, [authState, authService]); // Update if authState changes


  if(!userInfo){
    return (
      <div>
        <p>Fetching user profile...</p>
      </div>
    );
  }

  return (
    <div>
      <h1>User Profile</h1>
      <ul>
        {Object.entries(userInfo).map((claim) => {
          return <li><strong>{claim[0]}:</strong> {claim[1]}</li>;
        })}
      </ul>
    </div>
  );
}

export default Profile;
You can see, I’ve removed the withAuth HOC and replaced it with the useOktaAuth() hook. I’ve also brought in the useEffect() and useState() hooks. The useEffect() lets you act on side effects within your component and the useState() allows you to use component state inside of a functional component (not a class component). You’ll also notice I was able to remove the checkAuthentication() helper method. Using the React Hooks, there won’t be the chunks of repeated code that made me break that function out.
The useEffect() call checks for authentication and updates the state with the user’s claims. Then there’s just a return() if the userInfo isn’t there yet, and a render() when there IS user information to display. That’s a LOT cleaner, don’t you think?
Learn More about React
All this doesn’t mean that Higher-Order Components aren’t still useful or supported. There’s no need to go rambling through a large, existing codebase to change all of your HOCs to React Hooks. But in places where you might be wrapping your React components in two, three, or more HOCs, you might start by refactoring those into React Hooks.
You can find the source code for this example on GitHub.
I find the useability and composability of React Hooks to be much more compelling than HOCs. What do you think?
If you want to learn more about React or Okta, check out these great posts!
- Build a React App with Styled Components
- Build a Secure Blog with Gatsby, React, and Netlify
- Build a Secure CRUD App with Symfony and React
Also, don’t forget to follow us on Twitter and subscribe to our YouTube channel for more great content!
Changelog:
- May 6, 2020: Updated to use the v3.0.1 version of the Okta React SDK and add a GitHub repo. Changes to this article can be viewed in oktadeveloper/okta-blog#285.
Okta Developer Blog Comment Policy
We welcome relevant and respectful comments. Off-topic comments may be removed.