Build Reusable React Components

Who doesn’t love beer? When you drink a great beer you want to tell someone. You definitely want to be able to remind yourself of the great beers you’ve had. Enter Brewstr, a beer rating application that allows you to enter a beer you’re drinking and give it a rating. This way, you know what to get next time since there’s no way you’ll remember it later.
React gives the ability to create a component for rating that can be used and re-used anyplace a rating component is needed. You could even add it to your company’s internal package management system so that the component is easily consumed by any React application that needs it.
To build this app, you will need:
- A basic, working knowledge of React
- A free-forever Okta Developer Account
- A Firebase Real-Time Database
- The
create-react-appcommand-line tool
Note: In May 2025, the Okta Integrator Free Plan replaced Okta Developer Edition Accounts, and the Okta CLI was deprecated.
We preserved this post for reference, but the instructions no longer work exactly as written. Replace the Okta CLI commands by manually configuring Okta following the instructions in our Developer Documentation.
Scaffold Your React Application
To get this thing kicked off, scaffold a basic React application by running the following command in the terminal in a folder where you’d like to store your code:
create-react-app brewstr
Once this program has created your React application’s skeleton, change into your code directory and open it in your favorite code editor. I’ll be using Visual Studio Code, so I’ll run the following command:
code .
Add Okta Authentication to Your React Application
Now that you have a basic React app, you’ll need to set up Okta to allow users to authenticate into your application. If you don’t already have one, create a free-forever Okta developer account. Once you’ve logged in, take note of your Okta org URL on the top right of the dashboard. Then choose Applications from the main menu and click Add Application.
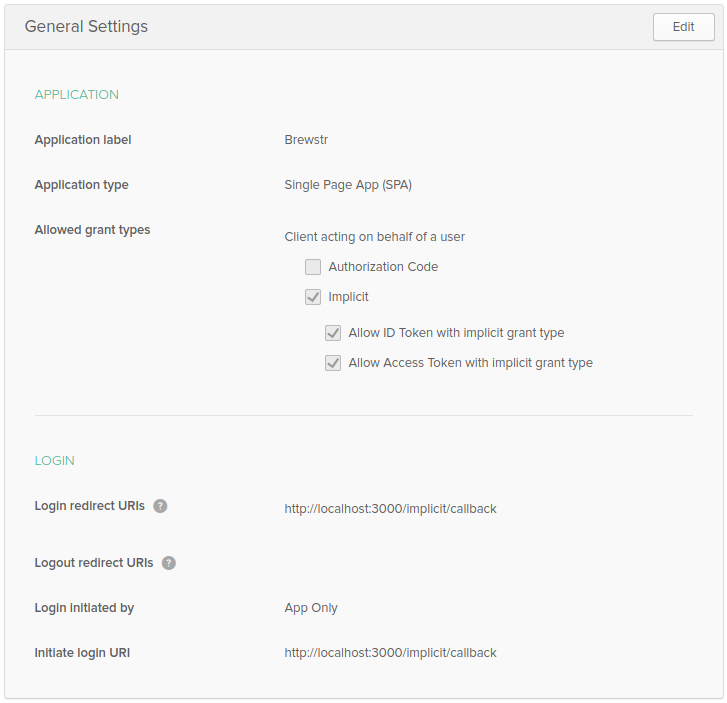
In the wizard, choose Single-Page App from the available platforms and click Next. In the Application Settings page you’ll want to name the app “Brewstr” and change the BaseURIs, and Login redirect URIs values to use port 3000, and click Done. Take note of the Client ID for your newly created app.
Back in the React application, add two packages to your application:
yarn add @okta/okta-react@^1.2.3 react-router-dom@^5.1.2
Create a .env.local file at the root of the project and add the following to it:
REACT_APP_OKTA_CLIENT_ID={yourClientId}
REACT_APP_OKTA_ORG_URL=https://{yourOktaOrgUrl}
Then, in the index.js file, add the following snippet right below the import statements:
const oktaConfig = {
  issuer: `${process.env.REACT_APP_OKTA_ORG_URL}/oauth2/default`,
  redirect_uri: `${window.location.origin}/implicit/callback`,
  client_id: process.env.REACT_APP_OKTA_CLIENT_ID,
};
Add some imports to your index.js file:
import { BrowserRouter } from 'react-router-dom';
import { Security } from '@okta/okta-react';
Then replace the entire ReactDOM.render statement with the following:
ReactDOM.render(
  <BrowserRouter>
    <Security {...oktaConfig}>
      <App />
    </Security>
  </BrowserRouter>,
  document.getElementById('root')
);
This sets up Okta to handle user authentication. It also makes it easy to get information about the logged in user by wrapping the App component in the Security component. Now you just have to use it.
To start simple, just change the App.js file to look like this:
import React from 'react';
import { Link, Route } from 'react-router-dom';
import { SecureRoute, ImplicitCallback } from '@okta/okta-react';

import './App.css';

function App() {
  return (
    <div className="App">
      <nav>
        <Link to="/">Home</Link>
        <Link to="/rating">Rate</Link>
      </nav>
      <main>
        <Route exact path="/" component={()=> 'Home Page'} />
        <SecureRoute exact path="/rating" component={()=>'Rating Page'} />
        <Route path="/implicit/callback" component={ImplicitCallback} />
      </main>
    </div>
  );
}

export default App;
Make sure you’ve logged out of your Okta account, and then run the application with:
yarn start
When you click on the Rate menu item, it should redirect you to log in with Okta. You can use the credentials you use to log in to your Okta dashboard. If you don’t get prompted to log in, it may be because the application still has you logged in. Go to your Okta dashboard and log out, then clear your tokens in the dev tools under Application, LocalStorage, http://localhost:3000. Then try to go to the Rate page again and make sure it prompts you to log in.
NOTE: If you’re still having problems getting the login to work, go back and double-check all your values and code from the previous steps.
Set Up a Firebase Real-Time Datastore
You’ll be storing your app’s beer ratings in a Firebase Real-Time Data Store, so you’ll need an account there. Once you’ve signed up and logged in, click the Add Project tile and choose the name “Brewstr”, then click Continue. On the next screen, turn off analytics (since it’s a test project), then click Create Project. This may take a few moments to get created. Once you see, “Your new project is ready”, click Continue.
You will then be taken to a screen that has three white icons for “Getting Started”. Choose the icon for web apps that should have </> as the text. You’ll need to register the project you just created with Firebase, so put in the name of your app again, “Brewstr”, and click Continue. You’ll see a chunk of code there, just copy it to an empty text file for now.

Now click Database in the left-hand menu and scroll down to Or choose Realtime Database. In that block, click on Create database and in the dialog that pops up choose Start in test mode then click Enable. The permissions here are completely open for reads and writes. Obviously, this is not the way you’ll want to set it up for production, but in the case of testing, this is the easiest set up.
Back in the editor, add some new keys to the .env.local file:
REACT_APP_FIREBASE_APIKEY={yourApiKey}
REACT_APP_FIREBASE_AUTH_DOMAIN={yourAuthDomain}
REACT_APP_FIREBASE_DB_URL={yourDatabaseUrl}
REACT_APP_FIREBASE_PROJECT_ID={yourProjectId}
REACT_APP_FIREBASE_STORAGE_BUCKET={yourStorageBucket}
REACT_APP_FIREBASE_MESSAGE_SENDER_ID={yourMessagSenderId}
REACT_APP_FIREBASE_APP_ID={yourAppId}
Add the firebase package to your app:
yarn add firebase@7.5.0
Now you can create a JavaScript file to set up your database connection. Create a file called firebase.js in your src directory.
import * as firebase from 'firebase';

var firebaseConfig = {
  apiKey: process.env.REACT_APP_FIREBASE_API_KEY,
  authDomain: process.env.REACT_APP_FIREBASE_AUTH_DOMAIN,
  databaseURL: process.env.REACT_APP_FIREBASE_DB_URL,
  projectId: process.env.REACT_APP_FIREBASE_PROJECT_ID,
  storageBucket: process.env.REACT_APP_FIREBASE_STORAGE_BUCKET,
  messagingSenderId: process.env.REACT_APP_FIREBASE_MESSAGE_SENDER_ID,
  appId: process.env.REACT_APP_FIREBASE_APP_ID
};

firebase.initializeApp(firebaseConfig);
const databaseRef = firebase.database().ref();
export const BrewstrRef = databaseRef.child('ratings');
This will set up the connection to the data store and allow you to use it wherever you need.
NOTE: You may need to stop the application from running (with a
CTRL+c) and restart it so it can pick up the environment variables you put in.env.local.
Create a Star Rating Component
The beauty of React is being able to reuse common components and compose pages from those components. Since you’re creating a beer rating site, you’ll create a star rating component that will handle collecting users’ ratings.
Start by creating a folder called components in the src directory and add a rater folder inside that. Then add two files: star-rating.jsx and star-rating.css. In the star-rating.jsx file add the following contents:
import React, { Component } from 'react';
import './star-rating.css';
class StarRating extends Component {
constructor(props) {
super(props);
this.state = {
currentRating: this.props.currentRating
};
}
componentDidMount() {
this.setRating();
}
hoverHandler = ev => {
const stars = ev.target.parentElement.getElementsByClassName('star');
const hoverValue = ev.target.dataset.value;
Array.from(stars).forEach(star => {
star.style.color = hoverValue >= star.dataset.value ? 'yellow' : 'gray';
});
};
setRating = ev => {
const stars = this.refs.rating.getElementsByClassName('star');
Array.from(stars).forEach(star => {
star.style.color =
this.state.currentRating >= star.dataset.value ? 'yellow' : 'gray';
});
};
starClickHandler = ev => {
let rating = ev.target.dataset.value;
this.setState({ currentRating: rating }); // set state so the rating stays highlighted
if(this.props.onClick){
this.props.onClick(rating); // emit the event up to the parent
}
};
render() {
return (
<div
className="rating"
ref="rating"
data-rating={this.state.currentRating}
onMouseOut={this.setRating}
>
{[...Array(+this.props.numberOfStars).keys()].map(n => {
return (
<span
className="star"
key={n+1}
data-value={n+1}
onMouseOver={this.hoverHandler}
onClick={this.starClickHandler}
>
★
</span>
);
})}
</div>
);
}
}
export default StarRating;
The import statements should be self-explanatory. The class component starts by setting up the basic state with a prop passed in that allows parent components to set an initial rating. In the componentDidMount() function the this.setRating() function is called so the initial rating is reflected in the number of stars highlighted when the component loads.
The next three functions are handlers for the rating component. The hoverHandler() function gets all the star elements in the components and as the user hovers and highlights all the stars up to (and including) the star being hovered over.
The setRating() function is called from componentDidMount() to highlight the stars with the initial rating. It is also called as an event handler from the component when the user moves their mouse away from the rating component without choosing a rating. This will reset the highlighting back to the current rating.
The starClickHandler() is used by the component when a user clicks a rating. It sets the state’s currentRating value so that the highlighting is locked in when the user moves their mouse away from the component. It also emits an event up to the parent’s onClick handler that was passed to the component and passes up the rating that the user clicked on.
The render() method displays a container to hold the stars and then it displays the requested number of stars, using a property passed in from the parent component. it loops through an array with that number of elements and gives each star a value of the current index + 1 to account for the zero-based nature of arrays. The relevant portion is:
{[...Array(+this.props.numberOfStars).keys()].map(n => {
return (
<span
className="star"
key={n+1}
data-value={n+1}
onMouseOver={this.hoverHandler}
onClick={this.starClickHandler}
>
★
</span>
);
})}
This just uses the spread operator ... on a new array with a size based on the number of stars requested. Each star gets wired to the hoverHandler() and starClickHandler() event handlers. The ★ is just the Unicode value of a star. I also added a little style to my stars in the star-rating.css file:
.star {
  color: gray;
}
This just sets the initial color of the stars to gray. You don’t have to do this, but I think it makes it look a lot nicer and it can help if you’re putting the star rater component on a weird colored background.
Consume the Rating Component
Now that you’ve got a rating component, you’ll want to put it on a page. Create a folder in src called pages and inside that add a new rating folder with a rating-page.jsx and rating-page.css file.
The contents of the rating-page.jsx should be:
import React, { Component } from 'react';
import { withAuth } from '@okta/okta-react';

import { BrewstrRef } from '../../firebase';
import StarRating from '../../components/rater/star-rating';
import './rating-page.css';

class RatingPage extends Component {

  constructor(props) {
    super(props);
    this.state = {
      name: '',
      description: '',
      rating: 0,
      user: ''
    };
  }

  async componentDidMount(){
    const user = await this.props.auth.getUser();
    this.setState({user:user.email});
  }


  handleChange = ev => {
    this.setState({
      [ev.target.name]: ev.target.value
    });
  };

  setRating = rating => {
    this.setState({ rating: rating });
  };

  saveRating = () => {
    BrewstrRef.push()
      .set(this.state)
      .then(() => {
        this.props.history.push('/ratinglist');
      });
  };

  render() {
    return (
      <div className="rating-form">
        <div className="heading">Rate A Beer</div>
        <div className="form-input">
          <label htmlFor="name">Beer:</label>
          <input
            type="text"
            name="name"
            id="name"
            onChange={this.handleChange}
          />
        </div>
        <div className="form-input">
          <label htmlFor="description">Description:</label>
          <textarea
            name="description"
            id="description"
            onChange={this.handleChange}
          />
        </div>
        <div className="form-input rating">
          <label htmlFor="rating">Rating:</label>
          <StarRating
            numberOfStars="5"
            currentRating="0"
            onClick={this.setRating}
          />
        </div>
        <div className="actions">
          <button type="submit" onClick={this.saveRating}>
            Submit Rating
          </button>
        </div>
      </div>
    );
  }
}

export default withAuth(RatingPage);
The import statements bring in the withAuth higher-order component from the @okta/okta-react package. This allows you to get the currently logged in user when saving ratings for that user. This also brings in the Firebase set up and the StarRating component.
At the bottom of the file, you wrap the RatingPage component with the withAuth higher-order component. This allows you to get the currently logged in user in the componentDidMount() function and add the user’s email address to the state. This will be saved with their ratings so that when they go to the RatingList page, they will only see their ratings.
The handleChange() function handles the changing of the text values for the beer name and description in the component’s form. The setRating() handler is what is passed to the rating component so that when a user clicks on a rating, the value is propagated back to the parent and, in this case, is added to the state.
The saveRating() function gets the reference to the Firebase store and pushes a new rating into the collection then the application is routed to the RatingList page.
The render() method is pretty standard except where you add the StarRating component. You set the numberOfStars to five for this rating system, then set the currentRating to zero. You could set it to two or three if you think that looks better. Finally, the reference to the click handler is passed to the StarRating component, so that when a user chooses a rating, the value is bubbled back up to the click handler on this page component.
The stylesheet for this page is unremarkable. It just contains some styles to make it more readable.
.rating-form {
  width: 50%;
  margin: 1rem auto;
  padding: 1rem;
}

.heading {
  padding: .5rem;
  background-color: black;
  color: white;
  font-size: 1.5rem;
  margin-bottom: 1rem;
}

.form-input {
  margin: 1rem;
}

.form-input label {
  font-weight: bold;
  display: block;
}

.form-input input,
.form-input textarea {
  font-size: 1.5rem;
  width: 100%;
}

.form-input textarea {
  height: 5rem;
}

.form-input.rating {
  text-align: right;
}

.form-input.rating .rating {
  font-size: 2rem;
}

.actions {
  padding: 1rem;
  text-align: right;
}

.actions button {
  padding: .5rem;
}
The only thing left is to add a list of the user’s ratings. Add a new folder under pages called rating-list and add two files: rating-list.jsx and rating-list.css. First, the CSS file:
table {
  width: 80%;
  margin: 1rem auto;
  font-size: 1.25rem;
  border-collapse: collapse;
}

table thead {
  background-color: black;
  color: #FFF;
}

table, th, td {
  border: 1px solid black;
}

th, td {
  padding: .5rem;
}

td.rating-value {
  text-align: center;
}
Then the actual page component:
import React, { Component } from 'react';
import { withAuth } from '@okta/okta-react';
import {BrewstrRef} from '../../firebase';
import './rating-list.css';

class RatingsListPage extends Component {

  constructor(props){
    super(props);
    this.state = {
      ratings: [],
      user:''
    };
  }

  async componentDidMount(){
    const user = await this.props.auth.getUser();
    BrewstrRef.orderByChild('user').equalTo(user.email).on('value', snap => {
      const response = snap.val();
      const ratings = [];
      for(let rating in response){
        ratings.push({id: rating, ...response[rating]});
      }
      this.setState({
        ratings: ratings
      });
    });
  }

  render(){
    return (
      <table className="ratings-list">
        <thead>
          <tr>
            <th>Beer</th>
            <th>Description</th>
            <th>Rating</th>
          </tr>
        </thead>
        <tbody>
        {this.state.ratings.map((rating) => {
          return (
            <tr className="rating" key={rating.id}>
              <td>{rating.name}</td>
              <td>{rating.description}</td>
              <td className="rating-value">{rating.rating}</td>
            </tr>
          )
        })}
        </tbody>
      </table>
    )
  }
}

export default withAuth(RatingsListPage);
Again, you’re bringing in the Okta and Firebase imports. This componentDidMount() is getting the currently logged in user and passing it to Firebase to get a list of the ratings that this user has entered. All queries to Firebase return a “snapshot” represented here by the variable snap and it is pushed onto an array and then the state is set with that array. If you push each “record” onto the array in the state object, the component will redraw each time one is pushed. That’s the reason you push onto another array and then only update the state once. The render() function merely lists the ratings in a table.
Add Routing to the Actual Components
If you remember, all the routing is going to “fake” components that just spit out text right now. You’ll need to go back to the App.js file and make sure the routes are hooked to the components you just created. so that the final file contents are:
import React from 'react';
import { Link, Route } from 'react-router-dom';
import { SecureRoute, ImplicitCallback } from '@okta/okta-react';

import RatingPage from './pages/rating/rating-page';
import RatingsListPage from './pages/rating-list/rating-list';
import './App.css';

function App() {
  return (
    <div className="App">
      <nav>
        <Link to="/">Home</Link>
        <Link to="/rating">Rate</Link>
        <Link to="/ratinglist">My Ratings</Link>
      </nav>
      <main>
        <Route exact path="/" component={()=> 'Home Page')} />
        <SecureRoute exact path="/rating" component={RatingPage} />
        <SecureRoute exact path="/ratinglist" component={RatingsListPage} />
        <Route path="/implicit/callback" component={ImplicitCallback} />
      </main>
    </div>
  );
}

export default App;
Here, you just added the imports for the component pages you just created, then updated or added routes to those components.
I also added some styling to my menu in App.css in the src folder:
nav {
  background-color: #333;
  font-size: 1.5rem;
}

nav a {
  display: inline-block;
  color: white;
  padding: 1rem;
  text-decoration: none;
}

nav a:hover {
  background-color: black;
}
Rate Some Beers
Now when you run your application, you will be able to go to the Rate menu item and add a beer and a rating. If you’re not logged in, it will prompt you to do so. When you’ve entered a beer and rating, you’ll be routed to the listing page with a listing of all the beers you’ve rated.
So what does this all mean? What have you learned? You learned how to create a React component with all the functionality encapsulated within it. You also learned how to pass values to the component and emit values back up to the consuming component. You also learned how to connect to a Firebase Realtime data store and read and write from it. That’s pretty good for a couple of hours of work!
Do Even More with React, Firebase, and Okta for Secure Authentication
Check out more tutorials on these subjects:
- Braden shows some Chuck Norris jokes
- Matt Raible takes you mobile with React Native
- Matt also shows you how to build a backend for React in Spring Boot
- Braden shows some React Redux
- Heather discusses being a generalist vs. being a specialist
If you have any questions, please don’t hesitate to leave a comment below, or ask us on our Okta Developer Forums. Don’t forget to follow us on Twitter @OktaDev, on Facebook and on YouTube!
Okta Developer Blog Comment Policy
We welcome relevant and respectful comments. Off-topic comments may be removed.