Build Secure Microservices with AWS Lambda and ASP.NET Core

Microservices are fun to build and offer us a scalable path to overcoming problems with tightly coupled dependencies that plague monolithic applications.
This post will walk you through building an AWS Lambda microservice written in C# with .NET Core 2.1, and communicating in JSON. We’re bringing together multiple exciting technologies here - microservices, serverless API via AWS Lambda, and authentication using Okta’s easy and convenient identity provider. Each of these technologies is deserving of their own deep-dive article, so there is a lot to cover on these subjects. This post is meant to provide a starting point implementing all three. It will be simple so that anyone can follow along. It will also be kept to a clean, basic implementation that you can expand easily if needed.
Let’s jump right in and build our first microservice - an authentication service.
There are a few things you will need to follow this tutorial.
Visual Studio 2017 If you don’t have it, you can download Visual Studio Community for free. An AWS Account. If you don’t already have one, you can create one here.
Note: In May 2025, the Okta Integrator Free Plan replaced Okta Developer Edition Accounts, and the Okta CLI was deprecated.
We preserved this post for reference, but the instructions no longer work exactly as written. Replace the Okta CLI commands by manually configuring Okta following the instructions in our Developer Documentation.
Create Your ASP.NET Core Microservice
Create a new AWS Serverless Application (.NET Core) project as shown below. If you do not have this option you need to install the AWS Toolkit for Visual Studio.
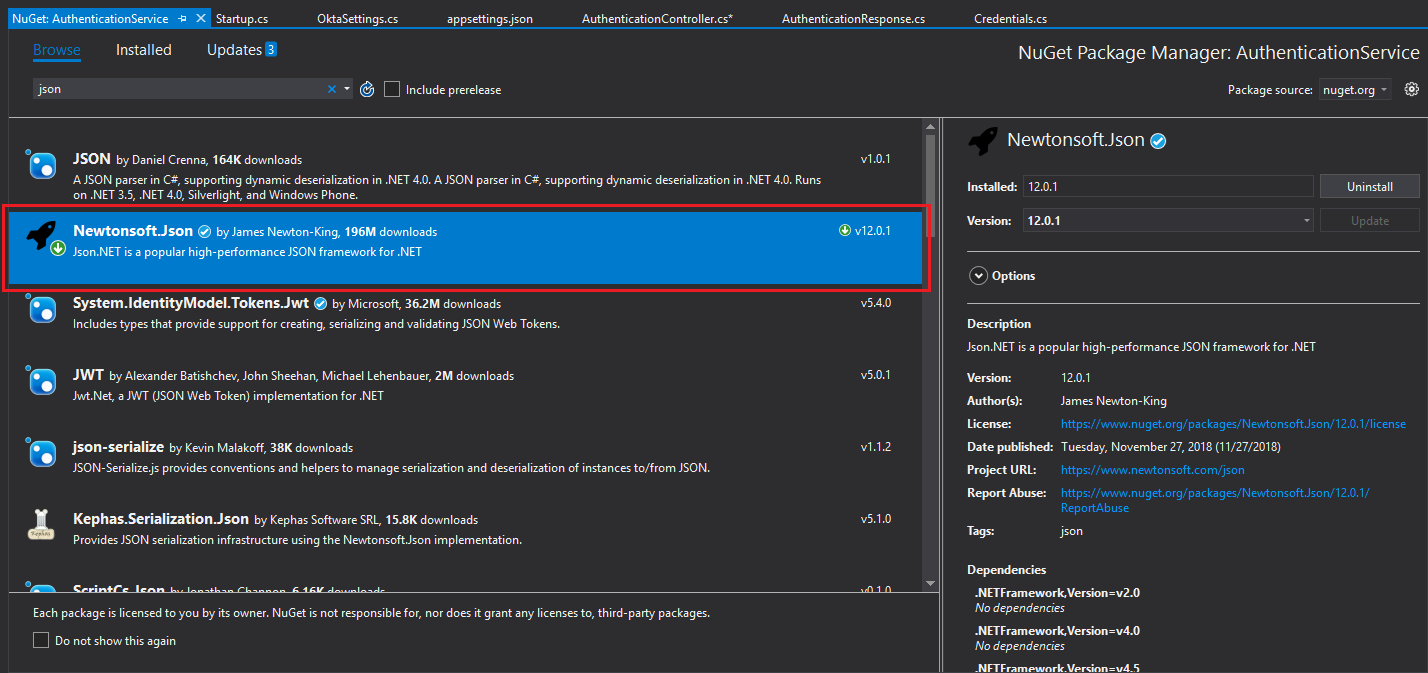
You’ll also want to install the Newtonsoft.Json package as shown in the image below.
A microservice architecture is particularly empowering when it comes to scalability. Each component is isolated in its own executable or web service. This means components can run on dedicated hardware, and specific pieces of functionality can be scaled up and down with more granular precision than in an ESB (Enterprise Service Bus). This makes AWS Lambda a complementary medium to host your new microservice. Lambda is a serverless hosting solution that’s highly scalable.
Configure Authentication for Your ASP.NET Microservice
For this example, you’ll need an Okta developer account. If you don’t already have one you can sign up for a free developer account.
You’ll also need an Okta ApiToken. For security reasons, ApiTokens are only displayed once, so make sure you keep it safe once it’s generated. Login to your Okta Developer account, and click API in the main menu, then go to Tokens. On the Tokens screen click Create Token in the top left-hand corner of the page. Give your token a name then click Create Token.
At this point, Okta will generate your ApiToken and display it on the screen. This value will eventually be placed in appSettings.json, but for now, copy it somewhere to keep for later.
Determine the Scope of Your ASP.NET Core Microservice
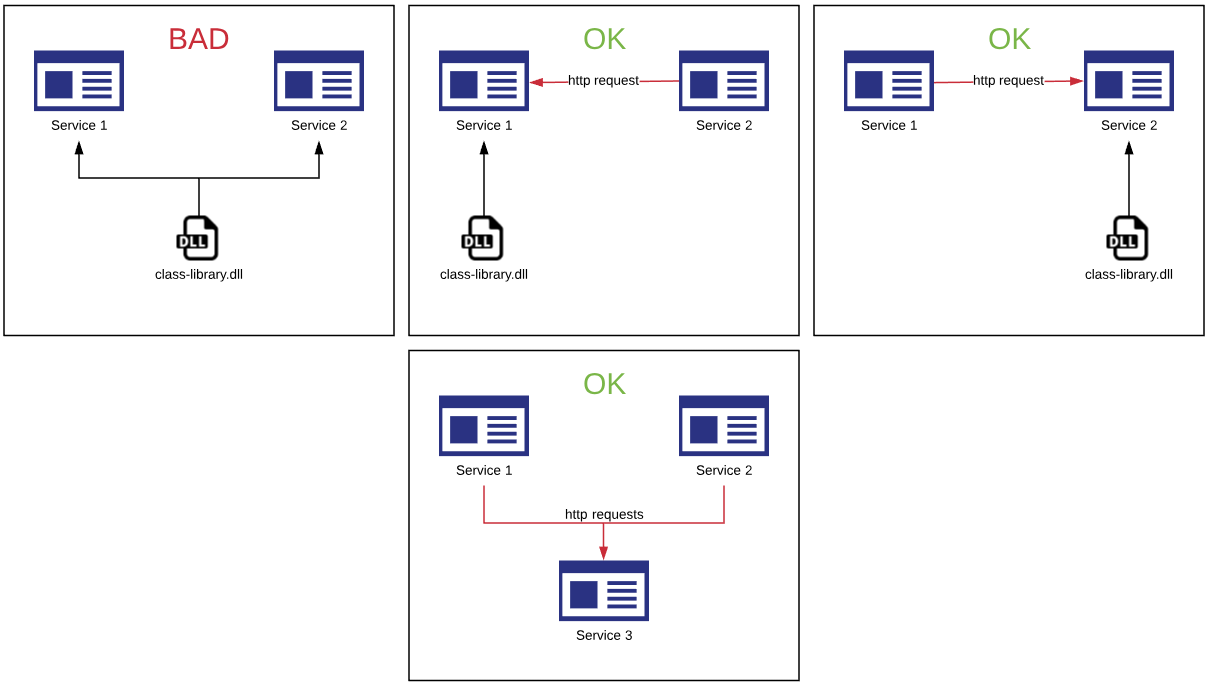
The utility microservices provide is the loose coupling of dependencies. Everything inside your service is tightly coupled. Everything outside is loosely coupled. Keep this in mind while trying to determine how big your microservice should be. You don’t want your service to grow to the point where your writing class libraries that are tightly-coupled dependencies of more than one “micro-service”.
Following this rule, a microservice could offer a very deep pool of functionality, that can always be made deeper but should very rarely (if ever) be made wider.
Create the Objects for Your ASP.NET Core Microservice
In your project’s root folder, create a folder called Model. Inside that file, you’ll need to create the following model objects. It’s easiest to create all these first so that the objects for transferring data will already be in place when we start writing our logic.
OktaSettings
The OktaSettings object will be used to store your Okta domain and the API token that enables programmatic access to your Okta account. Notice that these members - Domain and ApiToken - match the attributes in our appSettings.json file under the Okta heading. When the program is initiated, the config file will be read and the values will be stored in memory, where they will then be accessible via IOptions<OktaSettings>.
namespace AuthenticationService.Model
{
    public class OktaSettings
    {
        public string Domain { get; set; }
        public string ApiToken { get; set; }
    }
}
OktaAuthenticationRequest
This class is used to send data to the Okta Authentication API at https://{yourOktaDomain}/api/v1/authn. An instance of this class will be passed to Okta with the username and password supplied to our authentication service. This is the call that tells us whether the login was successful.
For more information on Okta’s authentication API, including postman examples of HTTP requests, click here.
namespace AuthenticationService.Model
{
    public class OktaAuthenticationRequest
    {
        public string username { get; set; }
        public string password { get; set; }
    }
}
Credentials
Our AuthenticationController will expose a single action - Authenticate. That method accepts a single input - Credentials. Credentials is used to pass the username and password in need of authentication to our microservice.
namespace AuthenticationService.Model
{
    public class Credentials
    {
        public string PublicKey { get; set; }
        public string PrivateKey { get; set; }
    }
}
Keeping your microservice small, with only a single controller and a single action, has beneficial consequences downstream on systems dependent upon your new microservice. On a microservice driven platform, disasters are isolated. If one service goes down, the rest of the services and the unrelated features of the application will still be operational. The impacted portion of the app can display a friendly message informing the user of the outage while your team sets to work fixing the production issue. If the service logic and app logic were tightly coupled, the entire app would be brought down with the service.
AuthenticationResponse
Just like Credentials is used to pass data to the Authenticate action, AuthenticationResponse is used to return data from the Authenticate action. It will tell the client calling your microservice if the call was successful or it will return an error message.
In the event of success, you will also define the User and Session members.
using System;

namespace AuthenticationService.Model
{
    public class AuthenticationResponse
    {
        public bool WasSuccessful { get; set; }
        public string Message { get; set; }

        public AuthenticatedSession Session { get; set; }
        public AuthenticatedUser User { get; set; }
    }
}
AuthenticatedSession
The AuthenticatedSession class is made to encapsulate details about the user’s session if they are successfully authenticated. This will be used to return that data to the client calling your microservice.
using System;

namespace AuthenticationService.Model
{
    public class AuthenticatedSession
    {
        public string Token { get; set; }
        public string ExpiresAt { get; set; }
    }
}
AuthenticatedUser
Much like AuthenticatedSession, AuthenticatedUser is made to encapsulate details about the user, if they are successfully authenticated. This will be used to return that data to the client calling our microservice.
using System;

namespace AuthenticationService.Model
{
    public class AuthenticatedUser
    {
        public string Id { get; set; }
        public DateTime PasswordChanged { get; set; }
        public string Login { get; set; }
        public string FirstName { get; set; }
        public string LastName { get; set; }
        public string Locale { get; set; }
        public string TimeZone { get; set; }
    }
}
Load the Configuration for the ASP.NET Core Microservice
At startup, we’ll want to process the config file so that we can get access to the configured Okta Domain, and ApiToken. To do this add the following lines to the bottom of the ConfigureServices method of your Startup.cs file. This tells dot net core where the config details are, and gives it our OktaSettings class, to be used for accessing the configuration settings.
// Okta configuration
services.Configure<OktaSettings>(Configuration.GetSection("Okta"));
services.AddOptions();
Add the Authentication Steps to Your ASP.NET Core Microservice
The next step is to implement authentication by calling Okta’s Authentication API. Add a file called AuthenticationController.cs to your Controllers folder. Then paste the following code:
using System;
using System.Threading.Tasks;
using System.Net.Http;
using Newtonsoft.Json;
using System.Net.Http.Headers;
using System.Text;

using Microsoft.Extensions.Options;
using Microsoft.AspNetCore.Mvc;

using AuthenticationService.Model;

namespace AuthenticationService.Controllers
{
    [Route("api/[controller]/[action]")]
    public class AuthenticationController : Controller
    {
        private IOptions<OktaSettings> settings;
        public AuthenticationController(IOptions<OktaSettings> settings)
        {
            this.settings = settings;
        }

        [HttpPost]
        public async Task<AuthenticationResponse> Authenticate(Credentials input)
        {
            var ret = new AuthenticationResponse();

            AuthenticatedSession session = null;
            AuthenticatedUser user = null;

            //generate URL for service call using your configured Okta Domain
            string url = string.Format("{0}/api/v1/authn", this.settings.Value.Domain);

            //build the package we're going to send to Okta
            var data = new OktaAuthenticationRequest() { username = input.PublicKey, password = input.PrivateKey };

            //serialize input as json
            var json = new StringContent(JsonConvert.SerializeObject(data), Encoding.UTF8, "application/json");

            //create HttpClient to communicate with Okta's web service
            using (HttpClient client = new HttpClient())
            {
                //Set the API key
                client.DefaultRequestHeaders.Authorization = new AuthenticationHeaderValue("SSWS", this.settings.Value.ApiToken);

                //Post the json data to Okta's web service
                using (HttpResponseMessage res = await client.PostAsync(url, json))

                //Get the response from the server
                using (HttpContent content = res.Content)
                {
                    //get json string from the response
                    var responseJson = await content.ReadAsStringAsync();
                    Console.WriteLine(responseJson);

                    //deserialize json into complex object
                    dynamic responseObj = JsonConvert.DeserializeObject(responseJson);

                    //determine if the returned status is success
                    if (responseObj.status == "SUCCESS")
                    {
                        //get session data
                        session = new AuthenticatedSession()
                        {
                            Token = responseObj.sessionToken,
                            ExpiresAt = responseObj.expiresAt
                        };

                        //get user data
                        user = new AuthenticatedUser()
                        {
                            Id = responseObj._embedded.user.id,
                            Login = responseObj._embedded.user.login,
                            Locale = responseObj._embedded.user.locale,
                            TimeZone = responseObj._embedded.user.timeZone,
                            FirstName = responseObj._embedded.user.firstName,
                            LastName = responseObj._embedded.user.lastName
                        };
                    }
                }
            }

            //return results of the operation packaged in a AuthenticationResponse object
            var wasSuccess = session != null && user != null;
            return new AuthenticationResponse()
            {
                WasSuccessful = wasSuccess,
                Message = wasSuccess ? "Success" : "Invalid username and password",

                Session = session,
                User = user
            };
        }
    }
}
You may notice that the constructor of the class accepts an instance of IOptions<OktaSettings>. OktaSettings is the same class you defined above in your Model folder to store your Okta configuration settings.
The configuration code you added to Startup.cs enables IOptions<OktaSettings> to be recognized by .Net Core and the framework will automatically supply the input when the class is initialized. This gives you access to the Okta configuration settings in appSettings.json.
The Authenticate action has been well commented to help you understand what each line is doing. Here are the high-level steps that the action goes through:
Creates an instance of OktaAuthenticationRequest to pass the supplied username and password to Okta’s authentication service
JSON encodes the data
Creates an instance of HttpClient to communicate with Okta, and sets the authentication header value using the ApiToken
Posts the JSON encoded data to Okta and awaits a response
Deserialized JSON response stream, and evaluates if "SUCCESS" was the returned status
If the login was unsuccessful it returns false for WasSuccess and "Invalid username and password" for Message. If it was a success it returns true for WasSuccess, and returns the session and user data provided by Okta
Add Configuration Management to Your Microservice
All your configuration for the service can be found in the appSettings.json file. Following best practice, you’ll want to configure each environment to point at a different instance of Okta. This isolates each environment so tests in one environment don’t interfere with tests in another. It helps you become familiar with your Okta settings so that you can be deliberate when configuring Okta and your software. It presents an opportunity to rehearse deployment and configuration. All of these things are useful steps you don’t want to skip when working your solution to production.
You’ll have to populate the below settings from your Okta account.
  "Okta": {
    "Domain": "https://{yourOktaDomain}",
    "ApiToken": "{yourApiToken}"
  }
Deploy Your Lambda Microservice
Deploying your new microservice as a Lambda function is easy. The AWS Toolkit for Visual Studio will create the cloud components for you. To deploy your microservice, in the Solution Explorer, right click on your web service project, and select Publish to AWS Lambda.
Click on the little person icon next to Account Profile to Use. In the resulting pop-up window, you can use “default” as the profile name. You’ll need to enter Access Key information. To create an Access Key in AWS, click on your account name in the top right of your AWS dashboard and choose My Security Credentials. Expand the Access Keys section and click Create New Access Key. In the pop-up window, there will be a link to show the Access Key ID and Secret Access Key. You can enter them in the deployment window in Visual Studio, or download the keyfile and click Import from csv file… to import it.
Then, you’ll need to get Provide a Stack Name. This can be whatever you want to name it and will be used by the wizard when creating your AWS resource to prefix automatically generated component names. You can also provide the S3 Bucket you’d like the code deployed to. You can click the New… button to create an S3 Bucket to use. Click Publish to start the deployment.
If your cloud resources have not already been created, publish will create them for you. During publish, the modal window will disappear and a deployment tab will appear in your IDE. Once the status shown in the tab displays UPDATE_COMPLETE, your deployment has finished.
Copy the AWS Serverless URL and use it to test your microservice. Your URL may look something like mine shown below:
https://25ayfn7ecl.execute-api.us-east-2.amazonaws.com/Prod
This means the URL to our authenticate action looks like:
https://25ayfn7ecl.execute-api.us-east-2.amazonaws.com/Prod/api/authentication/authenticate
Open Postman and POST to the above URL, while sending the following form data:
- PublicKey = {YOURUSERNAME}
- PrivateKey = {YOURPASSWORD}
If you get a response back like the following, you’re good to go!
{
    "wasSuccessful": true,
    "message": "Success",
    "session": {
        "token": "2011129scHesxiG6Psr1ZCtdADBEJ1iBMr_KtTnaeSV4ZJvpP03BOP_",
        "expiresAt": "03/19/2019 18:32:20"
    },
    "user": {
        "id": "00uitftb3egstVhnQ0h7",
        "passwordChanged": "0001-01-01T00:00:00",
        "login": null,
        "firstName": null,
        "lastName": null,
        "locale": null,
        "timeZone": null
    }
}
ASP.NET Core Microservice Next Steps and Considerations for Production
If you’re going to take this to production you’re definitely going to want to have an SSL certificate. Select a certificate authority like AWS or GoDaddy, and check out their SSL offerings. Purchase your SSL and install it on your web server or AWS account.
Authentication is about verifying the identity of the client. Authorization, on the other hand, is what you sometimes do after you know who you’re dealing with and you want to know what they have permission to access. If your authorization logic is simple, it may be appropriate to add another controller and action to this existing microservice. If your logic is more complex, then it should be put into a new microservice. That new microservice could then be passed the session token (returned from the authentication microservice we built today), and the identity of a digital resource, and it will return the level of access to that resource.
Learn More About ASP.NET Core and Microservices
You can find the complete source code on GitHub here. Have fun coding!
For other examples using ASP.NET Core and microservices check out the following links:
- API and Microservices Best Practice (video)
- Secure a Spring Microservices Architecture with Spring Security and OAuth 2.0
- Develop a Microservices Architecture with OAuth2.0 and JHipster
- Okta’s Authentication API Documentation with Postman Examples for HTTP Requests
- Martin Fowler - Microservices (video).
If you have any questions, please post in the comments section below. Don’t forget to follow us on Twitter and check out our videos on YouTube!
Okta Developer Blog Comment Policy
We welcome relevant and respectful comments. Off-topic comments may be removed.