Linking Your Alexa Skill Securely with Okta

We are moving toward a ‘SMART’ world where everything is interconnected and almost all things or devices are interactive. From a gesture-driven by an actual human being to automated interactions from another device or application, a lot of developers and even non-computer savvy users are trying to explore this space.

In this post, I will use Amazon’s Alexa which is Amazon’s voice-enabled and command Virtual Assistant as an example. I’ll show how you can make your very own Amazon Alexa Skills be secure and also provide a more rich, tailored and personalized experience to any users of your Amazon Alexa Skill through Okta.
For this project, you’ll need several components and these are:
- A Voice Command Enabled Device which will be Amazon Alexa
- Register for a Free Amazon Developer Account.
- Sign up for a Free-forever Okta environment.
Note: In May 2025, the Okta Integrator Free Plan replaced Okta Developer Edition Accounts, and the Okta CLI was deprecated.
We preserved this post for reference, but the instructions no longer work exactly as written. Replace the Okta CLI commands by manually configuring Okta following the instructions in our Developer Documentation.
Set Up Your First Alexa Skill Set
If you already have an existing Amazon Alexa Skill which you want to integrate Okta with then you can skip this step and go directly to the Setup Okta section.
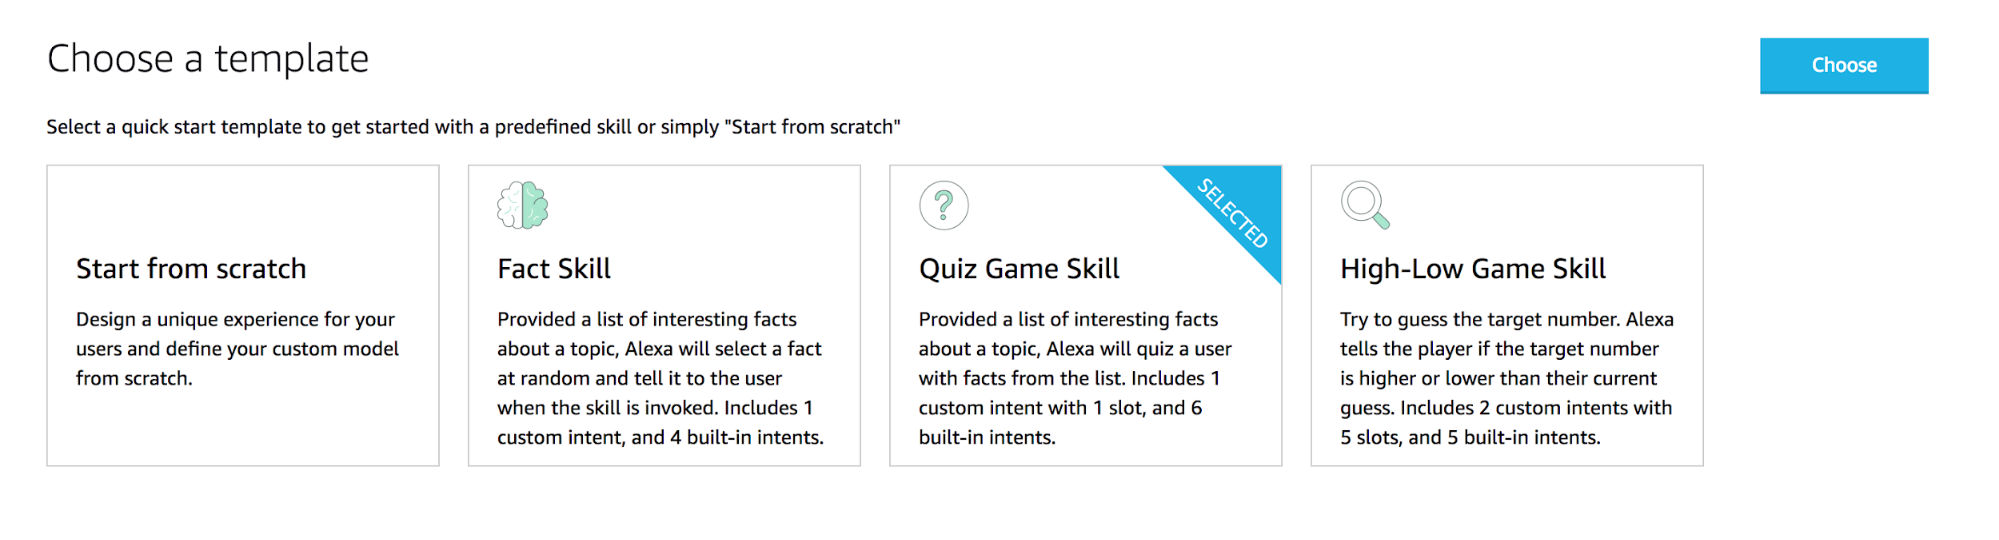
If this is your first time setting up an Amazon Alexa Skill then what’s nice with Amazon is that (after doing a separate registration and agreement) they provide you a sample template which you can start off developing your first Amazon Alexa Skill Set! You can start here.
What I like about this is that the template is very easy to follow and to implement. For this blog post, I’ll use the available Amazon Alexa Skill Set template which Amazon provides and we’ll use the Quiz Game Skills Template
Configure the Quiz Game Skill Set in AWS
For this blog post, I’ll fast track the setup covering the important steps.
First, you’ll create an Invocation Name. This allows you to dictate how you invoke the newly created skill later with Alexa (e.g.: “Alexa, ask
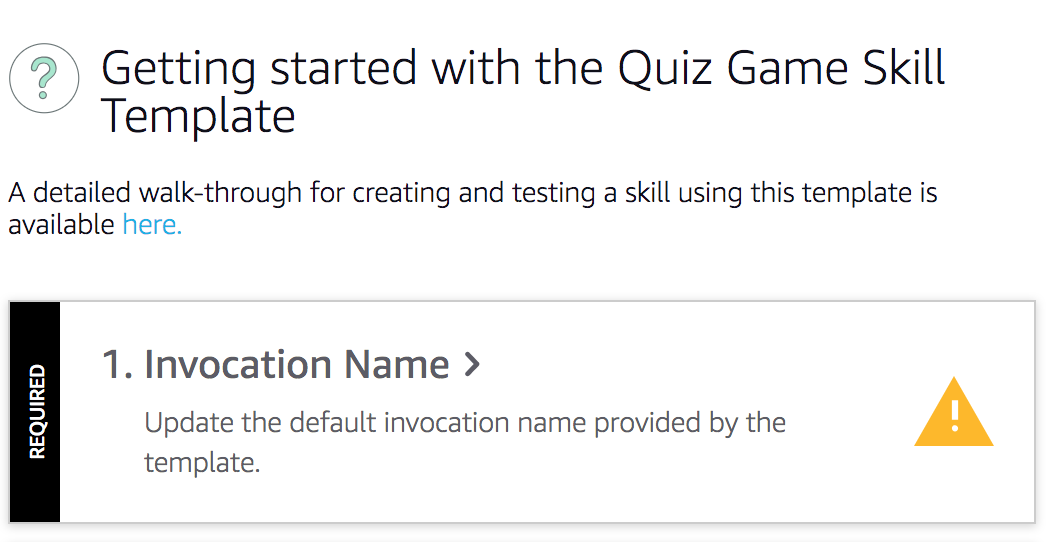
Put “sample quiz game” in the Skill Invocation Name field. Next, you’ll create a custom intent. This allows you to create custom commands on which your Alexa Skills can accept and process orders. For this example, I’ll create a custom intent which will try to see what is my favorite color!
Put “FavoriteColorIntent” in the Create custom intent field. Once we are done configuring what our Intent will look like, the next step is to provide some sample utterances on how the intent can be invoked and said upon.
For this example, I’ll add two utterances which are “What is my favorite color” and “Say my favorite color”. With these utterances, once Alexa hears these words, Alexa knows that the FavoriteColorIntent is to be used.
You’ll need to create a corresponding Lambda function in AWS which will act as the business logic to process the voice instructions invoked within Alexa.
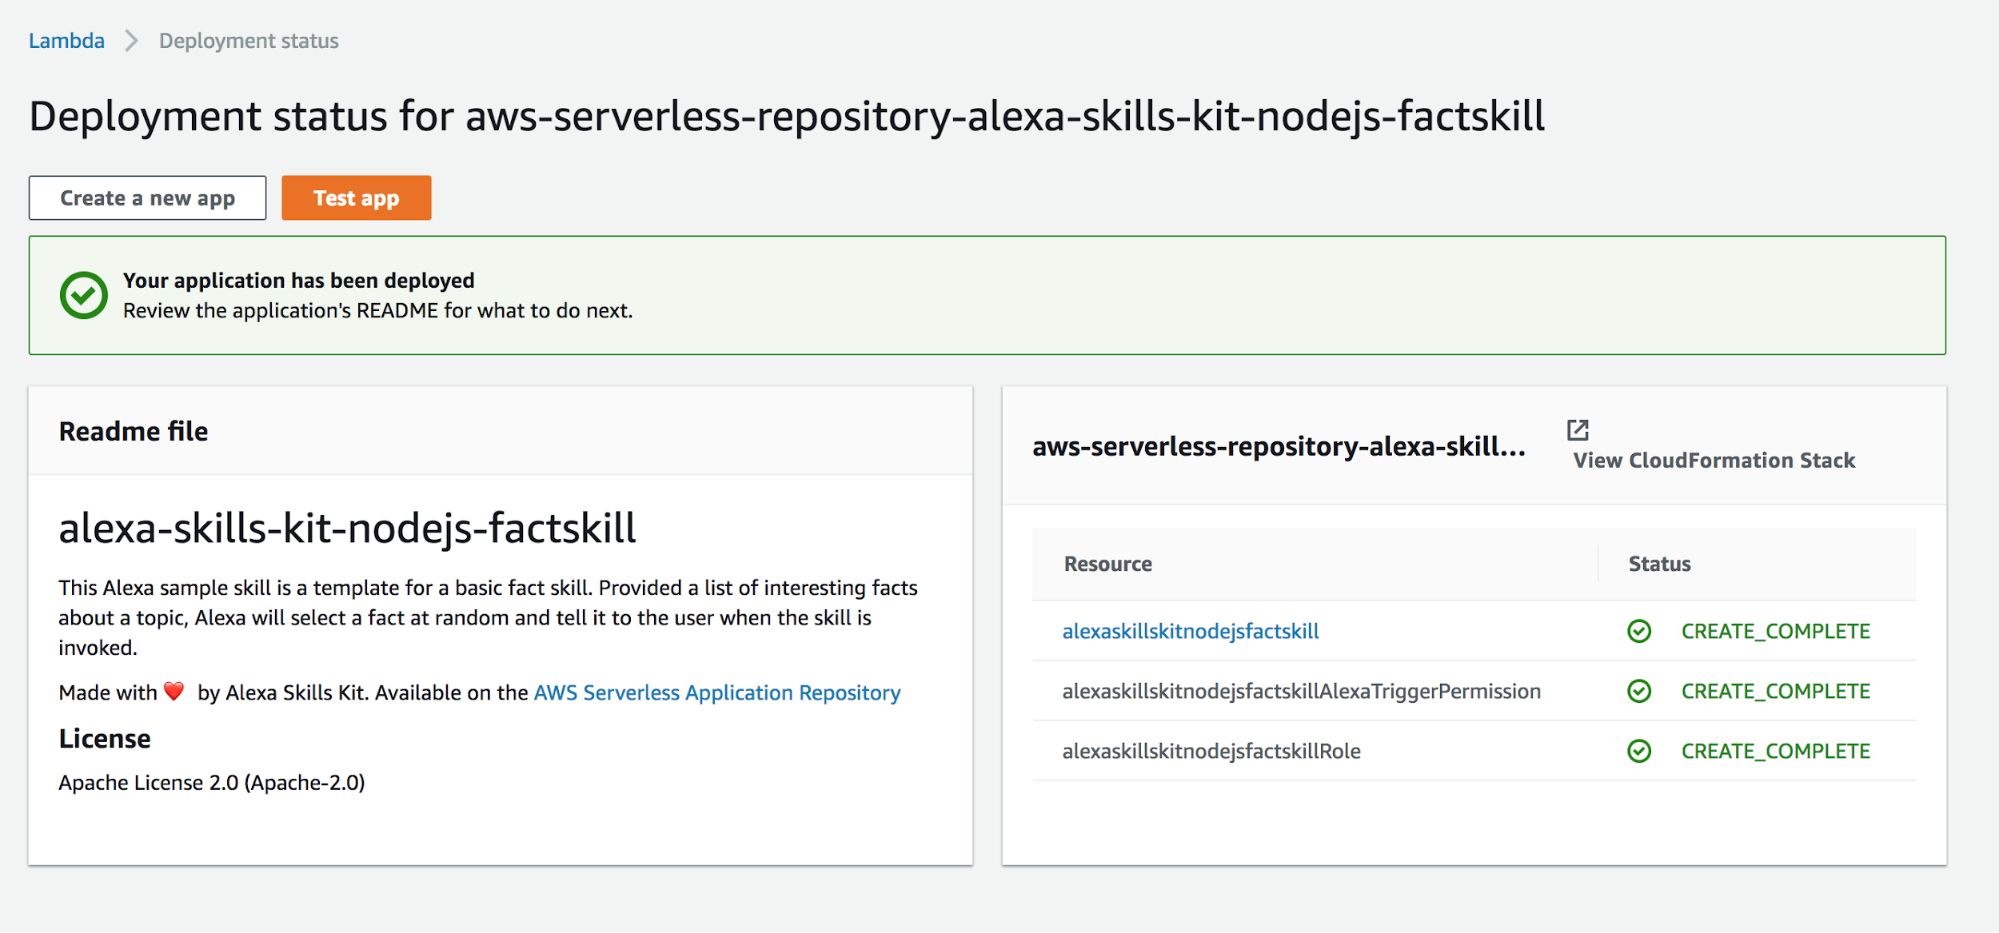
Click Create Function and Select AWS Serverless Function Repository such that you will be able to re-use and extend the available Alexa Quiz Game Skills Template which you were using earlier.
Select the alexa-skills-nodejs-factskill. Once you select the skill, click Deploy on the bottom right and AWS will deploy this automatically for you. You just have to sit and wait until everything is completed. You should see something like this once deployment is done.
Click the link available within the resource column and this should take you the AWS lambda resource page. Capture the ARN which we will use as part of the configuration within the Alexa Skills configuration page.
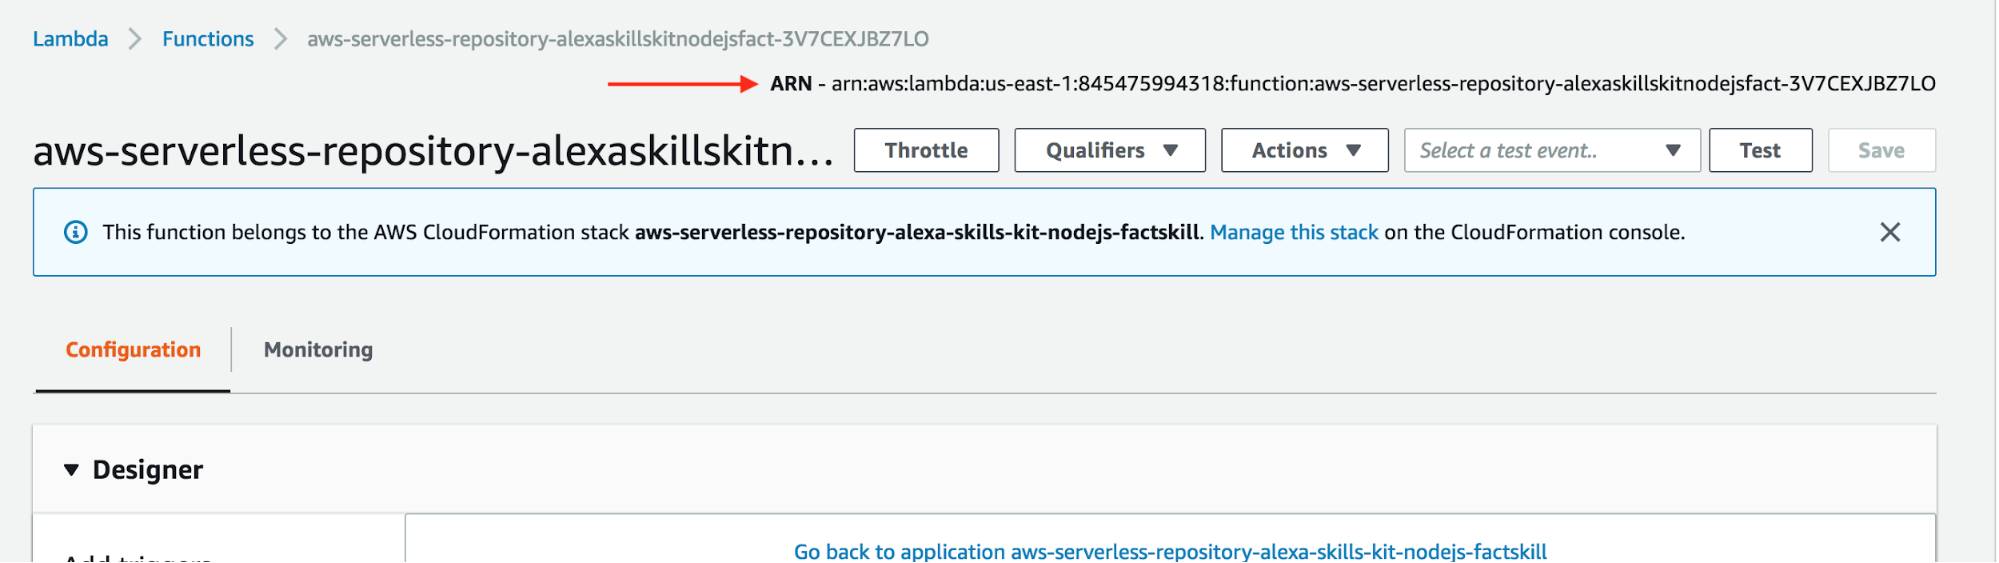
Back in the Alexa Skill page, make sure you are able to save the ARN value you’ve created above within the AWS Lambda ARN field and click Save Endpoints to confirm and apply the changes.
Once you have linked your Lambda function with your Alexa Skill then the last step is just adding our custom Favorite Color handler within the AWS lambda by adding the code snippet below on the index.js main file of your Alexa Quiz boiler template file.
const FavoriteColorHandler = {
 canHandle(handlerInput) {
   const request = handlerInput.requestEnvelope.request;
   return request.type === 'IntentRequest'
     && request.intent.name === 'FavoriteColorIntent';
 },
 handle(handlerInput) {
   const favoriteColor = 'red';
   const speechOutput = 'Your Favorite Color is ' + favoriteColor;
   return handlerInput.responseBuilder
     .speak(speechOutput)
     .getResponse();
 },
};
You’ll also need to register the FavoriteColorHandler at the bottom of the code. It should look like this:
exports.handler = skillBuilder
  .addRequestHandlers(
    GetNewFactHandler,
    FavoriteColorHandler,
    HelpHandler,
    ExitHandler,
    SessionEndedRequestHandler
  )
  .addErrorHandlers(ErrorHandler)
  .lambda();
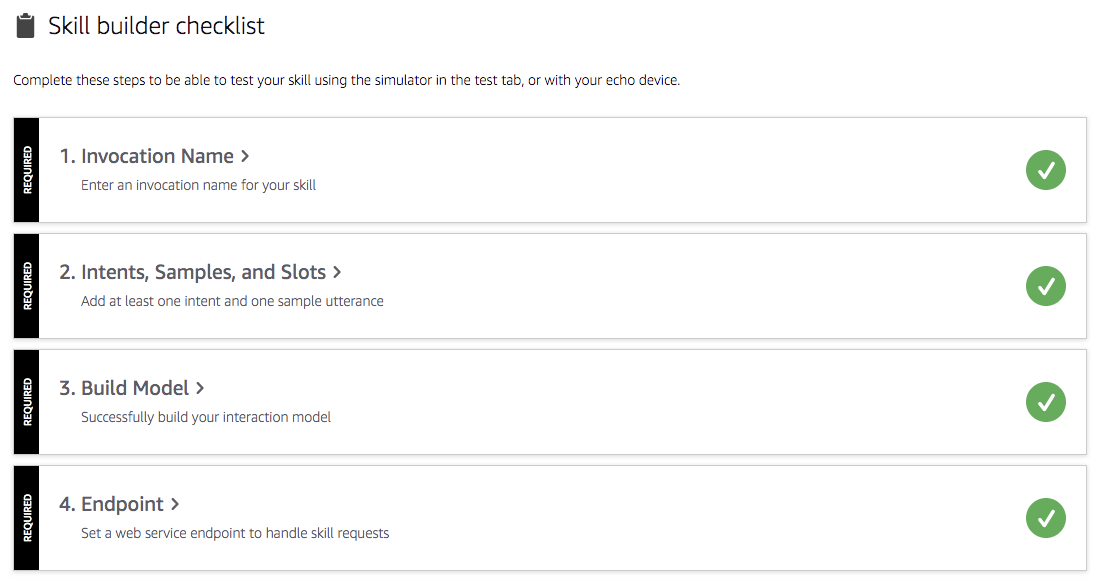
After fully integrating everything, you should be able to test your new skill and custom function. You may have to wait for Amazon to complete its interaction model. On the Build tab of your skill, you should see all check marks:
Go to the Test Tab of your Alexa Skill. Allow Amazon to use your computer’s microphone and turn on the “Test is enabled for this skill” toggle. Just say: “Alexa ask sample quiz game, what is my favorite color?” Then you should get a reply from Alexa saying “Your favorite color is red”. If you’re like me and have an Alexa device in the room, you can also simply type in the question in the text field.
Add Secure Authentication to the Mix
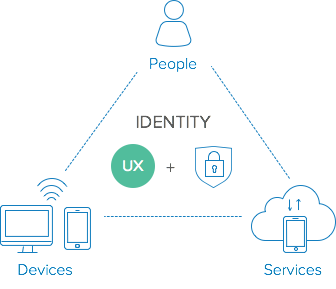
As you can see, we are now able to invoke any Alexa Skill. As part of the process, you may want to secure your skill by allowing users to log in before they are able to use your newly created skill. As part of the logging in process, you may also want to have your end users be able to bring in any existing profile they may already have such that your skill will automatically know who the end user is and what their actual favorite color is all about. To do this, you can leverage Okta to secure your Alexa Skill and also be able to provide a more personalized and enriching customer experience through Okta’s OAuth capability in the form of JWT scopes and claims.
To do this, the expectation is that you have already signed up for an Okta tenant. Head on over to the developer signup page and create an Okta org if you haven’t already.
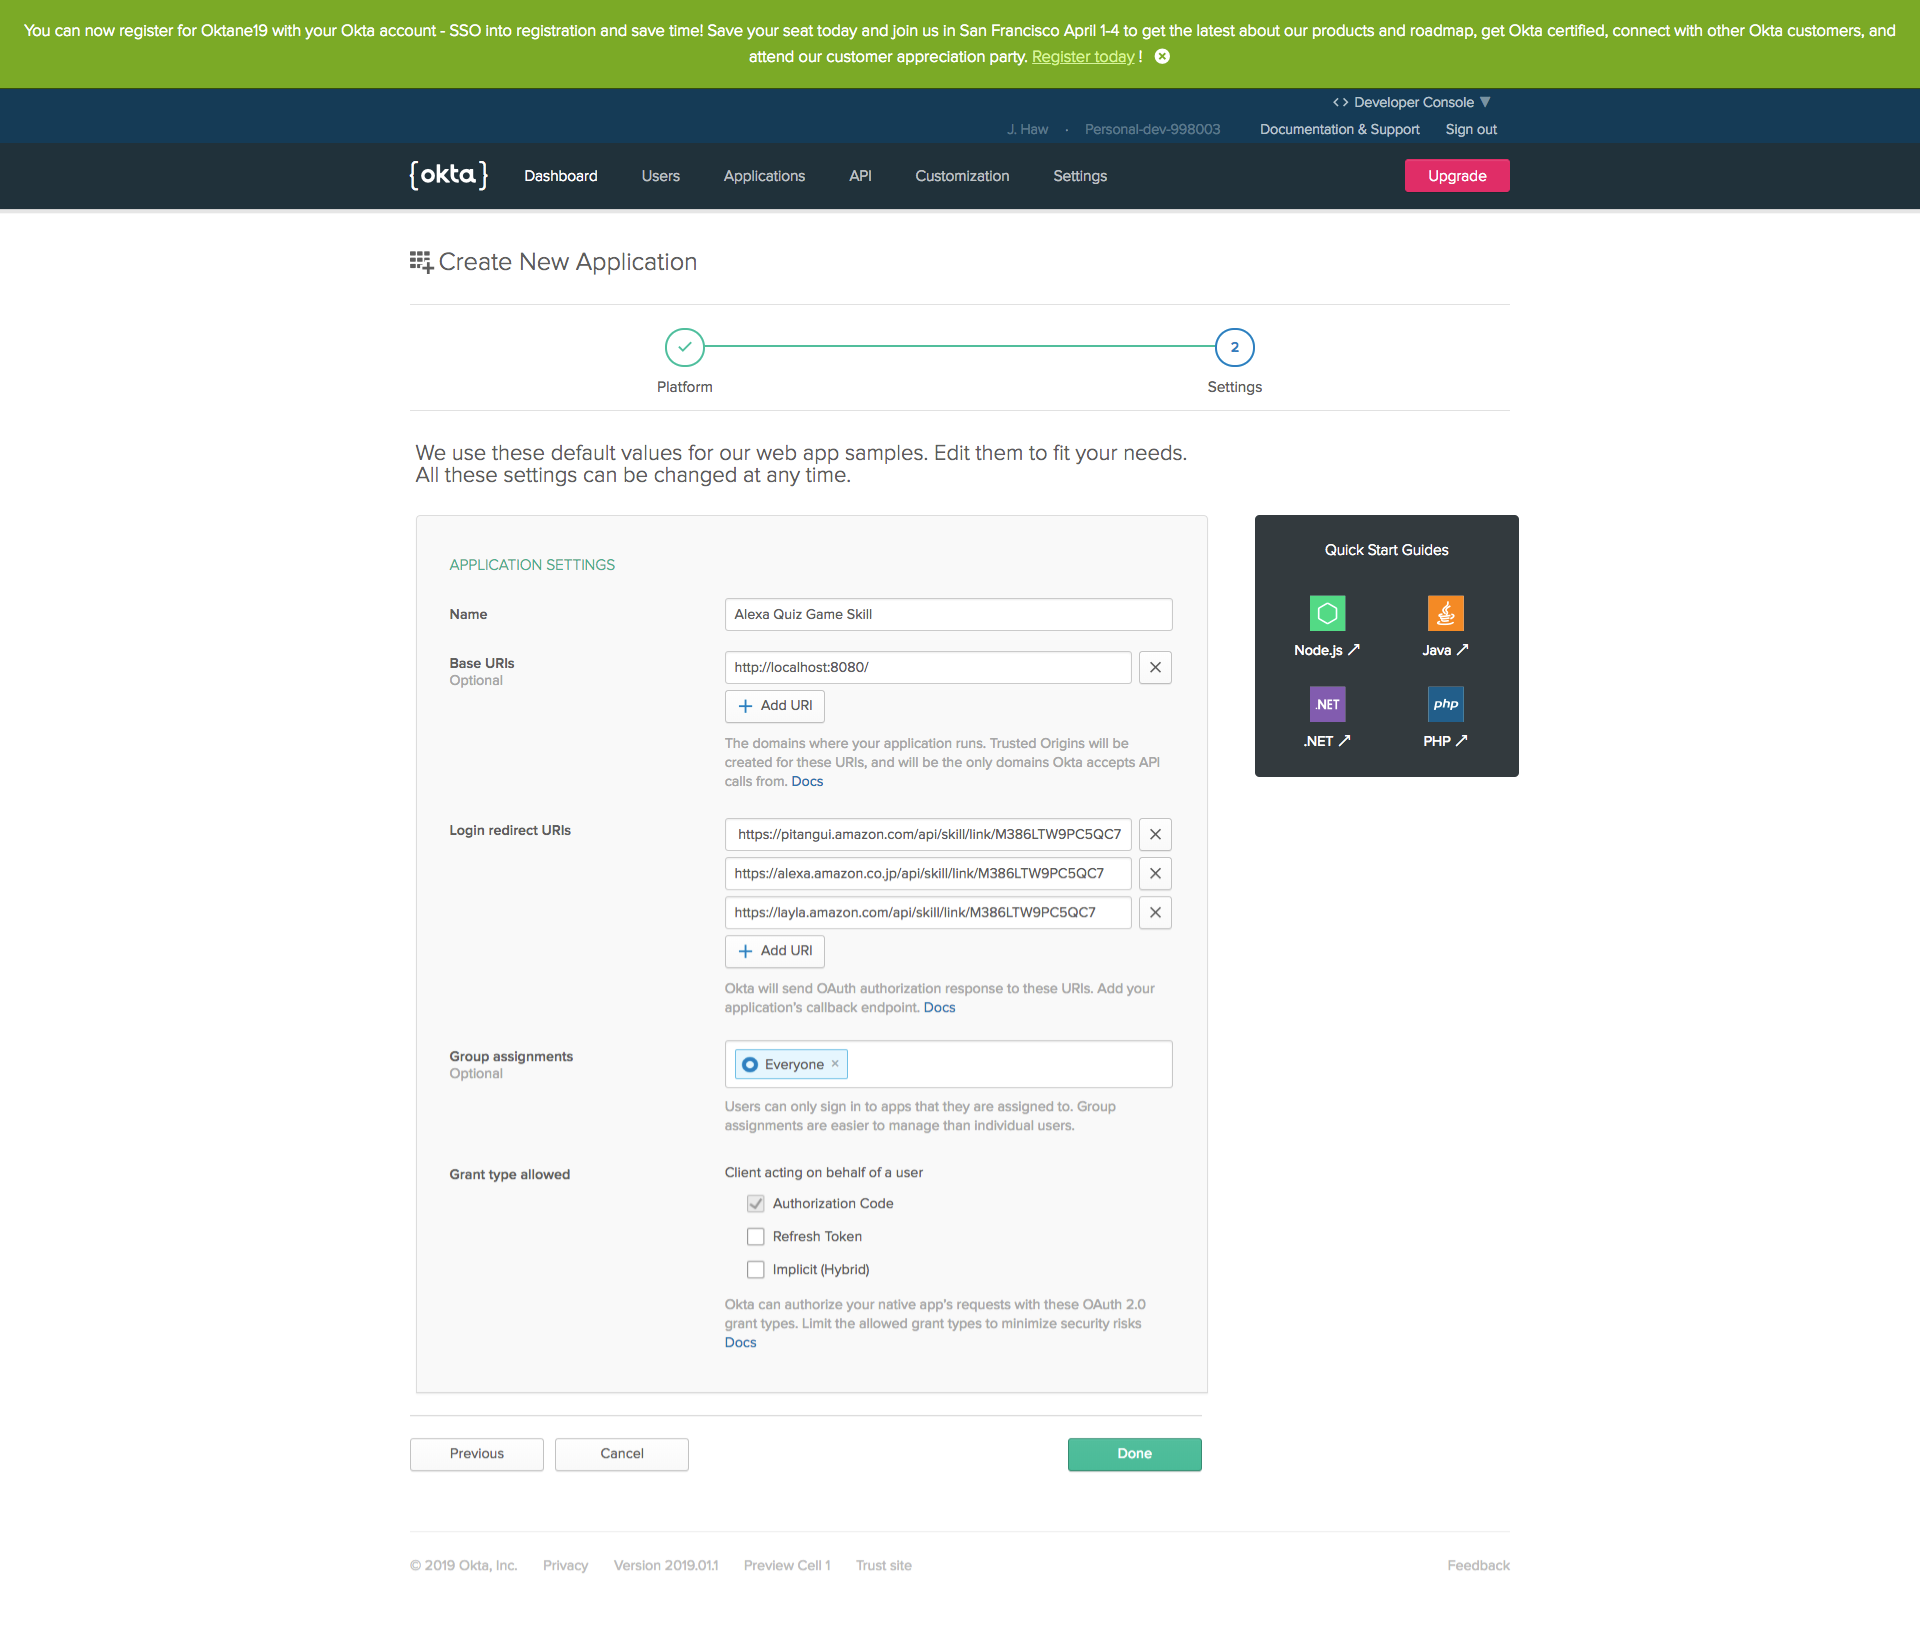
Login as your Okta Super Administrator. Click Applications and Add Application. Click Web and click Next.
This creates an OpenID Connect application which will represent your Alexa Quiz Game Application.
You’re presented with a screen to configure your Okta OpenID Connect application. You can change the name to represent it as the Alexa Quiz Game Skill Application. As for the “Login redirect URIs”, you would need to get this from your Alexa Amazon application via the skill page and clicking the Account Linking navigation bar.
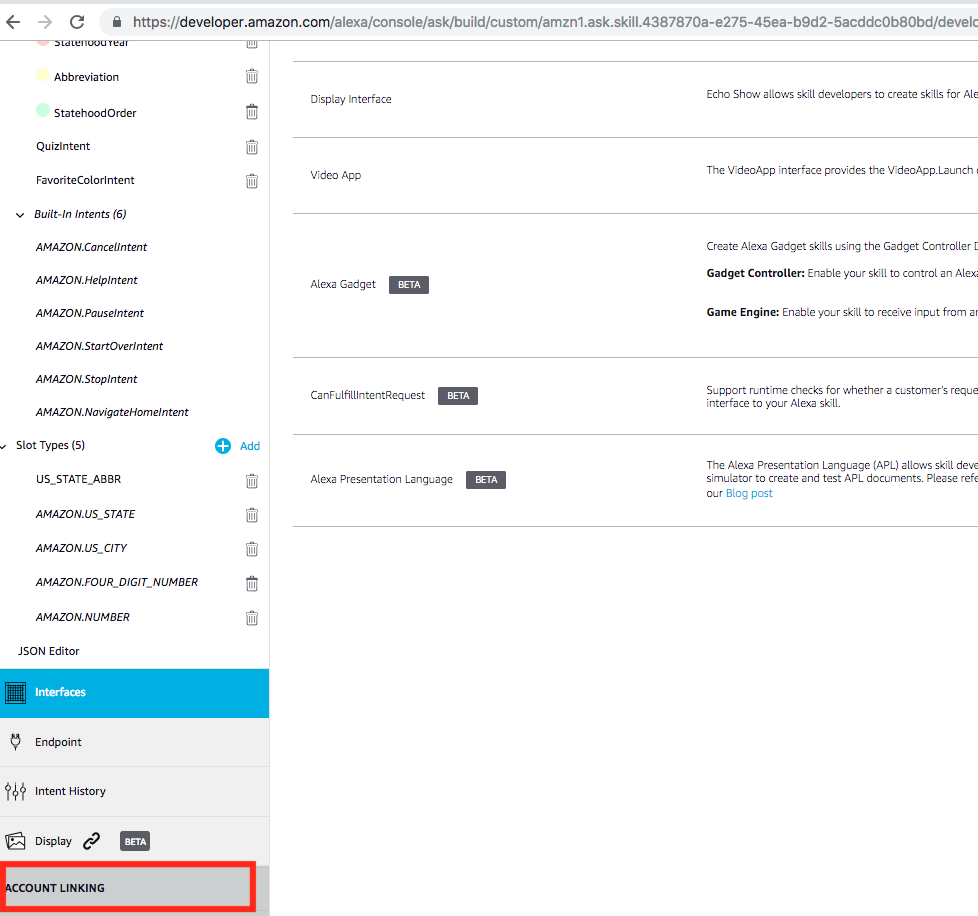
Once the Account Link navigation bar has been clicked, you’re shown a page which contains the information on how you get the Redirect URIs.
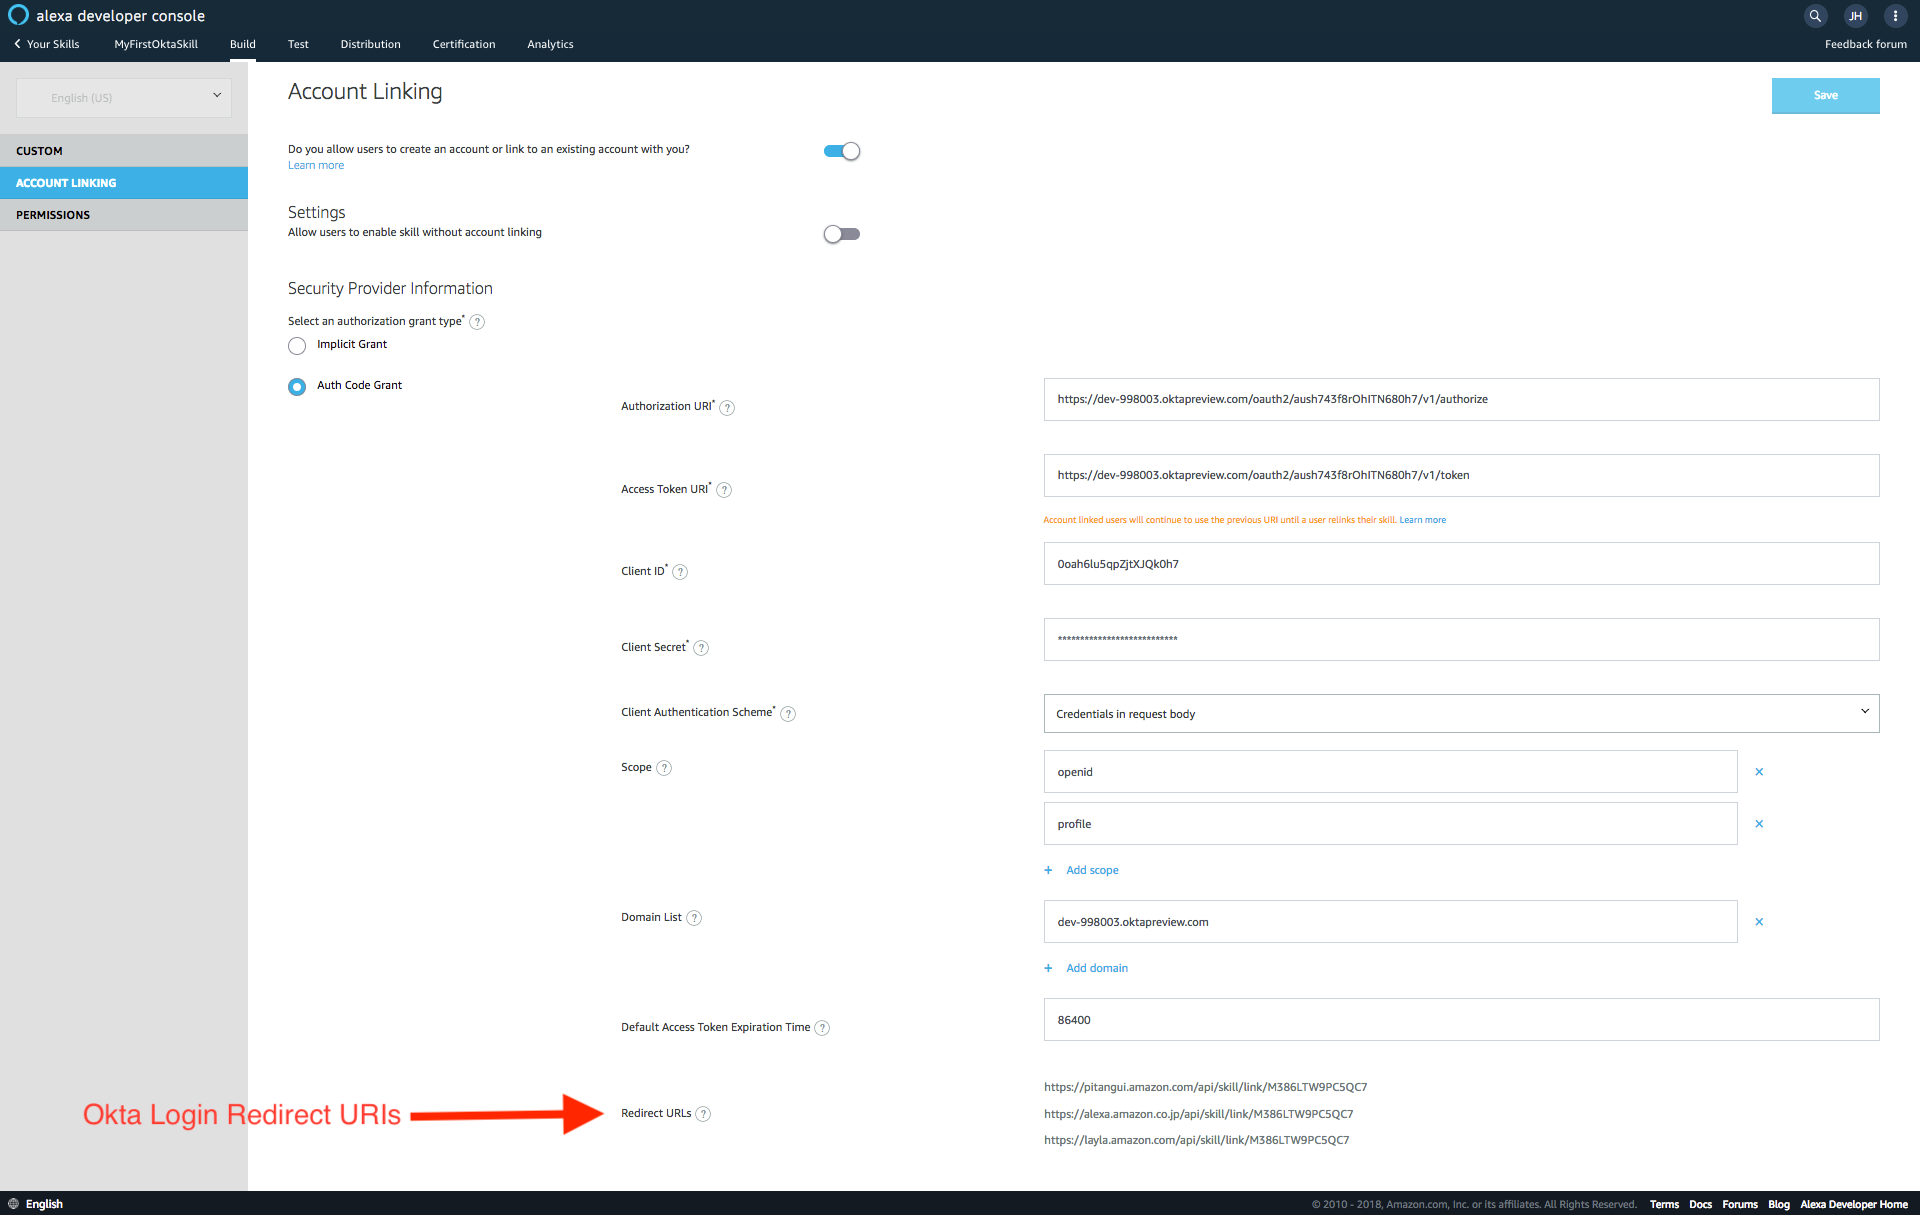
You need to copy the values generated here and configure this within your Okta OIDC application:
Click Done when you’re finished.
Make sure you note the Client ID, you’ll use it later to configure within your Amazon Alexa Skill application.
Create a Custom Authorization Server within Okta which will be used later on our Amazon Alexa Account Linking feature. Navigate to: API > Authorization Servers. Choose Add Authorization Server. Put OktaQuizGameSkillAuthServer for the Name field. Put http://oktaquizgame.com for the Audience field. Give it a description and click Save.
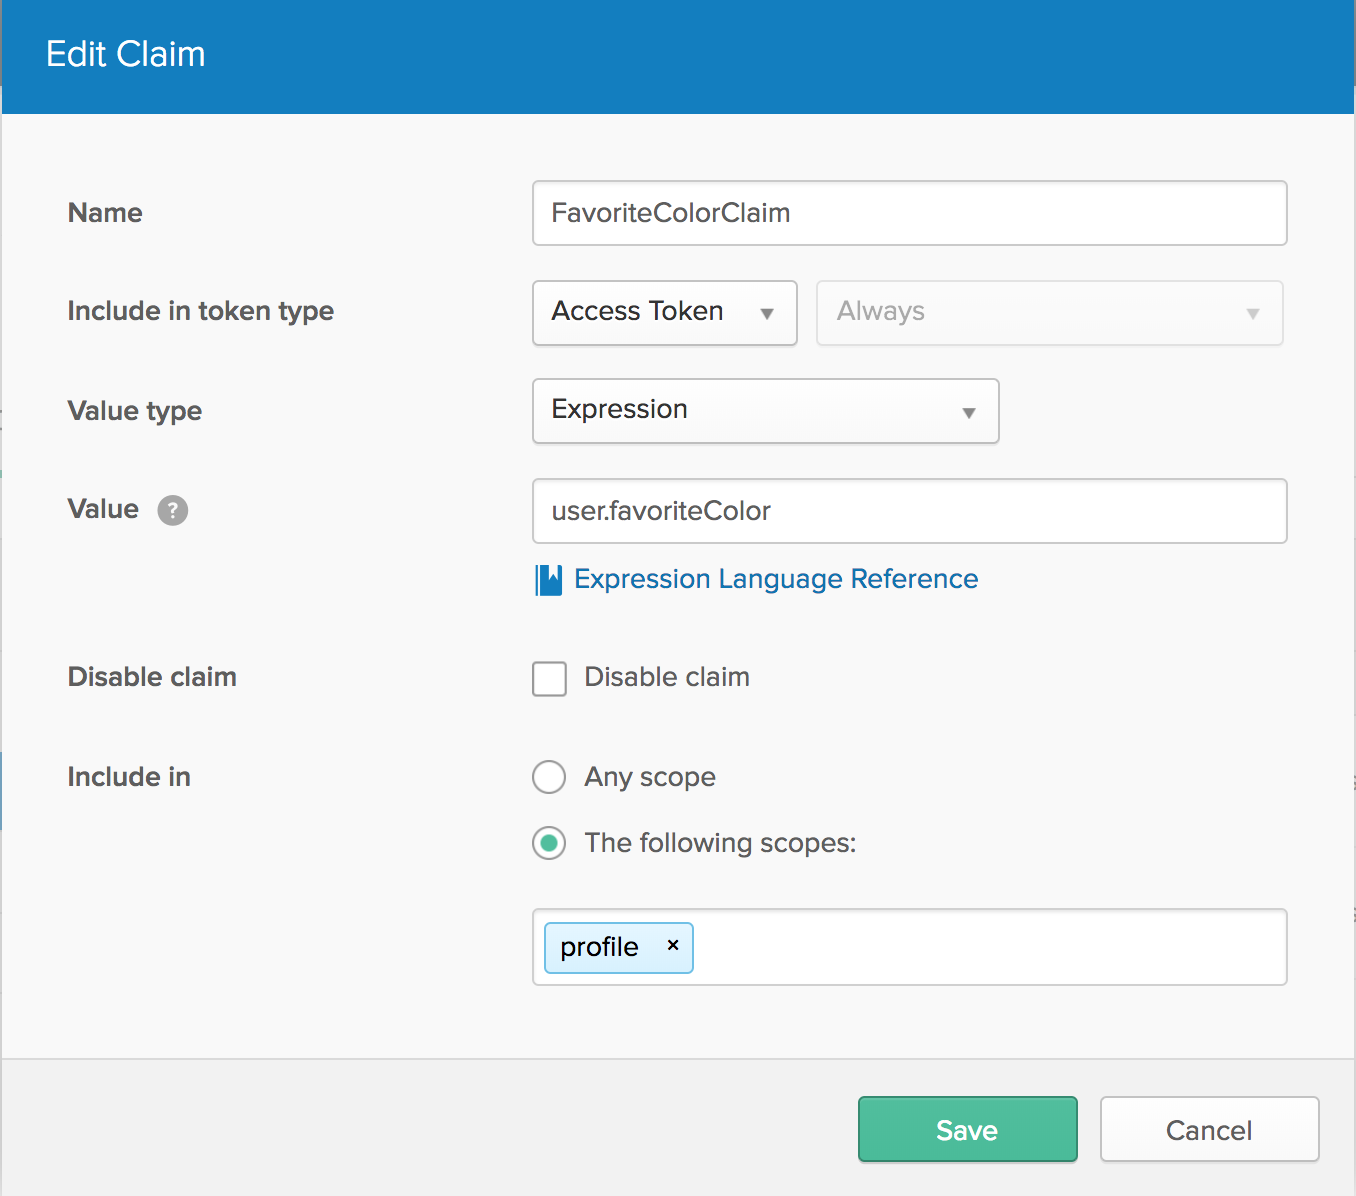
Create some custom claims which will represent our favorite color and first name as well. Click the Claims tab. Click Add Claims.
This claim is for the favorite color.
Add another custom claim for first name. Call it FirstNameClaim.
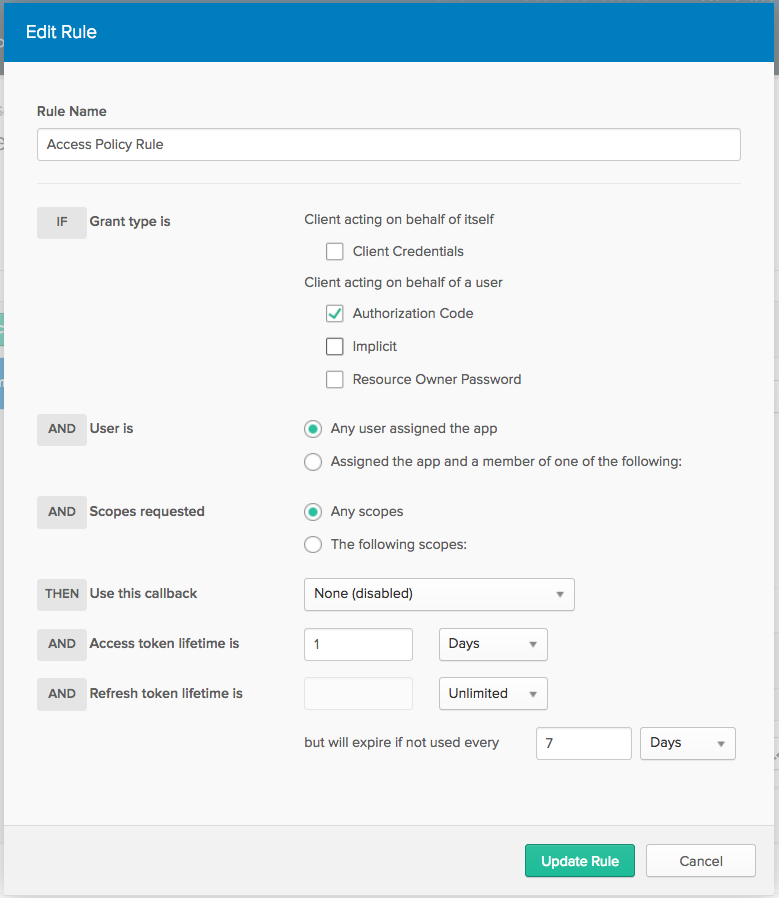
Once done, finish the task off by creating a simple Access Policy. Click the Access Policies tab and click Add New Access Policy.
Click Add Rule. Uncheck all the grant types, except Authorization Code. Leave the other defaults and click Save.
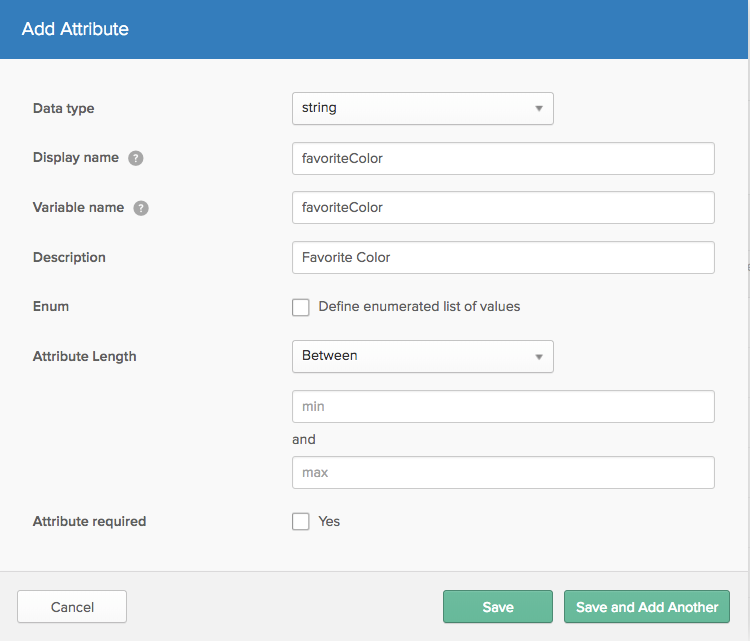
The last step is to create a custom user profile attribute which will store the favorite color of the user within Okta. To do this, we create a custom attribute within Okta’s User Profile Metadata such that Okta can store the favorite color and also have the user be able to change the color information by themselves. Select Users > Profile Editor. Click the pencil icon to the right of the Okta logo.
Add a new attribute called favoriteColor. Click Add Attribute and enter favoriteColor for the Display Name and Variable name. Fill in a description and click Save Attribute:
Link Okta and Your Amazon Alexa Skills
To be able to link Okta as your identity and authentication provider for Amazon Alexa Skill Set, you need to go to your Alexa Skill Account Linking Option and enable that feature. Once you are on that page, you just fill in the details from Okta. Information required will be the Authorization Grant Type to be used, Okta Authorization Server and Token URL, scope, client ID of the OIDC Application we created earlier and the permitted domains.
To get your authorization server URI, you can go to your Okta Custom Authorization Server page and you should be able to see the metadata URI.
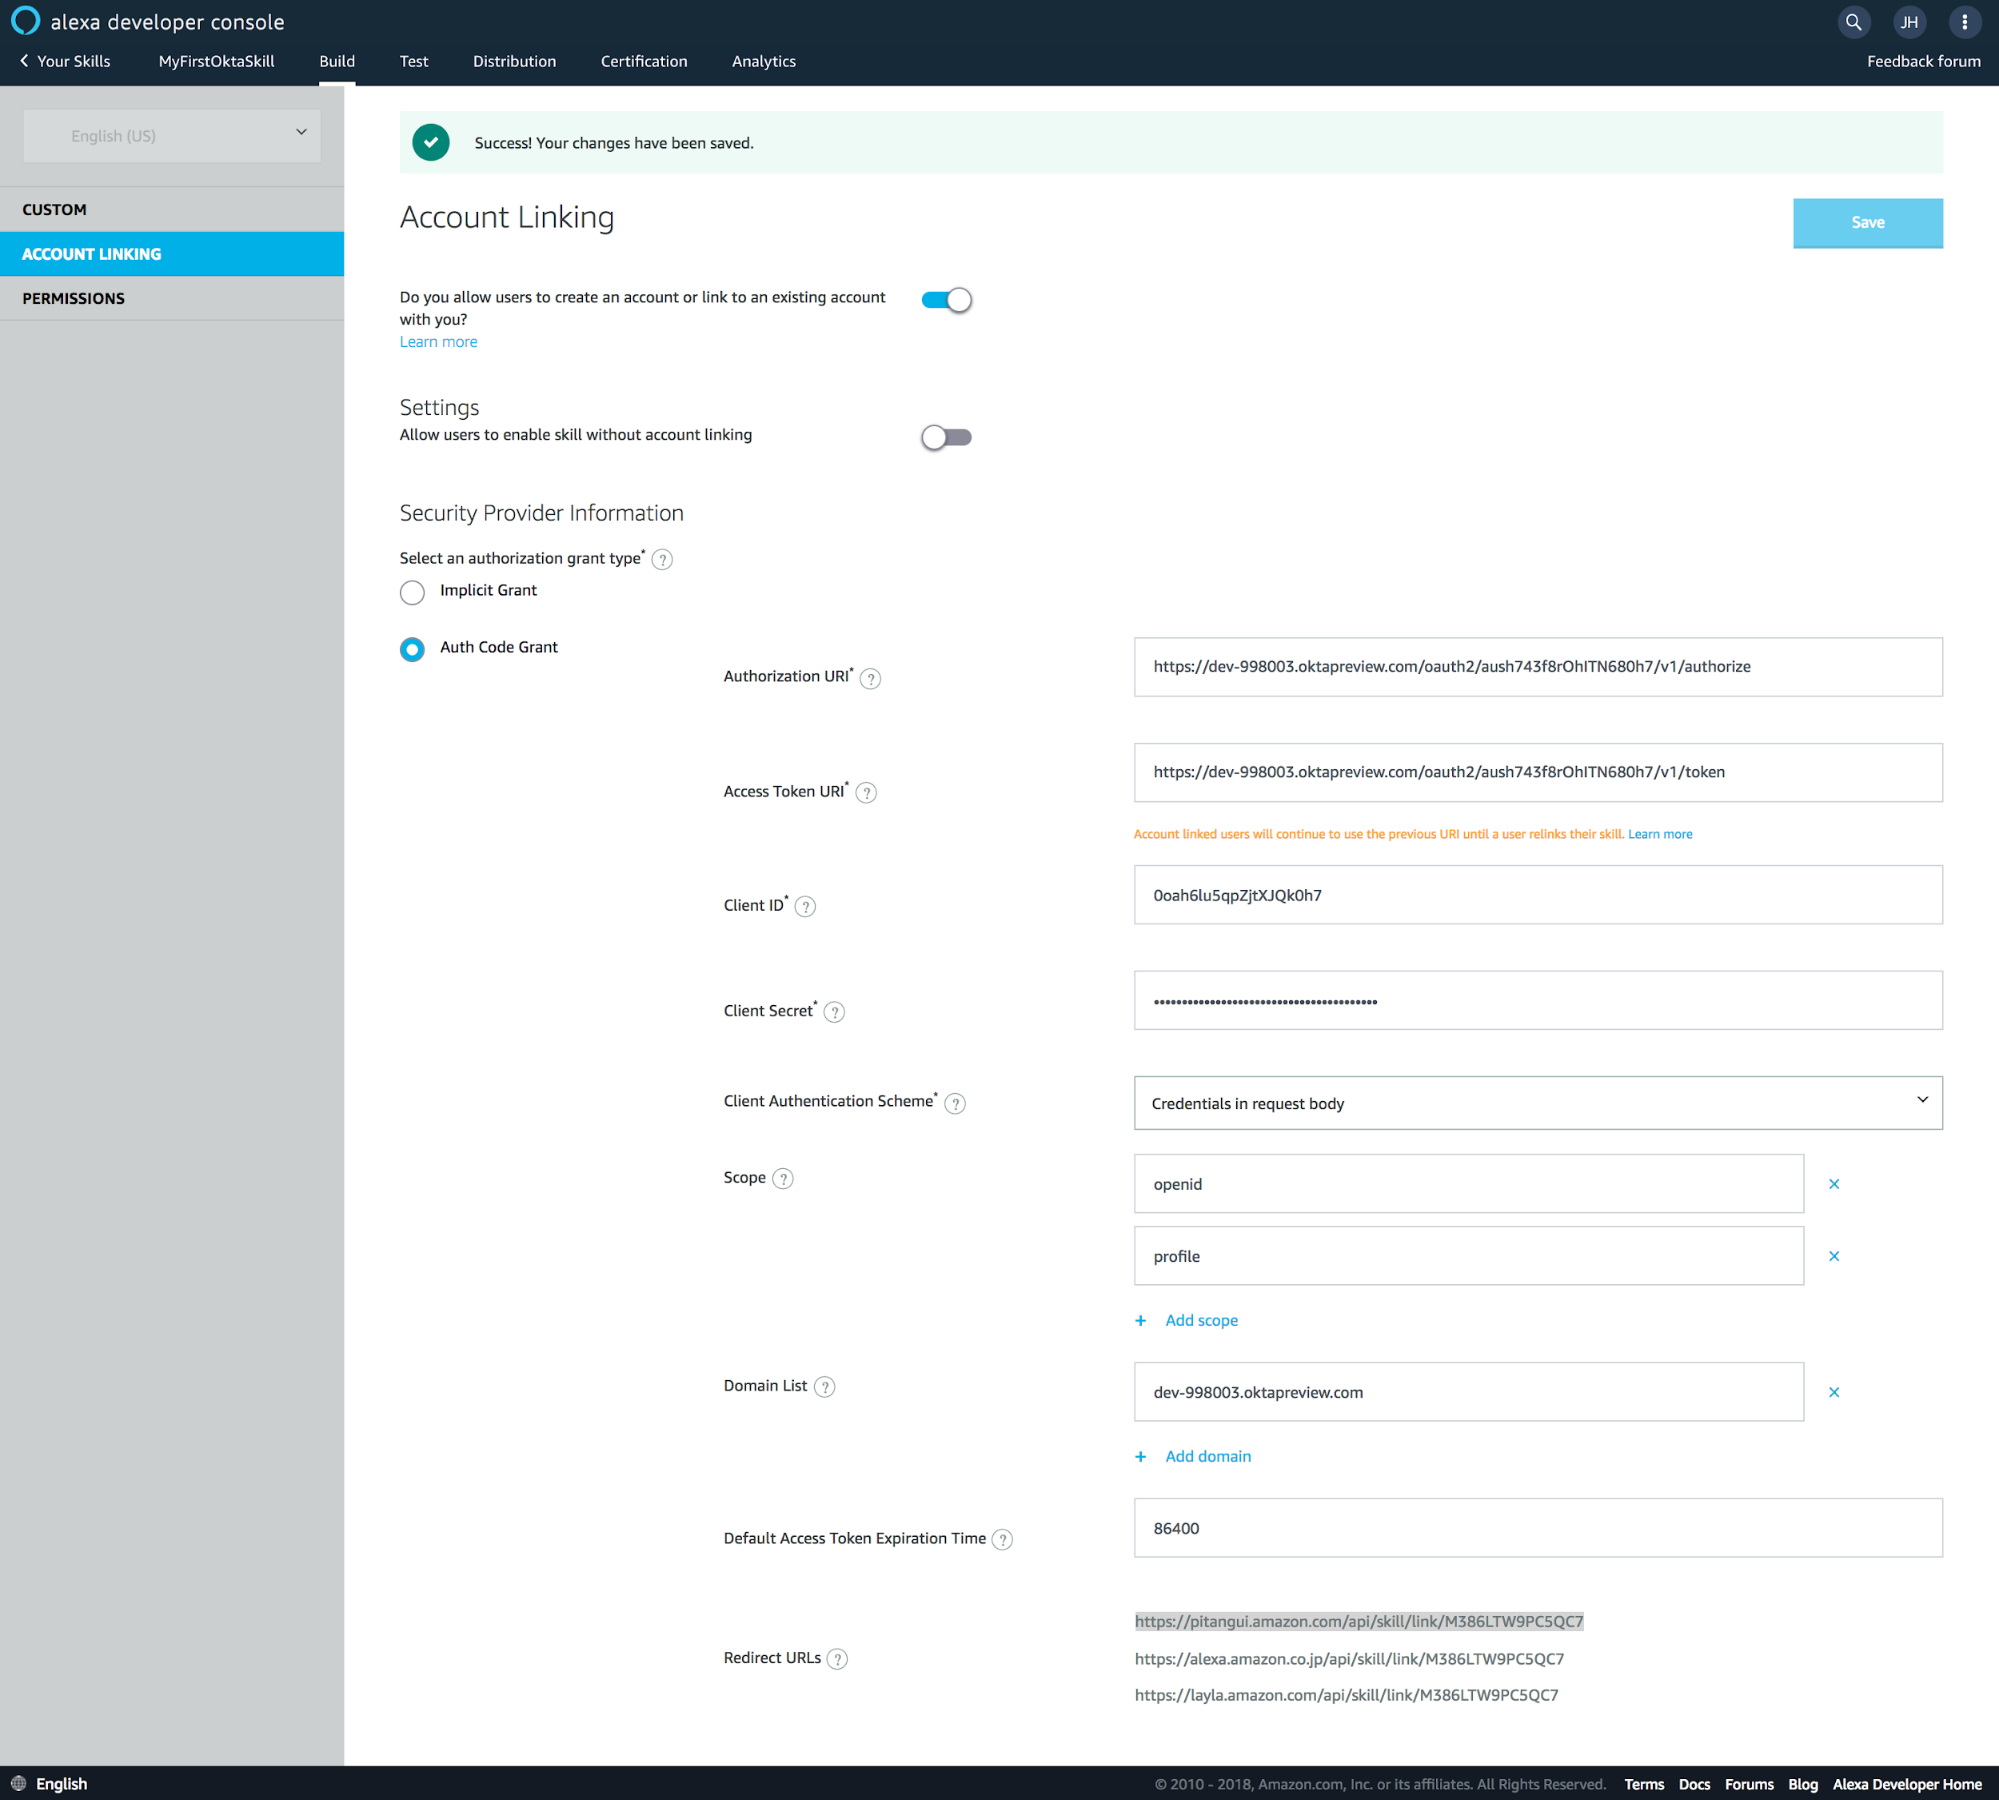
NOTE: You’ll need to select “Credentials in request body” for the Client Authentication Scheme dropdown field.
We also need to update our existing AWS Lambda code to use the access token generated by Okta. To do this, you can simply edit the existing code.
There are several ways to validate the access token generated by Okta. In this post, I’ll use the introspection API endpoint provided by Okta.
function validateAccessToken(token, callback) {
    console.log("token: ", token);
    //start
    var clientId = '**okta open id connect client id generated earlier**';
    var clientSecret = '**okta open id connect client secret generated earlier**';
    var auth = "Basic " + new Buffer(clientId + ":" + clientSecret).toString("base64");
    var https = require('https');
    var tokenParam = '?token=' + token;
    var tokenHintParam = '&token_type_hint=access_token';
    var tokenQuery = tokenParam + tokenHintParam;
    var optionspost = {
        host: '**your okta org**.oktapreview.com',
        port: 443,
        path: '/oauth2/**your authorization server id**/v1/introspect' + tokenQuery,
        method: 'POST',
        headers: {
            'Authorization': auth,
            'Accept': 'application/json',
            'Content-Type': 'application/x-www-form-urlencoded'
        }
    };
    console.log(optionspost);
    var jsonResponseUser;

    var firstName;
    var favoriteColor;
    console.log("pre Req Post");
    var jsonObject;
    var reqPost = https.request(optionspost, function(res) {
        console.log("statusCode: ", res.statusCode);
        // uncomment it for header details
        console.log("headers: ", res.headers);

        res.on('data', function(d) {
            console.info('POST result:\n');
            process.stdout.write(d);
            console.info('\n\nPOST completed');
            jsonResponseUser = JSON.parse(d);

            firstName = jsonResponseUser['FirstNameClaim'];
            favoriteColor = jsonResponseUser['FavoriteColorClaim'];
            let responseVoice = firstName + '\'s Favorite Color is ' + favoriteColor;
            console.log("responseVoice :" + responseVoice);
            callback(responseVoice);
        });
    });

    reqPost.end();
    reqPost.on('error', function(e) {
        console.error(e);
    });

}


const FavoriteColorHandler = {
    canHandle(handlerInput) {
        const request = handlerInput.requestEnvelope.request;
        return request.type === 'IntentRequest' &&
            request.intent.name === 'FavoriteColorIntent';

    },
    handle(handlerInput) {
        let favoriteColor = '';
        let request = handlerInput.requestEnvelope.request;
        console.log(handlerInput.requestEnvelope.context.System.user.accessToken);
        let token = handlerInput.requestEnvelope.context.System.user.accessToken;
        return new Promise((resolve) => {
            validateAccessToken(token, function(result) {
                // setTimeout(1000000000000);
                console.log("inside Opp Handler, responseVoice: " + result);
                resolve(handlerInput.responseBuilder.speak(result).getResponse());
            });
        });

    },
};
Test Your Secure Alexa Skill
To test this end to end, we just need to publish the skill in a contained user group and do the real testing with your own Alexa Voice command device.
You would need to go back to your Amazon Alexa developer page which will normally be https://developer.amazon.com/alexa/console/ask/build/<skill id>/developerment/en_US/dashboard. Click Distribution and fill in the details required.
Make sure you fill up all the required items. Privacy Policy URL is not marked as required but in order to publish your skill, Amazon Alexa requires some URL information placed in here hence make sure you provide a valid URL within the Privacy Policy URL field. Click Save and Continue. Complete the information required within the Privacy and Compliance page as well. Once done, click Save and Continue.
Under Availability Page, you will be able to add which users can test the newly created Alexa skill you just developed. Kindly add them and Amazon will send them an email which will allow them to activate the skill on their Alexa end user account. This step is optional if you just want to test your newly created skill first before you decide to publish it publicly in the Amazon Alexa Skills Store. Take note that Amazon has a verification process before your skill can publicly be accessible across the Alexa skill store.
You should receive an email like this and within the email, kindly click the link such that it can take you directly to the Alexa skill store page directed to your newly created custom skill.
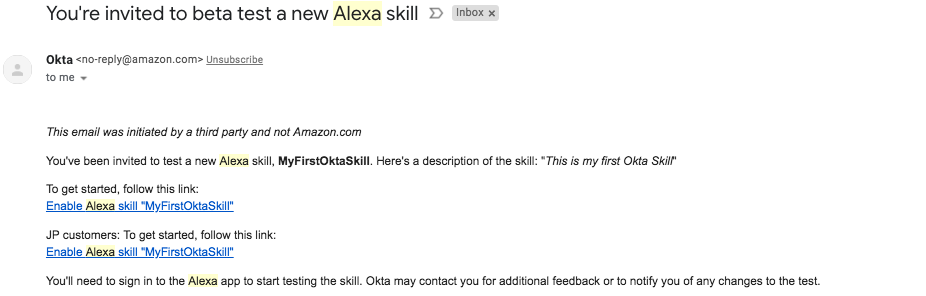
You will be taken to the Alexa End User Skill page if you are already authenticated. Click I Accept.
Note: If you don’t have any enrolled physical Alexa device to your Alexa Skill account, Amazon will most likely redirect you to the enrollment page of a new Alexa device. To bypass this page, you can either directly paste this URL:
https://alexa.amazon.com/spa/index.html#skills/your-skills/?ref-suffix=ysa_gwon your current browser and look for the newly created custom skill.
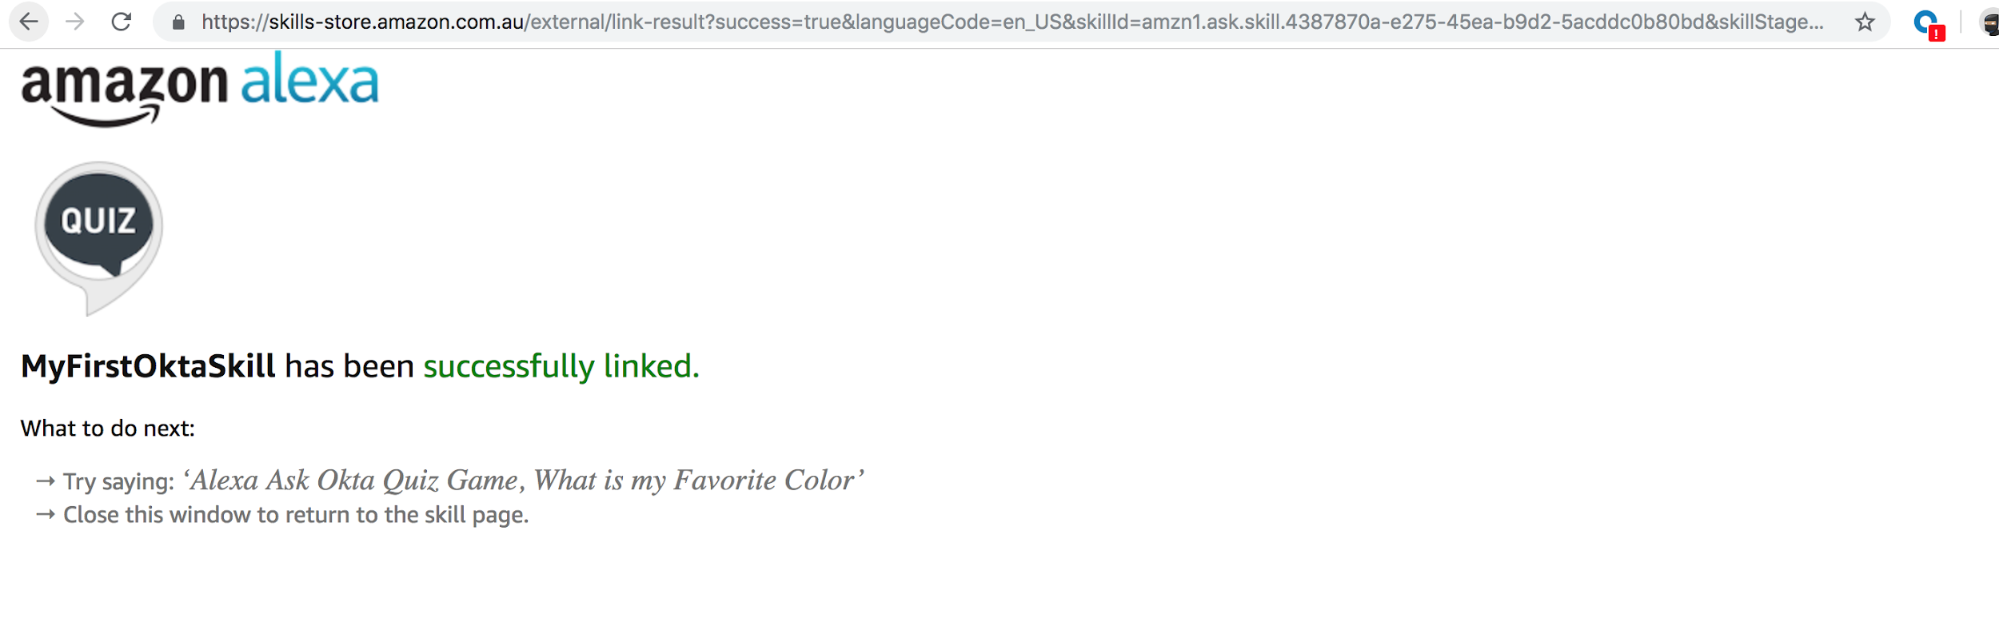
Click Settings in the upper right. Click Link Account.
If you haven’t authenticated with Okta yet, then you will be prompted to log in with your Okta credentials.
Once your authentication is successful, you should see a page saying your account has been successfully linked.
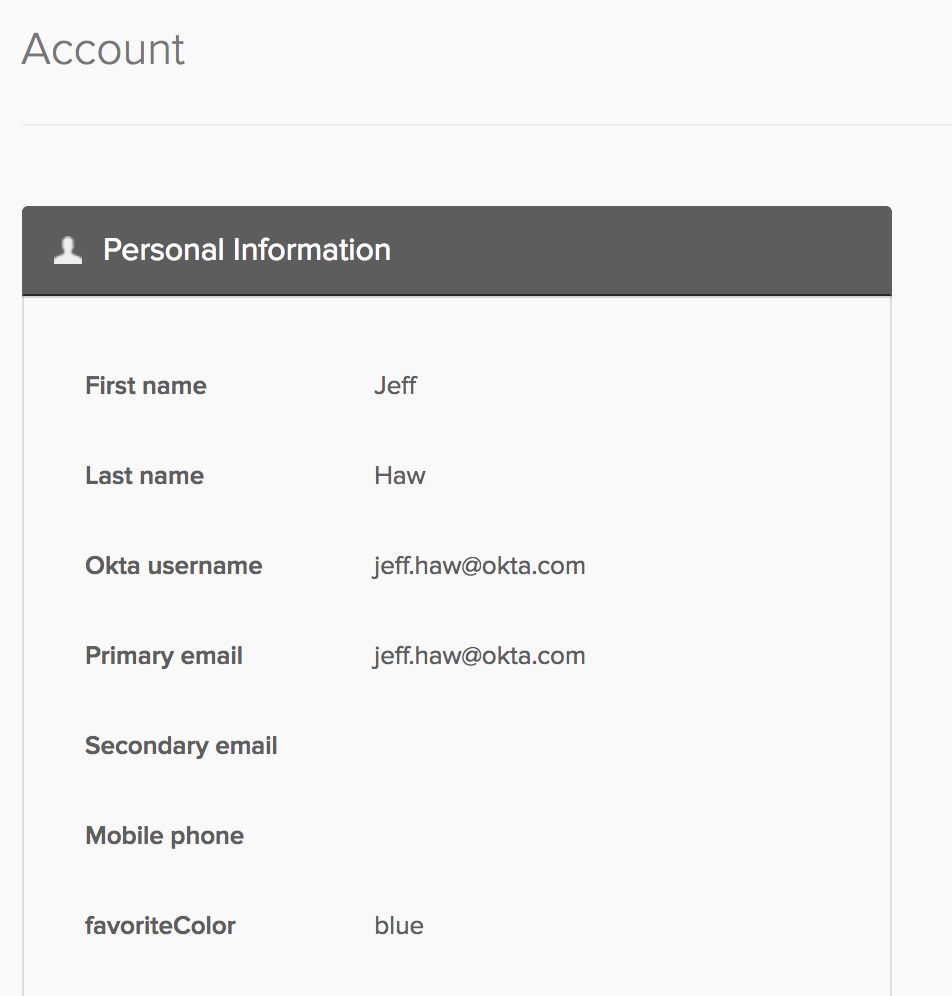
Make sure you already have a value set for your favorite color attribute within Okta.
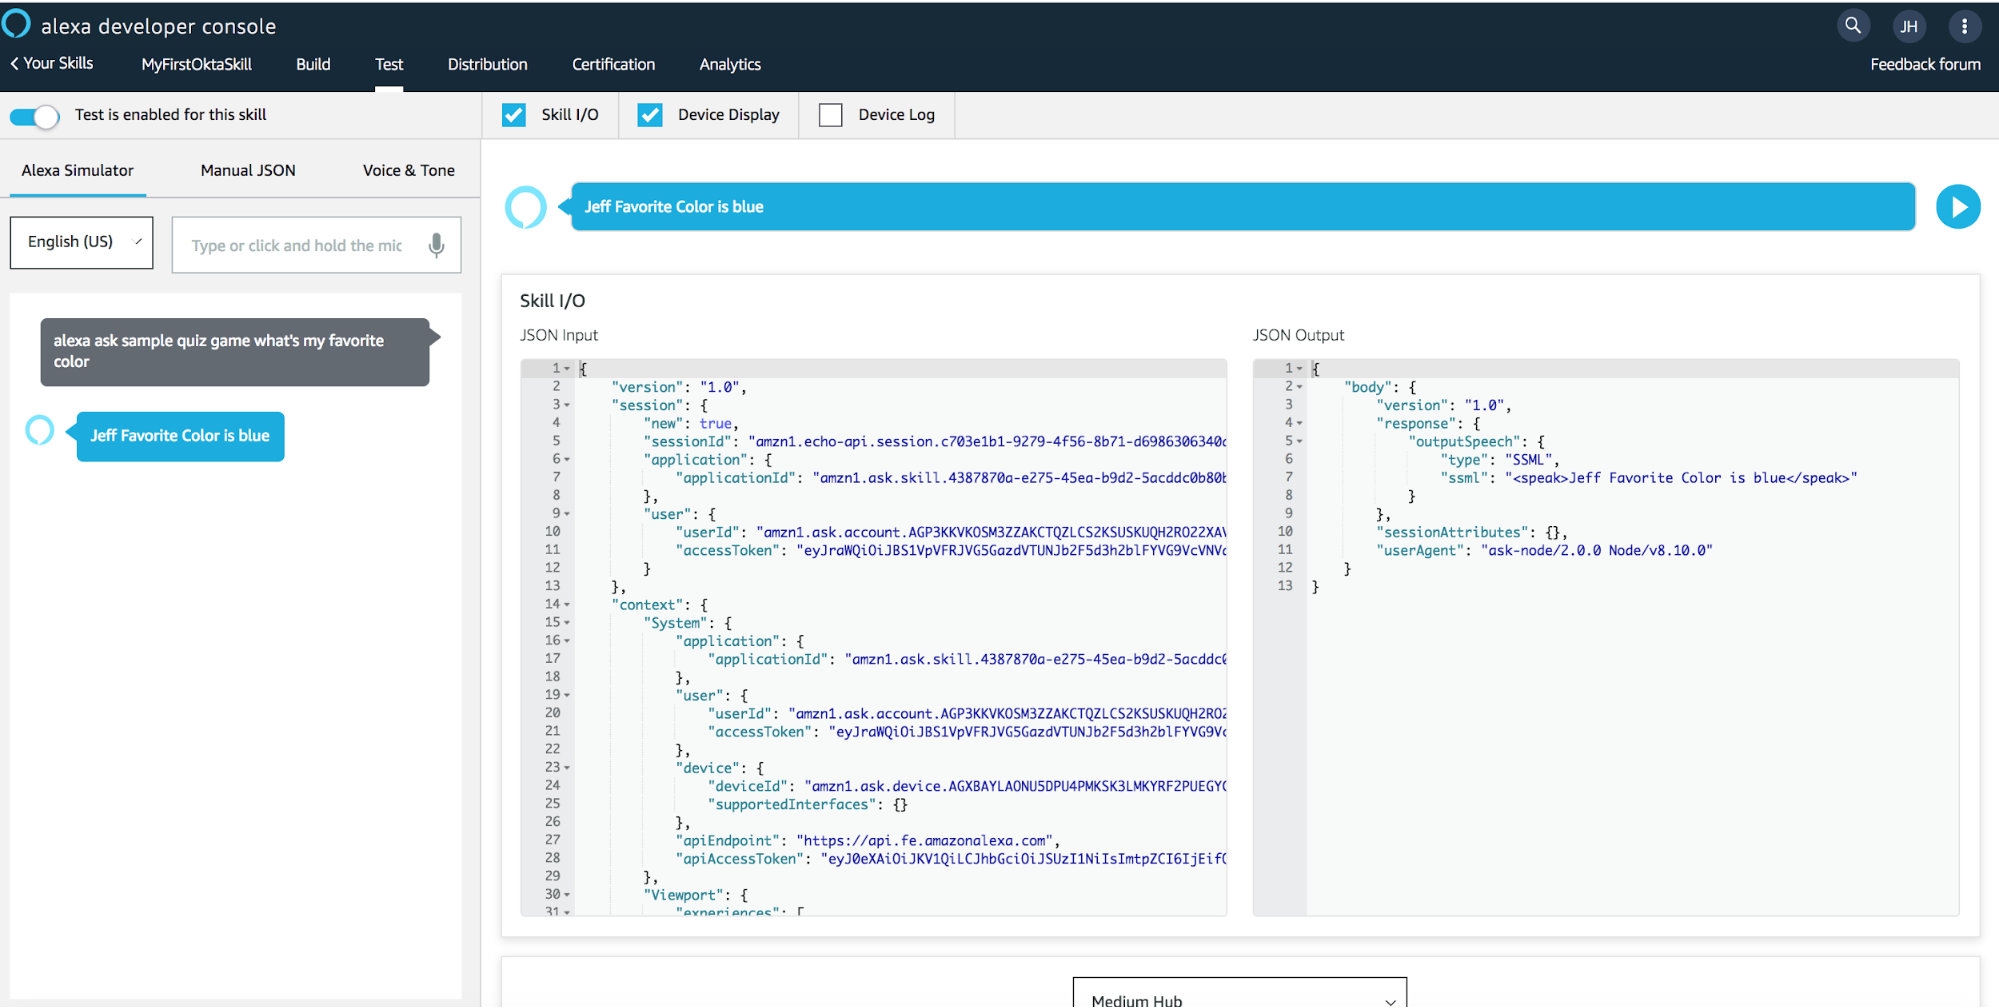
Go back to your Amazon Alexa Developer Console, navigate to Test then you can either say or type “Alexa ask sample quiz game what’s my favorite color”. See the results!
Video of actual live test here: https://okta.box.com/s/wly1fqje6oko0uagzt8hfj78p2tdn83z
To Infinity and Beyond
We can extend this use case further by adding transactional two factor or multifactor challenges on a user if you are dealing with transactional interactions (e.g.: buy, sell, trade, etc.)
An example would be like this flow:
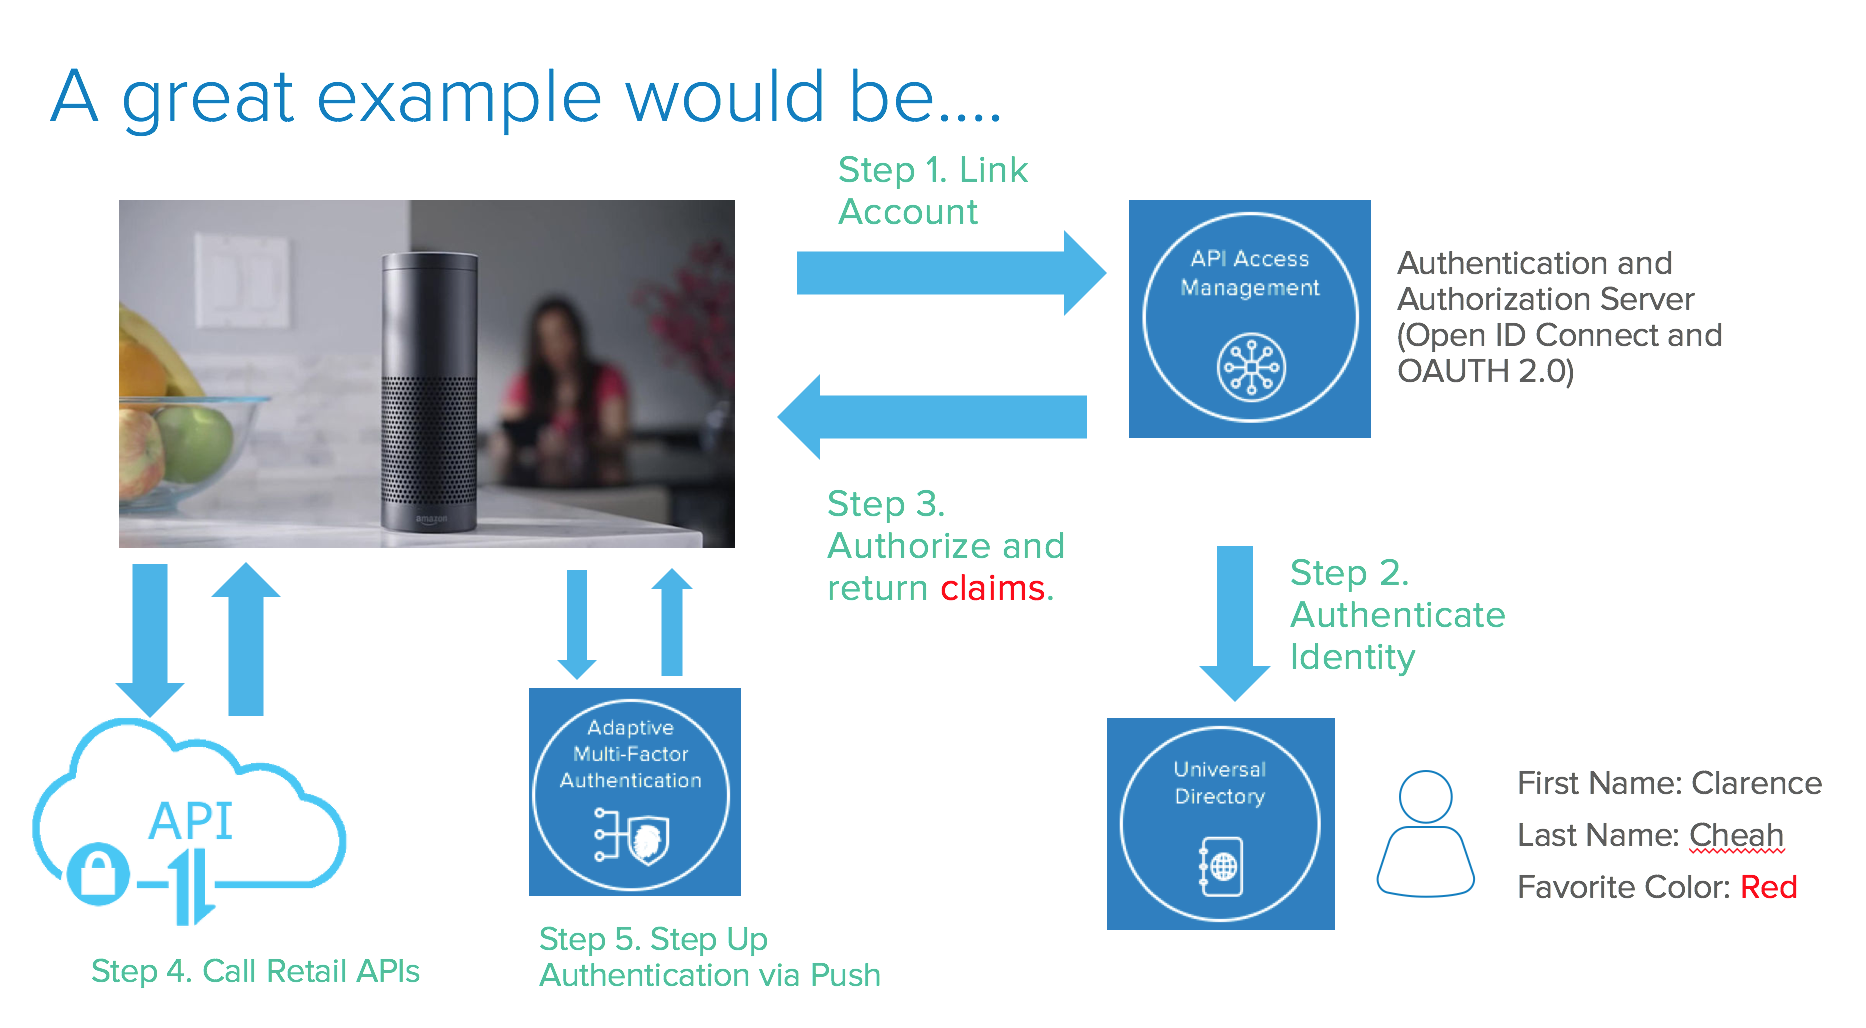
To do this, you would need additional components like an API gateway to orchestrate MFA Factor REST API calls within Okta. https://developer.okta.com/docs/api/resources/factors
Here is a live demo video on how this is done: https://okta.box.com/s/tkvzd0958pu2c290c9klgecedp6thsgf
If you want to know more about this complex use case, feel free to contact me: jefferson.haw@okta.com.
Okta Developer Blog Comment Policy
We welcome relevant and respectful comments. Off-topic comments may be removed.