Build Secure Agent-to-App Connections with Cross App Access (XAA) Using OIDC
So you want to get your AI agent in front of Okta customers or make your application securely accessible to agents — you’re in the right place. Here’s why it matters.
Secure access with enterprise IT oversight between independent applications that communicate with each other is a recognized gap in OAuth 2.0. Enterprises can’t effectively regulate cross-app communication, as OAuth 2.0 consent screens rely on users granting access to their individual accounts. Now, with the advent of AI agents that communicate across systems, the need to solve the gap is even greater – especially given the growing importance of enterprise AI security in protecting sensitive data flows.
What is Cross App Access (XAA)?
Cross App Access (XAA) is a new protocol that lets integrators enable secure agent-to-app and app-to-app access. Instead of scattered integrations and repeated logins, enterprise IT admins gain centralized control: they can decide what connects, enforce security policies, and see exactly what’s being accessed. This unlocks seamless, scalable integrations across apps — whether it’s just two like Google Calendar and Zoom, or hundreds across the enterprise. Read more about Cross App Access in this post:
Manage user and non-human identities, including AI in the enterprise with Cross App Access
Or watch the video about Cross App Access:
In this post, we’ll go hands-on with Cross App Access. Using Todo0 (the Resource App) and Agent0 (the Requesting App) as our sample applications, and Okta as the enterprise Identity Provider (IdP), we’ll show you how to set up trust, exchange tokens, and enable secure API calls between apps that enable enterprise IT oversight. By the end, you’ll not only understand how the protocol works but also have a working example you can adapt to your own integrations.
Prerequisites to set up the AI agent to app connections using Cross App Access (XAA)
To set up secure agent-to-app connections with Cross App Access (XAA), you’ll need the following:
- Okta Developer Account (Integrator Free Plan): You’ll need an Okta Developer Account with the Integrator Free Plan. This account will act as your Identity Provider (IdP) for setting up Cross App Access.
- If you don’t already have an account, sign up for a new one here: Okta Integrator Free Plan
- Once created, sign in to your new org
- AWS Credentials: You’ll need an AWS Access Key ID and AWS Secret Access Key
- The IAM user or role associated with these credentials must have access to Amazon Bedrock, specifically the Claude 3.7 Sonnet model, enabled
- If you don’t know how to obtain the credentials, follow this guide
- Developer Tools: These tools are essential for cloning, editing, building, and running your demo applications
- Git – to clone and manage the repository
- VS Code – for reading and modifying the sample source code
- Dev Containers Extension (VS Code) – recommended, as it automatically configures dependencies and environments when you open the project
- Docker – required by the Dev Container to build and run the sample applications in isolated environments
Table of Contents
- What is Cross App Access (XAA)?
- Prerequisites to set up the AI agent to app connections using Cross App Access (XAA)
- Use Okta to secure AI applications with OAuth 2.0 and OpenID Connect (OIDC)
- Set up a test user in Okta org
- Configure the Node.js Cross App Access project
- Configure OAuth 2.0 and AI foundation models environment files
- Initialize the database and run the project
- Testing the XAA flow: From Bob to Agent0 to Todo0
- Behind the scenes: the OAuth 2.0 Identity Assertion Authorization Grant
- Need help setting up secure cross-domain enterprise agentic application access?
- Learn more about Cross App Access, OAuth 2.0, and securing your applications
Use Okta to secure AI applications with OAuth 2.0 and OpenID Connect (OIDC)
Before we dive into the code, we need to register our apps with Okta. In this demo:
- Agent0: the agentic requesting app (makes the API call on behalf of the user)
- Todo0: the resource app (owns the protected API)
- Managed connection: the trust relationship between the two apps, created in Okta
We’ll create both apps in your Okta Integrator Free Plan account, grab their client credentials, and then connect them.
Enable Cross App Access in your Okta org
⚠️ Note: Cross App Access is currently an Early Access (EA) feature. This guide covers the OIDC integration path and applies whether you’re building a new OIDC-based application or adding XAA support to an existing one — as a resource app, a requesting app, or both.
To get Cross App Access EA enabled for your org:
- If you’re an Okta customer: reach out to the customer support team
- If you’re an ISV or hold a developer integrator org: reach out to developers@okta.com
Create the resource app (Todo0)
- In the Okta Admin console, navigate to Applications > Applications
- Select Browse App Catalog
- Search for XAA Resource App, and select it
- Select Add Integration
- Enter “Todo0” in the Application label field
- In the Issuer URL field, enter
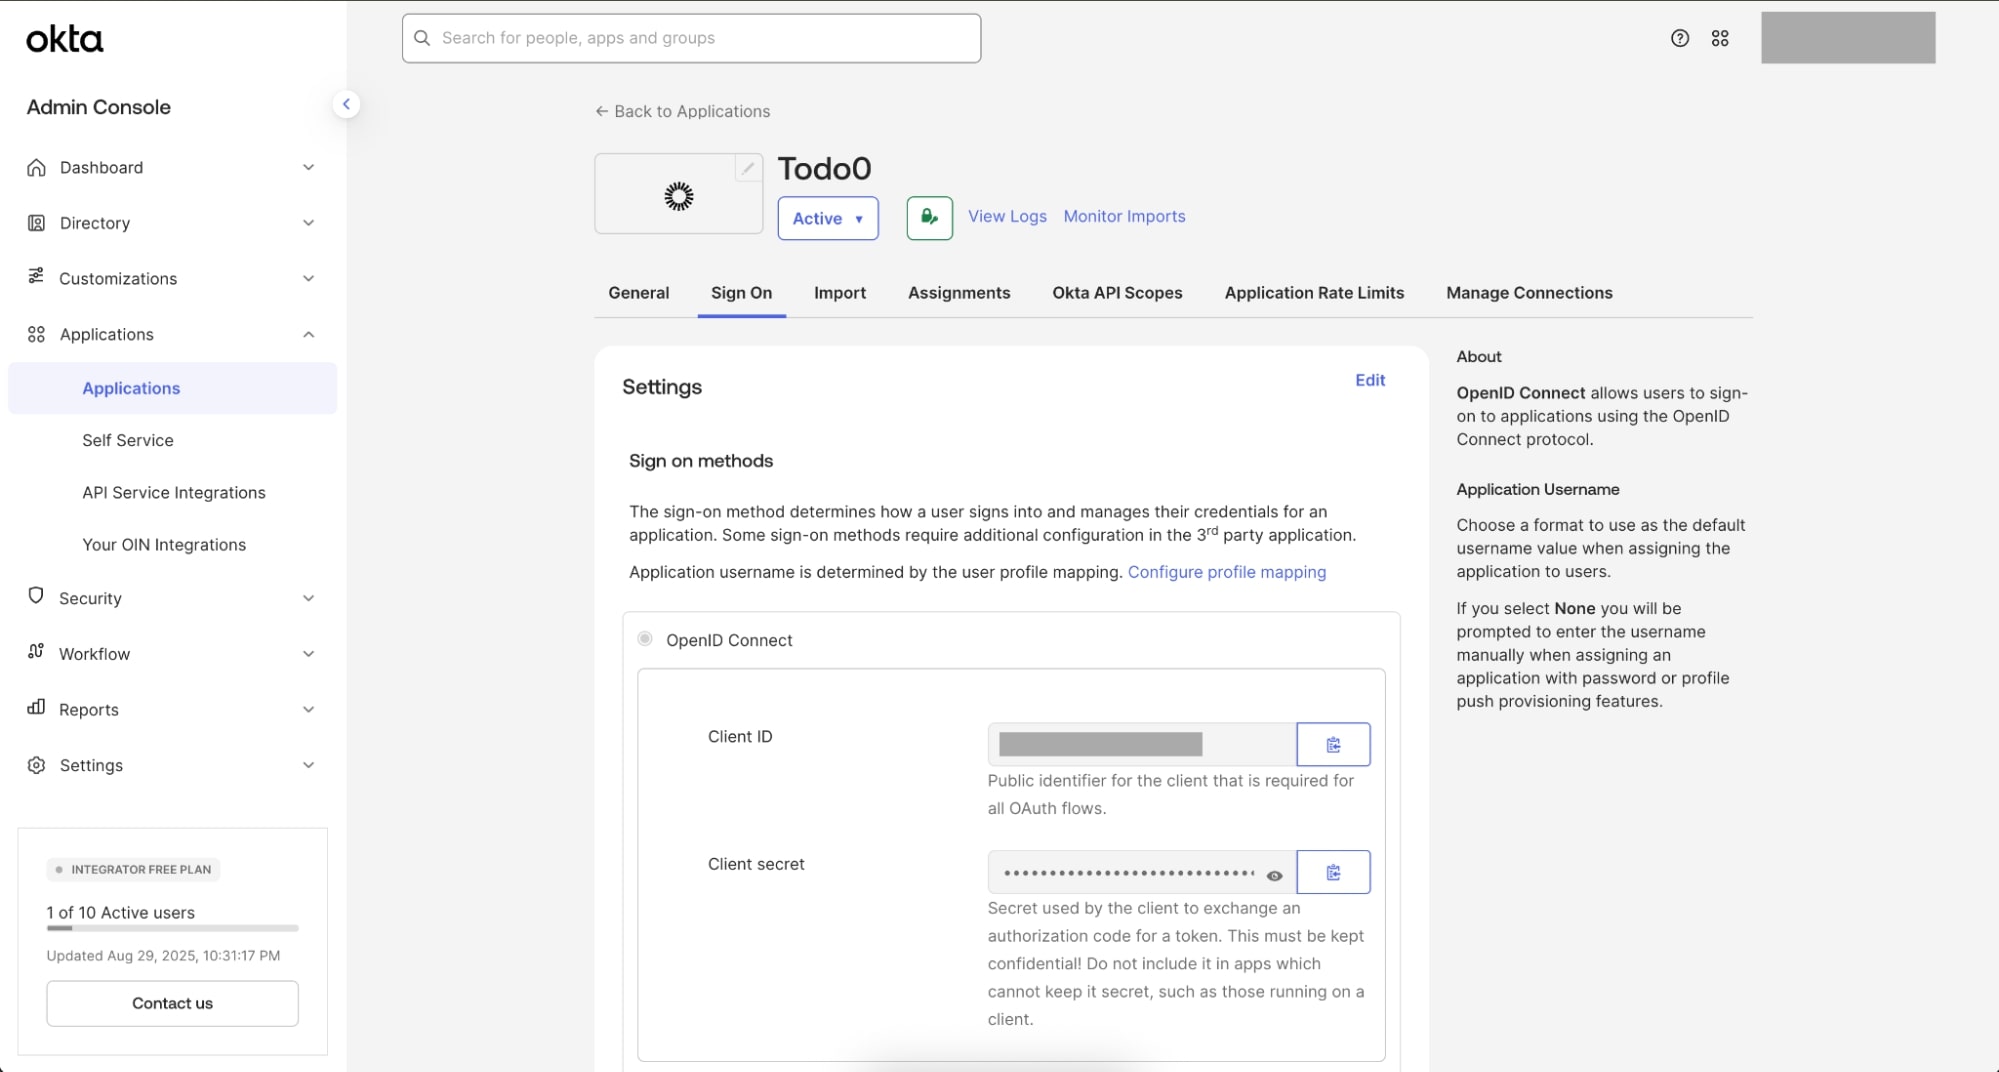
http://localhost:5001(Todo0’s Resource Authorization Server URL), then click Done - Click the Sign On tab to view the Client ID and Client secret. These are required to include in your
.env.todo
Create the requesting app (Agent0)
- Go back to Applications > Applications
- Select Browse App Catalog
- Search for XAA Requesting App, and select it
- Select Add Integration
- Enter Agent0 in the Application label field
- In the Issuer URL field, enter
http://localhost:5001(Todo0’s Resource Authorization Server URL) - In the Client ID field, enter
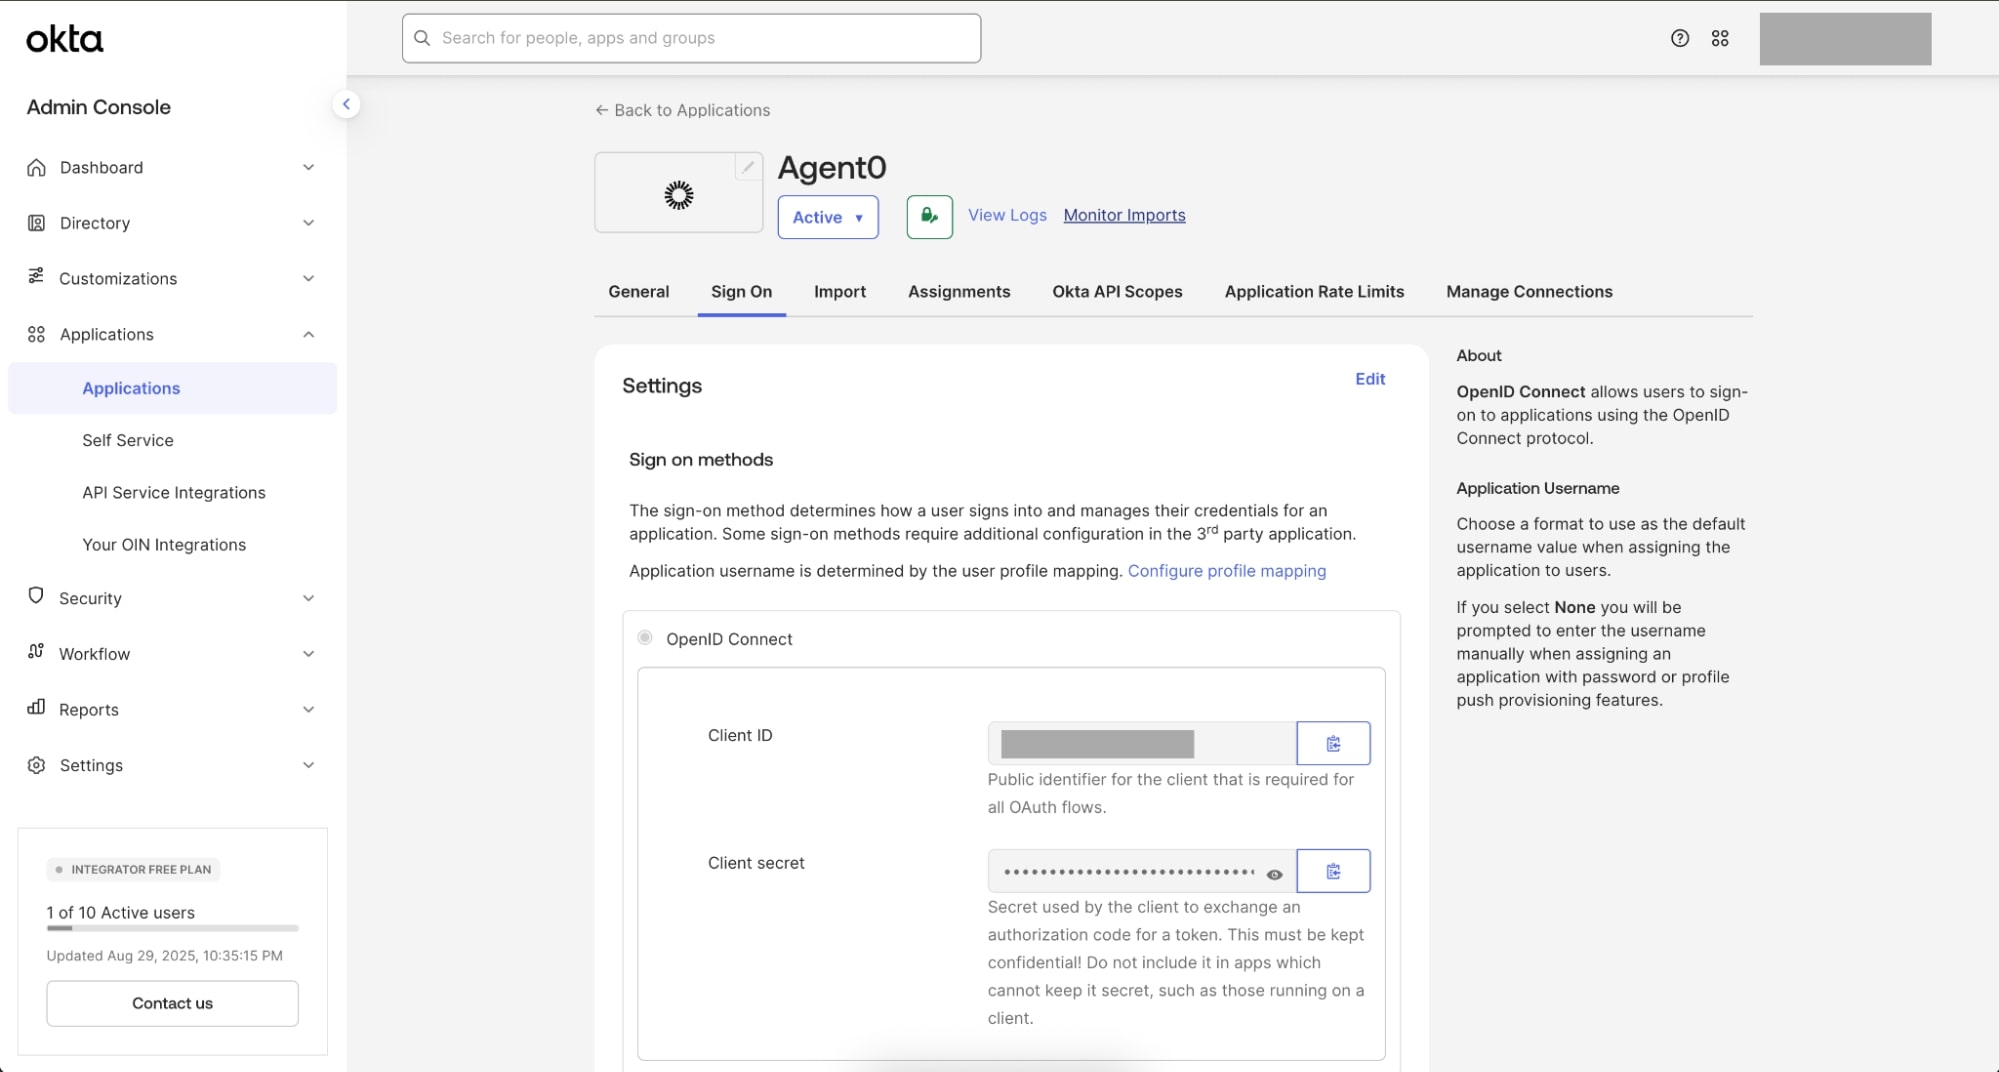
agent0-at-todo0(Requesting App’s Client ID in Resource Authorization Server), then click Done - Click the Sign On tab to view the Client ID and Client secret. These are required to be included in your
.env.agent
Establishing connections between Todo0 & Agent0
- From the Applications page, select the Agent0 app
- Go to the Manage Connections tab
- Under App granted consent, select Add requesting apps, select Todo0, then Save
- Under Apps providing consent, select Add resource apps, select Todo0, then Save
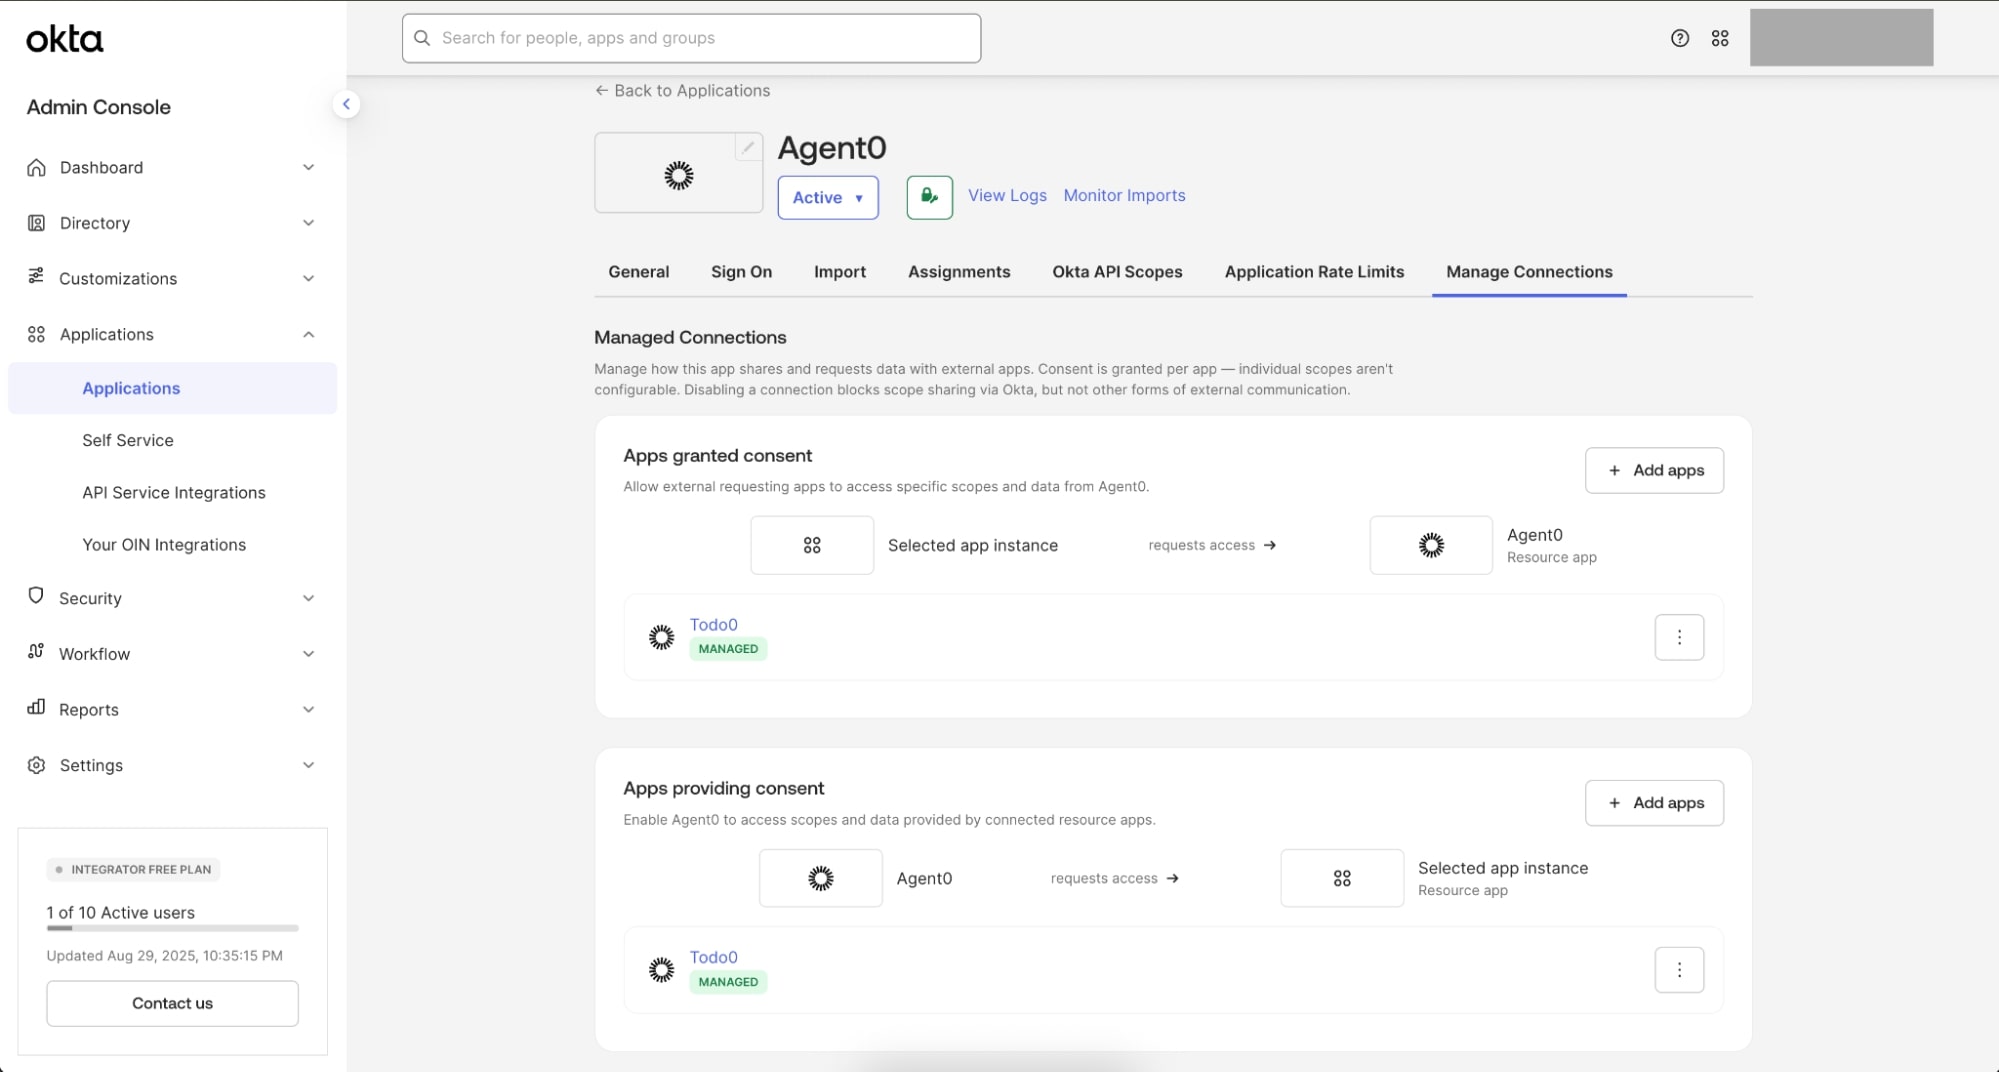
Now Agent0 and Todo0 are connected and Agent0’s AI Agent can access Todo0’s resources. If you check the Manage Connection tab for either app, you’ll see that the connection has been established.
Set up a test user in Okta org
Now that the apps are in place, we need a test user who will sign in and trigger the Cross App Access flow.
Create the test user
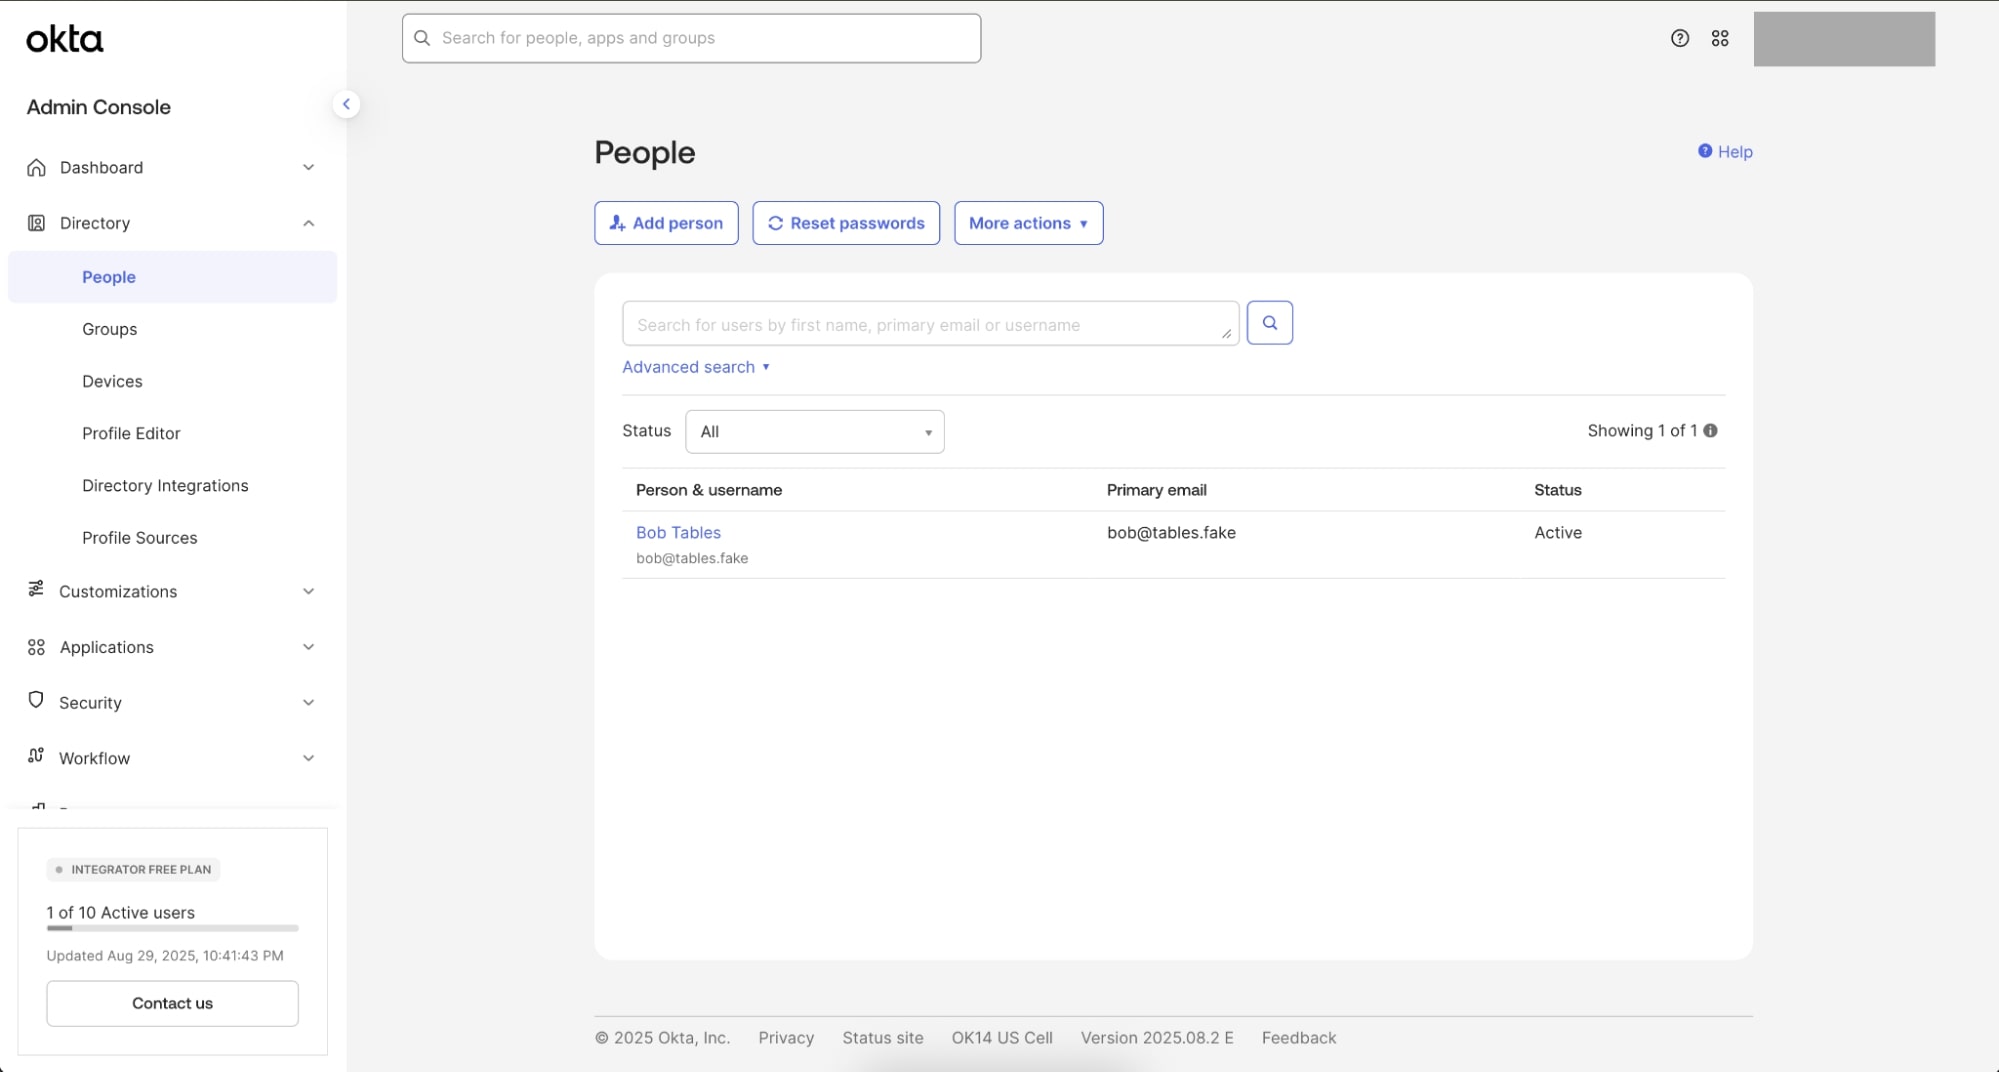
- In the Okta Admin Console, go to Directory > People
- Select Add Person
- Fill in the details:
- First name: Bob
- Last name: Tables
- Username / Email:
bob@tables.fake
- Under Activations, select Activate now, mark ☑️ I will set password, and create a temporary password
- Optional: You can mark ☑️ User must change password on first login
- Select Save (If you don’t see the new user right away, refresh the page)
Assign the Okta applications to the test user
- Open the Bob Tables user profile
- Select Assign Applications
- Assign both Agent0 (requesting app) and Todo0 (resource app) to Bob
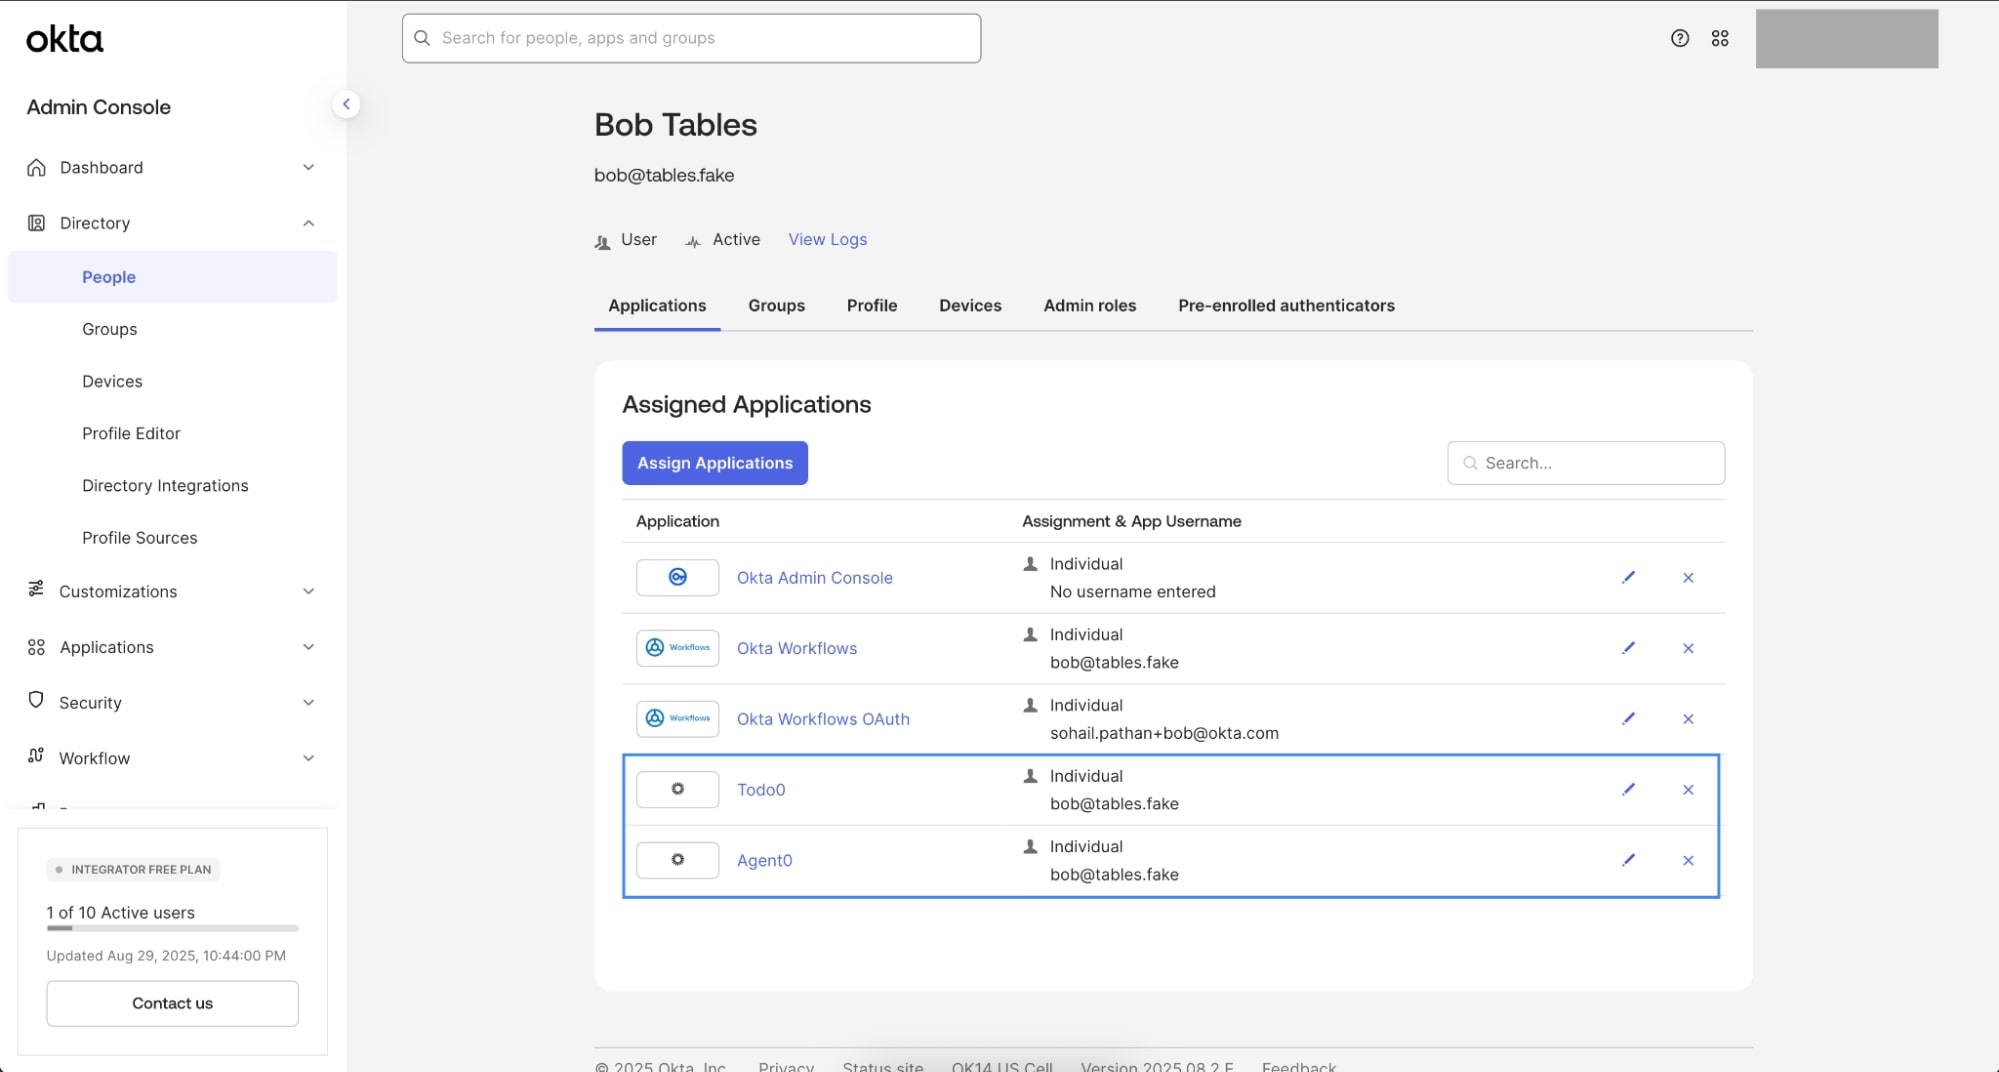
This ensures Bob can sign in to Agent0, and Agent0 can securely request access to Todo0 on his behalf.
⚠️ Note: Bob will be the identity we use throughout this guide to demonstrate how Agent0 accesses Todo0’s API through Cross App Access.
Configure the Node.js Cross App Access project
With your Okta environment (apps and user) ready, let’s set up the local project. Before we dive into configs, here’s a quick look at what you’ll be working with.
-
Clone the repository:
git clone https://github.com/oktadev/okta-cross-app-access-mcp -
Change into the project directory:
cd okta-cross-app-access-mcp -
Open VS Code Command Palette and run “Dev Containers: Open Folder in Container”
To open Command Palette, select View > Command Palette…, MacOS keyboard shortcutCmd+Shift+P, or Windows keyboard shortcutCtrl+Shift+P
⚠️ Note: This sets up all dependencies, including Node, Redis, Prisma ORM, and Yarn.
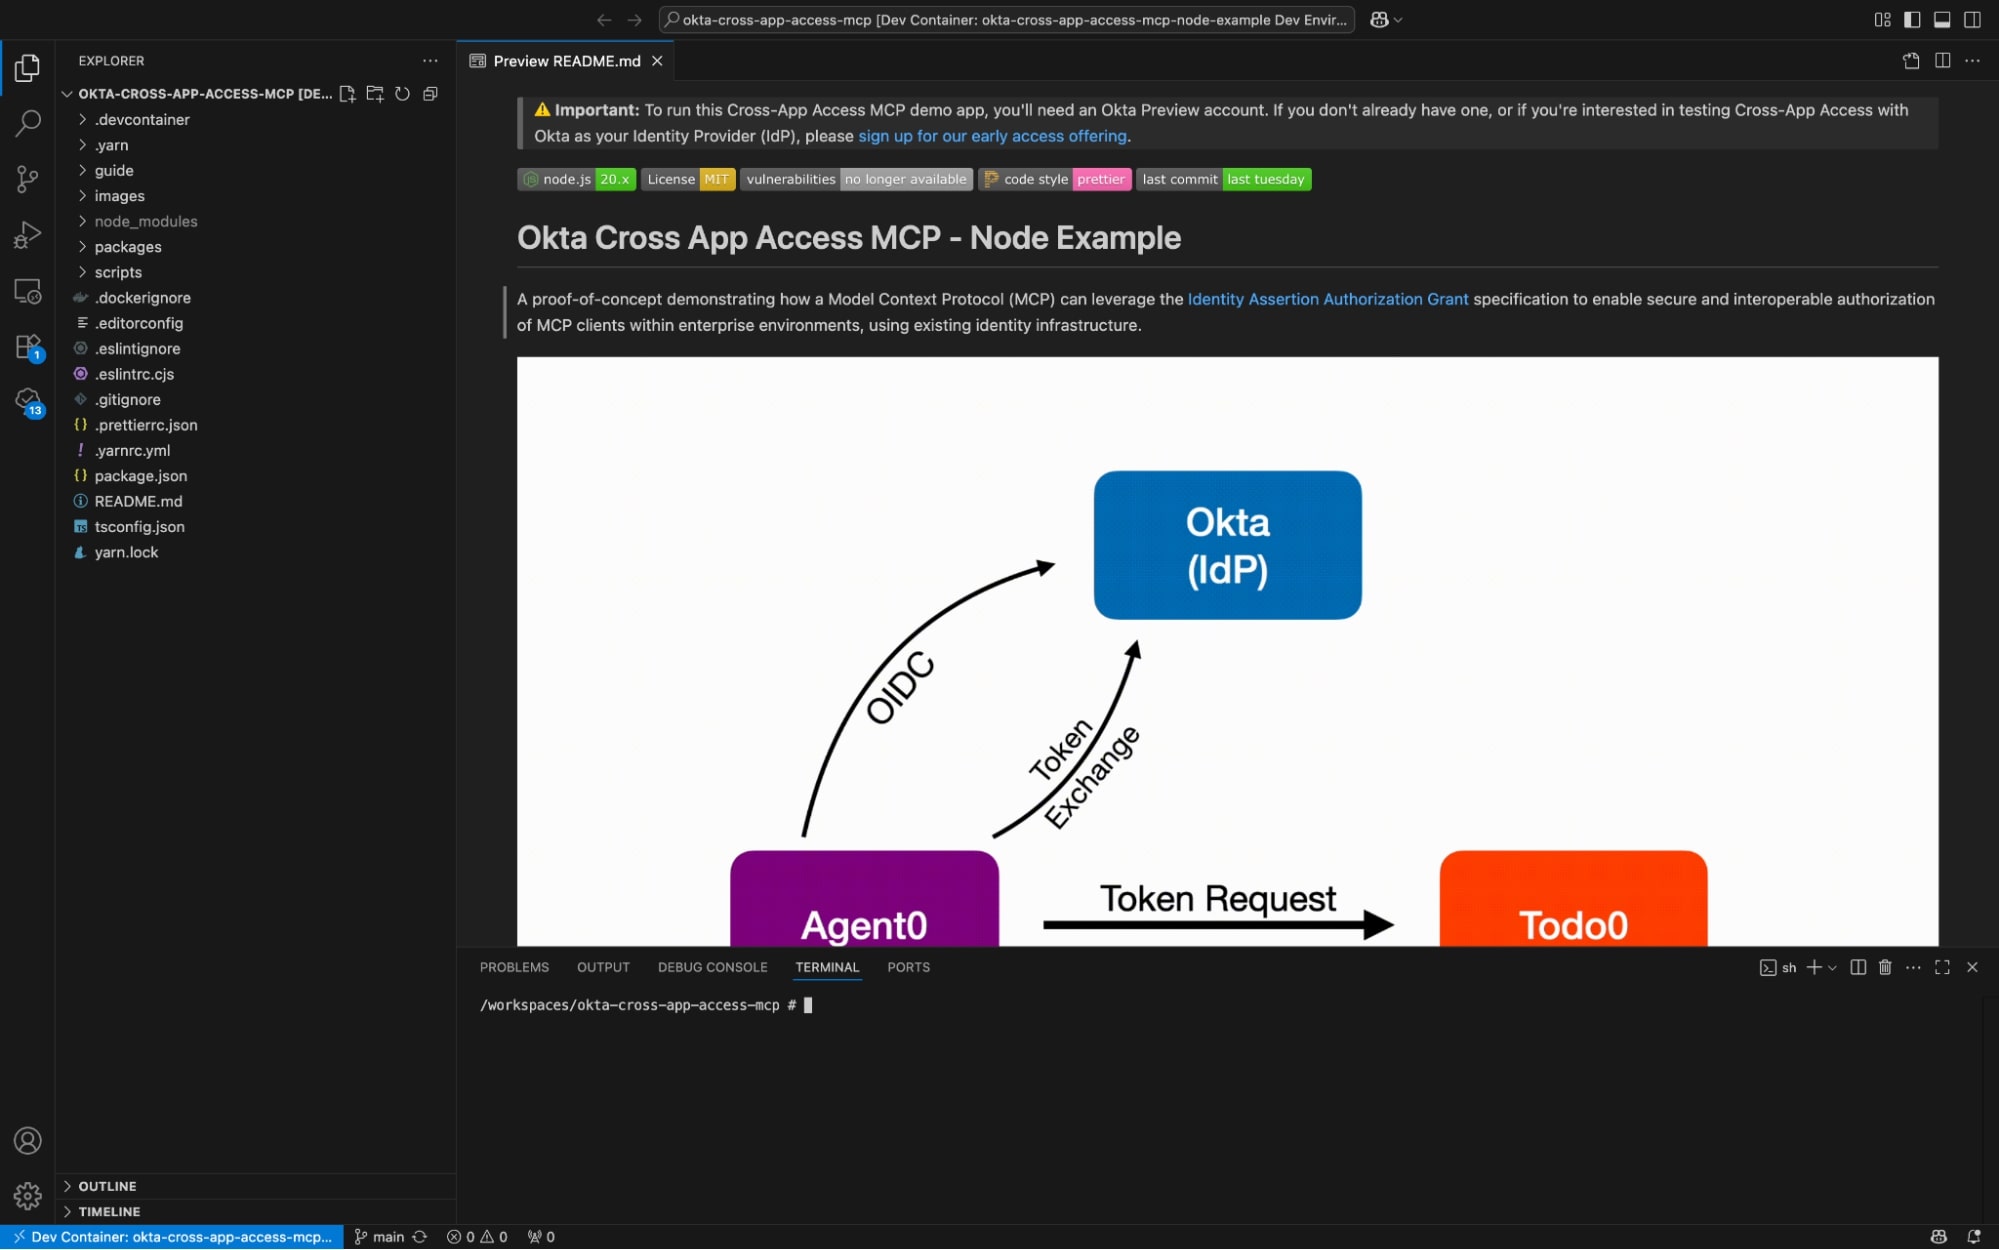
The Cross App Access MCP project at a glance
okta-cross-app-access-mcp/
├─ packages/
│  ├─ agent0/               # Requesting app (UI + service) – runs on :3000
│  │  └─ .env               # Agent0 env (AWS creds)
│  ├─ todo0/                # Resource app (API/UI) – runs on :3001
│  ├─ authorization-server/ # Local auth server for ID-JAG + token exchange
│  │  └─ .env.agent         # IdP creds (Agent0 side)
│  │  └─ .env.todo          # IdP creds (Todo0 side)
│  ├─ id-assert-authz-grant-client/ # Implements Identity Assertion Authorization Grant client logic
├─ .devcontainer/           # VS Code Dev Containers setup
├─ guide/                   # Docs used by the README
├─ images/                  # Diagrams/screens used in README
├─ scripts/                 # Helper scripts
├─ package.json
└─ tsconfig.json
Configure OAuth 2.0 and AI foundation models environment files
At this point, you have:
- Client IDs and Client Secrets for both Agent0 and Todo0 (from the Okta Admin Console)
-
Your Okta org URL, visible in the Okta Admin Console profile menu of the Admin Console. It usually looks like
https://integrator-123456.okta.com
This URL will be your IdP issuer URL and is shared across both apps.
Generate OIDC configuration and access token files
From the project root, run:
yarn setup:env
This scaffolds the following files:
packages/authorization-server/.env.todopackages/authorization-server/.env.agentpackages/agent0/.env
Configure application connection values
Open each file and update the placeholder with your org-specific values:
authorization-server/.env.todo
CUSTOMER1_EMAIL_DOMAIN=tables.fake
CUSTOMER1_AUTH_ISSUER=<Your integrator account URL>
CUSTOMER1_CLIENT_ID=<Todo0 client id>
CUSTOMER1_CLIENT_SECRET=<Todo0 client secret>
authorization-server/.env.agent
CUSTOMER1_EMAIL_DOMAIN=tables.fake
CUSTOMER1_AUTH_ISSUER=<Your integrator account URL>
CUSTOMER1_CLIENT_ID=<Agent0 client id>
CUSTOMER1_CLIENT_SECRET=<Agent0 client secret>
agent0/.env
AWS_ACCESS_KEY_ID=<your AWS access key id>
AWS_SECRET_ACCESS_KEY=<your AWS secret access key>
⚠️ Note:
- The issuer URL (
CUSTOMER1_AUTH_ISSUER) is the same in both.env.todoand.env.agent- The Client ID/Client secret values differ because they come from the respective apps you created
- AWS credentials are required only for Agent0 (requesting app)
Register OAuth 2.0 redirect URIs for both apps
Finally, we need to tell Okta where to send the authentication response for each app.
For Agent0:
- From your Okta Admin Console, navigate to Applications > Applications
- Open the Agent0 app
- Navigate to the Sign On tab
- In the Settings section, select Edit
-
In the Redirect URIs field, add
http://localhost:5000/openid/callback/customer1 - Select Save
Repeat the same steps for Todo0:
- Open the Todo0 app
- Go to the Sign On tab > Settings > Edit
-
In the Redirect URIs field, add:
http://localhost:5001/openid/callback/customer1 - Select Save
Now both apps know where to redirect after authentication.
Initialize the database and run the project
With the apps and environment configuration in place, the next step is to prepare the local project, set up its databases, and bring both applications online.
Bootstrap the project
From the root of the repo, install all workspaces and initialize the databases:
yarn bootstrap
Since this is your first run, you’ll be asked whether to reset the database. Type “y” for both Todo0 and Agent0.
Run and access the apps in your browser
Once the bootstrap is complete, start both apps (and their authorization servers) with:
yarn start
Open the following ports in your Chrome browser’s tab:
- Todo0 (Resource App): http://localhost:3001
- Agent0 (Requesting App): http://localhost:3000
At this point, both apps should be live and connected through Okta. 🎉
Testing the XAA flow: From Bob to Agent0 to Todo0
With everything configured, it’s time to see Cross App Access in action.
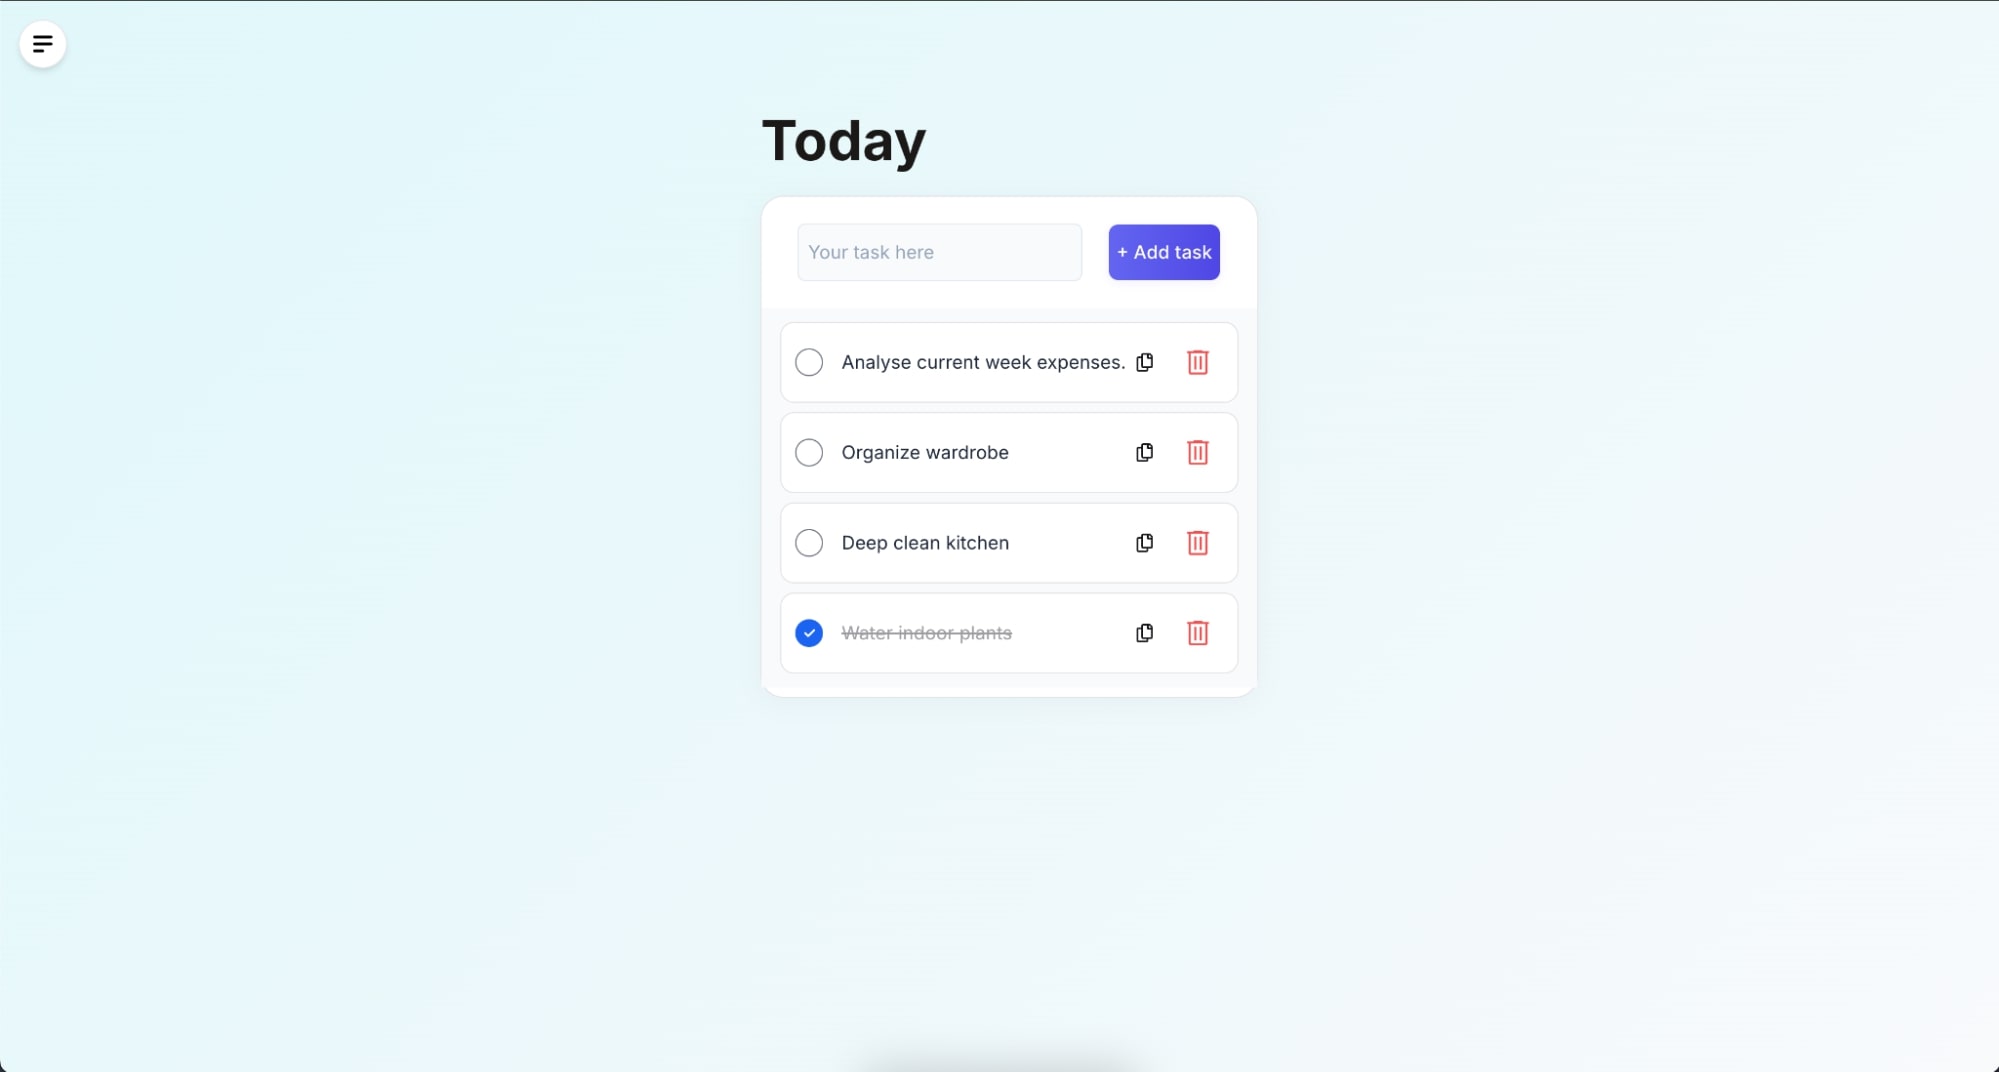
Interact with Todo0, the XAA resource app, by creating tasks
- In the Work Email field, enter:
bob@tables.fake, and select Continue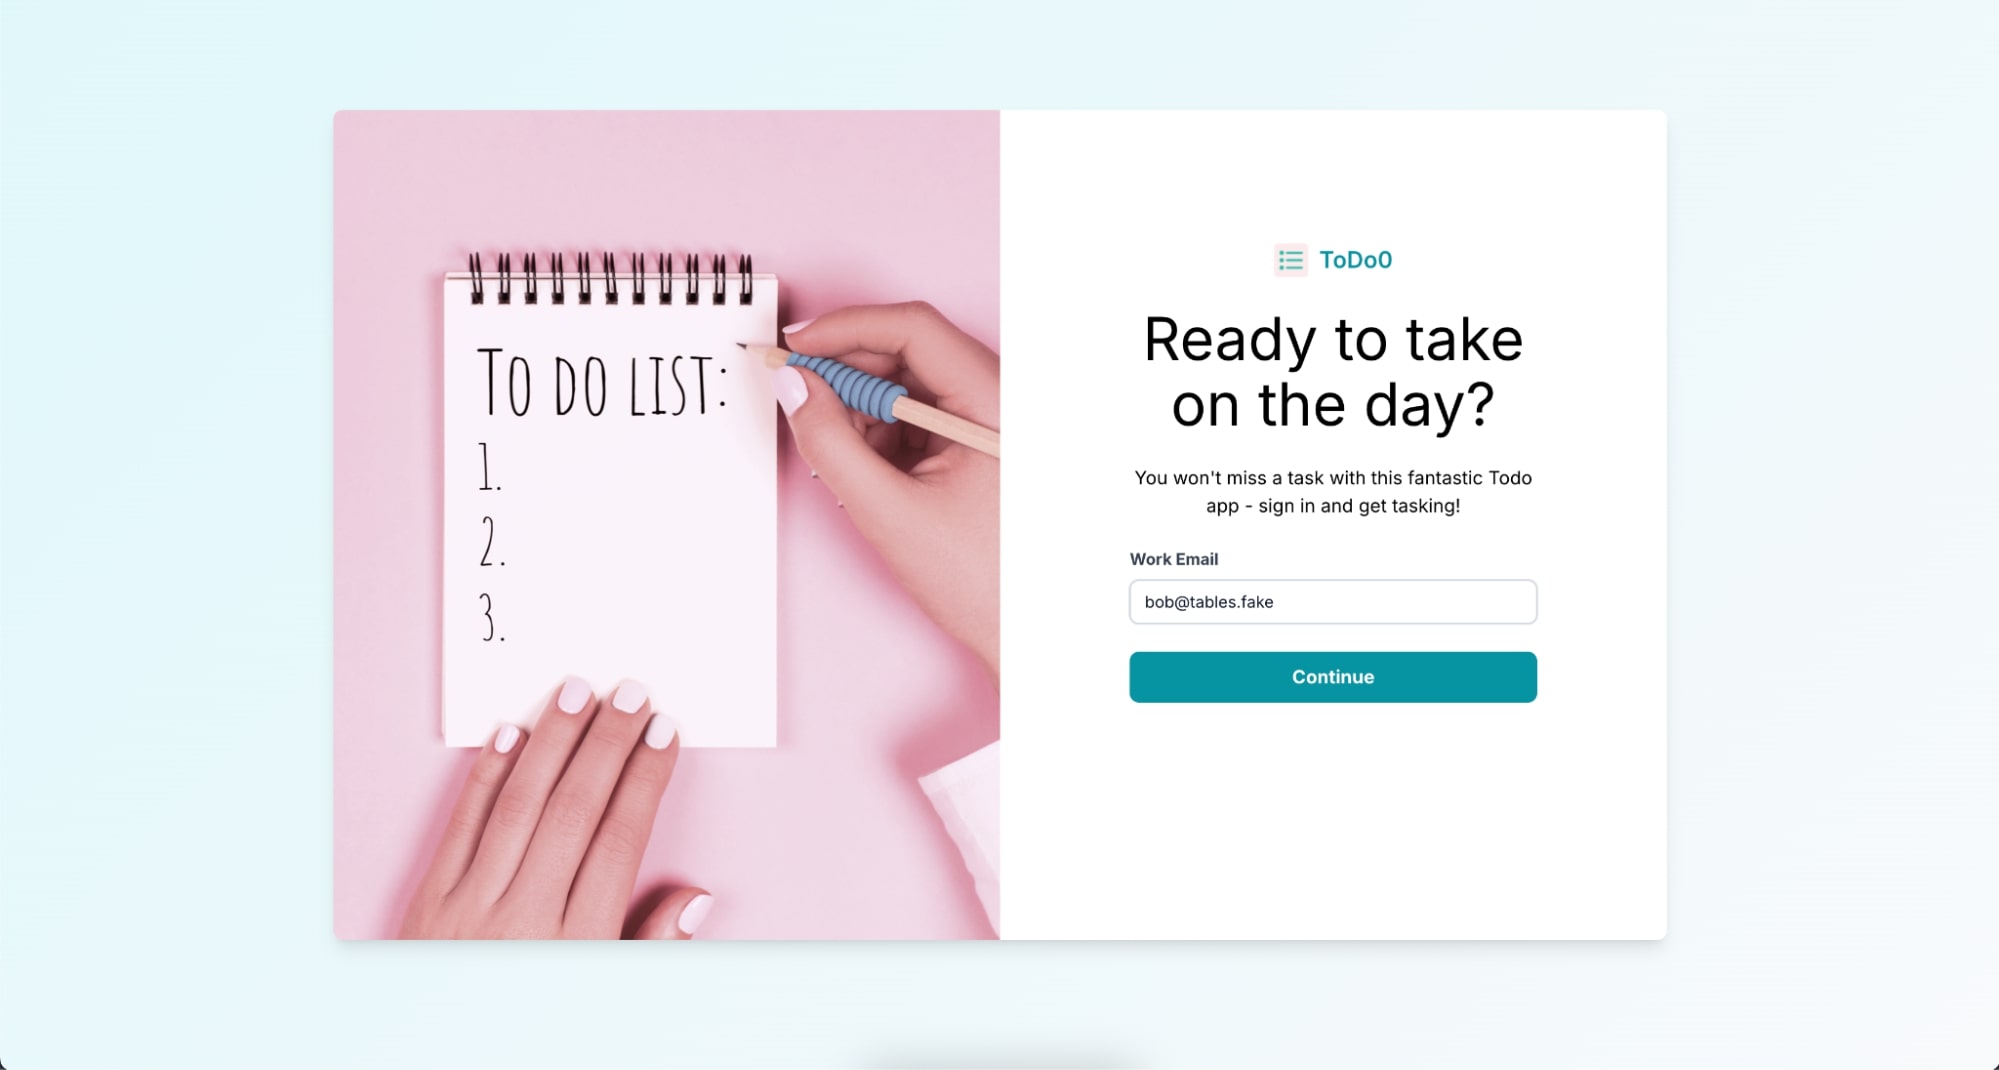
- You’ll be redirected to the Okta Login page. Sign in with the test user credentials:
- Username:
bob@tables.fake - Password: the temporary password you created earlier
- Username:
- The first time you sign in, you’ll be prompted to:
- Set a new password
- Enroll in Okta Verify for MFA
- Once logged in, add several tasks to your to-do list
- Select one of the tasks and mark it as complete to verify that the application updates the status accurately
Let the Agent0’s AI agent access your todos
- Open the Agent0 app in your browser
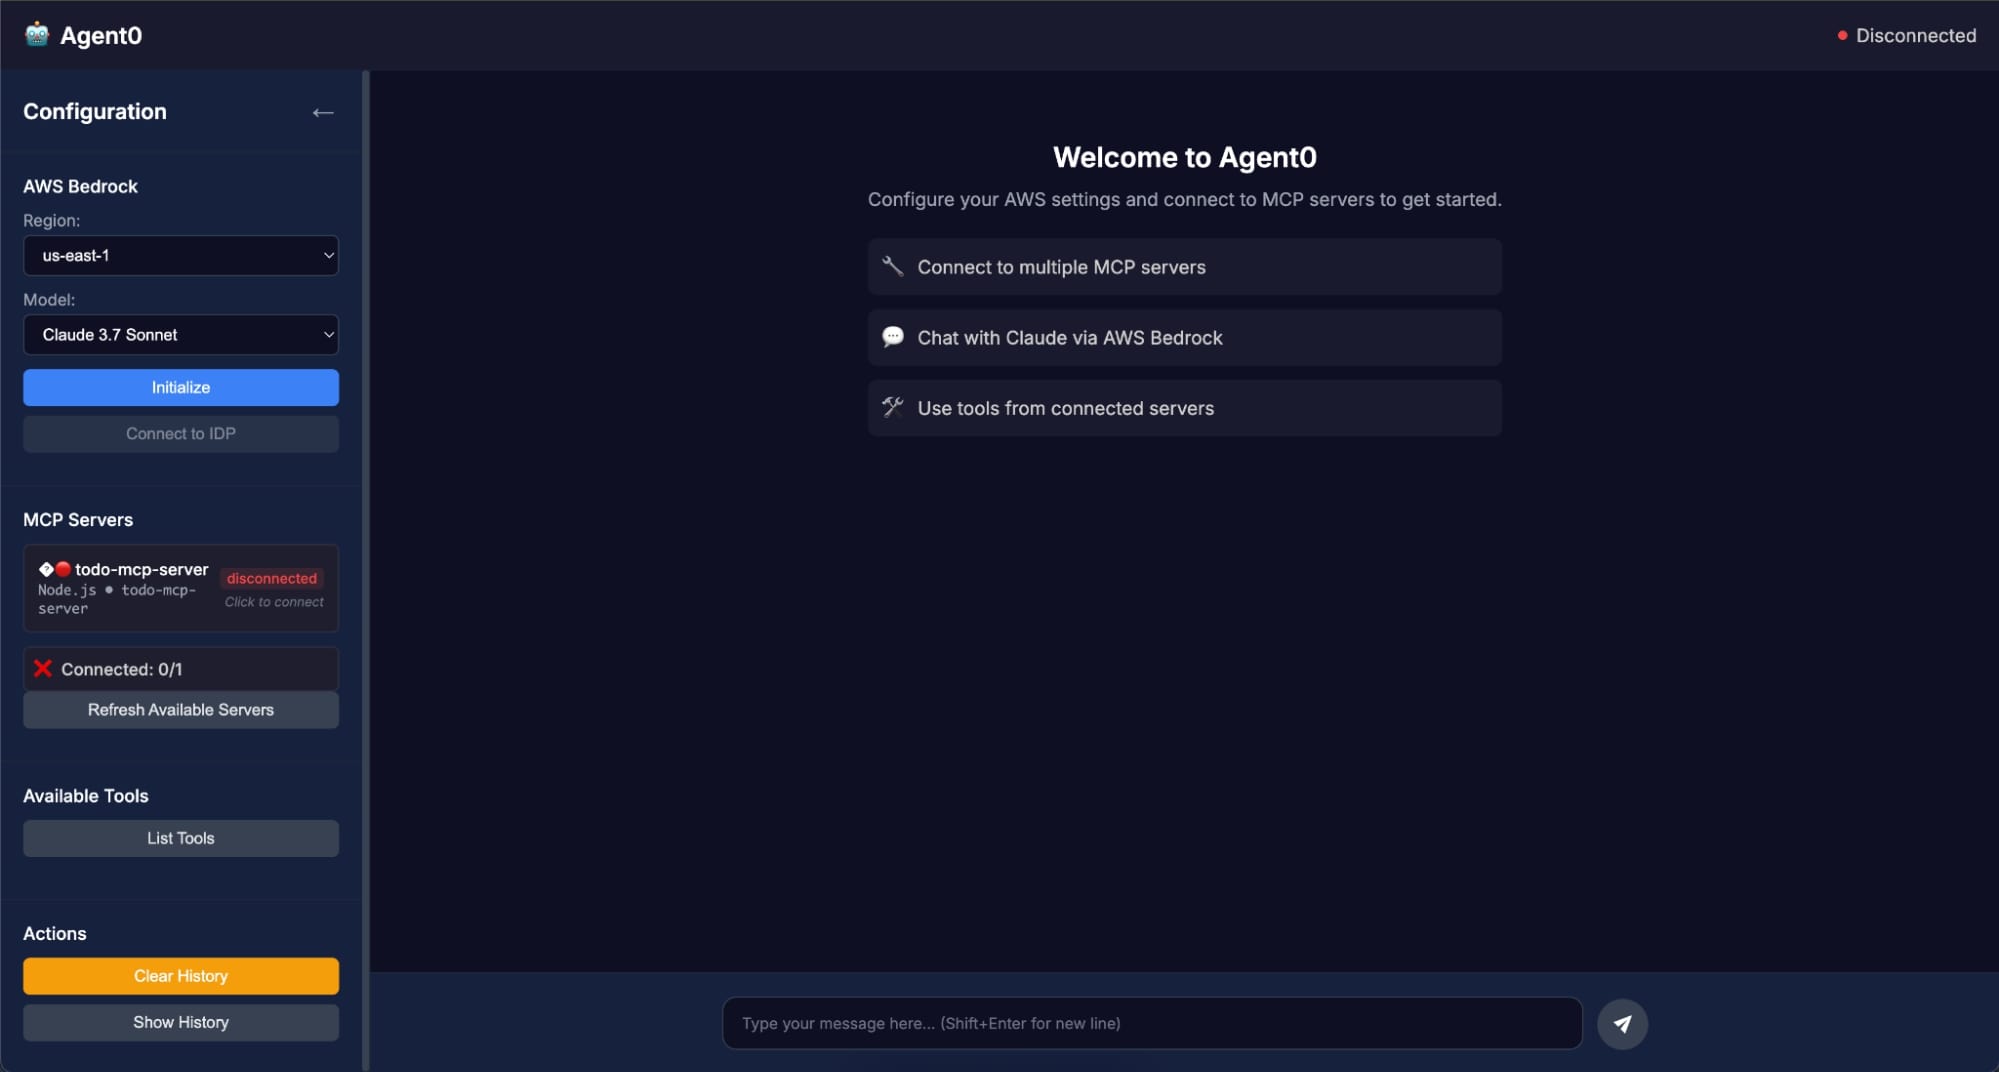
- Select Initialize to set up the AWS Bedrock client. Once connected, you’ll see the following message:
✅ Successfully connected to AWS Bedrock! You can now start chatting. - Select the Connect to IdP button
- Behind the scenes, Agent0 requests an identity assertion from Okta and exchanges it for an access token to Todo0
- If everything is configured correctly, you’ll see the following message
Authentication completed successfully! Welcome back.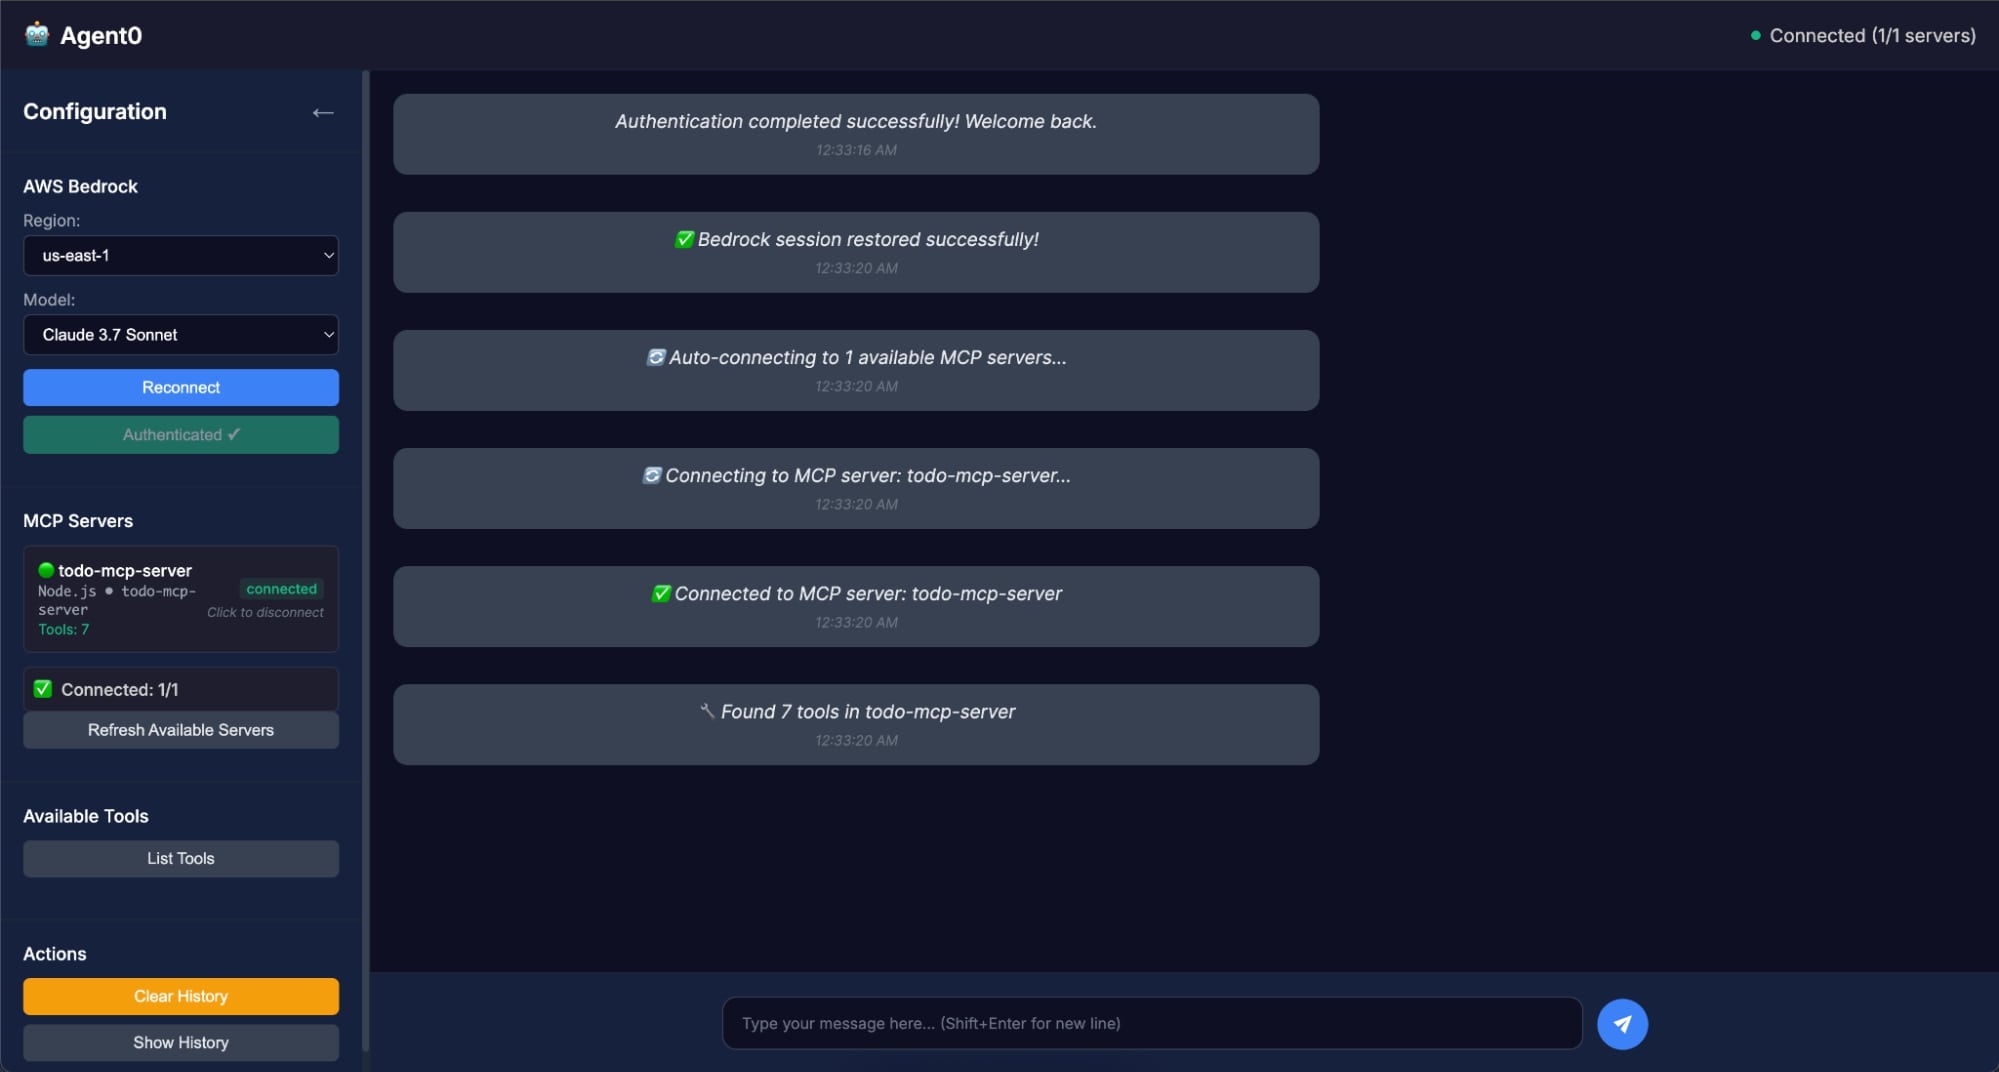
- To confirm that Agent0 is actually receiving tokens from Okta:
- Open a new browser tab and navigate to:
http://localhost:3000/api/tokens - You should see a JSON payload containing:
accessToken,jagToken, andidTokenThis verifies that Agent0 successfully authenticated through Okta and obtained the tokens needed to call Todo0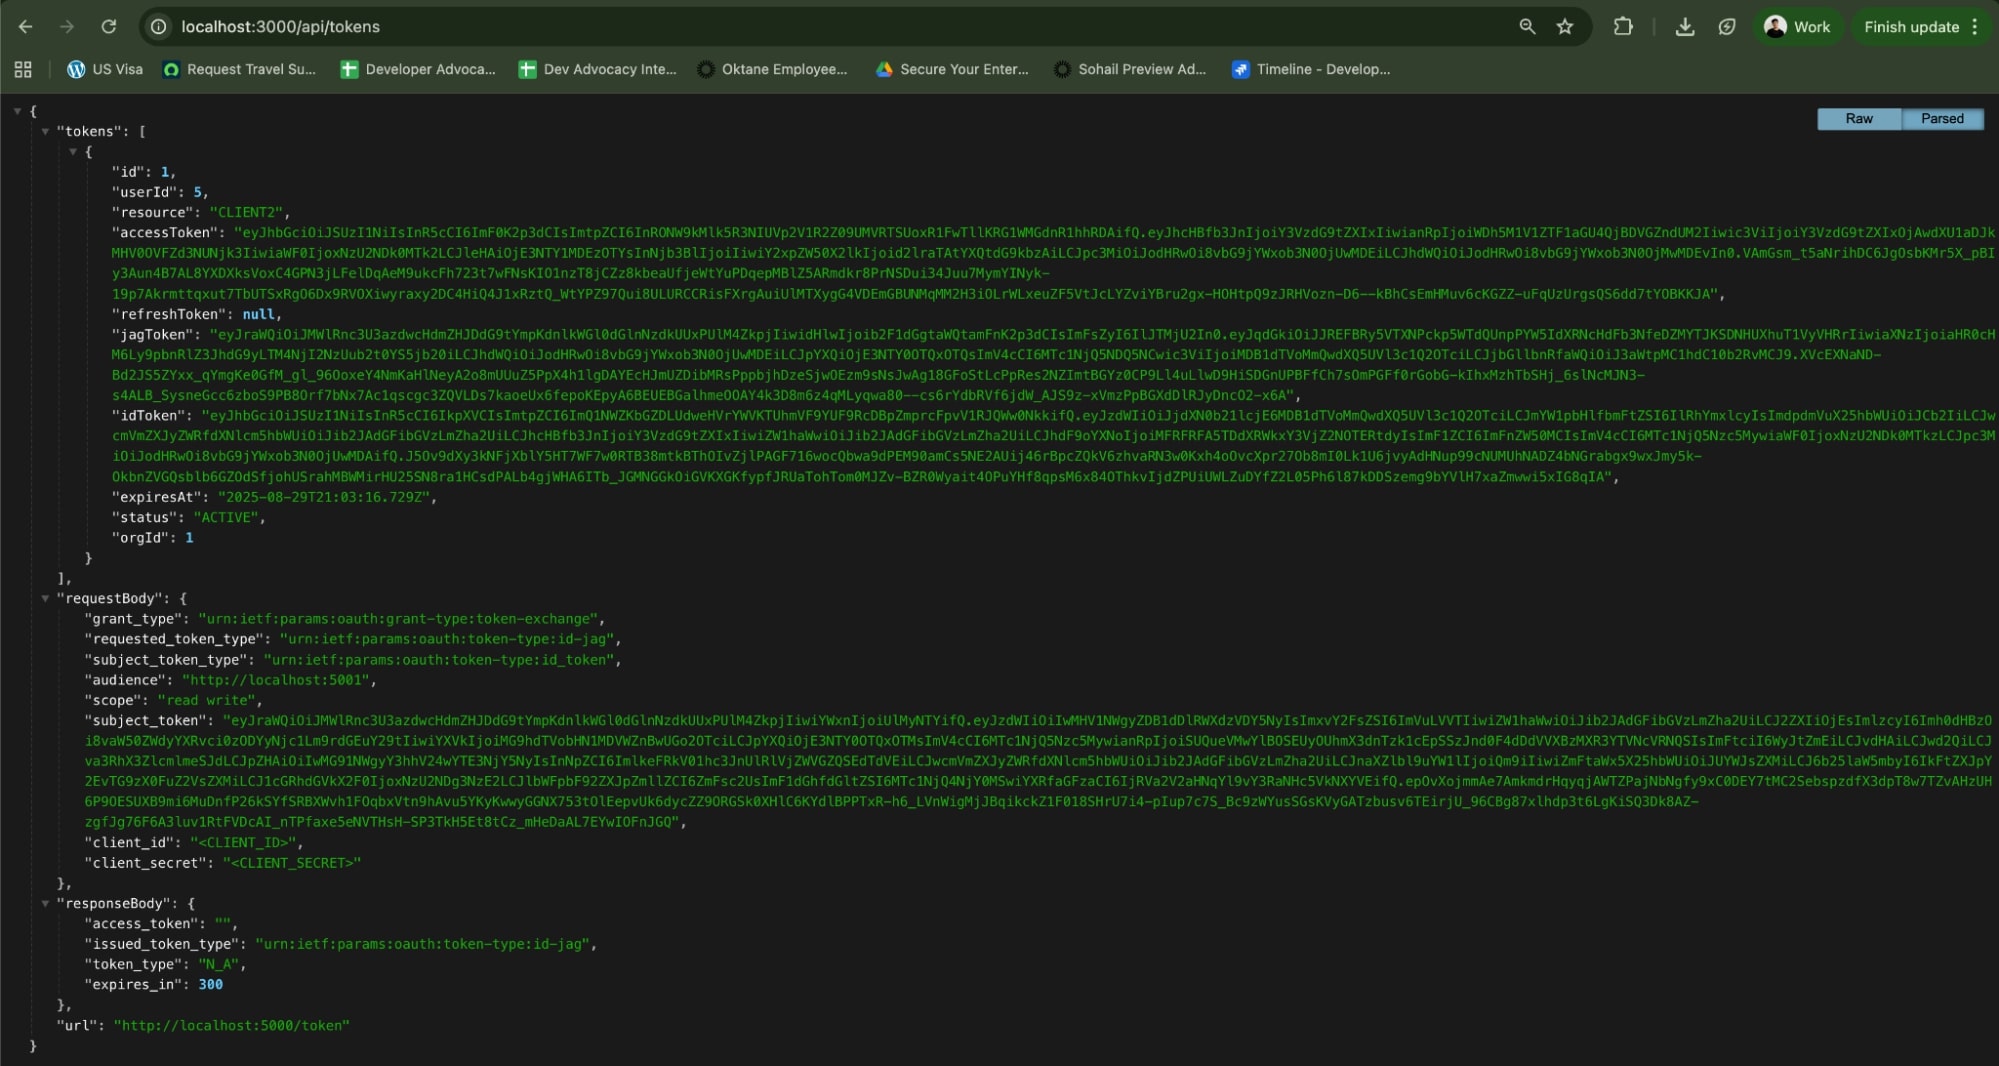
- Open a new browser tab and navigate to:
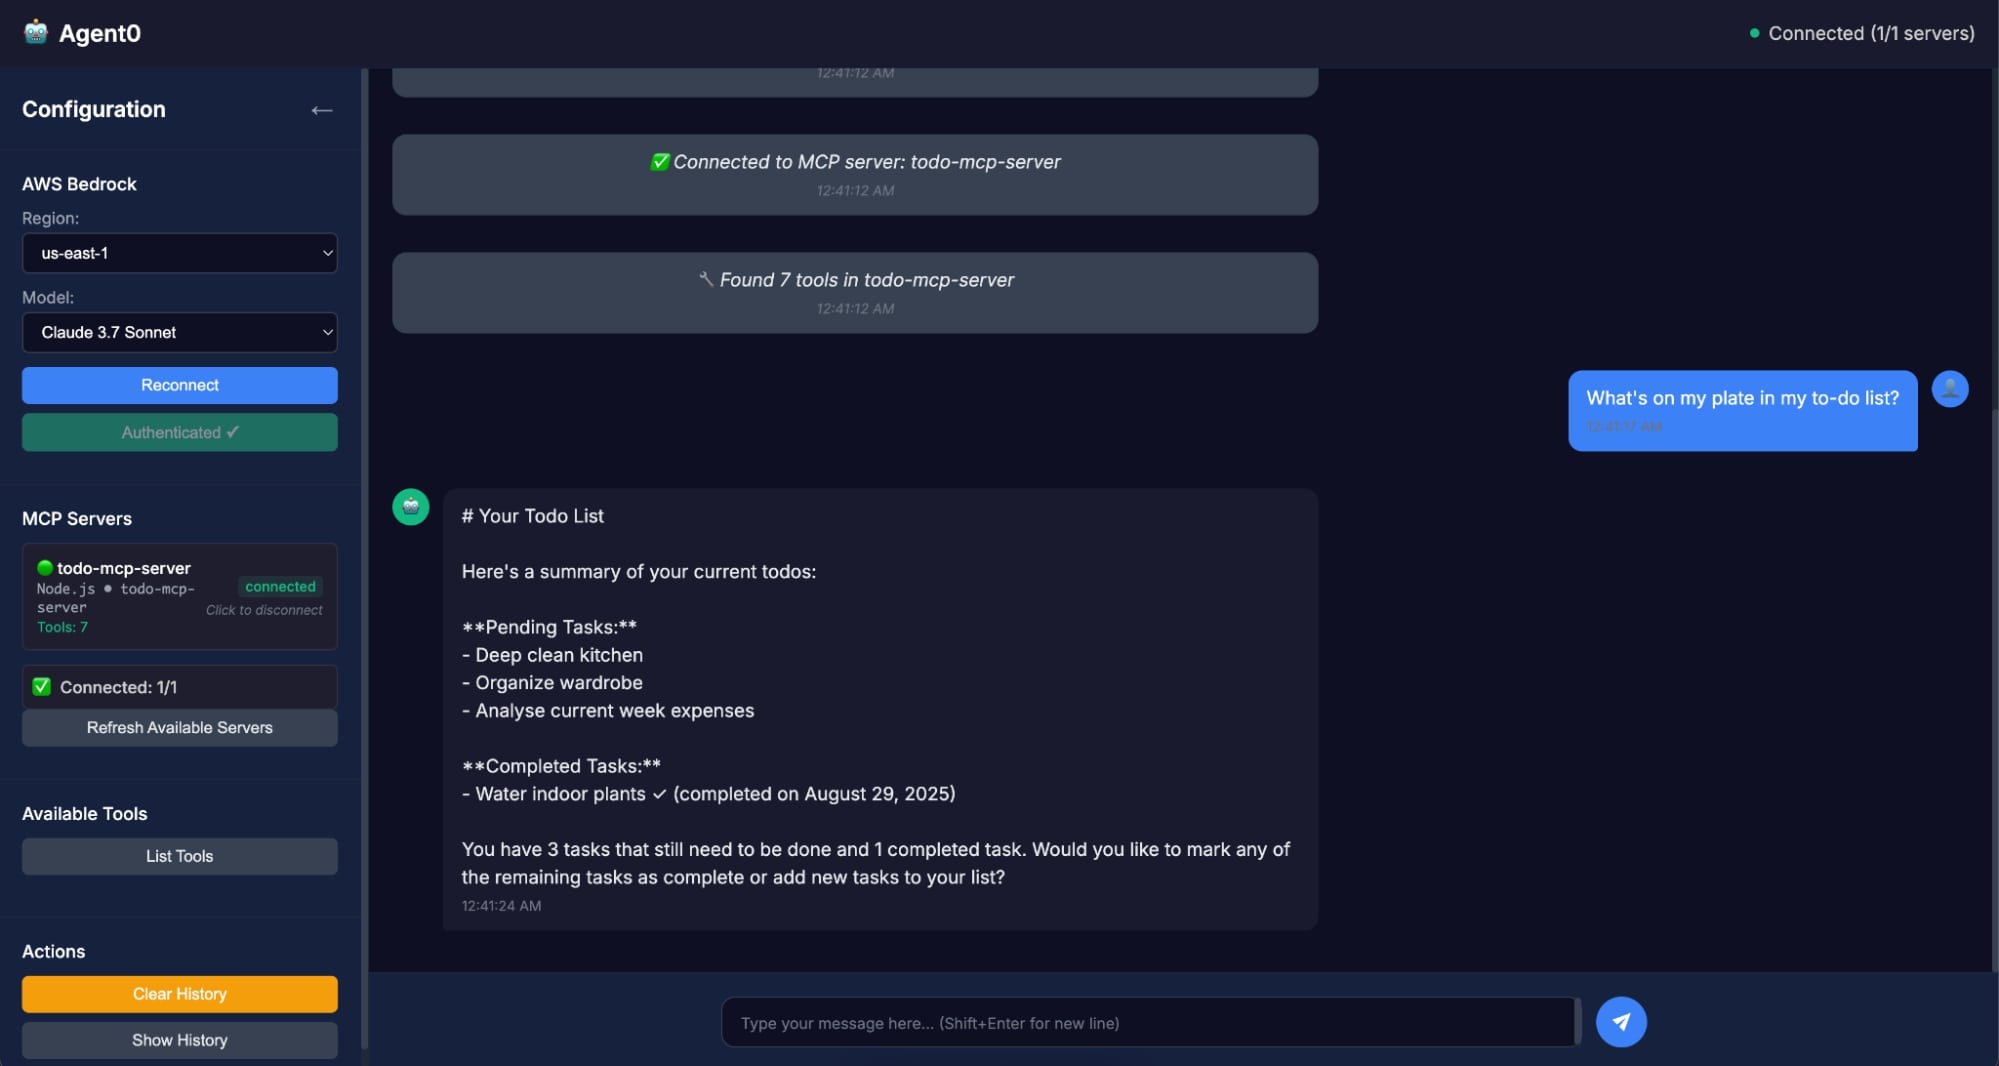
- Now interact with Agent0 using natural prompts. For example: write this prompt
What's on my plate in my to-do list?⚠️ Note: Agent0 will call the Todo0 API using the access token and return your pending tasks
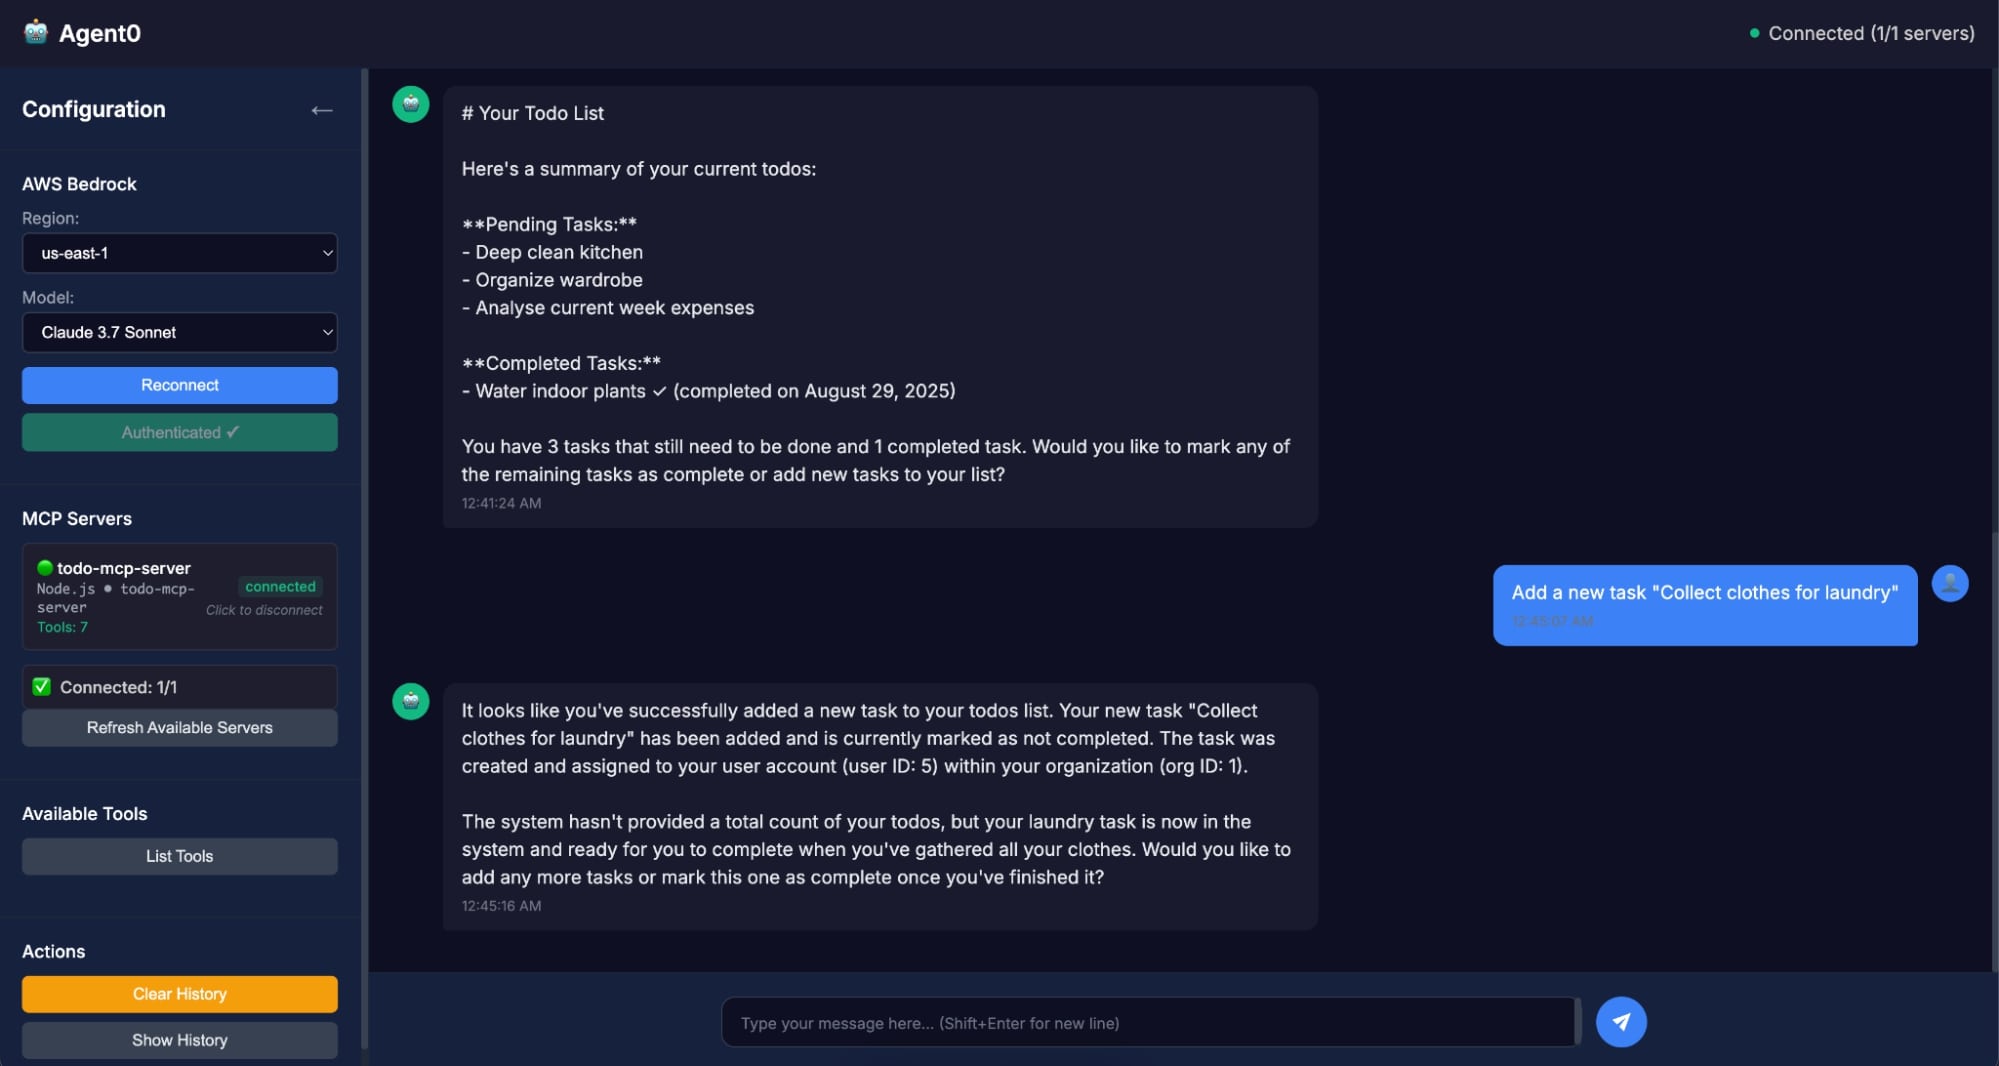
- Let’s try some more prompts
- Ask Agent0 to add a new task
- Ask it to mark an existing task complete
- Refresh the Todo0 app — you’ll see the changes reflected instantly
Behind the scenes: the OAuth 2.0 Identity Assertion Authorization Grant
✅ Bob Tables logs in once with Okta
⏩ Agent0 (requesting app) gets an identity assertion from Okta
🔄 Okta vouches for Bob and exchanges that assertion for an access token
👋 Agent0 uses that token to securely call the Todo0 (resource app) API

🎉 Congratulations! You’ve successfully configured and run the Cross App Access project.
Need help setting up secure cross-domain enterprise agentic application access?
If you run into any issues while setting up or testing this project, feel free to post your questions on the forum: 👉 Cross App Access (XAA) — Okta Developer Forum
If you’re interested in implementing Cross App Access (XAA) in your own application and integrating it into the Okta Integration Network (OIN) — whether as a requesting app or a resource app — and want to explore how Okta can support your use case, reach out to us at: 📩 xaa@okta.com
Learn more about Cross App Access, OAuth 2.0, and securing your applications
If this walkthrough helped you understand how Cross App Access works in practice, you might enjoy diving deeper into the standards and conversations shaping it. Here are some resources to continue your journey
- 📘 Cross App Access Documentation – official guides and admin docs to configure and manage Cross App Access in production
- 🎙️ Developer Podcast on MCP and Cross App Access – hear the backstory, use cases, and why this matters for developers
- 📄 OAuth Identity Assertion Authorization Grant (IETF Draft) – the emerging standard that powers this flow
If you’re new to OAuth or want to understand the basics behind secure delegated access, check out these resources:
- What the Heck is OAuth?
- What’s the Difference Between OAuth, OpenID Connect, and SAML?
- Secure Your Express App with OAuth 2.0, OIDC, and PKCE
- Why You Should Migrate to OAuth 2.0 From Static API Tokens
- How to Get Going with the On-Demand SaaS Apps Workshops
Follow us on LinkedIn, Twitter, and subscribe to our YouTube channel for more developer content. If you have any questions, please leave a comment below!
Changelog:
- Jun 30, 2026: Removed the self-service EA enablement steps as Cross App Access is no longer self-service. Updated the section to direct Okta customers to the customer support team and ISVs to developers@okta.com. Added a note clarifying that this guide covers the OIDC integration path. Changes to this article can be viewed in oktadev/okta-blog#1663.
- May 22, 2026: Updated the Okta Admin Console steps to reflect the new XAA Resource App and XAA Requesting App App Catalog integrations, and the new required Issuer URL and Client ID fields. Changes to this article can be viewed in oktadev/okta-blog#1641.
Sohail is a Senior Developer Advocate at Okta with roots in mobile app development and hands-on experience designing, building, and publishing APIs. Now, he helps developers secure their apps by turning complex OAuth and API topics into clear, actionable guides. When he's not coding or speaking at conferences, you'll find him on a quest for the perfect plate of biryani.
Okta Developer Blog Comment Policy
We welcome relevant and respectful comments. Off-topic comments may be removed.