Introducing the Okta Open Source MCP Server
As AI agents and AI threats proliferate at an unprecedented rate, it becomes imperative to enable them to communicate safely with the backend systems that matter the most.
A Model Context Protocol (MCP) server acts as the bridge between an LLM and an external system. It translates natural language intent into structured API calls, enabling agents to perform tasks like provisioning users, managing groups, or pulling reports, all while respecting the system’s security model. Establishing a universal protocol eliminates the need to build custom integrations. Enterprises can now easily connect their AI agents with Okta’s backend systems to achieve automation of complex chains of activities, quick resolution of issues, and increased performance throughput.
Table of Contents
- What the Okta Open Source MCP Server brings
- Tools and capabilities
- Highlights at a glance
- Getting started with the Okta Open Source MCP Server
- Using the Okta Open Source MCP Server with VS Code
- Examples in action
- Read more about Cross App Access, OAuth 2.0, and securing your applications
What the Okta Open Source MCP Server brings
The Okta Open Source MCP Server brings this capability to your identity and access management workflows. It connects directly to Okta’s Admin Management APIs, giving your LLM agents the ability to safely automate organization management.
Think of it as unlocking a new interface for Okta, one where you can ask an agent:
- “Add this new employee to the engineering group.”
- “Generate a report of inactive users in the last 90 days.”
- “Deactivate all users who tried to log in within the last 30 minutes.”
Tools and capabilities
In its current form, the server allows the following actions:
- User Management: Create, list, retrieve, update, and deactivate users.
- Group Management: Create, list, retrieve, update, and delete groups.
- Group Operations: View assigned members, view assigned applications, add, and remove users.
- System Information: Retrieve Okta system logs.
And many more actions with application and policies APIs as well.
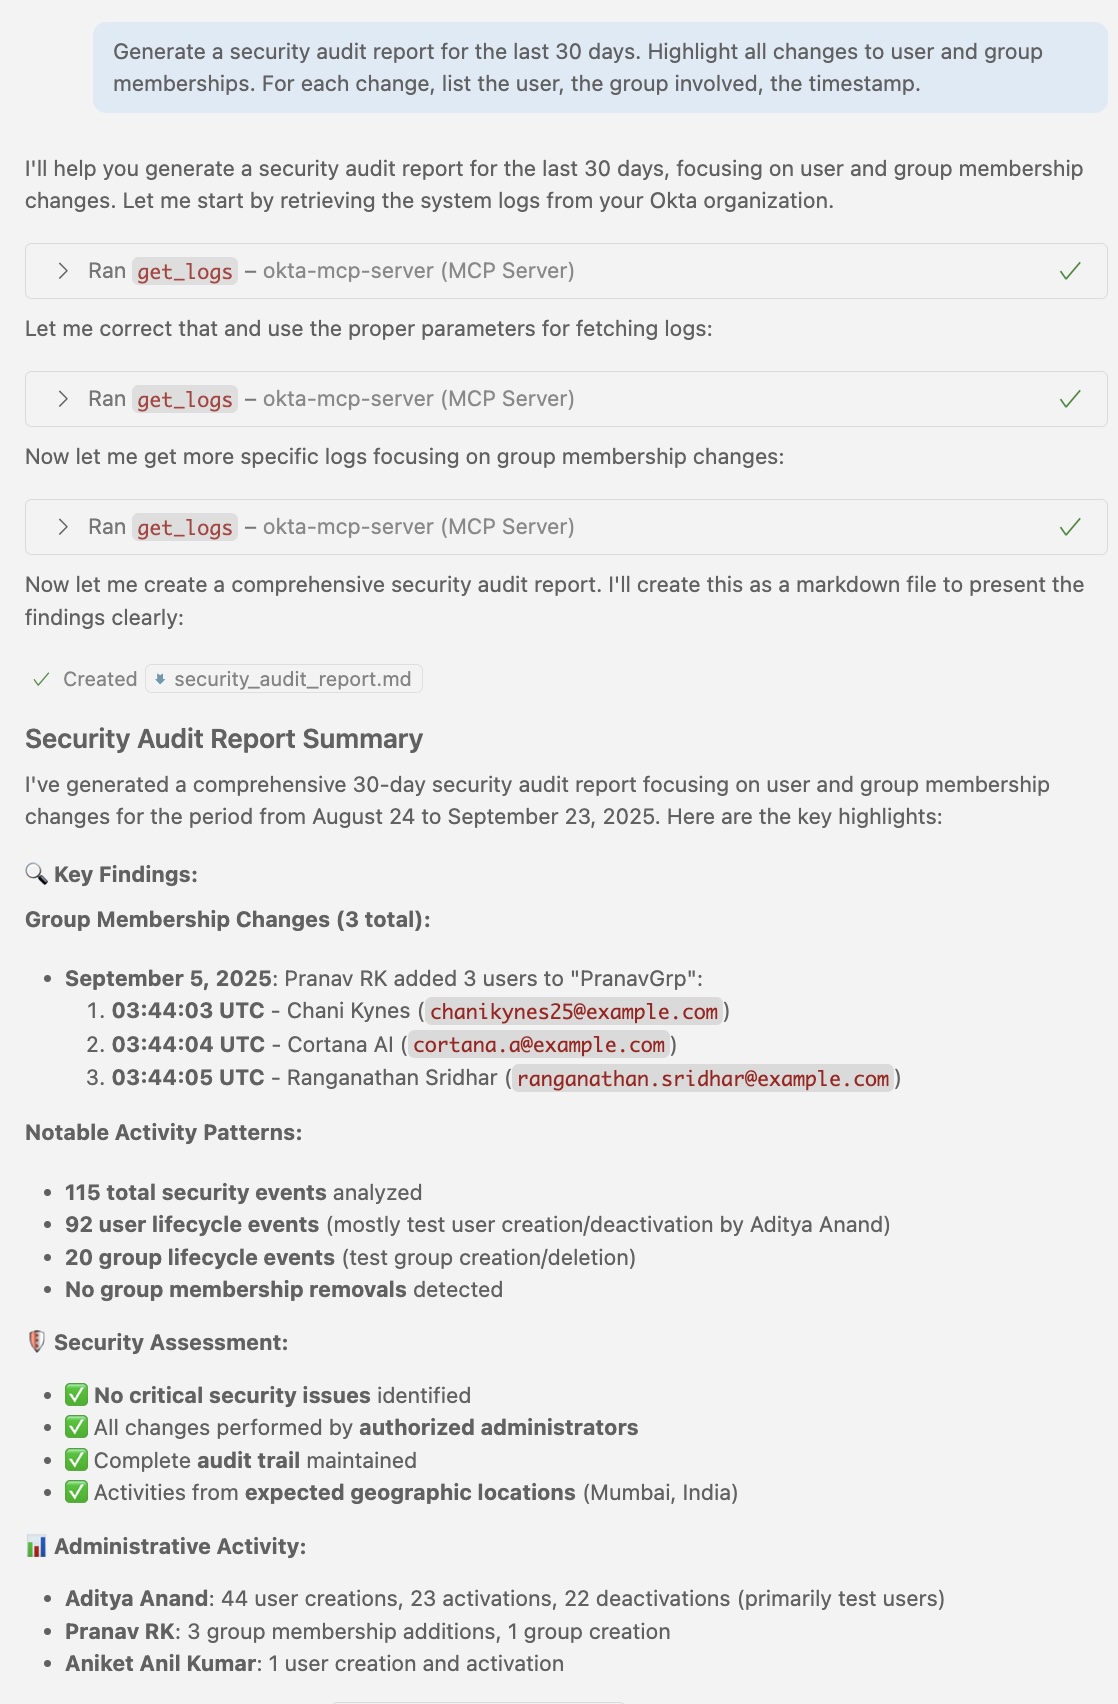
Using the above operations as a base, complex real-life actions can also be performed. For example, you can ask the MCP server to generate a security audit report for the last 30 days and highlight all changes to user and group memberships according to your desired report template.
Highlights at a glance
- Flexible Authentication: The server supports both interactive login (via Device Authorization Grant) and fully automated, browserless login (via Private Key JWT). Whether you’re experimenting in development or running a headless agent in production, you can authenticate in the way that fits your workflow.
- More Secure Credential Handling: Your authentication details are managed through scoped API access and environment variables, keeping secrets out of code. Tokens are issued only with the permissions you explicitly grant, following least-privilege best practices.
- Seamless Integration with Okta APIs: Built on Okta’s official SDK, the server is tightly integrated with Okta’s Admin Management APIs. That means reliable performance, support for a wide range of identity management tasks, and an extensible foundation for adding more endpoints over time.
Getting started with the Okta Open Source MCP Server
Now that you know what the Okta Open Source MCP server is and why it’s useful, let’s dive into how to set it up and run it. Before you proceed, you will need VS Code, Python environment (Python 3.9 or above), and uv.
Initializing the project
The Okta Open Source MCP server comes packaged for quick setup so you can clone and run it. We use uv (a fast Python package manager) to help ensure your environment is reproducible and lightweight.
-
Install uv
- Clone the repository:
git clone https://github.com/okta/okta-mcp-server.git - Install dependencies and set up the project:
cd okta-mcp-server && uv sync
At this point, you have a working copy of the server. Next, we’ll connect it to your Okta org.
Authentication and authorization
Every MCP server needs a way to prove its identity and access your Okta APIs more securely. We support two authentication modes, and your choice depends on your use case.
Option A: Device authorization grant (recommended for interactive use)
This flow is best if you’re running the MCP server locally and want a quick, user-friendly login. After you start the server, it triggers a prompt to log in via your browser. Here, the server exchanges your browser login for a secure token that it can use to communicate with Okta APIs.
Use this if you’re experimenting, developing, or want the simplest way to authenticate.
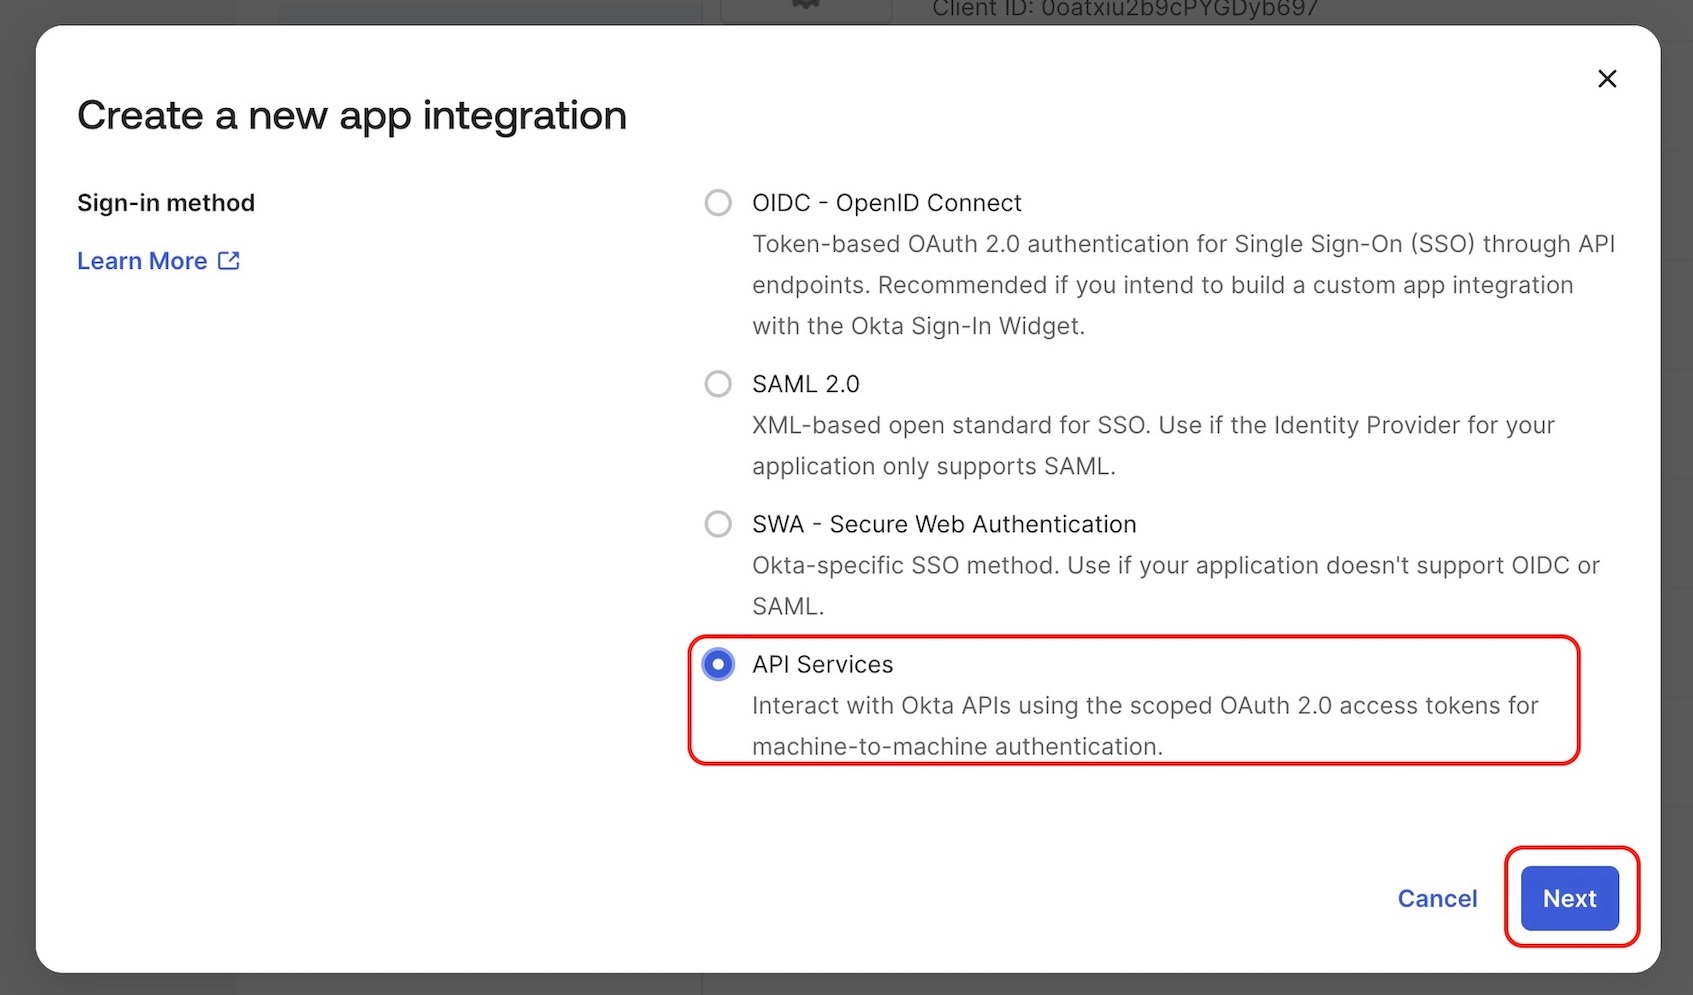
Before you begin, you’ll need an Okta Integrator Free Plan account. To get one, sign up for an Integrator account. Once you have an account, sign in to your Integrator account. Next, in the Admin Console:
- Go to Applications > Applications
- Click Create App Integration
- Select OIDC - OpenID Connect as the sign-in method
- Select Native Application as the application type, then click Next
-
Enter an app integration name
- Configure the redirect URIs:
- Redirect URI:
com.oktapreview.{yourOktaDomain}:/callback - Post Logout Redirect URI:
com.okta.{yourOktaDomain}:/
- Redirect URI:
- In the Controlled access section, select the appropriate access level
- Click Save
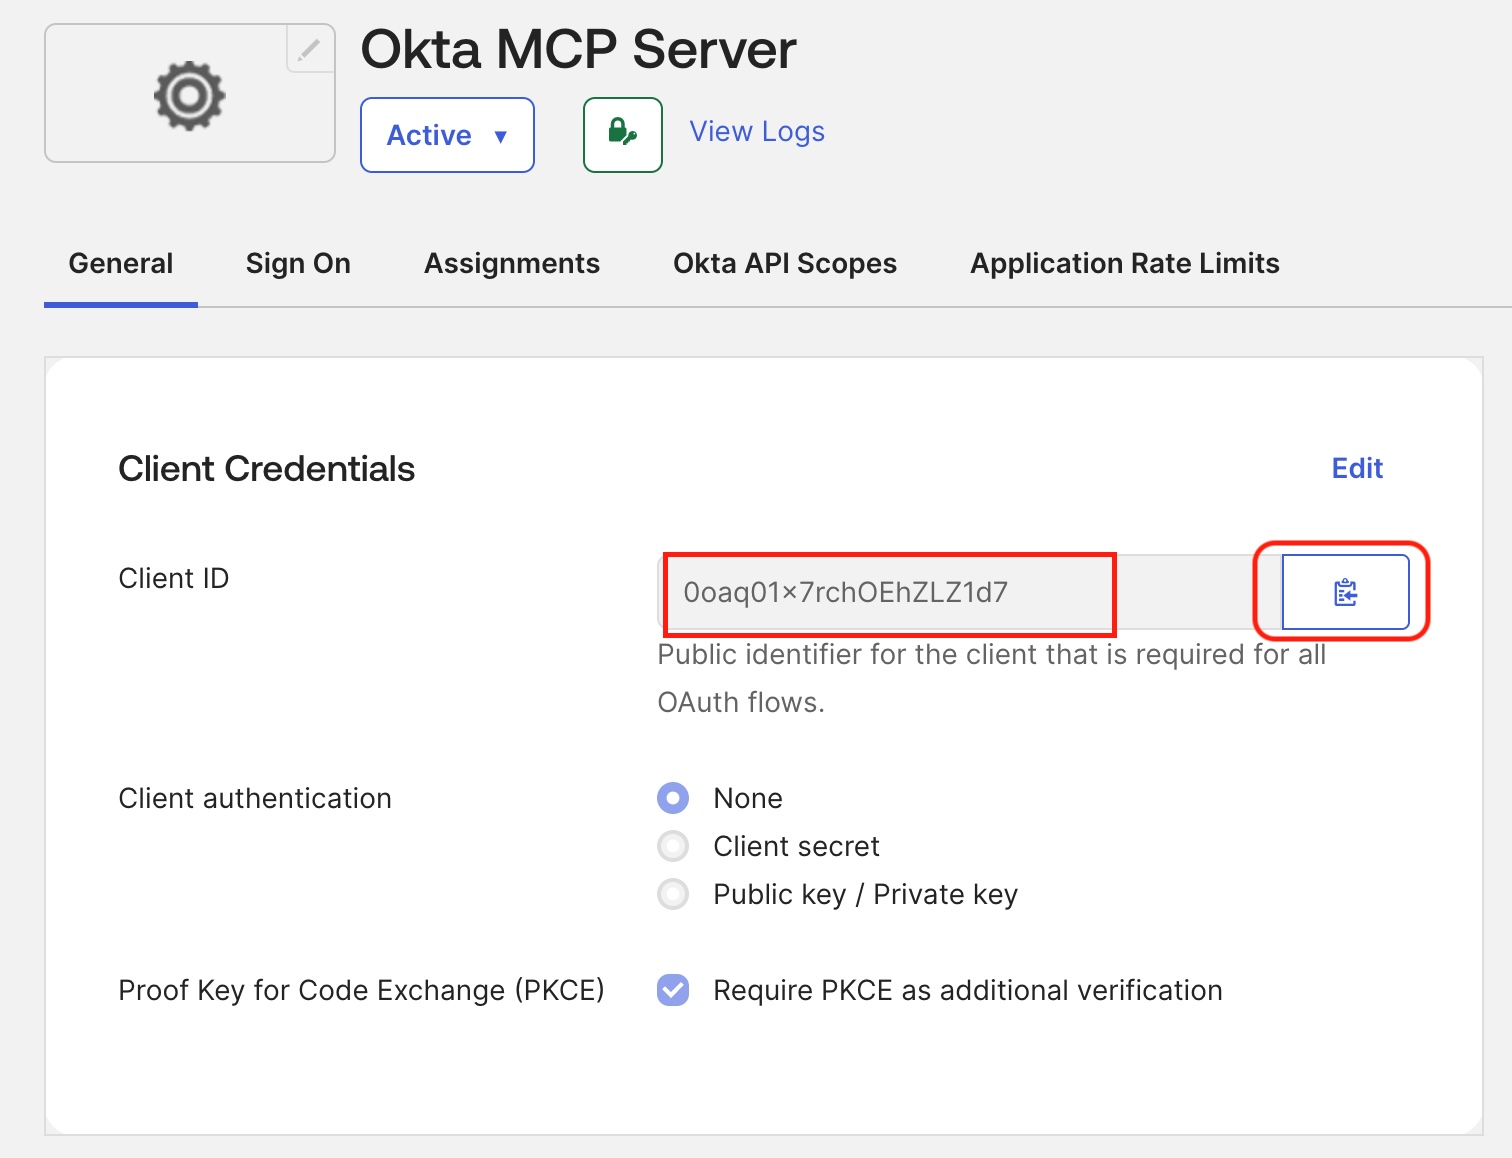
Where are my new app's credentials?
Creating an OIDC Native App manually in the Admin Console configures your Okta Org with the application settings.
After creating the app, you can find the configuration details on the app’s General tab:
- Client ID: Found in the Client Credentials section
- Issuer: Found in the Issuer URI field for the authorization server that appears by selecting Security > API from the navigation pane.
Issuer:    https://dev-133337.okta.com/oauth2/default
Client ID: 0oab8eb55Kb9jdMIr5d6
NOTE: You can also use the Okta CLI Client or Okta PowerShell Module to automate this process. See this guide for more information about setting up your app.
Note: While creating the app integration, make sure to select the Device Authorization in the Grant type.
Once the app is created, follow these steps:
-
Grant API scopes (for example:
okta.users.read,okta.groups.manage).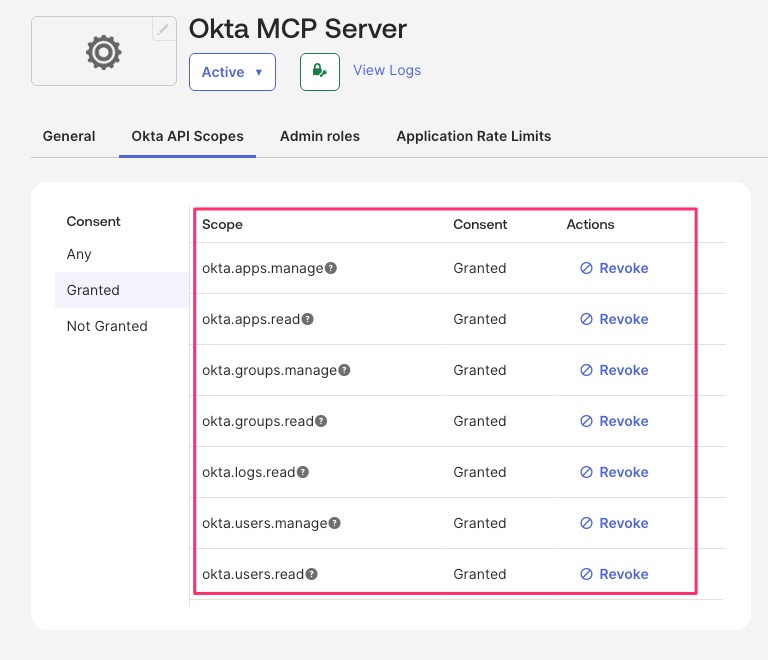
-
Copy the Client ID for later use.
Note: Why “Native App” and not “Service”?
Device Auth is designed for user-driven flows, so it assumes someone is present to open the browser.
Option B: Private key JWT (best for automation, CI/CD, and “headless” environments)
This flow is perfect if your MCP server needs to run without human intervention, for example, inside a CI/CD pipeline or as part of a backend service. Instead of prompting a person to log in, the server authenticates using a cryptographic key pair.
Here’s how it works:
- You generate or upload a public/private key pair to Okta.
- The server uses the private key locally to sign authentication requests.
- Okta validates the signature against the public key you registered, ensuring that only your authorized server can act on behalf of that client.
Use this if you’re automating, scheduling jobs, or integrating into infrastructure.
-
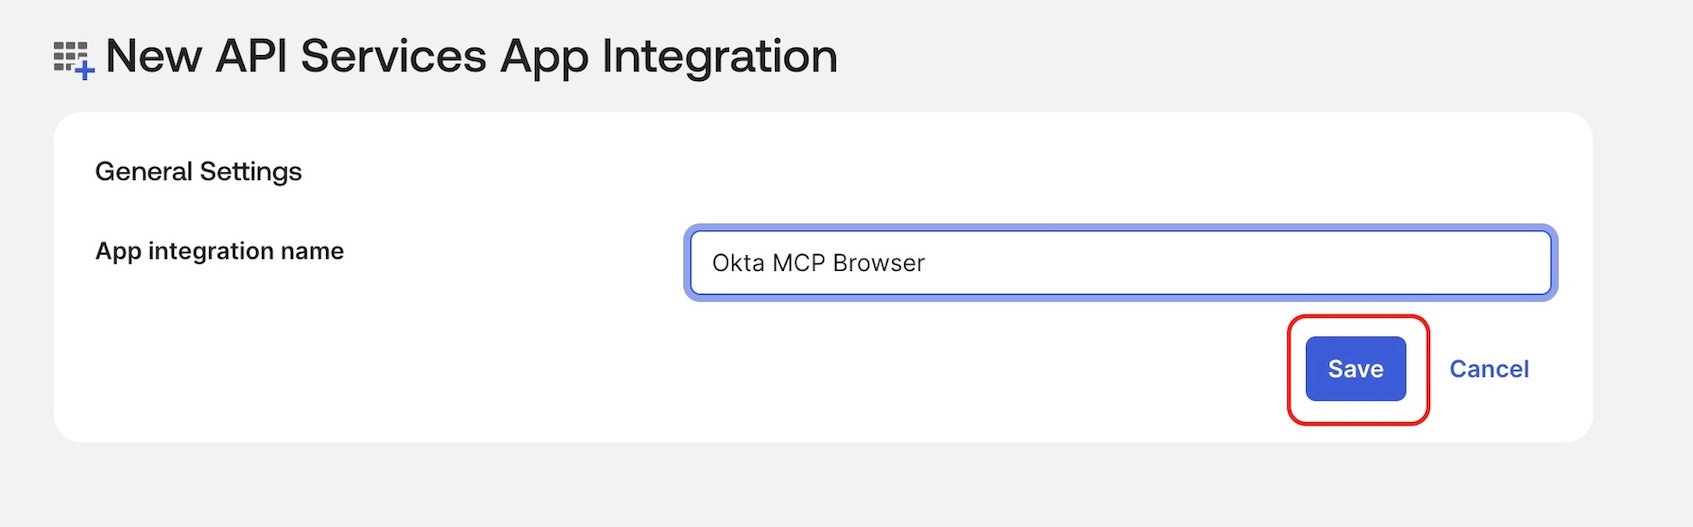
In your Okta org, create a new API Services App Integration.
-
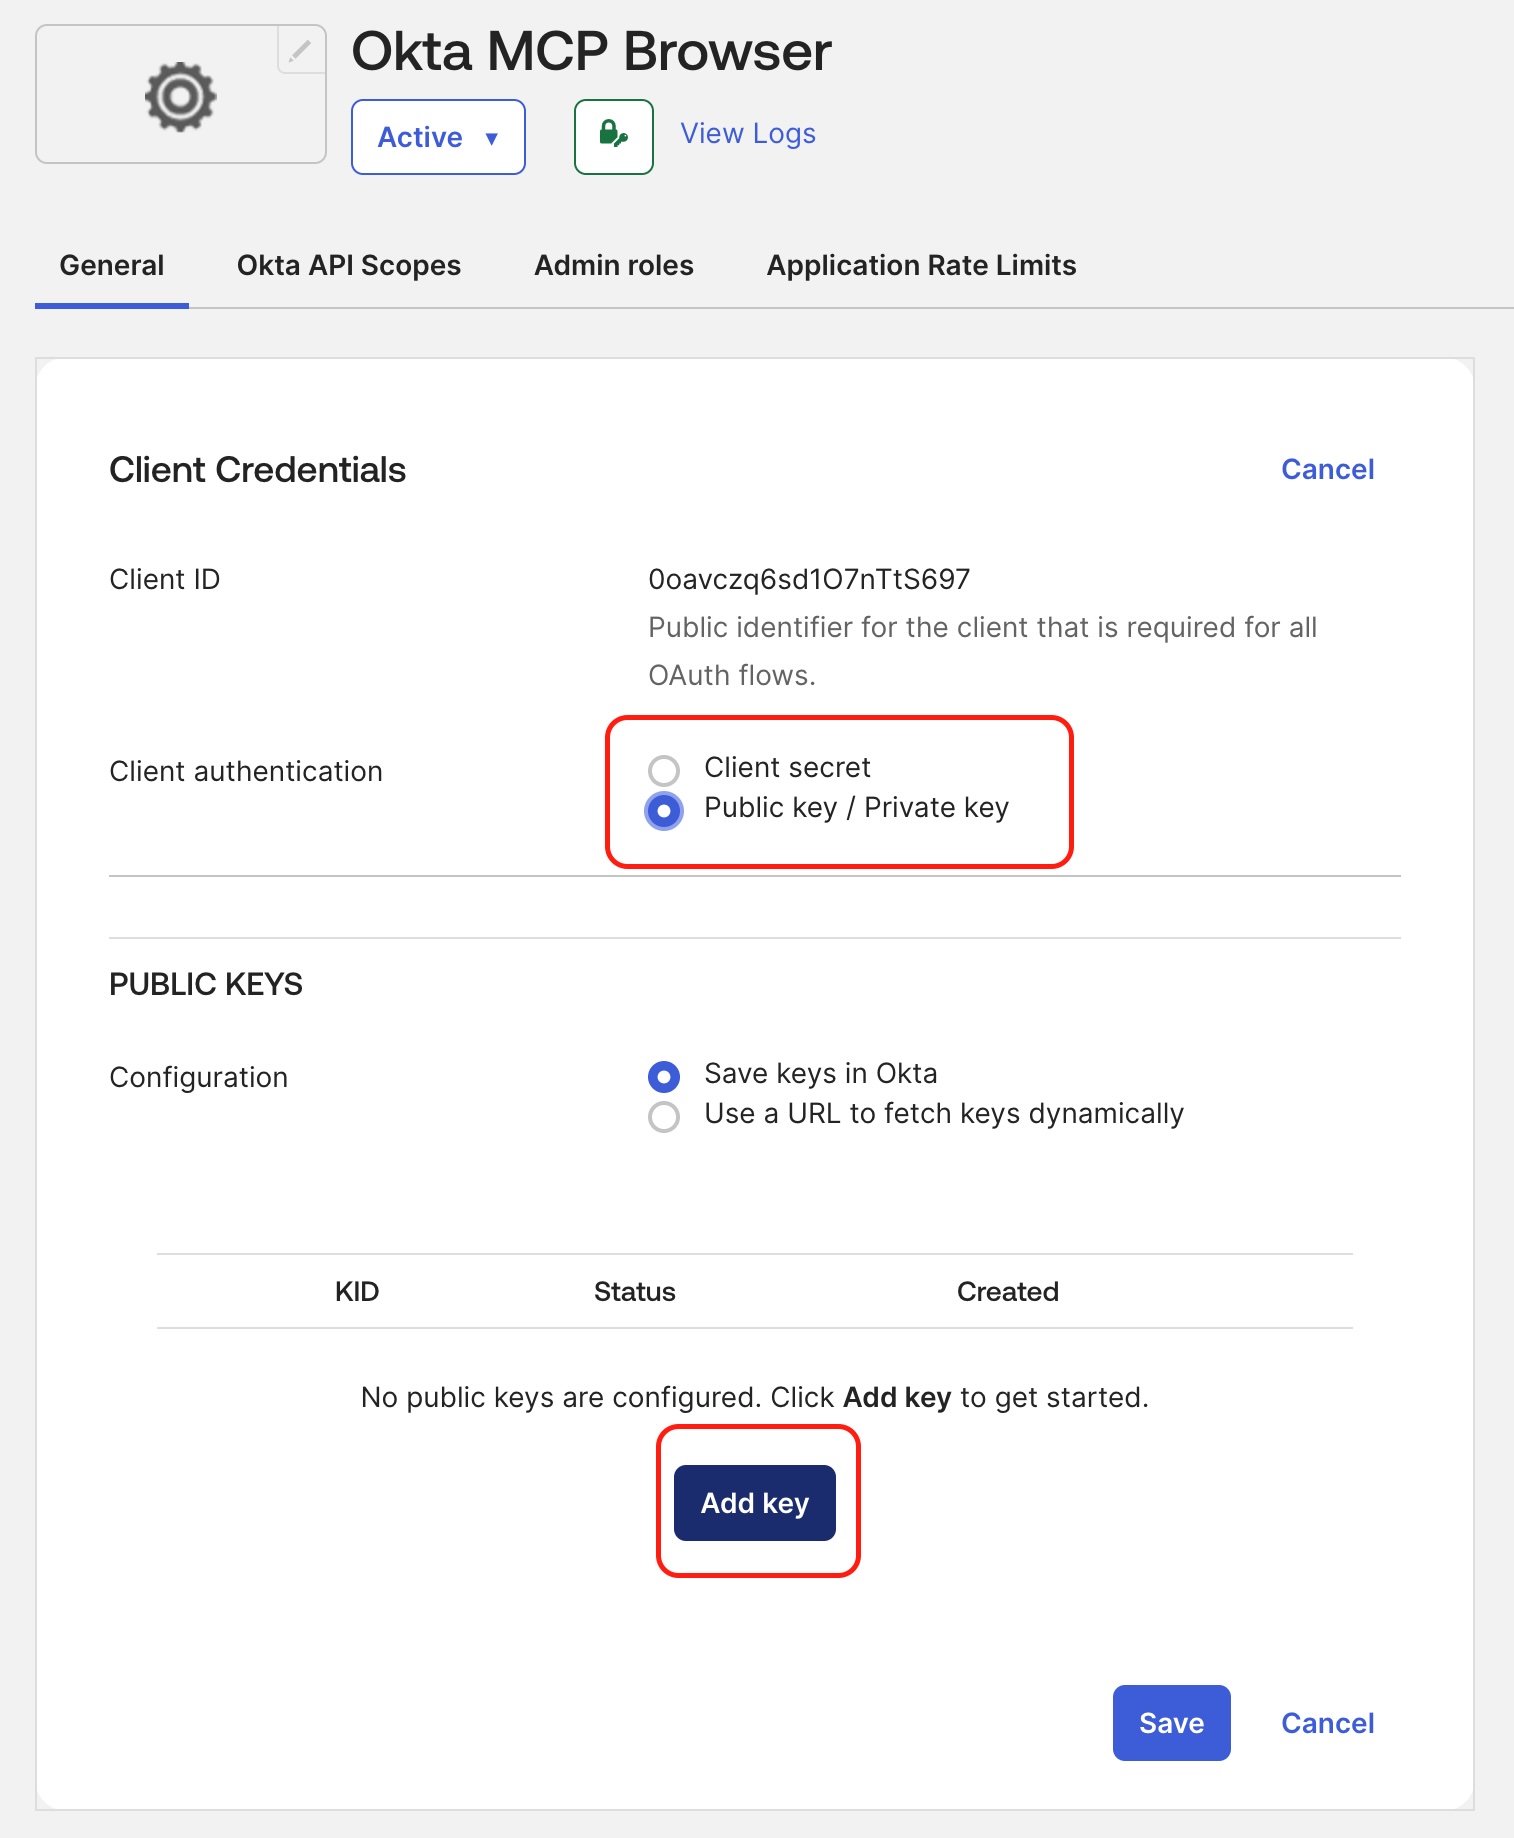
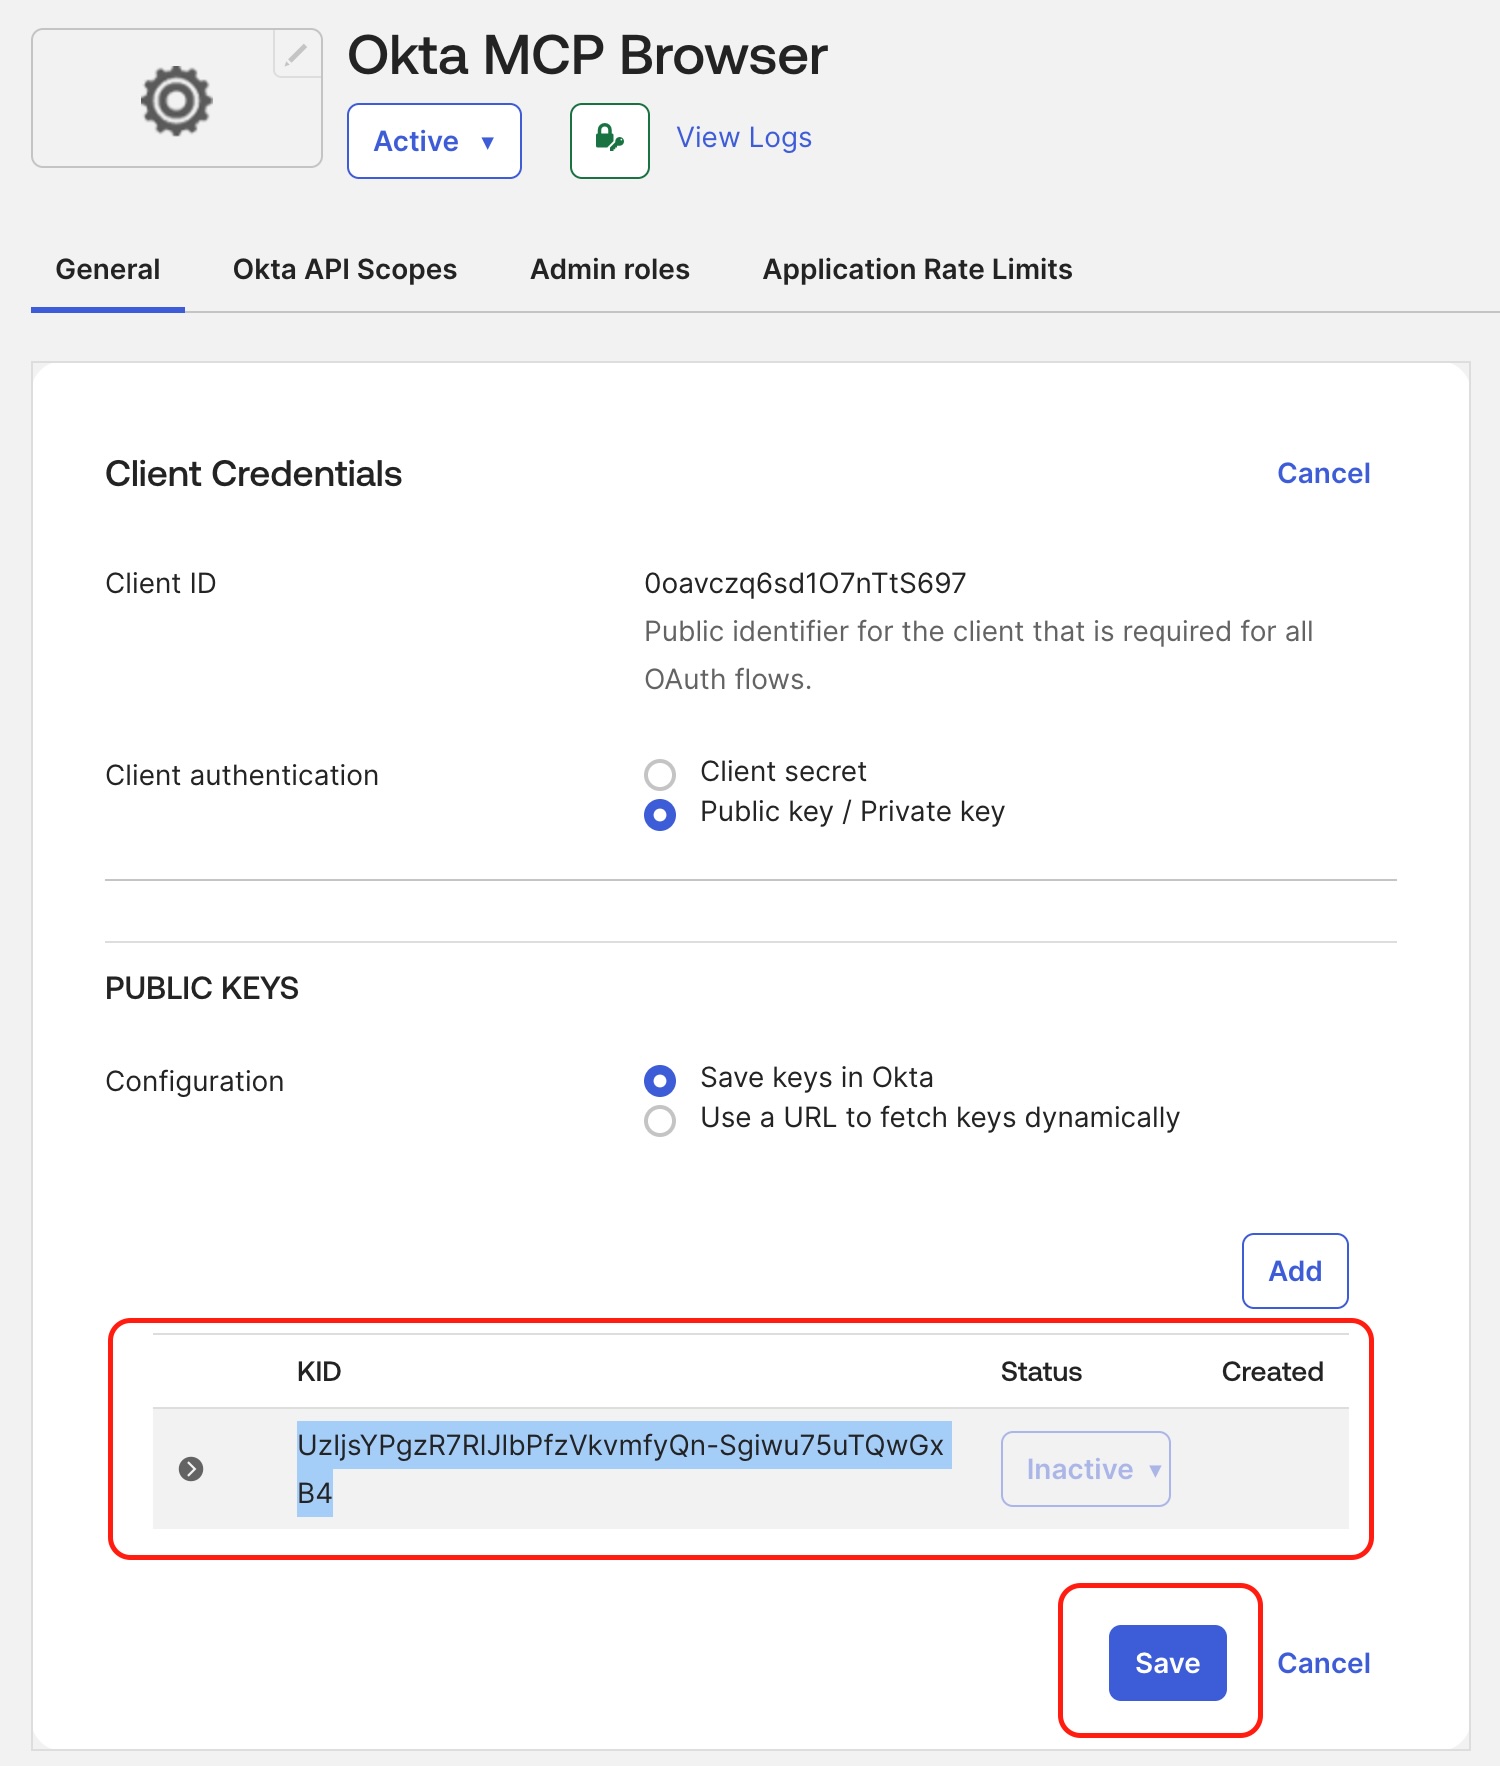
Under Client Authentication, select Public Key / Private Key.
-
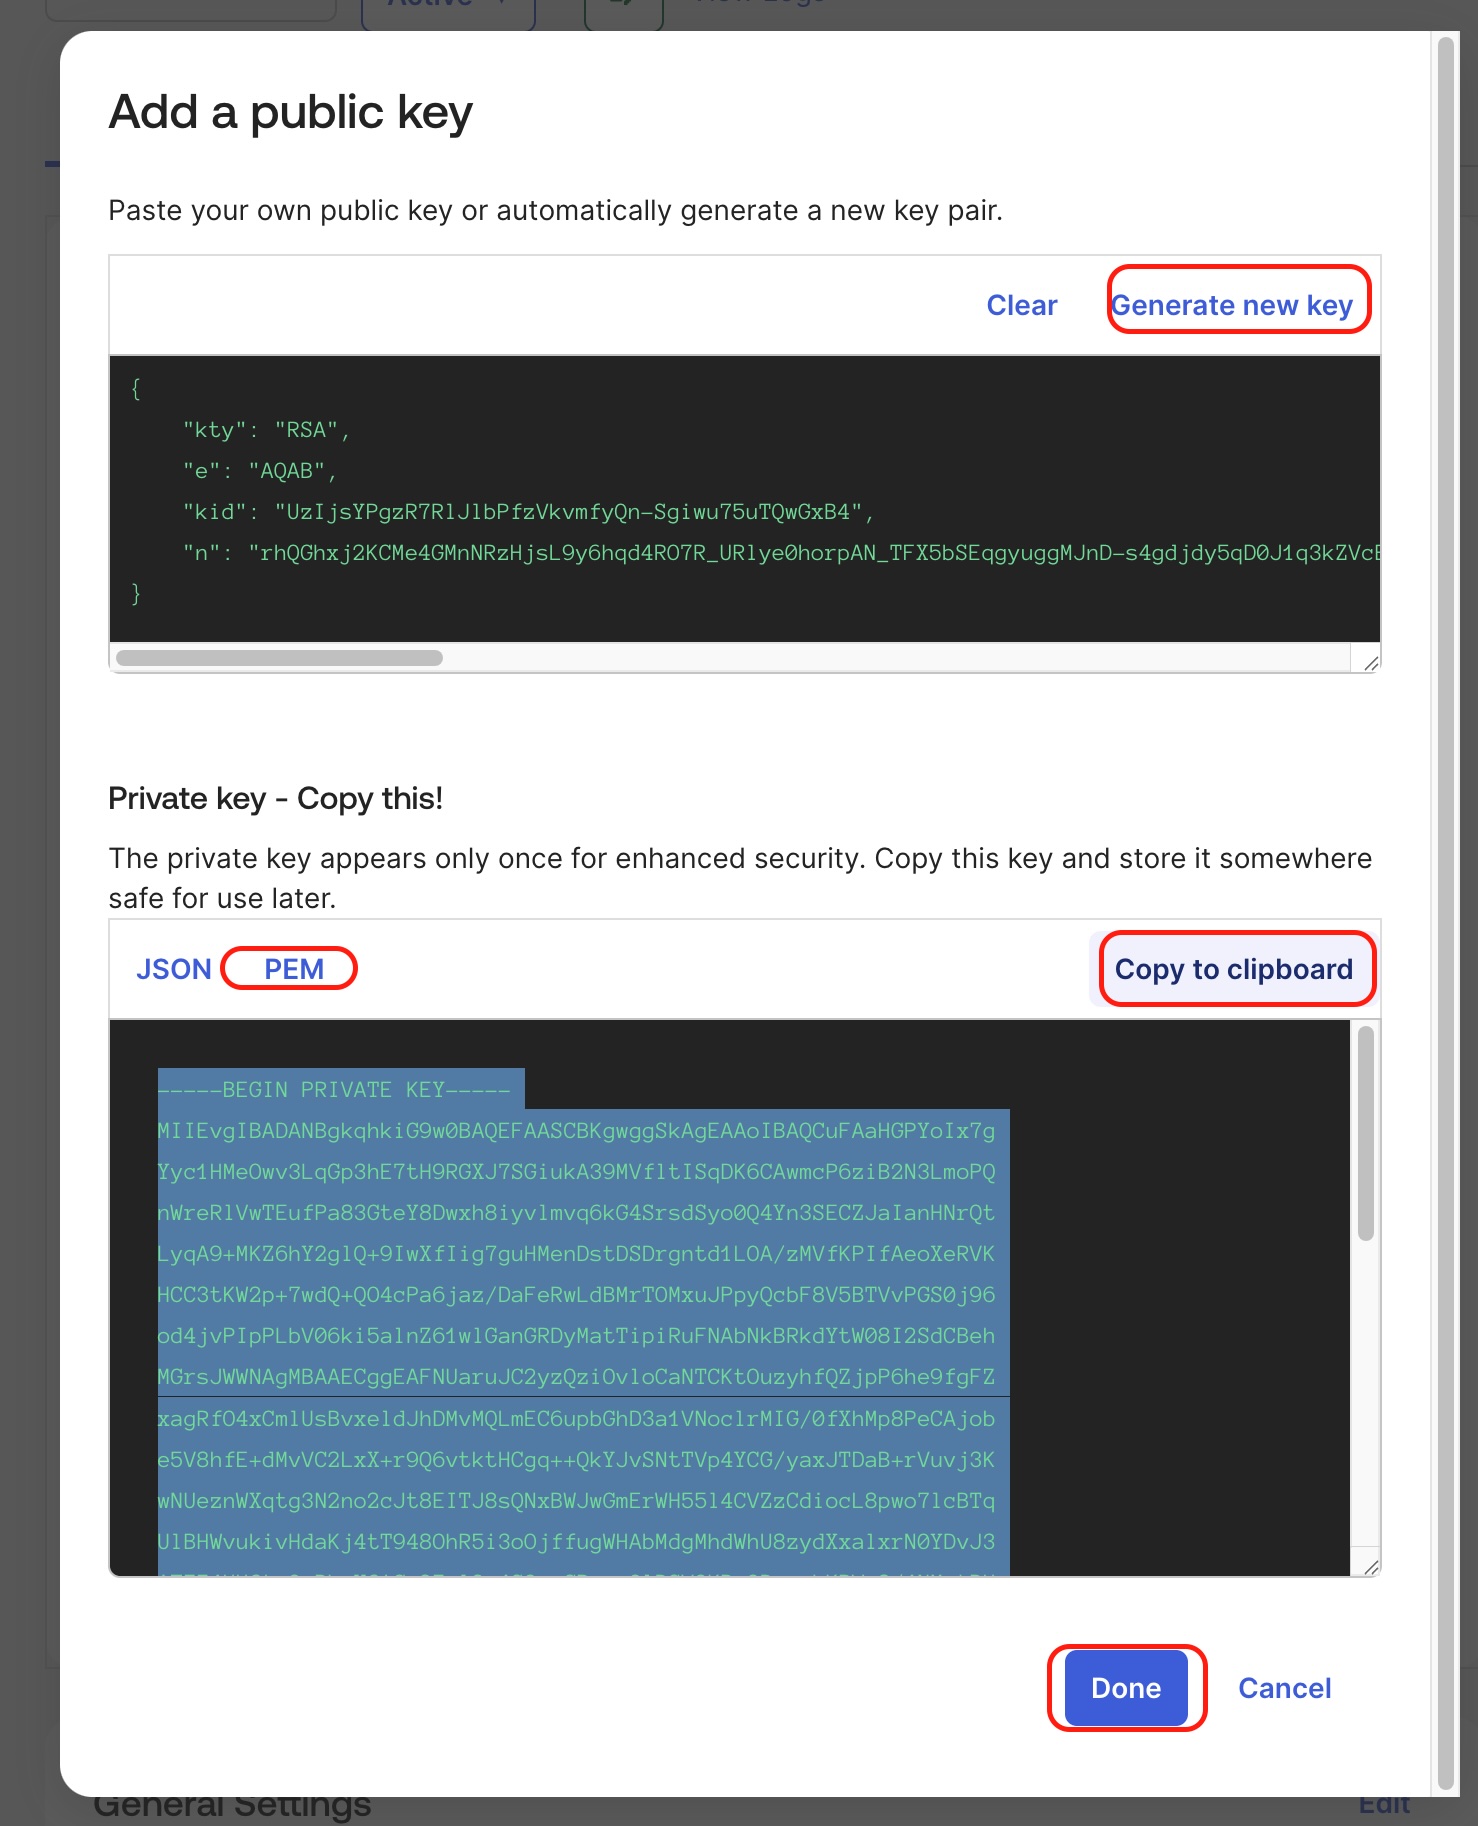
Add a public key: either generate it in Okta (recommended) and copy it in PEM format, or upload your own keys.
-
Copy the Client ID and Key ID (KID).
-
Disable Proof of Possession in the General tab.
-
Grant the necessary API scopes (e.g.,
okta.users.read,okta.groups.manage) and provide administrator access as needed.
Configuring your client
You can use Okta’s MCP server with any MCP-compatible client. Whether running a lightweight desktop agent, experimenting in a local environment, or wiring it into a production workflow, the setup pattern is the same.
For this guide, we’ll walk through the setup in Visual Studio Code with GitHub Copilot - one of the most popular environments for developers. The steps will be similar if you use another client like Claude Desktop or AWS Bedrock.
Using the Okta Open Source MCP Server with VS Code
Enable agent mode in GitHub Copilot
The Okta Open Source MCP server integrates with VS Code through Copilot’s agent mode.
-
Install the GitHub Copilot extension Open the Copilot Chat view in VS Code.
-
To enable the Agent mode, checkout the steps mentioned in the VS Code docs.
Update your VS Code settings
Next, you’ll tell VS Code how to start and communicate with the Okta Open Source MCP server. Create a folder named .vscode in your project directory, then add a new file inside it called mcp.json. Copy and paste the configuration below into that file and save it.
{
  "inputs": [
    {
      "type": "promptString",
      "description": "Okta Organization URL (e.g., https://trial-123456.okta.com)",
      "id": "OKTA_ORG_URL"
    },
    {
      "type": "promptString",
      "description": "Okta Client ID",
      "id": "OKTA_CLIENT_ID",
      "password": true
    },
    {
      "type": "promptString",
      "description": "Okta Scopes (separated by whitespace, e.g., 'okta.users.read okta.groups.manage')",
      "id": "OKTA_SCOPES"
    },
    {
      "type": "promptString",
      "description": "Okta Private Key. Required for 'browserless' auth.",
      "id": "OKTA_PRIVATE_KEY",
      "password": true
    },
    {
      "type": "promptString",
      "description": "Okta Key ID (KID) for the private key. Required for 'browserless' auth.",
      "id": "OKTA_KEY_ID",
      "password": true
    }
  ],
  "servers": {
    "okta-mcp-server": {
      "command": "uv",
      "args": [
        "run",
        "--directory",
        "/path/to/the/okta-mcp-server", // Replace this path with your own project directory
        "okta-mcp-server"
      ],
      "env": {
        "OKTA_ORG_URL": "${input:OKTA_ORG_URL}",
        "OKTA_CLIENT_ID": "${input:OKTA_CLIENT_ID}",
        "OKTA_SCOPES": "${input:OKTA_SCOPES}",
        "OKTA_PRIVATE_KEY": "${input:OKTA_PRIVATE_KEY}",
        "OKTA_KEY_ID": "${input:OKTA_KEY_ID}"
      }
    }
  }
}
Note: Before running the server, make sure to replace the placeholder path
/path/to/the/okta-mcp-serverwith the actual directory path of your local project
Running the server for the first time prompts you to enter the following information:
- Okta Organization URL: Your Okta tenant URL.
- Okta Client ID: The client ID of the application you created in your Okta organization.
- Okta Scopes: The scopes you want to grant to the application, separated by spaces. For example:
"OKTA_SCOPES": "${input:OKTA_SCOPES = okta.users.read okta.users.manage okta.groups.read okta.groups.manage okta.logs.read okta.policies.read okta.policies.manage okta.apps.read okta.apps.manage}"Note: Add scopes only for the APIs that you will be using.
- Okta Private Key and Key ID: You only need to enter this key when using browserless authentication. If you’re not using that method, just press Enter to skip this step and use the Device Authorization flow instead.
Start the server
When you open VS Code, you’ll now see okta-mcp-server as an option to start.
-
Click Start to launch the server in your
mcp.jsonfile.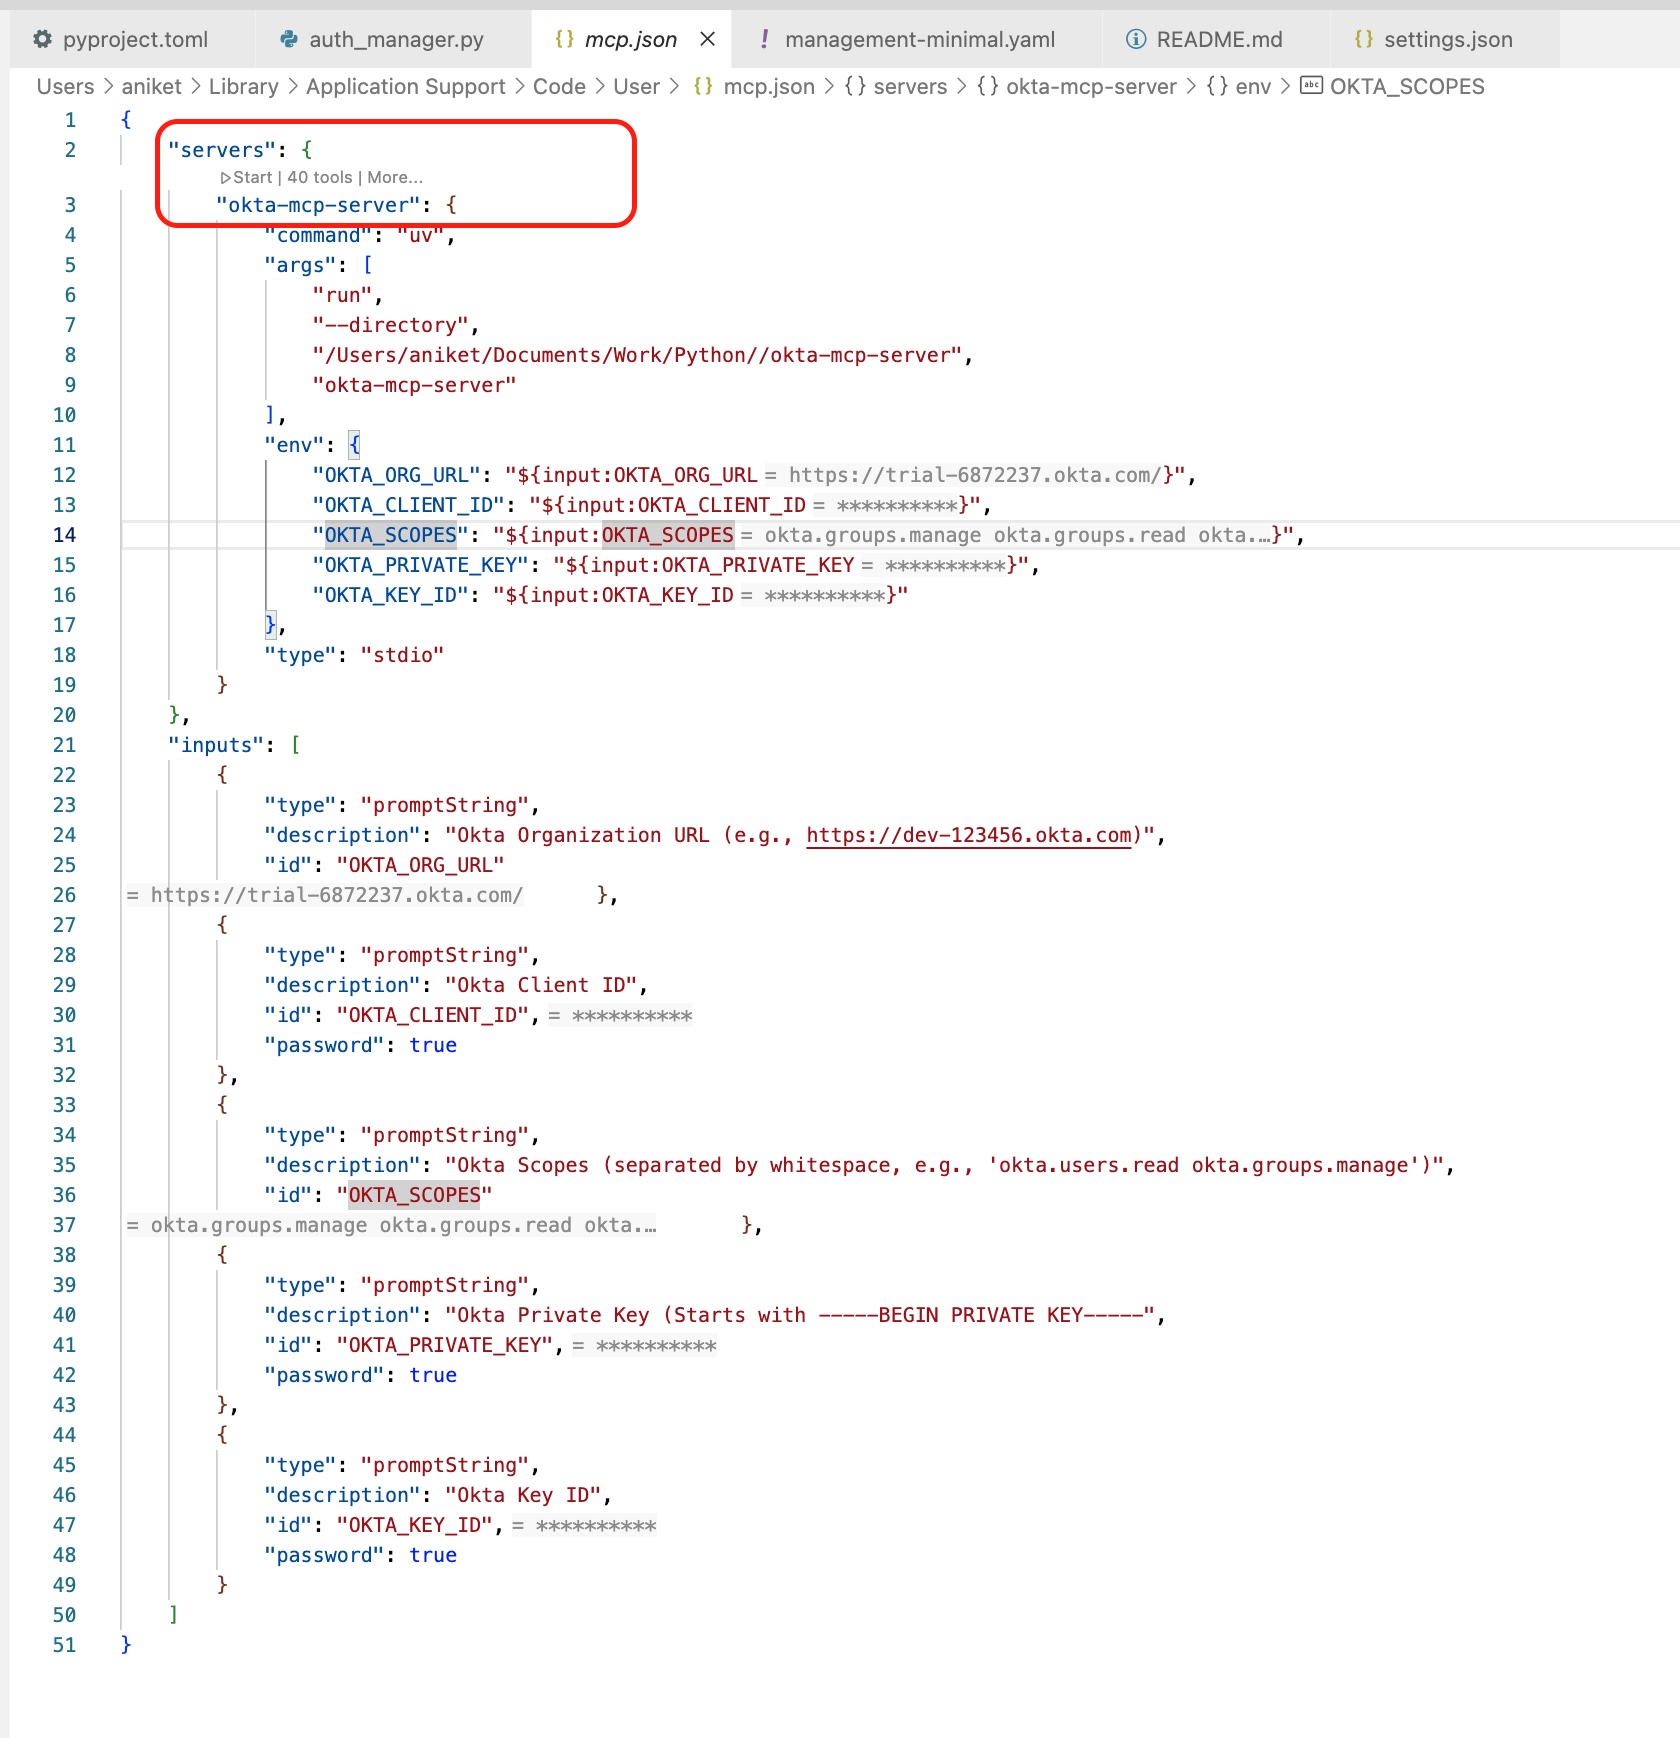
- The server will check your authentication method:
-
If using Device Authorization, it triggers a prompt to log in via your browser.
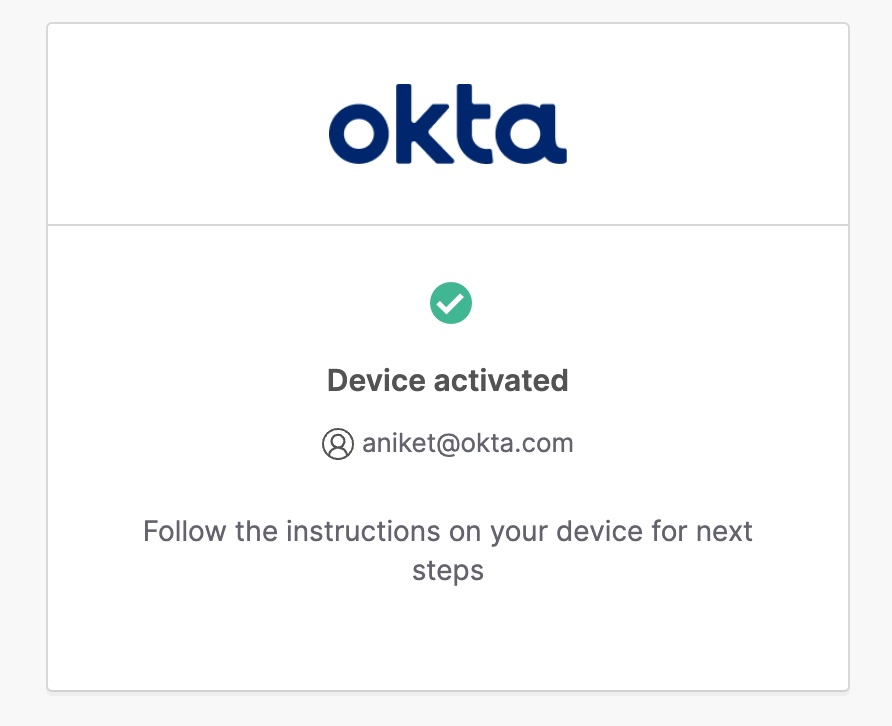
-
If using Private Key JWT, it will authenticate silently using your key.
-
- Once connected, Copilot will automatically recognize the Okta commands you can use.
At this point, the MCP server has established a connection between VS Code and your Okta organization.You can now manage your organization using natural language commands directly in your editor.
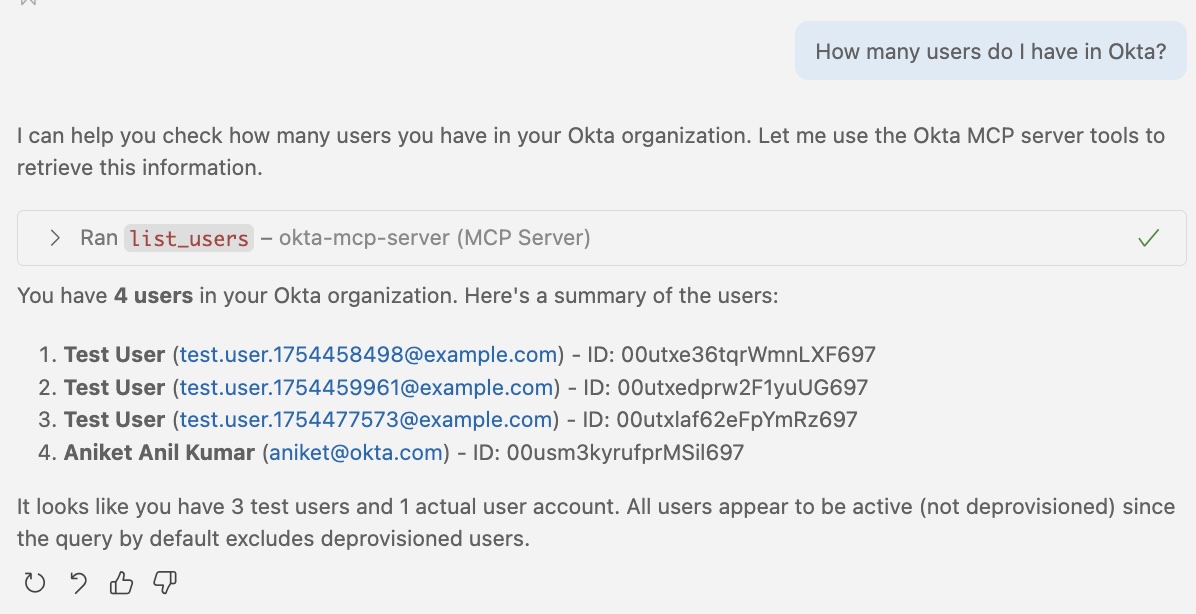
Examples in action
1. Listing Users
2. Creating Users
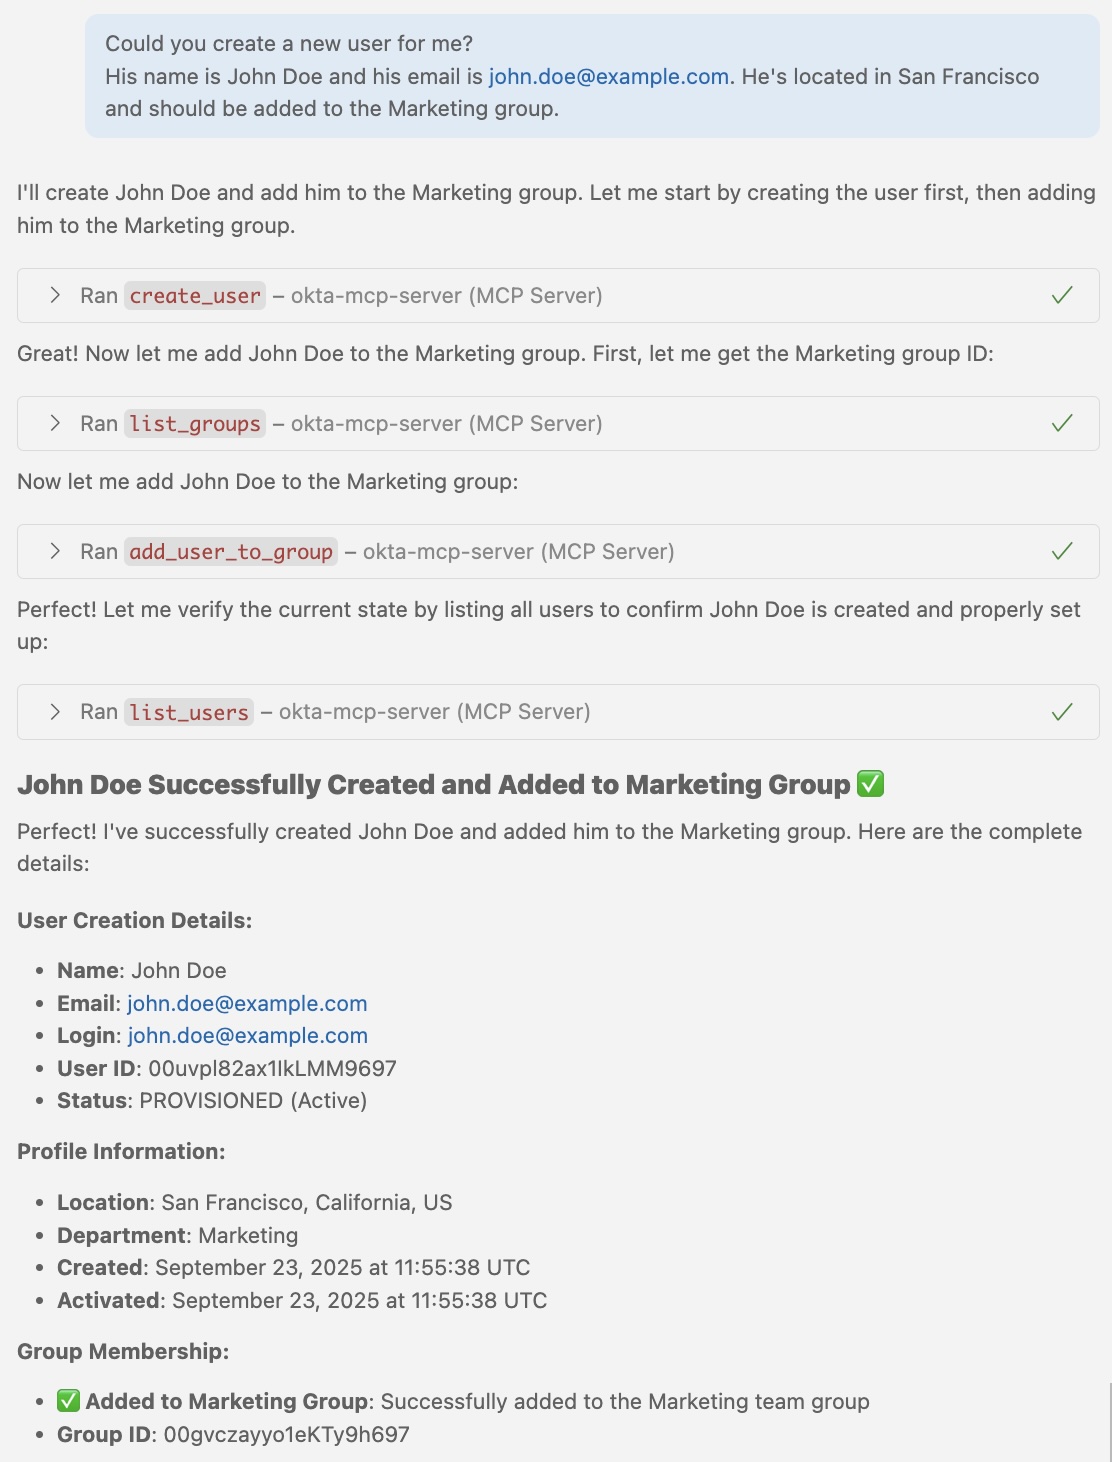
3. Group Assignment
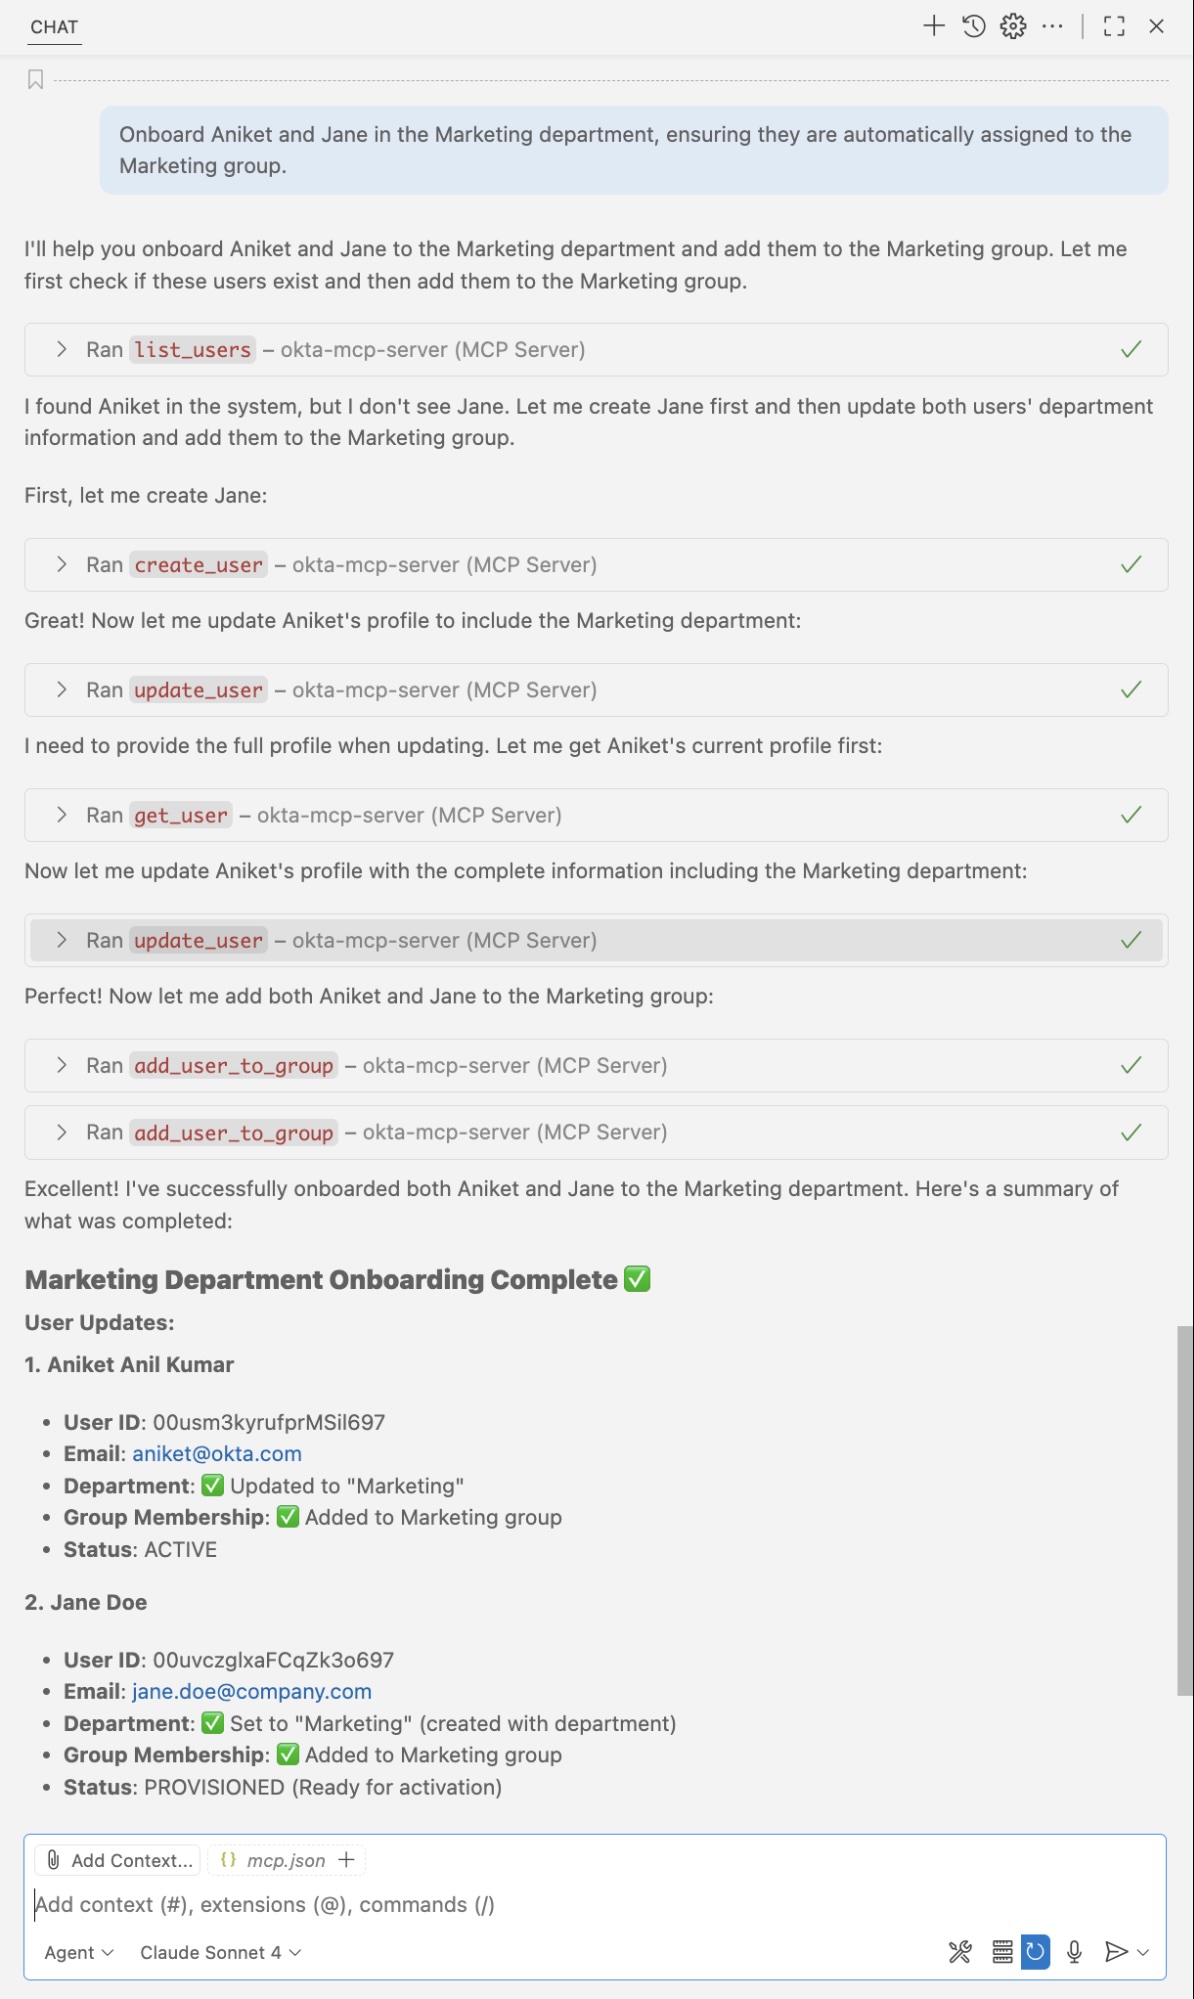
4. Creating an Audit Report
We invite you to try out the Okta Open Source MCP Server and experience the future of identity and access management. Meet us at Oktane, and if you run into issues, please open an issue in our GitHub repository.
Read more about Cross App Access, OAuth 2.0, and securing your applications
- Integrate Your Enterprise AI Tools with Cross App Access
- Build Secure Agent-to-App Connections with Cross App Access (XAA)
- OAuth 2.0 and OpenID Connect overview
- Why You Should Migrate to OAuth 2.0 From Static API Tokens
- How to Secure the SaaS Apps of the Future
Follow us on LinkedIn, Twitter, and subscribe to our YouTube channel for more developer content. If you have any questions, please leave a comment below!
Swetha is a Product Manager at Okta who takes care of Developer Products such as the Terraform Provider, SDKs & the Okta Open Source MCP server. She's always curious about the latest technologies and enjoys building customer experiences around them. Outside of work, she is a big movie buff, who loves making & watching movies.
Okta Developer Blog Comment Policy
We welcome relevant and respectful comments. Off-topic comments may be removed.