JHipster Microservices on AWS with Amazon Elastic Kubernetes Service
In this tutorial, you’ll use JHipster to build a microservice stack and deploy it to Amazon Elastic Kubernetes Service (EKS). The microservices will use Java and Spring Boot for resource servers and Vue for the frontend. The server-side applications will use Spring’s Reactive technology stack. The microservice will include multiple databases and database types: PostgresSQL, MongoDB, and Neo4j. You’ll secure the service using OAuth 2.0 and OpenID Connect (OIDC), with Okta as the OIDC provider. With Kubernetes secrets and kubeseal, you’ll encrypt all of the secrets in the project configuration files. To generate the project, you’ll use JHipster CLI and the JHipster Domain Language (JDL).
Prerequisites
Before you get started, install the required software listed below. You’ll need to sign up for an Amazon Web Services account and a free Okta account (which you will be able to sign up for later using the Okta CLI). The Kubernetes cluster required to finish this tutorial does not qualify for free tier on AWS. However, if you are careful about stopping and deleting the cluster when not actively working on the tutorial, the cost should be very small, only a few dollars.
- Docker: you’ll need to have Docker Engine installed.
- Docker Hub: you’ll need a Docker Hub account to host the Docker images so that EKS can pull them.
- Java 11: this tutorial requires Java 11. If you need to manage multiple Java versions, SDKMAN! is a good solution. Check out their docs to install it.
- JHipster CLI: you’ll use the JHipster CLI to bootstrap the application. To install with
npmjust usenpm install -g generator-jhipster - Okta CLI: you’ll use Okta to add security to the microservice network. You can register for a free account from the CLI.
- Amazon Web Services: sign up for an AWS account.
- AWS CLI: Amazon Web Service CLI
- eksctl: you’ll use
eksctlto create your cluster on EKS - kubectl: CLI to manage Kubernetes clusters. As of the time I was writing this tutorial, there was a bug in
kubectlversion 1.24 that results in an “invalid apiVersion” error. You can avoid this error by installing version 1.23.6.
For more info on the kubectl error, see this issue on GitHub.
The error looks like this:
2022-05-31 18:56:08 [✖]  parsing kubectl version string  (upstream error: error: exec plugin: invalid apiVersion "client.authentication.k8s.io/v1alpha1"
) / "0.0.0": Version string empty
On Linux, to install version 1.23.6, you can use the following commands.
curl -LO https://storage.googleapis.com/kubernetes-release/release/v1.23.6/bin/linux/amd64/kubectl
sudo install -o root -g root -m 0755 kubectl /usr/local/bin/kubectl
For Windows and Mac, there are instructions on how to install specific versions on the kubernetes docs pages.
Just so you have a general idea of what you’re going to do, the basic steps in this tutorial are:
- Generate the microservice applications and Kubernetes descriptor files using JHipster
- Build the apps and push the Docker images to Docker Hub
- Configure the services to use Okta for OIDC authentication
- Create an Amazon EKS cluster
- Deploy the microservice stack to EKS (which will pull your Docker images and deploy them to AWS EKS)
- Test the app
Note: In May 2025, the Okta Integrator Free Plan replaced Okta Developer Edition Accounts, and the Okta CLI was deprecated.
We preserved this post for reference, but the instructions no longer work exactly as written. Replace the Okta CLI commands by manually configuring Okta following the instructions in our Developer Documentation.
Generate the application using the JHipster generator
The JHipster generator makes it easy to bootstrap complex applications, including microservices with multiple services and domain models. You can read more about it in the JHipster docs. In this tutorial, you are going to create a microservice using the JHipster Domain Language.
This will generate a microservice with four services:
- JHipster registry
- JHipster API gateway
- Store
- Blog
When you look at the DSL below, you might notice that there isn’t a registry application listed. The JHipster registry is a standard application in the JHipster microservice stack that doesn’t need to be defined. It includes a Eureka server and a Spring Cloud Config server. The Eureka server is a Spring Cloud Netflix service discovery registry that allows services to find each other on the network. The Spring Cloud Config server allows the centralization of service configuration. You’ll use it to centralize the Okta OAuth 2.0 and OIDC configuration, among other things, allowing you to configure all of the services to use the same OIDC application from the same configuration point.
The JHipster API gateway is the front-facing, public face of the application. It has a Vue front-end and a PostgresSQL database backend. The gateway also includes features like load balancing and circuit breaking. Public requests to the service go through the gateway.
The store and blog applications are backend resource servers with MongoDB and Neo4j databases (respectively).
Create a file called app.jdl in the root directory for the project. Paste the contents below into the file. You need to add your docker repository name at the bottom in place of the placeholder {your-docker-repository-name}.
application {
  config {
    baseName gateway
    reactive true
    packageName com.okta.developer.gateway
    applicationType gateway
    authenticationType oauth2
    buildTool gradle
    clientFramework vue
    prodDatabaseType postgresql
    serviceDiscoveryType eureka
    testFrameworks [cypress]
  }
  entities Blog, Post, Tag, Product
}

application {
  config {
    baseName blog
    reactive true
    packageName com.okta.developer.blog
    applicationType microservice
    authenticationType oauth2
    buildTool gradle
    databaseType neo4j
    prodDatabaseType neo4j
    devDatabaseType neo4j
    enableHibernateCache false
    serverPort 8081
    serviceDiscoveryType eureka
  }
  entities Blog, Post, Tag
}

application {
  config {
    baseName store
    reactive true
    packageName com.okta.developer.store
    applicationType microservice
    authenticationType oauth2
    buildTool gradle
    databaseType mongodb
    prodDatabaseType mongodb
    devDatabaseType mongodb
    enableHibernateCache false
    serverPort 8082
    serviceDiscoveryType eureka
  }
  entities Product
}

entity Blog {
  name String required minlength(3)
  handle String required minlength(2)
}

entity Post {
  title String required
  content TextBlob required
  date Instant required
}

entity Tag {
  name String required minlength(2)
}

entity Product {
  title String required
  price BigDecimal required min(0)
  image ImageBlob
}

relationship ManyToOne {
  Blog{user(login)} to User
  Post{blog(name)} to Blog
}

relationship ManyToMany {
  Post{tag(name)} to Tag{post}
}

paginate Post, Tag with infinite-scroll
paginate Product with pagination

microservice Product with store
microservice Blog, Post, Tag with blog

deployment {
  deploymentType kubernetes
  appsFolders [gateway, blog, store]
  dockerRepositoryName "{your-docker-repository-name}"
  kubernetesNamespace demo
  serviceDiscoveryType eureka
  kubernetesServiceType LoadBalancer
}
From the root project directory, run the generator.
jhipster jdl app.jdl
This will probably take a minute or so to complete.
It should end with something like the following output.
...

INFO! Alternatively, you can use Jib to build and push image directly to a remote registry:
  ./gradlew bootJar -Pprod jib -Djib.to.image={your-docker-repository-name}/gateway in /home/andrewcarterhughes/Development/okta/2022/aws-kubernetes/gateway
  ./gradlew bootJar -Pprod jib -Djib.to.image={your-docker-repository-name}/blog in /home/andrewcarterhughes/Development/okta/2022/aws-kubernetes/blog
  ./gradlew bootJar -Pprod jib -Djib.to.image={your-docker-repository-name}/store in /home/andrewcarterhughes/Development/okta/2022/aws-kubernetes/store

You can deploy all your apps by running the following kubectl command:
  bash kubectl-apply.sh -f

[OR]

If you want to use kustomize configuration, then run the following command:
  bash kubectl-apply.sh -k

Use these commands to find your application's IP addresses:
  kubectl get svc gateway -n demo

INFO! Generator kubernetes succeed
Congratulations, JHipster execution is complete!
Sponsored with ❤️  by @oktadev.
If you look at the directories in your root project, you’ll see four subdirectories.
├── blog
├── gateway
├── kubernetes
└── store
Three of the directories are the application projects for your services: blog, store, and gateway. Remember that the registry uses a stock image, so it doesn’t need a local project. The fourth directory, kubernetes, holds the descriptor files for the kubernetes deployments (YAML files that tell Kubernetes how to deploy your applications from the Docker images).
If you looked in that directory, you’d see four subdirectories (as well as some other files).
├── blog-k8s
├── gateway-k8s
├── registry-k8s
└── store-k8s
These four directories hold the deployment descriptors for the Kubernetes services that correspond to the four applications in the microservice.
Update MongoDB headless service configuration
You also need to update the Kubernetes deployment definition for the store’s headless MongoDB service. This fixes a problem with the store not being able to find the database. This entry is at the bottom of the file.
kubernetes/store-k8s/store-mongodb.yml
# Headless service for DNS record
apiVersion: v1
kind: Service
...
spec:
  type: ClusterIP
  clusterIP: None
  publishNotReadyAddresses: true  # <- ADD ME
  ...
Use Jib to build the Docker images and push to your Docker Hub registry
Kubernetes on AWS needs to be able to access your Docker images. The easiest way to do this is to push them to your Docker Hub account (which you should have already signed up for, if you didn’t already have one).
Gradle and Jib make this super easy. In fact, you have the commands you need in your console output. You can copy and paste them from there and run them in the correct directories. You cannot copy and paste the commands from my terminal listing above without replacing the docker repository name.
Make sure you are logged into Docker.
docker login
The commands to build the Docker images and push them to Docker Hub are the following. You must replace {your-docker-repository-name} with your actual docker repository name and run these commands in the correct project subdirectories.
# in ./gateway
./gradlew bootJar -Pprod jib -Djib.to.image={your-docker-repository-name}/gateway
# in ./blog
./gradlew bootJar -Pprod jib -Djib.to.image={your-docker-repository-name}/blog
# in ./store
./gradlew bootJar -Pprod jib -Djib.to.image={your-docker-repository-name}/store
You’re only building the blog, store, and gateway, not the registry. This is because the registry using a stock image and you don’t have to build it.
Configure OAuth Security with Okta
Before you start, you’ll need a free Okta developer account. Install the Okta CLI. Run okta register to sign up for a new account. If you already have an account, run okta login.
Then, from the root project directory, open a Bash shell and run okta apps create jhipster.
The default app name is fine. Or change it. Also accept the default redirect URIs.
My output looked like this:
Application name [kubernetes]:
Redirect URI
Common defaults:
 Spring Security - http://localhost:8080/login/oauth2/code/okta
 JHipster - http://localhost:8080/login/oauth2/code/oidc
 Quarkus OIDC - http://localhost:8080/callback
Enter your Redirect URI(s) [http://localhost:8080/login/oauth2/code/oidc, http://localhost:8761/login/oauth2/code/oidc]:
Enter your Post Logout Redirect URI(s) [http://localhost:8080/, http://localhost:8761/]:
Configuring a new OIDC Application, almost done:
Created OIDC application, client-id: 0oa7pu3434DasvWSo4x7
Creating Authorization Server claim 'groups':
Adding user 'andrew.hughes@mail.com' to groups: [ROLE_USER, ROLE_ADMIN]
Existing group 'ROLE_USER' found
Existing group 'ROLE_ADMIN' found
|
Okta application configuration has been written to: /home/andrewcarterhughes/Development/okta/2022/aws-kubernetes/QA1/kubernetes/.okta.env
This command creates an OIDC application on the Okta servers for you. It also creates a groups claim on your authorization server and adds to groups: ROLE_USER and ROLE_ADMIN. The group names have ROLE_ prefixed to them because of the way Spring Boot processes group names. You need these default groups for authentication to work.
Remember the name of the OIDC application. You’ll need to find it in the Okta Admin Console later. The okta apps command creates a config file named .okta.env. This should look something like the following.
export SPRING_SECURITY_OAUTH2_CLIENT_PROVIDER_OIDC_ISSUER_URI="https://dev-123456.okta.com/oauth2/default"
export SPRING_SECURITY_OAUTH2_CLIENT_REGISTRATION_OIDC_CLIENT_ID="0oa7pu3434DasvWSo4x7"
export SPRING_SECURITY_OAUTH2_CLIENT_REGISTRATION_OIDC_CLIENT_SECRET="09328uu098u4..."
The microservices use Spring Cloud Config to centralize configuration (this service is part of the JHipster registry). This means that you can configure the entire microservice to use Okta as an OAuth and OpenID Connect (OIDC) provider in a single place.
Open kubernetes/registry-k8s/application-configmap.yml. Add the following at the end of the data.application.yml entry (before the jhipster-registry.yml entry), filling in the issuer-uri, client-id, and client-secret taken from the .okta.env file.
This is the Spring Cloud Config file that the JHipster registry will serve to the entire microservice network.
kubernetes/registry-k8s/application-configmap.yml
data:
  application.yml: |-
    ...
    spring:
      security:
        oauth2:
          client:
            provider:
              oidc:
                issuer-uri: https://<your-okta-domain>/oauth2/default
            registration:
              oidc:
                client-id: <client-id>
                client-secret: <client-secret>
# app specific configuration
jhipster-registry.yml: |-
  ...
You also need to configure the registry to use OAuth. In the kubernetes/registry-k8s/jhipster-registry.yml file, add oauth2 to the values under SPRING_PROFILES_ACTIVE (as shown below).
kubernetes/registry-k8s/jhipster-registry.yml
spec:
  containers:
    - name: jhipster-registry
      env:
        - name: SPRING_PROFILES_ACTIVE
          value: prod,k8s,oauth2
Create an Amazon Elastic Kubernetes (EKS) cluster
Now you are going to create the EKS cluster on AWS using the eksctl CLI.
You should have the AWS CLI and eksctl installed and configured already. Use the following command to create the Kubernetes cluster for the microservice. After you run the command, go get some coffee or lunch. This command is slooooow.
eksctl create cluster --name okta-k8s \
    --region us-west-2 \
    --nodegroup-name okta-k8s-nodes \
    --node-type t2.xlarge \
    --nodes 2
This will take several minutes to run.
IMPORTANT: This cluster costs money as long as it is running. If you only keep it running for the hour or so you need to run the tutorial, the costs are small. If you forget and leave it running for a month or two, it could cost a lot more. Don’t forget to delete it when you are done!
You are using a managed cluster with EC2 nodes. You are not using the newer, Fargate managed clusters because when I tried Fargate I ran into problems. There are reports of a compatibility problem between Fargate and Eureka. See this google groups thread and this GitHub repository.
You can look at the AWS docs on managed node groups for more in-depth information. Basically, though, being managed means that you do not need to separately provision and register the EC2 instances in the node group. The EC2 instances and Kubernetes nodes are packaged together and managed as a unit. Unmanaged node groups allow you to separate the node group management from the EC2 instances, allowing for finer control but also requiring more direct involvement in instance management.
Troubleshoot problems using AWS CloudFormation
If you have a problem, you can log into the AWS console and search for the CloudFormation tool. CloudFormation is an AWS service that (according to their docs) “helps you model and set up your AWS resources.” It allows you to create templates for configuring and provisioning resources and can help with dependencies between AWS resources. The eksctl tool uses CloudFormation behind the scenes.
My console ended with this non-specific error.
2022-06-17 09:32:51 [ℹ]  waiting for CloudFormation stack "eksctl-okta-k8s-nodegroup-okta-k8s-nodes"
2022-06-17 09:32:51 [!]  1 error(s) occurred and cluster hasn't been created properly, you may wish to check CloudFormation console
2022-06-17 09:32:51 [ℹ]  to cleanup resources, run 'eksctl delete cluster --region=us-west-2 --name=okta-k8s'
2022-06-17 09:32:51 [✖]  waiter state transitioned to Failure
Error: failed to create cluster "okta-k8s"
When I logged into AWS and opened CloudFormation, I saw this on the console.
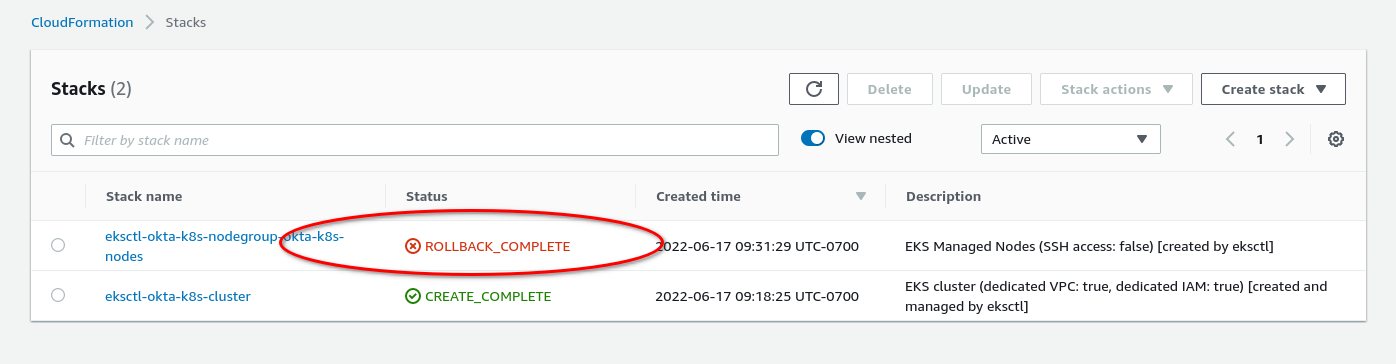
The cluster was created successfully, but the node group failed. I clicked on the node group name. Then I selected the events tab. Scrolling down, I found the error.
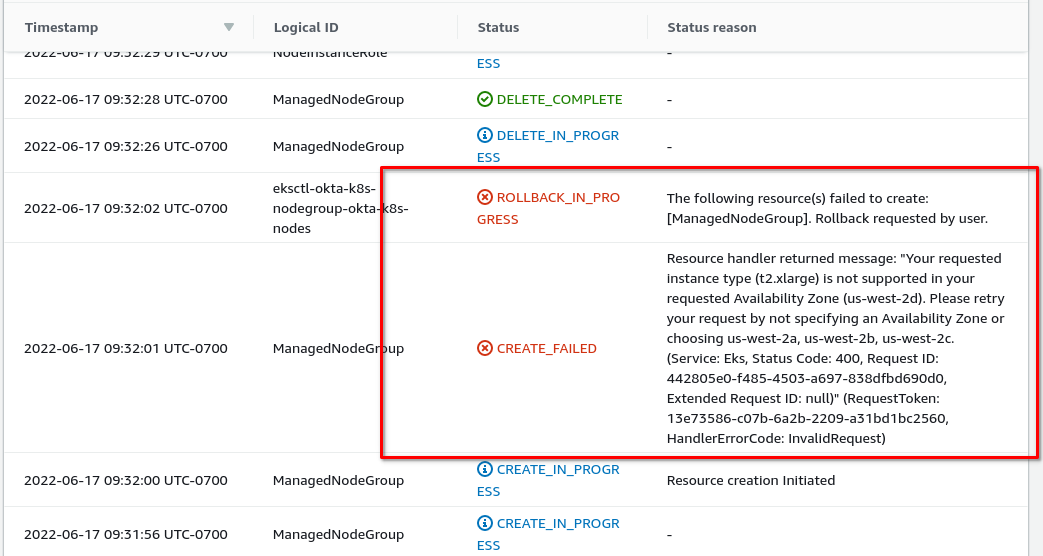
The error reads:
Resource handler returned message: “Your requested instance type (t2.xlarge) is not supported in your requested Availability Zone (us-west-2d). Please retry your request by not specifying an Availability Zone or choosing us-west-2a, us-west-2b, us-west-2c. (Service: Eks, Status Code: 400, Request ID: 442805e0-f485-4503-a697-838dfbd690d0, Extended Request ID: null)” (RequestToken: 13e73586-c07b-6a2b-2209-a31bd1bc2560, HandlerErrorCode: InvalidRequest)
I needed to add an additional flag to my command to specify an availability zone. If you look at the eksctl docs, there’s a note about this for the us-east-1 region. This was the first time I’d run into it in the us-west-1 region.
--zones=us-west-2a,us-west-2b,us-west-2c
I deleted the cluster and cleaned up using:
eksctl delete cluster --region=us-west-2 --name=okta-k8s
And tried it again:
eksctl create cluster --name okta-k8s \
--region us-west-2 \
--zones=us-west-2a,us-west-2b,us-west-2c \
--nodegroup-name okta-k8s-nodes \
--node-type t2.xlarge \
--nodes 2
You may have to rename the cluster. I found that sometimes even though the cluster resources have been deleted, the name is still unavailable.
Perhaps you are wondering, if you got this error, why I didn’t include the --zones flag in the original command. Was it just for the teachable moment? Not entirely. I wasn’t sure if the availability in the zones is consistent enough to warrant including the specific zones in the original command.
Deploy the JHipster Kubernetes microservice to EKS
Next you’ll use kubectl to deploy the microservice to AWS EKS. Before you do that, if you haven’t already, you should install a tool for monitoring the services. Both k9s and Kubernetes Lens are great. Installing one of these tools isn’t strictly necessary. You can do everything from the kubectl if you want, but life is short. Live a little. Use a GUI instead of the CLI. Step away from the vim and try an IDE. Nobody will know. You’ll still be cool.
Open a Bash shell and navigate to the kubernetes subdirectory of the project.
Run the following command to update your local Kubernetes configuration with the AWS EKS cluster config.
aws eks update-kubeconfig --name okta-k8s
If you don’t do this, you may see the following error.
Kubeconfig user entry is using deprecated API version client.authentication.k8s.io/v1alpha1. Run 'aws eks update-kubeconfig' to update.
Now you’re ready to deploy the microservice.
Run the following command (again, from the kubernetes subdirectory).
./kubectl-apply.sh -f
To use the CLI to check on the pods, you can use:
kubectl get pods -n demo
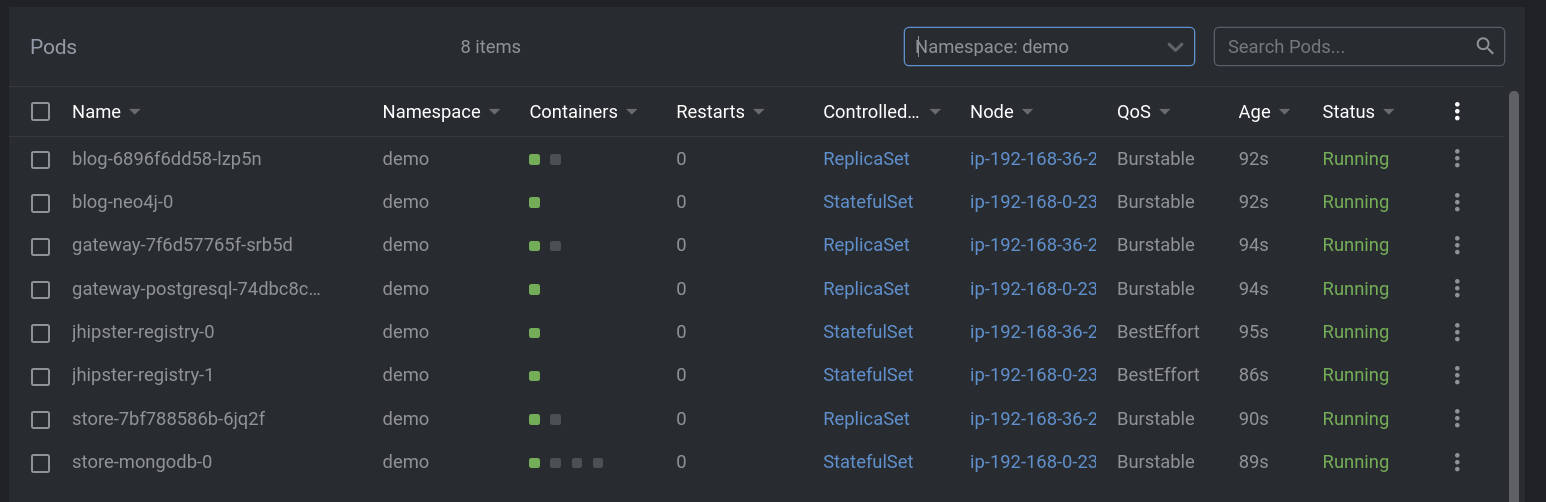
Hopefully everything has a status of running. If not, something is wrong.
NAME                                  READY   STATUS    RESTARTS   AGE
blog-6896f6dd58-lzp5n                 1/1     Running   0          15m
blog-neo4j-0                          1/1     Running   0          15m
gateway-7f6d57765f-srb5d              1/1     Running   0          15m
gateway-postgresql-74dbc8c987-zf9n7   1/1     Running   0          15m
jhipster-registry-0                   1/1     Running   0          15m
jhipster-registry-1                   1/1     Running   0          15m
store-7bf788586b-6jq2f                1/1     Running   0          15m
store-mongodb-0                       1/1     Running   0          15m
In K8s Lens, here’s what it looks like:
Another useful command is describe (I won’t replicate the output here). This is great for more detailed information for debugging.
kubectl describe pod <pod-name> -n demo
You can also tail logs of a specific pod using the following command.
kubectl logs <pod-name> --tail=-1 -n demo
To access the Eureka registry service, you need to forward the port.
kubectl port-forward svc/jhipster-registry -n demo 8761
Open a browser and navigate to http://localhost:8761. You may have to log in if you aren’t already logged into Okta.
You want to see a lot of green.
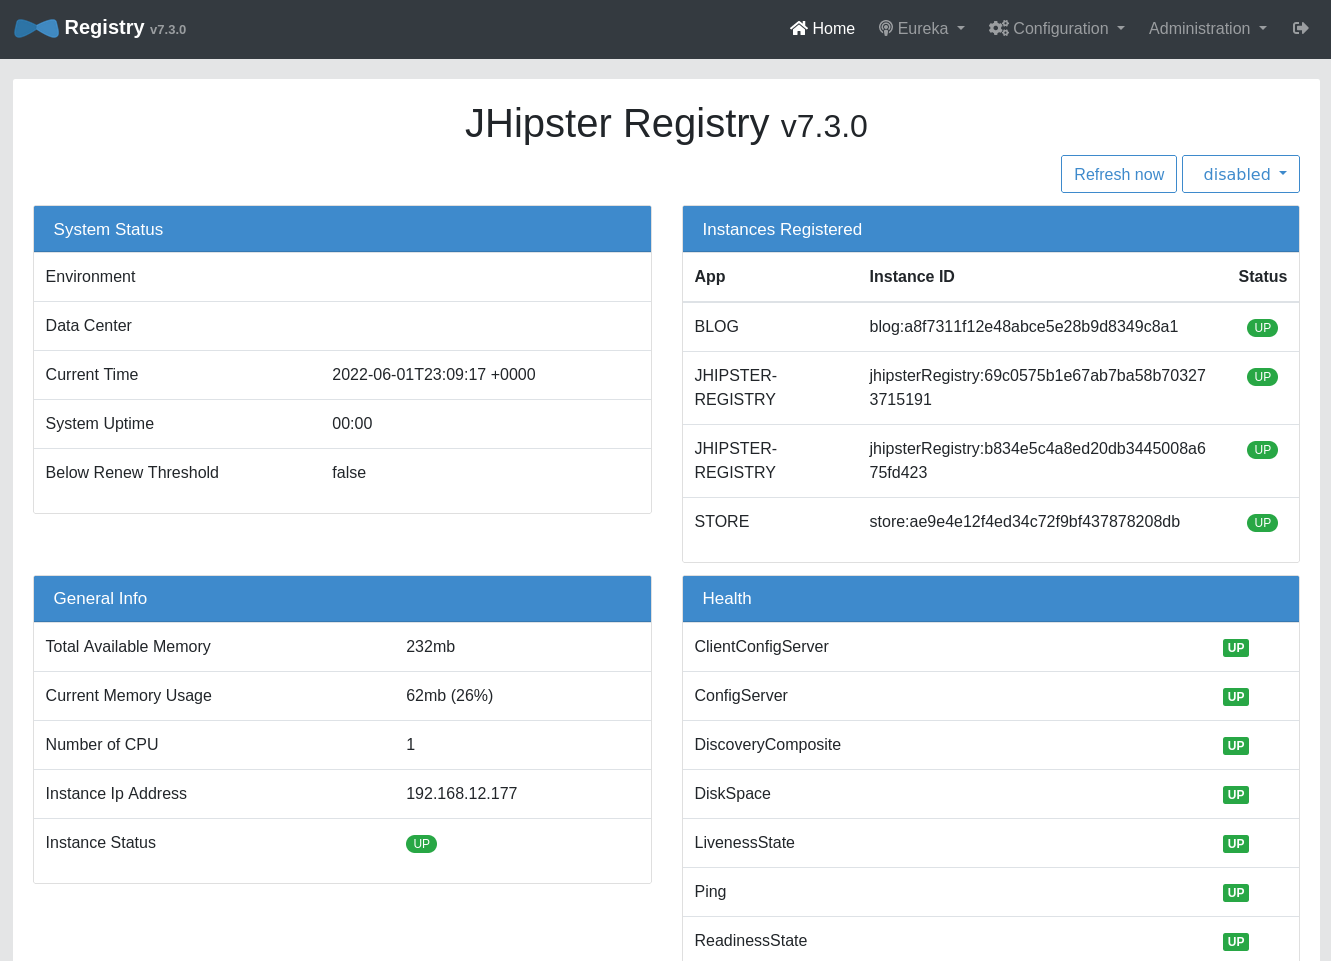
If everything is good, control-c to stop forwarding the registry. Forward the gateway and open it.
kubectl port-forward svc/gateway -n demo 8080
Open http://localhost:8080
You’ll see the front page of the demo application.
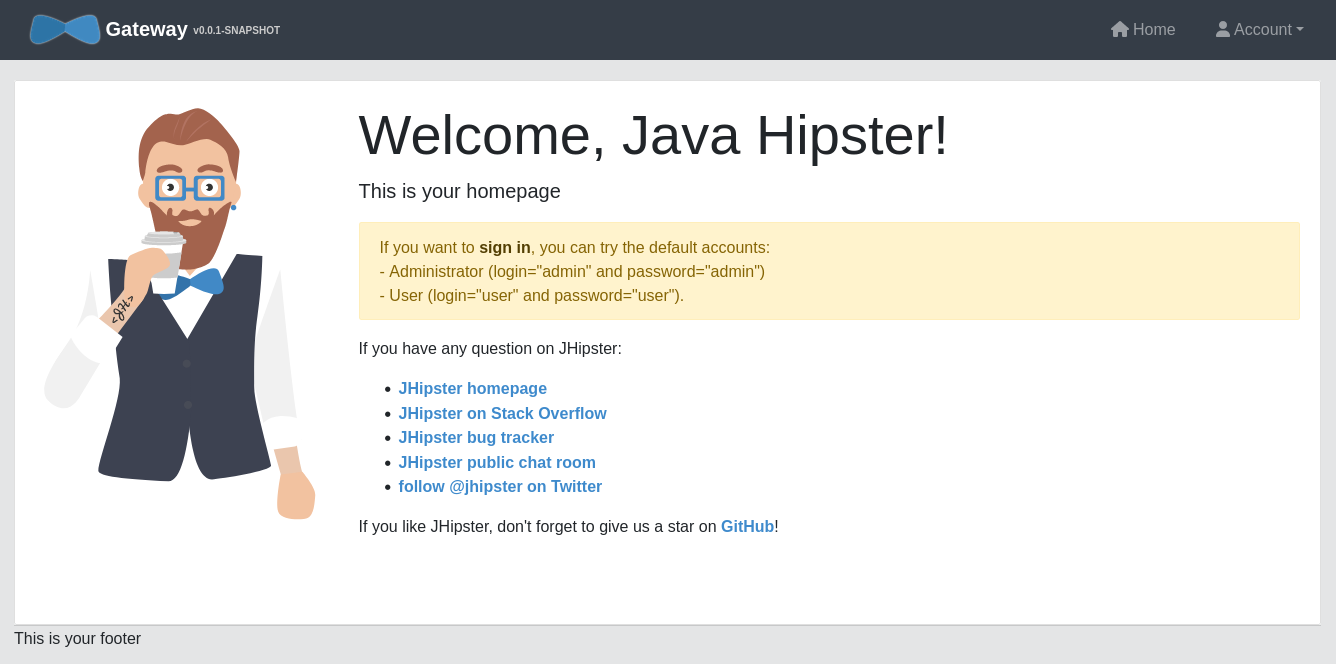
Go to Account and Sign in.
If you are already logged into Okta, you won’t have to log in again. Otherwise you’ll be redirected to the Okta SSO sign-in page.
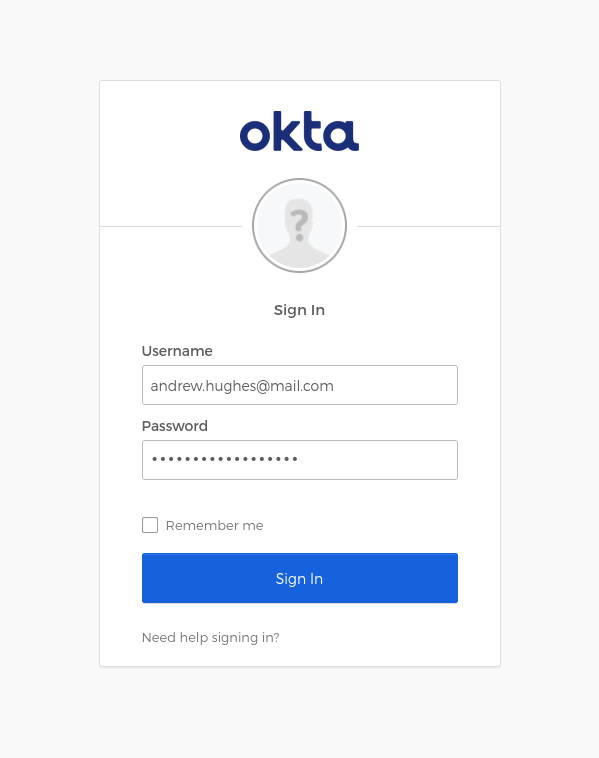
Once you’re authenticated, you’ll be directed to the authenticated front page.
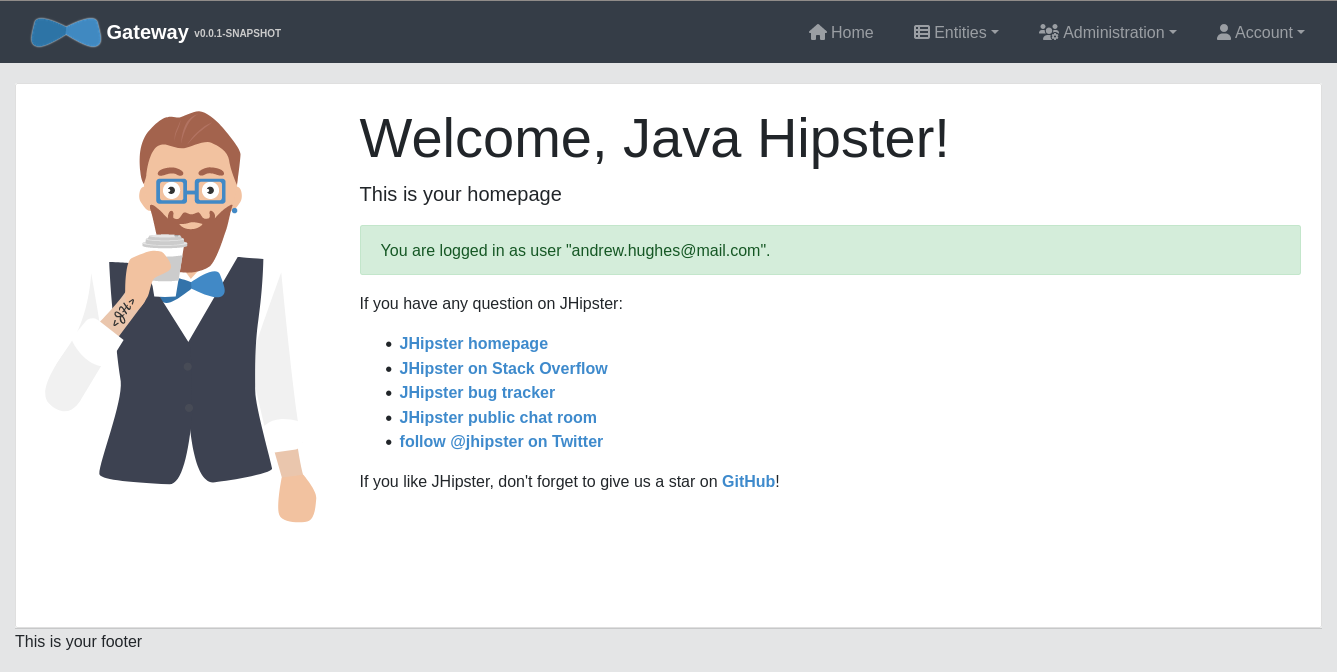
To verify that the application works, try and create a product and a blog. Go to the Entities menu and click on Product. Click Create a new Product and fill in the form with dummy values. You should be able to successfully create a new product. Do the same thing with Entities and Blog. You should be able to create a blog and a blog post.
Remember that the blog application uses a Neo4j database backend and the store uses a Mongo DB backend. You’re accessing these services through the public gateway application, but this is forwarding the requests to the private services and their associated databases.
Protect sensitive configuration values using kubeseal
The microservice is working. The only thing left to do is to protect any sensitive configuration parameters that you don’t want to check into a repository. In this case, the main value that needs to be protected is the Okta OIDC client secret (and the ENCRYPT_KEY, which, as you’ll see in a moment, is used to encrypt the client secret but which itself will need to be encrypted using kubeseal).
In kubernetes/registry-k8s/jhipster-registry.yml, add an environment key-value pair (you can add it anywhere under the same env list that you edited earlier). Make up an encryption key. The longer the better. Generating a UUID is a good solution. Linux has a tool called uuid that can be used.
- name: ENCRYPT_KEY
  value: <your-encryption-key>
Redeploy the Kubernetes configuration. If you are still port-forwarding the gateway, control-c to stop it. Run the following from the kubernetes subdirectory.
./kubectl-apply.sh -f
Port forward the registry.
kubectl port-forward svc/jhipster-registry -n demo 8761
Open http://localhost:8761
Go to Configuration and Encryption
Copy your client secret (from kubernetes/registry-k8s/application-configmap.yml or from the .okta.env file) and paste it into the text field.
Click Encrypt.
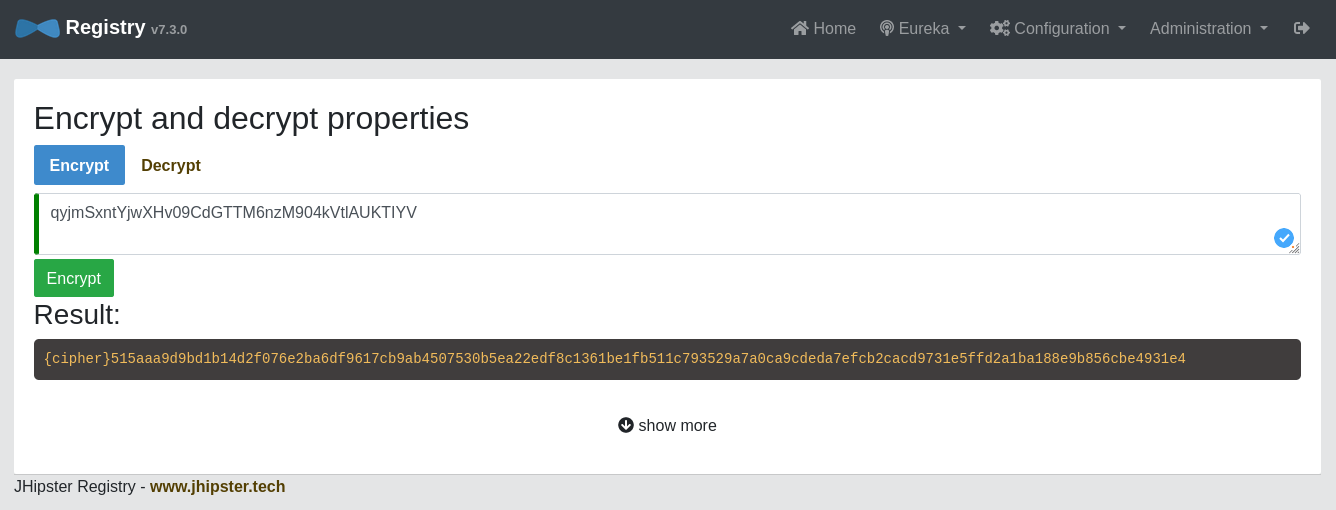
Copy that value, including the {cipher} part, and paste it back over the old value.
registration:
  oidc:
    client-id: 0oa7i972cgX989i99u
    client-secret: "{cipher}515aaa9d9bd1b14d2f076e2ba6..."
You can redeploy your app (./kubectl-apply.sh -f) and verify that the encrypted client secret is working (by making sure you can still log in). However, unfortunately, because the ENCRYPT_KEY is sitting there in the configuration files right alongside the encrypted client secret, this isn’t all that secure.
Fortunately, you can use kubeseal to secure the ENCRYPT_KEY. Matt Raible explains secrets management in Kubernetes in his post, Kubernetes to the Cloud with Spring Boot and JHipster. He also includes a lot of great resources. Check out his post for more info. You can also take a look at the kubeseal GitHub page for more info. In this post, I’m just going to show you how to get it working.
Install kubeseal in the EKS cluster.
kubectl apply -f https://github.com/bitnami-labs/sealed-secrets/releases/download/v0.17.5/controller.yaml
Retrieve the certificate keypair that this controller generates.
kubectl get secret -n kube-system -l sealedsecrets.bitnami.com/sealed-secrets-key -o yaml
Copy the raw value of tls.crt and decode it. You can use the command line, or learn more about base64 encoding/decoding in our documentation.
echo -n <paste-value-here> | base64 --decode
You should get something like this:
-----BEGIN CERTIFICATE-----
MIIEzTCCArWgAwIBAgIRAOTmN5wRwZak1XsbhMqpbBAwDQYJKoZIhvcNAQELBQAw
ADAeFw0yMjA2MTgwMzE1NTZaFw0zMjA2MTUwMzE1NTZaMAAwggIiMA0GCSqGSIb3
DQEBAQUAA4ICDwAwggIKAoICAQDKuios+wTX6cSQRmL7T4ebTQN37vCElL6CFps5
...
-----END CERTIFICATE-----
Put this value in a tls.crt file.
Next, install Kubeseal. On macOS, you can use Homebrew. For other platforms, see the release notes.
brew install kubeseal
Run the following command to encrypt ENCRYPT_KEY. Replace the placeholder with your actual encryption key value.
kubectl create secret generic project-secrets \
  --from-literal=ENCRYPT_KEY='<your-encryption-key>' \
  --dry-run=client -o yaml > secrets.yml
Convert the secrets to encrypted secrets.
kubeseal --cert tls.crt --format=yaml -n demo < secrets.yml > sealed-secrets.yml
Delete the unencrypted secrets file.
rm secrets.yml
The sealed-secrets.yml file will look like this:
apiVersion: bitnami.com/v1alpha1
kind: SealedSecret
metadata:
  creationTimestamp: null
  name: project-secrets
  namespace: demo
spec:
  encryptedData:
    ENCRYPT_KEY: AgBElusDb+KI9pHVeqWpzBAMnj4ksNXqXKoHdGTUQRzHi+0mnPxG+jm51QHz/6RoAGVRwVZbVnC+YpsjenbyYjz2q0U1yf+K1p3qYoOg8FlEQZYcbDRR/mQWhSZgIHTj5tRknZMkgGGkTCXGJTY4Dpjw...
  template:
    data: null
    metadata:
      creationTimestamp: null
      name: project-secrets
      namespace: demo
Deploy the sealed secrets to the cluster.
kubectl apply -n demo -f sealed-secrets.yml && kubectl get -n demo sealedsecret project-secrets
Update the registry configuration to use the encrypted value for the ENCRYPT_KEY. Replace the previous entry for ENCRYPT_KEY with the following.
env:
  ...
  - name: ENCRYPT_KEY
    valueFrom:
      secretKeyRef:
        name: project-secrets
        key: ENCRYPT_KEY
Deploy the cluster again.
./kubectl-apply.sh -f
Wait a few moments. Forward the registry again.
kubectl port-forward svc/jhipster-registry -n demo 8761
Open the registry and make sure you can log in.
If that works, try forwarding the gateway again.
kubectl port-forward svc/gateway -n demo 8080
Open http://localhost:8080
Make a product. Or a blog. Everything should still be working.
Once you’re done, delete the EKS cluster. If you don’t do this, you’ll keep getting charged for the AWS resources.
eksctl delete cluster --region=us-west-2 --name=okta-k8s
It wouldn’t hurt to log into the console and make sure all of the resources were cleaned up.
AWS, Kubernetes, and Spring Boot Microservice is done!
In this project you deployed a JHipster microservice to AWS EKS. You used the AWS CLI to create the Kubernetes resources, and you used kubectl to deploy the applications to the Kubernetes pods. You also used Okta as an OAuth 2.0 and OIDC provider to secure the microservice. Finally, you properly encrypted all of the sensitive configuration values using a combination of JHipster registry encryption, Kubernetes secrets, and kubeseal.
This project is based on two of Matt Raible’s tutorials, which were helpful for me when I was writing it.
- Reactive Java Microservices with Spring Boot and JHipster
- Kubernetes to the Cloud with Spring Boot and JHipster
If you liked this post, there’s a good chance you’ll like similar ones:
- How to Deploy Java Microservices on Amazon EKS Using Terraform and Kubernetes
- Introducing Spring Native for JHipster: Serverless Full-Stack Made Easy
- How to Secure Your Kubernetes Clusters With Best Practices
- Mobile Development with Ionic, React Native, and JHipster
- Fast Java Made Easy with Quarkus and JHipster
- Spring Cloud Config for Shared Microservice Configuration
- Kubernetes To The Cloud With AWS: Deploying a Node.js App to EKS
If you have questions, please ask them in the comments below! If you’re into social media, follow us: @oktadev on Twitter, Okta for Developers on LinkedIn, and OktaDev on Facebook. If you like learning via video, subscribe to our YouTube channel.
Okta Developer Blog Comment Policy
We welcome relevant and respectful comments. Off-topic comments may be removed.