Add Auth to Any App with OAuth2 Proxy
Updating an application to use OAuth 2.0 doesn’t need to be complicated. Most of the time, your language or framework will already have an OAuth library. Sometimes, this isn’t the case, and you need to find an alternative. In this post, I’ll walk through setting up and using OAuth2 Proxy to secure your application without any code changes!
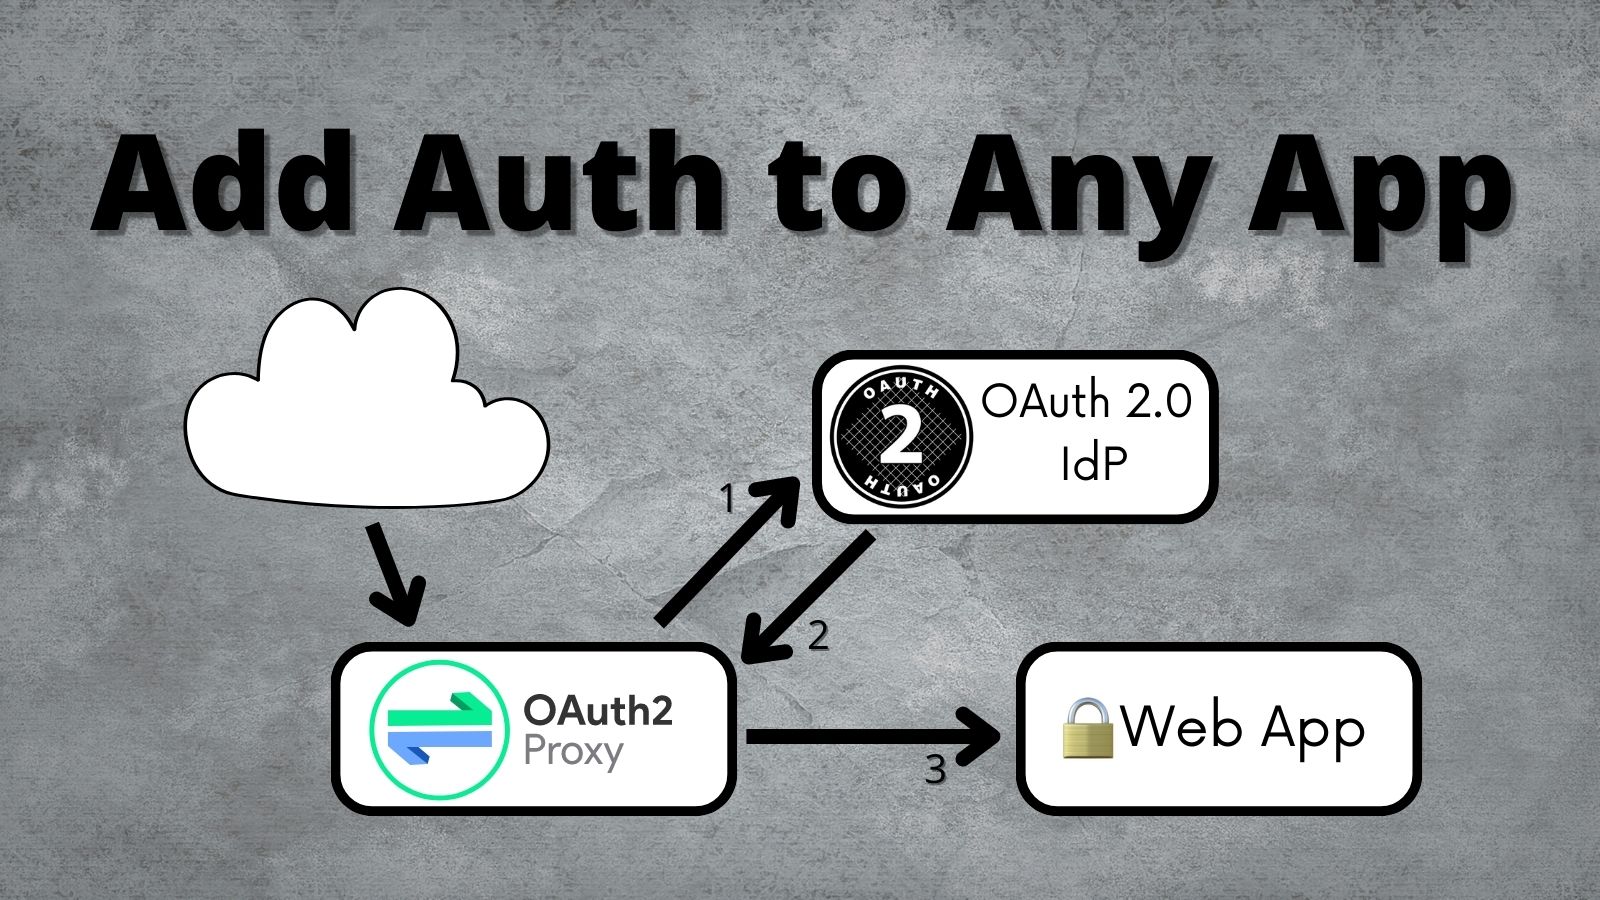
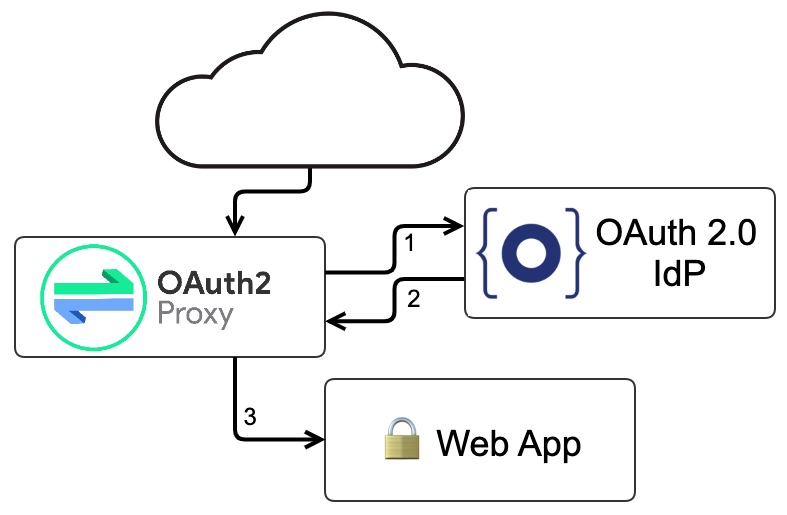
OAuth2 Proxy is a reverse proxy that sits in front of your application and handles the complexities of OpenID Connect / OAuth 2.0 for you; requests that make it to your application have already been authorized!
Prerequisites
-
Docker and Docker Compose
-
Httpie (A user friendly HTTP client)
-
Okta CLI (Configures applications in Okta)
-
Java 17 (optional)
An application without security
First things first, we need an application. You can use any web application, but for this post, I’ll stick with a Java Spring Boot app that will echo the details of the inbound HTTP request. Echoing the request information will help visualize the additional HTTP headers added by OAuth2 Proxy, such as the user’s email address.
You can grab the project from GitHub:
git clone https://github.com/oktadev/okta-oauth2-proxy-example.git -b start
cd okta-oauth2-proxy-example
If you want to see the completed project, check out the main branch instead.
|
If you are interested in the details for this Java application, take a look at the EchoApplication class. It contains a single endpoint that will handle all requests and "dump" the contents of the request as a JSON object:
@RestController
static class EchoRestController {
    @RequestMapping("/**")
    Map<String, Object> echo(HttpServletRequest request,
                             @RequestHeader HttpHeaders headers,
                             @RequestBody(required = false) Map<String, Object> body) {

        Instant now = Instant.now();
        Cookie[] cookies = request.getCookies();

        Map<String, Object> result = new LinkedHashMap<>();
        result.put("clientIpAddress", request.getRemoteAddr());
        result.put("cookies", cookies == null ? emptyList()
                                              : Arrays.stream(cookies).toList());
        result.put("headers", headers.toSingleValueMap()); // simplify json response
        result.put("httpVersion", request.getProtocol());
        result.put("method", request.getMethod());
        result.put("body", body);
        result.put("queryString", request.getQueryString());
        result.put("startedDateTime", now);
        result.put("url", request.getRequestURL());

        return result;
    }
}
If you are a Java fan, you can start the application by running ./mvnw spring-boot:run. Everyone else can run the following Docker commands:
docker build --tag echo-app .
docker run -p 8080:8080 echo-app
Once the application is running, open up your browser or access the web application in your terminal with HTTPie:
http localhost:8080/echo
When using HTTPie, you can omit "localhost" and just type http :8080/echo! 😎
|
You will see a response that looks something like this:
{
    "body": null,
    "clientIpAddress": "172.17.0.1",
    "cookies": [],
    "headers": {
        "accept": "*/*",
        "accept-encoding": "gzip, deflate",
        "connection": "keep-alive",
        "host": "localhost:8080",
        "user-agent": "HTTPie/3.2.1"
    },
    "httpVersion": "HTTP/1.1",
    "method": "GET",
    "queryString": null,
    "startedDateTime": "2022-06-24T18:52:07.853663255Z",
    "url": "http://localhost:8080/echo"
}
Now that we have a working application, let’s secure it!
Before moving on to the next section, stop the app with Ctrl+C, don’t worry; we will start it back up in a minute.
Set up Okta
To secure our application with OAuth 2.0, we are going to need an OAuth Identity Provider (IdP). Just about any OpenID Connect (OIDC) capable server should work, such as Auth0 or Keycloak, but this is an Okta blog, so let’s use Okta.
If you don’t already have one, you’ll need a free Okta developer account. Install the Okta CLI
and from the project directory, run okta start to sign up for a new account and configure this application!
If you already have an Okta account, run okta login first.
|
What does the Okta CLI do?
The Okta CLI will create an OIDC Web App in your Okta Org. It will add the required redirect URIs and grant access to the Everyone group. You will see output like the following when it’s finished:
Okta application configuration has been written to: .envRun cat .env (or type .env on Windows) to see the issuer and credentials for your app.
ISSUER=https://dev-133337.okta.com/oauth2/default
CLIENT_ID=0oab8eb55Kb9jdMIr5d6
CLIENT_SECRET=NEVER-SHOW-SECRETS
Set up OAuth2 Proxy
There are two ways to use OAuth2 Proxy: route your traffic through it directly or use it with the Nginx auth_request directive. I’d recommend routing traffic through Nginx if possible, but I’ll walk through both options and explain my recommendation below.
To reduce the number of moving parts, I’ll leave Nginx out in this first example; all of our web traffic will flow through OAuth2 Proxy. Users who access the echo web application will be redirected to Okta to sign in. Once they have signed in, OAuth2 Proxy will set a session cookie. OAuth2 Proxy will validate the session before passing the request to the echo web app in future requests.
|
In OAuth terms, OAuth2 Proxy is acting as the "client", handling the OAuth protocol details, (in this case, an Authorization Code Grant). TL;DR - Redirects the user to the OAuth IdP’s sign-in page and handles a "callback" route to return them to the application. |

This example is going to outgrow manually using docker run commands; switch to using docker compose to start the echo web-app and oauth2-proxy.
Let’s start simple and increase the complexity as we go along. Create a docker-compose.yml with oauth2-proxy and the web app from above:
version: "3.7"
services:

  web-app: (1)
    build: .

  oauth2-proxy:
    image: bitnami/oauth2-proxy:7.3.0
    command:
      - --http-address
      - 0.0.0.0:4180 (2)
    environment:
      OAUTH2_PROXY_UPSTREAMS: http://web-app:8080/ (3)
      OAUTH2_PROXY_PROVIDER_DISPLAY_NAME: Okta
      OAUTH2_PROXY_PROVIDER: oidc (4)
      OAUTH2_PROXY_OIDC_ISSUER_URL: ${ISSUER}
      OAUTH2_PROXY_CLIENT_ID: ${CLIENT_ID}
      OAUTH2_PROXY_CLIENT_SECRET: ${CLIENT_SECRET}
      OAUTH2_PROXY_PASS_ACCESS_TOKEN: true (5)
      OAUTH2_PROXY_EMAIL_DOMAINS: '*' (6)
      OAUTH2_PROXY_REDIRECT_URL: http://localhost:4180/oauth2/callback (7)
      OAUTH2_PROXY_COOKIE_SECRET: ${OAUTH2_PROXY_COOKIE_SECRET} (8)

    ports:
- 4180:4180 (9)| 1 | Build and run Dockerfile in the current directory. |
| 2 | Listen on port 4180. |
| 3 | Proxy authenticated requests to the Java web-app container. |
| 4 | OIDC client information (issuer, client ID, and client secret), these values are defined in the .env file. |
| 5 | Optionally, pass the access to the web-app. |
| 6 | Allow all email domains unless you use a social auth provider, you’ll want to manage this in your IdP and NOT in your application. |
| 7 | Set the redirect URL to an http URL, this defaults to https. |
| 8 | Open up the .env file and set this variable to a random 32-byte base64 string openssl rand -base64 32 | tr — '+/' '-_'. |
| 9 | Expose port 4180. |
Start everything up by running:
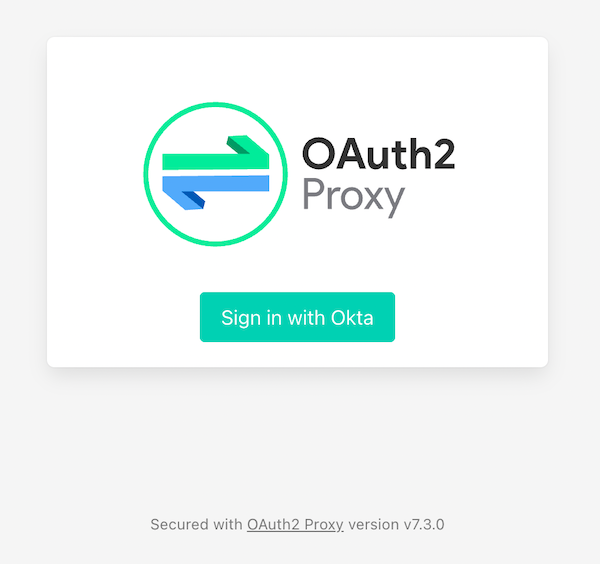
docker compose upNow open your browser to http://localhost:4180/echo, and you will be redirected to a page with a sign-in button. Click the button, and you will be redirected back to the "echo" application, and you should see information about the newly authenticated request!
| If you are already logged into your Okta account, open an incognito/private browser to see the full sign-in flow. |
Great, the application is now secured, but we still have a few things to clean up:
-
All the session state is stored in a cookie.
-
The initial double redirect sign-in page has to go.
-
We haven’t talked about API access yet.
These first two problems can be fixed with a few updates to the OAuth2 Proxy configuration. Edit the docker-compose.yml file:
       OAUTH2_PROXY_COOKIE_SECRET: ${OAUTH2_PROXY_COOKIE_SECRET}
+      OAUTH2_PROXY_SKIP_PROVIDER_BUTTON: true (1)
+      OAUTH2_PROXY_COOKIE_NAME: SESSION (2)
+      OAUTH2_PROXY_COOKIE_SAMESITE: lax (3)
+      OAUTH2_PROXY_SESSION_STORE_TYPE: redis (4)
+      OAUTH2_PROXY_REDIS_CONNECTION_URL: redis://redis
    ports:
      - 4180:4180
+    depends_on:
+      - redis
+
+  redis:(5)
+    image: redis:7.0.2-alpine3.16
+    volumes:
+      - cache:/data (6)
+
+volumes:
+  cache:
+ driver: local| 1 | Skip the default login page and redirect directly to the IdP. |
| 2 | By default, the cookie name is _oauth2_proxy; change it to SESSION. |
| 3 | Set the cookie’s same site policy to lax; the redirect from the OAuth IdP will need the session cookie. |
| 4 | Use Redis to store session information. |
| 5 | Start up a Redis container. |
| 6 | Persist the Redis data between restarts. |
Stop the docker-compose process (Ctrl+C) and start it up again:
docker compose upOnce again, open your browser to http://localhost:4180/echo and open up your network tab, you will see the renamed and now smaller SESSION cookie.
You could stop here, but you shouldn’t. We still have a few issues: API clients are not supported, and we haven’t talked about logging out.
For the next section, you will need an access token. You can use the access token from your last request’s x-access-token header. Open your terminal and set an environment variable: export TOKEN={your-token-value}.
|
REST API clients
For the sake of this post, I will consider any client that sets an Authorization HTTP header to be an API client. For example: Authorization: Bearer {access_token_here}.
The API client probably cannot handle a redirect response but expects a 40x status code to be returned.

Let’s take a step back and configure OAuth2 Proxy as an OAuth resource server, which accepts JWT access tokens. This might be all you need for some applications, but if you need to support both browser and API clients, keep reading, we will get there in the following section.
| It is common, but it’s not required for OAuth 2.0 access tokens to be a JWT. If you are using a different OAuth IdP, double-check if they support JWTs before continuing. |
In the docker-compose.yml, trim down the environment variables to the bare minimum needed for a REST API:
...
    environment:
      OAUTH2_PROXY_UPSTREAMS: http://web-app:8080/
      OAUTH2_PROXY_PROVIDER: oidc (1)
      OAUTH2_PROXY_EMAIL_DOMAINS: '*'
      OAUTH2_PROXY_SKIP_JWT_BEARER_TOKENS: true (2)
      OAUTH2_PROXY_OIDC_EMAIL_CLAIM: sub (3)
      OAUTH2_PROXY_OIDC_ISSUER_URL: ${ISSUER} (4)
      OAUTH2_PROXY_CLIENT_ID: api://default (5)
      OAUTH2_PROXY_SET_XAUTHREQUEST: true
      OAUTH2_PROXY_CLIENT_SECRET: this_value_is_required_but_not_used (6)
      OAUTH2_PROXY_COOKIE_SECRET: NOT_USED_BUT_REQUIRED_VALUE_32b_ (7)
...| 1 | We are not actually using any of the OIDC flows, but this is still required. |
| 2 | Perhaps a poorly named variable, this tells oauth2-proxy to validate the JWT access token and to "skip" looking for an OAuth 2.0 session. |
| 3 | Read the user’s email from the sub claim in the access token. |
| 4 | The same issuer URL is used, the JWKS endpoint will be looked up automatically via the OIDC discovery metadata. |
| 5 | The "client-id" is actually the audience aud claim and not the ID of a specific client (multiple API "clients" could be accessing the same REST API). |
| 6 | There is no "client-secret," but it’s a required field… |
| 7 | Same with the cookie secret, these flows do not use cookies, but the field is required. |
Restart the services. (Stop and then run docker compose up again.)
Using the access token environment variable you set in the previous section, run this:
http :4180/echo "Authorization: Bearer ${TOKEN}"Awesome! Now your application is secured for REST clients!
Not so fast; now our browser clients don’t work correctly! The client ID and secret are not correct, which means users will not be able to log in. We can fix both of these problems with Nginx.
Add Nginx to route traffic
Adding another reverse proxy into the mix might seem excessive; for a request to get to the application, it would need to pass through both Nginx and OAuth2 Proxy first. However, you may already use Nginx for load balancing, TLS termination, or other ingress concerns.

While we could route our traffic through both proxies as pictured above, I will use the Nginx auth_request directive instead. Nginx will make a REST request to OAuth2 Proxy’s /oauth2/auth endpoint using the original request headers (including any cookies and Authorization headers). OAuth2 Proxy will respond with a 202 status code if the request is valid or a 401 otherwise.

This setup uses the same number of requests as the previous diagram but provides additional flexibility on how requests are routed to the upstream web app.
Configure Nginx
Jump back into the docker-compose.yml and add a new service for Nginx:
...
  nginx:
    image: nginx:1.21.6-alpine
    depends_on:
      - oauth2-proxy
      - web-app
    volumes:
      - ./nginx-default.conf.template:/etc/nginx/templates/default.conf.template
    ports:
      - 80:80
Next, create a nginx-default.conf.template file. This code block is a little involved, be sure to read the annotations:
server {
    listen 80;
    server_name _;

    location = /oauth2/auth {
        internal; (1)
        proxy_pass       http://oauth2-proxy:4180;
        proxy_set_header Host             $host;
        proxy_set_header X-Real-IP        $remote_addr;
        proxy_set_header X-Scheme         $scheme;
        # nginx auth_request includes headers but not body
        proxy_set_header Content-Length   "";
        proxy_pass_request_body           off;
    }

    location / {
        auth_request /oauth2/auth; (2)

        auth_request_set $email  $upstream_http_x_auth_request_email; (3)
        proxy_set_header X-Email $email;
        auth_request_set $user  $upstream_http_x_auth_request_user;
        proxy_set_header X-User  $user;
        auth_request_set $token  $upstream_http_x_auth_request_access_token;
        proxy_set_header X-Access-Token $token;
        auth_request_set $auth_cookie $upstream_http_set_cookie;
        add_header Set-Cookie $auth_cookie;

        proxy_set_header Host $host;
        proxy_set_header X-Real-IP $remote_addr;
        proxy_set_header X-Forwarded-For $proxy_add_x_forwarded_for;
        proxy_set_header X-Forwarded-Host $host:80;
        proxy_set_header X-Forwarded-Port 80;
        proxy_set_header X-Forwarded-Server $host;
        proxy_set_header X-Forwarded-Proto http;

        proxy_http_version 1.1; (4)
        proxy_pass http://web-app:8080/; (5)
    }
}| 1 | Don’t expose this route to external clients. |
| 2 | Nginx makes a request to oauth2-proxy REST API, to verify the auth for this request. |
| 3 | Add headers returned from the auth request. |
| 4 | HTTP 1.0 is the default if not set. |
| 5 | Send authenticated requests to the web app. |
Restart the docker containers and verify everything is working with HTTPie (make sure you are using port 80 now).
http localhost/echo "Authorization: Bearer ${TOKEN}"If you remove or change the Authorization header, a 401 will be returned. Browser requests will now also return a 401!
Almost done! We still need to make everything work for both API clients and browsers, and handle sign-out requests.
Route all traffic through Nginx
Sending all the traffic through Nginx has the added benefit of giving you control of how the OAuth2 Proxy endpoints are exposed. For example, the previous section marked the /oauth2/auth route as "internal," so only the auth_requst directive can use it.
In the nginx-default.conf.template, add a couple of new location sections to expose the other /oauth2 endpoints. The first location will handle the OAuth 2.0-related requests like the redirect callback. The second will configure the sign-out endpoint to accept only POST requests. (This prevents a rogue GET request from ending the user’s session.)
    location /oauth2/ {
        proxy_pass       http://oauth2-proxy:4180; (1)
        proxy_set_header Host                    $host;
        proxy_set_header X-Real-IP               $remote_addr;
        proxy_set_header X-Scheme                $scheme;
    }

    location = /oauth2/sign_out { (2)
        # Sign-out mutates the session, only allow POST requests
        if ($request_method != POST) {
            return 405;
        }

        proxy_pass       http://oauth2-proxy:4180;
        proxy_set_header Host                    $host;
        proxy_set_header X-Real-IP               $remote_addr;
        proxy_set_header X-Scheme                $scheme;
    }
...| 1 | Send the OAuth callback and logout requests to oauth2-proxy. |
| 2 | Only allow POST requests to the sign-out endpoint. |
| This sign-out endpoint does not use a CSRF token. You can read more about why CSRF is important in this post: Protect Your Angular App From Cross-Site Request Forgery. |
One last change, update the location / section to redirect to the sign-in page for all non-API clients:
location / {
        auth_request /oauth2/auth;

        # if the authorization header was set (i.e. `Authorization: Bearer {token}`)
        # assume API client and do NOT redirect to login page
        if ($http_authorization = "") {
            error_page 401 = /oauth2/start;
        }
...
Configure OAuth2 Proxy to support API and browser clients
Sometimes, an application needs to handle requests from browsers and other API clients. In this case, the application acts both as an OAuth client and resource server. OAuth2 Proxy can be configured to support both types of applications. However, you may have noticed that a few OAuth2 Proxy configuration values are overloaded; for example, the "client ID" is used both as the ID of the OAuth client, and the JWT value for the audience. Luckily, there is a workaround! Here is the final annotated docker-compose.yml:
version: "3.7"

services:

  web-app:
    build: .

  oauth2-proxy:
    image: bitnami/oauth2-proxy:7.3.0
    depends_on:
      - redis
    command:
      - --http-address
      - 0.0.0.0:4180
    environment:
      OAUTH2_PROXY_EMAIL_DOMAINS: '*' (1)
      OAUTH2_PROXY_PROVIDER: oidc (2)
      OAUTH2_PROXY_PROVIDER_DISPLAY_NAME: Okta
      OAUTH2_PROXY_SKIP_PROVIDER_BUTTON: true (3)
      OAUTH2_PROXY_REDIRECT_URL: http://localhost/oauth2/callback (4)

      OAUTH2_PROXY_OIDC_ISSUER_URL: ${ISSUER} (5)
      OAUTH2_PROXY_CLIENT_ID: ${CLIENT_ID}
      OAUTH2_PROXY_CLIENT_SECRET: ${CLIENT_SECRET}

      OAUTH2_PROXY_SKIP_JWT_BEARER_TOKENS: true (6)
      OAUTH2_PROXY_OIDC_EXTRA_AUDIENCES: api://default (7)
      OAUTH2_PROXY_OIDC_EMAIL_CLAIM: sub (8)

      OAUTH2_PROXY_SET_XAUTHREQUEST: true (9)
      OAUTH2_PROXY_PASS_ACCESS_TOKEN: true (10)

      OAUTH2_PROXY_SESSION_STORE_TYPE: redis (11)
      OAUTH2_PROXY_REDIS_CONNECTION_URL: redis://redis

      OAUTH2_PROXY_COOKIE_REFRESH: 30m (12)
      OAUTH2_PROXY_COOKIE_NAME: SESSION (13)
      OAUTH2_PROXY_COOKIE_SECRET: ${OAUTH2_PROXY_COOKIE_SECRET} (14)

  nginx:
    image: nginx:1.21.6-alpine
    depends_on:
      - oauth2-proxy
      - web-app
    volumes:
      - ./nginx-default.conf.template:/etc/nginx/templates/default.conf.template
    ports:
      - 80:80

  redis:
    image: redis:7.0.2-alpine3.16
    volumes:
      - cache:/data

volumes:
  cache:
driver: local| 1 | Allow all email addresses; the IdP will manage which users have access. |
| 2 | For single IdP use cases, skip the intermediate login page. |
| 3 | oauth2-proxy defaults to https, this example uses http on localhost. |
| 4 | The issuer, client ID, and secret will be loaded from the .env file. |
| 5 | Allow processing of JWT bearer tokens for API clients. |
| 6 | Configure an extra "allowed" audience, in addition to the "client ID". |
| 7 | Use the sub claim from JWT access tokens as the email address. |
| 8 | Add user information headers to the proxied web-app request. |
| 9 | Optional, pass the access token to the proxied web-app request. |
| 10 | Use Redis for session management. |
| 11 | Refresh cookies every 30 minutes. |
| 12 | Set the session cookie name to SESSION. |
| 13 | Configure the encryption key (loaded from the .env file). |
Restart the services and access the application through your browser: http://localhost/echo. Try again using HTTPie:
http localhost/echo "Authorization: Bearer ${TOKEN}"Both requests should show similar information.
Without any code changes, the "echo" web application is now secured with OIDC / OAuth 2.0!
Is OAuth2 Proxy right for your application?
This post taught you how to secure an existing application with OAuth 2.0 without any code changes! OAuth2 Proxy isn’t just for legacy applications; it’s also commonly used in a sidecar pattern with Kubernetes, allowing you to keep authorization concerns separate from your application.
It’s not perfect, though; there are a few shortcomings:
-
SSO logout (OIDC RP-Initated Logout) isn’t supported yet.
-
Requires working around a logout route that accepts
GETrequests and doesn’t require a CSRF token. -
API use cases support JWT-only access tokens; if your application needs to remotely validate tokens you would need another solution. It may be easier to configure Nginx’s JWT module instead.
-
Configuration is a little clunky; some values are required but not used.
Where does it shine?
If you need to add authentication to an application that doesn’t have OAuth support, or you need to support various types of applications in a standard way, OAuth2 Proxy can be a great choice! As a bonus, it has excellent documentation.
If you enjoyed this post and want to read more like it check out these other posts:
Please comment below with any questions. For more interesting content, follow @oktadev on Twitter, find us on LinkedIn, or subscribe to our YouTube channel.
Brian Demers is a Developer Advocate at Okta and a PMC member for the Apache Shiro project. He spends much of his day contributing to OSS projects in the form of writing code, tutorials, blogs, and answering questions. Along with typical software development, Brian also has a passion for fast builds and automation. Away from the keyboard, Brian is a beekeeper and can likely be found playing board games. You can find him on Twitter at @briandemers.
Okta Developer Blog Comment Policy
We welcome relevant and respectful comments. Off-topic comments may be removed.