JWT vs Opaque Access Tokens: Use Both With Spring Boot
The topic of validating an OAuth 2.0 access tokens comes up frequently on this blog. Often we talk about how to validate JSON Web Token (JWT) based access tokens; however, this is NOT part of the OAuth 2.0 specification. JWTs are so commonly used that Spring Security supported them before adding support for remotely validating tokens (which is part of the OAuth 2.0 specification.)
In this post, you will build a simple application that takes advantage of both types of validation.
If you would rather follow along by watching a video, check out our YouTube channel.
Prerequisites
Note: In May 2025, the Okta Integrator Free Plan replaced Okta Developer Edition Accounts, and the Okta CLI was deprecated.
We preserved this post for reference, but the instructions no longer work exactly as written. Replace the Okta CLI commands by manually configuring Okta following the instructions in our Developer Documentation.
Should I Validate Access Tokens Locally or Remote?
Whether you should validate access tokens locally (e.g., a JWT) or remotely (per spec) is a question of how much security you need. Often, people jump to, “I need all of the securities!” This statement simply isn’t true—how much security you need should be balanced with other factors like ease of use, cost, and performance.
There is no such thing as perfect security, only varying levels of insecurity.
- Salman Rushdie
The biggest downside to validating a token locally is that your token is, by definition, stale. It is a snapshot of the moment in time when your identity provider (IdP) created the token. The further away you get from that moment, the more likely that token is no longer valid: it could have been revoked, the user could have logged out, or the application that created the token disabled.
Remotely validating tokens are not always ideal, either. Remote validation comes with the cost of adding latency in your application, as you need to add an HTTP request to a remote server every time you need to validate the token.
One way to reduce these concerns is to keep the lifetime of an access token short (say 5 minutes) and validate them locally; this limits the risk of using a revoked token.
There is another option: do both!
Validate Access Tokens Locally and Remotely!
By default, Spring Boot applications can be configured to use JWT validation OR opaque validation, simply by configuring a few properties. Using both types of validation in the same application requires a few extra lines of code.
Obviously, you wouldn’t do both on each request; you could validate more sensitive operations remotely and all other requests locally. For example, when updating a user’s contact information, you may want to validate the token remotely, but when viewing the user’s profile information, validate locally. This pattern keeps your application fast, as updating an address or an email happens less frequently than just viewing contact information.
To get started, you will need an OAuth Web application in Okta.
Login in to your Okta admin console, if you just created a new account, and have not logged in yet, follow the activation link in your inbox.
Make a note of the Org URL on the top right; I’ll refer to this as {yourOktaDomain} in the next section.
Once you are logged in, navigate to the top menu and select Applications -> Add Application. Select Web -> Next.
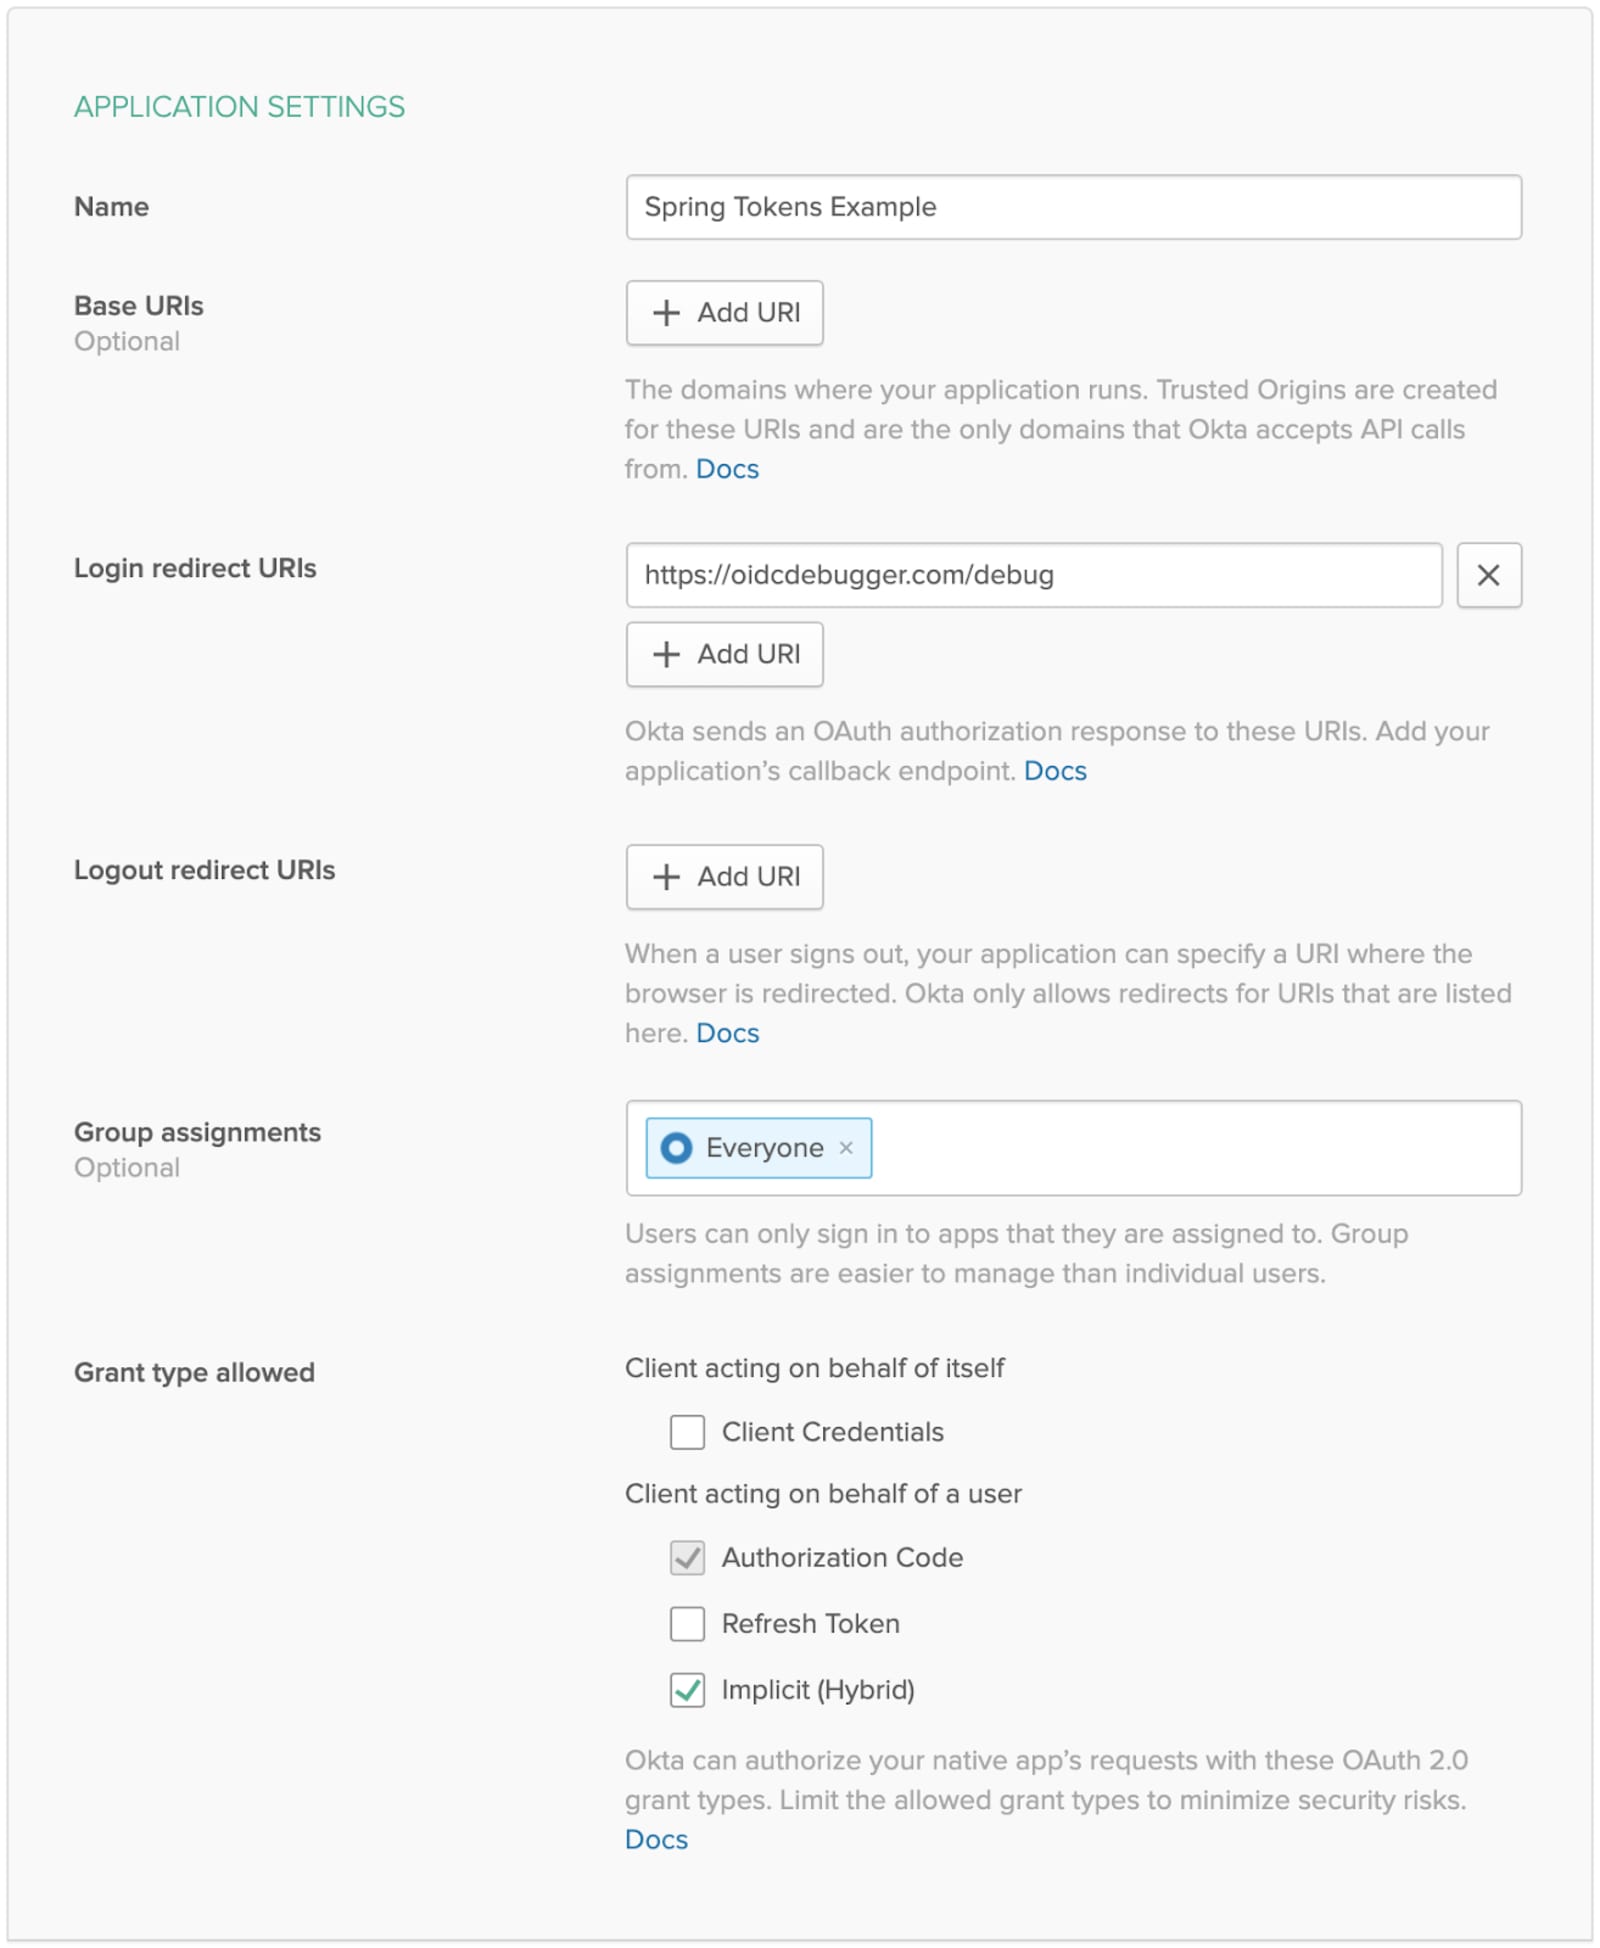
Give your application a name: “Spring Tokens Example”
Set the Login redirect URIs to https://oidcdebugger.com/debug
Check Implicit (Hybrid)
Click Done
Head over to start.spring.io and click the Generate button.
Note: The above link populates the following settings:
- Group: com.okta.example
- Artifact: spring-token-example
- Package name: com.okta.example
- Dependencies:
- Spring Security (security)
- Spring Web (web)
Unzip the project and open it in your favorite IDE.
Add two more dependencies to the Maven pom.xml file:
<dependency>
    <groupId>org.springframework.boot</groupId>
    <artifactId>spring-boot-starter-oauth2-resource-server</artifactId>
</dependency>
<dependency>
    <groupId>com.nimbusds</groupId>
    <artifactId>oauth2-oidc-sdk</artifactId>
</dependency>
Add an OAuth2ClientProperties bean to the SpringTokenExampleApplication class to reuse the standard Spring Security OAuth properties.
@Bean
OAuth2ClientProperties oAuth2ClientProperties() {
    return new OAuth2ClientProperties();
}
Add a simple REST controller with a GET and a POST handler, in src/main/java/com/okta/example/SimpleController.java
package com.okta.example;

import org.springframework.web.bind.annotation.GetMapping;
import org.springframework.web.bind.annotation.PostMapping;
import org.springframework.web.bind.annotation.RequestParam;
import org.springframework.web.bind.annotation.RestController;

@RestController
public class SimpleController {

    @GetMapping("/")
    String hello() {
        return "Hello!";
    }

    @PostMapping("/")
    String helloPost(@RequestParam("message") String message) {
        return "hello: " + message;
    }
}
Create a new class that will map a RequestMatcher to the AuthenticationManager (more on this below) src/main/java/com/okta/example/RequestMatchingAuthenticationManagerResolver.java
NOTE: This class may be part of a future version of Spring Security.
package com.okta.example;

import java.util.LinkedHashMap;
import java.util.Map;
import javax.servlet.http.HttpServletRequest;

import org.springframework.security.authentication.AuthenticationManager;
import org.springframework.security.authentication.AuthenticationManagerResolver;
import org.springframework.security.authentication.AuthenticationServiceException;
import org.springframework.security.web.util.matcher.RequestMatcher;
import org.springframework.util.Assert;

/**  An {@link AuthenticationManagerResolver} that returns a {@link AuthenticationManager}
*  instances based upon the type of {@link HttpServletRequest} passed into
*  {@link #resolve(HttpServletRequest)}.
*  @author Josh Cummings
*/  @since 5.2
public class RequestMatchingAuthenticationManagerResolver
        implements AuthenticationManagerResolver<HttpServletRequest> {

    private final LinkedHashMap<RequestMatcher, AuthenticationManager> authenticationManagers;

    private AuthenticationManager defaultAuthenticationManager = authentication -> {
        throw new AuthenticationServiceException("Cannot authenticate " + authentication);
    };

    public RequestMatchingAuthenticationManagerResolver
    (LinkedHashMap<RequestMatcher, AuthenticationManager> authenticationManagers) {
        Assert.notEmpty(authenticationManagers, "authenticationManagers cannot be empty");
        this.authenticationManagers = authenticationManagers;
    }

    @Override
    public AuthenticationManager resolve(HttpServletRequest context) {
        for (Map.Entry<RequestMatcher, AuthenticationManager> entry : this.authenticationManagers.entrySet()) {
            if (entry.getKey().matches(context)) {
                return entry.getValue();
            }
        }

        return this.defaultAuthenticationManager;
    }

    public void setDefaultAuthenticationManager(AuthenticationManager defaultAuthenticationManager) {
        Assert.notNull(defaultAuthenticationManager, "defaultAuthenticationManager cannot be null");
        this.defaultAuthenticationManager = defaultAuthenticationManager;
    }
}
Configure Spring Security to Validate JWTs and Opaque Tokens
Everything up until now has been boilerplate, now we get to the fun part!
Create a new ExampleWebSecurityConfigurer class which uses local JWT validation for GET requests, and remote “opaque” validation for all other requests (be sure to read the inline comments):
package com.okta.example;

import org.springframework.beans.factory.annotation.Autowired;
import org.springframework.boot.autoconfigure.security.oauth2.client.OAuth2ClientProperties;
import org.springframework.context.annotation.Configuration;
import org.springframework.security.authentication.AuthenticationManager;
import org.springframework.security.authentication.AuthenticationManagerResolver;
import org.springframework.security.config.annotation.web.builders.HttpSecurity;
import org.springframework.security.config.annotation.web.configuration.WebSecurityConfigurerAdapter;
import org.springframework.security.oauth2.jwt.JwtDecoder;
import org.springframework.security.oauth2.jwt.NimbusJwtDecoder;
import org.springframework.security.oauth2.server.resource.authentication.JwtAuthenticationProvider;
import org.springframework.security.oauth2.server.resource.authentication.JwtBearerTokenAuthenticationConverter;
import org.springframework.security.oauth2.server.resource.authentication.OpaqueTokenAuthenticationProvider;
import org.springframework.security.oauth2.server.resource.introspection.NimbusOpaqueTokenIntrospector;
import org.springframework.security.oauth2.server.resource.introspection.OpaqueTokenIntrospector;
import org.springframework.security.web.util.matcher.RequestMatcher;

import javax.servlet.http.HttpServletRequest;
import java.util.Arrays;
import java.util.LinkedHashMap;
import java.util.List;

@Configuration
public class ExampleWebSecurityConfigurerAdapter extends WebSecurityConfigurerAdapter {

    // Inject the `OAuth2ClientProperties` we configured in the previous step
    @Autowired
    private OAuth2ClientProperties oAuth2ClientProperties;

    @Override
    protected void configure(HttpSecurity http) throws Exception {

        // All routes require authentication
        http.authorizeRequests().anyRequest().authenticated();

        // Configure a custom `AuthenticationManager` to determine
        // if JWT or opaque token validation should be used
        http.oauth2ResourceServer().authenticationManagerResolver(customAuthenticationManager());
    }

    AuthenticationManagerResolver<HttpServletRequest> customAuthenticationManager() {
        LinkedHashMap<RequestMatcher, AuthenticationManager> authenticationManagers = new LinkedHashMap<>();

        // USE JWT tokens (locally validated) to validate HEAD, GET, and OPTIONS requests
        List<String> readMethod = Arrays.asList("HEAD", "GET", "OPTIONS");
        RequestMatcher readMethodRequestMatcher = request -> readMethod.contains(request.getMethod());
        authenticationManagers.put(readMethodRequestMatcher, jwt());

        // all other requests will use opaque tokens (remotely validated)
        RequestMatchingAuthenticationManagerResolver authenticationManagerResolver
            = new RequestMatchingAuthenticationManagerResolver(authenticationManagers);

        // Use opaque tokens (remotely validated) for all other requests
        authenticationManagerResolver.setDefaultAuthenticationManager(opaque());
        return authenticationManagerResolver;
    }

    // Mimic the default configuration for JWT validation.
    AuthenticationManager jwt() {
        // this is the keys endpoint for okta
        String issuer = oAuth2ClientProperties.getProvider().get("okta").getIssuerUri();
        String jwkSetUri = issuer + "/v1/keys";

        // This is basically the default jwt logic
        JwtDecoder jwtDecoder = NimbusJwtDecoder.withJwkSetUri(jwkSetUri).build();
        JwtAuthenticationProvider authenticationProvider = new JwtAuthenticationProvider(jwtDecoder);
        authenticationProvider.setJwtAuthenticationConverter(new JwtBearerTokenAuthenticationConverter());
        return authenticationProvider::authenticate;
    }

    // Mimic the default configuration for opaque token validation
    AuthenticationManager opaque() {
        String issuer = oAuth2ClientProperties.getProvider().get("okta").getIssuerUri();
        String introspectionUri = issuer + "/v1/introspect";

        // The default opaque token logic
        OAuth2ClientProperties.Registration oktaRegistration = oAuth2ClientProperties.getRegistration().get("okta");
        OpaqueTokenIntrospector introspectionClient = new NimbusOpaqueTokenIntrospector(
                introspectionUri,
                oktaRegistration.getClientId(),
                oktaRegistration.getClientSecret());
        return new OpaqueTokenAuthenticationProvider(introspectionClient)::authenticate;
    }
}
Better JWT Validation
Out of the box, Spring Security does minimal validation of the JWT because this is a vendor-specific detail. In addition to the standard JWT validation, Okta recommends validating the issuer and audience claims: iss and aud.
Update the above jwt() method to look like the following:
AuthenticationManager jwt() {
    // this is the keys endpoint for okta
    String issuer = oAuth2ClientProperties.getProvider().get("okta").getIssuerUri();
    String jwkSetUri = issuer + "/v1/keys";

    NimbusJwtDecoder jwtDecoder = NimbusJwtDecoder.withJwkSetUri(jwkSetUri).build();

    // okta recommends validating the `iss` and `aud` claims
    // see: https://developer.okta.com/docs/guides/validate-access-tokens/java/overview/
    List<OAuth2TokenValidator<Jwt>> validators = new ArrayList<>();
    validators.add(new JwtTimestampValidator());
    // Add validation of the issuer claim
    validators.add(new JwtIssuerValidator(issuer));
    validators.add(token -> {
        Set<String> expectedAudience = new HashSet<>();
        // Add validation of the audience claim
        expectedAudience.add("api://default");
        // For new Okta orgs, the default audience is `api://default`,
        // if you have changed this from the default update this value
        return !Collections.disjoint(token.getAudience(), expectedAudience)
            ? OAuth2TokenValidatorResult.success()
            : OAuth2TokenValidatorResult.failure(new OAuth2Error(
                OAuth2ErrorCodes.INVALID_REQUEST,
                "This aud claim is not equal to the configured audience",
                "https://tools.ietf.org/html/rfc6750#section-3.1"));
    });
    OAuth2TokenValidator<Jwt> validator = new DelegatingOAuth2TokenValidator<>(validators);
    jwtDecoder.setJwtValidator(validator);

    JwtAuthenticationProvider authenticationProvider = new JwtAuthenticationProvider(jwtDecoder);
    authenticationProvider.setJwtAuthenticationConverter(new JwtBearerTokenAuthenticationConverter());
    return authenticationProvider::authenticate;
}
Configure and Run Your OAuth 2.0 Application
We are in the home stretch; the last thing needed for our application is a little configuration.
Update your src/main/resources/application.properties file to include the properties from the previous steps.
spring.security.oauth2.client.provider.okta.issuer-uri = {yourOktaDomain}/oauth2/default
spring.security.oauth2.client.registration.okta.client-id = {clientId}
spring.security.oauth2.client.registration.okta.client-secret = {clientSecret}
# As of Spring Boot 2.4, you must explicitly set the scope value
spring.security.oauth2.client.registration.okta.scope = openid
Run the application on the command line:
./mvnw spring-boot:run
Make a curl request to the server:
curl localhost:8080/ -v
This will return something like:
HTTP/1.1 401
WWW-Authenticate: Bearer
A 401 is expected here as we did not provide an access token to the request. There are a few ways to get an access token—which option is right for you depends on where and how you access your REST application. Usually, another application is calling your REST API and that application already has an access token. For testing purposes, we will set up the OIDC Debugger.
Get a Token with the OIDC Debugger
Head over to https://oidcdebugger.com/ and populate the form with the following values:
- Authorize URI -
{yourOktaDomain}/oauth2/default/v1/authorize - Client ID -
{clientId}from the previous step - State -
this is a test(this can be any value) - Response type - select token
- Use defaults for all other fields
Press the Send Request button.
If you are using an incognito/private browser, this may prompt you to login again. Once the Success page loads, copy the Access token and create an environment variable:
export TOKEN="<your-access-token-here>"
Now that you have a token, you can make another request to your REST API:
curl localhost:8080/ -H "Authorization: Bearer $TOKEN"

> Hello!
Similarly, we can call the POST endpoint:
curl -X POST -F 'message=there' localhost:8080/ -H "Authorization: Bearer ${TOKEN}"

> hello: there
We can perform a simple (unscientific) performance test using the time utility, by prefixing the above commands with time:
time curl localhost:8080/ -H "Authorization: Bearer ${TOKEN}"
time curl -X POST -F 'message=there' localhost:8080/ -H "Authorization: Bearer ${TOKEN}"
This data isn’t a great benchmark as both the client and server are running on the same machine, but you can see the first one returned faster.
0.00s user 0.01s system 65% cpu 0.013 total
0.00s user 0.01s system 4% cpu 0.210 total
NOTE: The increased CPU usage is caused by the JWT signature validation.
Learn More About Secure Applications
In this post, I’ve discussed the different ways to validate access tokens and provided a simple example that shows how you can use both options. As always, this code is available on GitHub.
Check out these related blog posts to learn more about building secure web applications.
- A Quick Guide to Spring Boot Login Options
- OpenID Connect Logout Options with Spring Boot
- Secure Legacy Apps with Spring Cloud Gateway
If you like this blog post and want to see more like it, follow@oktadev on Twitter, subscribe to our YouTube channel, or follow us on LinkedIn. As always, please leave a comment below if you have any questions.
- Dec 22, 2020: Updated post to work with Spring Boot 2.4.1 and explicitly set the OAuth scope, as Spring Security no longer provides a default value. Thanks for the suggestion, Wolf! See the code changes in the example app on GitHub. Changes to this post can be viewed in oktadeveloper/okta-blog#508.
Brian Demers is a Developer Advocate at Okta and a PMC member for the Apache Shiro project. He spends much of his day contributing to OSS projects in the form of writing code, tutorials, blogs, and answering questions. Along with typical software development, Brian also has a passion for fast builds and automation. Away from the keyboard, Brian is a beekeeper and can likely be found playing board games. You can find him on Twitter at @briandemers.
Okta Developer Blog Comment Policy
We welcome relevant and respectful comments. Off-topic comments may be removed.