OAuth 2.0 Patterns with Spring Cloud Gateway
Note: In May 2025, the Okta Integrator Free Plan replaced Okta Developer Edition Accounts, and the Okta CLI was deprecated.
We preserved this post for reference, but the instructions no longer work exactly as written. Replace the Okta CLI commands by manually configuring Okta following the instructions in our Developer Documentation.
Spring Cloud Gateway is the Reactive API Gateway of the Spring Ecosystem, built on Spring Boot, WebFlux, and Project Reactor. Its job is to proxy and route requests to services and to provide cross-cutting concerns such as security, monitoring, and resilience. As Reactive models gain popularity, there is a chance that your microservices architecture becomes a mix of Spring MVC blocking applications and Spring WebFlux non-blocking applications.
In this tutorial, you will use Spring Cloud Gateway for routing to traditional Servlet API microservices, and you will learn the required configuration for these three common OAuth2 patterns, using Okta as authorization server:
- OpenID Connect Authentication - the pattern used for end-user authentication.
- Token Relay - when an OAuth2 consumer service or application, like the API gateway, acts as a client and forwards the incoming token to outgoing resource requests.
- Client Credentials Grant - the pattern to use when the authorized requestor is another service. In this case, we talk about machine to machine, m2m, or service to service authorization.
Prerequisites:
- Java 11+
- cURL
Table of Contents
- Pattern 1: OpenID Connect Authentication
- Pattern 2: Token Relay to Service
- Pattern 3: Service-to-Service Client Credentials Grant
- Putting it All Together
- Learn More About Building Secure Applications
Note: In May 2025, the Okta Integrator Free Plan replaced Okta Developer Edition Accounts, and the Okta CLI was deprecated.
We preserved this post for reference, but the instructions no longer work exactly as written. Replace the Okta CLI commands by manually configuring Okta following the instructions in our Developer Documentation.
Pattern 1: OpenID Connect Authentication
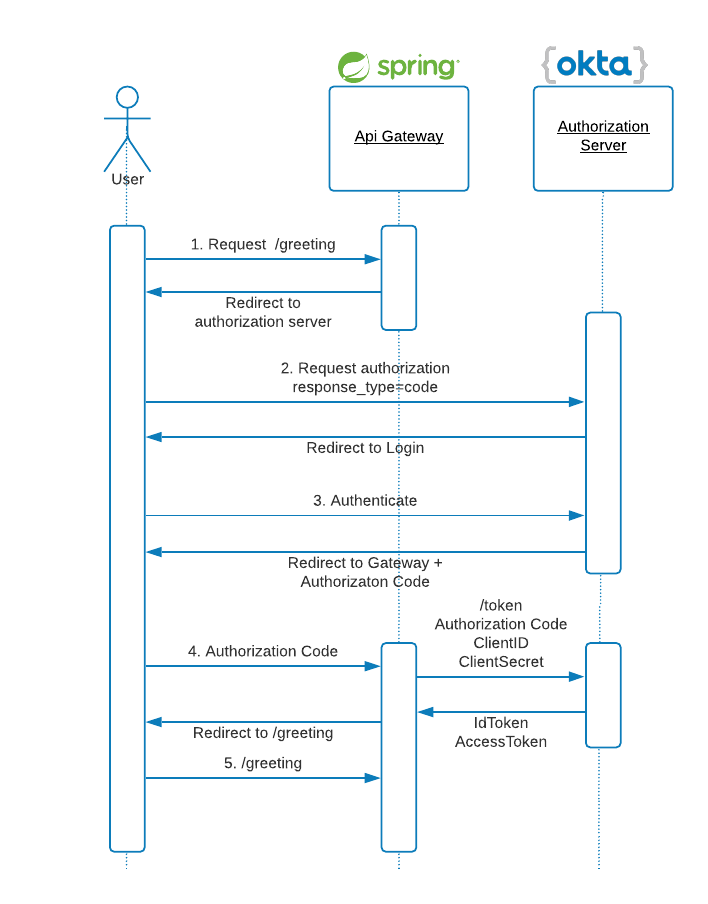
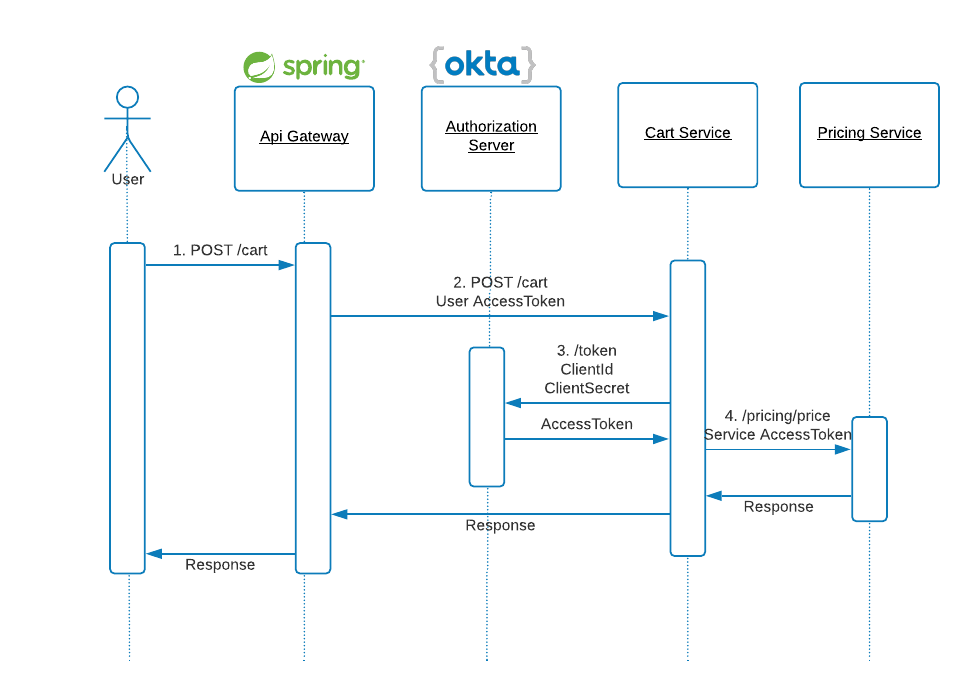
OpenID Connect defines a mechanism for End-User authentication based on the OAuth2 authorization code flow. In this pattern, the Authorization Server returns an Authorization Code to the application, which can then exchange it for an ID Token and an Access Token directly. The Authorization Server authenticates the application with a ClientId and ClientSecret before the exchange happens. As you can see in the diagram below, OpenID and OAuth2 patterns make extensive use of HTTP redirections, some of which have been omitted for clarity.
For testing this OAuth2 pattern, create the API Gateway with service discovery. First, create a base folder for all the projects:
mkdir oauth2-patterns
cd oauth2-patterns
Create a Eureka Discovery Service
With Spring Initializr, create an Eureka server:
curl https://start.spring.io/starter.zip -d dependencies=cloud-eureka-server \
-d bootVersion=2.3.1.RELEASE \
-d groupId=com.okta.developer \
-d artifactId=discovery-service  \
-d name="Eureka Service" \
-d description="Discovery service" \
-d packageName=com.okta.developer.discovery \
-d javaVersion=11 \
-o eureka.zip
Unzip the file:
unzip eureka.zip -d eureka
cd eureka
As described in Spring Cloud Netflix documentation, the JAXB modules, which the Eureka server depends upon, were removed in JDK 11. If you are running Eureka server with JDK 11, edit the pom.xml and add the following dependency:
<dependency>
  <groupId>org.glassfish.jaxb</groupId>
  <artifactId>jaxb-runtime</artifactId>
</dependency>
Edit EurekaServiceApplication to add @EnableEurekaServer annotation:
package com.okta.developer.discovery;

import org.springframework.boot.SpringApplication;
import org.springframework.boot.autoconfigure.SpringBootApplication;
import org.springframework.cloud.netflix.eureka.server.EnableEurekaServer;

@SpringBootApplication
@EnableEurekaServer
public class EurekaServiceApplication {

    public static void main(String[] args) {
        SpringApplication.run(EurekaServiceApplication.class, args);
    }
}
Rename src/main/resources/application.properties to application.yml and add the following content:
server:
  port: 8761

eureka:
  instance:
    hostname: localhost
  client:
    registerWithEureka: false
    fetchRegistry: false
    serviceUrl:
      defaultZone: http://${eureka.instance.hostname}:${server.port}/eureka/
Start the service:
./mvnw spring-boot:run
Go to http://localhost:8761 and you should see the Eureka home.
Create a Spring Cloud Gateway Application
Now let’s create an API Gateway with Spring Cloud Gateway, using Spring Initializr again.
curl https://start.spring.io/starter.zip \
-d bootVersion=2.3.1.RELEASE \
-d dependencies=cloud-eureka,cloud-gateway,webflux,okta,cloud-security,thymeleaf \
-d groupId=com.okta.developer \
-d artifactId=api-gateway  \
-d name="Spring Cloud Gateway Application" \
-d description="Demo project of a Spring Cloud Gateway application and OAuth flows" \
-d packageName=com.okta.developer.gateway \
-d javaVersion=11 \
-o api-gateway.zip
Unzip the project:
unzip api-gateway.zip -d api-gateway
cd api-gateway
Edit SpringCloudGatewayApplication to add @EnableEurekaClient annotation.
package com.okta.developer.gateway;

import org.springframework.boot.SpringApplication;
import org.springframework.boot.autoconfigure.SpringBootApplication;
import org.springframework.cloud.netflix.eureka.EnableEurekaClient;

@SpringBootApplication
@EnableEurekaClient
public class SpringCloudGatewayApplication {

    public static void main(String[] args) {
        SpringApplication.run(SpringCloudGatewayApplication.class, args);
    }
}
Add a package controller and the controller class src/main/java/com/okta/developer/gateway/controller/GreetingController.java. The controller will allow us to test the login without having configured any routes yet.
package com.okta.developer.gateway.controller;

import org.springframework.security.core.annotation.AuthenticationPrincipal;
import org.springframework.security.oauth2.client.OAuth2AuthorizedClient;
import org.springframework.security.oauth2.client.annotation.RegisteredOAuth2AuthorizedClient;
import org.springframework.security.oauth2.core.oidc.user.OidcUser;
import org.springframework.stereotype.Controller;
import org.springframework.ui.Model;
import org.springframework.web.bind.annotation.RequestMapping;

@Controller
public class GreetingController {

    @RequestMapping("/greeting")
    public String greeting(@AuthenticationPrincipal OidcUser oidcUser, Model model,
                           @RegisteredOAuth2AuthorizedClient("okta") OAuth2AuthorizedClient client) {
        model.addAttribute("username", oidcUser.getEmail());
        model.addAttribute("idToken", oidcUser.getIdToken());
        model.addAttribute("accessToken", client.getAccessToken());

        return "greeting";
    }
}
Add a greeting template src/main/resources/templates/greeting.html:
<!DOCTYPE HTML>
<html xmlns:th="https://www.thymeleaf.org">
<head>
    <title>Greeting</title>
    <meta http-equiv="Content-Type" content="text/html; charset=UTF-8" />
</head>
<body>

<h1><p th:text="'Hello, ' + ${username} + '!'" /></h1>
<p th:text="'idToken: ' + ${idToken.tokenValue}" /><br/>
<p th:text="'accessToken: ' + ${accessToken.tokenValue}" /><br>
</body>
</html>
Rename src/main/resources/application.properties to application.yml and add the following properties:
spring:
  application:
    name: gateway
  cloud:
    gateway:
      discovery:
        locator:
          enabled: true
logging:
  level:
    org.springframework.cloud.gateway: DEBUG
    reactor.netty: DEBUG
Add src/main/java/com/okta/developer/gateway/OktaOAuth2WebSecurity.java to make the API Gateway a resource server with login enabled:
package com.okta.developer.gateway;

import org.springframework.context.annotation.Bean;
import org.springframework.context.annotation.Configuration;
import org.springframework.security.config.annotation.web.reactive.EnableWebFluxSecurity;
import org.springframework.security.config.web.server.ServerHttpSecurity;
import org.springframework.security.web.server.SecurityWebFilterChain;

@Configuration
@EnableWebFluxSecurity
public class OktaOAuth2WebSecurity {

    @Bean
    public SecurityWebFilterChain securityWebFilterChain(ServerHttpSecurity http) {
        http.csrf().disable()
                .authorizeExchange()
                .anyExchange()
                .authenticated()
                .and().oauth2Login()
                .and().oauth2ResourceServer().jwt();
        return http.build();
    }
}
To keep things simple in this example, CSRF is disabled.
Before you begin, you’ll need a free Okta developer account. Install the Okta CLI and run okta register to sign up for a new account. If you already have an account, run okta login.
Then, run okta apps create. Select the default app name, or change it as you see fit.
Choose Web and press Enter.
Select Okta Spring Boot Starter.
Accept the default Redirect URI values provided for you. That is, a Login Redirect of http://localhost:8080/login/oauth2/code/okta and a Logout Redirect of http://localhost:8080.
What does the Okta CLI do?
The Okta CLI will create an OIDC Web App in your Okta Org. It will add the redirect URIs you specified and grant access to the Everyone group. You will see output like the following when it’s finished:
Okta application configuration has been written to:
  /path/to/app/src/main/resources/application.properties
Open src/main/resources/application.properties to see the issuer and credentials for your app.
okta.oauth2.issuer=https://dev-133337.okta.com/oauth2/default
okta.oauth2.client-id=0oab8eb55Kb9jdMIr5d6
okta.oauth2.client-secret=NEVER-SHOW-SECRETS
NOTE: You can also use the Okta Admin Console to create your app. See Create a Spring Boot App for more information.
Use the issuer, client ID, and client secret from the generated .okta.env file to start the gateway:
OKTA_OAUTH2_ISSUER={yourOktaIssuer} \
OKTA_OAUTH2_CLIENT_ID={yourOktaClientId} \
OKTA_OAUTH2_CLIENT_SECRET={yourOktaClientSecret} \
./mvnw spring-boot:run
Go to http://localhost:8080/greeting. The gateway will redirect to Okta login page:
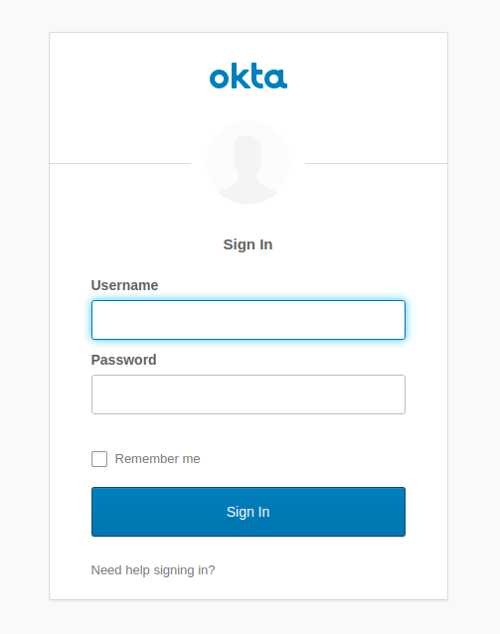
After the login, the idToken and accessToken will be displayed in the browser.
idToken: eyJraWQiOiIw...

accessToken: eyJraWQiOi...
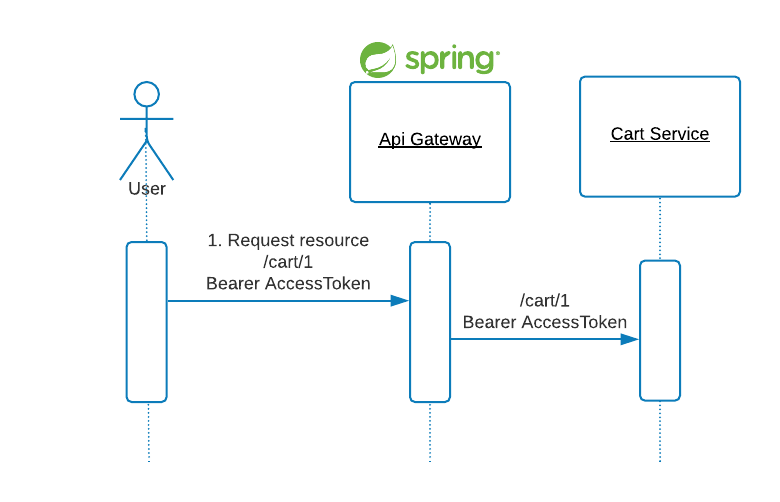
Pattern 2: Token Relay to Service
A Token Relay happens when an OAuth2 consumer, for example the API Gateway, acts as a Client and forwards the accessToken to the routed service.
Create a REST API Service
Let’s create a shopping cart service.
curl https://start.spring.io/starter.zip -d dependencies=web,data-jpa,h2,cloud-eureka,okta,security,lombok \
-d bootVersion=2.3.1.RELEASE \
-d groupId=com.okta.developer \
-d artifactId=cart-service  \
-d name="Cart Service" \
-d description="Demo cart microservice" \
-d packageName=com.okta.developer.cartservice \
-d javaVersion=11 \
-o cart-service.zip
Unzip the file:
unzip cart-service.zip -d cart-service
cd cart-service
Edit pom.xml and add Jackson Datatype Money dependency. For this tutorial, we will use JavaMoney for currency.
<dependency>
  <groupId>org.zalando</groupId>
  <artifactId>jackson-datatype-money</artifactId>
  <version>1.1.1</version>
</dependency>
Before creating the entities for the service, add a MonetaryAmountConverter for mapping the MonetaryAmount type to the database. The conversion to and from BigDecimal for persistence allows using the built-in Hibernate BigDecimal to JDBC numeric mapping.
Add src/main/java/com/okta/developer/cartservice/model/MonetaryAmountConverter.java:
package com.okta.developer.cartservice.model;

import javax.money.CurrencyUnit;
import javax.money.Monetary;
import javax.money.MonetaryAmount;
import javax.persistence.AttributeConverter;
import java.math.BigDecimal;

public class MonetaryAmountConverter implements AttributeConverter<MonetaryAmount, BigDecimal> {

    private final CurrencyUnit USD = Monetary.getCurrency("USD");

    @Override
    public BigDecimal convertToDatabaseColumn(MonetaryAmount monetaryAmount) {
        if (monetaryAmount == null){
            return null;
        }
        return monetaryAmount.getNumber().numberValue(BigDecimal.class);
    }

    @Override
    public MonetaryAmount convertToEntityAttribute(BigDecimal bigDecimal) {
        if (bigDecimal == null){
            return null;
        }
        return Monetary.getDefaultAmountFactory()
                .setCurrency(USD)
                .setNumber(bigDecimal.doubleValue())
                .create();
    }
}
Create the Cart and LineItem model classes under src/main/java/com/okta/developer/cartservice/model package:
package com.okta.developer.cartservice.model;


import lombok.Data;

import javax.money.MonetaryAmount;
import javax.persistence.*;
import java.util.ArrayList;
import java.util.List;

@Entity
@Data
public class Cart {

    @Id
    @GeneratedValue(strategy= GenerationType.AUTO)
    private Integer id;

    private String customerId;
    @Convert(converter=MonetaryAmountConverter.class)
    private MonetaryAmount total;

    @OneToMany(cascade = CascadeType.ALL)
    private List<LineItem> lineItems = new ArrayList<>();


    public void addLineItem(LineItem lineItem) {
        this.lineItems.add(lineItem);
    }
}
package com.okta.developer.cartservice.model;

import lombok.Data;

import javax.money.MonetaryAmount;
import javax.persistence.*;

@Entity
@Data
public class LineItem {

    @Id
    @GeneratedValue(strategy= GenerationType.AUTO)
    private Integer id;

    private String productName;

    private Integer quantity;

    @Convert(converter=MonetaryAmountConverter.class)
    private MonetaryAmount price;
}
Add a CartRepository under src/main/java/com/okta/developer/cartservice/repository/CartRepository.java:
package com.okta.developer.cartservice.repository;

import com.okta.developer.cartservice.model.Cart;
import org.springframework.data.repository.CrudRepository;

public interface CartRepository extends CrudRepository<Cart, Integer> {
}
Create the CartNotFoundException under src/main/java/com/okta/developer/cartservice/controller/CartNotFoundException.java for mapping the API 404 in the CartController we will create after:
package com.okta.developer.cartservice.controller;

import org.springframework.http.HttpStatus;
import org.springframework.web.bind.annotation.ResponseStatus;

@ResponseStatus(HttpStatus.NOT_FOUND)
public class CartNotFoundException extends RuntimeException {

    public CartNotFoundException(String message) {
        super(message);
    }
}
Add a CartController under src/main/java/com/okta/developer/cartservice/controller/CartController.java:
package com.okta.developer.cartservice.controller;

import com.okta.developer.cartservice.model.Cart;
import com.okta.developer.cartservice.repository.CartRepository;
import org.springframework.beans.factory.annotation.Autowired;
import org.springframework.web.bind.annotation.*;

@RestController
public class CartController {

    @Autowired
    private CartRepository repository;

    @GetMapping("/cart/{id}")
    public Cart getCart(@PathVariable Integer id){
        return repository.findById(id).orElseThrow(() -> new CartNotFoundException("Cart not found:" + id));
    }

    @PostMapping("/cart")
    public Cart saveCart(@RequestBody  Cart cart){

        Cart saved = repository.save(cart);
        return saved;
    }
}
Configure the Jackson Money Datatype module. Add a WebConfig class under src/main/java/com/okta/developer/cartservice:
package com.okta.developer.cartservice;

import org.springframework.context.annotation.Bean;
import org.springframework.context.annotation.Configuration;
import org.springframework.web.servlet.config.annotation.WebMvcConfigurer;
import org.zalando.jackson.datatype.money.MoneyModule;

@Configuration
public class WebConfig implements WebMvcConfigurer {

    @Bean
    public MoneyModule moneyModule(){
        return new MoneyModule().withDefaultFormatting();
    }
}
Edit CartServiceApplication and add @EnableEurekaClient:
package com.okta.developer.cartservice;

import org.springframework.boot.SpringApplication;
import org.springframework.boot.autoconfigure.SpringBootApplication;
import org.springframework.cloud.netflix.eureka.EnableEurekaClient;

@SpringBootApplication
@EnableEurekaClient
public class CartServiceApplication {

    public static void main(String[] args) {
        SpringApplication.run(CartServiceApplication.class, args);
    }

}
Rename src/main/resources/application.properties to application.yml and add the following values:
server:
  port: 8081

spring:
  application:
    name: cart

okta:
  oauth2:
    issuer: {yourOktaIssuer}
    audience: api://default
Start the cart-service:
./mvnw spring-boot:run
Route the REST API Through Spring Cloud Gateway
Go to the api-gateway project and add a route for the cart service, edit SpringCloudGatewayApplication:
package com.okta.developer.gateway;

import org.springframework.boot.SpringApplication;
import org.springframework.boot.autoconfigure.SpringBootApplication;
import org.springframework.cloud.gateway.route.RouteLocator;
import org.springframework.cloud.gateway.route.builder.RouteLocatorBuilder;
import org.springframework.cloud.netflix.eureka.EnableEurekaClient;
import org.springframework.cloud.security.oauth2.gateway.TokenRelayGatewayFilterFactory;
import org.springframework.context.annotation.Bean;

@SpringBootApplication
@EnableEurekaClient
public class SpringCloudGatewayApplication {

    public static void main(String[] args) {
        SpringApplication.run(SpringCloudGatewayApplication.class, args);
    }

    @Bean
    public RouteLocator routeLocator(RouteLocatorBuilder builder, TokenRelayGatewayFilterFactory filterFactory) {
        return builder.routes()
                .route("cart", r -> r.path("/cart/**")
                        .filters(f -> f.filter(filterFactory.apply()))
                        .uri("lb://cart"))
                .build();
    }
}
TokenRelayGatewayFilterFactory will find the accessToken from the registered OAuth2 client and include it in the outbound cart request.
Restart the gateway with:
OKTA_OAUTH2_ISSUER={yourOktaIssuer} \
OKTA_OAUTH2_CLIENT_ID={clientId} \
OKTA_OAUTH2_CLIENT_SECRET={clientSecret} \
./mvnw spring-boot:run
Go to http://localhost:8080/greeting and copy the accessToken. Then use the accessToken to make requests to the cart API through the gateway.
export ACCESS_TOKEN={accessToken}

# Add an item to the cart
curl \
  -d '{"customerId": "uijoon@example.com", "lineItems": [{ "productName": "jeans", "quantity": 1}]}' \
  -H "Authorization: Bearer ${ACCESS_TOKEN}" \
  -H 'Content-Type: application/json' \
  -H 'Accept: application/json' \
  http://localhost:8080/cart

# Return the contents of the cart
curl \
  -H 'Accept: application/json' \
  -H "Authorization: Bearer ${ACCESS_TOKEN}" \
  http://localhost:8080/cart/1
Pattern 3: Service-to-Service Client Credentials Grant
In this authorization pattern, the application requests an access token using only its own client credentials. This flow is suitable for machine-to-machine (M2M) or service-to-service authorizations.
Create a Micro Service
For service-to-service authorization, create a pricing Spring Boot service with Spring Initializr:
curl https://start.spring.io/starter.zip -d dependencies=web,cloud-eureka,okta,security,lombok \
-d bootVersion=2.3.1.RELEASE \
-d groupId=com.okta.developer \
-d artifactId=pricing-service  \
-d name="Pricing Service" \
-d description="Demo pricing microservice" \
-d packageName=com.okta.developer.pricing \
-d javaVersion=11 \
-o pricing-service.zip
Unzip the file:
unzip pricing-service.zip -d pricing-service
cd pricing-service
Edit pom.xml and add Jackson Datatype Money dependency again.
<dependency>
  <groupId>org.zalando</groupId>
  <artifactId>jackson-datatype-money</artifactId>
  <version>1.1.1</version>
</dependency>
Create the src/main/java/com/okta/developer/pricing/model/Cart.java and src/main/java/com/okta/developer/pricing/model/LineItem.java model classes:
package com.okta.developer.pricing.model;

import lombok.Data;
import javax.money.MonetaryAmount;
import java.util.ArrayList;
import java.util.List;

@Data
public class Cart {

    private Integer id;
    private String customerId;
    private List<LineItem> lineItems = new ArrayList<>();
    private MonetaryAmount total;

    public void addLineItem(LineItem lineItem){
        this.lineItems.add(lineItem);
    }
}
package com.okta.developer.pricing.model;

import lombok.Data;
import javax.money.MonetaryAmount;

@Data
public class LineItem {

    private Integer id;
    private Integer quantity;
    private MonetaryAmount price;
    private String productName;

    public LineItem(){
    }

    public LineItem(Integer id, Integer quantity) {
        this.id = id;
        this.quantity = quantity;
    }
}
Create the src/main/java/com/okta/developer/pricing/service/PricingService.java interface and a src/main/java/com/okta/developer/pricing/service/DefaultPricingService implementation to calculate prices for the LineItem.
package com.okta.developer.pricing.service;

import com.okta.developer.pricing.model.Cart;

public interface PricingService {

    Cart price(Cart cart);
}
package com.okta.developer.pricing.service;

import com.okta.developer.pricing.model.Cart;
import com.okta.developer.pricing.model.LineItem;
import org.springframework.stereotype.Service;

import javax.money.CurrencyUnit;
import javax.money.Monetary;
import javax.money.MonetaryAmount;
import java.math.BigDecimal;
import java.math.RoundingMode;

@Service
public class DefaultPricingService implements PricingService {

    private final CurrencyUnit USD = Monetary.getCurrency("USD");

    @Override
    public Cart price(Cart cart) {

        MonetaryAmount total = Monetary.getDefaultAmountFactory()
                .setCurrency(USD)
                .setNumber(0)
                .create();

        for (LineItem li : cart.getLineItems()) {
            BigDecimal bigDecimal = new BigDecimal(Math.random() * 100)
                    .setScale(2, RoundingMode.HALF_UP);

            MonetaryAmount amount = Monetary.getDefaultAmountFactory()
                    .setCurrency(USD)
                    .setNumber(bigDecimal)
                    .create();
            li.setPrice(amount);
            total = total.add(amount.multiply(li.getQuantity()));
        }

        cart.setTotal(total);
        return cart;
    }
}
Create a PricingController to handle the pricing request. Add the class src/main/java/com/okta/developer/pricing/controller/PricingController.java:
package com.okta.developer.pricing.controller;

import com.okta.developer.pricing.model.Cart;
import com.okta.developer.pricing.service.PricingService;
import org.springframework.beans.factory.annotation.Autowired;
import org.springframework.web.bind.annotation.PostMapping;
import org.springframework.web.bind.annotation.RequestBody;
import org.springframework.web.bind.annotation.RestController;

@RestController
public class PricingController {

    @Autowired
    private PricingService pricingService;

    @PostMapping("/pricing/price")
    public Cart price(@RequestBody Cart cart){

        Cart priced = pricingService.price(cart);
        return priced;
    }
}
Configure the Jackson Money Module in a src/main/java/com/okta/developer/pricing/WebConfig.java class:
package com.okta.developer.pricing;

import org.springframework.context.annotation.Bean;
import org.springframework.context.annotation.Configuration;
import org.springframework.web.servlet.config.annotation.WebMvcConfigurer;
import org.zalando.jackson.datatype.money.MoneyModule;

@Configuration
public class WebConfig implements WebMvcConfigurer {

    @Bean
    public MoneyModule moneyModule(){
        return new MoneyModule().withDefaultFormatting();
    }
}
Secure the Micro Service using OAuth 2.0 Scopes
Protect the pricing endpoint by requiring a custom scope pricing in the accessToken. One way to do it is with HttpSecurity configuration. Add a src/main/java/com/okta/developer/pricing/WebSecurity.java class with the following:
package com.okta.developer.pricing;

import org.springframework.security.config.annotation.web.builders.HttpSecurity;
import org.springframework.security.config.annotation.web.configuration.EnableWebSecurity;
import org.springframework.security.config.annotation.web.configuration.WebSecurityConfigurerAdapter;
import org.springframework.security.config.annotation.web.configurers.oauth2.server.resource.OAuth2ResourceServerConfigurer;

@EnableWebSecurity
public class WebSecurity extends WebSecurityConfigurerAdapter {

    protected void configure(HttpSecurity http) throws Exception {
        http
                .authorizeRequests(authorizeRequests -> authorizeRequests
                        .mvcMatchers("/pricing/**").hasAuthority("SCOPE_pricing")
                        .anyRequest().authenticated()
                )
                .oauth2ResourceServer(OAuth2ResourceServerConfigurer::jwt);
    }
}
Add @EnableEurekaClient to PricingServiceApplication:
package com.okta.developer.pricing;

import org.springframework.boot.SpringApplication;
import org.springframework.boot.autoconfigure.SpringBootApplication;
import org.springframework.cloud.netflix.eureka.EnableEurekaClient;

@SpringBootApplication
@EnableEurekaClient
public class PricingServiceApplication {

    public static void main(String[] args) {
        SpringApplication.run(PricingServiceApplication.class, args);
    }
}
Rename src/main/resources/application.properties to application.yml and add the following:
server:
  port: 8082

spring:
  application:
    name: pricing

okta:
  oauth2:
    issuer: {yourOktaIssuer}
    audience: api://default
Start the service:
./mvnw spring-boot:run
Let’s try the pricing API without an accessToken:
curl -v\
  -d '{"customerId": "uijoon@mail.com", "lineItems": [{ "productName": "jeans", "quantity": 1}]}' \
  -H 'Content-Type: application/json' \
  -H 'Accept: application/json' \
  http://localhost:8082/pricing/price
With the -v verbose flag, you should see the request is rejected with 401 (Unauthorized).
Update the REST API to Call the Micro Service
Now we are going to configure cart-service to use the client credentials grant flow to request pricing. First, create a new authorization client in Okta.
Before you begin, you’ll need a free Okta developer account. Install the Okta CLI and run okta register to sign up for a new account. If you already have an account, run okta login.
Then, run okta apps create service. Select the default app name, or change it as you see fit.
What does the Okta CLI do?
The Okta CLI will create an OAuth 2.0 Service App in your Okta Org. You will see output like the following when it’s finished:
Okta application configuration has been written to: /path/to/app/.okta.env
Run cat .okta.env (or type .okta.env on Windows) to see the issuer and credentials for your app.
export OKTA_OAUTH2_ISSUER="https://dev-133337.okta.com/oauth2/default"
export OKTA_OAUTH2_CLIENT_ID="0oab8eb55Kb9jdMIr5d6"
export OKTA_OAUTH2_CLIENT_SECRET="NEVER-SHOW-SECRETS"
Your Okta domain is the first part of your issuer, before /oauth2/default.
NOTE: You can also use the Okta Admin Console to create your app. See Create a Service App for more information.
Create a custom scope to restrict what the cart-service accessToken can access. In the Okta Admin Console, go to Security > API > Authorization Servers. Edit the default authorization server by clicking on the edit pencil, then click Scopes > Add Scope. Fill out the name field with pricing and press Create.
We need to configure the OAuth 2.0 client in the cart-service application, for calling the pricing-service. OAuth2RestTemplate is not available in Spring Security 5.3.x. According to Spring Security OAuth migration guides, the way to do this is by using RestTemplate interceptors or WebClient exchange filter functions. Since Spring 5, RestTemplate is in maintenance mode, using WebClient (which supports sync, async, and streaming scenarios) is the suggested approach. So let’s configure a WebClient for the pricing call.
First, add the spring-webflux starter dependency to the cart-service pom.xml:
<dependency>
    <groupId>org.springframework.boot</groupId>
    <artifactId>spring-boot-starter-webflux</artifactId>
</dependency>
IMPORTANT: Adding both spring-boot-starter-web and spring-boot-starter-webflux modules results in Spring Boot auto-configuring Spring MVC, not WebFlux. This allows Spring MVC applications to use the reactive WebClient.
Create src/main/java/com/okta/developer/cartservice/WebClientConfig.java:
package com.okta.developer.cartservice;

import com.fasterxml.jackson.databind.ObjectMapper;
import org.springframework.beans.factory.annotation.Autowired;
import org.springframework.cloud.client.loadbalancer.reactive.ReactorLoadBalancerExchangeFilterFunction;
import org.springframework.context.annotation.Bean;
import org.springframework.context.annotation.Configuration;
import org.springframework.http.codec.json.Jackson2JsonDecoder;
import org.springframework.security.oauth2.client.registration.ClientRegistrationRepository;
import org.springframework.security.oauth2.client.web.OAuth2AuthorizedClientRepository;
import org.springframework.security.oauth2.client.web.reactive.function.client.ServletOAuth2AuthorizedClientExchangeFilterFunction;
import org.springframework.web.reactive.function.client.ExchangeStrategies;
import org.springframework.web.reactive.function.client.WebClient;

@Configuration
public class WebClientConfig {

    @Autowired
    private ReactorLoadBalancerExchangeFilterFunction lbFunction;

    @Autowired
    private ObjectMapper objectMapper;

    @Bean
    public WebClient webClient(ClientRegistrationRepository clientRegistrations,
                               OAuth2AuthorizedClientRepository auth2AuthorizedClients){

        ExchangeStrategies exchangeStrategies = ExchangeStrategies.builder()
                .codecs(configurer ->
                        configurer.defaultCodecs().jackson2JsonDecoder(new Jackson2JsonDecoder(objectMapper)))
                .build();

        ServletOAuth2AuthorizedClientExchangeFilterFunction oauth2 =
                new ServletOAuth2AuthorizedClientExchangeFilterFunction(clientRegistrations, auth2AuthorizedClients);

        oauth2.setDefaultClientRegistrationId("pricing-client");

        return WebClient.builder().apply(oauth2.oauth2Configuration())
                .exchangeStrategies(exchangeStrategies)
                .filter(lbFunction).baseUrl("http://pricing/pricing/price").build();
    }
}
In the code above, we set a custom json decoder, from the objectMapper that includes the MoneyModule, so the monetary amounts are correctly serialized and deserialized. Also, we set pricing-client as the default OAuth 2.0 registrationId. For service discovery, a ReactorLoadBalancerExchangeFilterFunction must be added to the WebClient.
Let’s now configure the OAuth 2.0 client registration. Edit the cart-service application.yml and add security.oauth2 properties. The values for the {...} placeholders should be in the .okta.env file you generated earlier.
The cart-service is a resource server and an OAuth 2.0 client at the same time. The final configuration must be:
server:
  port: 8081

spring:
  application:
    name: cart
  security:
    oauth2:
      resourceserver:
        jwt:
          issuer-uri: {yourOktaIssuer}
      client:
        registration:
          pricing-client:
            provider: okta
            authorization-grant-type: client_credentials
            scope: pricing
            client-id: {clientId}
            client-secret: {clientSecret}
        provider:
          okta:
            issuer-uri: {yourOktaIssuer}
  cloud:
    loadbalancer:
      ribbon:
        enabled: false

logging:
  level:
    com.okta.developer: DEBUG
    org.springframework.web: DEBUG
Note the Ribbon loadbalancer has been disabled, otherwise the ReactorLoadBalancer auto-configuration will fail.
Also, note the requested scope for the client_credentials grant is pricing, the custom scope. Then, the accessTokens for this client will only have access to the pricing-service. Adding a custom scope for the client_credentials flow is a best practice.
Spring Boot will auto-configure the application as an OAuth2 client because of the client.registration presence in the YAML. Add a src/main/java/com/okta/developer/cartservice/WebSecurity.java class to override the auto-configuration, and configure the application as an OAuth 2.0 resource server:
package com.okta.developer.cartservice;

import org.springframework.context.annotation.Configuration;
import org.springframework.security.config.annotation.web.builders.HttpSecurity;
import org.springframework.security.config.annotation.web.configuration.WebSecurityConfigurerAdapter;
import org.springframework.security.config.annotation.web.configurers.oauth2.server.resource.OAuth2ResourceServerConfigurer;

@Configuration
public class WebSecurity extends WebSecurityConfigurerAdapter {

    protected void configure(HttpSecurity http) throws Exception {
        http
                .authorizeRequests(authorize -> authorize
                        .anyRequest().authenticated()
                )
                .oauth2ResourceServer(OAuth2ResourceServerConfigurer::jwt);
    }
}
Create the class src/main/java/com/okta/developer/cartservice/service/PricingException.java to return HttpStatus.INTERNAL_SERVER_ERROR (HTTP status 500) when the cart cannot be priced due to an unexpected error.
package com.okta.developer.cartservice.service;

import org.springframework.http.HttpStatus;
import org.springframework.web.bind.annotation.ResponseStatus;

@ResponseStatus(HttpStatus.INTERNAL_SERVER_ERROR)
public class PricingException extends RuntimeException {

    public PricingException(Exception e) {
        super(e);
    }
}
Add a PricingService for the pricing implementation. Create the class src/main/java/com/okta/developer/cartservice/service/PricingService.java:
package com.okta.developer.cartservice.service;

import com.okta.developer.cartservice.model.Cart;
import com.okta.developer.cartservice.model.LineItem;
import org.slf4j.Logger;
import org.slf4j.LoggerFactory;
import org.springframework.beans.factory.annotation.Autowired;
import org.springframework.stereotype.Service;
import org.springframework.web.reactive.function.client.WebClient;
import reactor.core.publisher.Mono;

@Service
public class PricingService {

    private static final Logger logger = LoggerFactory.getLogger(PricingService.class);

    @Autowired
    private WebClient webClient;

    public Cart price(Cart cart){
        try {

            Mono<Cart> response = webClient
                    .post()
                    .bodyValue(cart)
                    .retrieve().bodyToMono(Cart.class);

            Cart priced = response.block();

            for (int i = 0; i < priced.getLineItems().size(); i++) {
                LineItem pricedLineItem = priced.getLineItems().get(i);
                LineItem lineItem = cart.getLineItems().get(i);
                lineItem.setPrice(pricedLineItem.getPrice());
            }

            cart.setTotal(priced.getTotal());


            return cart;
        } catch (Exception e){
            logger.error("Could not price cart:", e);
            throw new PricingException(e);
        }
    }
}
Note that the WebClient is making a synchronous call, as we invoke response.block() to get the pricing result. This is the expected approach for non-reactive applications.
Modify the CartController to request pricing when creating a cart:
package com.okta.developer.cartservice.controller;

import com.okta.developer.cartservice.model.Cart;
import com.okta.developer.cartservice.repository.CartRepository;
import com.okta.developer.cartservice.service.PricingService;
import org.springframework.beans.factory.annotation.Autowired;
import org.springframework.web.bind.annotation.*;

@RestController
public class CartController {

    @Autowired
    private CartRepository repository;

    @Autowired
    private PricingService pricingService;


    @GetMapping("/cart/{id}")
    public Cart getCart(@PathVariable Integer id){
        return repository.findById(id).orElseThrow(() -> new CartNotFoundException("Cart not found:" + id));
    }

    @PostMapping("/cart")
    public Cart saveCart(@RequestBody  Cart cart){

        Cart priced = pricingService.price(cart);
        Cart saved = repository.save(priced);
        return saved;
    }
}
Restart the cart-service. You should be able to find the values for the client ID and client secret in .okta.env.
SPRING_SECURITY_OAUTH2_CLIENT_REGISTRATION_PRICINGCLIENT_CLIENTID={serviceClientId} \
SPRING_SECURITY_OAUTH2_CLIENT_REGISTRATION_PRICINGCLIENT_CLIENTSECRET={serviceClientSecret} \
./mvnw spring-boot:run
Putting it All Together
Create a cart through the API Gateway again, make sure to have a valid accessToken from http://localhost:8080/greeting:
export ACCESS_TOKEN={accessToken}

curl -v\
  -d '{"customerId": "uijoon@mail.com", "lineItems": [{ "productName": "jeans", "quantity": 1}]}' \
  -H "Authorization: Bearer ${ACCESS_TOKEN}" \
  -H 'Content-Type: application/json' \
  -H 'Accept: application/json' \
  http://localhost:8080/cart
You should get a priced cart as response:
{
   "id":1,
   "customerId":"uijoon@example.com",
   "total":{
      "amount":86.20,
      "currency":"USD",
      "formatted":"USD86.20"
   },
   "lineItems":[
      {
         "id":2,
         "productName":"jeans",
         "quantity":1,
         "price":{
            "amount":86.20,
            "currency":"USD",
            "formatted":"USD86.20"
         }
      }
   ]
}
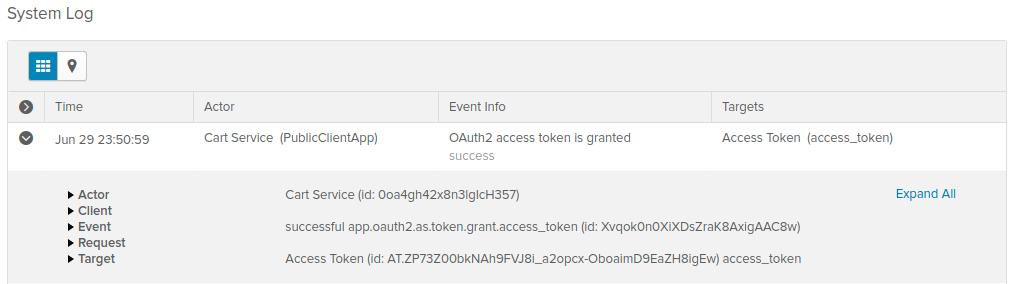
Take a look at the System Log in the Okta Admin Console and you will see an entry indicating the Cart Service requested an access token:
Learn More About Building Secure Applications
In this tutorial, you learned how to create an API Gateway with Spring Cloud Gateway, and how to configure three common OAuth 2.0 patterns (1. code flow, 2. token relay, and 3. client credentials grant) using Okta Spring Boot Starter and Spring Security. You can find all the code on GitHub.
To continue learning about Spring Cloud Gateway features and OAuth 2.0 authorization patterns, check also the following links:
- Reactive Java Microservices with Spring Boot and JHipster
- Secure Reactive Microservices with Spring Cloud Gateway
- Secure Legacy Apps with Spring Cloud Gateway
- Secure Server-to-Server Communication with Spring Boot and OAuth 2.0
- Secure Service-to-Service Spring Microservices with HTTPS and OAuth 2.0
- Use Okta Token Hooks to Supercharge OpenID Connect
If you like this blog post and want to see more like it, follow @oktadev on Twitter, subscribe to our YouTube channel, or follow us on LinkedIn. As always, please leave a comment below if you have any questions.
Okta Developer Blog Comment Policy
We welcome relevant and respectful comments. Off-topic comments may be removed.