Use Okta Token Hooks to Supercharge OpenID Connect

OpenID Connect (OIDC) and OAuth 2.0 are already recognized as powerful tools for incorporating authentication and authorization into modern web applications.
Okta has enhanced the capabilities of these standards by introducing our Inline Hooks feature. There are a number of different types of inline hooks that Okta supports. In this post, I focus on hooks that allow you to patch information into the tokens you get back from Okta via OIDC and OAuth.
You’ll first set up an OIDC application in Okta to see the types of tokens you get back. Then, you’ll configure a Spring Boot API app that allows you to register your favorite beers (this is based on a previous post from my friend and colleague, Matt Raible, who is passionate about good beer). This Spring Boot app also has API endpoints to register token hooks with Okta and to service token patch requests from Okta. By the time you’re done, you’ll see that your favorite beers are now included in the payload of a token thanks to the hooks you registered.
To get ready for the hands-on parts of this post, set yourself up with the following:
- Create a free Okta developer org at https://developer.okta.com/signup/
- Install HTTPie, a modern curl replacement for interacting with API endpoints later
- Install ngrok, an app that allows public access to a locally running server
- Optional: Create a free Heroku account at https://signup.heroku.com/
To start, let’s take a step back and talk a little more about OIDC and OAuth.
Note: In May 2025, the Okta Integrator Free Plan replaced Okta Developer Edition Accounts, and the Okta CLI was deprecated.
We preserved this post for reference, but the instructions no longer work exactly as written. Replace the Okta CLI commands by manually configuring Okta following the instructions in our Developer Documentation.
Three Minute Overview of OpenID Connect and OAuth 2.0
In the beginning, there were siloed websites that didn’t talk to each other, and everyone was sad.
Sites like Yelp started wanting access to the contact information you had in your Google contacts. So, Yelp naturally collected your Google username and password so that it could access your contacts. You gave Yelp your permission, so this was all good, Yes? No! With your username and password, Yelp could access your email, your docs - everything you had in Google - not just your contacts. And, worse, Yelp had to store your password in a way that it could use it in plaintext and there was no standard way to revoke your consent to Yelp to access your Google account.
We needed an authorization framework that would allow you to grant access to certain information without you giving up your password. Cue OAuth.
Use OAuth 2.0 for Delegated Authorization
Three revisions later, we’re at OAuth 2.0 (there was 1.0 and 1.0a before it) and all’s right with the world. Now, an application like Yelp (a Client Application) can request an Access Token from a service like Google (an Authorization Server). You (the Resource Owner) log into Google with your credentials and give your Consent to Yelp to access your contacts (and only your contacts). Access Token in hand, Yelp makes a request of the Google Contacts API (the Resource Server) and gets your contacts. Yelp never sees your password and never has access to anything more than you’ve consented to. And, you can withdraw your consent at any time.
Use OpenID Connect for Identity
In this new world of consent and authorization, only one thing was missing: identity. Cue OpenID Connect. OIDC is a thin layer on top of OAuth 2.0 that introduces a new type of token: the Identity Token. Encoded within these cryptographically signed tokens in JWT format, is information about the authenticated user. This opened the door to a new level of interoperability and Single SignOn.
OAuth (and by extension OIDC) use a number of defined Flows to manage the interactions between the Client App, the Authorization Server and the Resource Server. In this post, you’ll focus on the Authorization Code Flow. This flow is meant to be kicked off from your browser and goes like this:
- Yelp wants access to your contacts. It presents a button to link your Google Contacts.
- When you click the button, you’re redirected to Google where you login with your username and password (if you’re not already logged in).
- Google shows you a screen telling you that Yelp would like read-only access to your contacts.
- Once you give your consent, Google redirects back to Yelp, via your browser, with a temporary code (called an authorization code)
- Using this code, Yelp contacts Google to trade it for an Access Token
- Google validates the code and if all checks out, issues an Access Token with limited capabilities (read-only access to your contacts) to Yelp
- Yelp then presents the Access Token to the Google Contacts API
- Google Contacts API validates the token and, if the request matches the capabilities identified by the token, returns your contact list to Yelp
Set Up Your Okta Org for OIDC and OAuth 2.0
In this section, you’re going to create an OpenID Connect application in Okta. Then, you’ll exercise the OIDC application using a little OIDC playground app I created on Heroku. No coding needed! (That will come later).
After logging in to your Okta org, navigate to Applications from the top-level menu. Click: Add Application. Click the third box over labeled Web and click Next.
Enter the following:
| field | value |
|---|---|
| Name | OIDC Beers |
| Login redirect URIs | https://okta-oidc-fun.herokuapp.com/flow_result |
| Grant type allowed | Check Authorization Code and Implicit (Hybrid) |
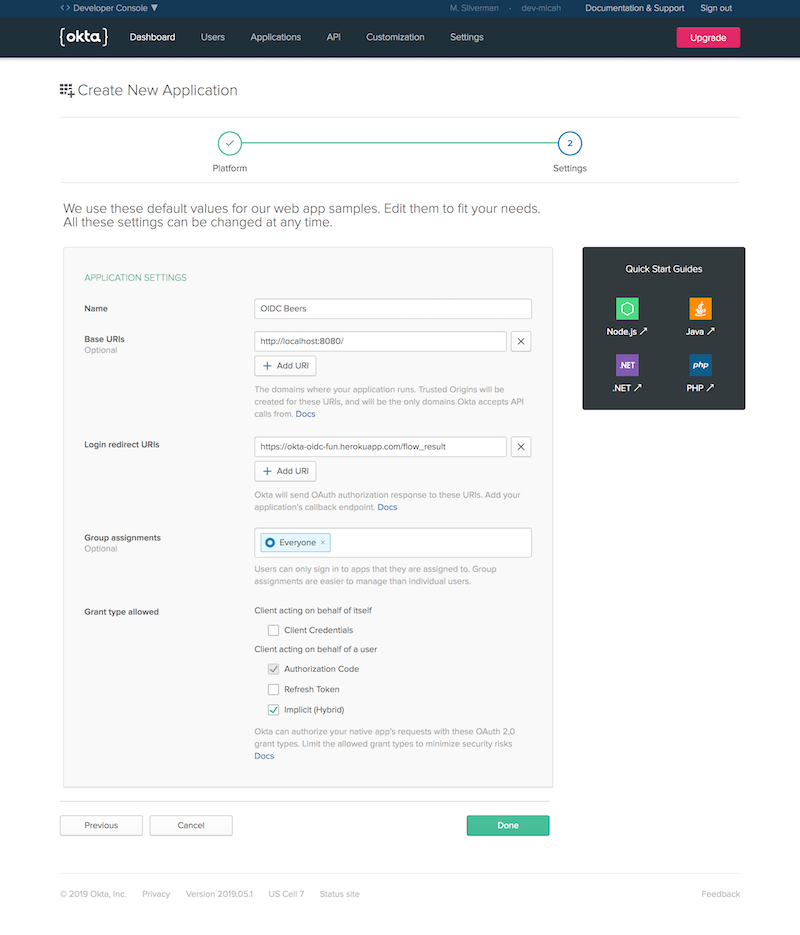
Click Done.
Note: Current best guidance for OAuth 2.0 (as outlined here) is to NOT use the implicit flow. We are using it here for demonstration purposes.
Scroll down and copy the Client ID and Client secret values. You’ll need these later.
OIDC Fun on Heroku
I created an OIDC playground application to be able to exercise the different flows available. This will come in handy to see the OIDC app you just created in action.
Navigate over to https://okta-oidc-fun.herokuapp.com
You’ll see a page with a form and some toggle buttons. Initially, it’s set to point to my Okta org. But, you can change it to your Okta org by filling in the form.
Update the values according to the following:
| field | value |
|---|---|
| Okta Org | the fully qualified domain for your okta org (NO https://) |
| Authorization Server ID | default |
| OIDC Client ID | The Client ID you copied when you created the OIDC app |
| response_type | DESELECT code, Select id_token and token |
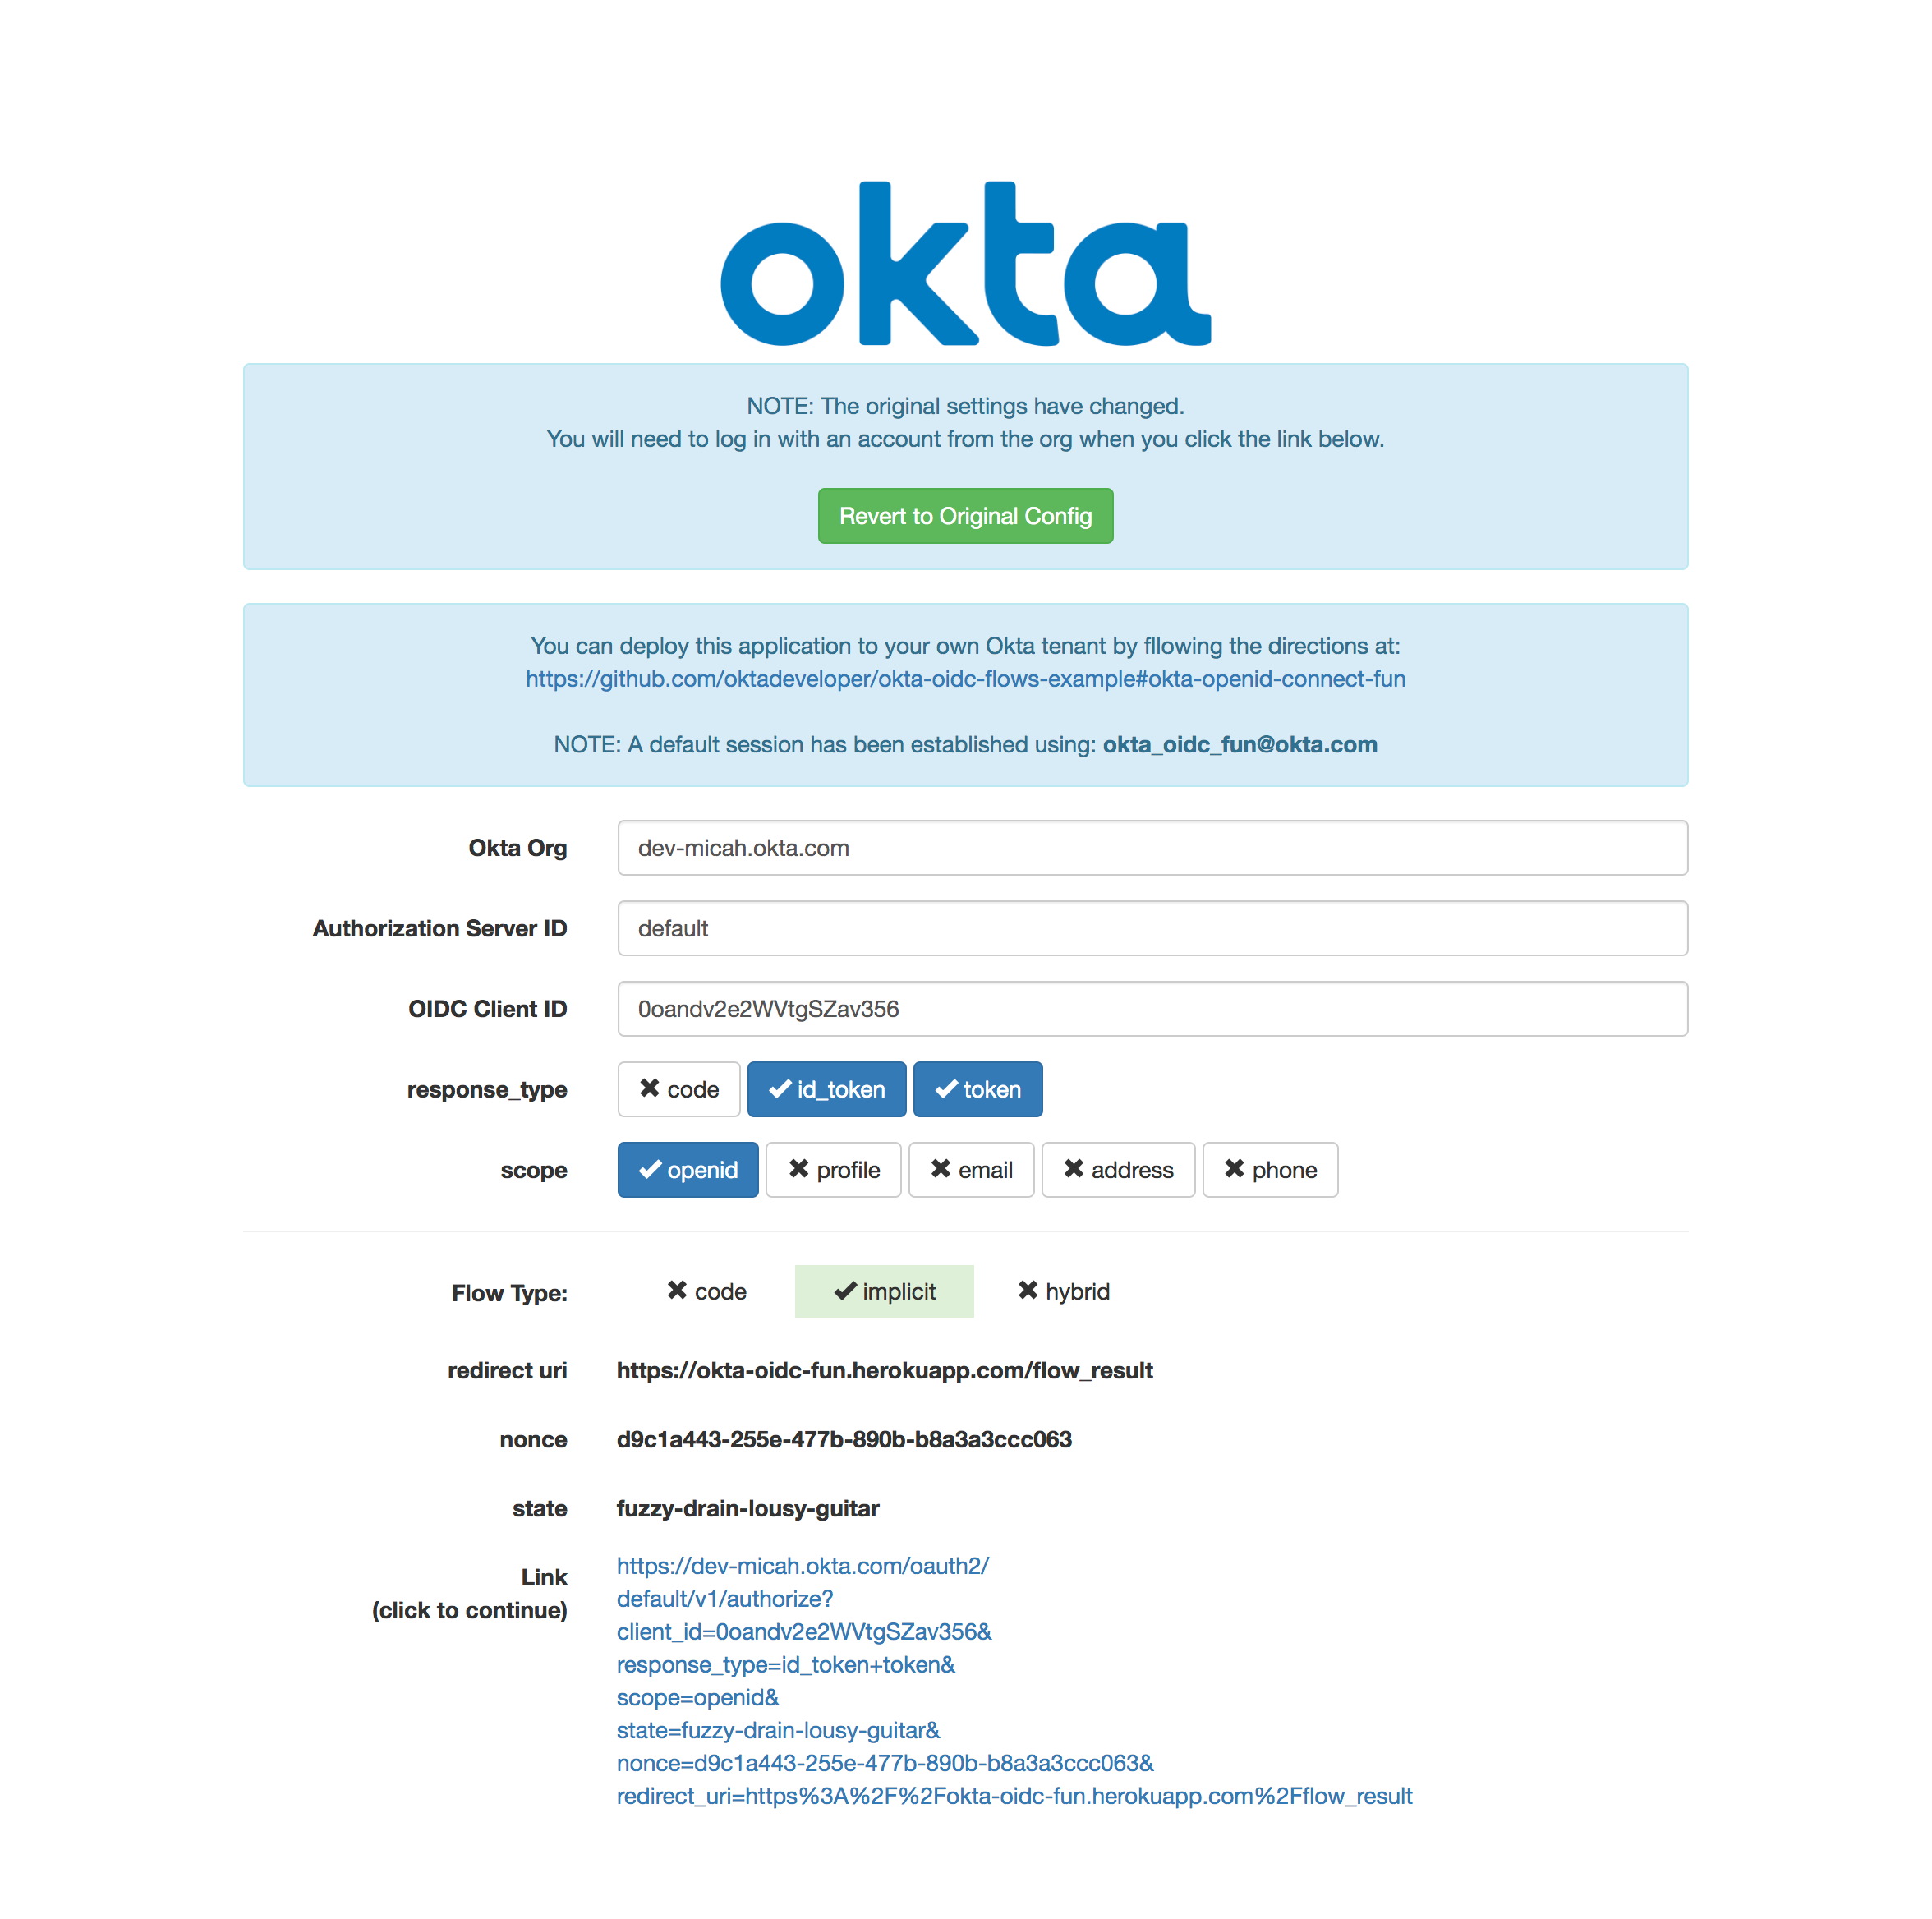
Scroll down and click the link. A new tab will launch where you can authenticate to your Okta org. Then, you’ll be redirected back where you’ll see an ID Token and an Access Token. Click Validate ID Token and you’ll see the payload encoded into that token.
You’ve now seen the kinds of tokens your OpenID Connect app in Okta can generate.
In the rest of this post, you’ll see how you can create a hook that will add custom claims to the ID Token. This happens in-flight, but before the ID Token is signed. This means that you can still safely validate the cryptographic signature.
Leave this browser tab open. You’ll make use of the access token in just a little bit.
Set Up the Favorite Beers API
Go and grab the source code for this post from GitHub.
This is a Spring Boot application which uses the Okta Spring Boot Starter for easy integration with OpenID Connect and OAuth 2.0.
It uses the H2 in-memory database and Spring Data JPA for easy object-relational mapping. It also uses the excellent Lombok project because - Who likes to write getters and setters?
The application has an API to indicate your favorite beers as well as an API to handle an incoming hook request from Okta and return an ID token patch response.
In the src/main/resources folder, you’ll see the application.sample.yml file. Copy that over to application.yml in the same folder.
You’ll need to customize the application.yml file with the values you’ve collected from the set up we did above. This includes the issuer, clientId and clientSecret values. You can also optionally change the id and password values to anything you want. These values are used later with the Hooks API. Once you have these set, you can run the app like so:
./mvnw spring-boot:run
Note: You’ll need Java 11 or higher to run this example. If you’re on Mac, I recommend SDKMAN to manage Java versions.
After the app starts, you’ll see output to indicate that the H2 in-memory database has been primed with some beers:
Beer(id=1, name=Kentucky Brunch Brand Stout)
Beer(id=2, name=Marshmallow Handjee)
Beer(id=3, name=Barrel-Aged Abraxas)
Beer(id=4, name=Hunahpu's Imperial Stout)
Beer(id=5, name=King Julius)
Beer(id=6, name=Heady Topper)
Beer(id=7, name=Budweiser)
Beer(id=8, name=Coors Light)
Beer(id=9, name=PBR)
Exercise the Beers Application
You’re now going to use the Beers API to add your favorite beer. But, all the API endpoints are protected with OIDC. This is where your access token from earlier comes in.
Execute the following command to add a beer to your list of favs:
http \
localhost:8080/api/add-beer \
name=Heineken \
Authorization:"Bearer <your access token>"
If all goes well, you’ll get a response like this:
HTTP/1.1 200
...

[
    { "id": 10, "name": "Heineken" }
]
The app has both created a new beer entry and added it to your list of favorites.
NOTE: Since the application uses an in-memory database, if you restart the app, you’ll need to re-add your favorite beers using this API.
Next up, you’ll set up the inline hook that will add the beers claim to your ID token on the fly.
Get Your Favorite Beers Patched into Your ID Token
In order to make use of your hooks processing API, Okta needs to be able to make calls to it over the public Internet. In “real life”, you’d deploy your application somewhere and set it up so that Okta could interact with it.
For demonstration purposes, you’re going to use the ngrok service, which issues you a unique, publicly addressable domain that’s connected to your locally running Spring Boot application.
Start by issuing this command in a separate terminal tab:
ngrok http 8080
You’ll see output like this:
ngrok by @inconshreveable                                                                                                                                                                     (Ctrl+C to quit)

Session Status                online
Session Expires               6 hours, 30 minutes
Version                       2.3.29
Region                        United States (us)
Web Interface                 http://127.0.0.1:4040
Forwarding                    http://e3fc9a95.ngrok.io -> http://localhost:8080
Forwarding                    https://e3fc9a95.ngrok.io -> http://localhost:8080

Connections                   ttl     opn     rt1     rt5     p50     p90
                              0       0       0.00    0.00    0.00    0.00
Copy the https link (https://e3fc9a95.ngrok.io in my case) as we’ll need it soon.
Set Up Okta Inline Hooks
The publicly accessible (thanks to ngrok) Spring Boot app you have running is all set up to receive hook requests from Okta. But, your Okta org isn’t ready for it yet.
First, you need to register the inline token hook with Okta.
From your Okta org’s admin console, navigate to Workflow > Inline Hooks. Click: Add Inline Hook > Token.
Enter the following into the form and then click Save:
| Field | Value |
|---|---|
| Name | Beers Hook |
| URL | {your ngrok url}/api/hooks/apiam |
| Authentication field | Authorization |
| Authentication secret | Basic bWVAZXhhbXBsZS5jb206d2hhdGV2cw== |
The Authentication field is the header that Okta will use to provide authentication to your hook. The Authentication secret is the value that will be sent in the Authorization header.
Note: The authentication secret value is found in the application.yml file. If you changed the hooks id and password values, you’ll need to recompute the basic auth string and have that value reflected in the settings above.

The hook is now created in your Okta org.
The Spring Boot application has basic authentication enabled on the hooks endpoints via WebSecurityConfiguration.java:
@EnableWebSecurity
public class WebSecurityConfiguration {


    @Value("#{ @environment['okta.hooks.id'] }")
    private String hooksId;

    @Value("#{ @environment['okta.hooks.password'] }")
    private String hooksPassword;

    @Autowired
    public void configureGlobal(AuthenticationManagerBuilder auth) throws Exception {
        auth.inMemoryAuthentication()
            .withUser(hooksId).password(passwordEncoder().encode(hooksPassword))
            .authorities("ROLE_USER");
    }

    @Bean
    public PasswordEncoder passwordEncoder() {
        return new BCryptPasswordEncoder();
    }

    @Configuration
    @Order(1)
    public static class HooksConfiguration extends WebSecurityConfigurerAdapter {

        @Override
        public void configure(HttpSecurity http) throws Exception {
            http
                .antMatcher("/api/hooks/**")
                .csrf().disable()
                .authorizeRequests()
                .anyRequest().authenticated()
                .and()
                .httpBasic();
        }
    }

    @Configuration
    @Order(2)
    public static class GlobalConfig extends WebSecurityConfigurerAdapter {

        @Override
        public  void configure(HttpSecurity http) throws Exception {
            http.authorizeRequests()
                .anyRequest().authenticated()
                .and()
                .oauth2ResourceServer().jwt();
        }
    }
}
Basic authentication is used for the /api/hooks/** endpoint and OAuth 2.0 is used for everything else.
Anatomy of a Token Transformation Inline Hook
Before we configure your Authorization Server to make use of the hook, let’s take a look at the heart of the code that enables the ID Token to be patched with a list of your favorite beers.
Here’s method from the HooksController:
@PostMapping("/apiam")
public TokenHookResponse apiam(@RequestBody TokenHookRequest request) {
    String login = request.getData().getContext().getUser().getProfile().getLogin();
    Person person = personRepository.findByEmail(login);

    TokenHookResponse response = new TokenHookResponse();
    if (person != null) {
        IDTokenPatchResponse idTokenPatchResponse = new IDTokenPatchResponse();
        idTokenPatchResponse.getValue().add(
            new TokenPatchResponse.Value(
                "add", "/claims/beers", transformBeers(person.getFavoriteBeers())
            )
        );
        response.getCommands().add(idTokenPatchResponse);
    }
    return response;
}
The TokenHookRequest class makes use of Lombok and some default initialization to ensure that you won’t get a NullPointerException.
There’s a lot to the token hook request that Okta sends into the controller. I’ve modeled out only what we need by making liberal use of the @JsonIgnoreProperties(ignoreUnknown = true) annotation. You can see an example of the complete request JSON here.
Using the login value from the request, the code does a database lookup to retrieve the Person associated with that login. When you added to your list of favorite beers earlier, a Person record was created for you.
The code then sets up a TokenHookResponse which will (potentially) have a list of commands to patch either (or both) the ID token and access aoken. In this example, we are only going to patch the ID token.
The critical line is this one:
new TokenPatchResponse.Value("add", "/claims/beers", transformBeers(p.getFavoriteBeers()))
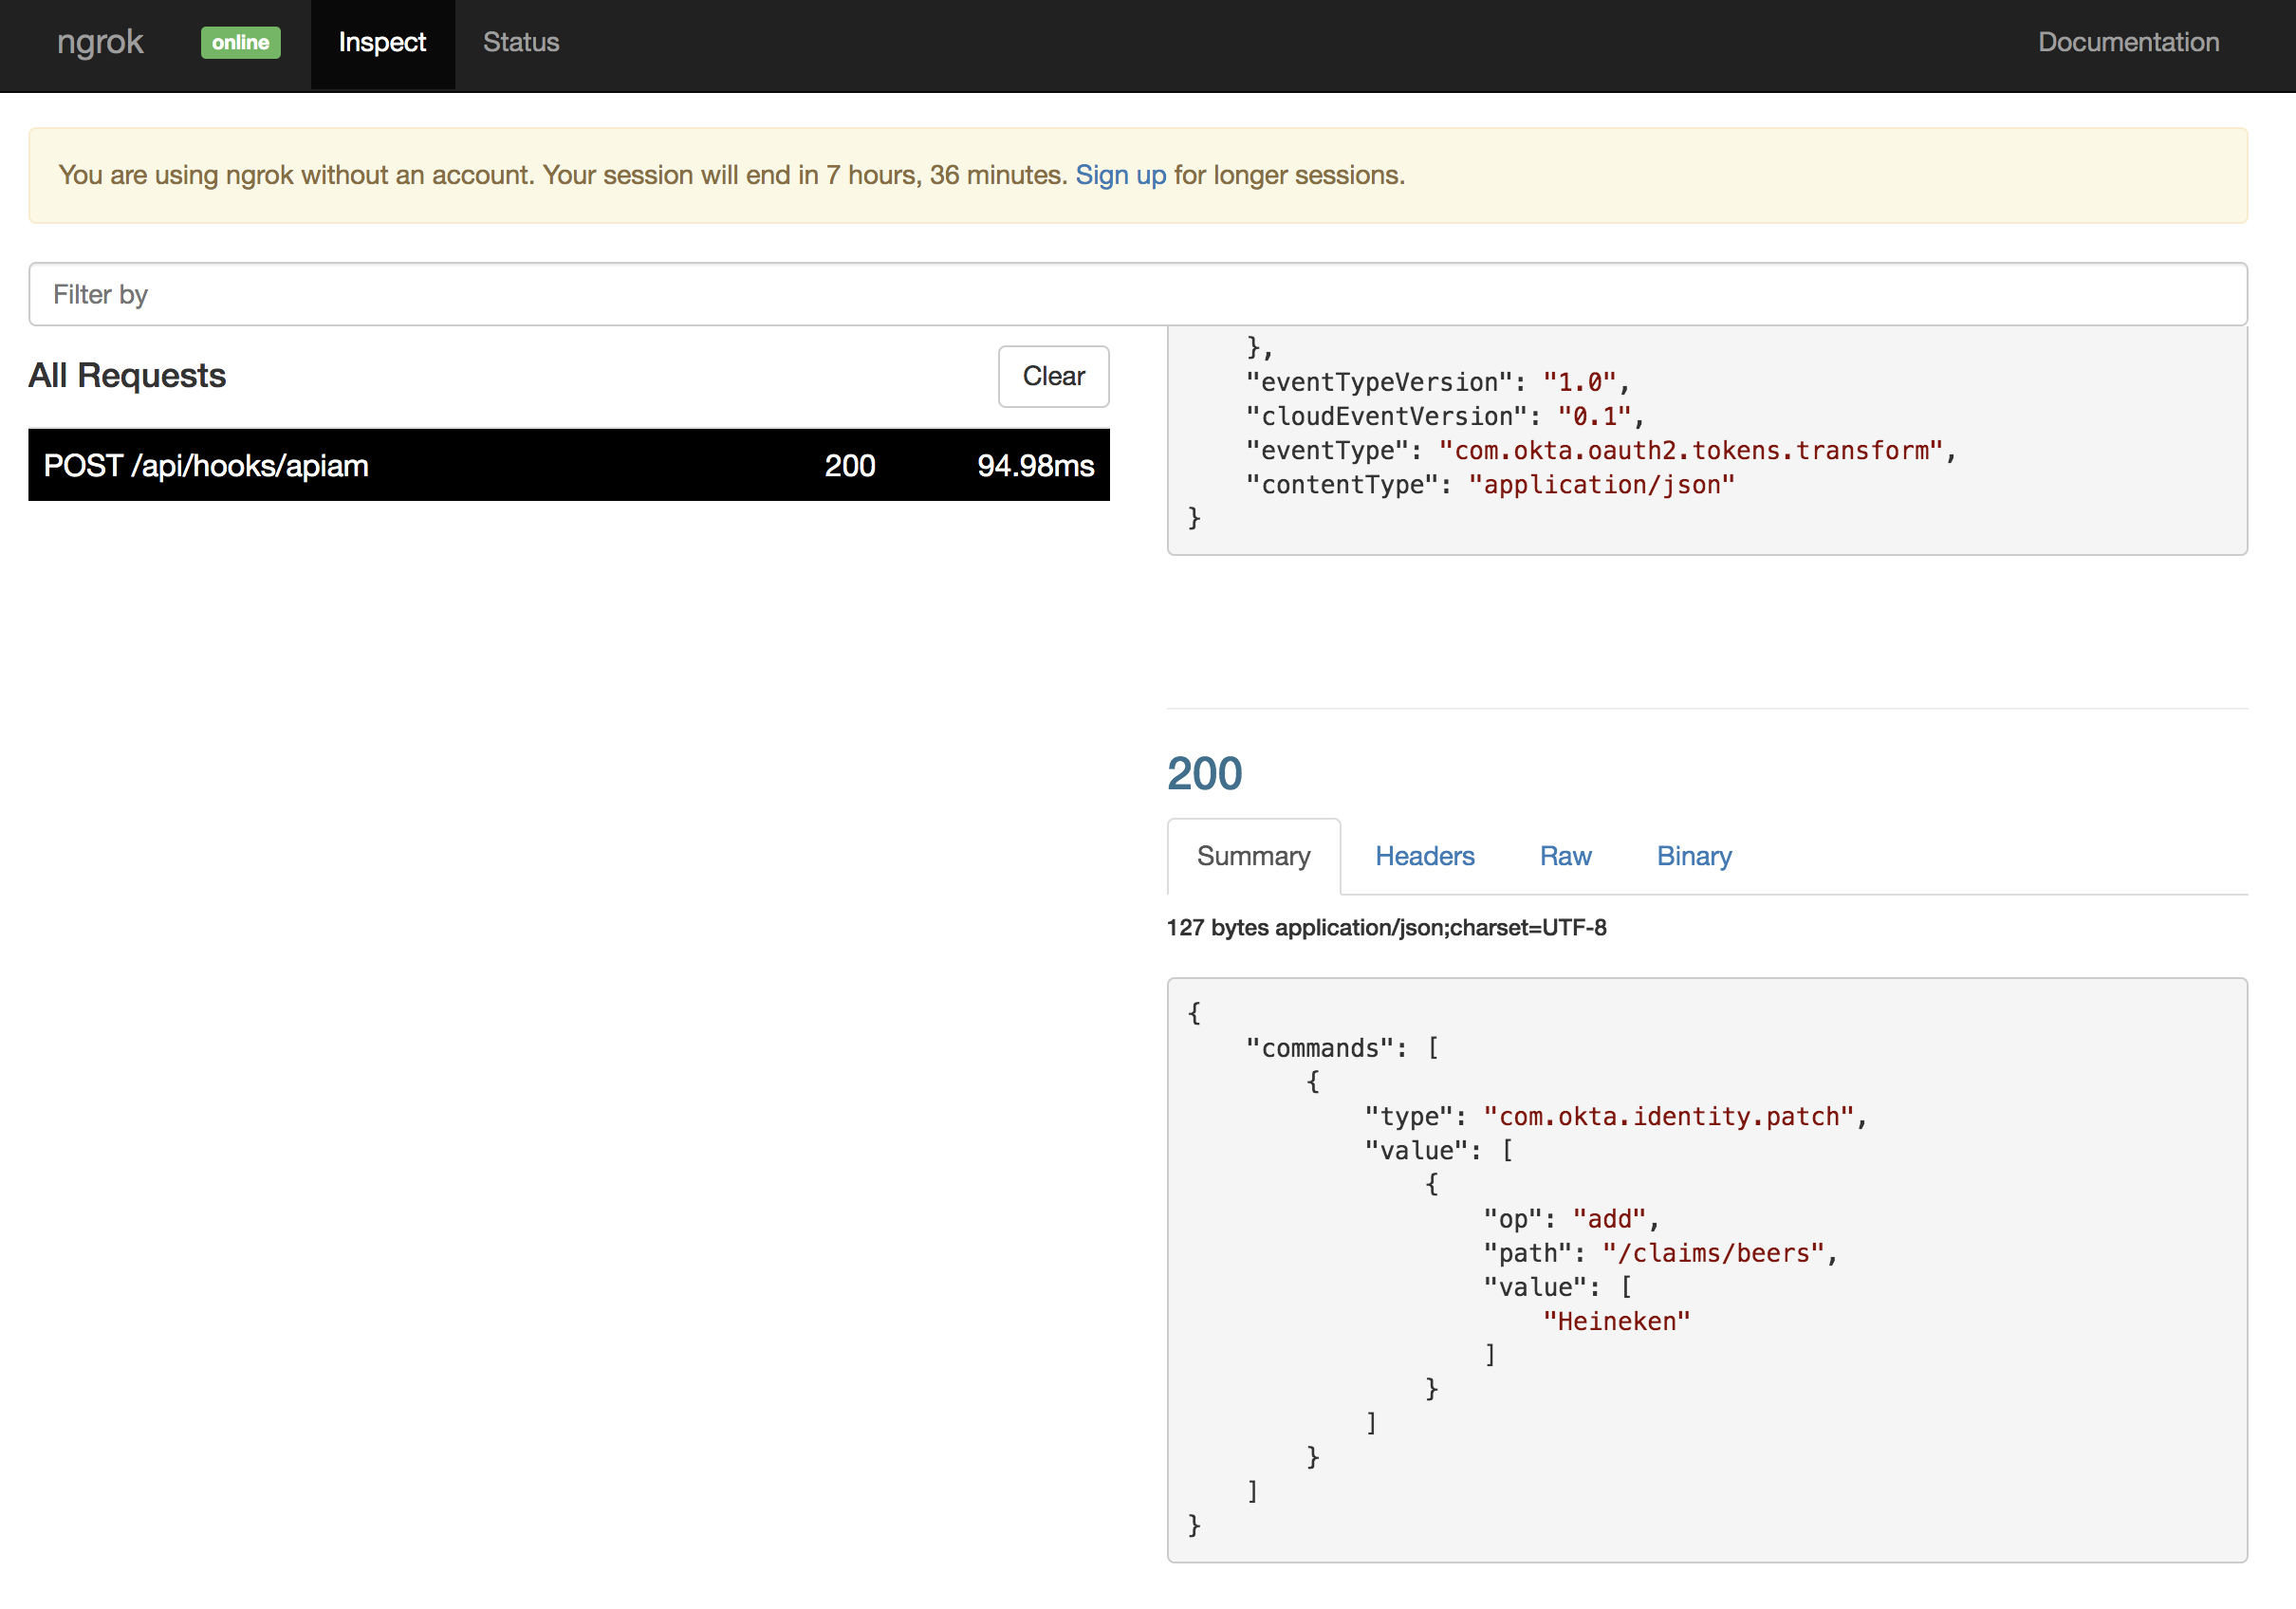
Here’s where a list of beer names is added to the response attached to the beers claim. The JSON response looks like this:
{
  "commands": [
    {
      "type": "com.okta.identity.patch",
      "value": [
        {
          "op": "add",
          "path": "/claims/beers",
          "value": ["Heineken"]
        }
      ]
    }
  ]
}
The last step to tie this all together is to configure your Authorization Server to use the hook.
Add Beer to Your ID Token
Click API > Authorization Servers from the top-level menu. Click default. Click Access Policies. Scroll down and click the pencil icon next to the Default Policy Rule.
Select Beers Hook from the Use this inline hook menu.
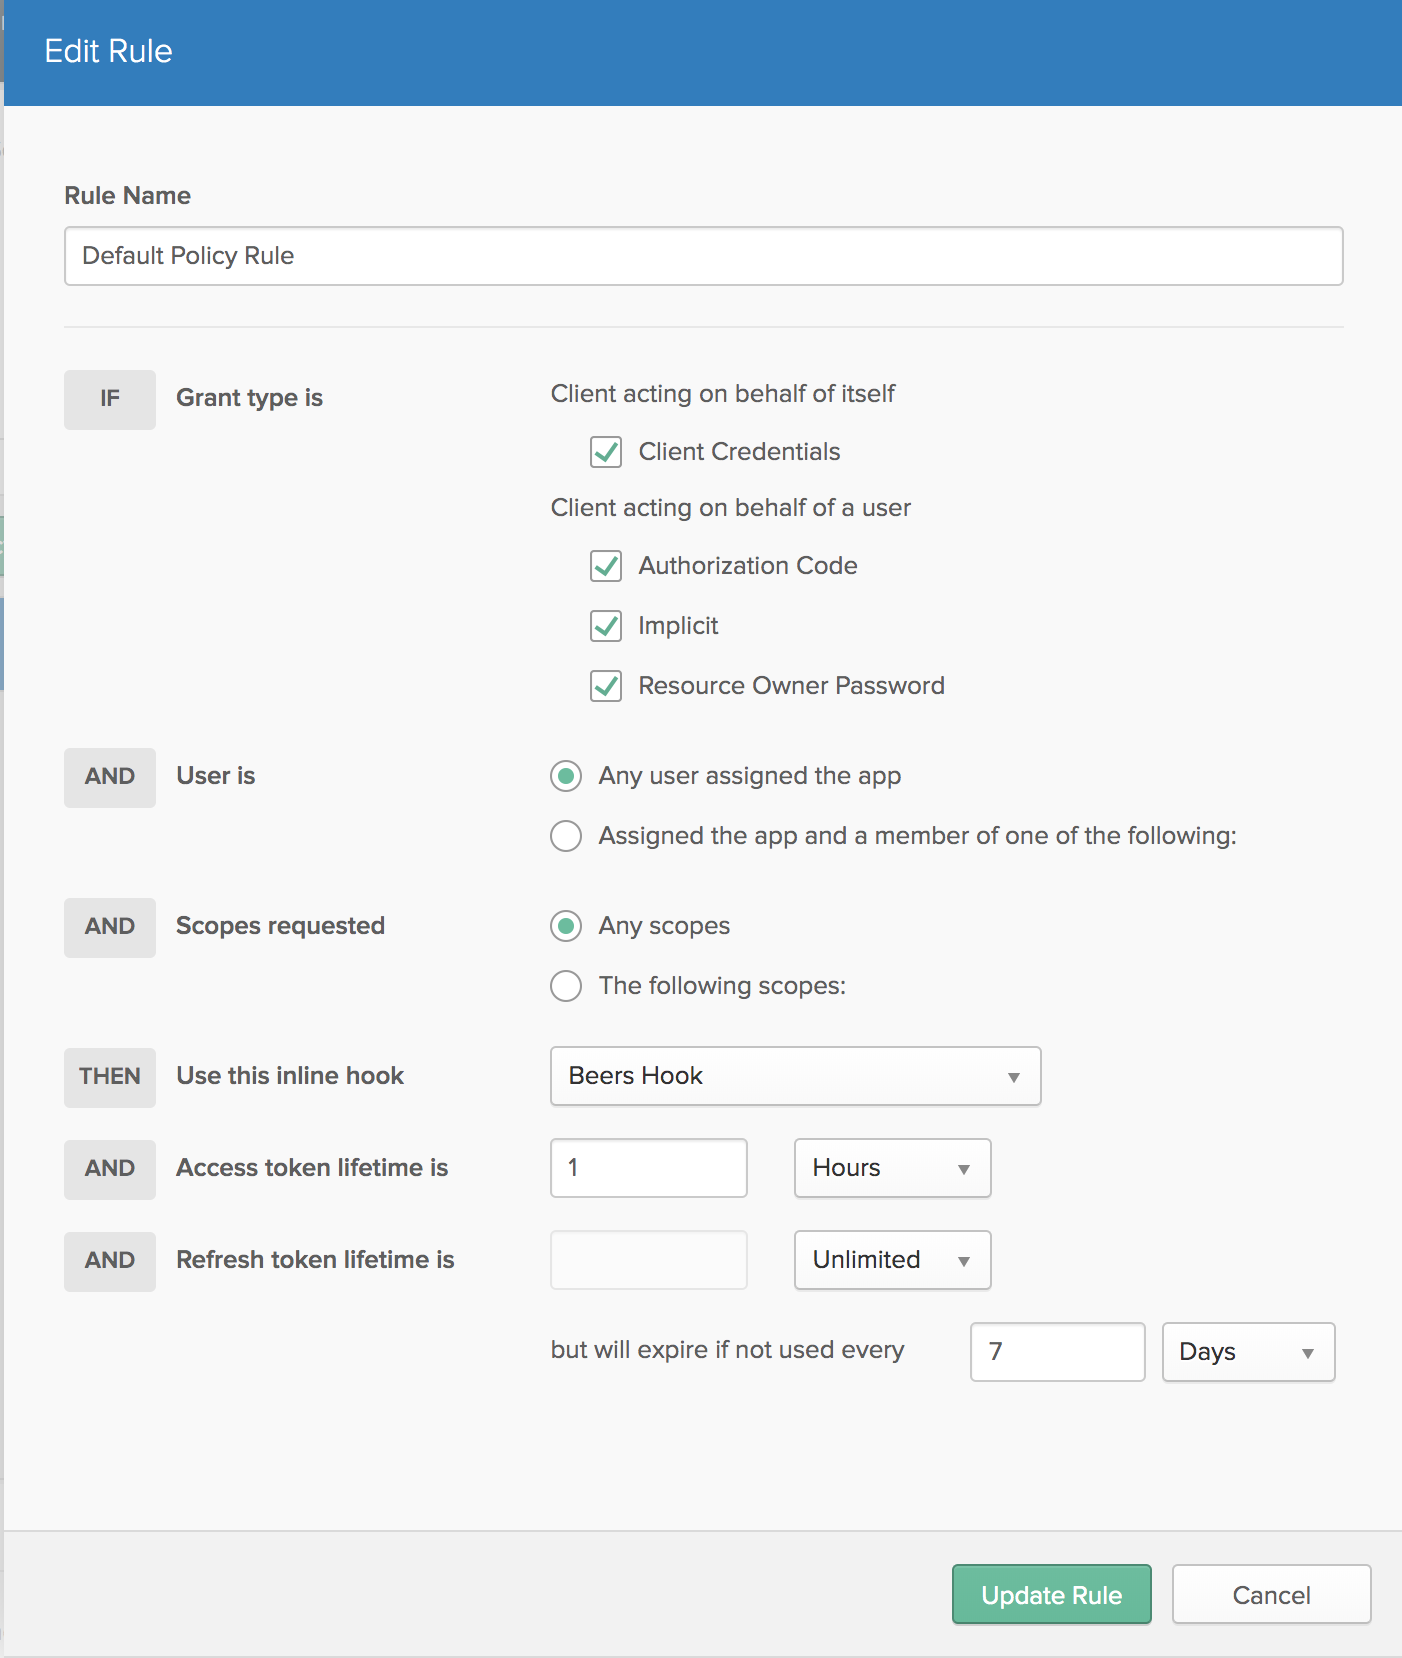
Click Update Rule.
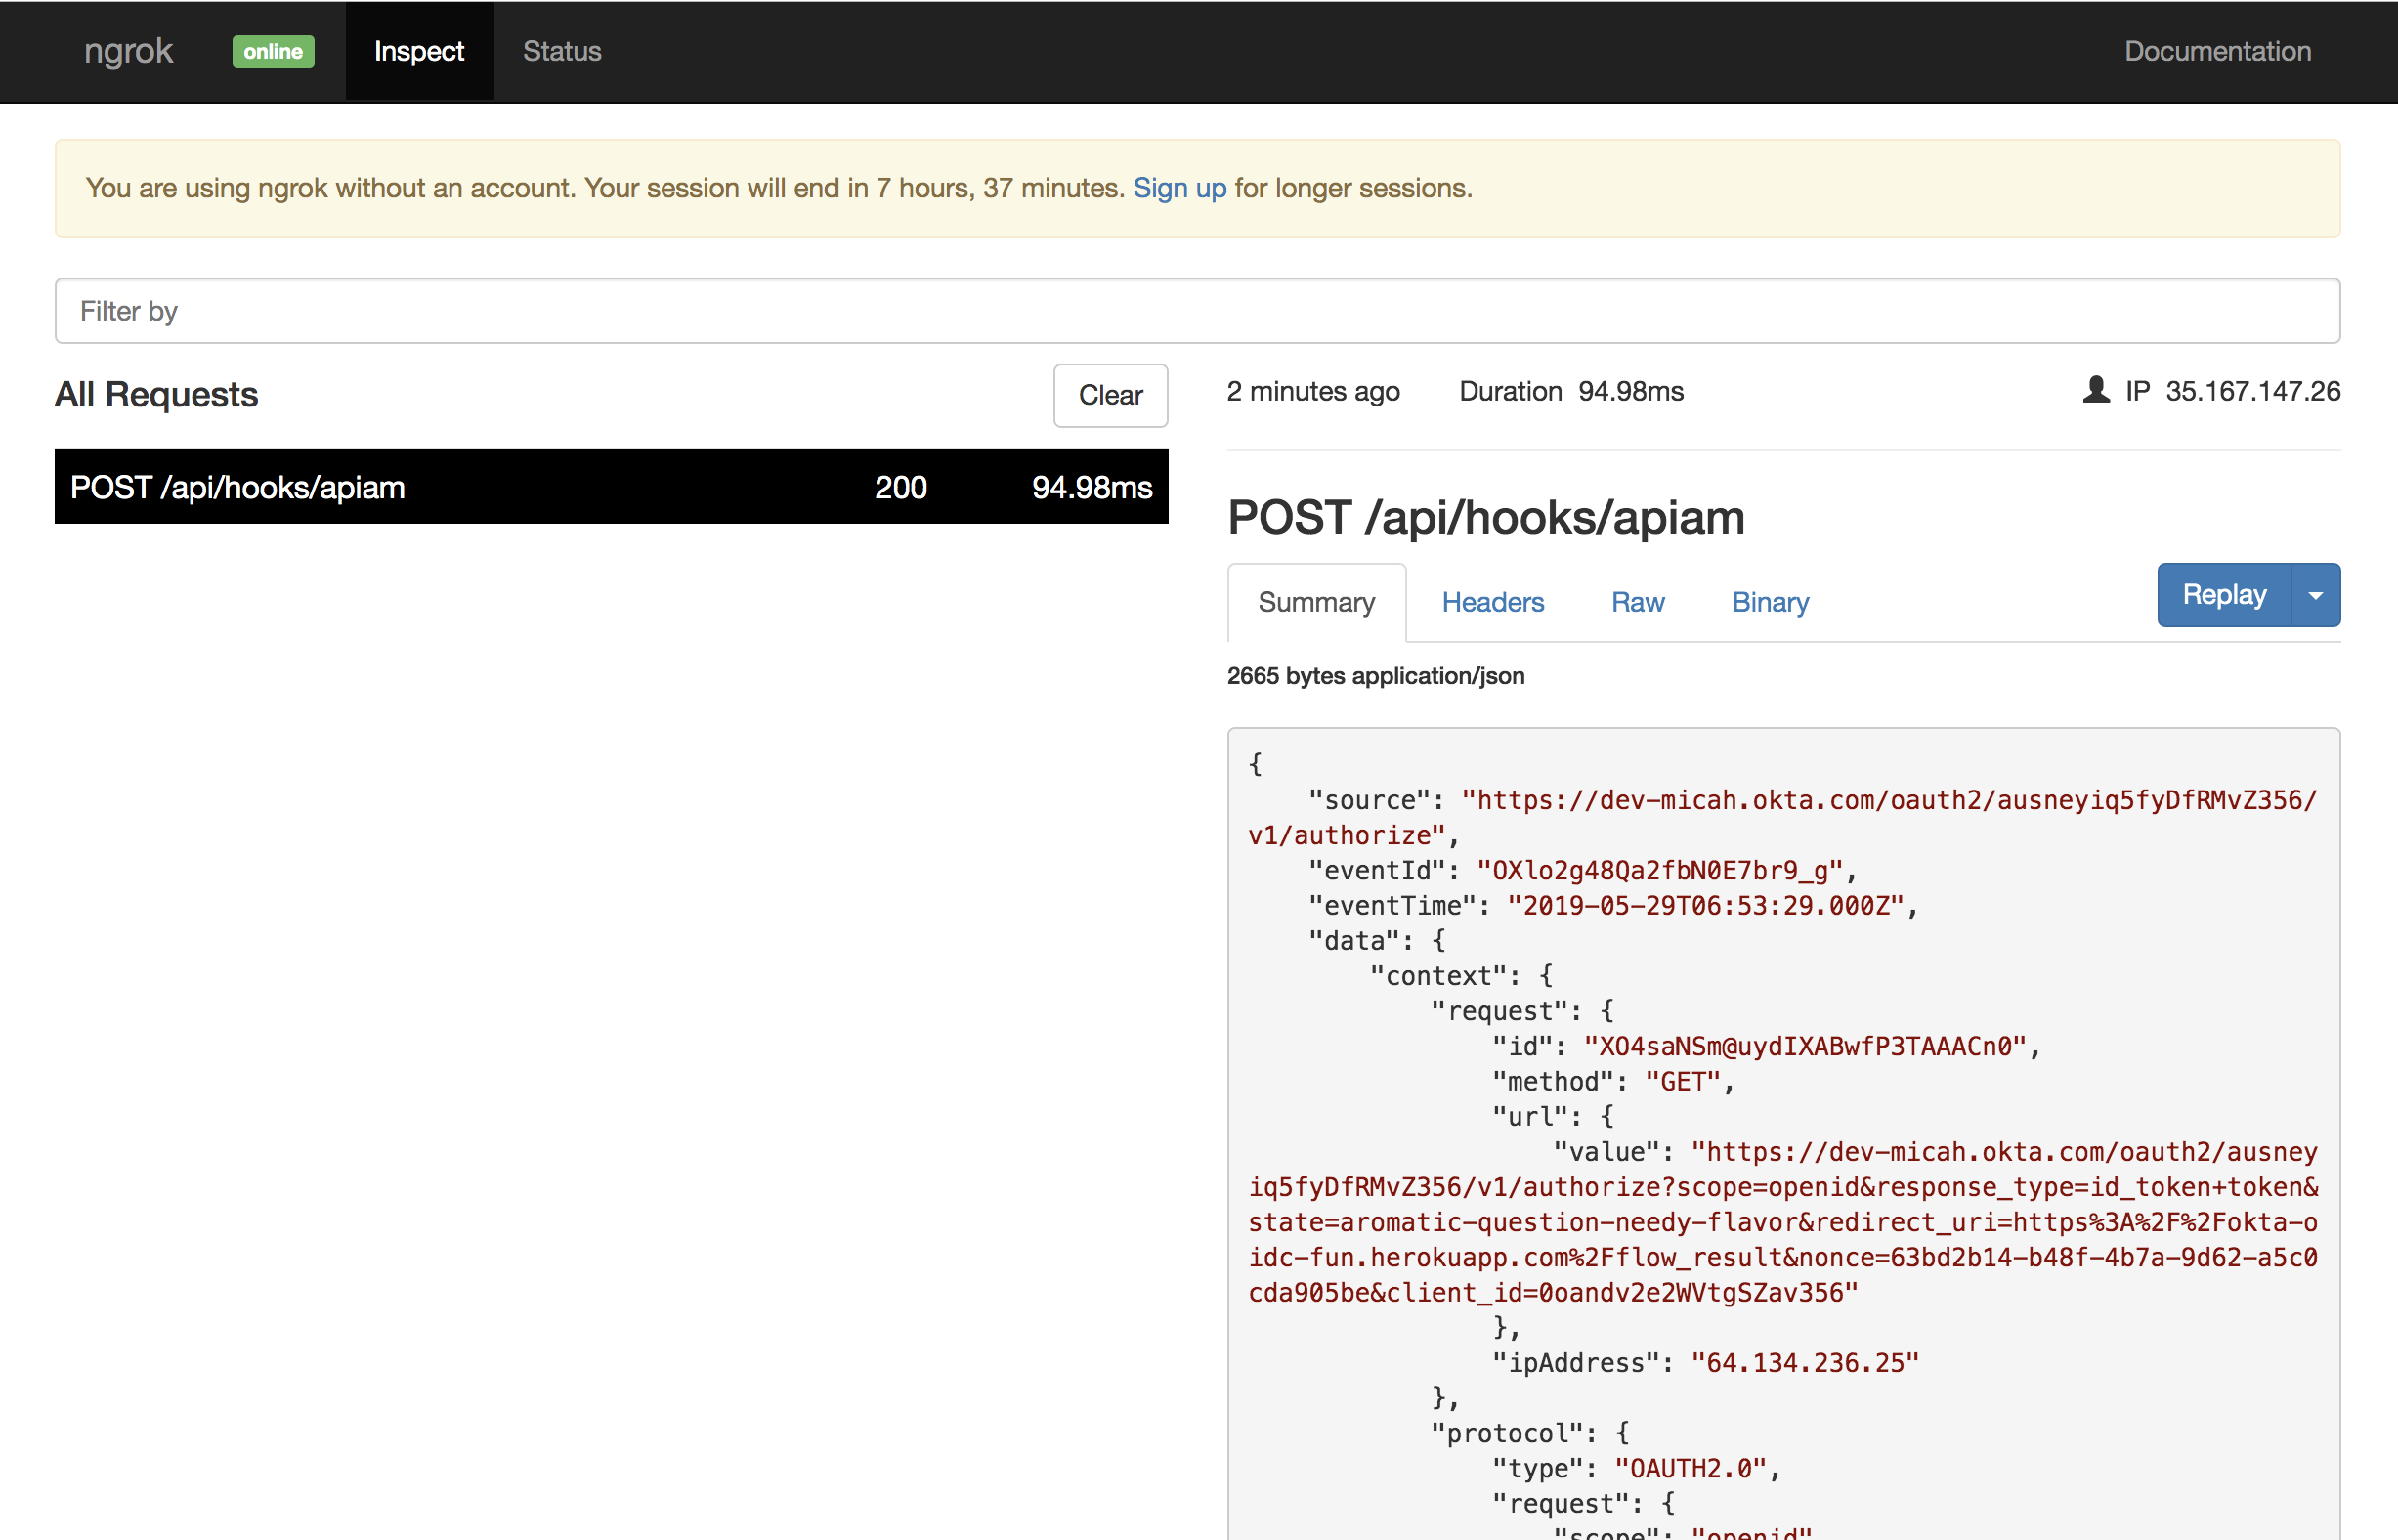
Open up a browser tab and navigate to localhost:4040. This is the ngrok monitoring interface.
Now, you can return to the OIDC playground from before. Close the results tab with the ID Token and Access Token. Click the link once again from the playground page. Click Validate ID Token and et voilà - you’ll see the beers claim with any beers you’ve added to your favorites.

Switch back to the ngrok monitoring tab and you can see the request from Okta and the response from the Spring Boot app.
Learn More About Secure Single Sign-on, OAuth 2.0, and Spring Boot
The Okta Spring Boot Starter enables you to integrate your Spring Boot apps with Okta with just a few lines of code and three configuration properties.
Along with our Spring Boot Starter, Okta’s OpenID Connect service not only conforms to the standard but also gives you a sophisticated single sign-on experience where the same user can access many different OIDC applications, each with their own set of requirements and configuration. Remember: OIDC rides on top of OAuth 2.0 - it’s not standalone. Whereas OAuth focuses exclusively on authorization, OIDC explicitly adds identity and authentication concerns.
If you’d like to learn more about OAuth and Spring Boot you might be interested in these other posts:
- Secure Server-to-Server Communication with Spring Boot and OAuth 2.0
- OAuth 2.0 for Native and Mobile Apps
- Is the OAuth 2.0 Implicit Flow Dead?
Like what you learned today? Follow us on Twitter, and subscribe to our YouTube channel for more awesome content!
Micah Silverman is a Senior Security H@X0R. With 25 years of Java Experience (yup, that's from the beginning), he's authored numerous articles, co-authored a Java EE book and spoken at many conferences. He's a maker, who's built full size MAME arcade cabinets and repaired old electronic games. He brings his love of all things Java and Developer Advocacy to you!
Okta Developer Blog Comment Policy
We welcome relevant and respectful comments. Off-topic comments may be removed.