Is the OAuth 2.0 Implicit Flow Dead?

You may have heard some buzz recently about the OAuth 2.0 Implicit flow. The OAuth Working Group has published some new guidance around the Implicit flow and JavaScript-based apps, specifically that the Implicit flow should no longer be used. In this post we’ll look at what’s changing with the Implicit flow and why.
Note: In May 2025, the Okta Integrator Free Plan replaced Okta Developer Edition Accounts, and the Okta CLI was deprecated.
We preserved this post for reference, but the instructions no longer work exactly as written. Replace the Okta CLI commands by manually configuring Okta following the instructions in our Developer Documentation.
The Best Practice Around Implicit in OAuth 2.0 is Changing
The Implicit flow in OAuth 2.0 was created nearly 10 years ago, when browsers worked very differently than they do today. The primary reason the Implicit flow was created was because of an old limitation in browsers. It used to be the case that JavaScript could only make requests to the same server that the page was loaded from. However, the standard OAuth Authorization Code flow requires that a POST request is made to the OAuth server’s token endpoint, which is often on a different domain than the app. That meant there was previously no way to use this flow from JavaScript. The Implicit flow worked around this limitation by avoiding that POST request, and instead returning the access token immediately in the redirect.
Today, Cross-Origin Resource Sharing (CORS) is universally adopted by browsers, removing the need for this compromise. CORS provides a way for JavaScript to make requests to servers on a different domain as long as the destination allows it. This opens up the possibility of using the Authorization Code flow in JavaScript.
It’s worth noting that the Implicit flow has always been seen as a compromise compared to the Authorization Code flow. For example, the spec provides no mechanism to return a refresh token in the Implicit flow, as it was seen as too insecure to allow that. The spec also recommends short lifetimes and limited scope for access tokens issued via the Implicit flow.
The OAuth Authorization Code Flow is Better
Now that it is possible to use the Authorization Code flow from a browser, we still have one more issue to deal with regarding JavaScript apps. Traditionally the Authorization Code flow uses a client secret when exchanging the authorization code for an access token, but there is no way to include a client secret in a JavaScript app and have it remain a secret. If you were to include a secret in the source code, anyone using the app could just “view source” in their browser and see it. So we need a solution.
Thankfully, this problem has already been solved, since the same issue applies to mobile apps as well. As we’ve seen in the past, native apps also can’t safely use a client secret. The OAuth working group solved this problem several years ago with the PKCE extension to the Authorization Code flow.
The Authorization Code flow with PKCE adds an additional step which allows us to protect the authorization code so that even if it is stolen during the redirect it will be useless by itself. You can read more about how PKCE works in our blog post, OAuth 2.0 for Native and Mobile Apps.
The OAuth 2.0 Implicit Flow for Existing Apps
The important thing to remember here is that there was no new vulnerability found in the Implicit flow. If you have an existing app that uses the Implicit flow, it’s not that your app is suddenly now insecure after this new guidance has been published.
That said, it is – and always has been – extremely challenging to implement the Implicit flow securely. If you have gone to the trouble of thoroughly auditing your source code, knowing exactly which third-party libraries you’re using in your application, have a strong Content Security Policy, and are confident in your ability to build a secure JavaScript application, then your application is probably fine.
So should you immediately switch all your apps to using PKCE instead of the Implicit flow? Probably not, it depends on your risk tolerance. But at this point I would definitely not recommend creating new apps using the Implicit flow.
Does the Authorization Code Flow Make Browser-Based Apps Totally Secure?
Unfortunately there is no such thing as perfect security. Especially in browsers, there are always many ways an application may be attacked. The best we can do is protect against common attacks, and reduce the overall attack surface of an application.
Specifically, the Authorization Code flow with PKCE does completely protect the application from the attack where an authorization code is stolen in transit back to the application. However, once the JavaScript app has obtained an access token, it will still have to store it somewhere in order to use it, and how it stores the access token will be the same whether the app used the Implicit flow or PKCE to obtain it. You’ll still need to ensure you have a good Content Security Policy and are aware of any third-party libraries you’re using in your application.
The best way to securely implement OAuth in a JavaScript app is to keep the token management outside of JavaScript entirely. If you’re building a JavaScript app that is served from a dynamic server, such as a Spring Boot backend with an Angular frontend, or an ASP.NET backend with a React front-end, then you can keep all of the OAuth exchange and token management inside the backend, never exposing it to the JavaScript front-end, and avoid all the risks inherent in managing tokens in JavaScript.
Start Using PKCE in JavaScript Today
So you’re ready to start writing an app using PKCE in JavaScript? Let’s take a look at exactly what that entails.
For the purposes of this demonstration, let’s assume you want to implement this in pure JavaScript, with no additional libraries required. This will illustrate exactly how PKCE works, which you should then be able to translate into your particular framework of choice.
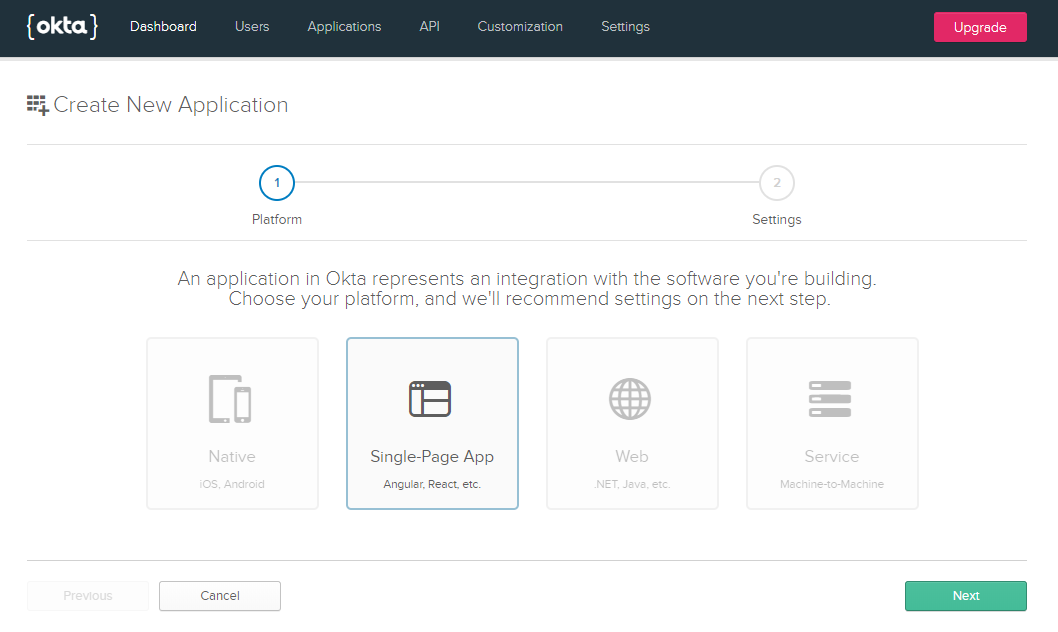
First, sign up for a free Okta Developer account. Once you’ve signed up, select Applications from the menu at the top of the page, and click Add Application.

Choose Single-Page App from the options, which will configure this application to enable the CORS headers on the token endpoint, and will not create a client secret.
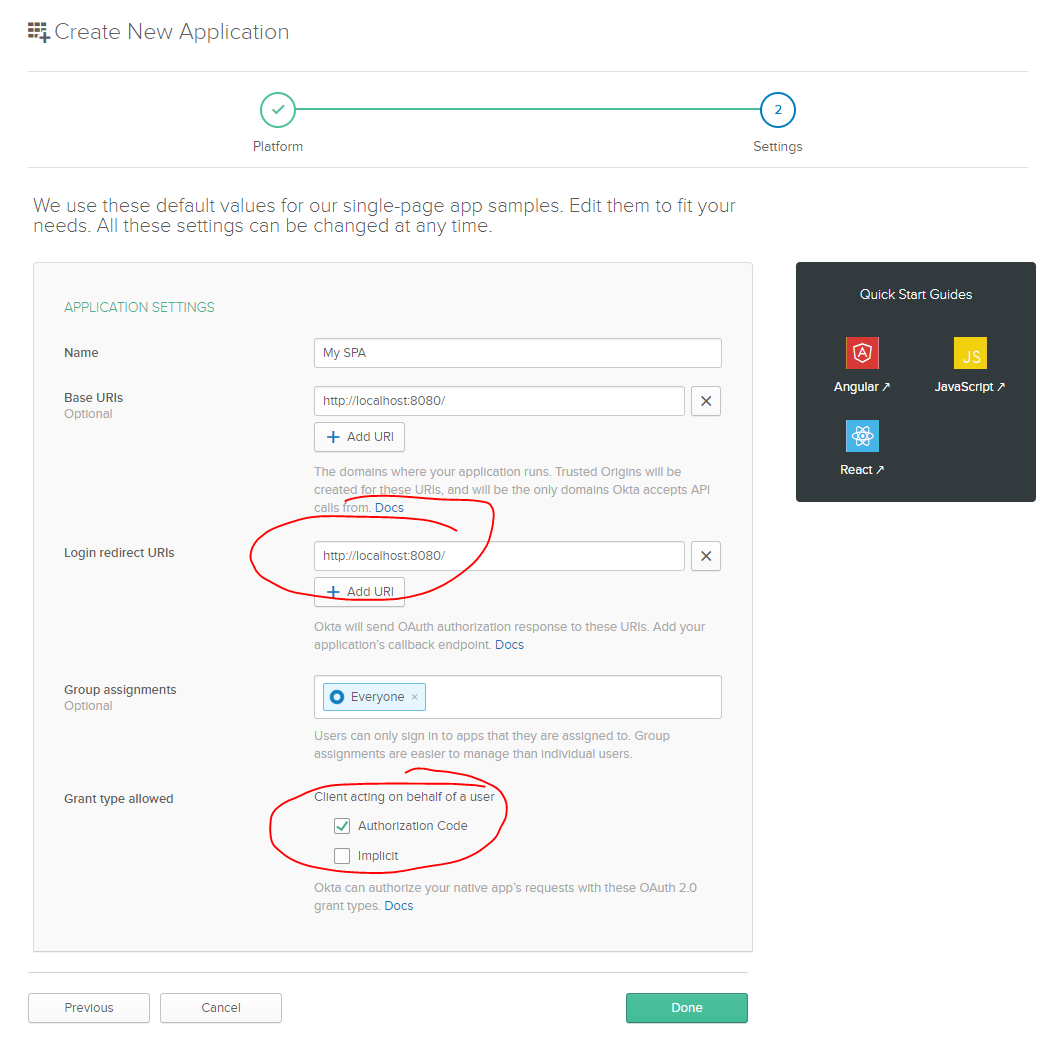
Give your application a name, and then there are two settings you’ll need to change.

Change the Login redirect URI to match the base URI, since we’ll be building a single-page app in just one HTML file.
Also make sure to check the Authorization Code checkbox, and uncheck Implicit.
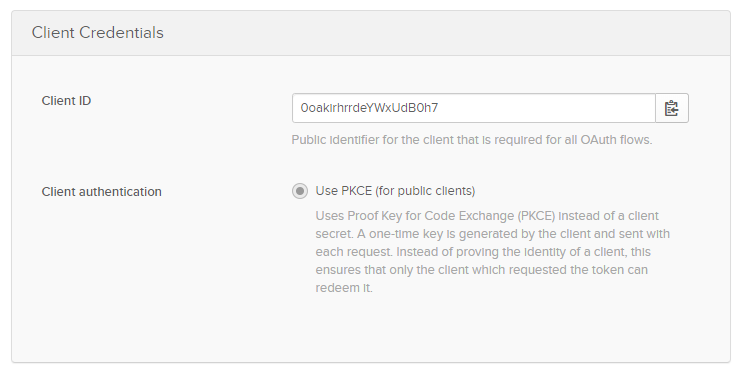
That will register the application and provide you with a client_id on the next screen. Make a note of this value since we’ll need it again later.

Create a new folder, and create an HTML file in it called index.html with the following contents. Fill in your Client ID in the config block below.
<html>
<title>OAuth Authorization Code + PKCE in Vanilla JS</title>
<meta name="viewport" content="width=device-width, initial-scale=1, user-scalable=no">

<script>
// Configure your application and authorization server details
var config = {
    client_id: "",
    redirect_uri: "http://localhost:8080/",
    authorization_endpoint: "",
    token_endpoint: "",
    requested_scopes: "openid"
};
</script>
Next, we need to find the authorization endpoint and token endpoint for your OAuth server. Navigate to API in the main menu at the top, then choose Authorization Servers. You will probably have only one server in that list, “default”.

Copy the Issuer URI from that authorization server. Your authorization endpoint will be that URI with /v1/authorize appended, and the token endpoint will end with /v1/token.
For example, if your Issuer URI is https://{yourOktaDomain}/oauth2/default, then your authorization endpoint will be https://{yourOktaDomain}/oauth2/default/v1/authorize and your token endpoint will be https://{yourOktaDomain}/oauth2/default/v1/token. Enter those two values in the JavaScript config object created in the previous step.
Set Up the HTML Structure
Next, let’s add some HTML to the page to create a couple of UI elements to help illustrate this flow.
<div class="flex-center full-height">
    <div class="content">
        <a href="#" id="start">Click to Sign In</a>
        <div id="token" class="hidden">
            <h2>Access Token</h2>
            <div id="access_token" class="code"></div>
        </div>
        <div id="error" class="hidden">
            <h2>Error</h2>
            <div id="error_details" class="code"></div>
        </div>
    </div>
</div>
And to make it look good, add the following CSS below.
<style>
body {
  padding: 0;
  margin: 0;
  min-height: 100vh;
  font-family: arial, sans-serif;
}
@media(max-width: 400px) {
  body {
    padding: 10px;
  }
}
.full-height {
  min-height: 100vh;
}
.flex-center {
  align-items: center;
  display: flex;
  justify-content: center;
}
.content {
  max-width: 400px;
}
h2 {
  text-align: center;
}
.code {
  font-family: "Courier New", "Courier", monospace;
  width: 100%;
  padding: 4px;
  border: 1px #ccc solid;
  border-radius: 4px;
  word-break: break-all;
}
.hidden {
  display: none;
}
</style>
Begin the PKCE Request
With that out of the way, we can get to the good stuff, actually starting the PKCE flow in JavaScript. First, add a new <script> tag so that we have a place to start writing JavaScript.
<script>
</script>
We’re first going to define a few helper functions that will take care of the tricky parts of PKCE: securely generating a random string, and generating the SHA256 hash of that string.
Add these functions into the <script> tag you just created.
// PKCE HELPER FUNCTIONS

// Generate a secure random string using the browser crypto functions
function generateRandomString() {
    var array = new Uint32Array(28);
    window.crypto.getRandomValues(array);
    return Array.from(array, dec => ('0' + dec.toString(16)).substr(-2)).join('');
}

// Calculate the SHA256 hash of the input text.
// Returns a promise that resolves to an ArrayBuffer
function sha256(plain) {
    const encoder = new TextEncoder();
    const data = encoder.encode(plain);
    return window.crypto.subtle.digest('SHA-256', data);
}

// Base64-urlencodes the input string
function base64urlencode(str) {
    // Convert the ArrayBuffer to string using Uint8 array to convert to what btoa accepts.
    // btoa accepts chars only within ascii 0-255 and base64 encodes them.
    // Then convert the base64 encoded to base64url encoded
    //   (replace + with -, replace / with _, trim trailing =)
    return btoa(String.fromCharCode.apply(null, new Uint8Array(str)))
        .replace(/\+/g, '-').replace(/\//g, '_').replace(/=+$/, '');
}

// Return the base64-urlencoded sha256 hash for the PKCE challenge
async function pkceChallengeFromVerifier(v) {
    hashed = await sha256(v);
    return base64urlencode(hashed);
}
Now we’re ready to kick off the flow. The first step of the PKCE flow is to generate a secret, hash it, then redirect the user over to the authorization server with that hash in the URL.
We’ll add an onclick listener to the Click to Sign In link we created in the HTML.
// Initiate the PKCE Auth Code flow when the link is clicked
document.getElementById("start").addEventListener("click", async function(e){
    e.preventDefault();

    // Create and store a random "state" value
    var state = generateRandomString();
    localStorage.setItem("pkce_state", state);

    // Create and store a new PKCE code_verifier (the plaintext random secret)
    var code_verifier = generateRandomString();
    localStorage.setItem("pkce_code_verifier", code_verifier);

    // Hash and base64-urlencode the secret to use as the challenge
    var code_challenge = await pkceChallengeFromVerifier(code_verifier);

    // Build the authorization URL
    var url = config.authorization_endpoint
        + "?response_type=code"
        + "&client_id="+encodeURIComponent(config.client_id)
        + "&state="+encodeURIComponent(state)
        + "&scope="+encodeURIComponent(config.requested_scopes)
        + "&redirect_uri="+encodeURIComponent(config.redirect_uri)
        + "&code_challenge="+encodeURIComponent(code_challenge)
        + "&code_challenge_method=S256"
        ;

    // Redirect to the authorization server
    window.location = url;
});
This function does a few things:
- Creates a random string to use as the
statevalue and stores it inLocalStorage - Creates a random string to use as the PKCE
code_verifiervalue - Hashes and base64-urlencodes the code verifier
- Builds the authorization URL with all the required parameters, using the config values you defined at the beginning
- Redirects the browser to the authorization URL
At this point, the user is handed off to the authorization server to log in. The authorization server will then redirect the user back to the application and there will be two parameters in the query string: code and state.
Get an Access Token using the Authorization Code
This application will need to verify the state value matches the one it generated at the beginning, then exchange the authorization code for an access token. To accomplish this, we’ll need to add a couple more helper functions.
Add the following function to the bottom of your JavaScript. This function will parse a query string into a JavaScript object.
// Parse a query string into an object
function parseQueryString(string) {
    if(string == "") { return {}; }
    var segments = string.split("&").map(s => s.split("=") );
    var queryString = {};
    segments.forEach(s => queryString[s[0]] = s[1]);
    return queryString;
}
Also add the function below, which will give us an easy way to make a POST request and parse the JSON response.
// Make a POST request and parse the response as JSON
function sendPostRequest(url, params, success, error) {
    var request = new XMLHttpRequest();
    request.open('POST', url, true);
    request.setRequestHeader('Content-Type', 'application/x-www-form-urlencoded; charset=UTF-8');
    request.onload = function() {
        var body = {};
        try {
            body = JSON.parse(request.response);
        } catch(e) {}

        if(request.status == 200) {
            success(request, body);
        } else {
            error(request, body);
        }
    }
    request.onerror = function() {
        error(request, {});
    }
    var body = Object.keys(params).map(key => key + '=' + params[key]).join('&');
    request.send(body);
}
Now you’re ready to exchange the authorization code for an access token. If you’re familiar with the traditional Authorization Code flow, you’ll remember that this step normally requires a client secret. But since we don’t have a client secret for this JavaScript application, instead we’ll send the PKCE code verifier when making this request, which ensures that only the application that requested a code can exchange it for an access token.
Add the following code to your JavaScript section.
// Handle the redirect back from the authorization server and
// get an access token from the token endpoint

var q = parseQueryString(window.location.search.substring(1));

// Check if the server returned an error string
if(q.error) {
    alert("Error returned from authorization server: "+q.error);
    document.getElementById("error_details").innerText = q.error+"\n\n"+q.error_description;
    document.getElementById("error").classList = "";
}

// If the server returned an authorization code, attempt to exchange it for an access token
if(q.code) {

    // Verify state matches what we set at the beginning
    if(localStorage.getItem("pkce_state") != q.state) {
        alert("Invalid state");
    } else {

        // Exchange the authorization code for an access token
        sendPostRequest(config.token_endpoint, {
            grant_type: "authorization_code",
            code: q.code,
            client_id: config.client_id,
            redirect_uri: config.redirect_uri,
            code_verifier: localStorage.getItem("pkce_code_verifier")
        }, function(request, body) {

            // Initialize your application now that you have an access token.
            // Here we just display it in the browser.
            document.getElementById("access_token").innerText = body.access_token;
            document.getElementById("start").classList = "hidden";
            document.getElementById("token").classList = "";

            // Replace the history entry to remove the auth code from the browser address bar
            window.history.replaceState({}, null, "/");

        }, function(request, error) {
            // This could be an error response from the OAuth server, or an error because the
            // request failed such as if the OAuth server doesn't allow CORS requests
            document.getElementById("error_details").innerText = error.error+"\n\n"+error.error_description;
            document.getElementById("error").classList = "";
        });
    }

    // Clean these up since we don't need them anymore
    localStorage.removeItem("pkce_state");
    localStorage.removeItem("pkce_code_verifier");
}
This code does a few things:
- Checks if the authorization server returned an error message and displays it to the user if so
- Checks if the authorization server returned an authorization code, and exchanges it for an access token
- Sends a POST request to the token endpoint which includes the
code_verifierparameter that it made in the previous step - Updates the UI to indicate error messages or show the access token returned
- Removes the authorization code from the address bar using the Session History Management API
At this point, you’re ready to try out the application! You’ll need to either run a local web server, or host it on a test domain. In any case, just make sure that the Base URI and Redirect URI in your application settings are set to the URL that you’ll be visiting this application. (Also note that this will not work just opening the page from your filesystem due to cross-domain restrictions that browser have with file:// URIs).
You can use any web server to serve the file, but I find that an easy way to launch this app is to use PHP’s built-in web server. You can run the command below to start a web server on port 8080:
php -S localhost:8080
You can now visit http://localhost:8080/ in your browser and you’ll see the sign-in link.

Click on that link and you’ll be redirected to Okta. If you’re already signed in, you’ll be immediately redirected and the app will get an access token!
Congrats! You’ve successfully implemented PKCE in a browser with vanilla JavaScript!
You can find the completed sample code here: pkce-vanilla-js
Hopefully this has been a helpful demonstration of what it takes to do PKCE in a browser! In practice, you’ll probably use a JavaScript library that handles this behind the scenes for you, but it can still be useful to know how this works under the hood!
Learn More about OAuth 2.0, the Implicit Flow, and Secure Authentication
If you’d like to dig deeper into these topics, here are a few resources:
- Source code from this blog post
- Interactive demo of PKCE
- Interactive demo of Implicit
- Why API Keys aren’t Safe in Mobile Apps
Like what you learned today? Follow us on Twitter, and subscribe to our YouTube channel for more awesome content! We’ve also recently launched a new security site where we’re publishing in-depth security-focused articles.
Okta Developer Blog Comment Policy
We welcome relevant and respectful comments. Off-topic comments may be removed.