Build a Secure CRUD App with ASP.NET Core and React
These days it’s prevalent to have a “back-end” and a “front-end” allowing two (or more) teams to work on a project. Microsoft’s latest version of the ASP.NET Core framework is cross-platform and performant. Pairing it with the power and flexibility of Facebook’s React framework makes it a pretty stable platform. In this tutorial, I will show you how to build a secure CRUD (Create, Read, Update, and Delete) application using these two powerful technologies.
When conferences need speakers, they sometimes put out a public speaker “Call for Presentations” or CFP. Potential speakers then submit talks that they’d like to give at the conference, and the organizers pick from those submissions which talks they’d like to have presented at their conference.
The application you’ll be building is a speaker submission page. It will allow users to register for an account, log in and submit potential conference sessions. They will also need to be able to log in later and update their submissions or, if they then are unable to present that talk, delete the submission.
The architecture for the application will be a React front-end application fed data from an ASP.NET Core Web API. For demonstration purposes, you’ll use Entity Framework’s in-memory database option. It is an excellent option for proof-of-concept applications. You can change it to use a SQL Server or PostgreSQL database later by just changing one line of configuration code!
Note: In May 2025, the Okta Integrator Free Plan replaced Okta Developer Edition Accounts, and the Okta CLI was deprecated.
We preserved this post for reference, but the instructions no longer work exactly as written. Replace the Okta CLI commands by manually configuring Okta following the instructions in our Developer Documentation.
What You’ll Need to Get Started
There are a few tools you will need to get, develop and run the application.
- A Git command line
- .NET Core 2+
- Node and NPM
- Visual Studio or VS Code
I am developing the application on a Linux laptop. Most of the commands will be the same whether you are on Linux, macOS, or Windows. The only thing that will be different is the home folder where your Okta credentials are stored for the ASP.NET Core API, and I will put both paths in the examples.
Get the Base ASP.NET Core and React Application
To get the basic scaffolding for the app in place, start by cloning the basic React and ASP.NET Core application.
git clone https://github.com/oktadeveloper/okta-dotnetcore-react-example.git
Then create a new branch we’ll use to turn the shell into a fully CRUD application.
git checkout -b crud-app
Set Up Your Okta Application
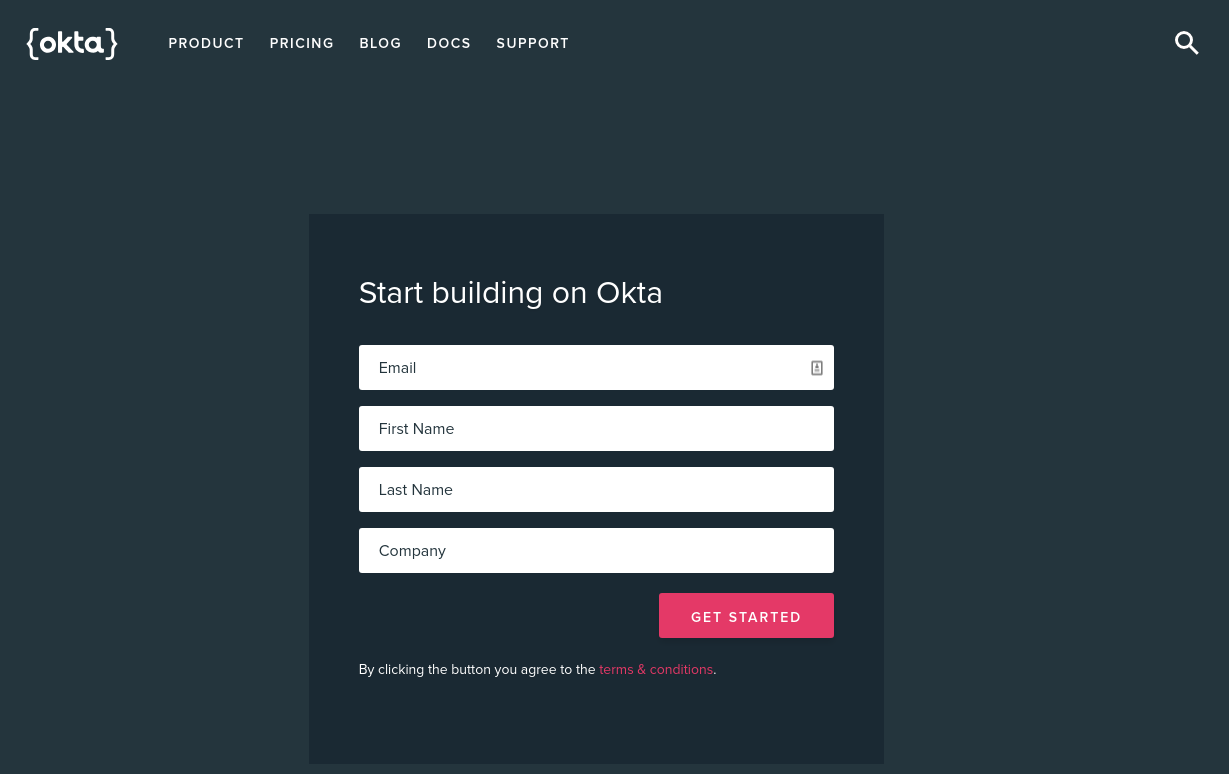
Dealing with user authentication in web apps is a massive pain for every developer. This is where Okta shines: it helps you secure your web applications with minimal effort. To get started, you’ll need to create an OpenID Connect application in Okta. Sign up for a forever-free developer account (or log in if you already have one).
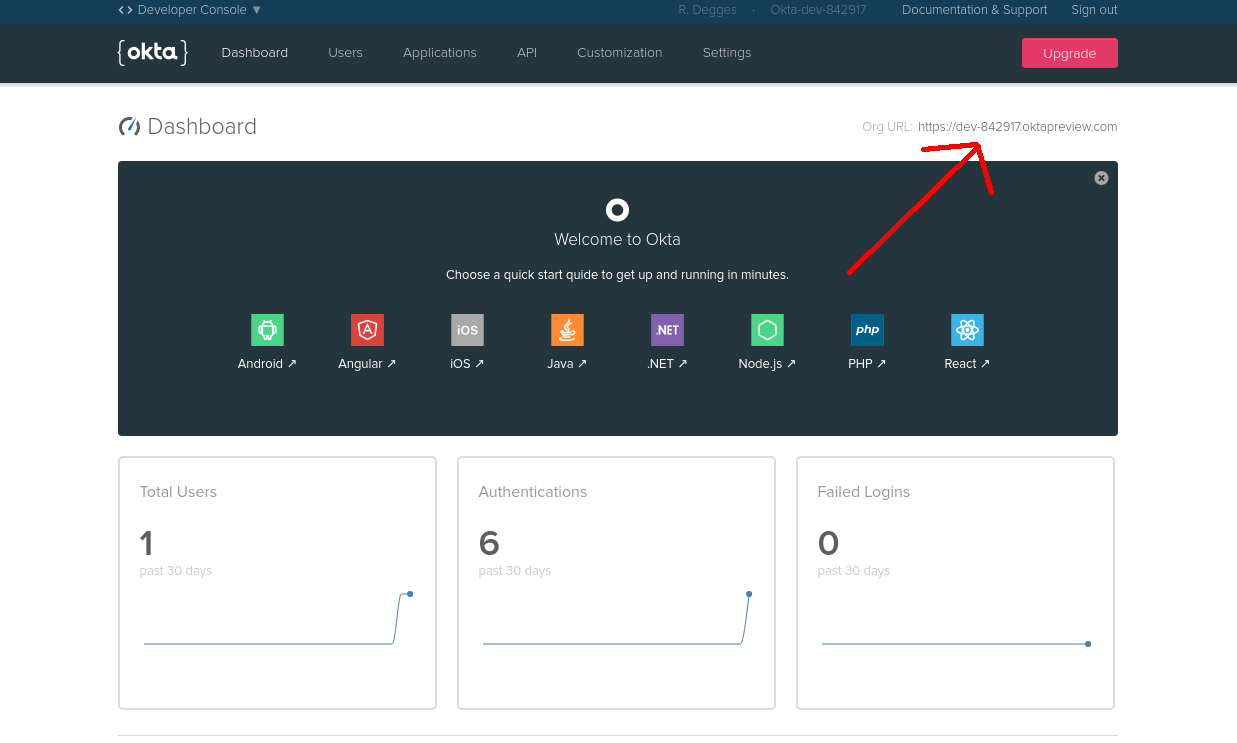
Once you’ve logged in and landed on the dashboard page, copy down the Org URL pictured below. You will need this later.
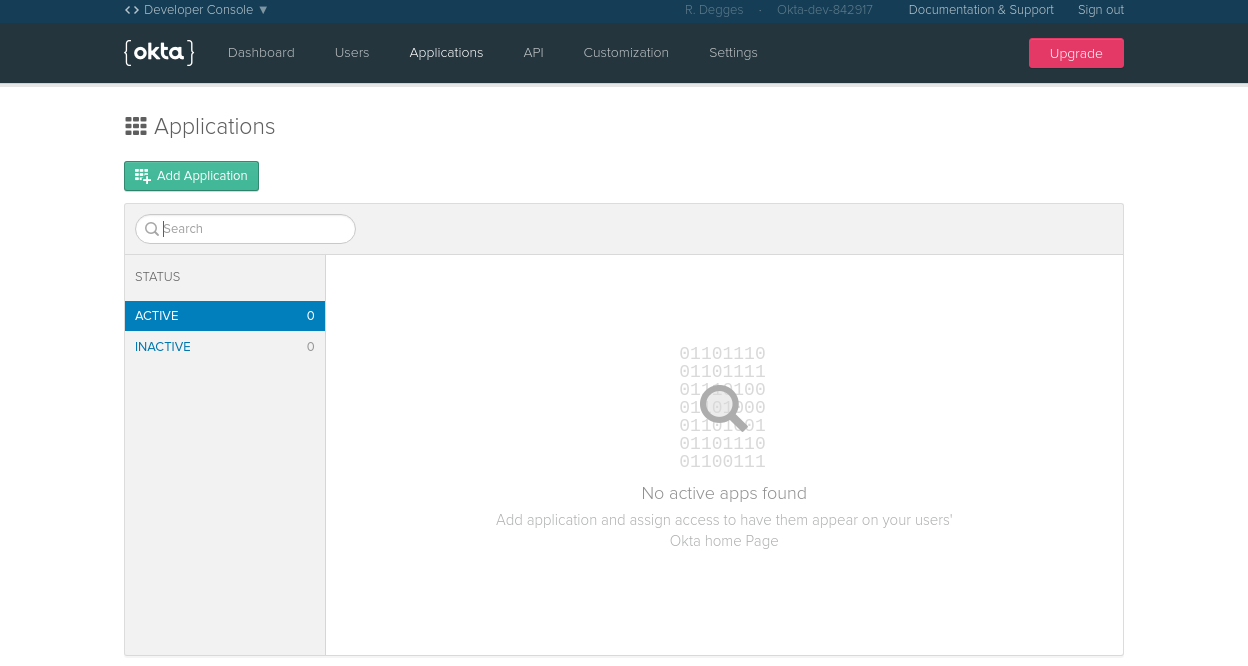
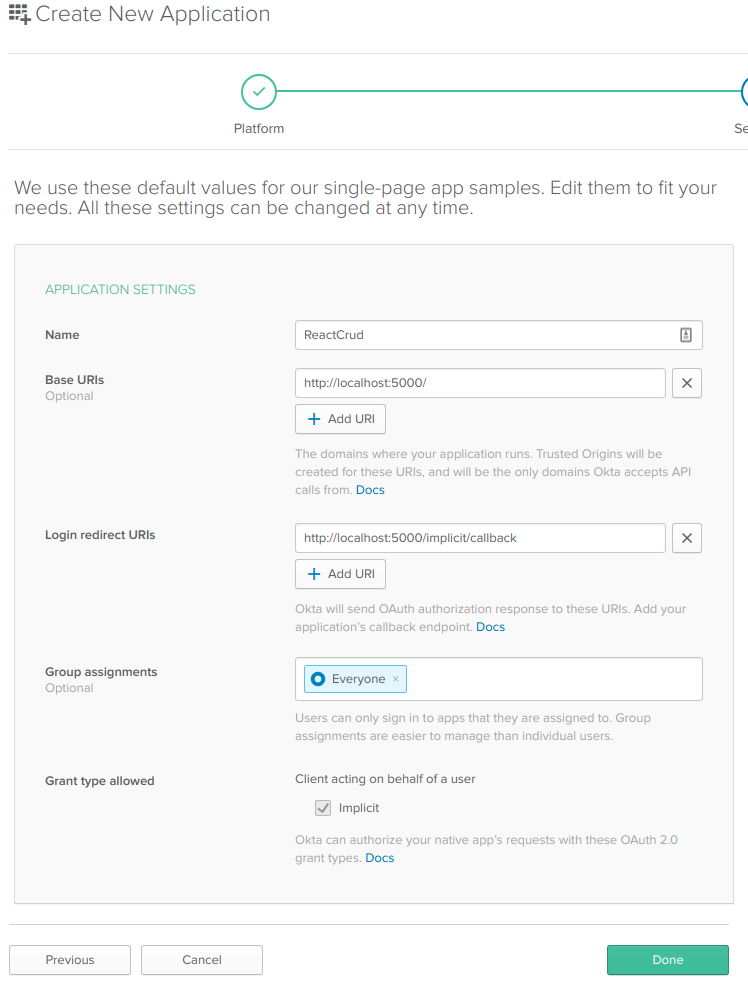
Then create a new application by browsing to the Applications tab and clicking Add Application.
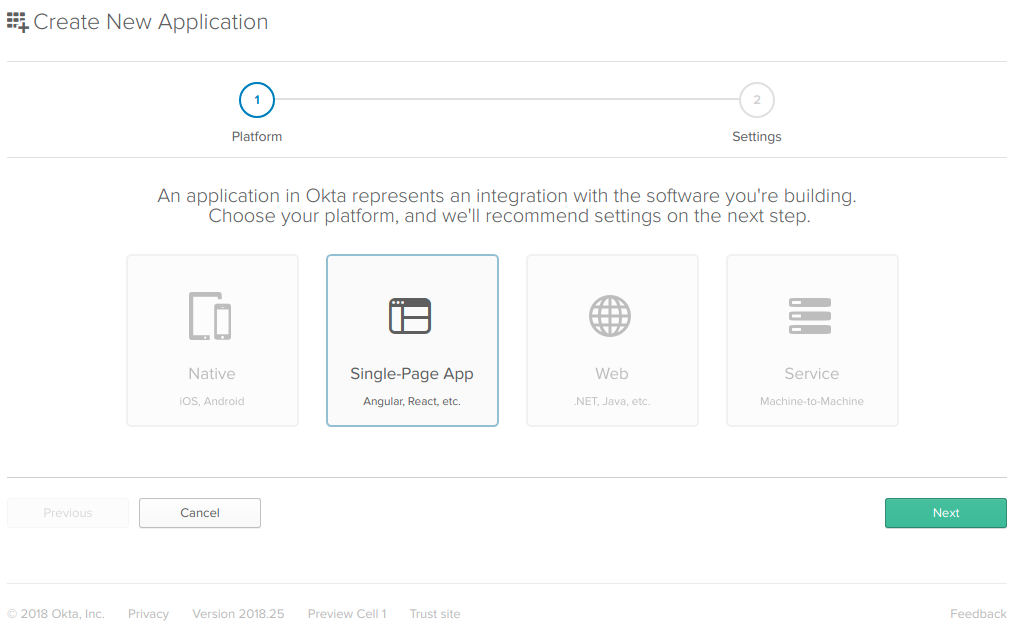
From the wizard, choose the Single-Page App option for the React app.
On the settings page, enter the following values:
- Name: ReactCrud
- Base URIs:
http://localhost:5000 - Login redirect URIs:
http://localhost:5000/implicit/callback
You can leave the other values unchanged.
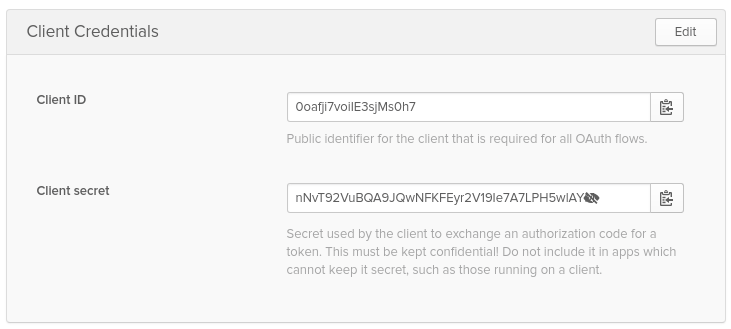
Now that your application has been created, copy down the Client ID and Client secret values on the following page, you’ll need them soon.
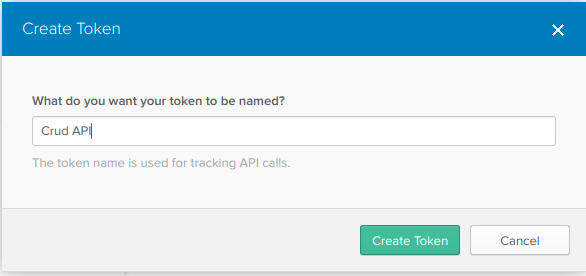
Finally, create a new authentication token. This will allow your app to talk to Okta to retrieve user information, among other things. To do this, click the API tab at the top of the page followed by the Create Token button. Give your token a name, in this case “Crud API” would be a good name, then click Create Token. Copy down this token value as you will need it soon.
Once you’ve created your new Okta application, you’ll want to store the configuration information in your React and ASP.NET Core applications.
For the React application, create a file in the /ClientApp folder called app.config.js. This will export a simple JSON object with the configuration information for your React application.
export default {
  url: 'https://{yourOktaDomain}',
  issuer: 'https://{yourOktaDomain}/oauth2/default',
  redirect_uri: window.location.origin + '/implicit/callback',
  client_id: '{clientId}'
}
For the ASP.NET Core application, the best thing to do is set up a file in your home folder to store the configuration. Okta’s SDK will pick the settings up for you, and you’ll never accidentally check them into source control!
In your home directory, create an .okta folder and add a file called okta.yaml. Your home folder will depend on your operating system. For *nix variants like Linux or macOS it is:
~/.okta/okta.yaml
for Windows environments it is:
%userprofile%\.okta\okta.yaml
YAML, is just a file format for configuration. The okta.yaml file looks like:
okta:
  client:
    orgUrl: "https://{yourOktaDomain}/"
    token: "{yourApiToken}"
Now you’re ready to get the dependencies set up!
Install Your React Dependencies
To take full advantage of Okta for identity management, you’ll need Okta’s React SDK and the generic JavaScript package it depends on. To install, from the command line run:
npm install @okta/okta-react@1.0.2 --save
Now you’re ready to write some code!
Add Registration to the React Application
Start by adding a folder for the authentication components you’ll be creating. In the /ClientApp/components folder, create a folder called auth, and create a RegisterPage.js file inside it. The page will be a component that is wrapped by the withAuth higher-order component. To learn more about higher-order components, read the docs on React’s website.
The final RegisterPage.js component will look like this:
import React from 'react';
import { Redirect} from 'react-router-dom';
import OktaAuth from '@okta/okta-auth-js';
import { withAuth } from '@okta/okta-react';

import config from '../../app.config';

export default withAuth(class RegisterPage extends React.Component{
  constructor(props){
    super(props);
    this.state = {
      firstName: '',
      lastName: '',
      email: '',
      password: '',
      sessionToken: null,
      registered: false
    };
    this.oktaAuth = new OktaAuth({ url: config.url });
    this.checkAuthentication = this.checkAuthentication.bind(this);
    this.checkAuthentication();

    this.handleSubmit = this.handleSubmit.bind(this);
    this.handleFirstNameChange = this.handleFirstNameChange.bind(this);
    this.handleLastNameChange = this.handleLastNameChange.bind(this);
    this.handleEmailChange = this.handleEmailChange.bind(this);
    this.handlePasswordChange = this.handlePasswordChange.bind(this);
  }

  async checkAuthentication() {
    const sessionToken = await this.props.auth.getIdToken();
    if (sessionToken) {
      this.setState({ sessionToken });
    }
  }

  componentDidUpdate() {
    this.checkAuthentication();
  }

  handleFirstNameChange(e){
    this.setState({firstName:e.target.value});
  }
  handleLastNameChange(e) {
    this.setState({ lastName: e.target.value });
  }
  handleEmailChange(e) {
    this.setState({ email: e.target.value });
  }
  handlePasswordChange(e) {
    this.setState({ password: e.target.value });
  }

  handleSubmit(e){
    e.preventDefault();
    fetch('/api/users', {
      method: 'POST',
      headers: {
        'Accept': 'application/json',
        'Content-Type': 'application/json',
      },
      body: JSON.stringify(this.state)
    }).then(user => {
      this.setState({ registered: true });
    })
    .catch(err => console.log);
  }

  render(){
    if (this.state.sessionToken) {
      this.props.auth.redirect({ sessionToken: this.state.sessionToken });
      return null;
    }

    if(this.state.registered === true){
      return <Redirect to="/login"/>
    }

    return(
      <form onSubmit={this.handleSubmit} className="registration">
        <div className="form-element">
          <label>Email:</label>
          <input type="email" id="email" value={this.state.email}
          onChange={this.handleEmailChange}/>
        </div>
        <div className="form-element">
          <label>First Name:</label>
          <input type="text" id="firstName" value={this.state.firstName}
          onChange={this.handleFirstNameChange} />
        </div>
        <div className="form-element">
          <label>Last Name:</label>
          <input type="text" id="lastName" value={this.state.lastName}
          onChange={this.handleLastNameChange} />
        </div>
        <div className="form-element">
          <label>Password:</label>
          <input type="password" id="password" value={this.state.password}
          onChange={this.handlePasswordChange} />
        </div>
        <div className="form-actions">
          <input type="submit" id="submit" className="btn btn-primary" value="Register"/>
        </div>
      </form>
    );
  }

});
I know this looks like a lot, but most of it is pretty simple. Let’s break it down into categories: state, handlers, and Okta stuff.
Handle User State in the React Application
The state declared in the constructor, has six properties. The firstName, lastName, email, and password are the required fields for registering an account in Okta.. The sessionToken property is there to use when checking to see if the user has mistakenly come to the page when they are already logged in. It’s checked using the checkAuthentication() method that runs from the constructor. The render() method checks the value of the sessionToken, and if a session token exists, redirects the user is redirected to the homepage.
There are many handler functions in the component: one for each property the user will edit in the form, and one for handling the submission of the registration form. The handlers for each field on the form are simple. They update the state when the fields’ values are changed by the user. The form submission handler does exactly what you’d expect; it submits the information in the form to a URL so that the API can handle creating the user in Okta.
The withAuth higher-order component wraps the RegisterPage component and adds an auth object to the props which can do things like getIdToken() for the currently logged in user. Any component that needs to get the current user or information about them will need to be wrapped by the withAuth higher-order component.
Add Registration to the ASP.NET Core API
For user registration to work, you’ll need to add that endpoint you’re calling in the registration page. This endpoint will call to Okta and add a user using the Okta .NET SDK.
In the Controllers folder add a controller called UserController.cs. Then you’ll add a POST action to the controller to handle getting the user’s registration information and creating the user in Okta.
using Microsoft.AspNetCore.Mvc;
using Okta.Sdk;
using Okta.Sdk.Configuration;
using okta_dotnetcore_react_example.Models;

namespace okta_dotnetcore_react_example.Controllers
{
  [Route("api/[controller]")]
  public class UsersController : Controller
  {
    [HttpPost]
    public async void Post([FromBody]Registration reg)
    {

      var oktaClient = new OktaClient();
      var user = await oktaClient.Users.CreateUserAsync(
          new CreateUserWithPasswordOptions
          {
            Profile = new UserProfile
            {
              FirstName = reg.FirstName,
              LastName = reg.LastName,
              Email = reg.Email,
              Login = reg.Email
            },
            Password = reg.Password,
            Activate = true
          }
      );
    }
  }
}
You’ll also need the Registration.cs file in the Models folder.
namespace okta_dotnetcore_react_example.Models
{
    public class Registration
    {
        public string FirstName { get; set; }
        public string LastName { get; set; }
        public string Email { get; set; }
        public string Password { get; set; }
    }
}
Nothing complicated here, just a set of properties for holding registration information.
Add Authentication to the React Application
Now you’ll need to add the ability for users to authenticate with their newly minted account. To do this, add a file to the /ClientApp/auth folder called LoginPage.js.
The login page willbe wrapped in the withAuth component, but will also need the OktaAuth component from the generic JavaScript library.
import React from 'react';
import OktaAuth from '@okta/okta-auth-js';
import { withAuth } from '@okta/okta-react';

export default withAuth(class LoginPage extends React.Component {
  constructor(props) {
    super(props);
    this.state = {
      sessionToken: null,
      error: null,
      username: '',
      password: ''
    }

    this.oktaAuth = new OktaAuth({ url: props.baseUrl });

    this.handleSubmit = this.handleSubmit.bind(this);
    this.handleUsernameChange = this.handleUsernameChange.bind(this);
    this.handlePasswordChange = this.handlePasswordChange.bind(this);
  }

  handleSubmit(e) {
    e.preventDefault();
    this.oktaAuth.signIn({
      username: this.state.username,
      password: this.state.password
    })
      .then(res => this.setState({
        sessionToken: res.sessionToken
      }))
      .catch(err => {
        this.setState({error: err.message});
        console.log(err.statusCode + ' error', err)
      });
  }

  handleUsernameChange(e) {
    this.setState({ username: e.target.value });
  }

  handlePasswordChange(e) {
    this.setState({ password: e.target.value });
  }

  render() {
    if (this.state.sessionToken) {
      this.props.auth.redirect({ sessionToken: this.state.sessionToken });
      return null;
    }

    const errorMessage = this.state.error ?
    <span className="error-message">{this.state.error}</span> :
    null;

    return (
      <form onSubmit={this.handleSubmit} className="login">
        {errorMessage}
        <div className="form-element">
          <label>Username:</label>
          <input
            id="username" type="text"
            value={this.state.username}
            onChange={this.handleUsernameChange} />
        </div>

        <div className="form-element">
          <label>Password:</label>
          <input
            id="password" type="password"
            value={this.state.password}
            onChange={this.handlePasswordChange} />
        </div>
        <div className="form-actions">
        <input id="submit" type="submit" value="Submit" />
        </div>
      </form>
    );
  }
});
Now that you’ve built the registration page component, this one should be easier to understand. The state has the sessionToken again, this time for checking after the user is logged in. The username and password properties are used for the form, and the error property allows you to store authentication error messages to display to users.
The handlers are very similar to those in the registration component in that they update the form values in the state as the user updates them and the handleSubmit() function once again handles the action from the form’s submit button.
There is a little more Okta functionality here as well. In the constructor, there is a new OktaAuth object created with a base URL (from props), and the form submission handler uses it. When the form is submitted, the OktaAuth object’s signIn() method is called with the username and password that the user has entered and a response with a session token is returned via a promise. In the then of the promise, the method adds the session token to the session state. The Okta SDK will handle storing the token for you, which you will set up next.
Add a Profile Page to the React Application
Once the user is logged in, you’ll need somewhere for them to view the list of their submissions, so create a new file in the /ClientApp/components/auth folder called ProfilePage.js.
Again, you’ll need to wrap the component in the withAuth component to get that auth object passed in the props.
import React from 'react';
import { Link } from 'react-router-dom';
import { withAuth } from '@okta/okta-react';
export default withAuth(class ProfilePage extends React.Component {
constructor(props){
super(props);
this.state = {
user: null
};
this.getCurrentUser = this.getCurrentUser.bind(this);
}
async getCurrentUser(){
this.props.auth.getUser()
.then(user => this.setState({user}));
}
componentDidMount(){
this.getCurrentUser();
}
render() {
if(!this.state.user) return null;
return (
<section className="user-profile">
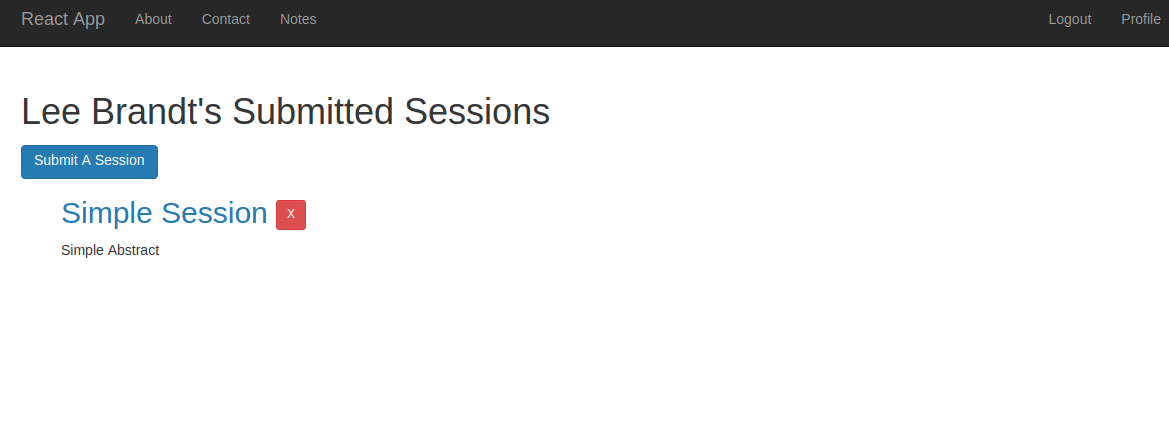
<h1>{this.state.user.name}'s Submitted Sessions</h1>
</section>
)
}
});
Simple, right? Just a user object in the state that you can use in the component courtesy of the higher-order component withAuth! The componentDidMount lifecycle method retrieves the user, and the render() method merely checks for it before rendering the page. This allows the component to render while it is waiting for this asynchronous call to come back and update when the user object is there.
Add Routes for the Login and Registration Pages
here are a few things to add in the /ClientApp/boot.js file. First, you’ll need to import a few things from the Okta React SDK, so add this import statement:
import { Security, SecureRoute, ImplicitCallback } from '@okta/okta-react';
I’ll explain these in a moment when you add them to the render() method, but for now, you’ll also need to import the components you just created.
import config from './app.config';
import RegisterPage from './components/auth/RegisterPage';
import ProfilePage from './components/auth/ProfilePage';
import LoginPage from './components/auth/LoginPage';
Then update the render() method like this:
render(
  <BrowserRouter>
    <Security issuer={config.issuer}
      client_id={config.client_id}
      redirect_uri={config.redirect_uri}
      onAuthRequired={onAuthRequired}>
      <Layout>
        <Route exact path="/" component={HomePage} />
        <Route path="/contact" component={ContactPage} />
        <Route path="/about" component={AboutPage} />
        <Route path="/notes" component={NotesPage} />
        <Route path="/login" render={() => <LoginPage baseUrl={config.url} />} />
        <Route path="/implicit/callback" component={ImplicitCallback} />
        <Route path="/register" component={RegisterPage} />
        <SecureRoute path="/profile" component={ProfilePage} />
      </Layout>
    </Security>
  </BrowserRouter>,
  document.getElementById('app')
);
There are a couple of things of note here. First, the Security component. It takes in all your information about your Okta application and wraps all the Route components so that they can do things like signIn() and have that information available. It also has an onAuthRequired property that will be handled by a method you’ll add above the render() method:
const onAuthRequired = ({ history }) => history.push('/login');
This method redirects the user to the login page when authentication is required (like for the SecureRoute routes). The SecureRoute simply fires that onAuthRequired() handler.
The login route looks a little funny. There’s no component property to let React know what component will be handling that route. However, the render property allows you to specify a “quick component”, if you will, with just a render method. This render method outputs the LoginPage component, but it passes a baseUrl property to the props in the component.
Lastly, the route for /implicit/callback is handled by the ImplicitCallback component from Okta’s React SDK. Remember setting that up when you configured your application in Okta? This handles getting the authentication responses back from Okta and storing the user’s tokens.
Add Navigation to Your React Application
In the /ClientApp/components/common/Navigation.js file, you’ll need to add navigation links to all these new routes. You’ll want to import that withAuth component again, wrap the component in the withAuth higher-order component, and add the methods you’ll need to change the menu items based on whether or not the user is currently logged in.
import React from 'react';
import { Link } from 'react-router-dom';
import { withAuth } from '@okta/okta-react';

export default withAuth(class Navigation extends React.Component {
  constructor(props) {
    super(props);
    this.state = { authenticated: null };
    this.checkAuthentication = this.checkAuthentication.bind(this);
    this.logout = this.logout.bind(this);
    this.checkAuthentication();
  }

  async checkAuthentication() {
    const authenticated = await this.props.auth.isAuthenticated();
    if (authenticated !== this.state.authenticated) {
      this.setState({ authenticated });
    }
  }

  componentDidUpdate() {
    this.checkAuthentication();
  }

  logout(){
    this.props.auth.logout('/');
  }

  render() {
    if (this.state.authenticated === null) return null;
    const authNav = this.state.authenticated ?
      <ul className="nav navbar-nav navbar-right">
        <li><a href="javascript:void(0)" onClick={this.logout}>Logout</a></li>
        <li><Link to="/profile">Profile</Link></li>
      </ul> :
      <ul className="nav navbar-nav navbar-right">
        <li><Link to="/login">Login</Link></li>
        <li><Link to="/register">Register</Link></li>
      </ul>;

    return (
      <div className="navbar navbar-inverse navbar-fixed-top">
        <div className="container">
          <div className="navbar-header">
            <button type="button" className="navbar-toggle" data-toggle="collapse" data-target=".navbar-collapse">
              <span className="sr-only">Toggle navigation</span>
              <span className="icon-bar"></span>
              <span className="icon-bar"></span>
              <span className="icon-bar"></span>
            </button>
            <Link to="/" className="navbar-brand">React App</Link>
          </div>
          <div className="navbar-collapse collapse">
            <ul className="nav navbar-nav">
              <li><Link to="/about">About</Link></li>
              <li><Link to="/contact">Contact</Link></li>
              <li><Link to="/notes">Notes</Link></li>
            </ul>
            {authNav}
          </div>
        </div>
      </div>
    )
  }
})
The only thing new here is the ternary operation inside the render() method. It simply makes some JSX menus based on whether or not the user is authenticated, and stores it in a variable. Then in the return, it adds that variable as the second, right-side menu.
With that, you should be able to run the application with F5, register a user, and log them in.
Add a Talk Submission React Component
Now that potential speakers can log in, they’ll need a way to submit proposals to speak at the conference. To do that, create a new group of components by adding a folder in the /ClientApp/components folder called sessions. In that folder, create a SubmissionPage.js. This will handle the creation of proposals and then sending them to the API to be saved in the database.
import React from 'react';
import { withRouter } from 'react-router-dom';
import { withAuth } from '@okta/okta-react';

class SubmissionPage extends React.Component {
  constructor(props) {
    super(props);

    this.state = {
      title: '',
      abstract: '',
      submitted: false
    };

    this.handleTitleChange = this.handleTitleChange.bind(this);
    this.handleAbstractChange = this.handleAbstractChange.bind(this);
    this.handleSubmit = this.handleSubmit.bind(this);
  }

  handleTitleChange(e) {
    this.setState({ title: e.target.value });
  }

  handleAbstractChange(e) {
    this.setState({ abstract: e.target.value });
  }

  async handleSubmit(e){
    e.preventDefault();
    fetch('/api/sessions', {
      body: JSON.stringify(this.state),
      cache: 'no-cache',
      headers: {
        'content-type':'application/json',
        Authorization: 'Bearer ' + await this.props.auth.getAccessToken()
      },
      method: 'POST'
    })
    .then(rsp => {
      if(rsp.status === 201){
        this.props.history.push('/profile');
      }
    })
    .catch(err => {
      console.error(err);
    });
  }

  render(){
    if(this.state.submitted === true){
      <Redirect to="/profile"/>
    }
    return(
      <form onSubmit={this.handleSubmit}>
        <div className="form-element">
          <label>Title:</label>
          <input
            id="title" type="text"
            value={this.state.title}
            onChange={this.handleTitleChange} />
        </div>
        <div className="form-element">
          <label>Abstract:</label>
          <textarea
            id="abstract"
            cols="100"
            rows="10"
            value={this.state.abstract}
            onChange={this.handleAbstractChange} />
        </div>
        <div className="form-actions">
          <input id="submit" type="submit" value="Submit Session"/>
        </div>
      </form>
    );
  }

};

export default withAuth(withRouter(SubmissionPage));
You’ll see this looks quite a bit like the login and registration pages, with some minor differences. The handlers should be very familiar by now for handling field updates and form submission. The significant difference is in the handleSubmit() function and with the higher-order components.
The form submission is doing a POST (like the registration page), but it is adding the Authorization header with a value of “Bearer {theUsersAccessToken}”. This is the reason for using the withAuth higher-order component, and it is there so that the server side will know who is making the request by sending a Bearer Token.
The form submission handler also uses this.props.history to redirect the user to back to the profile page once the submission is saved. You’ll also notice that the higher-order functions are also wrapping the submission page component at the bottom. What’s up with that? When using two wrapping function like the use of the withAuth and the withRouter higher-order components, I think it is more readable to export the component at the bottom. Either syntax for exporting components works.
To make submission easier, add a button on the user’s profile to add a new submission, so that the render() method looks like:
render() {
  if(!this.state.user) return null;
  return (
    <section className="user-profile">
      <h1>{this.state.user.name}'s Submitted Sessions</h1>
      <Link to="/submission" className="btn btn-primary">Submit A Session</Link>
    </section>
  )
}
Don’t forget to add a secure route to the new component in boot.js!
<SecureRoute path="/submission" component={SubmissionPage} />
The submission page will send the user’s input to the server, and now you need to tell the server what to do with all this awesomeness!
Add the Session Creation Route to ASP.NET Core
To save information, you’ll need a couple of things: you’ll need Entity Framework for easier interactions with the data store, and you’ll need a database context for that. In the Models folder create a ApiContext.cs file. This C# class should derive from DbContext and you’ll need to import a using for EntityFramework for that.
using Microsoft.EntityFrameworkCore;

namespace okta_dotnetcore_react_example.Data
{
  public class ApiContext : DbContext
  {
    public ApiContext(DbContextOptions<ApiContext> options)
  : base(options)
    { }

    public DbSet<Session> Sessions { get; set; }
  }
}
This merely sets up a “Sessions” table in the data store where every object of type Session will be stored.
You’ll also need a Session model, so you’ll need to create the Session.cs file in the Models folder and add:
using System.ComponentModel.DataAnnotations;

namespace okta_dotnetcore_react_example.Models
{
    public class Session
    {
        [Key]
        public int SessionId { get; set; }

        public string UserId { get; set; }
        public string Title { get; set; }
        public string Abstract { get; set; }
    }
}
The only real thing of note here is the Key data annotation that tells Entity Framework what the primary key value will be in the table. It also means that since we didn’t specify a way to make a key value, Entity Framework will use the default of incrementing from 1.
The last database context setup step is to add to the Startup.cs file in the ConfigureServices() function:
services.AddDbContext<ApiContext>(options => options.UseInMemoryDatabase("ConferenceDb"));
This lets .NET know to inject the database context into every controller that needs it.
Now you need an endpoint for the React app to send data to. You already know what the endpoint needs to look like, because the submission component is posting data to /api/session, so you’ll need a controller to handle the incoming data.
In the Controllers folder create a file called SessionsController.cs and add the content as follows:
using System.Linq;
using System.Security.Claims;
using Microsoft.AspNetCore.Authorization;
using Microsoft.AspNetCore.Mvc;
using okta_dotnetcore_react_example.Data;
using okta_dotnetcore_react_example.Models;

namespace okta_dotnetcore_react_example.Controllers
{
  [Authorize]
  [Route("/api/[controller]")]
  public class SessionsController : Controller
  {
    private readonly ApiContext context;
    public SessionsController(ApiContext context)
    {
      this.context = context;
    }

    [HttpPost]
    public IActionResult AddSession([FromBody] Session session)
    {
      session.UserId = User.Claims.SingleOrDefault(u=>u.Type == "uid")?.Value;
      context.Add<Session>(session);
      context.SaveChanges();
      return Created($"api/sessions/{session.SessionId}", session);
    }
  }
}
The AddSession action on the controller has the FromBody attribute on the argument. This lets ASP.NET’s default model binder know how to take the incoming JSON data and map it to a Session type. The action then takes the session and sets the UserId property to the authenticated user’s user id value. Then it adds the session to the Sessions collection in the context and saves those changes back to the database.
Lastly, it returns an IActionResult type. There are some “helpers” that create common action results. Here, it is returning a message with a 201 HTTP status that means there was a resource created. The first argument is the URL to retrieve that resource in the future and the second is the session. The outgoing session will now have a SessionId that data store created when it inserted the record.
The Authorize attribute on the controller class secures every action on the controller. So to call any endpoint declared here, a user must provide an access token (as a Bearer Token). To ensure that it’s there, you’ll need to add one more thing to the Startup.cs file.
In the ConfigureServices() method before the services.AddMvc() line, add:
services.AddAuthentication(sharedOptions =>
{
  sharedOptions.DefaultAuthenticateScheme = JwtBearerDefaults.AuthenticationScheme;
  sharedOptions.DefaultChallengeScheme = JwtBearerDefaults.AuthenticationScheme;
})
.AddJwtBearer(options =>
{
  options.Authority = "https://{yourOktaOrgUrl}/oauth2/default";
  options.Audience = "api://default";
});
And in the Configure() method before the app.UseMvc() line add:
app.UseAuthentication();
That’s it! Now your ASP.NET Core app will take that bearer token, get the user’s information from Okta add them to the User object so you can get the currently requesting user’s data.
Read The Sessions in You React Application
Even though users can now submit sessions to your conference, they’ll need to be able to see the list of their submissions so that they can see what they’ve submitted, edit, and delete them if they need to. Start by adding the submission listing to the profile page. In the /ClientApp/components/auth/ProfilePage.js component, add a component for listing a user’s submitted sessions. Change the render method to read:
render() {
  if(!this.state.user) return null;
  return (
    <section className="user-profile">
      <h1>{this.state.user.name}'s Submitted Sessions</h1>
      <Link to="/submission" className="btn btn-primary">Submit A Session</Link>
      <SessionListing userId={this.state.user.sub} />
    </section>
  )
}
This will pass the currently logged in user’s id to the SessionListing component you’ll create next.
Back in the /ClientApp/components/sessions folder create a SessionListing.js file.
import React from 'react';
import { withAuth } from '@okta/okta-react';

import './SessionListing.css';
import Session from './Session';

export default withAuth(class SessionListing extends React.Component {
  constructor(props) {
    super(props);
    this.state = { sessions: [] }
  }

  async getUsersSessions() {
    fetch('/api/sessions', {
      headers: {
        Authorization: 'Bearer ' + await this.props.auth.getAccessToken()
      }
    })
    .then(rsp => rsp.json())
    .then(sessions => {
      this.setState({ sessions });
    })
    .catch(err => {
      console.error(err);
    });
  }

  componentDidMount() {
    this.getUsersSessions();
  }

  render() {
    return (
      <ul className="session-list">
        {this.state.sessions.map(session =>
          <Session key={session.sessionId}
            id={session.sessionId}
            session={session} />)}
      </ul>
    )
  }

})
All of this should be familiar by now. The getUserSessions() method is called once the component is mounted, and the current user’s access token is sent in the Authorize header. The map function being called on the header will essentially loop through the sessions and pass them to the Session component for display. The render() method just needs one more thing: a Session component to pass each session to.
Hint: If you get a
cannot call map on undefinederror. Make sure you’ve initialized yoursessionsproperty in the state to an empty array.
Add a Session.js file to the sessions folder where your listing component lives.
import React from 'react';
import {Link} from 'react-router-dom';

const Session = (props) => {
  return (
    <li key={props.id} className="session">
      <h2>{props.session.title}</h2>
      <div>{props.session.abstract}</div>
    </li>
  );
}

export default Session;
If you’re new to React, this is what is known as a presentational or a “dumb” component. It is not wrapped in the class type and just takes props and renders output. It is made for this kind of situation. All this component does is display the title and abstract of a session submission.
Get Sessions from Your ASP.NET Core Application
Now that the React app can request a list of all a user’s sessions, the ASP.NET Core API needs a way to respond. In the SessionsController.cs file add a new action:
[HttpGet]
public IActionResult GetAllSessions()
{
  var userId = User.Claims.SingleOrDefault(u=>u.Type == "uid")?.Value;
  var sessions = context.Sessions.Where(x=>x.UserId == userId).ToList();
  return Ok(sessions);
}
Since this is inside a controller that has the Authorize attribute on it, there will be a User object to interrogate. Here, the user returns their “uid”, which is their user’s unique identifier. Then the context searches all the sessions in the data store for the ones belonging to that user and returns them in a 200 OK HTTP status.
Make the Sessions Editable in React
Now that the users can see their submitted sessions, they’ll need to be able to edit them if they’ve made any mistakes, or want to update the content. To the Session component change the return so that it reads:
  return (
    <li key={props.id} className="session">
      <h2><Link to={`/submission/${props.session.sessionId}`}>{props.session.title}</Link></h2>
      <div>{props.session.abstract}</div>
    </li>
  );
That link will take the user to the submission page and pass the session’s sessionId. To handle that, you’ll need to update the route for the submission page to handle route parameters. Update the boot.js file and change the route for /submissions.
<SecureRoute path="/submission/:sessionId?" component={SubmissionPage} />
The colon after /submission/ lets React know that the value there will be put into this.props.match.params for use in the component handling the route. The question mark after the route lets know that the parameter is optional and that the SubmissionPage component will be handling routes that do and do not have the optional parameter. If the value is not passed the value in this.props.match.params.sessionId will be undefined.
Now the submission page just needs to handle loading up an existing session submission. Add a function to the component:
async loadSubmission(){
  fetch(`/api/sessions/${this.props.match.params.sessionId}`, {
    headers: {
      Authorization: 'Bearer ' + await this.props.auth.getAccessToken()
    }
  })
  .then(rsp => rsp.json())
  .then(session => {
    this.setState(Object.assign({}, this.state, session));
  })
  .catch(err => {
    console.error(err);
  });
}
Make sure that it is bound to the component’s this context in the constructor by adding:
this.loadSubmission = this.loadSubmission.bind(this);
Then make sure the loadSessions() method only runs once the component has finished rendering by adding the lifecycle method:
componentDidMount(){
  if(this.props.match.params.sessionId){
    this.loadSubmission();
  }
}
Finally, change the handleSubmit() method so that it POSTs to the add or save URL in the API depending on whether the user is updating or creating a session. You can determine that based on whether or not a sessionId was passed as a route parameter.
async handleSubmit(e){
  e.preventDefault();
  var sessionId = this.props.match.params.sessionId;
  var url = sessionId ? `/api/sessions/${sessionId}` : '/api/sessions';
  fetch(url, {
    body: JSON.stringify(this.state),
    cache: 'no-cache',
    headers: {
      'content-type':'application/json',
      Authorization: 'Bearer ' + await this.props.auth.getAccessToken()
    },
    method: 'POST'
  })
  .then(rsp => {
    if(rsp.status === 201 || rsp.status === 200){
      this.props.history.push('/profile');
    }
  })
  .catch(err => {
    console.error(err);
  });
}
This pulls the sessionId out and if it exists, changes the URL where you are posting the session data.
Update a Session in ASP.NET Core API
Now that the infrastructure is in place for the data store and the authentication, adding to the API is very simple. To the SessionsController.cs add the following action:
[HttpPost("/api/sessions/{sessionId}")]
public IActionResult UpdateSession([FromBody] Session session)
{
  var savedSession = context.Sessions.SingleOrDefault(x=>x.SessionId == session.SessionId);
  if(savedSession == null){
    return NotFound();
  }
  if(savedSession.UserId != User.Claims.SingleOrDefault(u=>u.Type == "uid")?.Value)
  {
    return Unauthorized();
  }
  savedSession.Title = session.Title;
  savedSession.Abstract = session.Abstract;
  context.SaveChanges();
  return Ok(savedSession);
}
This action has a specified URL in the HttpPost attribute. Just like the action for creating sessions, this pulls the data from the JSON data and maps it to a session object. Unlike the create action, this looks up the session by its sessionId. If it doesn’t find one, it returns a NotFound action result.
The action then checks to see if the currently logged in user is the owner of that session by checking their ID against the session’s UserId property. If it doesn’t match, it returns an Unauthorized action result.
Once all those checks have passed, the session is updated with the incoming data and saved back to the database.
Delete Submissions From React
Lastly, a potential speaker might decide that they don’t want to submit that session for consideration after all. They will need a way to delete that session submission.
Add a deleteSession() method to the session listing.
async deleteSession(session){
  fetch(`/api/sessions/${session.sessionId}`, {
    method: 'DELETE',
    headers: {
      Authorization: 'Bearer ' + await this.props.auth.getAccessToken()
    }
  })
  .then(rsp => {
    if(rsp.status === 200){
      this.getUsersSessions();
    }
  })
  .catch(err => {
    console.error(err);
  });
}
As before, you are sending the user’s access token. This time to a DELETE endpoint. The reason this is here and not in the session component is so that the list will be redisplayed once the submission has been deleted. To call it from the session component, you’ll need to pass it as an action.
You also won’t want to even give the option to someone who doesn’t own that session, so first check the userId passed in the props against the session’s userId property. In the SessionListing.js component, change the render() method, so it reads:
render() {
  return (
    <ul className="session-list">
      {this.state.sessions.map(session =>
        <Session key={session.sessionId}
          id={session.sessionId}
          isOwner={session.userId === this.props.userId}
          delete={this.deleteSession.bind(this, session)}
          session={session} />)}
    </ul>
  )
}
Now you can edit the Session.js file. The final version of the file will look like:
import React from 'react';
import {Link} from 'react-router-dom';

const Session = (props) => {
  const deleteButton = props.isOwner ?
    <input type="button" title="Delete This Session" className="btn btn-sm btn-danger" value="X" onClick={props.delete}/> :
    null;
  return (
    <li key={props.id} className="session">
      <h2><Link to={`/submission/${props.session.sessionId}`}>{props.session.title}</Link> {deleteButton}</h2>
      <div>{props.session.abstract}} />
    </li>
  );
}

export default Session;
Now the component uses the isOwner prop to decide whether or not to show the delete button, and the delete button calls the delete() method on the session listing component.
Delete Sessions in ASP.NET Core
Now that the React application can request a delete to a specific session, add the action to handle that request in the SessionsController.cs file.
[HttpDelete("/api/sessions/{sessionId}")]
public IActionResult Delete(int sessionId){
  var session = context.Sessions.SingleOrDefault(sess => sess.SessionId == sessionId);
  if(session == null){
    return NotFound();
  }
  if(session.UserId != User.Claims.SingleOrDefault(u=>u.Type == "uid")?.Value)
  {
    return Unauthorized();
  }
  context.Remove(session);
  context.SaveChanges();
  return Ok();
}
Just like the update action, you’ll want to make sure that the session that the request intends to delete exists, and that it belongs to the user making the request. If that is the case, then the Remove() method is called on the context, and the session to be deleted is passed to it. Finally, don’t forget to call SaveChanges() to write that context back to the database and return an Ok() action result.
You should now be able to run the app and register users, login, create, read, update, and delete session submissions!
Do More Full Stack!!
If you enjoyed building this ASP.NET Core API with React, check out more full-stack CRUD posts from Okta.
- Build a Basic CRUD App with Vue.js and Node
- Build a Basic CRUD App with Symfony 4 and Vue
- Build a CRUD App with ASP.NET Core and Angular
As always if you have any questions, comments, or concerns about this post feel free to leave a comment below. For other great content from the Okta Dev Team, follow us on Twitter @OktaDev, Facebook, and watch us on YouTube!
Okta Developer Blog Comment Policy
We welcome relevant and respectful comments. Off-topic comments may be removed.