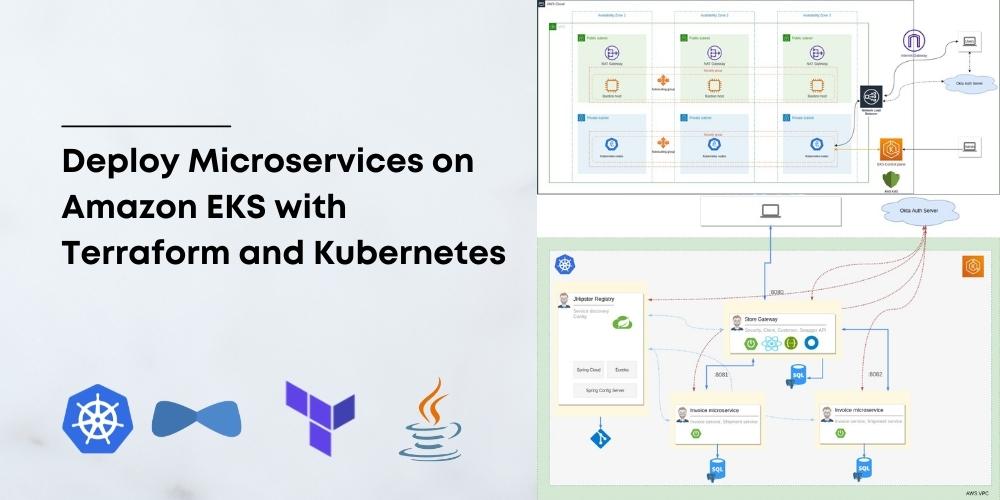
How to Deploy Java Microservices on Amazon EKS Using Terraform and Kubernetes
When it comes to infrastructure, public clouds are the most popular choice these days, especially Amazon Web Services (AWS). If you are in one of those lucky or unlucky (depending on how you see it) teams running microservices, then you need a way to orchestrate their deployments. When it comes to orchestrating microservices, Kubernetes is the de-facto choice. Most public cloud providers also provide managed Kubernetes as a service; for example, Google provides Google Kubernetes Engine (GKE), Microsoft provides Azure Kubernetes Service (AKS), and Amazon provides Amazon Elastic Kubernetes Service (EKS).
This doesn’t mean that deploying and managing microservices on the public cloud is easy; each cloud service comes with its own challenges and pain. This is especially true for Amazon EKS, which, in my opinion, is the most difficult Kubernetes service to use, but also one of the most flexible. This is because EKS consists of some clever orchestrations doing a complex dance on top of other AWS services like EC2, EBS, etc.
If you want to run a microservice stack on EKS, you will need to spend some extra time and effort setting it up and managing it. This is where infrastructure as code (IaC) tools like Terraform come in handy.
So here is what you will learn to do today:
- Scaffold a Java microservice stack using JHipster, Spring Boot, and Spring Cloud
- Create an EKS cluster, Virtual Private Cloud (VPC), subnets, and required Kubernetes add-ons using Terraform on AWS
- Set up OIDC authentication for the microservice stack using Okta
- Build and deploy the microservice stack to the cluster
Prerequisites
- AWS account with the IAM permissions to create EKS clusters
- AWS CLI installed and configured
- AWS IAM Authenticator installed
- kubectl installed
- Docker installed and configured
- Terraform installed
- Java 11+ installed
- Okta CLI installed
- [Optional] JHipster CLI installed
- [Optional] KDash
Table of Contents
- Why Terraform, why not CloudFormation?
- Scaffold a Java microservice stack using JHipster
- Create an EKS cluster using Terraform
- Set up OIDC authentication using Okta
- Deploy the microservice stack
- Tear down the cluster with Terraform
- Learn more about Java Microservices, EKS, Kubernetes, and JHipster
Note: In May 2025, the Okta Integrator Free Plan replaced Okta Developer Edition Accounts, and the Okta CLI was deprecated.
We preserved this post for reference, but the instructions no longer work exactly as written. Replace the Okta CLI commands by manually configuring Okta following the instructions in our Developer Documentation.
Why Terraform, why not CloudFormation?
At this point, the first question that might pop up in your mind would be, “Why not use CloudFormation?”. It’s a good question; after all, CloudFormation is built by AWS and hence sounds like an excellent solution to manage AWS resources. But anyone who has tried both CloudFormation and Terraform will probably tell you to forget that CloudFormation even exists. I think CloudFormation is far more complex and less developer-friendly than Terraform. You also need to write a lot more boilerplate with CloudFormation in YAML or JSON. Yikes! And most importantly, Terraform is far more powerful and flexible than CloudFormation. It’s cross-platform, which means you can take care of all your infrastructure management needs on any platform with one tool.
Scaffold a Java microservice stack using JHipster
You need a microservice stack to deploy to the cluster. I’m using a microservice stack scaffolded for demo purposes using JHipster. You can use another microservice stack if you want. If you prefer using the same application as in this demo, then you can either scaffold it using JHipster JDL or clone the sample repository from GitHub.
Option 1: Scaffold the microservice stack using JHipster
mkdir jhipster-microservice-stack
cd jhipster-microservice-stack
# download the JDL file.
jhipster download https://raw.githubusercontent.com/oktadev/okta-jhipster-k8s-eks-microservices-example/main/apps.jdl
# Update the `dockerRepositoryName` property to use your Docker Repository URI/Name.
# scaffold the apps.
jhipster jdl apps.jdl
Option 2: Clone the sample repository
git clone https://github.com/oktadev/okta-jhipster-k8s-eks-microservices-example
In either case, remember to change the Docker repository name to match your Docker repository.
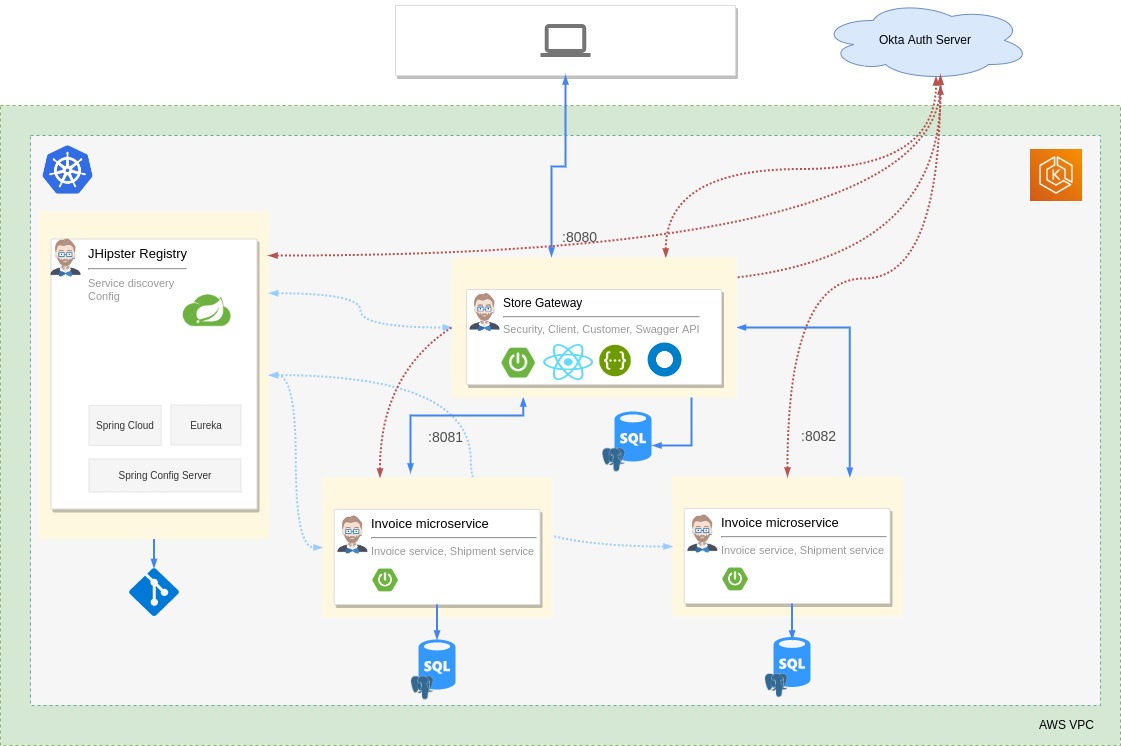
The JHipster scaffolded sample application has a gateway application, two microservices, and uses JHipster Registry for service discovery and centralized configuration.
Create an EKS cluster using Terraform
Now let us move on to the important part of the tutorial. Creating an EKS cluster in AWS is not as straightforward as in Google Cloud Platform (GCP). You need to also create a lot more resources for everything to work correctly without surprises. You will be using a bunch of Terraform providers to help with this, and you will also use some prebuilt Terraform modules like AWS VPC Terraform module and Amazon EKS Blueprints for Terraform to reduce the amount of boilerplate you need to write.
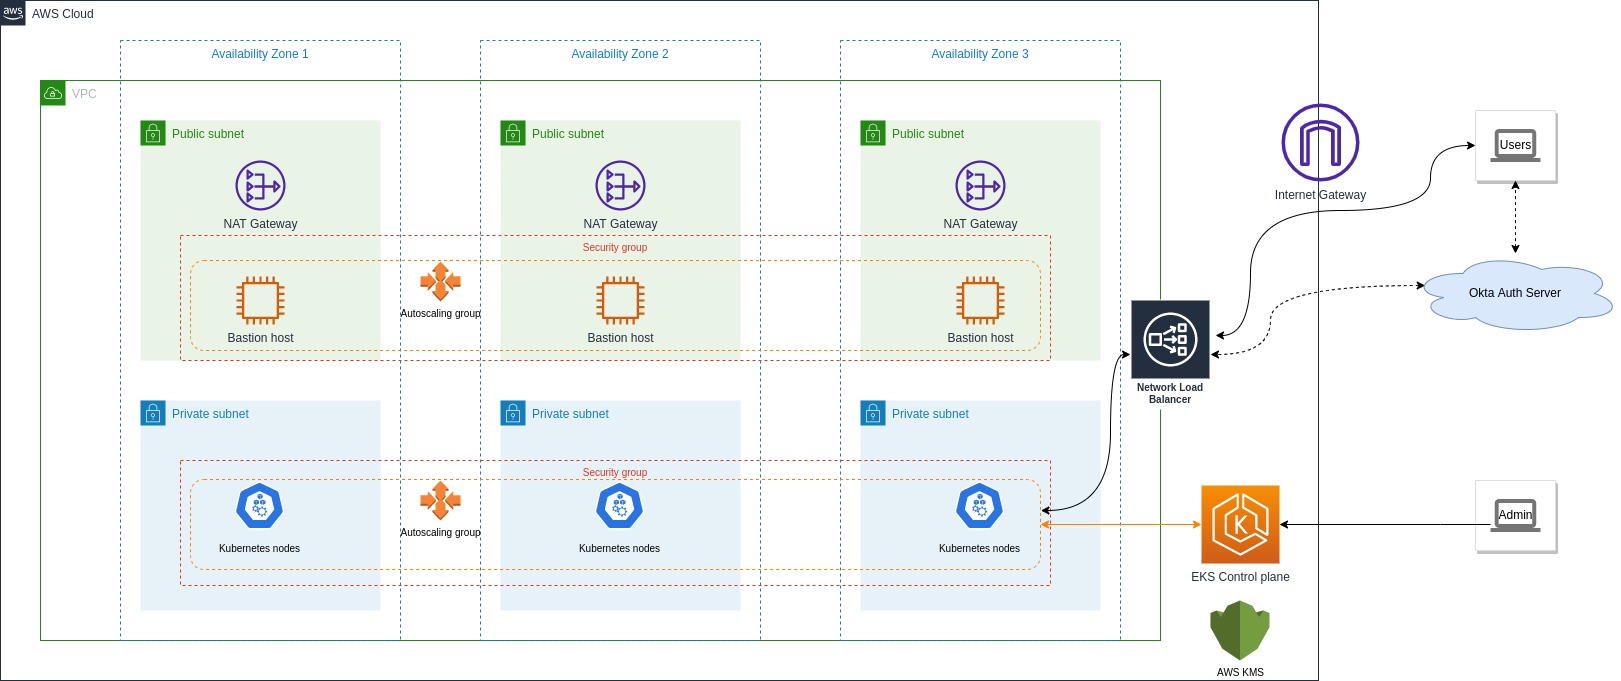
These are the AWS resources and VPC architecture you will create:
Build the Terraform configuration
First, make sure you use a specific version of the providers as different versions might use different attributes and features. Create a versions.tf file:
mkdir terraform
cd terraform
touch versions.tf
Add the following to the file:
terraform {
  required_version = ">= 1.0.0"

  required_providers {
    aws = {
      source  = "hashicorp/aws"
      version = ">= 3.72"
    }
    kubernetes = {
      source  = "hashicorp/kubernetes"
      version = ">= 2.10"
    }
    helm = {
      source  = "hashicorp/helm"
      version = ">= 2.4.1"
    }
    random = {
      source  = "hashicorp/random"
      version = ">= 3.2.0"
    }
    nullres = {
      source  = "hashicorp/null"
      version = ">= 3.1"
    }
  }
}
Next, you need to define variables and configure the providers. Create a config.tf file:
touch config.tf
Add the following to the file:
# ##  To save state in s3. Update to suit your needs
# backend "s3" {
#   bucket = "create-an-s3-bucket-and-provide-name-here"
#   region = local.region
#   key    = "eks-cluster-with-new-vpc/terraform.tfstate"
# }

variable "region" {
  default     = "eu-west-1"
  description = "AWS region"
}

resource "random_string" "suffix" {
  length  = 8
  special = false
}

data "aws_availability_zones" "available" {}

locals {
  name            = "okta-jhipster-eks-${random_string.suffix.result}"
  region          = var.region
  cluster_version = "1.22"
  instance_types  = ["t2.large"] # can be multiple, comma separated

  vpc_cidr = "10.0.0.0/16"
  azs      = slice(data.aws_availability_zones.available.names, 0, 3)

  tags = {
    Blueprint  = local.name
    GitHubRepo = "github.com/aws-ia/terraform-aws-eks-blueprints"
  }
}

provider "aws" {
  region = local.region
}

# Kubernetes provider
# You should **not** schedule deployments and services in this workspace.
# This keeps workspaces modular (one for provision EKS, another for scheduling
# Kubernetes resources) as per best practices.
provider "kubernetes" {
  host                   = module.eks_blueprints.eks_cluster_endpoint
  cluster_ca_certificate = base64decode(module.eks_blueprints.eks_cluster_certificate_authority_data)

  exec {
    api_version = "client.authentication.k8s.io/v1alpha1"
    command     = "aws"
    # This requires the awscli to be installed locally where Terraform is executed
    args = ["eks", "get-token", "--cluster-name", module.eks_blueprints.eks_cluster_id]
  }
}

provider "helm" {
  kubernetes {
    host                   = module.eks_blueprints.eks_cluster_endpoint
    cluster_ca_certificate = base64decode(module.eks_blueprints.eks_cluster_certificate_authority_data)

    exec {
      api_version = "client.authentication.k8s.io/v1alpha1"
      command     = "aws"
      # This requires the awscli to be installed locally where Terraform is executed
      args = ["eks", "get-token", "--cluster-name", module.eks_blueprints.eks_cluster_id]
    }
  }
}
You can uncomment the backend section above to save state in S3 instead of your local filesystem. This is recommended for production setup so that everyone in a team has the same state. This file defines configurable and local variables used across the workspace and configures some of the providers used. The Kubernetes provider is included in this file so the EKS module can complete successfully. Otherwise, it throws an error when creating kubernetes_config_map.aws_auth. The helm provider is used to install Kubernetes add-ons to the cluster.
Build the VPC
Next up, you need a VPC, subnets, route tables, and other networking bits. You will use the vpc module from the terraform-aws-modules repository. This module is a wrapper around the AWS VPC module. It makes it easier to configure VPCs and all the other required networking resources. Create a vpc.tf file:
touch vpc.tf
Add the following to the file:
#---------------------------------------------------------------
# VPC, Subnets, Internet gateway, Route tables, etc.
#---------------------------------------------------------------
module "vpc" {
  source  = "terraform-aws-modules/vpc/aws"
  version = "~> 3.0"

  name = local.name
  cidr = local.vpc_cidr

  azs             = local.azs
  public_subnets  = [for k, v in local.azs : cidrsubnet(local.vpc_cidr, 8, k)]
  private_subnets = [for k, v in local.azs : cidrsubnet(local.vpc_cidr, 8, k + 10)]

  enable_nat_gateway   = true
  single_nat_gateway   = true
  enable_dns_hostnames = true

  # Manage so we can name
  manage_default_network_acl    = true
  default_network_acl_tags      = { Name = "${local.name}-default" }
  manage_default_route_table    = true
  default_route_table_tags      = { Name = "${local.name}-default" }
  manage_default_security_group = true
  default_security_group_tags   = { Name = "${local.name}-default" }

  public_subnet_tags = {
    "kubernetes.io/cluster/${local.name}" = "shared"
    "kubernetes.io/role/elb"              = 1
  }

  private_subnet_tags = {
    "kubernetes.io/cluster/${local.name}" = "shared"
    "kubernetes.io/role/internal-elb"     = 1
  }

  tags = local.tags
}
This will create:
- A new VPC, three private subnets, and three public subnets,
- Internet gateway and NAT gateway for the public subnets,
- and AWS routes for the gateways, public/private route tables, and route table associations.
Build the EKS cluster
Now that you have the networking part done, you can build configurations for the EKS cluster and its add-ons. You will use the eks_blueprints module from terraform-aws-eks-blueprints, which is a wrapper around the terraform-aws-modules and provides additional modules to configure EKS add-ons.
Create a eks-cluster.tf file:
touch eks-cluster.tf
Add the following to the file:
#---------------------------------------------------------------
# EKS cluster, worker nodes, security groups, IAM roles, K8s add-ons, etc.
#---------------------------------------------------------------
module "eks_blueprints" {
  source = "github.com/aws-ia/terraform-aws-eks-blueprints?ref=v4.0.9"

  cluster_name    = local.name
  cluster_version = local.cluster_version

  vpc_id             = module.vpc.vpc_id
  private_subnet_ids = module.vpc.private_subnets

  managed_node_groups = {
    node = {
      node_group_name = "managed-ondemand"
      instance_types  = local.instance_types
      min_size        = 2
      subnet_ids      = module.vpc.private_subnets
    }
  }

  tags = local.tags
}

module "eks_blueprints_kubernetes_addons" {
  source = "github.com/aws-ia/terraform-aws-eks-blueprints//modules/kubernetes-addons?ref=v4.0.9"

  eks_cluster_id       = module.eks_blueprints.eks_cluster_id
  eks_cluster_endpoint = module.eks_blueprints.eks_cluster_endpoint
  eks_oidc_provider    = module.eks_blueprints.oidc_provider
  eks_cluster_version  = module.eks_blueprints.eks_cluster_version

  # EKS Managed Add-ons
  enable_amazon_eks_vpc_cni    = true
  enable_amazon_eks_coredns    = true
  enable_amazon_eks_kube_proxy = true

  # K8S Add-ons
  enable_aws_load_balancer_controller = true
  enable_metrics_server               = true
  enable_cluster_autoscaler           = true
  enable_aws_cloudwatch_metrics       = false

  tags = local.tags

}

# To update local kubeconfig with new cluster details
resource "null_resource" "kubeconfig" {
  depends_on = [module.eks_blueprints_kubernetes_addons]
  provisioner "local-exec" {
    command = "aws eks --region ${local.region}  update-kubeconfig --name $AWS_CLUSTER_NAME"
    environment = {
      AWS_CLUSTER_NAME = local.name
    }
  }
}
The eks_blueprints module definition creates:
- EKS Cluster Control plane with one managed node group and fargate profile,
- Cluster and node security groups and rules, IAM roles and policies required,
- and AWS Key Management Service (KMS) configuration.
The eks_blueprints_kubernetes_addons module definition creates:
- Amazon EKS add-ons vpc-cni, CoreDNS, and kube-proxy,
- AWS Load Balancer Controller that provisions an AWS Network Load Balancer for distributing traffic,
- and Metrics Server, and Cluster Autoscaler for scaling your workloads.
The null_resource configuration updates your local kubeconfig with the new cluster details. It’s not a required step for provisioning but just a handy hack.
Finally, you can also define some outputs to be captured. Create a outputs.tf file:
touch outputs.tf
Add the following to the file:
output "vpc_private_subnet_cidr" {
  description = "VPC private subnet CIDR"
  value       = module.vpc.private_subnets_cidr_blocks
}

output "vpc_public_subnet_cidr" {
  description = "VPC public subnet CIDR"
  value       = module.vpc.public_subnets_cidr_blocks
}

output "vpc_cidr" {
  description = "VPC CIDR"
  value       = module.vpc.vpc_cidr_block
}

output "eks_cluster_id" {
  description = "EKS cluster ID"
  value       = module.eks_blueprints.eks_cluster_id
}

output "eks_managed_nodegroups" {
  description = "EKS managed node groups"
  value       = module.eks_blueprints.managed_node_groups
}

output "eks_managed_nodegroup_ids" {
  description = "EKS managed node group ids"
  value       = module.eks_blueprints.managed_node_groups_id
}

output "eks_managed_nodegroup_arns" {
  description = "EKS managed node group arns"
  value       = module.eks_blueprints.managed_node_group_arn
}

output "eks_managed_nodegroup_role_name" {
  description = "EKS managed node group role name"
  value       = module.eks_blueprints.managed_node_group_iam_role_names
}

output "eks_managed_nodegroup_status" {
  description = "EKS managed node group status"
  value       = module.eks_blueprints.managed_node_groups_status
}

output "configure_kubectl" {
  description = "Configure kubectl: make sure you're logged in with the correct AWS profile and run the following command to update your kubeconfig"
  value       = module.eks_blueprints.configure_kubectl
}
Provision the cluster
Our Terraform definitions are ready. Now you can provision the cluster. First, initialize Terraform workspace and plan the changes:
# download modules and providers. Initialize state.
terraform init
# see a preview of what will be done
terraform plan
Review the plan and make sure everything is correct. Ensure you have configured your AWS CLI and IAM Authenticator to use the correct AWS account. If not, run the following:
# Visit https://console.aws.amazon.com/iam/home?#/security_credentials for creating access keys
aws configure
Now you can apply the changes:
terraform apply
Confirm by typing yes when prompted. This will take a while (15-20 minutes), so sit back and have a coffee or contemplate what led you to this point in life. 😉
Once the EKS cluster is ready, you will see the output variables printed to the console.
configure_kubectl = "aws eks --region eu-west-1 update-kubeconfig --name okta-tf-demo"
eks_cluster_id = "okta-tf-demo"
eks_managed_nodegroup_arns = tolist([
  "arn:aws:eks:eu-west-1:216713166862:nodegroup/okta-tf-demo/managed-ondemand-20220610125341399700000010/f0c0a6d6-b8e1-cf91-3d21-522552d6bc2e",
])
eks_managed_nodegroup_ids = tolist([
  "okta-tf-demo:managed-ondemand-20220610125341399700000010",
])
eks_managed_nodegroup_role_name = tolist([
  "okta-tf-demo-managed-ondemand",
])
eks_managed_nodegroup_status = tolist([
  "ACTIVE",
])
eks_managed_nodegroups = tolist([
  {
    "node" = {
      "managed_nodegroup_arn" = [
        "arn:aws:eks:eu-west-1:216713166862:nodegroup/okta-tf-demo/managed-ondemand-20220610125341399700000010/f0c0a6d6-b8e1-cf91-3d21-522552d6bc2e",
      ]
      "managed_nodegroup_iam_instance_profile_arn" = [
        "arn:aws:iam::216713166862:instance-profile/okta-tf-demo-managed-ondemand",
      ]
      "managed_nodegroup_iam_instance_profile_id" = [
        "okta-tf-demo-managed-ondemand",
      ]
      "managed_nodegroup_iam_role_arn" = [
        "arn:aws:iam::216713166862:role/okta-tf-demo-managed-ondemand",
      ]
      "managed_nodegroup_iam_role_name" = [
        "okta-tf-demo-managed-ondemand",
      ]
      "managed_nodegroup_id" = [
        "okta-tf-demo:managed-ondemand-20220610125341399700000010",
      ]
      "managed_nodegroup_launch_template_arn" = []
      "managed_nodegroup_launch_template_id" = []
      "managed_nodegroup_launch_template_latest_version" = []
      "managed_nodegroup_status" = [
        "ACTIVE",
      ]
    }
  },
])
region = "eu-west-1"
vpc_cidr = "10.0.0.0/16"
vpc_private_subnet_cidr = [
  "10.0.10.0/24",
  "10.0.11.0/24",
  "10.0.12.0/24",
]
vpc_public_subnet_cidr = [
  "10.0.0.0/24",
  "10.0.1.0/24",
  "10.0.2.0/24",
]
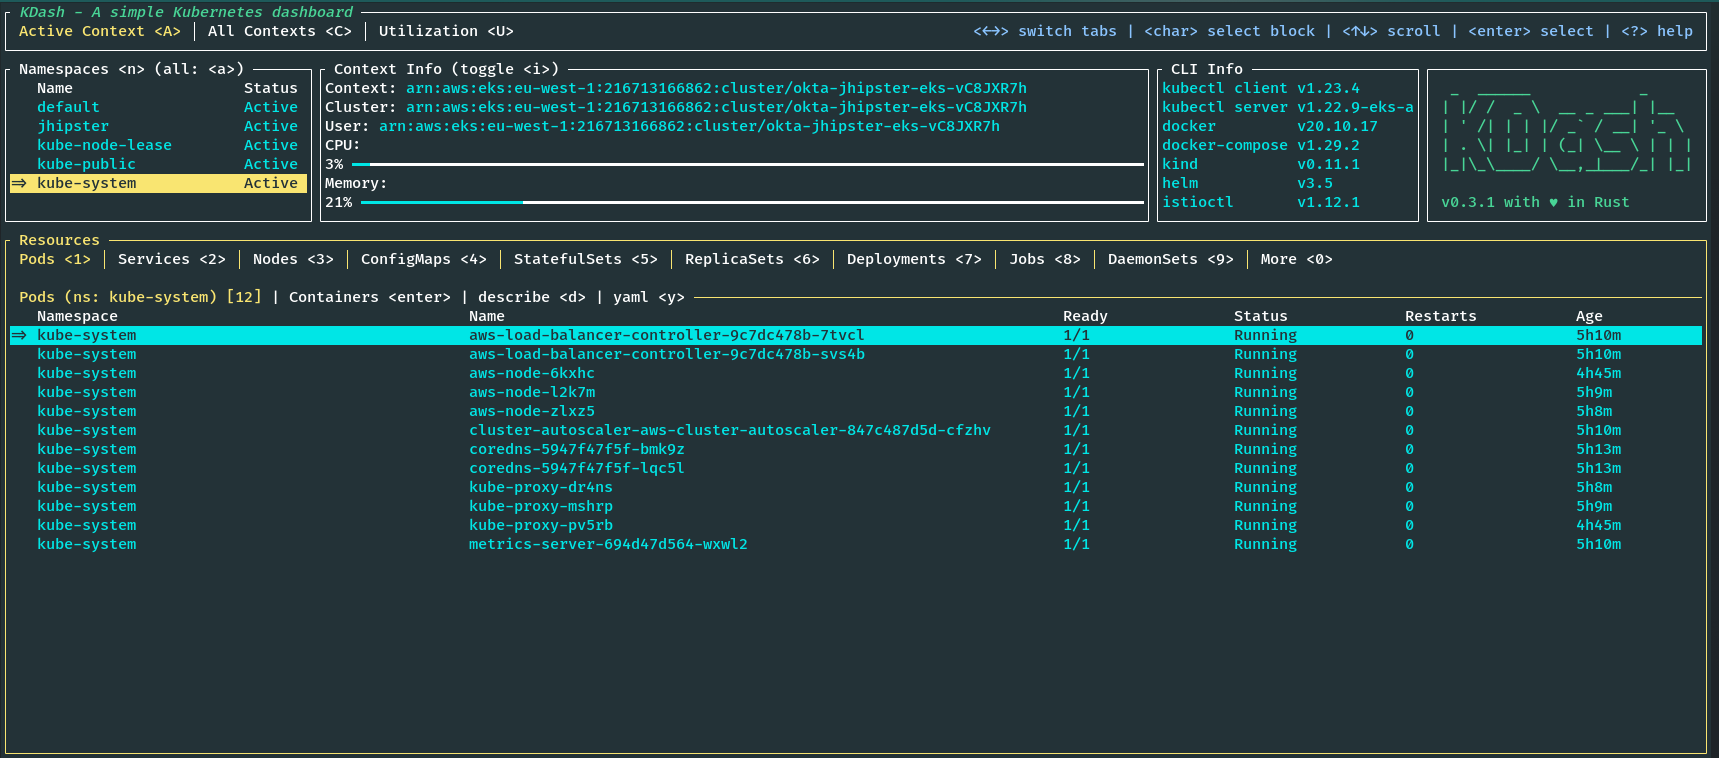
You should see the cluster details if you run kdash or kubectl get nodes commands.
Note: The EKS cluster defined here will not come under AWS free tier; hence, running this will cost money, so delete the cluster as soon as you finish the tutorial to keep the cost within a few dollars.
Set up OIDC authentication using Okta
You can proceed to deploy the sample application. You could skip this step if you used a sample that does not use Okta or OIDC for authentication.
First, navigate to the store application folder.
Before you begin, you’ll need a free Okta developer account. Install the Okta CLI and run okta register to sign up for a new account. If you already have an account, run okta login.
Then, run okta apps create jhipster. Select the default app name, or change it as you see fit.
Accept the default Redirect URI values provided for you.
What does the Okta CLI do?
The Okta CLI streamlines configuring a JHipster app and does several things for you:
- Creates an OIDC app with the correct redirect URIs:
- login:
http://localhost:8080/login/oauth2/code/oidcandhttp://localhost:8761/login/oauth2/code/oidc - logout:
http://localhost:8080andhttp://localhost:8761
- login:
- Creates
ROLE_ADMINandROLE_USERgroups that JHipster expects - Adds your current user to the
ROLE_ADMINandROLE_USERgroups - Creates a
groupsclaim in your default authorization server and adds the user’s groups to it
NOTE: The http://localhost:8761* redirect URIs are for the JHipster Registry, which is often used when creating microservices with JHipster. The Okta CLI adds these by default.
You will see output like the following when it’s finished:
Okta application configuration has been written to: /path/to/app/.okta.env
Run cat .okta.env (or type .okta.env on Windows) to see the issuer and credentials for your app. It will look like this (except the placeholder values will be populated):
export SPRING_SECURITY_OAUTH2_CLIENT_PROVIDER_OIDC_ISSUER_URI="https://{yourOktaDomain}/oauth2/default"
export SPRING_SECURITY_OAUTH2_CLIENT_REGISTRATION_OIDC_CLIENT_ID="{clientId}"
export SPRING_SECURITY_OAUTH2_CLIENT_REGISTRATION_OIDC_CLIENT_SECRET="{clientSecret}"
NOTE: You can also use the Okta Admin Console to create your app. See Create a JHipster App on Okta for more information.
Note: Make sure to add the newly created
.okta.envfile to your.gitignorefile so that you don’t accidentally expose your credentials to the public.
Update kubernetes/registry-k8s/application-configmap.yml with the OIDC configuration from the .okta.env file. The Spring Cloud Config server reads from this file and shares the values with the gateway and microservices.
data:
  application.yml: |-
    ...
    spring:
      security:
        oauth2:
          client:
            provider:
              oidc:
                issuer-uri: https://<your-okta-domain>/oauth2/default
            registration:
              oidc:
                client-id: <client-id>
                client-secret: <client-secret>
Next, configure the JHipster Registry to use OIDC for authentication. Modify kubernetes/registry-k8s/jhipster-registry.yml to enable the oauth2 profile, which is preconfigured in the JHipster Registry application.
- name: SPRING_PROFILES_ACTIVE
  value: prod,k8s,oauth2
The application is now ready.
Secure secrets
If you have noticed, you are setting secrets in plain text on the application-configmap.yml file, which is not ideal and is not a best practice for security. For the specific JHipster application, you can use the encrypt functionality provided by the JHipster Registry to encrypt the secrets. See Encrypt Your Secrets with Spring Cloud Config to learn how to do this. But that would also rely on a base64 encoded encryption key added as a Kubernetes Secret, which still can be decoded. The best way to do this would be to use AWS Secrets Manager, an external service like HashiCorp Vault, or Sealed Secrets. To learn more about these methods see Encrypt Your Kubernetes Secrets.
Deploy the microservice stack
You are ready to deploy to our shiny new EKS cluster, but first, you need to build and push the Docker images to a container registry. You can use Amazon Elastic Container Registry (ECR) or any other container registry.
Build the Docker images
You need to build Docker images for each app. This is specific to the JHipster application used in this tutorial which uses Jib to build the images. Make sure you are logged into Docker using docker login. Navigate to each app folder (store, invoice, product) and run the following command:
./gradlew bootJar -Pprod jib -Djib.to.image=<docker-repo-uri-or-name>/<image-name>
Image names should be store, invoice, and product.
Deploy the applications to EKS
Start the deployment using the handy script provided by JHipster. You could also manually apply deployments using kubectl apply -f <file> commands.
cd kubernetes
./kubectl-apply.sh -f
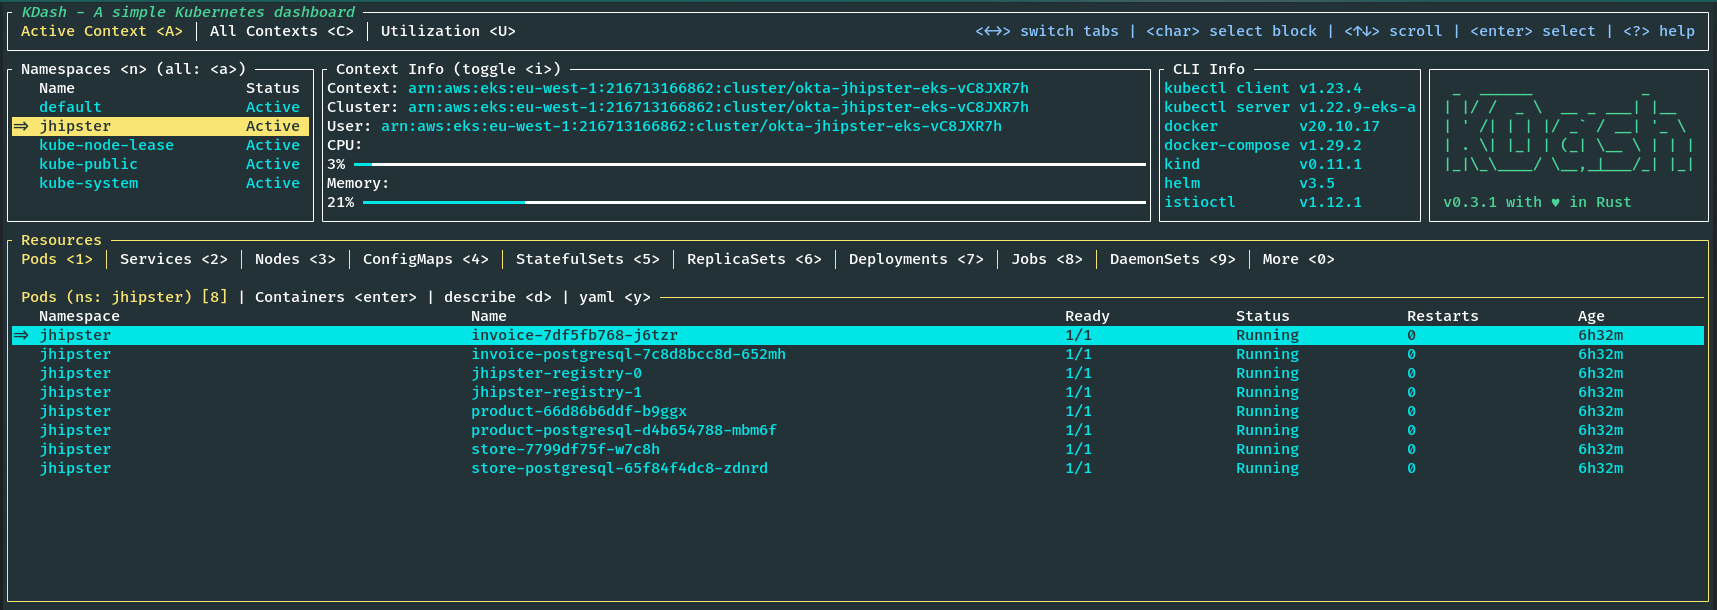
You can also run the following command to see the status of the deployments:
kubectl get pods -n jhipster
View the registry using port-forwarding as follows, and you will be able to access the application at http://localhost:8761.
kubectl port-forward svc/jhipster-registry -n jhipster 8761
You can access the gateway application using port-forwarding as follows, and you will be able to access the application at http://localhost:8080.
kubectl port-forward svc/store -n jhipster 8080
Or, you can access the application via the load balancer exposed. Find the external IP of the store service by navigating to the service tab in KDash or by running the following:
kubectl get svc store -n jhipster
Navigate to the Okta Admin Console and go to Applications > Applications from left-hand navigation. Find the application you created earlier with okta apps create jhipster and add the external IP from kubectl get svc command to the Sign-in redirect URIs and Sign-out redirect URIs. Make sure to use the same paths as the current localhost entries.
Now you should be able to visit the external IP of the store service on port 8080 and see the application, and you should be able to log in using your Okta credentials.
Tear down the cluster with Terraform
Once you are done with the tutorial, you can delete the cluster and all the resources created using Terraform by running the following commands:
cd terraform
# The commands below might take a while to finish.
terraform destroy -target="module.eks_blueprints_kubernetes_addons" -auto-approve
# If deleting VPC fails, then manually delete the load balancers and security groups
# for the load balancer associated with the VPC from AWS EC2 console and try again.
terraform destroy -target="module.eks_blueprints" -auto-approve
terraform destroy -target="module.vpc" -auto-approve
# cleanup anything left over.
terraform destroy -auto-approve
Learn more about Java Microservices, EKS, Kubernetes, and JHipster
If you want to learn more about Kubernetes, OIDC, or using OIDC with Kubernetes, and security in general, check out these additional resources.
- Cloud Native Java Microservices with JHipster and Istio
- Kubernetes to the Cloud with Spring Boot and JHipster
- How to Secure Your Kubernetes Cluster with OpenID Connect and RBAC
- How to Secure Your Kubernetes Clusters With Best Practices
- Secure Access to AWS EKS Clusters for Admins
- Run Microservices on DigitalOcean with Kubernetes
- Kubernetes Microservices on Azure with Cosmos DB
You can find all the code from this example on GitHub.
If you liked this tutorial, chances are you’ll enjoy the others we publish. Please follow @oktadev on Twitter and subscribe to our YouTube channel to get notified when we publish new developer tutorials.
Deepu is a polyglot developer, Java Champion, and OSS aficionado. He mainly works with Java, JS, Rust, and Golang. He co-leads JHipster and created the JDL Studio and KDash. He's a Senior Developer Advocate for DevOps at Okta. He is also an international speaker and published author.
Okta Developer Blog Comment Policy
We welcome relevant and respectful comments. Off-topic comments may be removed.