Kubernetes Microservices on Azure with Cosmos DB
In this tutorial, you’ll learn how to deploy a JHipster-based reactive microservice to Azure Kubernetes Service (AKS). You’ll use Azure’s Cosmos DB as a persistent store for one of the services. For security, you’ll use Okta as an OAuth 2.0 and OpenID Connect (OIDC) provider. You’ll also securely encrypt all secrets in the project configuration files using Kubernetes secrets and kubeseal. This tutorial focuses on deploying an already generated project to Azure AKS. It does not go into great detail about generating the project. To see how the project was generated using JHipster, take a look at Reactive Java Microservices with Spring Boot and JHipster.
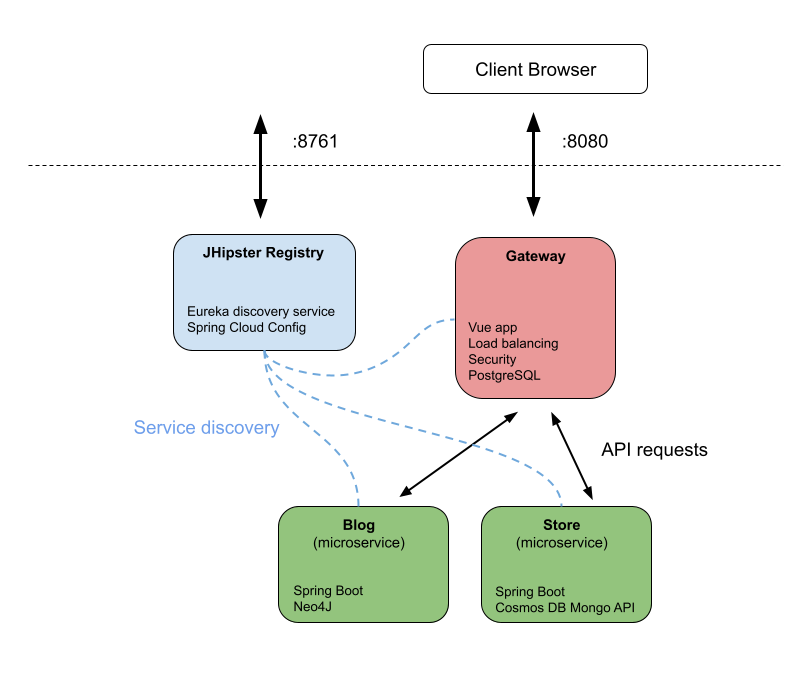
The project has a few different pieces:
- JHipster Registry: a Eureka server for service discovery and a Spring Cloud Config server for centralized configuration management
- Gateway: public Spring Cloud Gateway application using Vue
- Store: Spring Boot microservice using Azure’s Cosmo DB API for MongoDB
- Blog: Spring Boot microservice using a Neo4J database
This tutorial has a lot of different technologies in it. I’ve tried to make it as simple and as explicit as possible, but it’s probably helpful to have some basic knowledge of Docker and Kubernetes before you start.
If you’re already familiar with all the tech in this tutorial, you can skip ahead to the prerequisites section. If not, I’m going to explain them a little before we move on.
Table of Contents
- JHipster microservices architecture overview
- Spring Boot microservices for Azure and Cosmos DB
- Setting the store app’s initial status for Eureka
- Clone the microservices project from GitHub
- Create the Azure Cosmos DB with API for MongoDB
- Configure identity with Okta
- Build the Docker images and run the app with Docker Compose
- Encrypt the client secret
- Create the Azure Kubernetes cluster
- Configure Kubernetes for Okta and Cosmos DB
- Build Docker images and push to Docker Hub
- Deploy your microservices to Azure AKS
- Encrypt the sensitive configuration parameters
- Azure AKS, Kubernetes, and Spring Boot microservices deployed!
Note: In May 2025, the Okta Integrator Free Plan replaced Okta Developer Edition Accounts, and the Okta CLI was deprecated.
We preserved this post for reference, but the instructions no longer work exactly as written. Replace the Okta CLI commands by manually configuring Okta following the instructions in our Developer Documentation.
JHipster microservices architecture overview
JHipster is a development platform that streamlines the generation, development, and deployment of both monolithic and microservice applications. It supports a dizzying array of frontend (Angular, React, and Vue) and backend (Spring Boot, Micronaut, Quarkus, Node.js, and .NET) technologies. It’s designed to be deployed using Docker and Kubernetes, and can easily deploy to all the major cloud platforms, such as AWS, Azure, Heroku, Cloud Foundry, Google Cloud Platform, and OpenShift.

The project in this tutorial uses Spring Boot with Java resource servers and a Vue frontend. It was built with the JHipster generator that quickly scaffolds a new application based on either an interactive shell or a DSL file. You can read more about generating microservices with JHipster in their docs. One of the slick features of the JHipster generator is that you can generate data entities along with applications.

The JHipster Registry that is generated with the microservice includes two important functions: a Eureka server and a Spring Cloud Config server. The Eureka server allows the microservices to dynamically find each other without having to use hard-coded URIs. This means that the microservice can scale and services can be replaced without causing problems. It’s a bit like a phonebook or a DNS service for the microservice. The Spring Cloud Config server allows project configuration to be centralized and distributed to all of the different services. In this tutorial you’ll use this feature to configure all of the services for Okta OAuth in one place.
The JHipster API Gateway is the public face of your microservice. All public traffic comes through this service, which also includes the Vue frontend. The gateway is one of three application types that can be created by the JHipster generator DSL. The other two are monolith and microservice. A monolith is a non-microservice application with a single service.
The store service and blog service are both examples of the microservice application type. This means that each service is a Spring Boot resources server with some type of SQL or NoSQL backend.
![]()
The generator creates four applications. They are designed to be built and run as docker containers, which makes it easy for them to be packaged in Kubernetes pods. Kubernetes is a container orchestrator specifically designed for managing microservice networks. It’s something like Docker Compose but designed for microservices with a lot of great features like service discovery, load balancing, automatic rollouts and restarts, resource management, and storage mounting.
Prerequisites
This tutorial has a lot of pieces. Install the required software below and sign up for an Azure Cloud account. You’ll need a free Okta account, but you can use the Okta CLI to sign up for it later in the tutorial.
- Docker: you’ll need to have both Docker Engine and Docker Compose installed (If you install the Docker desktop, this will automatically install both. On Linux, if you install Docker Engine individually, you will have to also install Docker Compose) separately.
- Docker Hub: you’ll need a Docker Hub to host the docker images so that Azure can pull them.
- Java 11: this tutorial requires Java 11. If you need to manage multiple Java versions, SDKMAN! is a good solution. Check out their docs to install it.
- Okta CLI: you’ll use Okta to add security to the microservice network. You can register for a free account from the CLI.
- Azure Cloud account: they offer a free-tier account with a $200 credit to start.
- Azure CLI: you’ll use the Azure CLI to manage the Kubernetes cluster.
- kubectl: CLI to manage Kubernetes clusters.
If you have never had an Azure account before, you can create a new one that will allow free-tier access and has $200 credit allocated to it. This is more than enough to finish this tutorial. However, the credit does expire after 30 days. If you do not have credit left or your credit has expired, this tutorial should only cost a few dollars if you stop and start the AKS cluster when you are not working on it. You can keep an eye on your costs using the cost explorer in the Azure portal and set alerts if you are concerned about it. Upgrading to pay-as-you-go may also alleviate some resource throttling issues around testing the AKS clusters.
Spring Boot microservices for Azure and Cosmos DB
This project is based on two of Matt Raible’s tutorials: Reactive Java Microservices with Spring Boot and JHipster and Kubernetes to the Cloud with Spring Boot and JHipster. In these tutorials, he builds a reactive Java microservice architecture and shows how to deploy it to Google Cloud (GCP). I have modified the project to work with Azure and Cosmos DB.
You will first run the project using Docker Compose. Once you have this working, you will run the project as a Kubernetes cluster on Azure. My modifications were relatively minor and involved removing the unnecessary MongoDB instances (from both the docker-compose.yml file and from the Kubernetes descriptors) as well as updating environment values to point the store service to the Cosmos DB instance instead of a MongoDB instance.
Listed briefly, the changes I made from Matt Raible’s posts to make this work with Azure and Cosmos DB are as follows. You can skip this list (and the next section) and go right to cloning the Git repository if you want, but since this documents how to update a JHipster-generated project to use Cosmos DB, I thought it was worth including.
In the docker-compose/docker-compose.yml file:
- removed the MongoDB service
- updated the
storeservice propertySPRING_DATA_MONGODB_URIto point to the Cosmos DB instance via a.envfile - removed the Keycloak service and the environment variables that configured auth to use Keycloak from the remaining services (not strictly necessary but cleaned things up)
In the k8s/store-k8s directory:
- removed the
store-mongodb.ymlfile (This creates the MongoDB Kubernetes service that our project does not need.) - in
store-deployment.yml:- removed the
initContainers(The init container waits for the MongoDB instance, which is removed.) - updated
SPRING_DATA_MONGODB_URIenv value of thestore-appcontainer to the Cosmos DB URI (This points the store to the Cosmos DB instance.) - properly secured the Cosmos DB connection string using Kubernetes secrets and
kubeseal
- removed the
Setting the store app’s initial status for Eureka
Creating this tutorial, I ran into a problem with the store app getting stuck as OUT_OF_SERVICE. When I inspected the logs, I found that the service started as UP, quickly went to DOWN, and then OUT_OF_SERVICE. Later, it would go back to UP but the Eureka server never registered this change.
There’s an open issue documenting this problem on Spring Cloud Netflix and Netflix Eureka.
A temporary fix taken from the issue on GitHub is to override the health reporting implementation so that it returns DOWN instead of OUT_OF_SERVICE while the program is still starting. This blocks it from ever reporting OUT_OF_SERVICE. You can see the fix in the EurekaFix.java file in the store app.
Clone the microservices project from GitHub
Clone the modified JHipster reactive microservice project from GitHub and checkout the start tag.
git clone https://github.com/oktadev/okta-azure-kubernetes-cosmosdb-example.git \
  azure-k8s-cosmosdb
cd azure-k8s-cosmosdb
git fetch --all --tags
git checkout tags/start -b working
Create the Azure Cosmos DB with API for MongoDB
You need to create an Azure Cosmos DB instance. You can either use the Azure Portal or the CLI to create a new Cosmos DB instance. Make sure you create a one that is Azure Cosmos DB API for MongoDB (Cosmos DB supports various database types). If you use the portal, it’s pretty self-explanatory but don’t forget to enable the free tier and enable a public network.
Here are the instructions for using the CLI.
Log into the Azure CLI using a Bash shell. This will redirect you to a browser to log into the Azure portal.
az login
This should show you the subscriptions for your account.
[
  {
    "cloudName": "AzureCloud",
    "homeTenantId": "21c44b6d-a007-4d48-80cb-c45966ca1af9",
    "id": "90eb9f51-b4be-4a9f-a69f-11b7668a874d",
    "isDefault": true,
    "managedByTenants": [],
    "name": "Azure subscription 1",
    "state": "Enabled",
    "tenantId": "21c44b6d-a007-4d48-80cb-c45966ca1af9",
    "user": {
      "name": "andrewcarterhughes@outlook.com",
      "type": "user"
    }
  }
]
Set the subscription in the shell. Your subscription is probably Azure subscription 1, as that is the default. Make sure you use the subscription that was created when you registered for a free account (or whatever subscription you want if you already have an account).
az account set --subscription <you-subscription-name>
Open a Bash shell. Create a resource group with the following command.
az group create --name australia-east --location australiaeast
Create the Cosmos DB account in the resource group. Substitute your Azure subscription name in the command below (it’s probably Azure subscription 1, which is what mine defaulted to).
az cosmosdb create --name jhipster-cosmosdb --resource-group australia-east \
  --kind MongoDB --subscription <you-subscription-name> --enable-free-tier true \
  --enable-public-network true
Once that command returns (it may take a few minutes), it should list a lot of JSON showing properties of the created Cosmos DB account.
If you get an error that says:
(BadRequest) DNS record for cosmosdb under zone Document is already taken.
Then you need to change the --name parameter to something else. Since this is used to generate the public URI for the database it needs to be unique across Azure. Try adding your name or a few random numbers.
I’m using the Australia East location because that was the location that had free tier AKS nodes available when I wrote this tutorial. You can use any resource group you want as long as it allows you to create the AKS cluster later in the tutorial. Even if you can’t use the free tier or the free credits, if you stop and start the AKS cluster between working on the tutorial, the cost should be very small (mine was less than a few dollars). The application should still work if the Cosmos DB database is in a different resource group and region since the database URI is configured to be publicly accessible.
List the connection string for the Cosmos DB API for MongoDB endpoint using the following command. If you changed the database name above, you will need to update it in the command below.
az cosmosdb keys list --type connection-strings --name jhipster-cosmosdb \
  --resource-group australia-east
This will list four connection strings. You need to save (copy and paste somewhere) the first, the primary connection string. (Ellipses have been used for brevity below.)
{
  "connectionStrings": [
    {
      "connectionString": "mongodb://jhipster-cosmosdb:XBq5KZ81V8hM63KjCOezi1arq...",
      "description": "Primary MongoDB Connection String"
    },
    ...
  ]
}
Edit the .env file in the docker-compose subdirectory. Add the following variables to it, substituting your connection string for the placeholder. Make sure the connection string is enclosed in quotes. This value is referenced by the docker-compose.yml file and passed to the store service, pointing it to the Cosmos DB MongoDB database.
The ENCRYPT_KEY will be used as the key for encrypting sensitive values stored in the Spring Cloud Config and used by the JHipster registry. You can put whatever value you want in there. A UUID works well, but any string value will work. The longer, the better.
docker-compose/.env
SPRING_DATA_MONGO_URI=<your-connection-string>
ENCRYPT_KEY=<your-encryption-key>
Configure identity with Okta
Before you begin, you’ll need a free Okta developer account. Install the Okta CLI and run okta register to sign up for a new account. If you already have an account, run okta login.
Then, run okta apps create jhipster. Select the default app name, or change it as you see fit.
Accept the default Redirect URI values provided for you.
What does the Okta CLI do?
The Okta CLI streamlines configuring a JHipster app and does several things for you:
- Creates an OIDC app with the correct redirect URIs:
- login:
http://localhost:8080/login/oauth2/code/oidcandhttp://localhost:8761/login/oauth2/code/oidc - logout:
http://localhost:8080andhttp://localhost:8761
- login:
- Creates
ROLE_ADMINandROLE_USERgroups that JHipster expects - Adds your current user to the
ROLE_ADMINandROLE_USERgroups - Creates a
groupsclaim in your default authorization server and adds the user’s groups to it
NOTE: The http://localhost:8761* redirect URIs are for the JHipster Registry, which is often used when creating microservices with JHipster. The Okta CLI adds these by default.
You will see output like the following when it’s finished:
Okta application configuration has been written to: /path/to/app/.okta.env
Run cat .okta.env (or type .okta.env on Windows) to see the issuer and credentials for your app. It will look like this (except the placeholder values will be populated):
export SPRING_SECURITY_OAUTH2_CLIENT_PROVIDER_OIDC_ISSUER_URI="https://{yourOktaDomain}/oauth2/default"
export SPRING_SECURITY_OAUTH2_CLIENT_REGISTRATION_OIDC_CLIENT_ID="{clientId}"
export SPRING_SECURITY_OAUTH2_CLIENT_REGISTRATION_OIDC_CLIENT_SECRET="{clientSecret}"
NOTE: You can also use the Okta Admin Console to create your app. See Create a JHipster App on Okta for more information.
Take note of the name because you will need to find the app in the Okta Admin Console and update the redirect URIs a little later. The okta apps command creates a config file named .okta.env. It will look something like the following. It helpfully lists the values you will need in the next step.
export SPRING_SECURITY_OAUTH2_CLIENT_PROVIDER_OIDC_ISSUER_URI="https://dev-13337.okta.com/oauth2/default"
export SPRING_SECURITY_OAUTH2_CLIENT_REGISTRATION_OIDC_CLIENT_ID="2989u928u383..."
export SPRING_SECURITY_OAUTH2_CLIENT_REGISTRATION_OIDC_CLIENT_SECRET="09328uu098u4..."
Both the Docker Compose project and the Kubernetes project use Spring Cloud Config to centralize configuration. The JHipster registry service makes these config values available to all of the other services in the cluster.
Open docker-compose/central-server-config/application.yml and add the following to the end, filling in the issuer-uri, client-id, and client-secret taken from the .okta.env file. This is the Spring Cloud Config file for the Docker Compose project.
docker-compose/central-server-config/application.yml
spring:
  security:
    oauth2:
      client:
        provider:
          oidc:
            issuer-uri: https://<your-okta-domain>/oauth2/default
        registration:
          oidc:
            client-id: <client-id>
            client-secret: <client-secret>
Build the Docker images and run the app with Docker Compose
You’re all set to run the app locally using Docker and Docker Compose. You need to build the docker image for each of the projects: gateway, store, and blog (you don’t have to build the registry because it uses an image).
In the three different app directories, run the following Gradle command.
./gradlew -Pprod bootJar jibDockerBuild
The default Docker resource settings may not be enough to run this project. You may need to bump them. These settings worked for me.
- CPUs: 8
- Memory: 25 GB
- Swap: 2 GB
- Disk image size: 120 GB
Navigate to the docker-compose directory and run the app. You can use the -d param to run it as a daemon but for the moment I like seeing the logs. You’re just running this in Docker Compose as a warm-up for the Azure deployment anyway.
docker-compose up
Give that a minute or two to finish running all the services.
Open the gateway service at http://localhost:8080.
Go to Account and Sign in. You should be directed to the Okta sign-in form.
You should be able to authenticate with your Okta credentials.
Make sure all parts of the application are working. First, test the store (which is using the Cosmos DB Mongo database) by going to Entities and Product. Make sure you can add a new product and see it in the list of products. Next, create a blog (Entities and Blog).
If that works, you can take a look at the Administration menu. There’s a lot of helpful info there.
You can also check the JHipster Registry at http://localhost:8761.
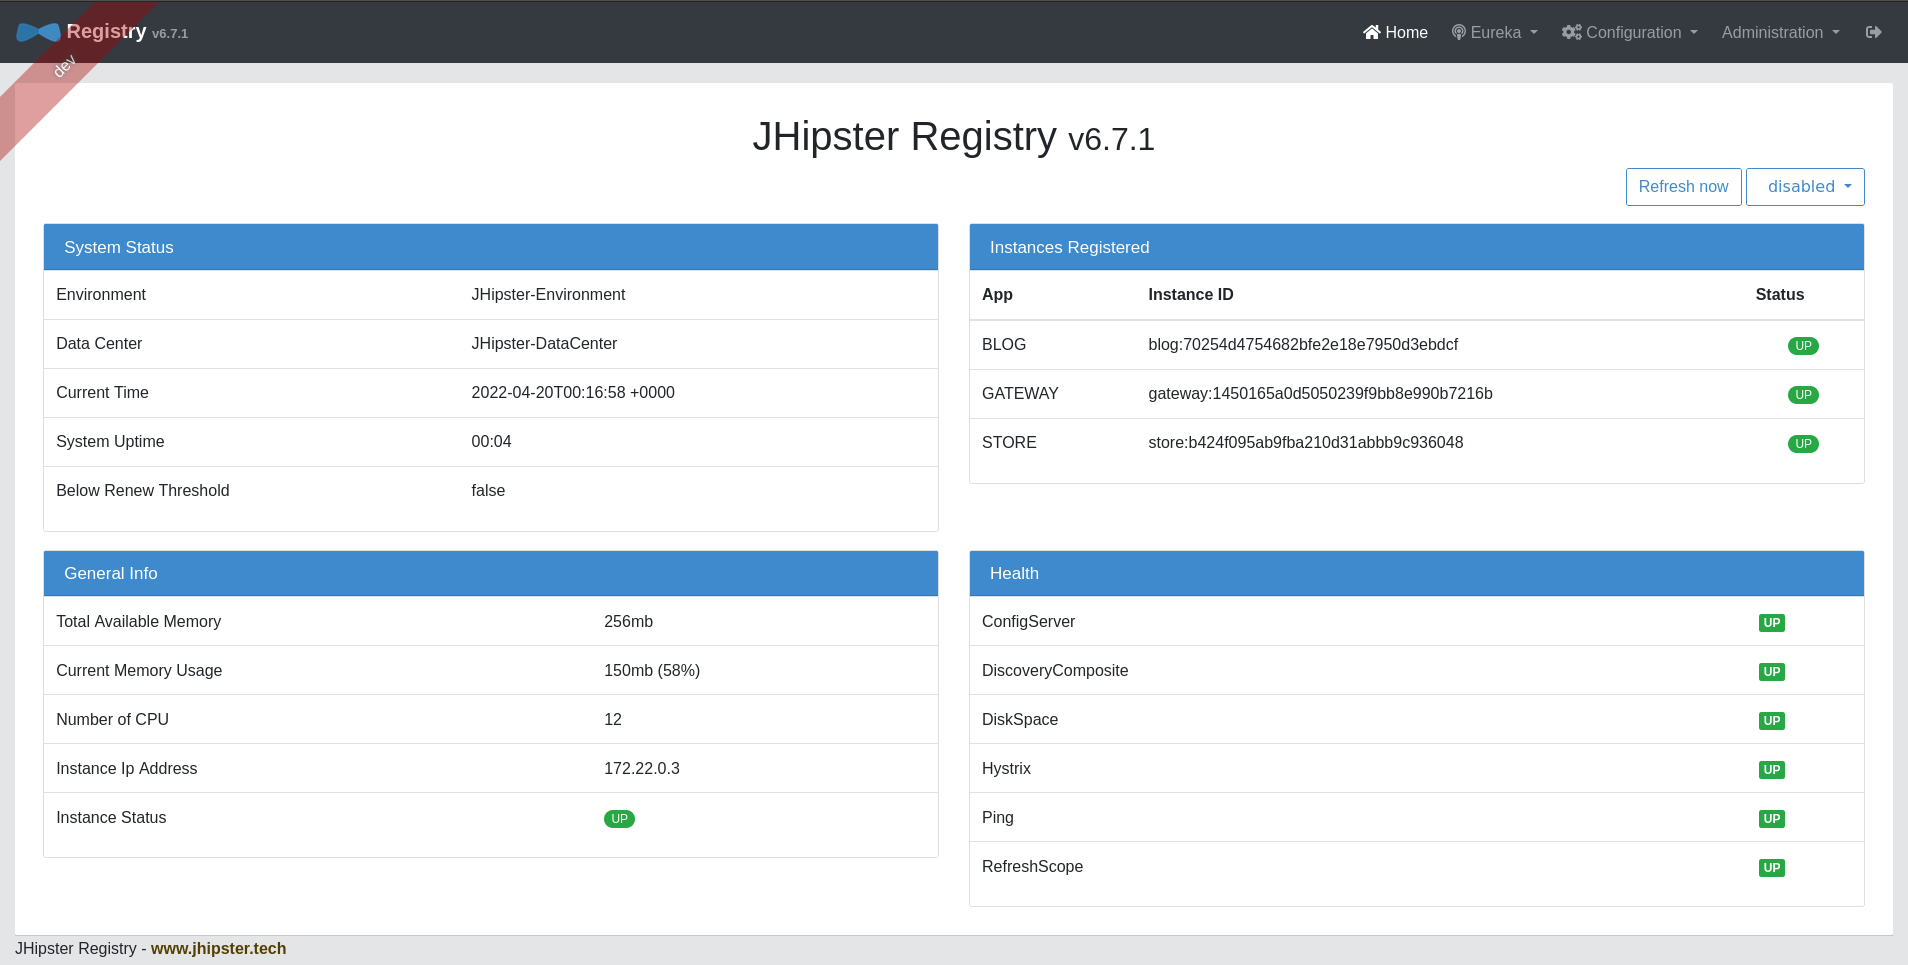
Encrypt the client secret
Leaving secrets in plain text in repositories is a security risk. There are two values in this app that are sensitive: the Cosmos DB connection string that includes the username and password and the Okta OIDC app client secret. You were able to avoid exposing the database credentials by using a .env file. However, the Okta client secret is exposed as plain text in the Spring Cloud Config file (docker-compose/central-server-config/application.yml). This can be encrypted using the JHipster registry.
Open the registry (http://localhost:8761) and click on Configuration and Encryption.
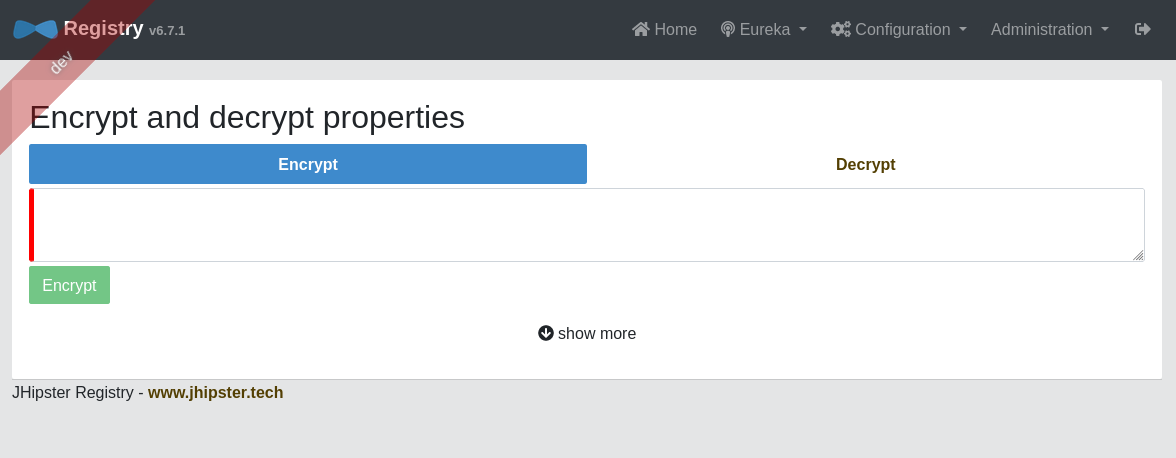
Paste your client secret in the text box. Click Encrypt.
This, incidentally, is why you needed the ENCRYPT_KEY property in the .env file. That’s the key that JHipster registry uses to encrypt these values (so keep it secret!).
You can now copy the encrypted value and paste it back into the application.yml file. Make sure you include the {cipher} part. It should look similar to below. Don’t forget the quotes!
docker-compose/central-server-config/application.yml
...
spring:
  security:
    oauth2:
      client:
        provider:
          oidc:
            issuer-uri: https://dev-123456.okta.com/oauth2/default
        registration:
          oidc:
            client-id: 0oa6ycm987987uy98
            client-secret: "{cipher}88acb434dd088acb434dd088acb434dd0..."
Stop the app if you have not already using control-c. Restart it.
docker-compose up
Make sure you can still sign into the gateway at http://localhost:8080.
You may be wondering (like I did initially), why can’t I just put the client secret in the .env file? This doesn’t work because the .env file is processed by Spring Cloud Config and JHipster registry after the container is composed, not by Docker Compose during the container creation, which is when the .env file is processed.
You’re done with the Docker Compose implementation. To clean up, you can run the following command. This will stop and remove the containers, networks, volumes, and images created by docker-compose up.
docker-compose down --remove-orphans
Create the Azure Kubernetes cluster
The app works locally. Now it’s time to deploy it to an Azure Kubernetes Cluster (AKS). The first step is to create an AKS cluster.
It’s super easy to use the CLI to create a cluster. I’ll show you the command below. However, there’s a wrinkle. The free tier cannot create a cluster in many of the regions because of resource quotas. At least, this was the case when I was working on this tutorial. Nor is there an easy way to quickly see what regions will allow you to create a free-tier cluster. This is why I used Australia East as the region–it allowed me to create a free cluster.
If the command below does not work, I suggest going to the Azure portal and creating a Kubernetes cluster there. Select Create a service and Kubernetes Service. You’ll have to select different regions and see what sizes are available (under Node size and Change size) until you find a region that will allow you to create something in the free tier. But hopefully the command will work and you won’t have to worry about it.
The size I’m using for this tutorial is Standard B4ms with two nodes. I found that I needed two nodes for the cluster to start properly.
Run the following command to create the AKS cluster.
az aks create --resource-group australia-east --name jhipster-demo \
  --node-count 2 --enable-addons monitoring --generate-ssh-keys --node-vm-size standard_b4ms
This will probably take a few minutes.
As a side note, you can stop the cluster at any point. This will pause billing on the cluster.
az aks stop --resource-group australia-east --name jhipster-demo
And you can start it again.
az aks start --resource-group australia-east --name jhipster-demo
You can stop and start the cluster from the Azure portal as well.
The next step is to get the credentials for the cluster and merge them into .kube/config so that kubectl can use them. Use the following command.
az aks get-credentials --resource-group australia-east --name jhipster-demo
You should see output that ends like the following.
Merged "jhipster-demo" as current context in /home/andrewcarterhughes/.kube/config
You should be able to use kubectl to get the node on Azure.
kubectl get nodes
NAME                                STATUS   ROLES   AGE    VERSION
aks-nodepool1-21657131-vmss000000   Ready    agent   105s   v1.22.6
aks-nodepool1-21657131-vmss000001   Ready    agent   108s   v1.22.6
You can also list a lot of information about the cluster in JSON format using:
az aks list --resource-group australia-east
Configure Kubernetes for Okta and Cosmos DB
The Kubernetes files in the k8s directory were created with the JHipster Kubernetes sub-generator (see the docs for info). To see how the original project was generated, take a look at Matt Raible’s JHipster and Kubernetes tutorial. As outlined above, these files were modified to work with Azure Cosmos DB instead of MongoDB in a Kubernetes pod (which is what the sub-generator assumes).
Configure Spring OAuth in the Kubernetes pod by updating k8s/registry-k8s/application-configmap.yml. You can use the same values you used above in the Docker Compose section, in docker-compose/central-server-config/application.yml.
Make sure you use the encrypted client secret enclosed in quotes with the {cipher} prefix. You’re going to copy both the encryption key and the encrypted client secret from the Docker Compose configuration to avoid having to re-encrypt the client secret with a new key.
data:
  application.yml: |-
    ...
    spring:
      security:
        oauth2:
          client:
            provider:
              oidc:
                issuer-uri: https://<your-okta-domain>/oauth2/default
            registration:
              oidc:
                client-id: <client-id>
                client-secret: "{cipher}<encrypted-client-secret>"
To configure the JHipster Registry to use OIDC for authentication, you have to modify k8s/registry-k8s/jhipster-registry.yml to enable the oauth2 profile. This has already been done for you in the example app in the project Git repository.
- name: SPRING_PROFILES_ACTIVE
  value: prod,k8s,oauth2
Also in k8s/registry-k8s/jhipster-registry.yml, update the ENCRYPT_KEY value to use the same encryption key you used above in the Docker Compose section in the .env file.
- name: ENCRYPT_KEY
  value: <your-encryption-key>
To configure the store service to use the Cosmo database, you need to put your connection string in k8s/store-k8s/store-deployment.yml.
- name: SPRING_DATA_MONGODB_URI
  value: "<your-connection-string>"
Both the encryption key and the database connection string are sensitive values that need to be encrypted. You’ll see how to do that just a little later in this tutorial.
Build Docker images and push to Docker Hub
Previously you built the docker images, but you left them in the local repository. Now you need to upload them to Docker Hub so that Azure AKS can find them. If you haven’t already signed up for a Docker Hub account, please do so now.
In each of the three directories (blog, store, and gateway), run the following command. Save your Docker Hub username in a Bash variable as shown below and you can copy and paste the commands and run them in each service directory.
DOCKER_HUB_USERNAME=<docker-hub-username>
# in blog
./gradlew bootJar -Pprod jib -Djib.to.image=$DOCKER_HUB_USERNAME/blog
# in store
./gradlew bootJar -Pprod jib -Djib.to.image=$DOCKER_HUB_USERNAME/store
# in gateway
./gradlew bootJar -Pprod jib -Djib.to.image=$DOCKER_HUB_USERNAME/gateway
To briefly explain what’s happening here, take a look at the blog service’s Kubernetes descriptor file. It defines a container named blog-app that uses the docker image andrewcarterhughes/blog, which is my Docker Hub username and the blog image.
k8s/blog-k8s/blog-deployment.yml
containers:
  - name: blog-app
    image: andrewcarterhughes/blog
Thus in the k8s directory, each service (store, blog, gateway, and registry) defines a container and a docker image to be run in that container, along with a whole lot of configuration (which is really a lot of what JHipster is bootstrapping for you). The registry does not have a project folder because it uses a stock image that can be pulled directly from the JHipster Docker repository.
To use the images you just created with Kubernetes, do a find and replace in the k8s directory. Replace all instances of andrewcarterhughes with your Docker Hub username (<docker-hub-username>).
One nice feature of Kubernetes is the ability to define init containers. These are containers that run before the main container and can be used to create or wait for necessary resources like databases. I noticed while I was debugging things in this app that a lot of the errors happened in the init containers. It’s helpful to know this because if you try and inspect the main container log nothing will be there because the container hasn’t even started yet. You have to check the log for the init container that failed. The Kubernetes management tools that I mention below really come in handy for this.
Deploy your microservices to Azure AKS
You can manage a Kubernetes service purely with kubectl. However, there are some pretty helpful tools for monitoring and logging. Both k9s and Kubernetes Lens are great. I recommend installing one or both of these and using them to inspect and monitor your Kubernetes services. They are especially helpful when things go wrong (not that things ever go wrong, I wouldn’t know anything about that, I just heard about it from friends, I swear). Kubernetes Lens is a full-on desktop app that describes itself as a Kubernetes IDE. In comparison, k9s is a lighter-weight, text-based tool.
Open a Bash shell and navigate to the k8s subdirectory of the project.
Deploy your microservice architecture to Azure with:
./kubectl-apply.sh -f
If you open this file, you’ll see that it creates the namespace and applies the project files. If you do this manually, it’s important that the namespace is created first and that the registry is run before the other services.
...
suffix=k8s
kubectl apply -f namespace.yml
kubectl apply -f registry-${suffix}/
kubectl apply -f blog-${suffix}/
kubectl apply -f gateway-${suffix}/
kubectl apply -f store-${suffix}/
...
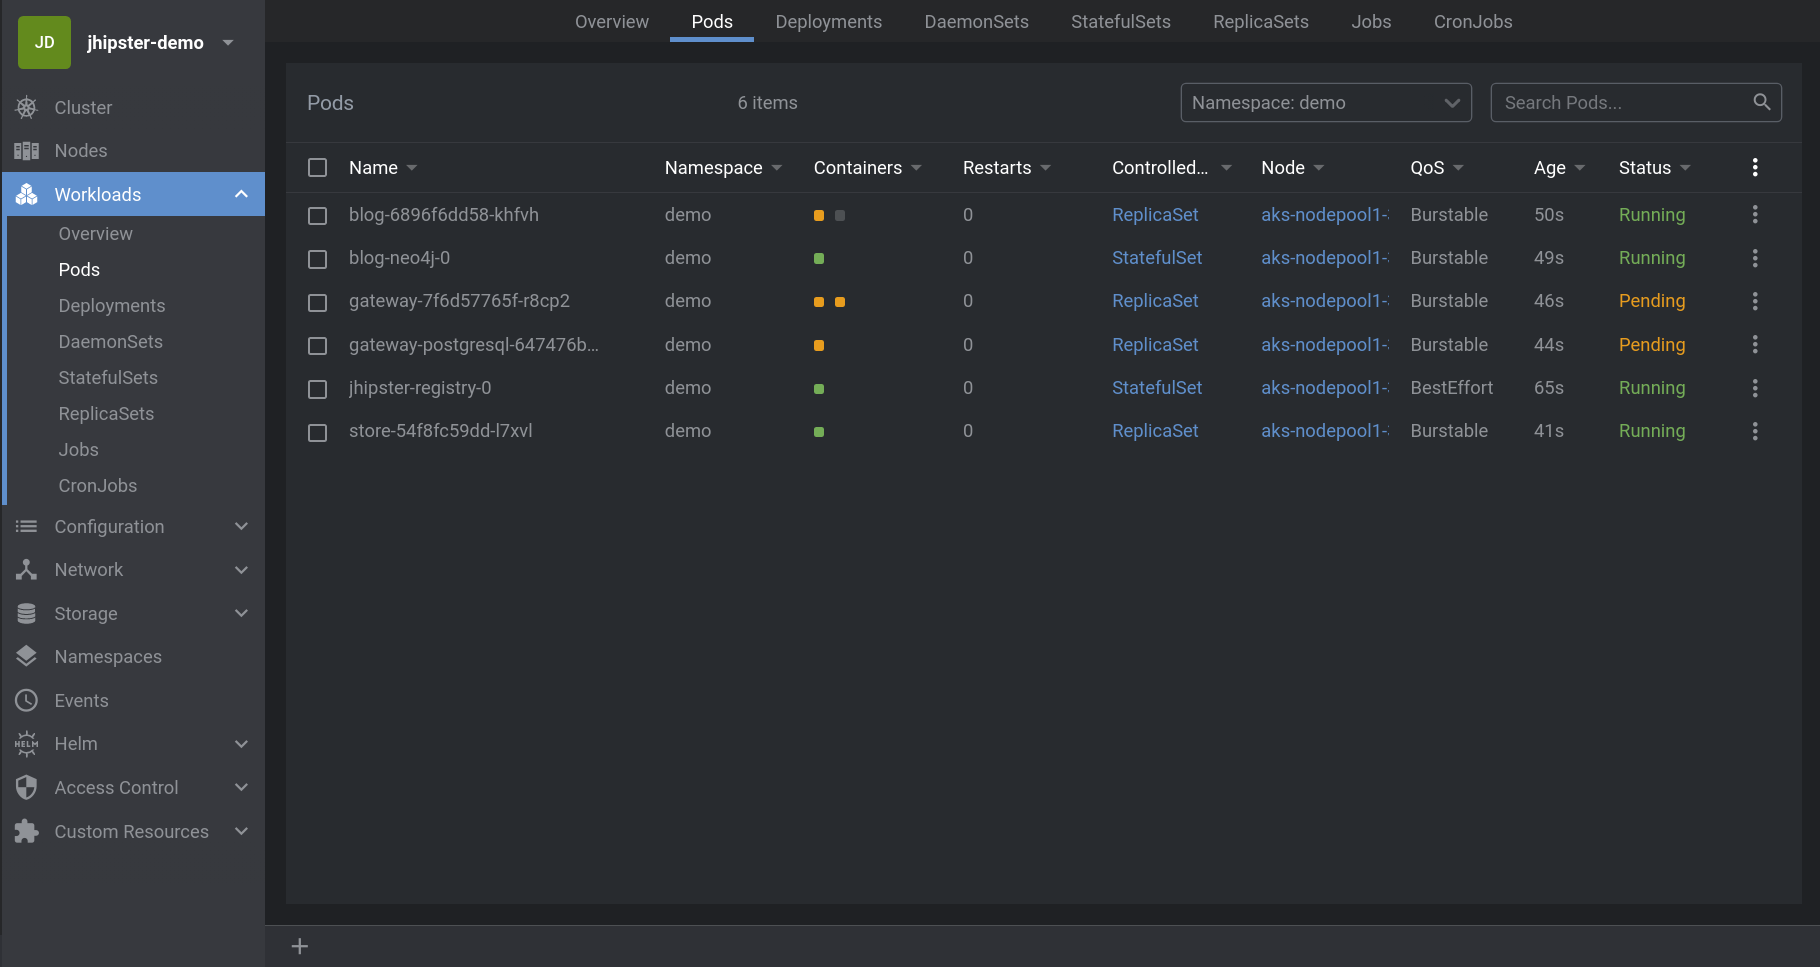
You can check on your pods with the following command. If you’re on the free tier, this may take a few minutes. Using the pay-as-you-go plan, everything was up and running almost immediately for me.
kubectl get pods -n demo
NAME                                  READY   STATUS    RESTARTS   AGE
blog-6896f6dd58-mbjkn                 1/1     Running   0          3m51s
blog-neo4j-0                          1/1     Running   0          3m48s
gateway-7f6d57765f-2fhfb              1/1     Running   0          3m46s
gateway-postgresql-647476b4d5-jdp5c   1/1     Running   0          3m44s
jhipster-registry-0                   1/1     Running   0          3m52s
store-7889695569-k4wkv                1/1     Running   0          3m41s
Here’s an example of what this looks like with Kubernetes Lens (the containers were still booting).
Another useful command is describe. I won’t replicate the output here, but if you want more detailed information for debugging, you can also run the following.
kubectl describe pods -n demo
To tail logs, you can use the name of the pod.
kubectl logs <pod-name> --tail=-1 -n demo
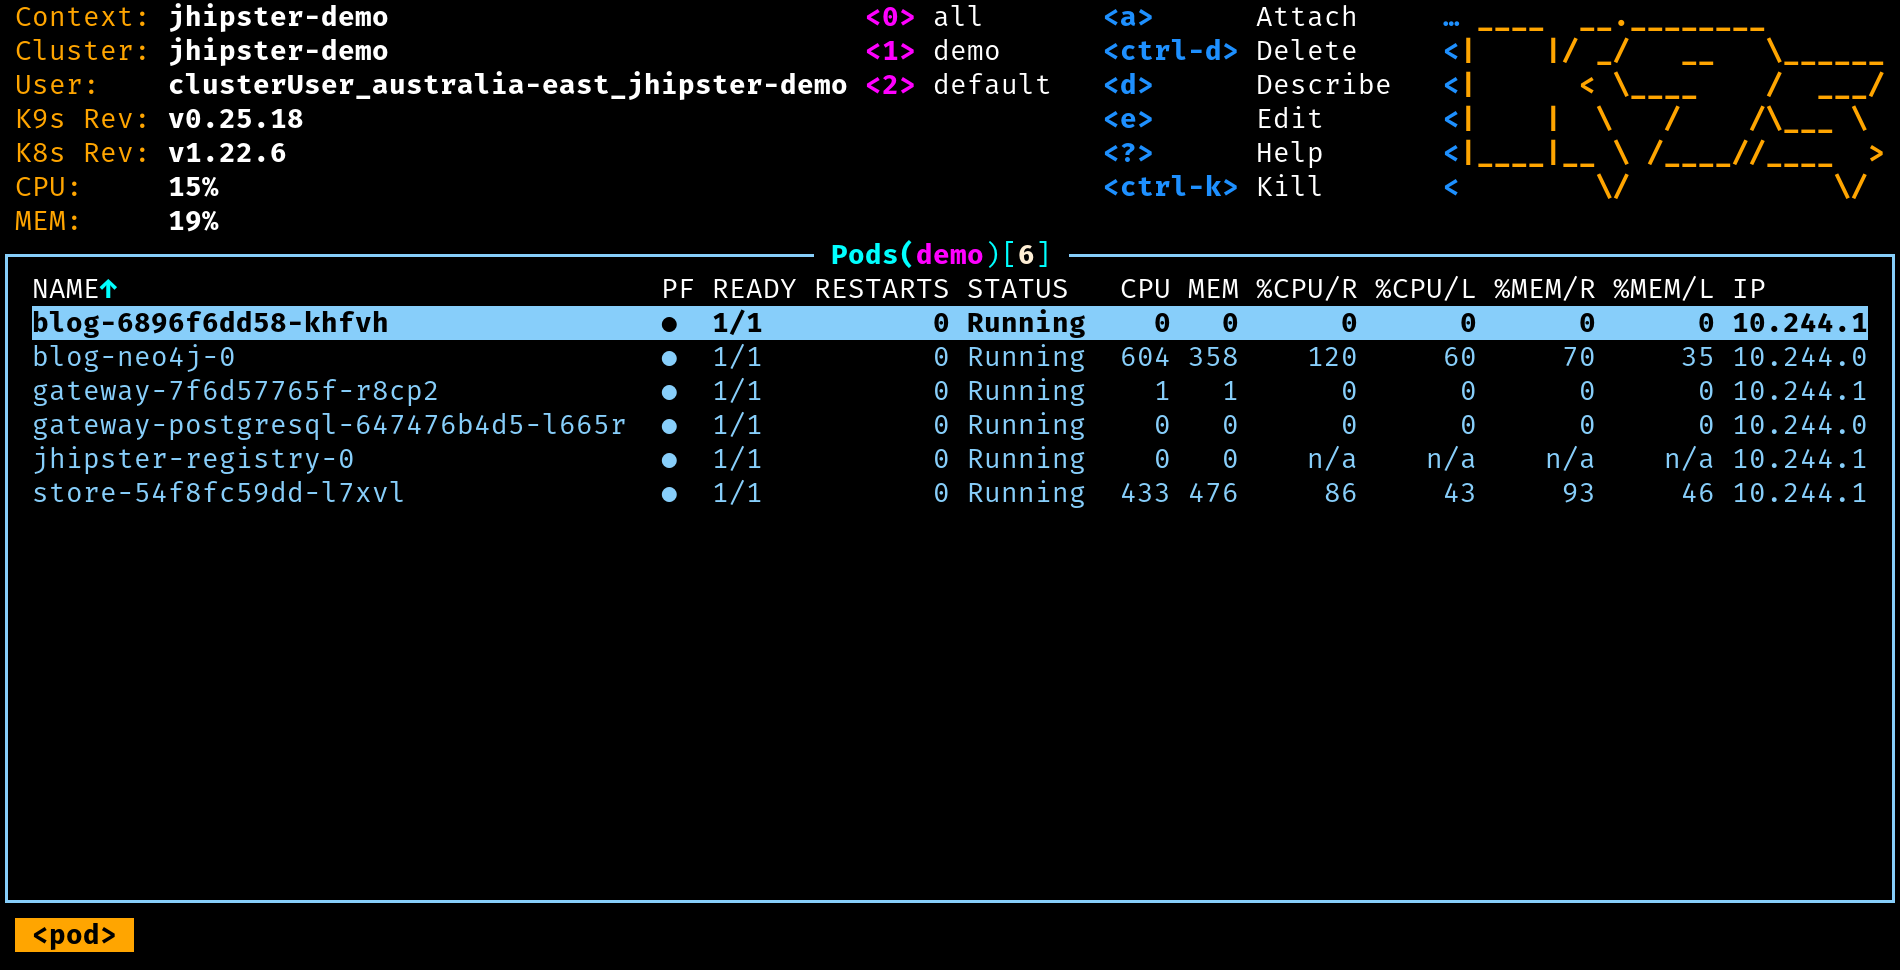
Although, like I said, k9s and Lens are really the way to go for more detailed inspection.
Here’s a screenshot from k9s. You can dig down into the different pods to get more detailed information and inspect logs.
You can use port-forwarding to see the JHipster Registry.
kubectl port-forward svc/jhipster-registry -n demo 8761
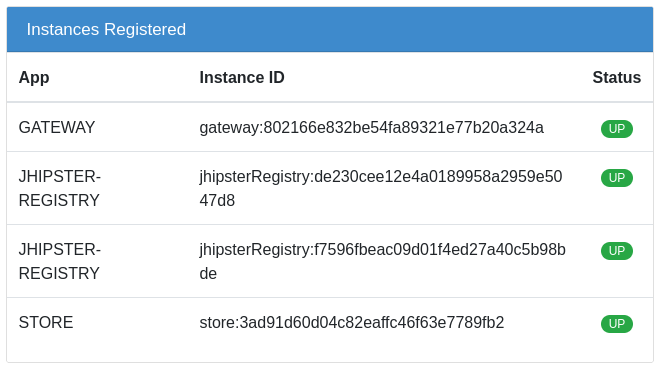
Open a browser and navigate to http://localhost:8761. You will be redirected to the Okta login screen, after which you will be taken to the registry.
Make sure everything is green. If you have an error, check the logs for the pod that caused the error. You can restart a specific deployment by deleting it and re-applying it. For example, to restart the store, you can use the commands below from the k8s directory.
kubectl delete -f store-k8s/
kubectl apply -f store-k8s/
Once all is good, control-c to stop forwarding the registry. Expose the gateway and open it.
kubectl port-forward svc/gateway -n demo 8080
Go to http://localhost:8080.
Authenticate with Okta. Make sure you can add blogs, posts, tags, and products. Because the store service uses the same Cosmos DB instance that you were using with Docker Compose locally, any test products you created earlier will still be there.
In preparation for the next step, delete everything you just deployed to AKS in the demo namespace.
kubectl delete all --all -n demo
The first all refers to all resource types. The second --all refers to every object in the resource types (as opposed to specifying an object name or ID). Thus by specifying the namespace you are deleting every object of every resource type in that namespace.
This is one of the benefits of using a namespace. You can do a delete like this. If you do this from the default namespace, you’ll risk deleting things you didn’t mean to delete or pods added by Kubernetes and Azure for infrastructure administration.
You can also just delete the entire namespace. It will be recreated if you use the Bash script to apply the deployments. This deletes absolutely everything from the namespace but is a little slower. If you do this, you need to make sure that you recreate the namespace later (I’ll remind you).
kubectl delete namespace demo
Encrypt the sensitive configuration parameters
There are two really important config values that need to be encrypted: (1) the Cosmos DB connection string (which contains the database credentials) and (2) the OIDC client secret. Because these two values are processed differently, you’re going to use two slightly different methods for encrypting them.
There are three different layers of encryption happening here. I found this a little confusing so I’m going to explain it briefy.
- JHipster registry encryption for Spring Cloud Config values (values in
k8s/registry-k8s/application-configmap.yml) - Kubernetes “encryption” (obfuscation, really) that moves secrets found in Kubernetes deployment files to base64-encoded secrets files
kubesealwhich hardens Kubernetes secrets to properly encrypted values
The first above is only for Spring Cloud Config values. The latter two are used to encrypt values in the Kubernetes descriptor files (the other yml files in the k8s directory).
When you use JHipster registry encryption, you have to define an ENCRYPT_KEY value that is used by JHipster to encrypt the secrets. However, because this value is stored in yml files that are going to be committed to a repository, this value must be properly encrypted to ensure the security of the Spring Cloud Config values.
The Cosmos DB connection string (the SPRING_DATA_MONGODB_URI env var) is a Kubernetes deployment value, same as the ENCRYPT_KEY, not a Spring Cloud Config value.
Thus, to harden the OIDC client secret, you must (1) define an ENCRYPT_KEY to enable JHipster registry encryption, (2) use JHipster registry to encrypt the client ID and place the encrypted value in the application-configmap.yml, and (3) use Kubernetes secrets and kubeseal to properly encrypt the ENCRYPT_KEY.
Securing the Cosmos DB connection string is the same as the ENCRYPT_KEY: use Kubernetes secrets and kubeseal to properly encrypt it.
Matt Raible did a great job of explaining secrets management in Kubernetes in his post, Kubernetes to the Cloud with Spring Boot and JHipster. He also linked to a lot of great resources. I’m not going to go into much more detail explaining it here. Check his post out for more info.
The first thing you need to do is install kubeseal into the AKS cluster. You can take a look at the kubeseal GitHub page for more info.
kubectl apply -f https://github.com/bitnami-labs/sealed-secrets/releases/download/v0.17.5/controller.yaml
Retrieve the certificate keypair that this controller generates.
kubectl get secret -n kube-system -l sealedsecrets.bitnami.com/sealed-secrets-key -o yaml
Copy the raw value of tls.crt and decode it. You can use the command line, or learn more about base64 encoding/decoding in our documentation.
echo -n <paste-value-here> | base64 --decode
Put the raw value in a tls.crt file.
Next, install Kubeseal. On macOS, you can use Homebrew. For other platforms, see the release notes.
brew install kubeseal
Encrypt ENCRYPT_KEY and SPRING_DATA_MONGODB_URI (the Cosmos DB connect string). Run the following command to do this, replacing the two values with your encryption key and your connection string.
kubectl create secret generic project-secrets \
  --from-literal=ENCRYPT_KEY='<your-encryption-key>' \
  --from-literal=SPRING_DATA_MONGODB_URI='<your-connection-string>' \
  --dry-run=client -o yaml > secrets.yml
If you deleted the namespace earlier, you need to create it again (it won’t hurt to run this if you didn’t delete the namespace).
kubectl apply -f namespace.yml
Now, use kubeseal to convert the secrets to encrypted secrets.
kubeseal --cert tls.crt --format=yaml -n demo < secrets.yml > sealed-secrets.yml
Remove the original secrets file and deploy your sealed secrets.
rm secrets.yml
kubectl apply -n demo -f sealed-secrets.yml && kubectl get -n demo sealedsecret project-secrets
You need to update the yml files to refer to the encrypted values. Add the following env variable to the jhister-registry container in k8s/registry-k8s/jhipster-registry.yml (if an ENCRYPT_KEY already exists, replace it).
env:
  ...
  - name: ENCRYPT_KEY
    valueFrom:
      secretKeyRef:
        name: project-secrets
        key: ENCRYPT_KEY
In k8s/store-k8s/store-deployment.yml, change the SPRING_DATA_MONGODB_URI env variable to use the sealed secret.
env:
  ...
  - name: SPRING_DATA_MONGODB_URI
    valueFrom:
      secretKeyRef:
        name: project-secrets
        key: SPRING_DATA_MONGODB_URI
Deploy the cluster.
./kubectl-apply.sh -f
Give the cluster a bit to start. Check it with one of the tools I mentioned or the following:
kubectl get pods -n demo
Once everything is ready, port forward the registry to check the services.
kubectl port-forward svc/jhipster-registry -n demo 8761
Make sure you can log in and that all the services are green. You should either be automatically logged in and redirected back to the home page or directed to log in with the Okta login screen.
This is the happy dance.
Forward the gateway and test the app.
kubectl port-forward svc/gateway -n demo 8080
Log in. Make sure everything works. Kick the tires. Start a blog. Create some products. Influence some people. Restore democracy. Take over the world. Whatever you want.
Once you’re done with everything, you can delete the resource group. This will also delete all the resources in the resource group, including the Cosmos database and the AKS cluster. If you have multiple subscriptions, you may need to add a --subscription param.
az group delete --name australia-east
Wait for this to finish. Once it is done, it’s probably a good idea to log into the Azure Portal and make sure that the AKS cluster, the Cosmos DB instance, and the resource group have been deleted.
Azure AKS, Kubernetes, and Spring Boot microservices deployed!
Thanks to Julien Dubois for help getting this tutorial finished!
In this project you saw how to deploy a JHipster microservice to Azure AKS. You saw how you can use a managed Cosmos DB instance in place of a MongoDB pod in Kubernetes. You saw how to deploy the app first with Docker Compose and then later with kubectl and the Azure CLI. Finally, you properly encrypted all of the sensitive configuration values using a combination of JHipster registry encryption, Kubernetes secrets, and kubeseal.
As I mentioned at the top, this project is based on two of Matt Raible’s tutorials:
- Reactive Java Microservices with Spring Boot and JHipster
- Kubernetes to the Cloud with Spring Boot and JHipster
Deepu Sasidharan wrote a tutorial, Deploying JHipster Microservices on Azure Kubernetes Service (AKS), that was also a big help.
If you liked this post, there’s a good chance you’ll like similar ones:
- Introducing Spring Native for JHipster: Serverless Full-Stack Made Easy
- How to Secure Your Kubernetes Clusters With Best Practices
- Mobile Development with Ionic, React Native, and JHipster
- Fast Java Made Easy with Quarkus and JHipster
- Spring Cloud Config for Shared Microservice Configuration
- Kubernetes To The Cloud With AWS: Deploying a Node.js App to EKS
If you have questions, please ask them in the comments below! If you’re into social media, follow us: @oktadev on Twitter, Okta for Developers on LinkedIn, and OktaDev on Facebook. If you like learning via video, subscribe to our YouTube channel.
Okta Developer Blog Comment Policy
We welcome relevant and respectful comments. Off-topic comments may be removed.