Introducing Spring Native for JHipster: Serverless Full-Stack Made Easy

Over the years, I’ve developed a lot of Java applications. I started writing Java code in the late 90s and spent several years doing Java before I tried another server-side language. I was impressed when I first tried building apps in Ruby on Rails, Python, and Node.js - they all started super-fast!
Starting fast is cool, but we in the Java community have often asked, does it perform over time? The Java Virtual Machine is famous for performance and optimization over time.
I scoffed at serverless when it first came out. Mostly because I was a Java developer and my apps didn’t start in milliseconds. They also used a whole lotta memory and there was no hope in sight.
Then, along came GraalVM. It’s gained support from many Java frameworks in the last few years and has made their apps start in milliseconds!
Today, I’m proud to announce that this same capability is now available for your JHipster 7+ apps!
Note: In May 2025, the Okta Integrator Free Plan replaced Okta Developer Edition Accounts, and the Okta CLI was deprecated.
We preserved this post for reference, but the instructions no longer work exactly as written. Replace the Okta CLI commands by manually configuring Okta following the instructions in our Developer Documentation.
Prerequisites:
- Why should you care about serverless?
- GraalVM allows serverless Java for everyone!
- What is Spring Native?
- 🔥 Announcing the JHipster Native blueprint!
- Go native with Spring Native and GraalVM
- What does the JHipster Native blueprint do?
- What’s the performance like?
- Learn more about GraalVM and Spring Native
If you’d rather learn visually, you can watch a video of this tutorial.
Why should you care about serverless?
Serverless is a cloud execution model that enables a simpler, more cost-effective way to build and operate cloud-native applications.
That’s it!
For companies with high traffic and large cloud bills, serverless makes sense. They can save millions of dollars a month.
GraalVM allows serverless Java for everyone!
I’ve been playing with GraalVM and the Java frameworks that support it for around 18 months. After doing a lot of research, I blogged about building native Java apps with Micronaut, Quarkus, and Spring Boot.
In September 2021, I did a talk with Josh Long about Spring Native with JHipster at the San Francisco JUG.
There was a 'Moved Permanently' error fetching URL: 'https://twitter.com/dummyuser/status/1442698739563446276'
I flew out on a Monday, we got everything working by Wednesday afternoon, and then spoke about our experience on Wednesday night. I wrote about it in JHipster Works with Spring Native! on LinkedIn and created a JHipster issue to automate our learnings.
What is Spring Native?
Spring Native provides an API to configure Spring Boot and GraalVM so classes that are not easily discoverable become recognizable. For example, those that are instantiated using reflection. It’s a really slick extension to Spring Boot and will likely disappear with Spring Boot 3 because it’ll be native by default.
As a result of our successful presentation at the SF JUG, Josh and I were invited to speak at the Garden State JUG in December. We laid low for a few months and rekindled our research in December. I wrote about it in JHipster works with Spring Native, Part 2!
🔥 Announcing the JHipster Native blueprint!
In late January 2022, we (the JHipster team) upgraded JHipster to use Spring Boot 2.6 and released version 7.6.0.
In early February, I updated the Spring Native with JHipster examples that Josh and I’d been using for research. I was ready to start automating the Spring Native integration using a JHipster module. When I asked the JHipster team about the best way to implement it, Marcelo Shima volunteered to create the initial blueprint.
This was on a Friday afternoon (Mountain Time or MT). By the next morning, Marcelo had the MVP finished and provided steps to reproduce our examples. 😳
I was amazed! I remember telling (my partner) Trish that he’d done a week’s worth of (my estimated) work in a matter of hours.
Today, I’m proud to announce the JHipster Native blueprint is available! Here’s how to use it:
npm install -g generator-jhipster-native
jhipster-native
This will generate a JHipster app and integrate GraalVM automatically. You can build and run a native image with the following commands:
./mvnw package -Pnative,prod -DskipTests
npm run ci:e2e:prepare # start docker dependencies
./target/native-executable| Gradle is not currently an option. Follow generator-jhipster-native#24 to see when it’s supported. |
Go native with Spring Native and GraalVM
To see Spring Native + JHipster in action, let’s look at a previous JHipster app I created for the Auth0 blog. First, clone the example:
git clone https://github.com/oktadev/auth0-full-stack-java-example.git jhipster-native
cd jhipster-native|
Want results right away? Clone the git clone -b spring-native https://github.com/oktadev/auth0-full-stack-java-example.git jhipster-native Then, skip to the Configure your OpenID Connect identity provider section to continue. |
Install JHipster 7.8.1 and the JHipster Native blueprint:
npm i -g generator-jhipster@7.8.1
npm i -g generator-jhipster-native@1.1.2
Then, remove all the existing project files and regenerate them. The jhipster-native command includes parameters to disable caching because it’s not supported by Spring Native, yet.
rm -rf *
jhipster-native --with-entities --cache-provider no --no-enable-hibernate-cache
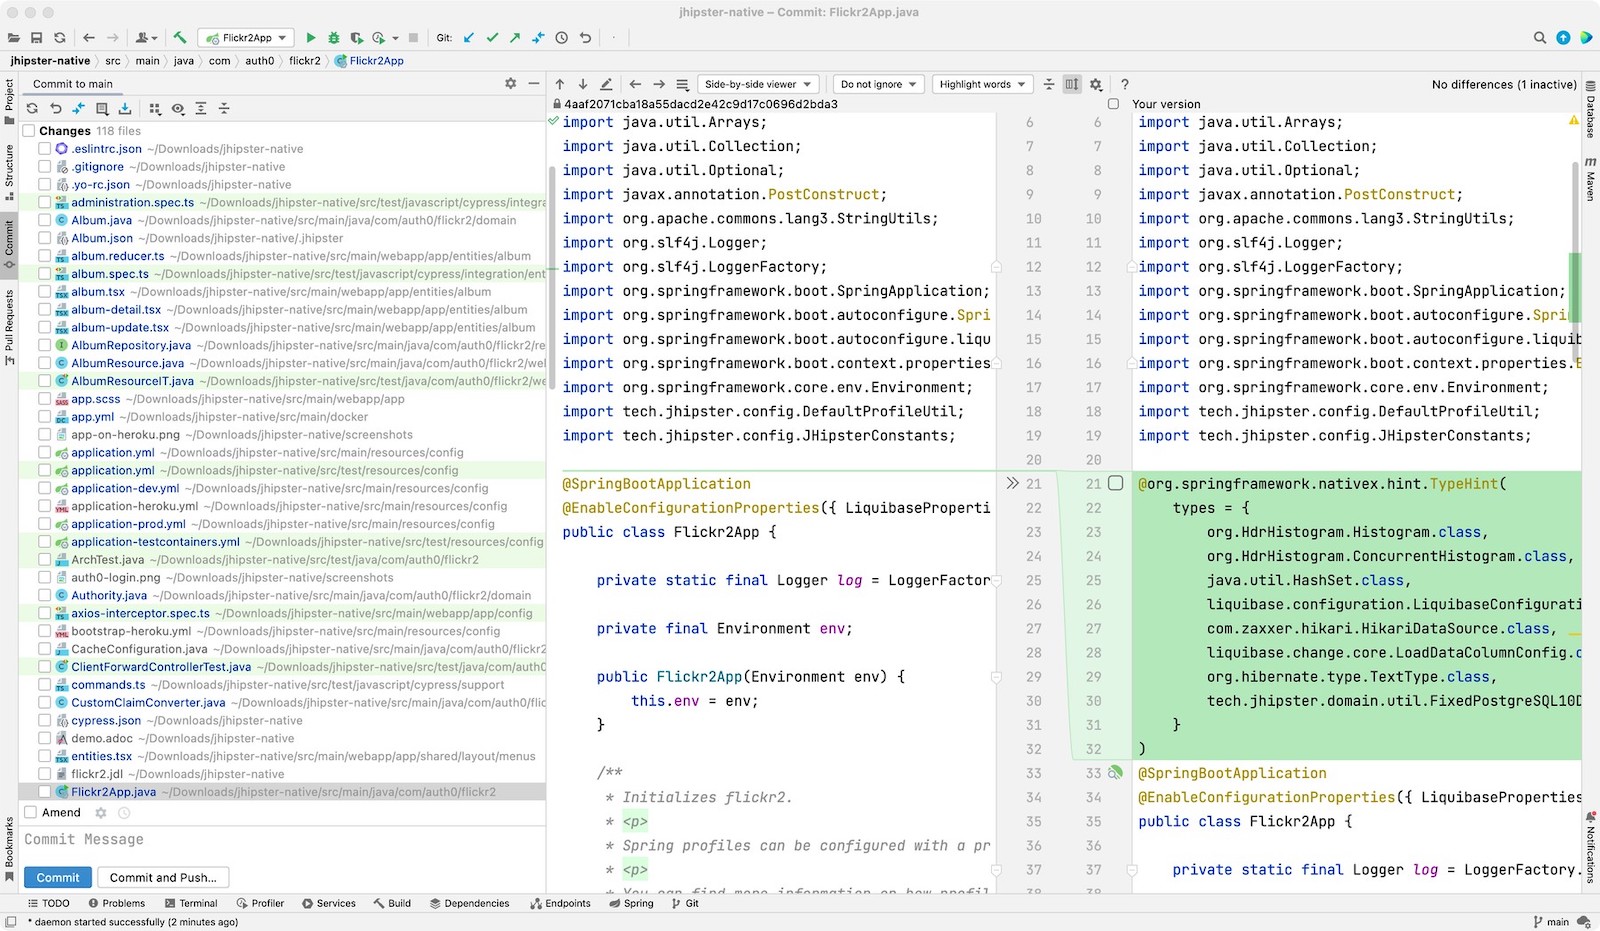
# When prompted to overwrite .gitignore, type "a" to overwrite all filesIf you open the project in IntelliJ IDEA, you can use the Commit Tools Window (⌘+0 on macOS or Ctrl+0 on Linux/Windows) to view files that changed.
Next, run the following git checkout commands to restore the files that were modified in the original example.
git checkout .gitignore
git checkout README.md
git checkout demo.adoc
git checkout flickr2.jdl
git checkout screenshots
git checkout src/main/webapp/app/entities/photo/photo.tsx
git checkout src/main/webapp/app/entities/photo/photo-update.tsx
git checkout src/main/java/com/auth0/flickr2/config/SecurityConfiguration.java
git checkout src/main/resources/config/application-heroku.yml
git checkout src/main/resources/config/bootstrap-heroku.yml
git checkout Procfile
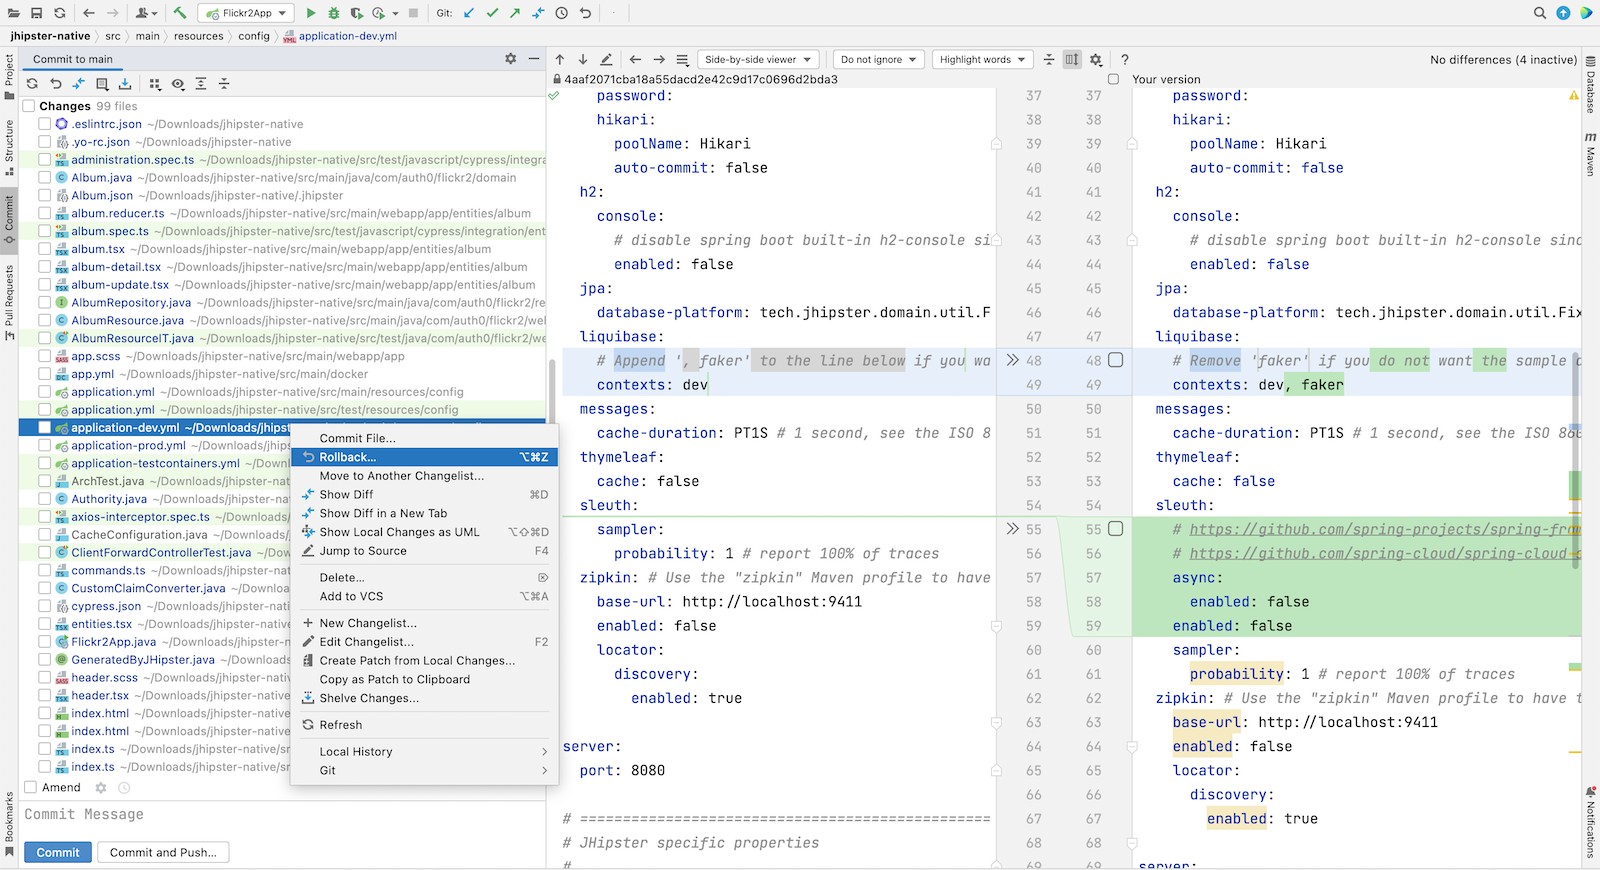
git checkout system.propertiesIf you’d rather not use the command line, you can right-click on each file and select Rollback.
If you ran the git checkout commands, there are several changes I made in the first tutorial that’ll need to be re-applied:
-
In
src/main/resources/config/application-dev.yml, remove thefakerprofile for Liquibase. -
In
pom.xml, re-add Drew Noake’smetadata-extractorlibrary:<dependency> <groupId>com.drewnoakes</groupId> <artifactId>metadata-extractor</artifactId> <version>2.16.0</version> </dependency> -
Next, modify the
createPhoto()method insrc/main/java/com/auth0/flickr2/web/rest/PhotoResource.javato set the metadata when an image is uploaded.import com.drew.imaging.ImageMetadataReader; import com.drew.imaging.ImageProcessingException; import com.drew.metadata.Metadata; import com.drew.metadata.MetadataException; import com.drew.metadata.exif.ExifSubIFDDirectory; import com.drew.metadata.jpeg.JpegDirectory; import javax.xml.bind.DatatypeConverter; import java.io.BufferedInputStream; import java.io.ByteArrayInputStream; import java.io.IOException; import java.io.InputStream; import java.time.Instant; import java.util.Date; public class PhotoResource { ... public ResponseEntity<Photo> createPhoto(@Valid @RequestBody Photo photo) throws URISyntaxException { log.debug("REST request to save Photo : {}", photo); if (photo.getId() != null) { ... } try { photo = setMetadata(photo); } catch (ImageProcessingException | IOException | MetadataException ipe) { log.error(ipe.getMessage()); } Photo result = photoRepository.save(photo); ... } private Photo setMetadata(Photo photo) throws ImageProcessingException, IOException, MetadataException { String str = DatatypeConverter.printBase64Binary(photo.getImage()); byte[] data2 = DatatypeConverter.parseBase64Binary(str); InputStream inputStream = new ByteArrayInputStream(data2); BufferedInputStream bis = new BufferedInputStream(inputStream); Metadata metadata = ImageMetadataReader.readMetadata(bis); ExifSubIFDDirectory directory = metadata.getFirstDirectoryOfType(ExifSubIFDDirectory.class); if (directory != null) { Date date = directory.getDateDigitized(); if (date != null) { photo.setTaken(date.toInstant()); } } if (photo.getTaken() == null) { log.debug("Photo EXIF date digitized not available, setting taken on date to now..."); photo.setTaken(Instant.now()); } photo.setUploaded(Instant.now()); JpegDirectory jpgDirectory = metadata.getFirstDirectoryOfType(JpegDirectory.class); if (jpgDirectory != null) { photo.setHeight(jpgDirectory.getImageHeight()); photo.setWidth(jpgDirectory.getImageWidth()); } return photo; } ... } -
Install the React libraries needed:
npm i react-photo-album react-imagesIn the previous tutorial, I used
react-photo-gallery. I switched toreact-photo-albumbecause it supports React 17. Because of this, you’ll also need to updatesrc/main/webapp/app/entities/photo/photo.tsx.-
Change
import Gallery from 'react-photo-gallery'toimport PhotoAlbum from 'react-photo-album'. -
Change
<Gallery photos={photoSet} onClick={openLightbox} />to<PhotoAlbum photos={photoSet} layout="rows" onClick={openLightbox} />.
-
-
In
src/test/javascript/cypress/integration/entity/photo.spec.ts, remove the code that sets the calculated data in theshould create an instance of Phototest:cy.get(`[data-cy="height"]`).type('99459').should('have.value', '99459'); cy.get(`[data-cy="width"]`).type('61514').should('have.value', '61514'); cy.get(`[data-cy="taken"]`).type('2021-10-11T16:46').should('have.value', '2021-10-11T16:46'); cy.get(`[data-cy="uploaded"]`).type('2021-10-11T15:23').should('have.value', '2021-10-11T15:23');
Then, you’ll need to add type hints for Drew Noake’s EXIF processing library in src/main/java/com/auth0/flickr2/Flickr2App.java:
@org.springframework.nativex.hint.TypeHint(
    types = {
        ...
        com.drew.metadata.exif.ExifIFD0Directory.class,
        com.drew.metadata.exif.ExifSubIFDDirectory.class,
        com.drew.metadata.exif.ExifThumbnailDirectory.class,
        com.drew.metadata.exif.makernotes.AppleMakernoteDirectory.class,
        com.drew.metadata.exif.GpsDirectory.class,
})
@org.springframework.nativex.hint.NativeHint(options = "-H:+AddAllCharsets")
The @NativeHint(options = "-H:+AddAllCharsets") solves the following exception that happens when you upload a photo:
Caused by: java.nio.charset.UnsupportedCharsetException: Cp1252
    at java.nio.charset.Charset.forName(Charset.java:528) ~[native-executable:na]
    at com.drew.lang.Charsets.<clinit>(Charsets.java:40) ~[na:na]
Once you’ve made all the changes (or cloned the spring-native branch), you can build your hip native binary.
Build a native JHipster app
You will need a JDK with GraalVM and its native-image compiler. Using SDKMAN, run the following command and set it as the default:
sdk install java 22.0.0.2.r17-grlThen, use Maven to build the project. Skip tests since there’s no support for Mockito at this time.
./mvnw package -Pnative,prod -DskipTestsThis process will take a few minutes to complete.
Configure your OpenID Connect identity provider
When you generate a JHipster app with OAuth 2.0 / OIDC for authentication, it defaults to using Keycloak. It creates a src/main/docker/keycloak.yml file for Docker Compose, as well as a src/main/docker/realm-config directory with files to auto-create users and OIDC clients.
If you want to use Keycloak for your running app, start it with the following command:
docker-compose -f src/main/docker/keycloak.yml up -dIf you’d rather use Okta or Auth0, that’s possible too!
Use Okta as your identity provider
Before you begin, you’ll need a free Okta developer account. Install the Okta CLI and run okta register to sign up for a new account. If you already have an account, run okta login.
Then, run okta apps create jhipster. Select the default app name, or change it as you see fit.
Accept the default Redirect URI values provided for you.
What does the Okta CLI do?
The Okta CLI streamlines configuring a JHipster app and does several things for you:
- Creates an OIDC app with the correct redirect URIs:
- login:
http://localhost:8080/login/oauth2/code/oidcandhttp://localhost:8761/login/oauth2/code/oidc - logout:
http://localhost:8080andhttp://localhost:8761
- login:
- Creates
ROLE_ADMINandROLE_USERgroups that JHipster expects - Adds your current user to the
ROLE_ADMINandROLE_USERgroups - Creates a
groupsclaim in your default authorization server and adds the user’s groups to it
NOTE: The http://localhost:8761* redirect URIs are for the JHipster Registry, which is often used when creating microservices with JHipster. The Okta CLI adds these by default.
You will see output like the following when it’s finished:
Okta application configuration has been written to: /path/to/app/.okta.env
Run cat .okta.env (or type .okta.env on Windows) to see the issuer and credentials for your app. It will look like this (except the placeholder values will be populated):
export SPRING_SECURITY_OAUTH2_CLIENT_PROVIDER_OIDC_ISSUER_URI="https://{yourOktaDomain}/oauth2/default"
export SPRING_SECURITY_OAUTH2_CLIENT_REGISTRATION_OIDC_CLIENT_ID="{clientId}"
export SPRING_SECURITY_OAUTH2_CLIENT_REGISTRATION_OIDC_CLIENT_SECRET="{clientSecret}"
NOTE: You can also use the Okta Admin Console to create your app. See Create a JHipster App on Okta for more information.
You’ll need to source the .okta.env file the Okta CLI creates to override the default Spring Security settings.
source .okta.env
If you’re on Windows, you can modify this file to use set instead of export and rename it to okta.bat. Then, run it with okta.bat from the command line.
|
Modify your existing .gitignore file to have *.env so you don’t accidentally check in your secrets!
|
Skip to Run your native JHipster app if you’ve configured your app for Okta and just want to see it running.
Use Auth0 as your identity provider
To switch from Keycloak to Auth0, override the Spring Security OAuth properties. You don’t even need to write any code!
To see how it works, create a .auth0.env file in the root of your project, and fill it with the code below to override the default OIDC settings:
export SPRING_SECURITY_OAUTH2_CLIENT_PROVIDER_OIDC_ISSUER_URI=https://<your-auth0-domain>/
export SPRING_SECURITY_OAUTH2_CLIENT_REGISTRATION_OIDC_CLIENT_ID=<your-client-id>
export SPRING_SECURITY_OAUTH2_CLIENT_REGISTRATION_OIDC_CLIENT_SECRET=<your-client-secret>
export JHIPSTER_SECURITY_OAUTH2_AUDIENCE=https://<your-auth0-domain>/api/v2/
You’ll need to create a new web application in Auth0 and fill in the <…> placeholders before this works.
Create an OpenID Connect app on Auth0
Log in to your Auth0 account (or sign up if you don’t have an account). You should have a unique domain like dev-xxx.eu.auth0.com.
Press the Create Application button in the Applications section. Use a name like JHipster Native!, select Regular Web Applications, and click Create.
Switch to the Settings tab and configure your application settings:
-
Allowed Callback URLs:
http://localhost:8080/login/oauth2/code/oidc -
Allowed Logout URLs:
http://localhost:8080/
Scroll to the bottom and click Save Changes.
Copy your Auth0 domain, client ID, and client secret into the .auth0.env file you created earlier. Then, run source .auth0.env.
In the roles section, create new roles named ROLE_ADMIN and ROLE_USER.
Create a new user account in the users section. Click on the Role tab to assign the roles you just created to the new account.
Make sure your new user’s email is verified before attempting to log in!
Next, head to Auth Pipeline > Rules > Create. Select the Empty rule template. Provide a meaningful name like Group claims and replace the Script content with the following.
function(user, context, callback) {
  user.preferred_username = user.email;
  const roles = (context.authorization || {}).roles;

  function prepareCustomClaimKey(claim) {
    return `https://www.jhipster.tech/${claim}`;
  }

  const rolesClaim = prepareCustomClaimKey('roles');

  if (context.idToken) {
    context.idToken[rolesClaim] = roles;
  }

  if (context.accessToken) {
    context.accessToken[rolesClaim] = roles;
  }

  callback(null, user, context);
}
This code is adding the user’s roles to a custom claim (prefixed with https://www.jhipster.tech/roles). Click Save changes to continue.
| Want to have all these steps automated for you? Add a 👍 to issue #351 in the Auth0 CLI project. |
Run your native JHipster app
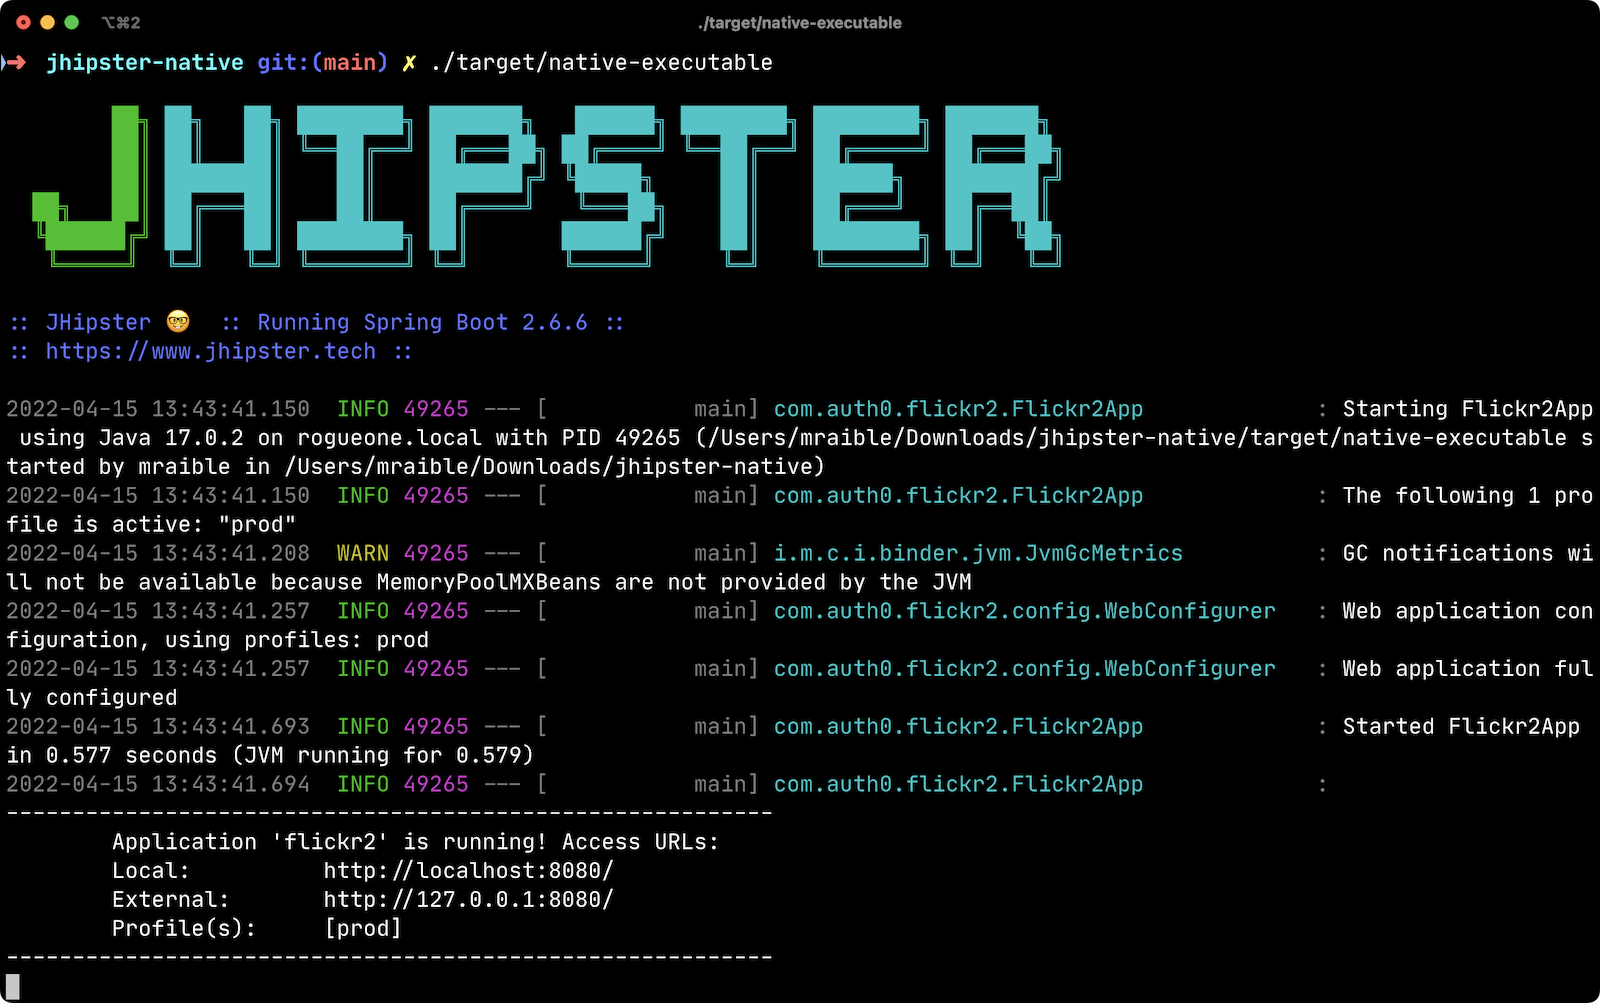
After you’ve built your app, it will be available in target/native-executable. Start Keycloak or source your Okta/Auth0 settings. Then, run the following commands:
npm run ci:e2e:prepare # start docker dependencies
./target/native-executable
It should start in under a second!
What does the JHipster Native blueprint do?
The JHipster Native blueprint integrates Spring Native into a JHipster project based on findings from the research by Josh Long and me. I documented our findings in September and December 2021.
-
Sep 30, 2021: JHipster Works with Spring Native!
-
Dec 14, 2021: JHipster works with Spring Native, Part 2!
The unexpected thing is, one of the hardest problems we had to solve was with JPA and relationships. In JVM mode, everything worked fine. When running in native mode, there was an exception. The solution took days to figure out, but was quite simple to fix: I just had to add a type hint for java.util.HashSet.class. 🤯
During this experience, I was surprised to find that Spring Native doesn’t support caching yet. I believe this support will be added by the community soon. In the meantime, if you’re looking to start/stop your infra as fast as possible, you probably don’t care about caching. Caching is made for long-lived, JVM-strong, JVM-loving apps.
What’s the performance like?
The native binary starts in just over 500ms (577ms) on my 2019 MacBook Pro with a 2.4 GHz 8-Core Intel Core i9 processor and 64 GB of RAM.
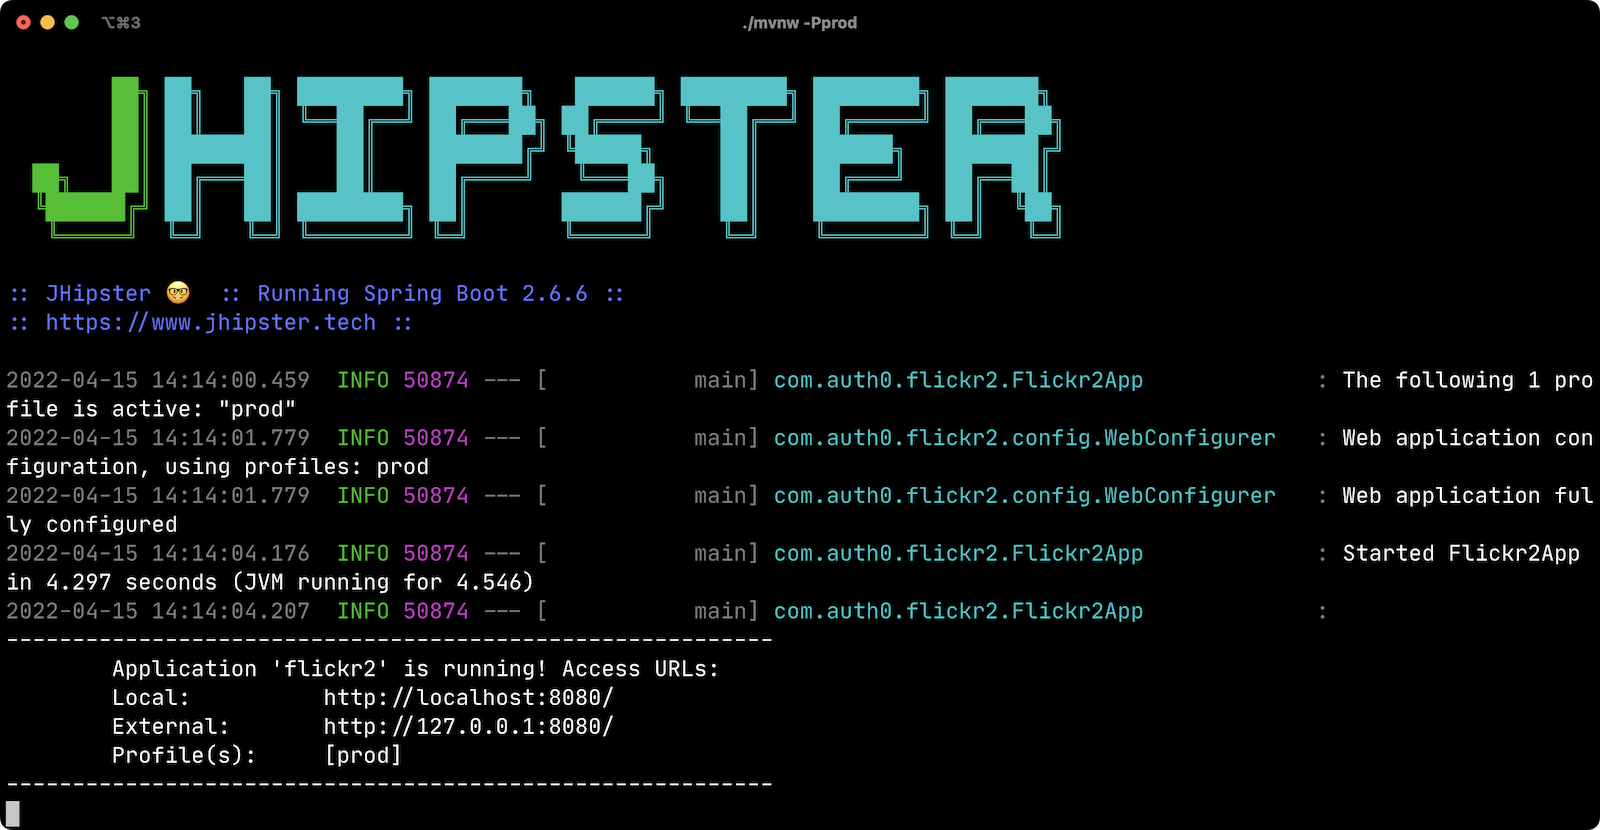
If I start it in JVM mode with Maven, it takes a little over four seconds.
As far as build time goes, Spring Native says:
Finished generating 'native-executable' in 3m 15s.
If I build a Docker image with the native binary:
mvn spring-boot:build-image -Pprod
It takes a while the first time:
Total time: 07:24 min
And it’s slightly faster the second time:
Total time: 06:43 min
The amount of memory used after starting: 178 MB.
The amount of memory used after running npm run e2e: 211 MB.
In the interest of full disclosure, here’s the command I used to measure the amount of memory used:
ps -o pid,rss,command | grep --color native | awk '{$2=int($2/1024)" MB";}{ print;}'What about the M1 Max? That’s not an option yet, but could be in the next release of GraalVM.
Learn more about GraalVM and Spring Native
I hope you’ve enjoyed learning how to make JHipster work with Spring Native and GraalVM. It’s still a work-in-progress. Startup time isn’t the end-all-be-all metric, but it is important in a serverless environment.
You can find the source code for this example on GitHub in the @oktadev/auth0-full-stack-java-example repository. The source for the JHipster Native blueprint is in the @jhipster/generator-jhipster-native repository.
JHipster also has Micronaut and Quarkus blueprints. However, their native support is currently a work-in-progress. I hope to help improve them in the next few months.
If you liked this post, there’s a good chance you’ll like similar ones:
If you have questions, please ask them in the comments below! If you’re into social media, follow us: @oktadev on Twitter, Okta for Developers on LinkedIn, and OktaDev on Facebook. If you like learning via video, subscribe to our YouTube channel.
Changelog:
- Apr 22, 2022: Updated to use JHipster Native 1.1.2. See this post’s changes in okta-blog#1152 and the example app changes in auth0-full-stack-java-example#17.
- Apr 15, 2022: Updated to use JHipster 7.8.1 and JHipster Native 1.1.1. See this post’s changes in okta-blog#1137 and the example app changes in auth0-full-stack-java-example#15.
Matt Raible is a well-known figure in the Java community and has been building web applications for most of his adult life. For over 20 years, he has helped developers learn and adopt open source frameworks and use them effectively. He's a web developer, Java Champion, and Developer Advocate at Okta. Matt has been a speaker at many conferences worldwide, including Devnexus, Devoxx Belgium, Devoxx France, Jfokus, and JavaOne. He is the author of The Angular Mini-Book, The JHipster Mini-Book, Spring Live, and contributed to Pro JSP. He is a frequent contributor to open source and a member of the JHipster development team. You can find him online @mraible and raibledesigns.com.
Okta Developer Blog Comment Policy
We welcome relevant and respectful comments. Off-topic comments may be removed.