Build REST APIs and Native Java Apps with Helidon

Project Helidon is a set of Java libraries for writing microservices. It’s an open source, Apache 2.0-licensed, Oracle-sponsored project and contains support for MicroProfile as well as a reactive, functional API. Helidon’s two different styles are known as Helidon MP and SE, respectively. The helidon.io website says:
Since Helidon is simply a collection of Java libraries running on a fast Netty core, there is no extra overhead or bloat.

Today, I’m going to put this statement to the test! First, I’ll show you how to run a secure, OAuth 2.0-protected, Java REST API that allows JWT authentication. Then, I’ll show you how to build a native image with GraalVM. Finally, I’ll compare Helidon to the most popular Java REST API frameworks: Micronaut, Quarkus, and Spring Boot.
My Build Native Java Apps with Micronaut, Quarkus, and Spring Boot post compares startup times and memory usage of these three frameworks. How does Helidon perform? Read on!
Note: In May 2025, the Okta Integrator Free Plan replaced Okta Developer Edition Accounts, and the Okta CLI was deprecated.
We preserved this post for reference, but the instructions no longer work exactly as written. Replace the Okta CLI commands by manually configuring Okta following the instructions in our Developer Documentation.
Prerequisites
-
HTTPie (a better version of cURL)
-
An Okta Developer Account
Get started with Helidon
I created a GitHub repository you can clone and run to get started with Helidon quickly.
git clone https://github.com/oktadev/native-java-examples.git
cd native-java-examples/helidon
In a section below, I’ll show you how I created this example. First, let’s see how to run it.
Open the helidon directory in your favorite IDE, so you have easy access to the example’s project files.
| If you just want to see how to build a native image, skip to the build a native Helidon app section. |
Install a JDK with GraalVM
You will need a JDK with GraalVM and its native-image compiler. Using SDKMAN, run the following command and set it as the default:
sdk install java 22.1.0.r17-grlRun a Helidon Java API
In a terminal window, run mvn package to package the app into a JAR. Then use java -jar to run it.
mvn package
java -jar target/helidon.jar
Helidon’s Maven Plugin doesn’t have a run command. You can install the Helidon CLI and run helidon dev. Running this command allows you to change code and automatically recompile and restart your application.
|
If you open another terminal window and try to access it with HTTPie, you’ll get a 401 Unauthorized error.
$ http :8080/hello

HTTP/1.1 401 Unauthorized
Content-Length: 0
Date: Wed, 11 May 2022 11:23:16 -0600
connection: keep-alive
To make it so you can access this endpoint, you’ll need to generate an OAuth 2.0 access token and update the JWKS (JSON Web Key Sets) URL to yours (in this project’s application.yml).
| If you’re unsure what OIDC and OAuth 2.0 are, see What the Heck is OAuth?. |
Before you begin, you’ll need a free Okta developer account. Install the Okta CLI and run okta register to sign up for a new account. If you already have an account, run okta login.
Then, run okta apps create. Select the default app name, or change it as you see fit.
Choose Single-Page App and press Enter.
Use https://oidcdebugger.com/debug for the Redirect URI and set the Logout Redirect URI to https://oidcdebugger.com.
What does the Okta CLI do?
The Okta CLI will create an OIDC Single-Page App in your Okta Org. It will add the redirect URIs you specified and grant access to the Everyone group. It will also add a trusted origin for https://oidcdebugger.com. You will see output like the following when it’s finished:
Okta application configuration:
Issuer:    https://dev-133337.okta.com/oauth2/default
Client ID: 0oab8eb55Kb9jdMIr5d6
NOTE: You can also use the Okta Admin Console to create your app. See Create a Single-Page App for more information.
Take note of the clientId and issuer values. You’ll need those to get an access token and to configure each framework for JWT authentication.
Open src/main/resources/META-INF/microprofile-config.properties and change the Okta URL to match yours.
mp.jwt.verify.issuer=https://{yourOktaDomain}/oauth2/default
mp.jwt.verify.publickey.location=${mp.jwt.verify.issuer}/v1/keys
Stop your Helidon app with Ctrl+C, repackage it, and re-run it with ⬆️+Return.
mvn package
java -jar target/helidon.jar
Generate an OAuth 2.0 access token
An easy way to get an access token is to generate one using OpenID Connect Debugger. Open the site in a new window or tab. Fill in your client ID, and use https://{yourOktaDomain}/oauth2/default/v1/authorize for the Authorize URI. Select code for the response type and Use PKCE.
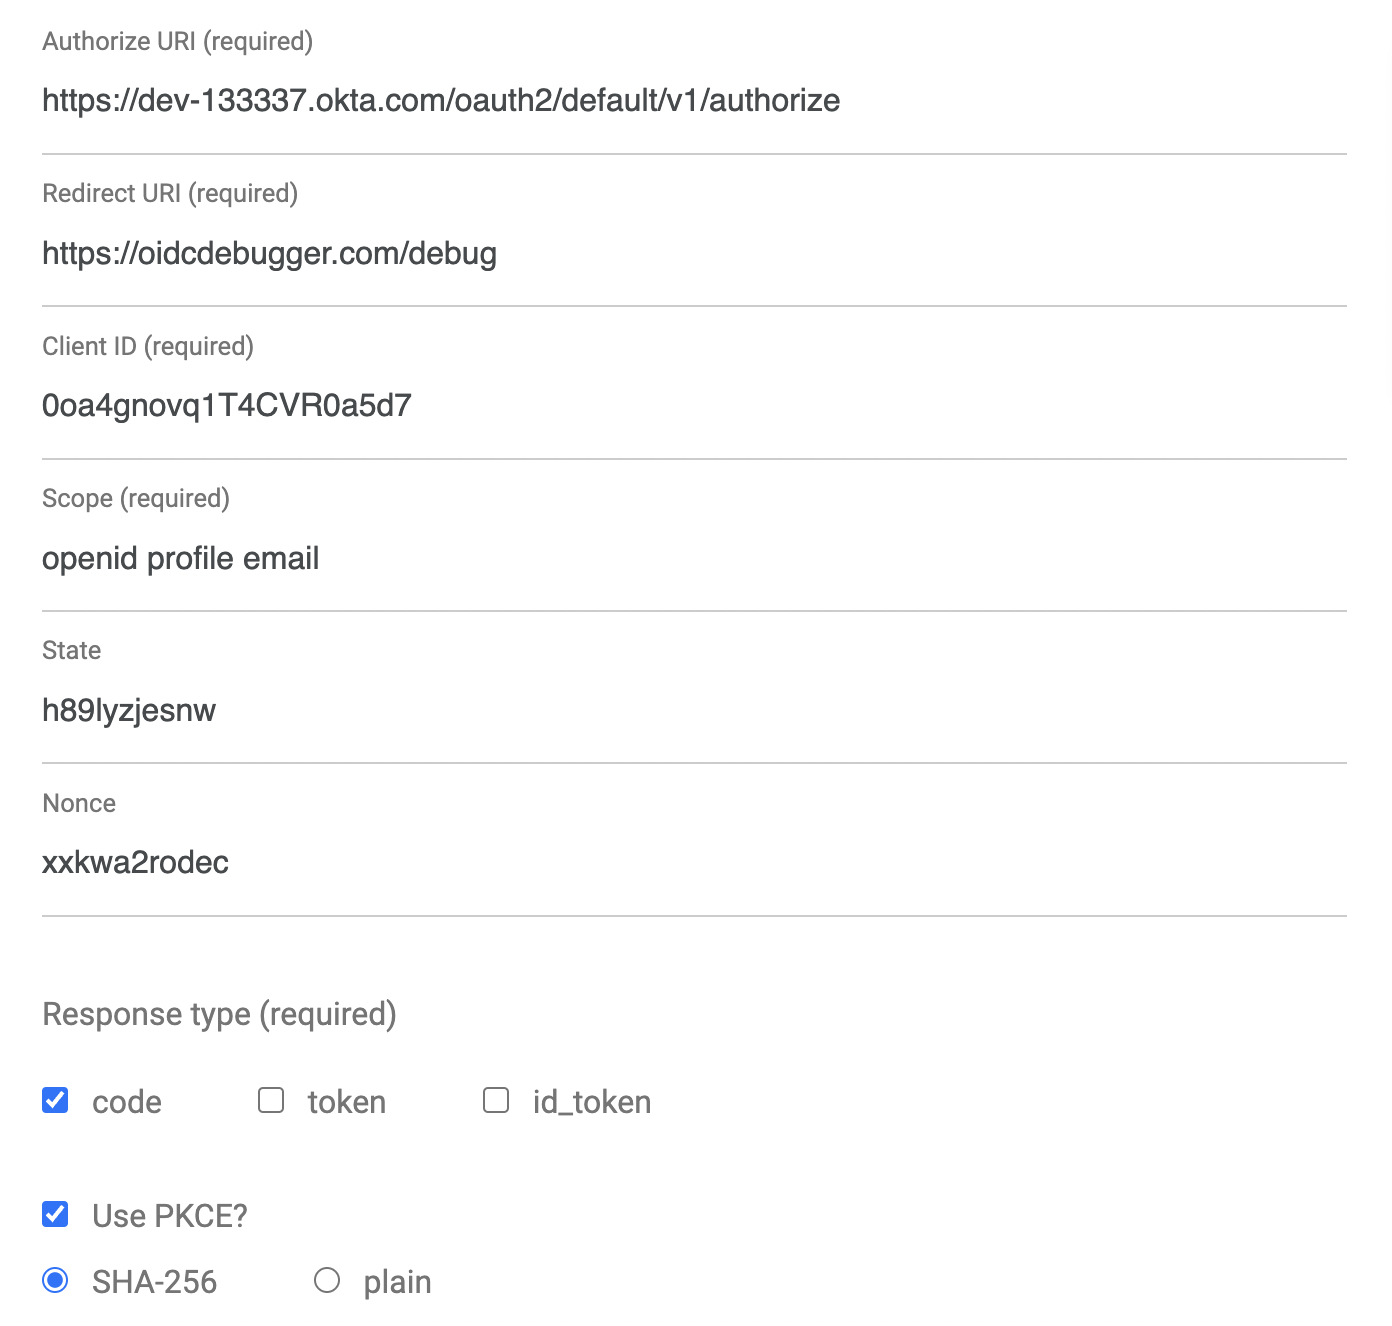
Click Send Request to continue.
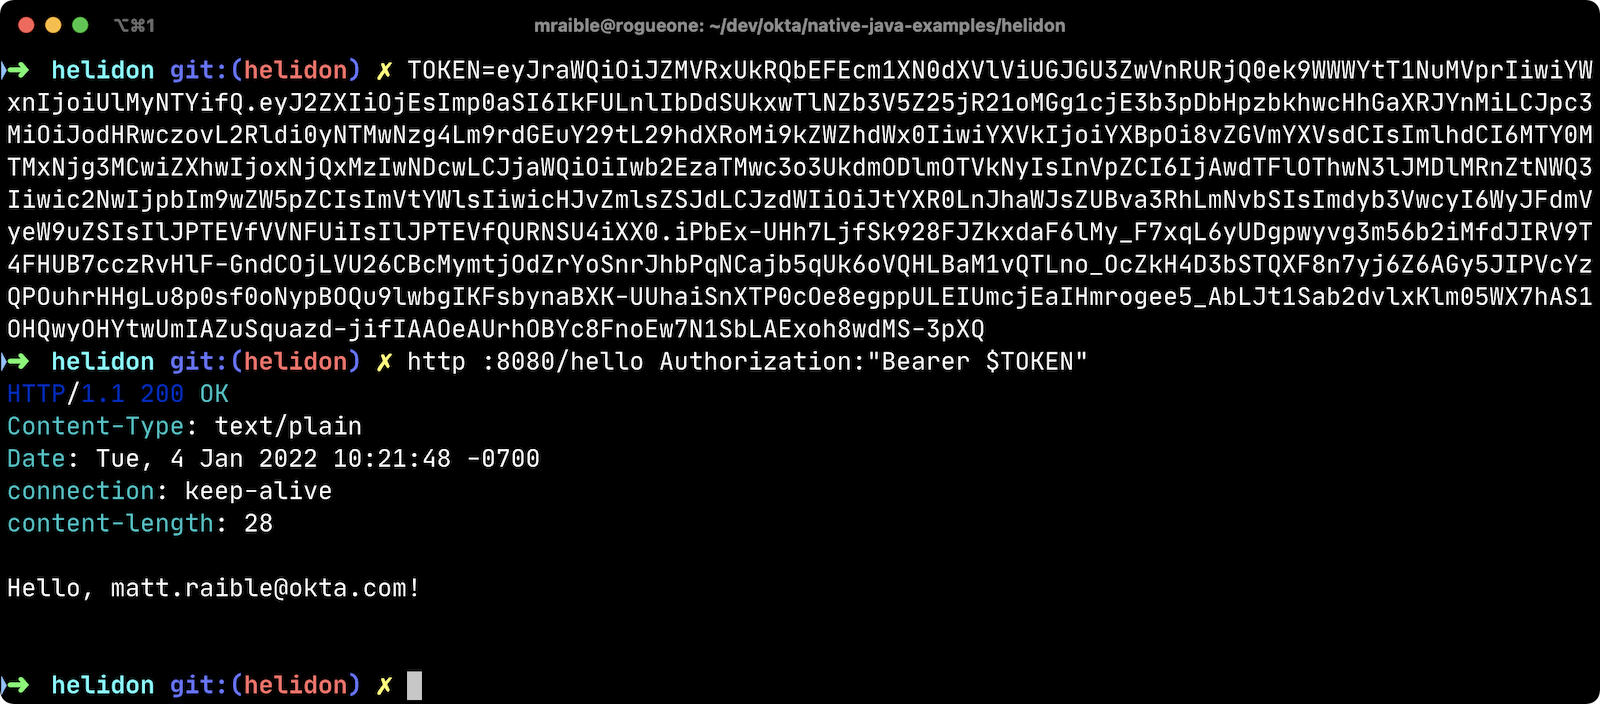
Once you have an access token, set it as a TOKEN environment variable in a terminal window.
TOKEN=eyJraWQiOiJZMVRxUkRQbEFEcm1XN0dX...Test your Helidon API with HTTPie
Use HTTPie to pass the JWT in as a bearer token in the Authorization header.
http :8080/hello Authorization:"Bearer $TOKEN"You should get a 200 response with your email address in it.
Build a native Helidon app
To compile this Helidon app into a native binary, run:
mvn package -Pnative-imageThis command will take a few minutes to complete. My 2019 MacBook Pro with a 2.4 GHz 8-Core Intel Core i9 processor and 64 GB of RAM took 1 min. 23 s. to finish.
Start it with ./target/helidon:
$ ./target/helidon
2022.05.11 11:25:37 INFO io.helidon.common.LogConfig Thread[main,5,main]: Logging at runtime configured using classpath: /logging.properties
2022.05.11 11:25:37 INFO io.helidon.microprofile.security.SecurityCdiExtension Thread[main,5,main]: Authorization provider is missing from security configuration, but security extension for microprofile is enabled (requires providers configuration at key security.providers). ABAC provider is configured for authorization.
2022.05.11 11:25:37 INFO io.helidon.microprofile.server.ServerCdiExtension Thread[main,5,main]: Registering JAX-RS Application: HelloApplication
2022.05.11 11:25:37 INFO io.helidon.webserver.NettyWebServer Thread[nioEventLoopGroup-2-1,10,main]: Channel '@default' started: [id: 0x440397cf, L:/[0:0:0:0:0:0:0:0]:8080]
2022.05.11 11:25:37 INFO io.helidon.microprofile.server.ServerCdiExtension Thread[main,5,main]: Server started on http://localhost:8080 (and all other host addresses) in 39 milliseconds (since JVM startup).
2022.05.11 11:25:37 INFO io.helidon.common.HelidonFeatures Thread[features-thread,5,main]: Helidon MP 2.5.0 features: [CDI, Config, Health, JAX-RS, Metrics, Security, Server, Web Client]
2022.05.11 11:25:37 INFO io.helidon.common.HelidonFeatures.experimental Thread[features-thread,5,main]: You are using experimental features. These APIs may change, please follow changelog!
2022.05.11 11:25:37 INFO io.helidon.common.HelidonFeatures.experimental Thread[features-thread,5,main]: 	Experimental feature: Web Client (WebClient)
As you can see, it starts in just 39 milliseconds! Test it with HTTPie and an access token. You may have to generate a new JWT with oidcdebugger.com if yours has expired.
http :8080/hello Authorization:"Bearer $TOKEN"Create a Helidon app from scratch
You might be wondering, "how did you build a secure Helidon app"? Did I just hide the complexity? No. It only takes six steps to create the same app.
-
Install Helidon’s CLI and run
helidon initor use Maven:mvn -U archetype:generate -DinteractiveMode=false \ -DarchetypeGroupId=io.helidon.archetypes \ -DarchetypeArtifactId=helidon-quickstart-mp \ -DarchetypeVersion=2.5.0 \ -DgroupId=com.okta.rest \ -DartifactId=helidon \ -Dpackage=com.okta.rest
If you use
helidon init, answer the questions like I did.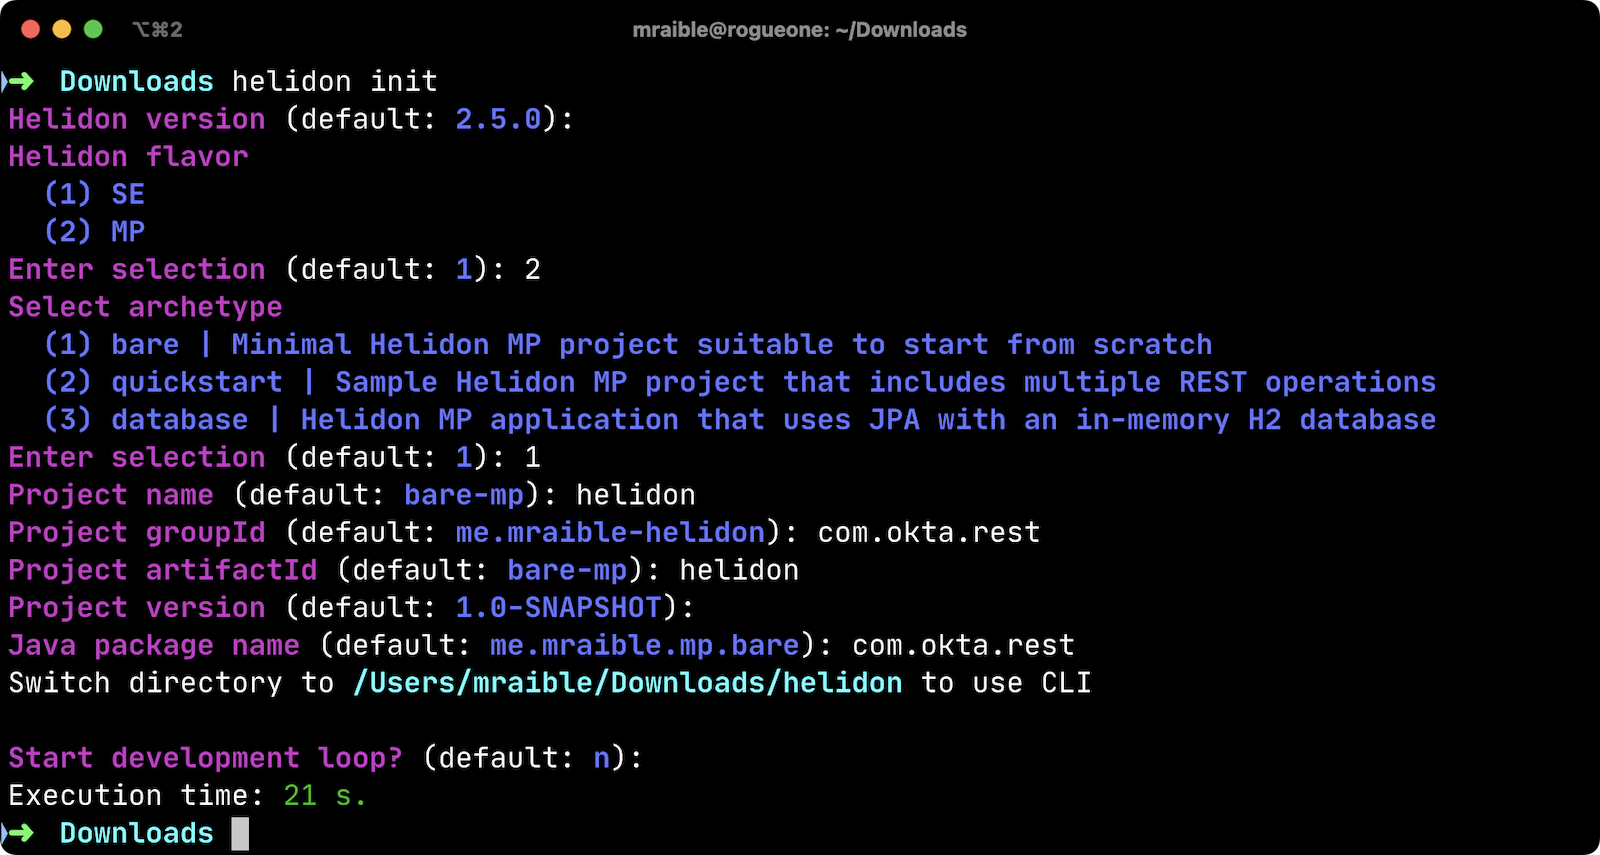
-
Add MicroProfile JWT support in
pom.xml:<dependency> <groupId>io.helidon.microprofile.jwt</groupId> <artifactId>helidon-microprofile-jwt-auth</artifactId> </dependency> -
Add a
HelloResourceinsrc/main/java/com/okta/rest/controller/HelloResource.java:package com.okta.rest.controller; import io.helidon.security.Principal; import io.helidon.security.SecurityContext; import javax.ws.rs.GET; import javax.ws.rs.Path; import javax.ws.rs.Produces; import javax.ws.rs.core.Context; import java.util.Optional; import static javax.ws.rs.core.MediaType.TEXT_PLAIN; @Path("/hello") public class HelloResource { @GET @Produces(TEXT_PLAIN) public String hello(@Context SecurityContext context) { Optional<Principal> userPrincipal = context.userPrincipal(); return "Hello, " + userPrincipal.get().getName() + "!"; } } -
Enable and configure JWT security in
src/main/resources/META-INF/microprofile-config.properties:mp.jwt.verify.issuer=https://{yourOktaDomain}/oauth2/default mp.jwt.verify.publickey.location=${mp.jwt.verify.issuer}/v1/keys -
Add a
HelloApplicationclass insrc/main/java/com/okta/restto register your resource and configure JWT authentication:package com.okta.rest; import com.okta.rest.controller.HelloResource; import org.eclipse.microprofile.auth.LoginConfig; import javax.enterprise.context.ApplicationScoped; import javax.ws.rs.core.Application; import java.util.Set; @LoginConfig(authMethod = "MP-JWT") @ApplicationScoped public class HelloApplication extends Application { @Override public Set<Class<?>> getClasses() { return Set.of(HelloResource.class); } } -
Delete
GreetingsProvider,GreetResource, andMainTestsince they’re not used in this example.rm src/main/java/com/okta/rest/Greet* rm src/test/java/com/okta/rest/MainTest.java
That’s it! Now you can start the app or build the native image as shown above.
Native Java startup time comparison
To compare startup times between Micronaut, Quarkus, Spring Boot, and Helidon, I first created native executables. You can run the following commands to do the same from the root directory of the example you cloned.
cd micronaut
./mvnw package -Dpackaging=native-image

cd ../quarkus
./mvnw package -Pnative

cd ../spring-boot
./mvnw package -Pnative

# Helidon should already be built, but just in case it isn't
cd ../helidon
mvn package -Pnative-image
I ran each image three times before I started recording the numbers. I then ran each command five times.
These numbers are from a 2019 MacBook Pro with a 2.4 GHz 8-Core Intel Core i9 processor and 64 GB of RAM. I think it’s important to note that my WiFi connection was 73.9 Mbps down and 10.1 Mbps up (according to the Speedtest app).
| Framework | Command executed | Milliseconds to start |
|---|---|---|
Helidon |
|
42.4 |
Micronaut |
|
27.8 |
Quarkus |
|
19.2 |
Spring Boot |
|
58.6 |
The chart below should help you visualize this comparison.
I also tested the memory usage in MB of each app using the command below. I made sure to send an HTTP request to each one before measuring.
ps -o pid,rss,command | grep --color <executable> | awk '{$2=int($2/1024)"M";}{ print;}'I substituted <executable> as follows:
| Framework | Executable | Megabytes before request | Megabytes after 1 request | Megabytes after 5 requests |
|---|---|---|---|---|
Helidon |
|
42 |
54 |
62 |
Micronaut |
|
31 |
45 |
56 |
Quarkus |
|
23 |
34 |
36 |
Spring Boot |
|
50 |
61 |
62 |
The chart below shows the memory usage after five requests.
This data shows that Helidon has almost caught up to its competition!
I asked Dmitry Alexandrov about these numbers and he’s what he had to say:
The numbers may look higher than expected, but, in Helidon MP you’ve got a fully functional CDI container and full MicroProfile support, unlike other competitors. If you still require ultimate performance, you should try Helidon SE, which is a fully reactive "magic free" flavour of Helidon, designed for environments working under maximal pressure.
Learn more about Java and GraalVM
In this post, you learned how to develop, build, and run a native Java app with Helidon. You also learned how to secure it with OpenID Connect and access it with a JWT access token.
You can find the source code for this example on GitHub in the native-java-examples repository.
If you liked this post, chances are you’ll like others we’ve published:
Got questions? Leave them in the comments below! You can also follow us on our social channels: @oktadev on Twitter, Okta for Developers on LinkedIn, OktaDev on Facebook. If you like learning via video, subscribe to our YouTube channel.
Changelog:
- May 11, 2022: Updated to use GraalVM 22.1. See this post’s changes in okta-blog#1166.
- Apr 19, 2022: Updated to use Helidon 2.5.0. See this post’s changes in okta-blog#1143 and the example app changes in native-java-examples#23.
- Mar 31, 2022: Updated to use GraalVM 22.0 and Helidon 2.4.2. See this post’s changes in okta-blog#1124 and the example app changes in native-java-examples#17.
Matt Raible is a well-known figure in the Java community and has been building web applications for most of his adult life. For over 20 years, he has helped developers learn and adopt open source frameworks and use them effectively. He's a web developer, Java Champion, and Developer Advocate at Okta. Matt has been a speaker at many conferences worldwide, including Devnexus, Devoxx Belgium, Devoxx France, Jfokus, and JavaOne. He is the author of The Angular Mini-Book, The JHipster Mini-Book, Spring Live, and contributed to Pro JSP. He is a frequent contributor to open source and a member of the JHipster development team. You can find him online @mraible and raibledesigns.com.
Okta Developer Blog Comment Policy
We welcome relevant and respectful comments. Off-topic comments may be removed.