Secure Your .NET 5 Blazor Server App with MFA

Note: In May 2025, the Okta Integrator Free Plan replaced Okta Developer Edition Accounts, and the Okta CLI was deprecated.
We preserved this post for reference, but the instructions no longer work exactly as written. Replace the Okta CLI commands by manually configuring Okta following the instructions in our Developer Documentation.
Introduction to Server Blazor apps
Blazor is an exciting new technology from Microsoft that will allow developers to bring C# to clients. Server and client components are written in the same language and can be used and re-used interchangeably. Blazor comes in two flavors, server and client apps. In this tutorial you will be working with Server Blazor apps, where the C# code is run on the server, and messages are exchanged using SignalR.
I’ll show you how to integrate Okta with a server-side Blazor app. Then you will learn how to use Okta’s multi-factor authentication system to provide an additional layer of security. Multi-factor authentication (MFA) is a technology in which a user must present two or more credentials before they can successfully gain access to complete a login or other transaction. There are a number of ways this can be accomplished. The most common is to email or text message a code to a user after the user is authenticated. The user can then verify the code thus establishing that the user knows the proper credentials but also has access to the phone number or email address of record.
What you’ll need
- Your favorite IDE (I will be using Visual Studio 2019, but Visual Studio Code is another great option.)
- A git repository
- .NET 5
- An Okta Developer Account
- The Okta CLI tool
Create your Okta application
Using the Okta CLI, create a new Okta app for .NET Blazor. Or, use your Okta admin portal to accomplish this: Navigate to Applications, click on Create App Integration, select OIDC for Sign in Type, Web for Application Type, and fill out the specifics for your localhost environment.
Before you begin, you’ll need a free Okta developer account. Install the Okta CLI and run okta register to sign up for a new account. If you already have an account, run okta login.
Then, run okta apps create. Select the default app name, or change it as you see fit.
Choose Web and press Enter.
Select ASP.NET Core.
Then, change the Redirect URI to https://localhost:44378/authorization-code/callback and use https://localhost:44378/signout/callback for the Logout Redirect URI.
What does the Okta CLI do?
The Okta CLI will create an OIDC Web App in your Okta Org. It will add the redirect URIs you specified and grant access to the Everyone group. You will see output like the following when it’s finished:
Okta application configuration has been written to: /path/to/app/.okta.env
Run cat .okta.env (or type .okta.env on Windows) to see the issuer and credentials for your app.
export OKTA_OAUTH2_ISSUER="https://dev-133337.okta.com/oauth2/default"
export OKTA_OAUTH2_CLIENT_ID="0oab8eb55Kb9jdMIr5d6"
export OKTA_OAUTH2_CLIENT_SECRET="NEVER-SHOW-SECRETS"
Your Okta domain is the first part of your issuer, before /oauth2/default.
NOTE: You can also use the Okta Admin Console to create your app. See Create a ASP.NET Core App for more information.
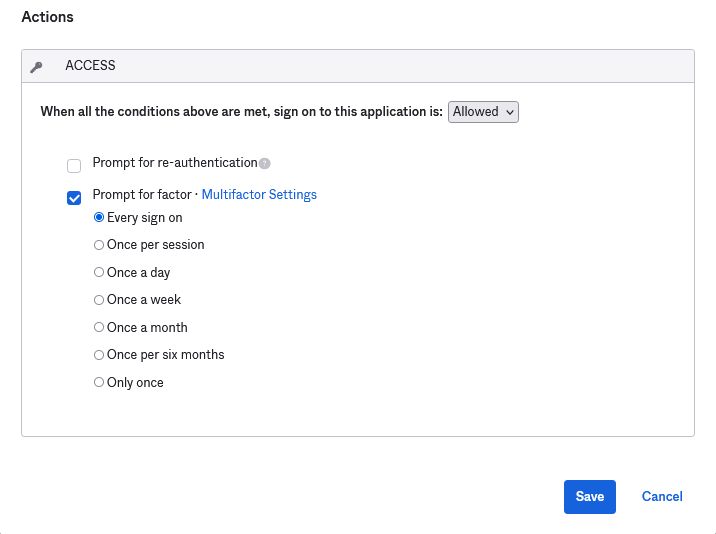
Once you have completed an Okta application setup you will need to enable multi-factor authentication and then enable it on your application. Now, navigate to the admin portal and under Applications select the application you just created. Click on Sign on and under the Sign on Policy section click on Add Rule.
Under the Access section click on Multifactor Settings. For this application you will only be enabling SMS Authentication but you can see the Factor Types that Okta allows on this page. Under the SMS Authentication tab set the drop-down to Active.

Return to the Rule page and click Prompt for factor and then click Every sign on. Give your new rule a name and click Save. This sign-on policy will now trigger for anyone who attempts to sign on to this application.
Create your Blazor application
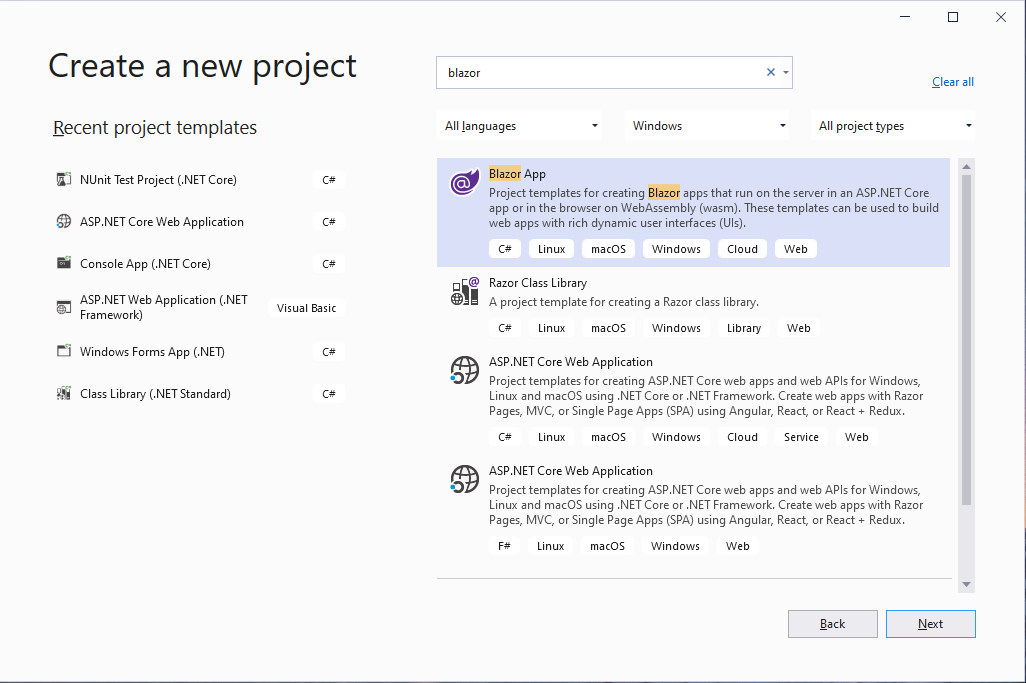
Open Visual Studio 2019 and select Create a new project. Find the Blazor App entry on the Create a project page. Please note, if you are using a different version of Visual Studio your project create templates may look different.
Under the Create a new Blazor app section select Blazor Server App and give it a minute to set up.
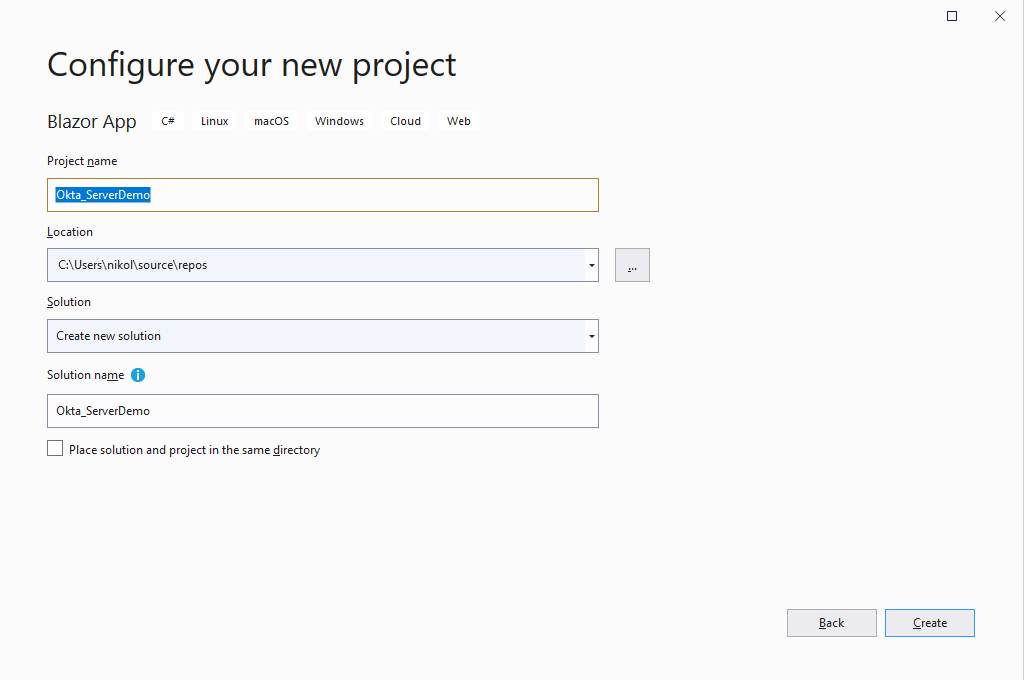
Once it does you will see the Configure your new project screen. Name your project Okta_ServerDemo and press Create.
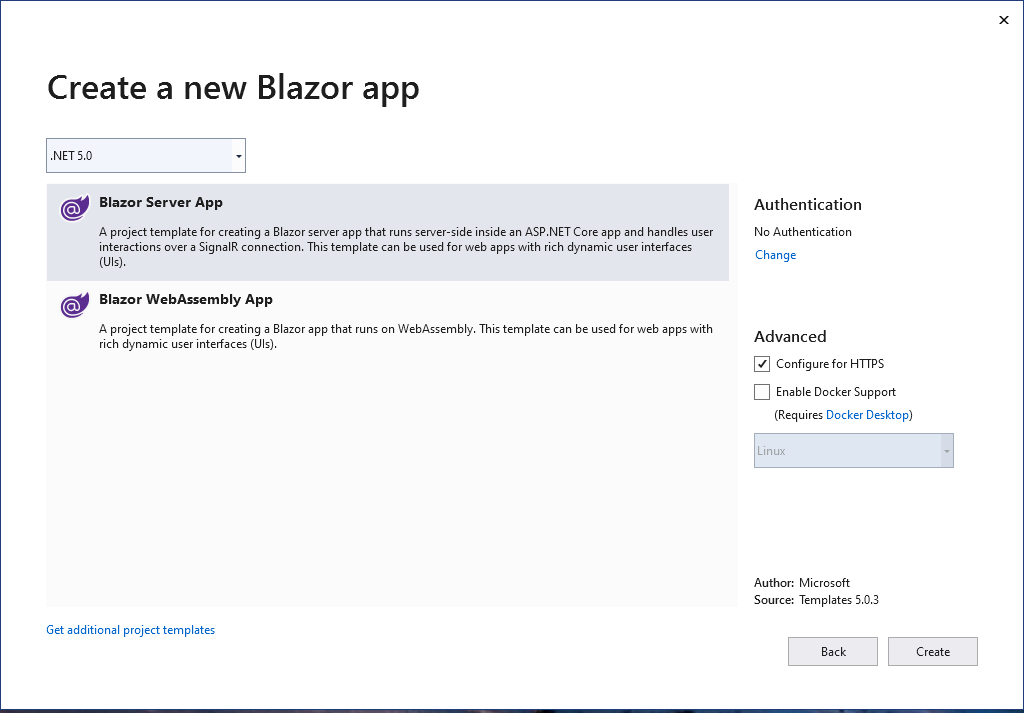
After setup is complete, take a minute to run the application and see how Blazor is set up. For this tutorial, the demo application that comes with Blazor setup is enough. We will need to make some changes to the application though.
Set up your application
First install the Okta.AspNetCore package from NuGet via the Command Line or NuGet package manager. This will make integration with Okta quick and easy.
Install-Package Okta.AspNetCore -Version 4.0.0
Next, open appsettings.Development.json and edit the code with the following.
{
  "DetailedErrors": true,
  "Logging": {
    "LogLevel": {
      "Default": "Information",
      "Microsoft": "Warning",
      "Microsoft.Hosting.Lifetime": "Information"
    }
  },
  "Okta": {
    "Domain": "{yourOktaDomain}",
    "ClientId": "{yourClientId}}",
    "ClientSecret": "{yourClientSecret}"
  }
}
If you don’t know where to find the values for your Okta settings, you should be able to find them in .okta.env. You can also retrieve them from the Okta admin console.
You can now alter your Startup.cs to configure authentication using Okta.
using Microsoft.AspNetCore.Builder;
using Microsoft.AspNetCore.Components;
using Microsoft.AspNetCore.Hosting;
using Microsoft.AspNetCore.HttpsPolicy;
using Microsoft.Extensions.Configuration;
using Microsoft.Extensions.DependencyInjection;
using Microsoft.Extensions.Hosting;
using Okta_ServerDemo.Data;
using System;
using System.Collections.Generic;
using Okta.AspNetCore;

using Microsoft.AspNetCore.Authentication.Cookies;
using Microsoft.AspNetCore.Authentication.OpenIdConnect;

namespace Okta_ServerDemo
{
    public class Startup
    {
        public Startup(IConfiguration configuration)
        {
            Configuration = configuration;
        }

        public IConfiguration Configuration { get; }

        // This method gets called by the runtime. Use this method to add services to the container.
        public void ConfigureServices(IServiceCollection services)
        {
            services.AddRazorPages();
            services.AddServerSideBlazor();
            services.AddSingleton<WeatherForecastService>();

            services.AddAuthentication(options =>
            {
                options.DefaultScheme = CookieAuthenticationDefaults.AuthenticationScheme;
                options.DefaultChallengeScheme = OpenIdConnectDefaults.AuthenticationScheme;
            })
           .AddCookie()
           .AddOktaMvc(new OktaMvcOptions
           {
               OktaDomain = Configuration.GetValue<string>("Okta:Domain"),
               ClientId = Configuration.GetValue<string>("Okta:ClientId"),
               ClientSecret = Configuration.GetValue<string>("Okta:ClientSecret"),
               Scope = new List<string> { "openid", "profile", "email" },
           });
        }

        // This method gets called by the runtime. Use this method to configure the HTTP request pipeline.
        public void Configure(IApplicationBuilder app, IWebHostEnvironment env)
        {
            if (env.IsDevelopment())
            {
                app.UseDeveloperExceptionPage();
            }
            else
            {
                app.UseExceptionHandler("/Error");
                // The default HSTS value is 30 days. You may want to change this for production scenarios, see https://aka.ms/aspnetcore-hsts.
                app.UseHsts();
            }

            app.UseHttpsRedirection();

            app.UseStaticFiles();

            app.UseRouting();

            app.UseAuthentication();
            app.UseAuthorization();

            app.UseEndpoints(endpoints =>
            {
                endpoints.MapBlazorHub();
                endpoints.MapFallbackToPage("/_Host");
            });
        }
    }
}
Write your application
Next, you can turn your attention to the pages. First, you will want to edit App.razor with the following code.
<CascadingAuthenticationState>
    <Router AppAssembly="@typeof(Program).Assembly" PreferExactMatches="@true">
        <Found Context="routeData">
            <AuthorizeRouteView RouteData="@routeData" DefaultLayout="@typeof(MainLayout)">
                <Authorizing>
                    <p>Determining session state, please wait...</p>
                </Authorizing>
                <NotAuthorized>
                    <h1>Sorry</h1>
                    <p>You're not authorized to reach this page. You need to log in.</p>

                    <UserComponent></UserComponent>
                </NotAuthorized>
            </AuthorizeRouteView>
        </Found>
        <NotFound>
            <LayoutView Layout="@typeof(MainLayout)">
                <p>Sorry, there's nothing at this address.</p>
            </LayoutView>
        </NotFound>
    </Router>
</CascadingAuthenticationState>
Much of this page is boilerplate from the setup process. But you need to make a few important changes. First, wrap the entire code in the CascadingAuthenticationState element. This will cascade the authentication state to each of your routes. Next, you need to change RouteView to AuthorizeView and handle the Authorizing and NotAuthorized states.
At this point, you may have noticed that UserComponent.razor doesn’t exist, so create that now in the Shared folder. Add the following code to it.
<AuthorizeView>
    <Authorized>
        <a href="logout">Log out</a>
    </Authorized>
    <NotAuthorized>
        <a href="login?redirectUri=/">Log in</a>
    </NotAuthorized>
</AuthorizeView>
This component makes use of the CascadingAuthenticationState from above and presents two different views. If the user is logged in, then you display a logout button. If the user is unauthorized, present them with a login button.
The two routes here, login and logout need to be implemented next. Under Pages, add a new RazorPage called Login. Razor pages are created with two components, a cshtml file and a .cs file. Since your login page is hosted by Okta you do not need any presentation in the .cshtml file. However, you still need to tell the page which model file to use. Open Login.cshtml and add the following code.
@page
@model Okta_ServerDemo.Pages.LoginModel


@{

}
Next, open Login.cshtml.cs and add the login logic.
using System.Threading.Tasks;
using Microsoft.AspNetCore.Mvc.RazorPages;
using Microsoft.AspNetCore.Authentication;
using Okta.AspNetCore;

namespace Okta_ServerDemo.Pages
{
    public class LoginModel : PageModel
    {
        public async Task OnGet(string redirectUri)
        {
            await HttpContext.ChallengeAsync(OktaDefaults.MvcAuthenticationScheme, new AuthenticationProperties
            {
                RedirectUri = redirectUri
            });
        }
    }
}
This code should look familiar if you’ve used Okta with any ASP.NET application. You’re simply returning the Challenge provided by Okta. This will redirect the user to the Okta login page.
After you authenticate, you’ll either be asked for your phone number or prompted to send a code to your phone. This depends on whether you’ve set up your phone in Okta yet. If you haven’t, add your phone number to your account and verify the code; otherwise, click Send Code and then verify the code on this page. And just like that, your application is now secure with MFA using Okta! You can select several MFA methods found on Okta’s site, ranging from email and phone codes to physical authenticators.
Now you can add the Logout page the same way you added the Login page. Again, since there is no presentation here your .cshtml file will declare the model page without any HTML.
@page
@model Okta_ServerDemo.Pages.LogoutModel
@{
}
Your Logout.cshtml.cs file will contain the stock ASP.Net Core logout logic.
using Microsoft.AspNetCore.Mvc;
using Microsoft.AspNetCore.Mvc.RazorPages;
using Microsoft.AspNetCore.Authentication;
using Microsoft.AspNetCore.Authentication.Cookies;
using Okta.AspNetCore;

namespace Okta_ServerDemo.Pages
{
    public class LogoutModel : PageModel
    {
        public SignOutResult OnGet()
        {
            return new SignOutResult(
                new[]
                {
                     OktaDefaults.MvcAuthenticationScheme,
                     CookieAuthenticationDefaults.AuthenticationScheme,
                },
                new AuthenticationProperties { RedirectUri = "/" });
        }
    }
}
Finally, the Counter and FetchData pages will require user authentication.
Open Counter.razor and add the @attribute [Authorize] annotation.
@page "/counter"

@attribute [Authorize]

<h1>Counter</h1>

<p>Current count: @currentCount</p>

<button class="btn btn-primary" @onclick="IncrementCount">Click me</button>

@code {
    private int currentCount = 0;

    private void IncrementCount()
    {
        currentCount++;
    }
}
This code is almost identical to the boilerplate code except for the Authorize attribute at the top of the page. Like ASP.Net Core, this attribute will require the user to be logged in before accessing it.
Similarly, edit the FetchData.razor file with the following code.
@page "/fetchdata"

@using Okta_ServerDemo.Data
@inject WeatherForecastService ForecastService

@attribute [Authorize]

<h1>Weather forecast</h1>

<p>This component demonstrates fetching data from a service.</p>

@if (forecasts == null)
{
    <p><em>Loading...</em></p>
}
else
{
    <table class="table">
        <thead>
            <tr>
                <th>Date</th>
                <th>Temp. (C)</th>
                <th>Temp. (F)</th>
                <th>Summary</th>
            </tr>
        </thead>
        <tbody>
            @foreach (var forecast in forecasts)
            {
                <tr>
                    <td>@forecast.Date.ToShortDateString()</td>
                    <td>@forecast.TemperatureC</td>
                    <td>@forecast.TemperatureF</td>
                    <td>@forecast.Summary</td>
                </tr>
            }
        </tbody>
    </table>
}

@code {
    private WeatherForecast[] forecasts;

    protected override async Task OnInitializedAsync()
    {
        forecasts = await ForecastService.GetForecastAsync(DateTime.Now);
    }
}
Again the only change here is the addition of the Authorize attribute.
Test your application
Now start the application and navigate to the Counter page.
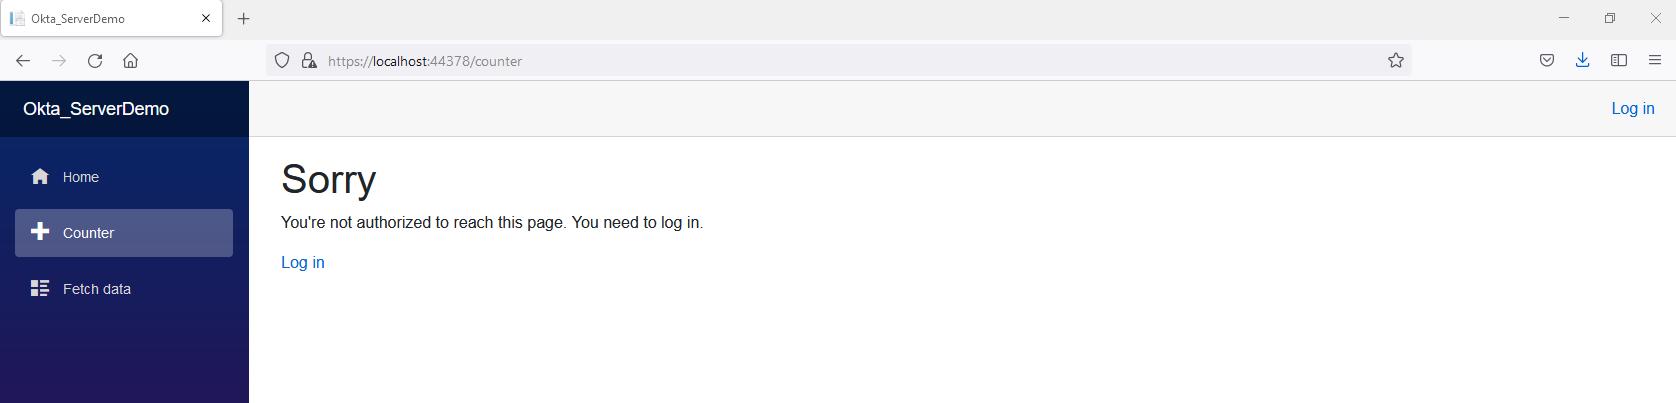
You will see the message found on your App.razor page. Click on the Login button and walk through the authentication and MFA process. Once you’re logged in, you should be presented with the `** page.

That’s it! if you’d like to take a look at this solution in full, check out the GitHub repo.
Learn more about working with Blazor
With Okta securing your application with MFA is easier than ever. With a few configuration changes, Okta does the heavy lifting and adds an additional layer of security to your Blazor server-side app.
If you liked this tutorial, you might like these others:
- How to Build Securely with Blazor WebAssembly (WASM)
- Web Forms Migration to Blazor in .NET Core
- Migrate Your ASP.NET Framework to ASP.NET Core with Okta
Make sure you follow us on Twitter and subscribe to our YouTube channel. If you have any questions, or you want to share what tutorial you’d like to see next, please comment below!
Okta Developer Blog Comment Policy
We welcome relevant and respectful comments. Off-topic comments may be removed.