Migrate Your ASP.NET Framework to ASP.NET Core with Okta

Ah, migration! Let’s say you have an ASP.NET application that has been running fine for years. You have kept up with the various .NET Framework updates and then suddenly you get told that you need to migrate to the latest and greatest, ASP.NET Core using .NET Core. .NET Core is the successor to the .NET Framework we’ve been using for years. It is open-source and supports cross-platform applications. To a veteran .NET developer it should look relatively similar to ASP.NET applications but there are some differences. In this article, we will migrate an existing ASP.NET application to ASP.NET Core that has an external auth provider - like Okta!
Note: In May 2025, the Okta Integrator Free Plan replaced Okta Developer Edition Accounts, and the Okta CLI was deprecated.
We preserved this post for reference, but the instructions no longer work exactly as written. Replace the Okta CLI commands by manually configuring Okta following the instructions in our Developer Documentation.
Requirements
- A computer with .NET Framework and .NET Core-compatible operating system
- A modern internet browser
- An Okta Developer account
- Your IDE of choice (I used Visual Studio 2019)
- The .NET Core 3.1 SDK
- ASP.NET
Create your Okta application
For this application, you will use Okta for your authentication. The Okta.AspNetCore makes implementing secure authentication in your application easier than ever. All you need to do is set up a new application on Okta’s developer website and configure the authentication in your project on startup, and Okta handles the rest.
Log in to your Okta Developer Console and click on Applications. Click on the Add Application button and select Web. On the next page, give your application a meaningful name. I named my application Conversion App. Change your URIs from localhost:8080 to localhost:3000.

Click Done at the bottom of the form and you will be redirected to the application’s settings page. Make sure to note your Client ID and Client secret as you will need these in your application.
Build an ASP.NET MVC Application to Migrate
Now it is time to create an ASP.NET application, that we will eventually migrate to .NET Core. You can use an existing application, of course, but for the purpose of this tutorial, we will create one from scratch. The application will consist of a home page and a dashboard page for users after they are authenticated. The dashboard will retrieve a list of users from a web service and provide a way to send emails. To authenticate users you will use Okta. Okta’s Okta.AspNet package makes using Okta for authentication as simple as a few lines of code.
Create an ASP.NET Framework MVC Application
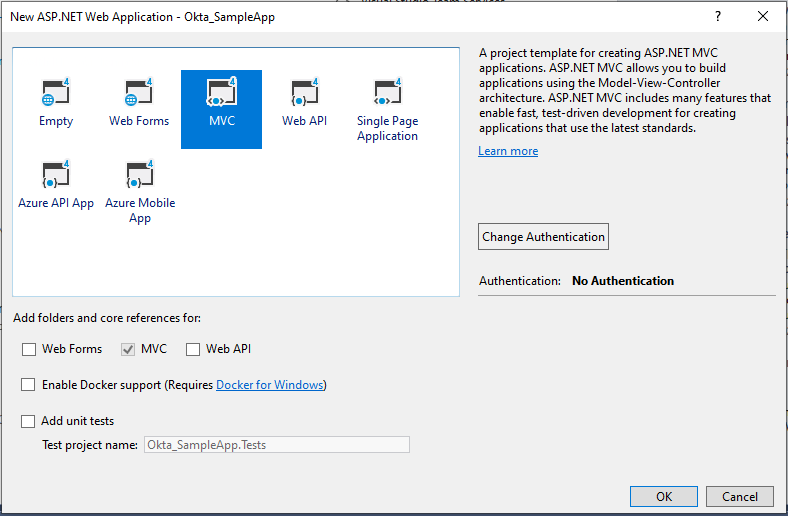
Open Visual Studio and select New Project. Under the Web section select ASP.NET Web Application (.NET Framework) and give it a name. On the next screen select MVC and select OK. After the application is scaffolded, you can get to work.
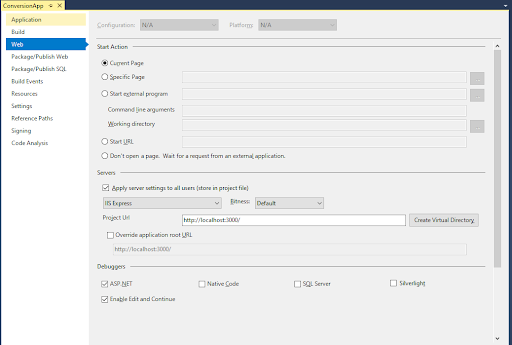
Right-click on your project name and select Properties. Under the Web section set your Project Url to localhost:3000.
Install Okta’s ASP.NET library with the package command Install-Package Okta.AspNet -Version 1.5.0.
In your web.config file add the following entries to the <appSettings> node.
    <add key="okta:OktaDomain" value="{yourOktaDomain}"/>
    <add key="okta:ClientId" value="{yourClientId}"/>
    <add key="okta:ClientSecret" value="{yourClientSecret}"/>
    <add key="okta:RedirectUri" value="http://localhost:3000/authorization-code/callback"/>
    <add key="okta:PostLogoutRedirectUri" value="Home/Index"/>
You should also add the SMTP configuration to your web.config. Add the code below and replace the asterisks with your SMTP configuration values.
<system.net>
    <mailSettings>
      <smtp from="*">
        <network enableSsl="true" host="*" port="*" userName="*" password="*"/>
      </smtp>
    </mailSettings>
  </system.net>
Create your Controllers
Under your Controllers folder add or update the following controllers; HomeController, AccountController, and DashboardController.
HomeController is the simplest. It has one action that returns a view called Index.
using System.Web.Mvc;

namespace ConversionApp.Controllers
{
    public class HomeController : Controller
    {
        public ActionResult Index()
        {
            return View();
        }
    }
}
AccountController will contain your LogOff method that will log the user out of your website using Okta.
using System.Web;
using System.Web.Mvc;
using Microsoft.Owin.Security.Cookies;
using Okta.AspNet;

namespace ConversionApp.Controllers
{
    public class AccountController : Controller
    {
        [HttpPost]
        public ActionResult LogOff()
        {
            if (HttpContext.User.Identity.IsAuthenticated)
            {
                HttpContext.GetOwinContext().Authentication.SignOut(
                    CookieAuthenticationDefaults.AuthenticationType,
                    OktaDefaults.MvcAuthenticationType);
            }

            return RedirectToAction("Index", "Home");
        }
    }
}
Finally, DashboardController will have an Index action that returns a view, but it also has two more actions. One sends an email and the other gets a list of users from a mock web service.
using System;
using System.Collections.Generic;
using System.Linq;
using System.Web;
using System.Web.Mvc;
using System.NET;
using System.NET.Mail;
using System.IO;
using Newtonsoft.Json;

namespace ConversionApp.Controllers
{
    [Authorize]
    public class DashboardController : Controller
    {
        // GET: Dashboard
        public ActionResult Index()
        {
            return View();
        }

        //send email
        [HttpPost]
        public ActionResult SendEmail()
        {
            SmtpClient smtpClient = new SmtpClient();
            smtpClient.EnableSsl = true;
            MailMessage mail = new MailMessage();

            //Setting From , To and CC
            mail.From = new MailAddress("nik@fishbowlllc.com", "Nickolas Fisher");
            mail.To.Add(new MailAddress("nik@fishbowlllc.com", "Nickolas Fisher"));

            mail.Subject = "Hello From the Conversion App";

            mail.Body = "this is my test email";

            smtpClient.Send(mail);

            return new JsonResult(){ Data = true };
        }

        public ActionResult GetUsers()
        {
            WebRequest request = WebRequest.Create("https://jsonplaceholder.typicode.com/users");
            request.Method = "GET";

            WebResponse response = request.GetResponse();

            using (var reader = new StreamReader(response.GetResponseStream()))
            {
                var text = reader.ReadToEnd();
                var userList = JsonConvert.DeserializeObject<List<Models.UserModel>>(text);
                return new JsonResult()
                {
                    Data = userList,
                    JsonRequestBehavior = JsonRequestBehavior.AllowGet
                };
            }

            throw new Exception("There was a problem fetching the users");
        }
    }
}
A model called UserModel is added to the Models folder and contains the relevant data from the web service call to send down to your client.
namespace ConversionApp.Models
{
    public class UserModel
    {
        public int id { get; set; }
        public string name { get; set; }
        public string username { get; set; }
        public string email { get; set; }
        public string website { get; set; }
    }
}
Add your Views
There are four views you need to add or edit. The first is the Shared/_Layout.cshtml file. Most of this is the automated code Visual Studio created.
<!DOCTYPE html>
<html>
<head>
<meta charset="utf-8" />
<meta name="viewport" content="width=device-width, initial-scale=1.0">
<title>@ViewBag.Title - Conversion - An Okta Demo</title>
@Styles.Render("~/Content/css")
@Scripts.Render("~/bundles/modernizr")
</head>
<body>
<div class="navbar navbar-inverse navbar-fixed-top">
<div class="container">
<div class="navbar-header">
<button type="button" class="navbar-toggle" data-toggle="collapse" data-target=".navbar-collapse">
<span class="icon-bar"></span>
<span class="icon-bar"></span>
<span class="icon-bar"></span>
</button>
@Html.ActionLink("Conversion", "Index", "Home", new { area = "" }, new { @class = "navbar-brand" })
</div>
<div class="navbar-collapse collapse">
<ul class="nav navbar-nav">
<li>@Html.ActionLink("Home", "Index", "Home")</li>
</ul>
@Html.Partial("_LoginPartial")
</div>
</div>
</div>
<div class="container body-content">
@RenderBody()
<hr />
<footer>
<p>© @DateTime.Now.Year - Conversion by <a href="https://profile.fishbowlllc.com/" rel="noreferrer" target="_blank">Nik Fisher.</a></p>
</footer>
</div>
@Scripts.Render("~/bundles/jquery")
@Scripts.Render("~/bundles/bootstrap")
@RenderSection("scripts", required: false)
</body>
</html>
Next, you can edit the Shared/_LoginPartial.cshtml file. This partial view will display a login button to an authenticated user, and a logout button if the user is logged in. You do not need the register button that Visual Studio adds in, since Okta is handling the authentication.
@if (Request.IsAuthenticated)
{
    using (Html.BeginForm("LogOff", "Account", FormMethod.Post, new { id = "logoutForm", @class = "navbar-right" }))
    {

    <ul class="nav navbar-nav navbar-right">
        <li>
            Hello + @User.Identity.Name + !
        </li>
        <li><a href="javascript:document.getElementById('logoutForm').submit()">Log off</a></li>
    </ul>
    }
}
else
{
    <ul class="nav navbar-nav navbar-right">
        <li>@Html.ActionLink("Log in", "Index", "Dashboard", routeValues: null, htmlAttributes: new { id = "loginLink" })</li>
    </ul>
}
Next, you will edit the Home/Index.cshml page. Again, Visual Studio has some stock marketing for ASP.NET here. You can just replace it with some information about your site.
@{
ViewBag.Title = "Home Page";
}
<div class="jumbotron">
<h1>Conversion</h1>
<p class="lead">A demo using .NET Framework, .NET Core, and Okta</p>
<p><a href="https://developer.okta.com/" class="btn btn-primary btn-lg">Learn more »</a></p>
</div>
<div class="row">
<div class="col-md-4">
<h2>Purpose</h2>
<p>
Learn how to convert a .NET Framework MVC web application using Okta to a .NET Core application.
</p>
<p><a class="btn btn-default" href="https://go.microsoft.com/fwlink/?LinkId=301865">Learn more »</a></p>
</div>
<div class="col-md-4">
<h2>Okta</h2>
<p>Powerful Single Sign-On provider </p>
<p><a class="btn btn-default" href="https://go.microsoft.com/fwlink/?LinkId=301866">Learn more »</a></p>
</div>
<div class="col-md-4">
<h2>Author</h2>
<p>Written by Nik Fisher</p>
<p><a class="btn btn-default" href="https://go.microsoft.com/fwlink/?LinkId=301867">Learn more »</a></p>
</div>
</div>
Finally, add the dashboard page where most of your functionality lives. This page will populate a table asynchronously with data that is fetched from the mock API. There is also some Javascript for sending the email.
@{
    ViewBag.Title = "Index";
}

<div class="row mb-2">
    <div class="alert alert-dismissable">
        <button class="btn btn-primary" onclick="sendEmail()">Send Email</button>

    </div>
</div>

<table class="table table-striped">
    <thead>
        <tr>
            <th>Name</th>
            <th>Username</th>
            <th>Email</th>
            <th>Website</th>
        </tr>
    </thead>
    <tbody></tbody>
</table>

@section scripts
{
<script>

        $(document).ready(function () {
            $.get('@Url.Action("GetUsers", "Dashboard")', function (data) {
                $.each(data, function (key, value) {
                    var row = '<tr><td>' + value.name + '</td><td>' + value.username + '</td><td>' + value.email + '</td><td>' + value.website + '</td></tr>';
                    $('table').append(row);
                });
            });
        });

        function sendEmail() {
            $.post('@Url.Action("SendEmail", "Dashboard")', function (data) {
                console.log(data);
            })
        }

</script>
}
Set up the Startup.cs file
To allow Okta to work with your ASP.NET application you will need to set it up in the App_Start/Startup.Auth.cs file.
using Microsoft.Owin.Security.Cookies;
using Owin;
using Okta.AspNet;
using Microsoft.Owin.Security;
using System.Configuration;

namespace ConversionApp
{
    public partial class Startup
    {
        // For more information on configuring authentication, please visit https://go.microsoft.com/fwlink/?LinkId=301864
        public void ConfigureAuth(IAppBuilder app)
        {
            app.SetDefaultSignInAsAuthenticationType(CookieAuthenticationDefaults.AuthenticationType);
            app.UseCookieAuthentication(new CookieAuthenticationOptions());

            app.UseOktaMvc(new OktaMvcOptions
            {
                OktaDomain = ConfigurationManager.AppSettings["okta:OktaDomain"],
                ClientId = ConfigurationManager.AppSettings["okta:ClientId"],
                ClientSecret = ConfigurationManager.AppSettings["okta:ClientSecret"],
                AuthorizationServerId = "default",
                RedirectUri = ConfigurationManager.AppSettings["okta:RedirectUri"],
                PostLogoutRedirectUri = ConfigurationManager.AppSettings["okta:PostLogoutRedirectUri"]
            });
        }
    }
}
Migrate your .NET Framework App to .NET Core
Your ASP.NET sample application is complete and you are ready to migrate to ASP.NET Core!
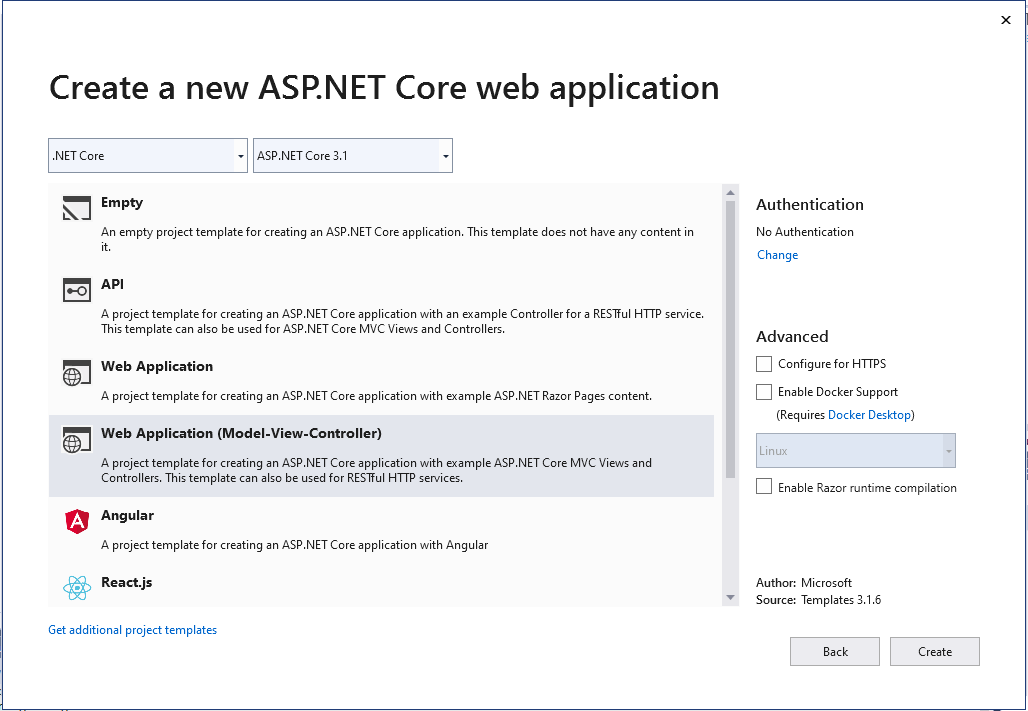
Open Visual Studio and create a new project. This time, select ASP.NET Core Web Application. Give it a name and click Create. For this, select No Authentication and Web Application (Model-View-Controller). You can also uncheck Configure for HTTPS as this won’t be necessary immediately.
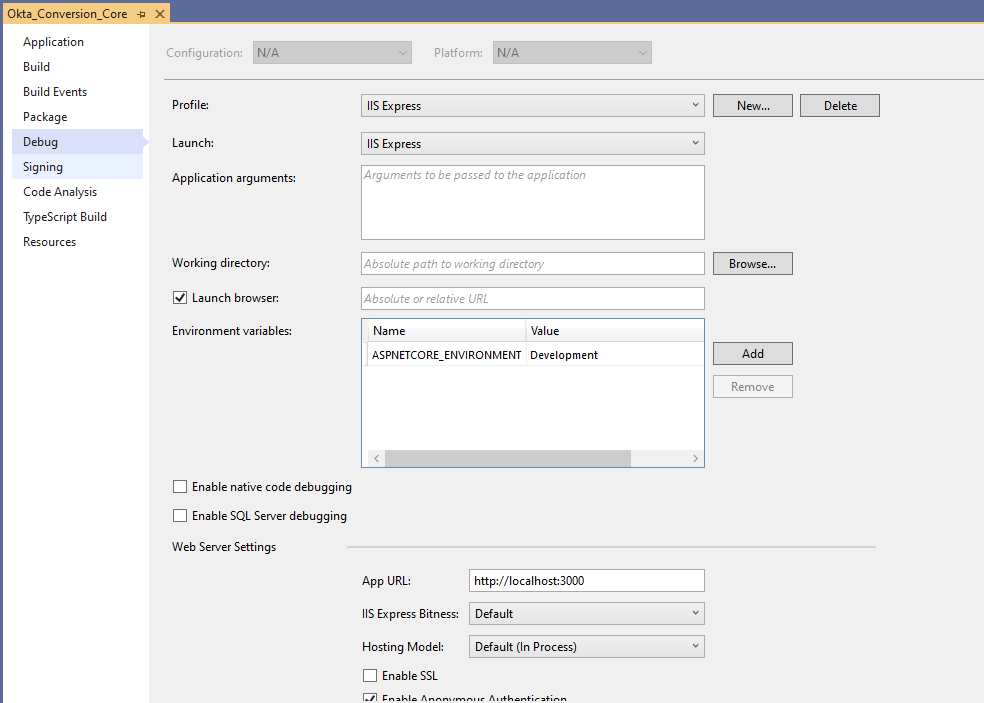
You will want to set your App URL to localhost:3000 as you did with the ASP.NET application.
Install dependencies
As with any project, start by installing the dependencies. For this, you will use MailKit and Okta.AspNetCore. With the release of .NET Core, Microsoft now recommends not using the System.NET.Mail libraries that you may be familiar with. MailKit is the preferred library to send emails according to their documentation. Okta.AspNetCore is the .NET Core version of Okta’s authentication library. There are minor changes when migrating to this package but it’s just as easy as the .NET Framework version.
    Install-Package Okta.AspNetCore -Version 3.1.1
    Install-Package MailKit -Version 2.8.0
Configure Appsettings.json
Chances are you are familiar with the web.config that ASP.NET has used for years. With .NET Core, web.config is no longer used. Instead, you will use appsettings.json for any of your configuration settings. By default, Visual Studio will add both appsettings.json and appsettings.Development.json files. If you decide to add new appsettings files, such as appsettings.Production.json you can change the ASPNETCORE_ENVIRONMENT variable to Production to use that file.
For this application, you can use appsettings.json. Add the following code to it. Again, you will need to replace the SMTP values with your configuration settings.
{
  "Logging": {
    "LogLevel": {
      "Default": "Information",
      "Microsoft": "Warning",
      "Microsoft.Hosting.Lifetime": "Information"
    }
  },
  "AllowedHosts": "*",
  "Okta": {
    "OktaDomain": "{yourOktaDomain}",
    "ClientId": "{yourClientId}",
    "ClientSecret": "{yourClientSecret}"
  },
  "Smtp": {
    "Host": "",
    "Port": 0,
    "Username": "",
    "Password": ""
  }
}
Startup.cs for .NET Core
Another core element of ASP.NET that is gone is the global.asax file. If you used OWIN in the past, you are familiar with the Startup.cs file. In ASP.NET Core the Startup file is the main way you set up your application. Here you will register middleware, leverage .NET Core’s built-in dependency injection, and configure your application.
Before you start that, create a new folder called Settings, and in it, add a file called SmtpSettings.cs. Add the following code to it.
namespace Okta_Conversion_Core.Settings
{
    public class SmtpSettings
    {
        public string Host { get; set; }
        public int Port { get; set; }
        public string Username { get; set; }
        public string Password { get; set; }
    }
}
Now open your Startup.cs file and add the following code to it.
using System.Collections.Generic;
using Microsoft.AspNetCore.Builder;
using Microsoft.AspNetCore.Hosting;
using Microsoft.Extensions.Configuration;
using Microsoft.Extensions.DependencyInjection;
using Microsoft.Extensions.Hosting;
using Okta.AspNetCore;
using Microsoft.AspNetCore.Authentication.Cookies;

namespace Okta_Conversion_Core
{
    public class Startup
    {
        public Startup(IConfiguration configuration)
        {
            Configuration = configuration;
        }

        public IConfiguration Configuration { get; }

        // This method gets called by the runtime. Use this method to add services to the container.
        public void ConfigureServices(IServiceCollection services)
        {
            services.AddControllersWithViews();

            services.Configure<Settings.SmtpSettings>(Configuration.GetSection("Smtp"));

            var oktaMvcOptions = new OktaMvcOptions()
            {
                OktaDomain = Configuration.GetSection("Okta").GetValue<string>("OktaDomain"),
                ClientId = Configuration.GetSection("Okta").GetValue<string>("ClientId"),
                ClientSecret = Configuration.GetSection("Okta").GetValue<string>("ClientSecret"),
                Scope = new List<string> { "openid", "profile", "email" },
            };

            services.AddAuthentication(options =>
            {
                options.DefaultAuthenticateScheme = CookieAuthenticationDefaults.AuthenticationScheme;
                options.DefaultSignInScheme = CookieAuthenticationDefaults.AuthenticationScheme;
                options.DefaultChallengeScheme = OktaDefaults.MvcAuthenticationScheme;
            })
            .AddCookie()
            .AddOktaMvc(oktaMvcOptions);

            services.AddMvc();
        }

        // This method gets called by the runtime. Use this method to configure the HTTP request pipeline.
        public void Configure(IApplicationBuilder app, IWebHostEnvironment env)
        {
            if (env.IsDevelopment())
            {
                app.UseDeveloperExceptionPage();
            }
            else
            {
                app.UseExceptionHandler("/Home/Error");
            }
            app.UseStaticFiles();

            app.UseRouting();

            app.UseAuthentication();

            app.UseAuthorization();

            app.UseEndpoints(endpoints =>
            {
                endpoints.MapControllerRoute(
                    name: "default",
                    pattern: "{controller=Home}/{action=Index}/{id?}");
            });
        }
    }
}
Most of this code is boilerplate from selecting MVC as your project type in the project creation. You will need to add app.UseAuthentication() to your Configure method. In ConfigureServices you will add the setup logic for Okta. With these two setups, you will be able to use the Authorize attribute on your actions or controllers the same as you did in ASP.NET.
You also added a line for configuring the SmtpSettings as a service in your application. This line will pull the Smtp section from your appsettings file and bind it to the selected model. Then it will make the configuration available using the IOptions Pattern in .NET Core.
Migrate controllers
You can now begin the process of migrating your controllers. First is the HomeController. This is also the simplest in your application. This controller will look also exactly as it did in ASP.NET, except that the directive will point at the new Microsoft.AspNetCore.Mvc namespace.
using Microsoft.AspNetCore.Mvc;

namespace Okta_Conversion_Core.Controllers
{
    public class HomeController : Controller
    {
        public ActionResult Index()
        {
            return View();
        }
    }
}
Next, you can implement your AccountController. In ASP.NET Core you will add a SignIn action that will return a Challenge if the user isn’t authenticated. The internal logic of this is contained in the Okta Asp.NET Core library. You also have the LogOff action which looks a little different than the classic ASP.NET version but is still simple to implement.
using Microsoft.AspNetCore.Http;
using Microsoft.AspNetCore.Mvc;

using Microsoft.AspNetCore.Authentication;
using Microsoft.AspNetCore.Authorization;
using Microsoft.AspNetCore.Authentication.Cookies;
using Okta.AspNetCore;

namespace Okta_Conversion_Core.Controllers
{
    public class AccountController : Controller
    {
        public IActionResult SignIn()
        {
            if (!HttpContext.User.Identity.IsAuthenticated)
            {
                return Challenge(OktaDefaults.MvcAuthenticationScheme);
            }

            return RedirectToAction("Index", "Home");
        }

        [HttpPost]
        [Authorize]
        public ActionResult LogOff()
        {
            return new SignOutResult(
                    new[]
                    {
                            OktaDefaults.MvcAuthenticationScheme,
                            CookieAuthenticationDefaults.AuthenticationScheme,
                    },
                    new AuthenticationProperties { RedirectUri = "/Home/" });

                    }
         }
}
Finally, you will need to add your DashboardController. Since this is where the bulk of your logic is, we should take a little extra time to go over it. Add your DashboardController and add the following code to it.
using System;
using System.Collections.Generic;
using Microsoft.AspNetCore.Mvc;

using Microsoft.AspNetCore.Authorization;

using MailKit.NET.Smtp;
using MimeKit;

using System.NET;
using System.IO;
using Newtonsoft.Json;

using Microsoft.Extensions.Options;

namespace Okta_Conversion_Core.Controllers
{
    [Authorize]
    public class DashboardController : Controller
    {
        IOptions<Settings.SmtpSettings> _smtpSettings;

        public DashboardController(IOptions<Settings.SmtpSettings> smtpSettings)
        {
            _smtpSettings = smtpSettings;
        }

        // GET: Dashboard
        public ActionResult Index()
        {
            return View();
        }

        //send email
        [HttpPost]
        public ActionResult SendEmail()
        {
            SmtpClient smtpClient = new SmtpClient();

            MimeMessage message = new MimeMessage();

            MailboxAddress to = new MailboxAddress("Nik Fisher", "nik@fishbowlllc.com");
            MailboxAddress from = new MailboxAddress("Nik Fisher", "nik@fishbowlllc.com");

            message.To.Add(to);
            message.From.Add(from);

            message.Subject = "Hello From the Conversion App";

            BodyBuilder bodyBuilder = new BodyBuilder();
            bodyBuilder.HtmlBody = "<p>this is my test email</p>";
            bodyBuilder.TextBody = "this is my test email";

            smtpClient.Connect(_smtpSettings.Value.Host, _smtpSettings.Value.Port, true);
            smtpClient.Authenticate(_smtpSettings.Value.Username, _smtpSettings.Value.Password);

            smtpClient.Send(message);
            smtpClient.Disconnect(true);
            smtpClient.Dispose();

            return new JsonResult(true);
        }

        public ActionResult GetUsers()
        {
            WebRequest request = WebRequest.Create("https://jsonplaceholder.typicode.com/users");
            request.Method = "GET";

            WebResponse response = request.GetResponse();

            using (var reader = new StreamReader(response.GetResponseStream()))
            {
                var text = reader.ReadToEnd();
                var userList = JsonConvert.DeserializeObject<List<Models.UserModel>>(text);
                return new JsonResult(userList);
            }

            throw new Exception("There was a problem fetching the users");
        }
    }
}
First, the entire controller is under the [Authorize] attribute. This is the same as it was in ASP.NET.
You make use of the IOptions pattern by injecting the SmtpSettings into the controller. Now this controller will have access to the configuration you set up in your appsettings file.
The SendEmail action is considerably different. Microsoft has depreciated the System.NET.Mail libraries that were used in ASP.NET to send emails. Now they recommended using MailKit to send emails. MailKit is very simple though. If you are familiar with the System.NET.Mail libraries implementing the MailKit version is very similar.
The last thing to notice here is that JsonResult now has a constructor that takes a parameter containing your data. In ASP.NET you had to set the data manually after calling the constructor. The new syntax makes for cleaner code and allows you to inject the data right into the JsonResult object.
Migrate Your Views to .NET Core
Finally, it’s time to migrate your views. There are only a few changes here. To start, Dashboard/Index.cshtml and Home/Index.cshtml are the same as they were in the ASP.NET project. The nice thing is Razor hasn’t changed much.
For reference see below for the Home/Index page.
@{
ViewBag.Title = "Home Page";
}
<div class="jumbotron">
<h1>Conversion</h1>
<p class="lead">A demo using .NET Framework, .NET Core, and Okta</p>
<p><a href="https://developer.okta.com/" class="btn btn-primary btn-lg">Learn more »</a></p>
</div>
<div class="row">
<div class="col-md-4">
<h2>Purpose</h2>
<p>
Learn how to convert a .NET Framework MVC web application using Okta to a .NET Core application.
</p>
<p><a class="btn btn-default" href="https://go.microsoft.com/fwlink/?LinkId=301865">Learn more »</a></p>
</div>
<div class="col-md-4">
<h2>Okta</h2>
<p>Powerful Single Sign-On provider </p>
<p><a class="btn btn-default" href="https://go.microsoft.com/fwlink/?LinkId=301866">Learn more »</a></p>
</div>
<div class="col-md-4">
<h2>Author</h2>
<p>Written by Nik Fisher</p>
<p><a class="btn btn-default" href="https://go.microsoft.com/fwlink/?LinkId=301867">Learn more »</a></p>
</div>
</div>
And now you can add your code for the Dashboard/Index page.
@{
    ViewBag.Title = "Index";
}

<div class="row mb-2">
    <div class="alert alert-dismissable">
        <button class="btn btn-primary" onclick="sendEmail()">Send Email</button>

    </div>
</div>

<table class="table table-striped">
    <thead>
        <tr>
            <th>Name</th>
            <th>Username</th>
            <th>Email</th>
            <th>Website</th>
        </tr>
    </thead>
    <tbody></tbody>
</table>

@section scripts
{
    <script>

        $(document).ready(function () {
            $.get('@Url.Action("GetUsers", "Dashboard")', function (data) {
                $.each(data, function (key, value) {
                    var row = '<tr><td>' + value.name + '</td><td>' + value.username + '</td><td>' + value.email + '</td><td>' + value.website + '</td></tr>';
                    $('table').append(row);
                });
            });
        });

        function sendEmail() {
            $.post('@Url.Action("SendEmail", "Dashboard")', function (data) {
                console.log(data);
            })
        }

    </script>
}
Next, you can update your Shared/_Layout.cshtml file. There are a couple of small changes here as the ASP.NET application was written using Bootstrap version 3 while this application was shipped with Bootstrap version 4.
<!DOCTYPE html>
<html lang="en">
<head>
<meta charset="utf-8" />
<meta name="viewport" content="width=device-width, initial-scale=1.0" />
<title>@ViewData["Title"] - Okta_Conversion_Core</title>
<link rel="stylesheet" href="~/lib/bootstrap/dist/css/bootstrap.min.css" />
<link rel="stylesheet" href="~/css/site.css" />
</head>
<body>
<div class="navbar navbar-inverse navbar-fixed-top">
<div class="container">
<div class="navbar-header">
<button type="button" class="navbar-toggler" data-toggle="collapse" data-target=".navbar-collapse">
<span class="icon-bar"></span>
<span class="icon-bar"></span>
<span class="icon-bar"></span>
</button>
@Html.ActionLink("Conversion", "Index", "Home", new { area = "" }, new { @class = "navbar-brand" })
</div>
<div class="navbar-collapse collapse">
<ul class="nav navbar-nav">
<li>@Html.ActionLink("Home", "Index", "Home")</li>
</ul>
</div>
@Html.Partial("_LoginPartial")
</div>
</div>
<div class="container body-content">
@RenderBody()
<hr />
<footer>
<p>© @DateTime.Now.Year - Conversion by <a href="https://profile.fishbowlllc.com/" rel="noreferrer" target="_blank">Nik Fisher.</a></p>
</footer>
</div>
<script src="~/lib/jquery/dist/jquery.min.js"></script>
<script src="~/lib/bootstrap/dist/js/bootstrap.bundle.min.js"></script>
<script src="~/js/site.js" asp-append-version="true"></script>
@RenderSection("Scripts", required: false)
</body>
</html>
Finally, you can update your Shared/_LoginPartial.cshtml with the code below. It is very similar to the ASP.NET code but there are a couple of changes to be aware of. First, to check if the user is authenticated, you need to check the Context object rather than the Request object. Also, note that you are using the new TagHelpers.AnchorTagHelper class to build your anchor link for signing on. You can declare the controller and action as attributes of the anchor rather than manually type in a URL.
@if (Context.User.Identity.IsAuthenticated)
{
    using (Html.BeginForm("LogOff", "Account", FormMethod.Post, new { id = "logoutForm", @class = "navbar-right" }))
    {

        <ul class="nav navbar-nav navbar-right">
            <li>
                Hello @User.Identity.Name !
            </li>
            <li><a href="javascript:document.getElementById('logoutForm').submit()">Log off</a></li>
        </ul>
    }
}
else
{
<ul class="nav navbar-nav navbar-right">
    <a asp-controller="Account" asp-action="SignIn">Sign In</a>
</ul>
}
Wrap up
At this point, it’s recommended that you test all your actions and make sure they are still working properly. Between the upgrade path provided by Microsoft and the ease of using Okta, converting ASP.NET applications to ASP.NET Core can be a painless process.
Okta Developer Blog Comment Policy
We welcome relevant and respectful comments. Off-topic comments may be removed.