Build a Basic CRUD App with ASP.NET Core 3.0 and MongoDB

Document databases have become increasingly popular due to their speed and ability to store huge amounts of data or semi-structured data. MongoDB has emerged as a leader in the document database space and, as a consequence, it may be necessary for developers to learn how to interact with MongoDB from .NET applications. This post strips away all the arguments that obscure how document databases can easily serve as a datastore for .NET applications.
The app you’ll build is a virtual suggestion box. It is meant to strip away anything that doesn’t deal with saving, retrieving, updating, and deleting data from the document store.
For this example, you’ll use MongoDB’s Atlas. Atlas is a hosted solution for MongoDB clusters. You can easily sign up for a free account. You’ll also use Okta for user authentication (you can also sign up for a free account).
Scaffold Your ASP.NET Core Application
For this application, I’ll show you all the command-line commands for creating the application, coding in VS Code. You could use Visual Studio but, if you’re on macOS or Linux, you won’t have that ability.
To scaffold a basic ASP.NET Core MVC application, use the following command:
dotnet new mvc --no-https -n OktaNetCoreMvcMongoExample
This command creates the application in a folder called OktaNetCoreMvcMongoExample. It also tells the .NET Core SDK not to use https for the development URL. Obviously, if this were a production application, you would want to leave that on.
Next, change into the OktaNetCoreMvcMongoExample folder and open VSCode in that directory. From there, install the two packages you need for the application to work:
dotnet add package MongoDB.Driver -v 2.10.4
dotnet add package Microsoft.AspNetCore.Authentication.OpenIdConnect -v 3.1.4
The MongoDB.Driver package allows .NET Core to connect to the MongoDB database. ou’ll use the Microsoft.AspNetCore.Authentication.OpenIdConnect to authenticate to Okta.
Set Up Your Free MongoDB Cluster
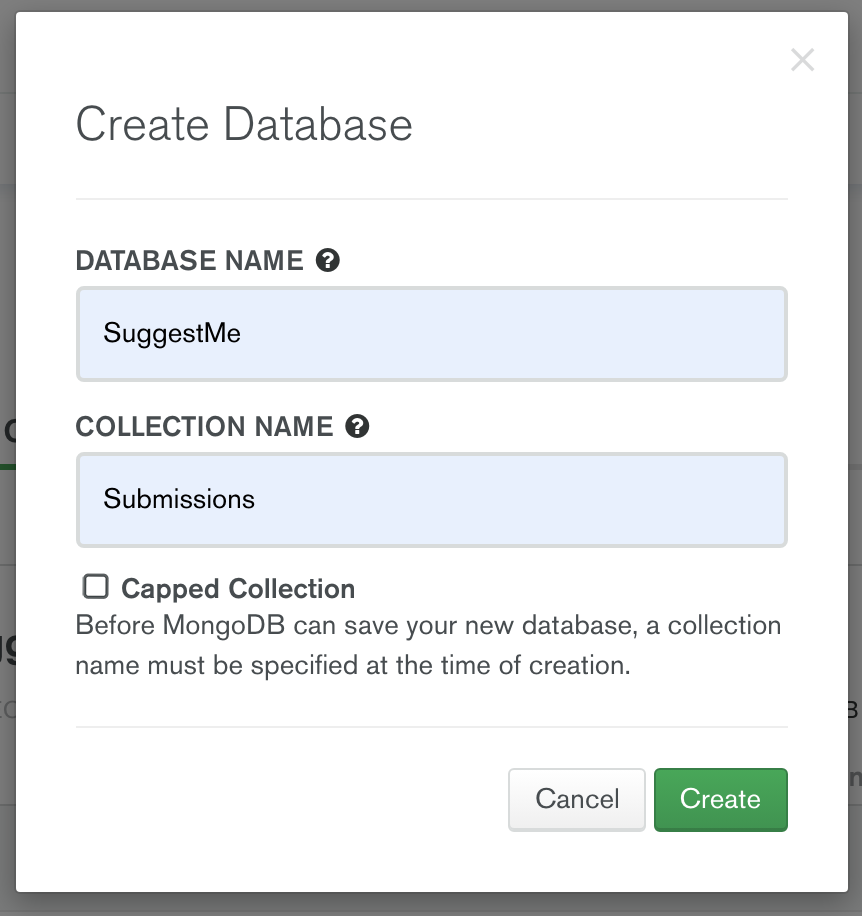
Once you’ve signed up for a free MongoDB cluster (I just used my Google account), you should be taken to a page that lists your clusters. The only cluster that should be in there to begin with is called Cluster0. Click on the COLLECTIONS button, then click the + Create Database button and create a database called “SuggestMe” with a collection of “Submissions”. You can have as many collections in the database as you want, but for the purposes of the “SuggestMe” app, all you’ll need is the “Submissions” collection.
Connect Your .NET Core Application to the MongoDB Database
Add your database connection information to the appsettings.json file in the root of your application. After the Logging section of the JSON document, add:
"DatabaseSettings": {
    "ConnectionString": "{MongoDBConnectionString}",
    "DatabaseName": "SuggestMe"
},
If you go back to the clusters listing by clicking the Clusters menu item on the left, you can then click the CONNECT button.
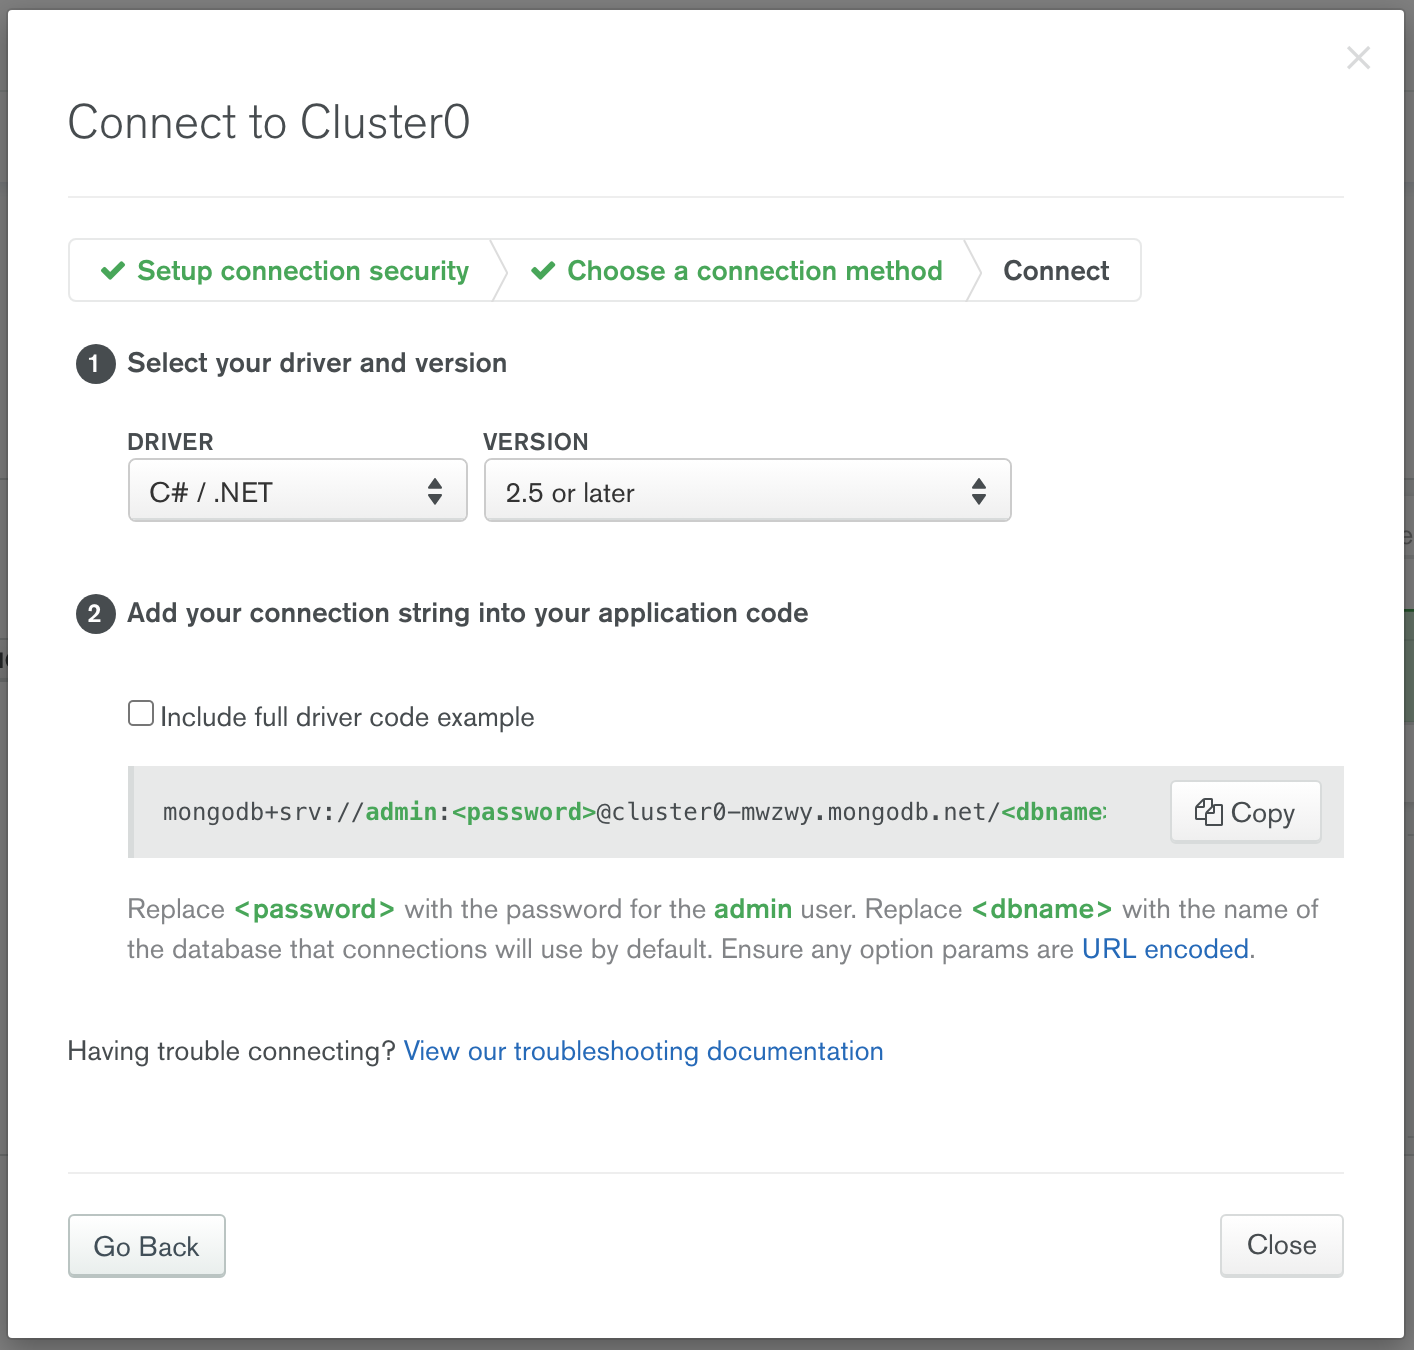
Replace the {MongoDBConnectionString} placeholder with your connection string from MongoDB Atlas. You can copy it directly from the CONNECT dialog and replace your admin password (or, even better, add a new user to the database specifically for your application to use) and put that user and password in the connection string. Also, replace the <dbname> in the connection string with suggestme for your database.
Next, you’ll need some classes to get the connection working correctly. In your Models folder, add a file called DatabaseSettings.cs. The contents of the file will be:
namespace OktaNetCoreMvcMongoExample.Models
{
    public interface IDatabaseSettings
    {
        string ConnectionString { get; set; }
        string DatabaseName { get; set; }
    }

    public class DatabaseSettings : IDatabaseSettings
    {
        public string ConnectionString { get; set; }
        public string DatabaseName { get; set; }
    }
}
You might notice there are a class and an interface in this file. Again, this is just for simplicity’s sake. You can easily separate them into two files if you would like.
The interface will allow you to inject the database connection into any class that needs it using the dependency injection framework built into .NET Core. Do so by going into the Startup.cs file in the root of your project and adding to the beginning of the ConfigureServices method:
services.Configure<DatabaseSettings>(Configuration.GetSection(nameof(DatabaseSettings)));
services.AddSingleton<IDatabaseSettings>(x => x.GetRequiredService<IOptions<DatabaseSettings>>().Value);
This will pull the settings from appsettings.json file into the properties of the DatabaseSettings object and inject them anywhere another object requires a IDatabaseSettings contract to be fulfilled.
In the Models folder, create a file called Submission.cs with the following contents:
using System;
using MongoDB.Bson;
using MongoDB.Bson.Serialization.Attributes;

namespace OktaNetCoreMvcMongoExample.Models
{
    public class Submission
    {
        [BsonId]
        [BsonRepresentation(BsonType.ObjectId)]
        public string Id { get; set; }

        public string UserId { get; set; }

        public string UserName { get; set; }

        public string Content { get; set; }

        public DateTime Created { get; set; }

        public DateTime LastUpdated { get; set; }
    }
}
Prepare the .NET Core Application to Store Data in MongoDB
Notice the MongoDB.Bson and MongoDB.Bson.Serialization.Attributes namespaces that are added. These allow the MongoDB package to handle serialization and the document identifier as a BSON type. The rest of the code is a regular C Sharp class.
Now, add a folder called Services and to it, add a class file called SubmissionService.cs. This will be the class that communicates with the MongoDB data store.
using System.Collections.Generic;
using MongoDB.Driver;
using OktaNetCoreMvcMongoExample.Models;

namespace OktaNetCoreMvcMongoExample.Services
{

    public class SubmissionService
    {
        private readonly IMongoCollection<Submission> _submissions;

        public SubmissionService(IDatabaseSettings settings)
        {
            var client = new MongoClient(settings.ConnectionString);
            var database = client.GetDatabase(settings.DatabaseName);
            _submissions = database.GetCollection<Submission>("Submissions");
        }

        public Submission Create(Submission submission)
        {
            _submissions.InsertOne(submission);
            return submission;
        }

        public IList<Submission> Read() =>
            _submissions.Find(sub => true).ToList();

        public Submission Find(string id) =>
            _submissions.Find(sub=>sub.Id == id).SingleOrDefault();

        public void Update(Submission submission) =>
            _submissions.ReplaceOne(sub => sub.Id == submission.Id, submission);

        public void Delete(string id) =>
            _submissions.DeleteOne(sub => sub.Id == id);
    }
}
It seems like a lot to unpack, but most of it is likely stuff you have seen before. The IDatabaseSettings is injected with your DatabaseSettings object carrying the connection information for the MongoClient object instantiated in the constructor. Then, the database is retrieved and the “Submissions” collection.
All of the data interaction methods here use the MongoDB driver syntax. Things like InsertOne, Find, ReplaceOne, and DeleteOne all do exactly as their name suggests. Then, lambda functions are passed to them to determine which documents in the Submissions collection to Find or Replace, etc. Everything else works exactly like a SQL-centric method would by returning lists, single documents, or nothing.
Add a single line to your Startup.cs file right below the dependency injection code you added earlier. This will inject the SubmissionService into any class that requires it:
services.AddSingleton<SubmissionService>();
Then, add a SubmissionController.cs to your Controllers folder to glue all of this together:
using System;
using System.Collections.Generic;
using System.Linq;
using System.Security.Claims;
using Microsoft.AspNetCore.Authorization;
using Microsoft.AspNetCore.Mvc;
using OktaNetCoreMvcMongoExample.Models;
using OktaNetCoreMvcMongoExample.Services;

namespace OktaNetCoreMvcMongoExample.Controllers
{
    [Authorize]
    public class SubmissionController : Controller
    {
        private readonly SubmissionService _subSvc;

        public SubmissionController(SubmissionService submissionService)
        {
            _subSvc = submissionService;
        }

        [AllowAnonymous]
        public ActionResult<IList<Submission>> Index() => View(_subSvc.Read());

        [HttpGet]
        public ActionResult Create() => View();

        [HttpPost]
        [ValidateAntiForgeryToken]
        public ActionResult<Submission> Create(Submission submission){
            submission.Created = submission.LastUpdated = DateTime.Now;
            submission.UserId = User.Claims.FirstOrDefault(c=>c.Type == ClaimTypes.NameIdentifier).Value;
            submission.UserName = User.Identity.Name;
            if(ModelState.IsValid){
                _subSvc.Create(submission);
            }
            return RedirectToAction("Index");
        }

        [HttpGet]
        public ActionResult<Submission> Edit(string id) =>
            View(_subSvc.Find(id));

        [HttpPost]
        [ValidateAntiForgeryToken]
        public ActionResult Edit(Submission submission)
        {
            submission.LastUpdated = DateTime.Now;
            submission.Created = submission.Created.ToLocalTime();
            if(ModelState.IsValid){
                if(User.Claims.FirstOrDefault(c=>c.Type == ClaimTypes.NameIdentifier).Value != submission.UserId)
                {
                    return Unauthorized();
                }
                _subSvc.Update(submission);
                return RedirectToAction("Index");
            }
            return View(submission);
        }

        [HttpGet]
        public ActionResult Delete(string id)
        {
            _subSvc.Delete(id);
            return RedirectToAction("Index");
        }
    }
}
The SubmissionService will be injected into the controller to make it easy to call those methods. You’ve also added actions to handle everything a user would want to do for a submission. The Create() and Edit() actions add Created and LastUpdated properties to the submission object to be saved or updated.
You may notice something kind of weird here: the
Edit()action actually takes theCreatedproperty and converts itToLocalTime(). This is because the MongoDB driver converts the dates to a GMT date. The interface for updating submissions has a hidden field for the date in a local date format, but it doesn’t convert the value. So you’ll need to convert the value to the local date-time. That way, when MongoDB converts it to GMT it’s not off.
The Create() action adds a Created and LastUpdated value of DateTime.Now as well as the UserId and UserName of the currently logged in user. You’ll notice there is an [Authorize] attribute on the whole controller with an [AllowAnonymous] attribute only on the Index() action. This will ensure that anyone can view the list of suggestions, but any other action taken on the suggestions requires the user be logged in.
Add Views to the .NET Core Application
You’ll need some user interface elements for the user to add and edit suggestions. Add a folder called Submission to the Views folder of the application. Then, on the suggestion listing page, add an Index.cshtml view with the following contents:
@model IEnumerable<OktaNetCoreMvcMongoExample.Models.Submission>

<h1>List of Ideas</h1>

    @foreach (var sub in Model)
    {
        <div class="idea">
            <span>Created By: @sub.UserName on @sub.Created.ToLocalTime()</span>
            <span>Last Updated: @sub.LastUpdated.ToLocalTime()</span>
            <div>
                @sub.Content
            </div>
            @if (User.Identity.IsAuthenticated && User.Claims.FirstOrDefault(c=>c.Type == System.Security.Claims.ClaimTypes.NameIdentifier).Value == @sub.UserId)
            {
                <a asp-action="Edit" asp-route-id="@sub.Id">edit</a>
                <a asp-action="Delete" asp-route-id="@sub.Id">delete</a>
            }
        </div>
    }
<hr/>
<a class="create" asp-action="Create">Add New Idea</a>
This view declares the Submission model list at the top, then loops through the list and displays each submission in a div block. For the actions available for each submission, it checks to see if there is a logged-in user and if the logged-in user is the one who created the submission. This ensures that only the person who created that particular submission can edit or delete it.
You’ll also need a view for creating and editing submissions. Add a Create.cshtml and Edit.cshtml file to the Submission folder.
Create.cshtml
@model OktaNetCoreMvcMongoExample.Models.Submission

<form asp-action="Create">
    <fieldset class="idea-form">
        <h2>Submit an Idea</h2>
        @Html.TextAreaFor(m=>m.Content)
        <input type="submit" name="Create" />
    </fieldset>
</form>
Edit.cshtml
@model OktaNetCoreMvcMongoExample.Models.Submission

<form asp-action="Edit">
    <fieldset class="idea-form">
        @Html.HiddenFor(m => m.Created)
        @Html.HiddenFor(m=>m.UserId)
        @Html.HiddenFor(m=>m.UserName)
        @Html.LabelFor(m => m.Content)
        @Html.TextAreaFor(m => m.Content)
        <input type="submit" name="Update" />
    </fieldset>
</form>
The only things really remarkable here are the hidden fields for the Created, UserId, and UserName properties in the edit form. These will ensure the values are passed back without exposing them to edits.
I added a little CSS magic to make the views look a little more presentable. In the wwwroot/css/site.css file at the bottom, I added:
/* Idea specific styles */

.idea {
  border: solid 1px #DDD;
  padding: .5rem;
  margin-bottom: .5rem;
}

.idea > span {
  font-size: .75rem;
  color: #AAA;
  font-style: italic;
  padding: .5rem;
}

.idea > div {
  padding: .5rem;
}

a.create {
  display: block;
  width: 100%;
  text-align: right;
}

.idea-form > * {
  display: block;
}

.idea-form > textarea {
  height: 5rem;
  width: 100%;
}
Add Authentication to the .NET Core Application
Lastly, you’ll need to add authentication using Okta so that the application can enforce the rule that only users who created a submission can edit or delete those submissions. Start by creating an application in Okta—go to your Okta dashboard, click on Applications in the top menu and then click the green Add Application button. Choose Web and click Next.
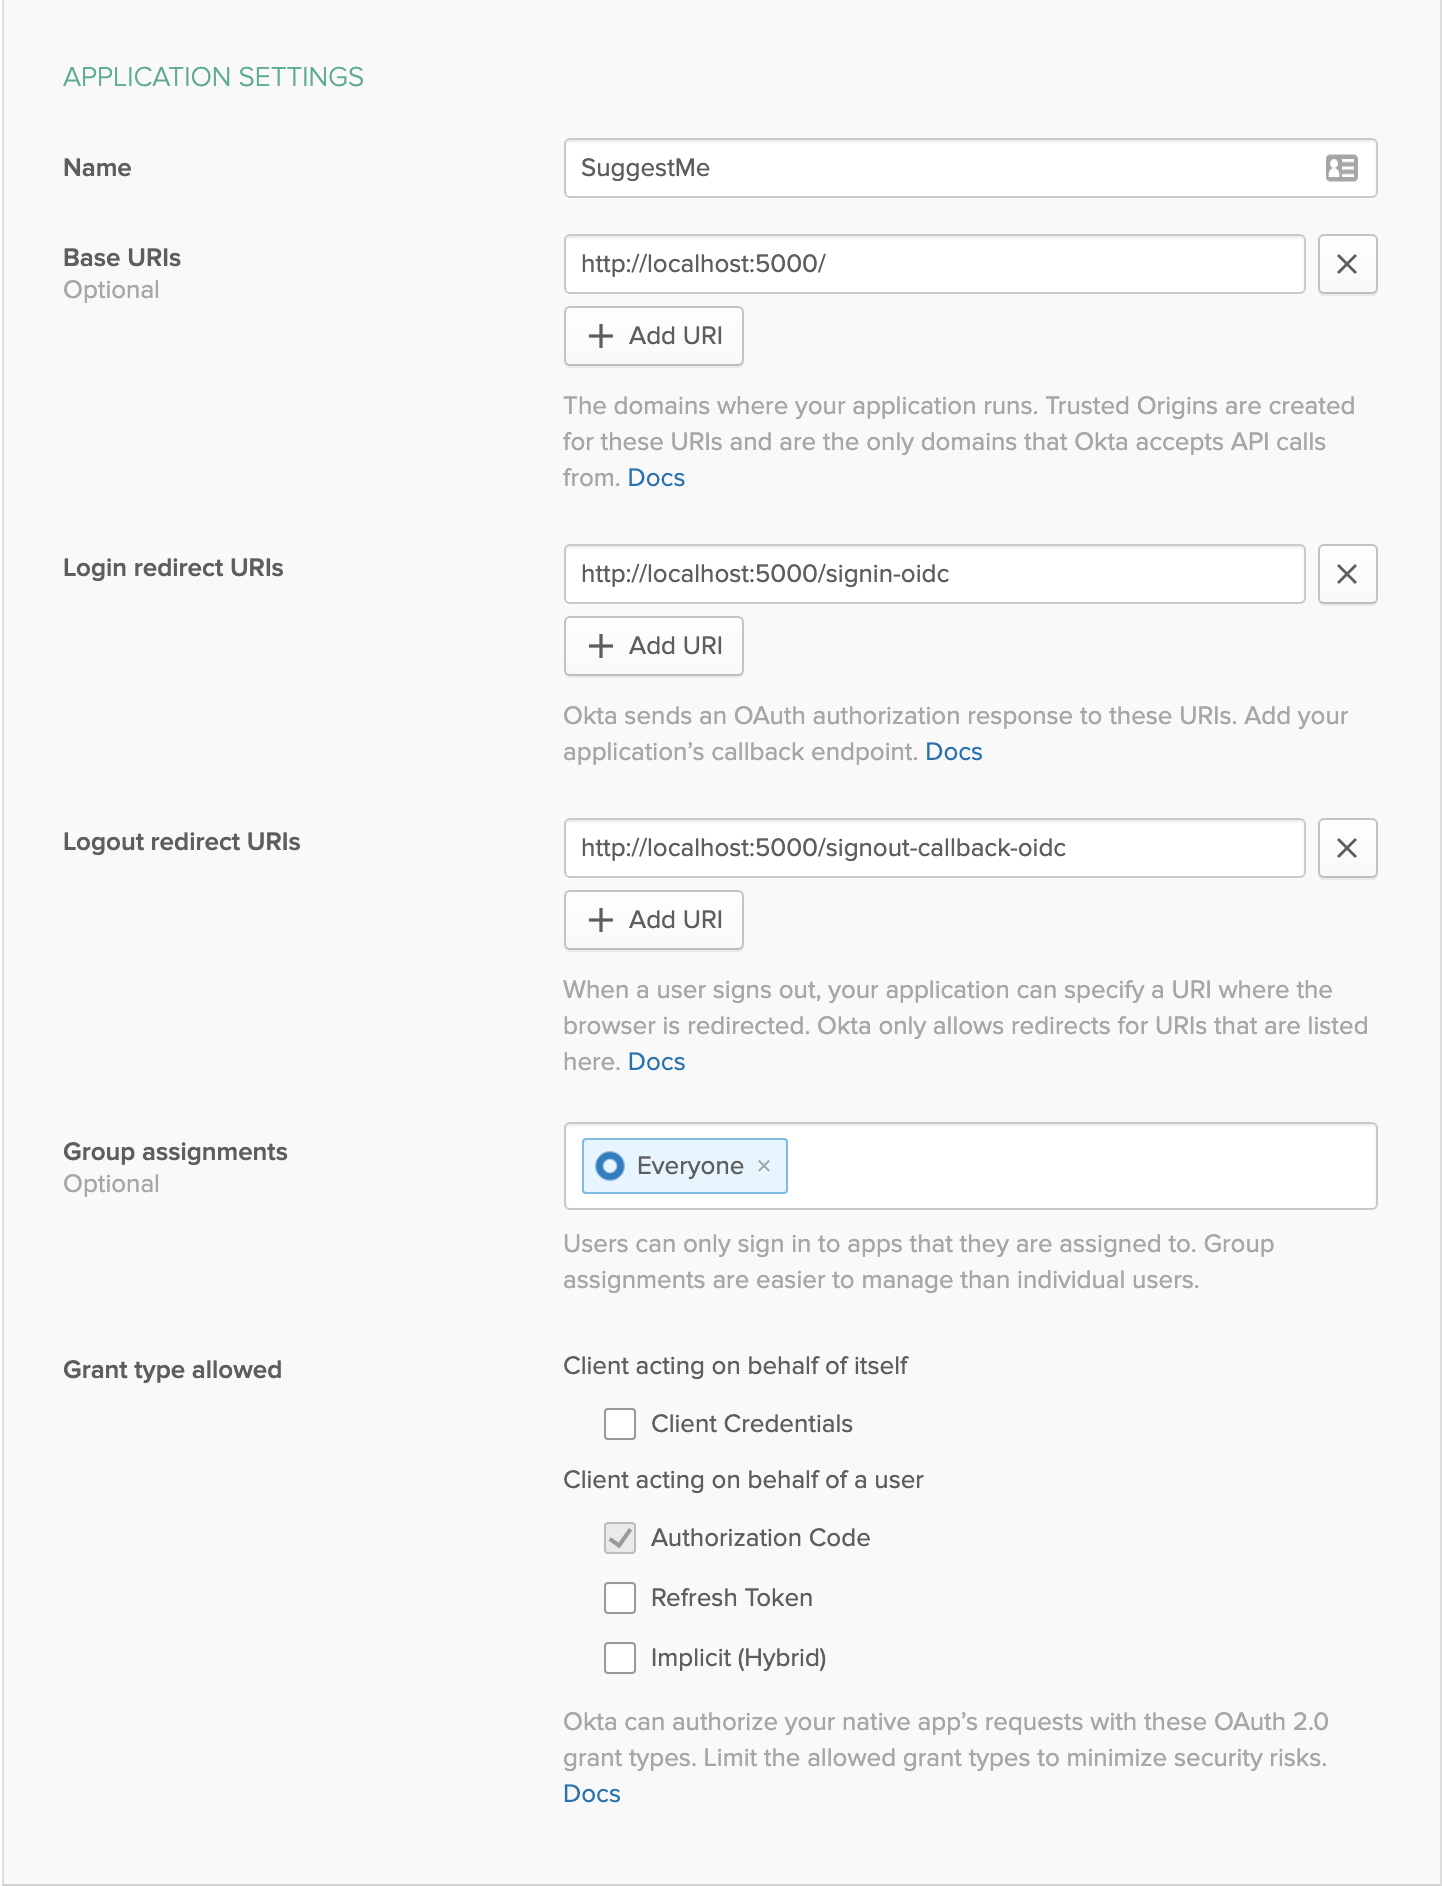
In the Application Settings, name the application “SuggestMe” then change the Base URIs to http://localhost:5000/, the Login redirect URIs to http://localhost:5000/signin-oidc and the Logout redirect URIs to http://localhost:5000/signout-callback-oidc. All the other default values should be fine.
When you click Done, you should be directed to the application settings page. On the General tab at the bottom, you’ll see a box with a ClientId and ClientSecret. Copy those to a new section in appsettings.json below the database settings you added earlier:
"Okta": {
    "ClientId": "{yourClientId}",
    "ClientSecret": "{yourClientSecret}",
    "Domain": "{yourOktaDomain}",
    "PostLogoutRedirectUri": "http://localhost:5000"
},
You can find your Okta domain URL on the top right of your Okta dashboard.

Next, add a file called AccountController.cs to the Controllers folder like so:
using Microsoft.AspNetCore.Authentication.Cookies;
using Microsoft.AspNetCore.Authentication.OpenIdConnect;
using Microsoft.AspNetCore.Mvc;

namespace DockerPipelineExample.Controllers
{
    public class AccountController : Controller
    {
        public IActionResult Login()
        {
            if(!HttpContext.User.Identity.IsAuthenticated)
            {
              return Challenge(OpenIdConnectDefaults.AuthenticationScheme);
            }
            return RedirectToAction("Index", "Home");
        }

        public IActionResult Logout()
        {
            return new SignOutResult(new[]
            {
              OpenIdConnectDefaults.AuthenticationScheme,
              CookieAuthenticationDefaults.AuthenticationScheme
            });
        }
    }
}
This adds actions for logging in and logging out that can then be used by the application to facilitate authentication with Okta.
Finally, you’ll add navigation so that users can get to all this cool stuff! In the Views/Shared folder add a file called _LoginPartial.cshtml. This will be the partial view that contains navigation and display elements for authentication routes:
@if (User.Identity.IsAuthenticated)
{
<ul class="navbar-nav">
<li>
<span class="navbar-text">Hello, @User.Identity.Name</span>
<a onclick="document.getElementById('logout_form').submit();" style="cursor: pointer;">Log out</a>
</li>
</ul>
<form asp-controller="Account" asp-action="Logout" method="post" id="logout_form"></form>
}
else
{
<ul class="navbar-nav">
<li><a asp-controller="Account" asp-action="Login">Log in</a></li>
</ul>
}
This will display the user’s name and a logout button when the user is logged in, as well as a login button when they’re not. All that’s left is to add it to the main navigation. Change the _Layout.cshtml file so that it looks like this:
<!DOCTYPE html>
<html lang="en">
<head>
<meta charset="utf-8" />
<meta name="viewport" content="width=device-width, initial-scale=1.0" />
<title>@ViewData["Title"] - OktaNetCoreMvcMongoExample</title>
<link rel="stylesheet" href="~/lib/bootstrap/dist/css/bootstrap.min.css" />
<link rel="stylesheet" href="~/css/site.css" />
</head>
<body>
<header>
<nav class="navbar navbar-expand-sm navbar-toggleable-sm navbar-light bg-white border-bottom box-shadow mb-3">
<div class="container">
<a class="navbar-brand" asp-area="" asp-controller="Home" asp-action="Index">OktaNetCoreMvcMongoExample</a>
<button class="navbar-toggler" type="button" data-toggle="collapse" data-target=".navbar-collapse" aria-controls="navbarSupportedContent"
aria-expanded="false" aria-label="Toggle navigation">
<span class="navbar-toggler-icon"></span>
</button>
<div class="navbar-collapse collapse justify-content-between">
<ul class="navbar-nav mr-auto">
<li class="nav-item">
<a class="nav-link text-dark" asp-area="" asp-controller="Home" asp-action="Index">Home</a>
</li>
<li class="nav-item">
<a class="nav-link text-dark" asp-area="" asp-controller="Submission" asp-action="Index">Ideas</a>
</li>
<li class="nav-item">
<a class="nav-link text-dark" asp-area="" asp-controller="Home" asp-action="Privacy">Privacy</a>
</li>
</ul>
<partial name="_LoginPartial" />
</div>
</div>
</nav>
</header>
<div class="container">
<main role="main" class="pb-3">
@RenderBody()
</main>
</div>
<footer class="border-top footer text-muted">
<div class="container">
© 2020 - OktaNetCoreMvcMongoExample - <a asp-area="" asp-controller="Home" asp-action="Privacy">Privacy</a>
</div>
</footer>
<script src="~/lib/jquery/dist/jquery.min.js"></script>
<script src="~/lib/bootstrap/dist/js/bootstrap.bundle.min.js"></script>
<script src="~/js/site.js" asp-append-version="true"></script>
@RenderSection("Scripts", required: false)
</body>
</html>
You’ll see the new login partial after the ul for the menu. I’ve also changed the classes on the navbar-collapse element adding the justify-content-between class. That will move the login partial to the right side of the menu while leaving the regular navigation on the left. I also added the mr-auto class that will justify it to the right.
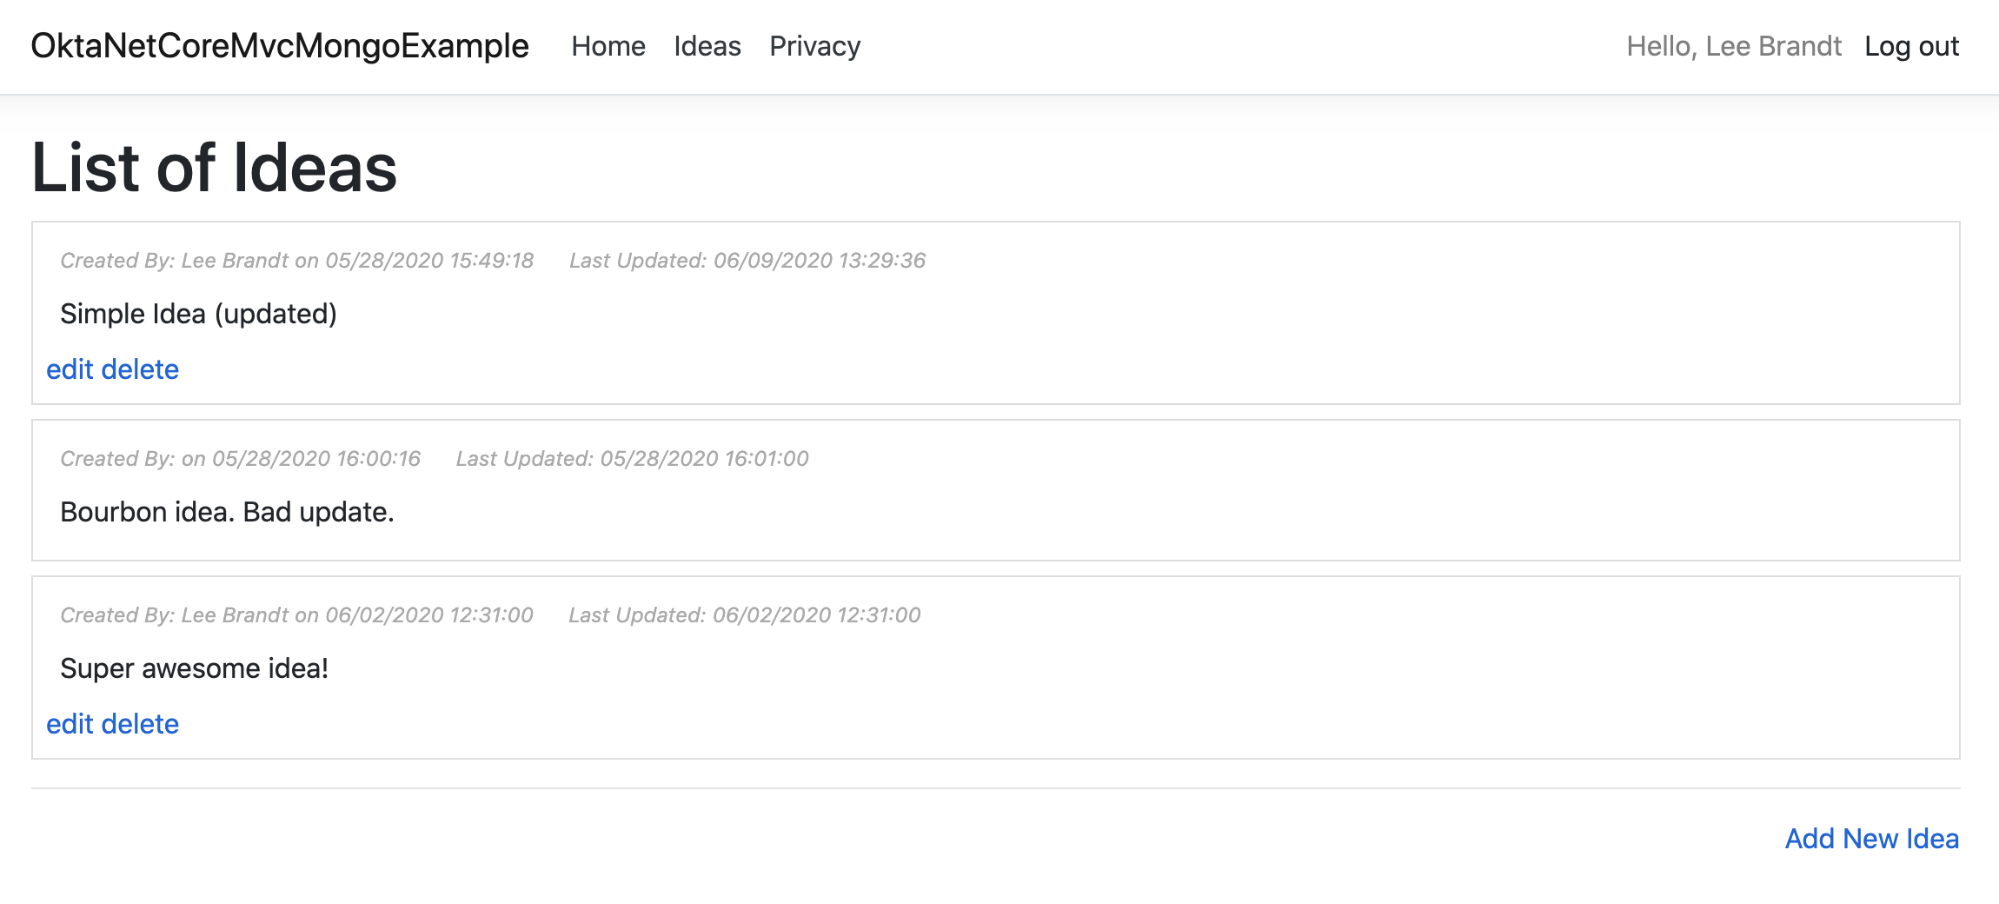
Run Your New .NET Core and MongoDB Application
You should now be able to fire this new application up with either an F5 from VS Code or by typing dotnet run in a terminal in the folder where the application is.
Learn More About ASP.NET Core
If you’d like to learn more about ASP.NET Core, check out some of our other killer content:
- ASP.NET Core 3.0 MVC Secure Authentication
- User Authorization in ASP.NET Core with Okta
- Secure Your ASP.NET Core App with OAuth 2.0
We are always posting new content. If you like this content, be sure to follow us on Twitter and subscribe to our YouTube Channel.
Okta Developer Blog Comment Policy
We welcome relevant and respectful comments. Off-topic comments may be removed.