Quickly Build Node.js Apps with Sails.js

Sails.js is an exciting MVC framework for Node.js. Recently the team released version 1.0 and today you’re going to learn how to use the framework to rapidly build a new website. The hype around Sails.js is real. As a veteran MVC developer, I was impressed with the extensibility, organization, flow, and speed Sails.js provides.
The team at Sails. js has done an excellent job of abstracting the MVC portion of the codebase away from the ancillary tasks of database management, authentication, authorization, setting up middleware, and anything else you can imagine. Once your project is set up the way you see fit, the MVC portion of the project is very quick. In this tutorial, I won’t be going over everything in the setup because Sails.js supports almost any tools you use. Once you start work on your project, you’ll want to go through and understand how best to meet your needs. I highly recommend going over the Concepts Section on Sails’ website for more information.
One last note about Sails.js in general; the framework really shines with a project that is well thought through and ready for development. If you start working on a project and continuously flip between the policies, routes, models, views, and controllers the framework can get a little overwhelming. It’s much easier to have the list of routes already designed before implementing the code then moving on to the controllers and so forth.
In this project, you will build a small web application for monitoring and maintaining a garden. Recently, I completed an enclosed garden for my wife and grew interested in monitoring and maintaining it remotely using an Arduino. The system will have a controller for a fountain, a GSM module for communicating with this web application, and an array of peripherals for monitoring the general health of the garden. This application will be used to store and display the metrics on the garden’s health as well as take instructions for turning the fountain on and off.
Setup Okta
First, you need to set up a new application in Okta. Log into your developer console and click on Applications and then Add Application. Okta will ask you to choose your platform which you can select Web. This will bring you to the Application Settings section of the setup phase. Name your application something meaningful, I named mine Gardino. You will likely need to change the ports on your Base URIs, Login redirects URIs, and Logout redirect URIs. By default, Sails.js uses 1337 so change 8080 to 1337.
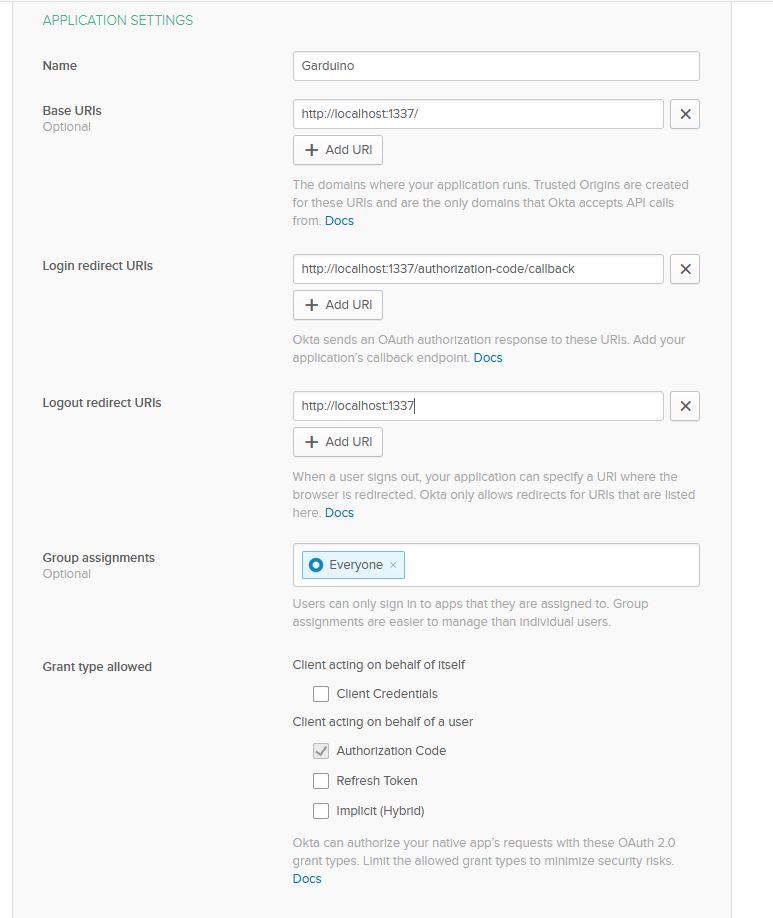
Press Done and you’ll be able to review your setup before moving forward. Make note of your ClientId and your Client Secret as you will need these for your application.
Create Your Sails.js Application
With your Okta application complete you can start building your application. First, you will need to install Sails. js globally using npm.
npm install sails -g
Next, you can use the Sails generator in your directory to create a new app.
sails new gardunio
You will be shown a prompt asking if you want to create a Web App or Empty project. Choose the Web App option.

The Web App option will automatically load some dependencies that are pretty useful out of the box. These include bootstrap, vue, and parasails. Parasails is a small wrapper around Vue.js and Lodash that is useful if you choose to use Vue.js on your front end.
The downside of this approach is it will create a whole web app with pages and models that you don’t need. You can remedy this by removing some of the irrelevant files. First, delete the views/emails. Next, delete views/layouts/layout-email.ejs . Finally, you can delete everything in the views/pages folder except homepage.ejs.
Next, in the api folder you should delete the hooks folder. You can delete the contents of api/controllers , api/models , and api/helpers . Finally, delete api/responses/expired.js and api/policies/is-super-admin.js.
Last, you will want to delete the contents of the assets/js folder. You may be wondering why you deleted all those files rather than using the Empty option. It’s a matter of deleting some extraneous things, vs going through the work of adding in missing but critical components to the application. It’s a little bit easier to remove the web app features than add back the missing components.
Install Application Dependencies
Because the web app version of the sails.js generator comes pretty near ready to go, the packages you need to install are minimal. You will need the Okta Middleware for managing your authentication. You will also want to get dotenv for housing your environment variables.
npm i @okta/oidc-middleware@4.0.1
npm i @okta/okta-sdk-nodejs@3.2.0
npm i dotenv@8.2
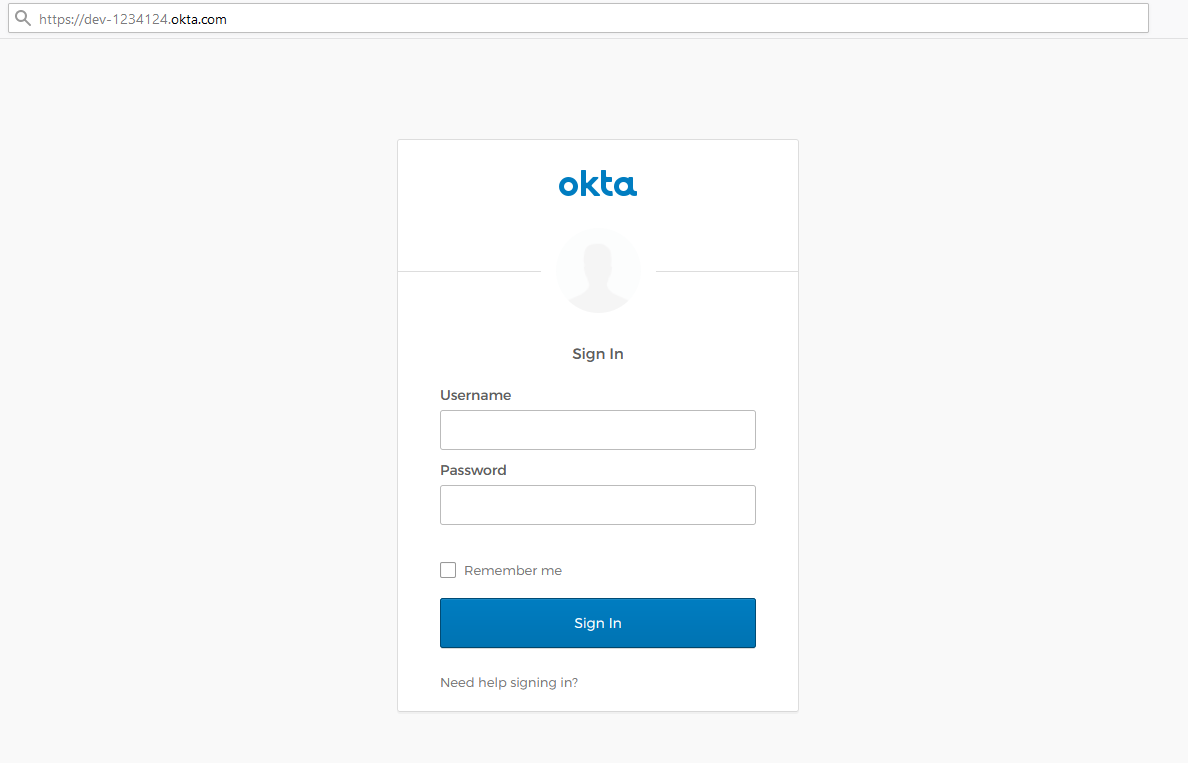
Once these are installed, add a file called .env to your root folder and add the following values. The OKTA_ORG_URL will be the same as the URL you used to login into your developer’s console. In the instance below, that would be https://dev-1234124.okta.com. The OKTA_CLIENT_ID and OKTA_CLIENT_SECRET you should have retrieved from the developer’s console when setting up your Okta application.
APP_BASE_URL = http://localhost:1337
OKTA_ORG_URL = {yourOktaOrgUrl}
OKTA_CLIENT_ID = {yourClientId}
OKTA_CLIENT_SECRET = {yourClientSecret}
Configure Your Sails.js Application
Now, you can start to configure your application. As mentioned before, this is where most of your code not related to the application workflow itself is.
With the .env file set up and your Okta application configured, you can configure the Okta middleware to help handle your authentication. To do so you will need to configure the Okta middleware, express-session, and define the order in which the middleware will be executed. This work takes place in the config/http.js file.
require("dotenv").config();

module.exports.http = {
  middleware: {
    order: [
      "cookieParser",
      "session",
      "bodyParser",
      "compress",
      "poweredBy",
      "router",
      "www",
      "favicon",
      "expresssession",
      "oktaInit",
    ],

    expresssession: (function () {
      var session = require("express-session");
      return session({
        secret: "some*crazy*long*random*string",
        resave: true,
        saveUninitialized: false,
      });
    })(),

    oktaInit: (function () {
      var ExpressOIDC = require("@okta/oidc-middleware").ExpressOIDC;

      var oidc = new ExpressOIDC({
        issuer: process.env.OKTA_ORG_URL + "/oauth2/default",
        client_id: process.env.OKTA_CLIENT_ID,
        client_secret: process.env.OKTA_CLIENT_SECRET,
        appBaseUrl: process.env.APP_BASE_URL,
        scope: "openid profile",
        routes: {
          login: {
            path: "/login",
          },
          loginCallback: {
            path: "/authorization-code/callback",
            afterCallback: "/Dashboard",
          },
        },
      });

      return oidc.router;
    })(),
  },
};
Configure Sails.js Routes and Policies
Next, you will define your routes as well as the policies associated with them. Routing in Sails.js is very flexible and powerful. . A full explanation of routing features and options is out of the scope of this tutorial, but you should know routing in Sails.js is very flexible and powerful. Replace config/routes.js with the following code.
module.exports.routes = {
  "/": { view: "pages/homepage" },

  "GET /dashboard": { action: "dashboard/index" },
  "GET /history": { action: "history/index" },

  "POST /users/logout": { action: "users/logout" },
  "POST /device/toggle-fountain": { action: "device/toggle-fountain" },
};
Here you are registering 5 routes. The first is the index page which will return a view called pages/homepage. You haven’t created this view yet but you will shortly. The homepage is a static HTML page, so there is no need to bind the route to an action. The home page will simply serve as a landing page with a login button.
The remaining two pages, however, require a model in order to render them, so you will need to connect those to an action. First, you have a dashboard page which will show the current conditions of the garden itself. The second is a history page which will show you the trends of your garden’s health.
Finally, you have 2 post routes; one logs out the user and the other is for toggling the fountain on or off.
You don’t want unauthorized users coming in and viewing your garden’s status or controlling your water fountain so you’ll need to add some authentication to the routes you want to protect. For this project, you will put all of your routes—except the homepage—under authentication. To do so, you will define policies in your config/policies.js file.
module.exports.policies = {
  "*": "is-logged-in",
  "/": true,
};
Your policies are fairly straightforward. All pages will look to is-logged-in to determine if the user is logged in. That is overridden for the '/' path. Setting the '/' path to true means that the page allows public access.
Finally, you need to implement the is-logged-in policy module. Open the api/policies/is-logged-in.js file. If you have deleted this file, create a new one named is-logged-in.js under api/policies. Replace the contents of this file with the following code.
module.exports = async function (req, res, proceed) {
  if (req.session.passport) {
    return proceed();
  }

  // Otherwise, this request did not come from a logged-in user.
  return res.unauthorized();
};
When the user logs in using Okta, the value of that user will be stored in the passport session object. You can check the request’s session object for the passport. If it is there, the user is logged in and you can use that object to collect data about the user if required. If the passport is missing the user isn’t logged in and you return an unauthorized response. The unauthorized response is defined in api/responses/unauthorized.js.
module.exports = function unauthorized() {
  var req = this.req;
  var res = this.res;

  sails.log.verbose("Ran custom response: res.unauthorized()");

  if (req.wantsJSON) {
    return res.sendStatus(401);
  }
  // Or log them out (if necessary) and then redirect to the login page.
  else {
    if (req.session.userId) {
      delete req.session.userId;
    }

    return res.redirect("/login");
  }
};
The code automatically generated by Sails.js checks if the request wants a JSON response. If that’s the case, this function will return a 401 to the client indicating the user isn’t logged in. If it is requesting a page, the current user is removed from the session and is redirected to the login route. The login route is defined in the http.js file as the login page for Okta. Therefore, routing the user to the login page will send them to Okta to sign in. After a successful login, the user is redirected to the Dashboard page.
Bootstrap Your Sails.js App
By default, Sails.js reads and writes data to a local disk, which is perfect for prototyping your application. Although this tutorial does not use an external database, it’s good to know the config/datastores.js file is used to configure your backend database of choice. The built-in ORM will perform CRUD operations against your datastore while being agnostic to whatever underlying storage you use. For example, you can configure your test environment using local storage, a staging environment using MySql, and a production environment using PostgreSQL. The application will switch seamlessly between the three without affecting the rest of your application’s code.
Your application needs some initial data for testing. At application startup, Sails.js executes the config/bootstrap.js module, making it an ideal place to inject seed data. Replace the contents of config/bootstrap.js with the following code.
module.exports.bootstrap = async function () {
  var date = Date.now();

  await GardenData.createEach([
    {
      readingDateTime: date,
      temperature: 75,
      moistureContent: 15,
      sunlight: 80,
      ph: 7.8,
      storedWater: 14,
      fountainStatus: false,
    },
    {
      readingDateTime: date - 60 * 1000,
      temperature: 74,
      moistureContent: 15.2,
      sunlight: 80,
      ph: 7.8,
      storedWater: 14,
      fountainStatus: false,
    },
    {
      readingDateTime: date - 2 * 60 * 1000,
      temperature: 74,
      moistureContent: 15.6,
      sunlight: 80,
      ph: 7.8,
      storedWater: 14,
      fountainStatus: false,
    },
    {
      readingDateTime: date - 3 * 60 * 1000,
      temperature: 73,
      moistureContent: 16,
      sunlight: 80,
      ph: 7.5,
      storedWater: 14.5,
      fountainStatus: true,
    },
    {
      readingDateTime: date - 4 * 60 * 1000,
      temperature: 73,
      moistureContent: 16.5,
      sunlight: 80,
      ph: 7.5,
      storedWater: 15,
      fountainStatus: true,
    },
    {
      readingDateTime: date - 5 * 60 * 1000,
      temperature: 73,
      moistureContent: 17,
      sunlight: 80,
      ph: 7.5,
      storedWater: 15.5,
      fountainStatus: false,
    },
  ]);
};
This is populating basic information into your database by mocking up some test readings that may have taken place over the last 5 minutes. This is the first time you will see the query language used by Sails.js. It is fairly intuitive and, if you’re a veteran node developer, most of it will look very familiar to you. The createEach function takes an array of GardenData and adds it to your local store. After lifting the application you will be able to see this data in the .tmp/localDiskDb/gardendata.db file.
Add Models to Your Sails.js App
Before you lift the application, however, you need to define the GardenData model. You should put your models in the api/models folder that Sails generated for you.
module.exports = {
  attributes: {
    id: {
      type: "number",
      autoIncrement: true,
    },

    readingDateTime: {
      type: "number",
      autoCreatedAt: true,
    },

    temperature: {
      type: "number",
    },

    moistureContent: {
      type: "number",
    },

    sunlight: {
      type: "number",
    },

    ph: {
      type: "number",
    },

    storedWater: {
      type: "number",
    },

    fountainStatus: {
      type: "boolean",
    },
  },
};
Here is where you define the columns on your table with their types and any attributes they carry. In this case, you told id to auto increment. By default, Sails.js will consider id to be the primary key. The readingDateTime field will also automatically be populated with the created DateTime of the row.
You also want to define a FountainRequest model in the api/models folder. This model is what the controller at the garden will read to check if it should turn the fountain on or off. The web application will have a toggle switch on it to call your device/toggle-fountain action which will add a new record to this table.
module.exports = {
  attributes: {
    id: {
      type: "number",
      autoIncrement: true,
    },

    dateTime: {
      type: "number",
      autoCreatedAt: true,
    },

    toggle: {
      type: "boolean",
    },

    respondedTo: {
      type: "boolean",
    },

    respondedAt: {
      type: "number",
      autoUpdatedAt: true,
    },
  },
};
The key is knowing when the request has been handled. If there are multiple unhandled requests, the application should only send the latest and mark all as respondedTo. But, using the autoUpdatedAt attribute on respondedAt, will automatically populate the respondedAt field when you have updated respondedTo.
Add Controllers to Your Sails.js App
If you’re familiar with MVC you are probably used to having a controller file with a list of actions in it. Sails.js recommends keeping each action in its own file and using the folder structure to define the controller. This is the approach you will take here. Start by adding 4 new folders to the api/controllers folder; dashboard , device , history , and users .
In the dashboard folder, add a file namedindex.js. As you may have guessed, this folder structure and file name together will define the route dashboard/index.
module.exports = {
  friendlyName: "Dashboard",

  description: "Displays the Garduino Dashboard",

  exits: {
    success: {
      viewTemplatePath: "pages/dashboard",
    },
  },

  fn: async function () {
    var data = await GardenData.find({
      where: {},
      sort: [
        {
          readingDateTime: "DESC",
        },
      ],
      limit: 1,
    });

    return {
      currentData: data[0],
    };
  },
};
This is the real beauty of Sails.js. Controllers are small and concise and don’t rely on any code that isn’t directly related to rendering and serving the view. A controller returns an object with a few properties and a function. The fn function is used to build and return a model. The exits property defines what to do with the model—such as a view to render.
In dashboard/index.js, the fn function uses the Sails.js ORM (currently configured for local file storage) to retrieve the latest GardenData reading. The exits property instructs Sails.js to render the pages/dashboard view using the given model.
Next, you can add the index.js file to the history folder and add the following code.
module.exports = {
  friendlyName: "History",

  description: "Displays the Garduino History for the last Month",

  exits: {
    success: {
      viewTemplatePath: "pages/history",
    },
  },

  fn: async function () {
    var data = await GardenData.find({});
    return {
      gardenData: data,
    };
  },
};
Again, you are just returning some GardenData but this time you are getting all of the garden’s history. If you need to apply pagination, you can always use the skip and limit arguments to only send down a few of the entries at once.
Add a file for the logout.js action under the users folder. This will log the user out and redirect them to the home page.
module.exports = {
  friendlyName: "Logout",

  description: "Logs the User Out",

  exits: {},

  fn: async function () {
    this.req.session.destroy(function () {});
    this.res.clearCookie("connect.sid");
    this.res.redirect("/");
  },
};
Finally, under the device folder, create a file named toggle-fountain.js. This action will add an entry that will tell the fountain to turn off or on. The controller returns JSON data with a success flag.
module.exports = {
  friendlyName: "Toggle Fountain",

  description: "Logs a request for the Fountain to be turned on",

  exits: {},

  fn: async function () {
    var on = this.req.body.on == "true";

    await FountainRequest.create({
      respondedTo: false,
      toggle: on,
    });

    return this.res.json({ success: true });
  },
};
Add Views to Your Sails.js App
With all the server work done, it’s time to add the views. First, you should edit your layout view. In the layouts folder edit (or add) the layout.ejs file.
<!DOCTYPE html>
<html>
  <head>
    <title>Garudino - A Place to Manage your Garden</title>

    <!-- Viewport mobile tag for sensible mobile support -->
    <meta
      name="viewport"
      content="width=device-width, initial-scale=1, maximum-scale=1"
    />

    <%/* If you want to discourage search engines from indexing this site,
    uncomment the following line: */%> <%/*
    <meta name="robots" content="noindex" />
    */%>

    <!--STYLES-->
    <link rel="stylesheet" href="/dependencies/bootstrap-4/bootstrap-4.css" />
    <link rel="stylesheet" href="/dependencies/fontawesome.css" />
    <link rel="stylesheet" href="/styles/importer.css" />
    <!--STYLES END-->
  </head>

  <body>
    <div class="container">
      <nav class="navbar navbar-expand-lg navbar-light bg-light mb-4">
        <div class="collapse navbar-collapse" id="navbarSupportedContent">
          <ul class="navbar-nav mr-auto">
            <li class="nav-item active">
              <a class="nav-link" href="/"
                >Home <span class="sr-only">(current)</span></a
              >
            </li>
            <%if (req.session.passport) { %>
            <li class="nav-item">
              <a class="nav-link" href="/Dashboard">Dashboard</a>
            </li>
            <li class="nav-item">
              <a class="nav-link" href="/History">History</a>
            </li>
            <% } %>
          </ul>

          <%if (!req.session.passport) { %>
          <div>
            <a class="btn btn-outline-success my-2 my-sm-0" href="/login"
              >Login</a
            >
          </div>
          <% } else { %>
          <div>
            <form action="users/logout" method="POST">
              <input type="hidden" name="_csrf" value="<%= _csrf %>" />
              <button
                class="btn btn-outline-success my-2 my-sm-0"
                type="submit"
              >
                Logout
              </button>
            </form>
          </div>
          <% } %>
        </div>
      </nav>

      <%- body %>
    </div>

    <!--SCRIPTS-->
    <script src="/dependencies/sails.io.js"></script>
    <script src="/dependencies/lodash.js"></script>
    <script src="/dependencies/jquery.min.js"></script>
    <script src="/dependencies/vue.js"></script>
    <script src="/dependencies/vue-router.js"></script>
    <script src="/dependencies/bootstrap-4/bootstrap-4.bundle.js"></script>
    <script src="/dependencies/cloud.js"></script>
    <script src="/dependencies/moment.js"></script>
    <script src="/dependencies/parasails.js"></script>
    <script src="/js/pages/dashboard.page.js"></script>
    <script src="/js/pages/history.page.js"></script>
    <!--SCRIPTS END-->
  </body>
</html>
There isn’t anything too groundbreaking on the view side. As this application is set up, you can use EJS or Vue to render your views. There is a login/logout button that detects if the user is logged in and some menu options that you hide from the user until they log in. You’ll also notice the <%- body %> tag that renders the body from the individual views.
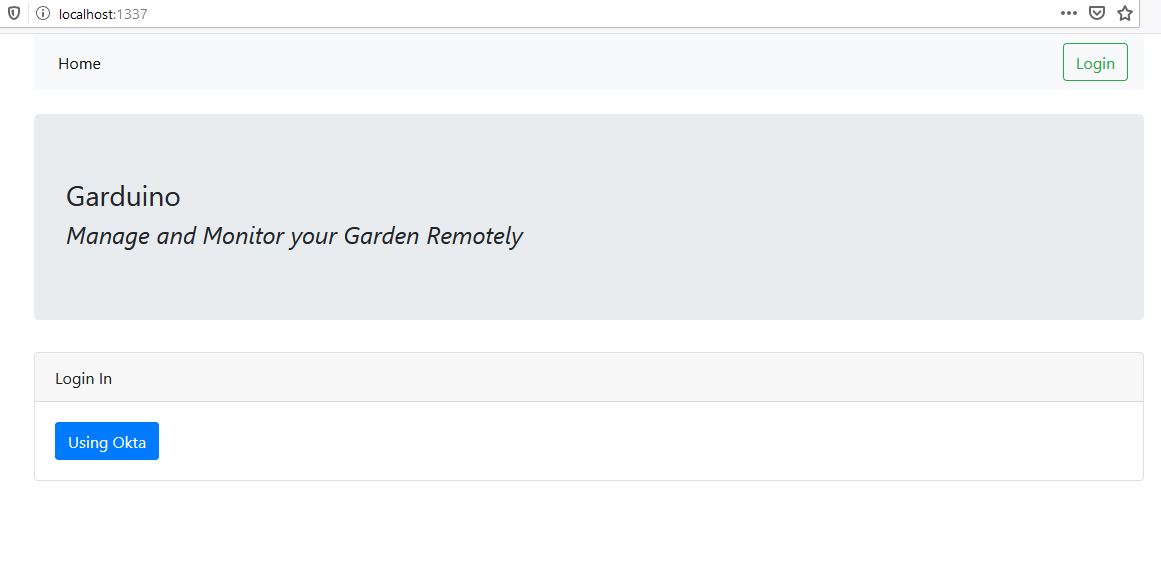
Next is the home page. In your pages folder edit or add homepage.ejs.
<div class="jumbotron">

  <h3>Garduino</h4>
  <h4><i>Manage and Monitor your Garden Remotely</i></h4>

</div>

<div class="card">
<div class="card-header">
  Login In
</div>

<div class="card-body">

  <a class="btn btn-primary" href="/login">Using Okta</a>
</div>

</div>
You are providing the Login button for users as well as a small landing page.
Next, you can add history.ejs to your pages folder.
<div id="history">
<h3>Historical Readings</h3>
<hr />
<div class="row">
<div class="col-lg-12">
<table class="table table-striped">
<thead>
<tr>
<th>Date/Time</th>
<th>Temperature</th>
<th>Soil Moisture</th>
<th>Sunlight</th>
<th>Soil PH</th>
<th>Stored Water</th>
<th>Fountain Status</th>
</tr>
</thead>
<tbody>
<tr v-for="data in gardenData">
<td>
{{ new Date(data.readingDateTime).toLocaleDateString() + ' ' + new
Date(data.readingDateTime).toLocaleTimeString() }}
</td>
<td>{{data.temperature}}˚</td>
<td>{{data.moistureContent}}</td>
<td>{{data.sunlight}}</td>
<td>{{data.ph}}</td>
<td>{{data.storedWater}} Gallons</td>
<td>{{data.fountainStatus}}</td>
</tr>
</tbody>
</table>
</div>
</div>
</div>
<%- exposeLocalsToBrowser() %>
In this section, you present a table to the user with the gardenData information. Take note of the <%- exposeLocalsToBrowser() %> piece of code. This is provided by sails.js and provides a number of features. First, it will make your model available using window.SAILS_LOCALS. Second,it provides some protection against Cross-Site Scripting attacks by escaping untrusted data.
Where can you use window.SAILS_LOCALS? In the javascript page that is bound to this view. Under assets/js, add a new folder for pages. In that folder add a new javascript file called history.page.js and add the code below.
parasails.registerPage("history", {
  data: {
    gardenData: undefined,
  },

  beforeMount: function () {
    // Attach any initial data from the server.
    _.extend(this, window.SAILS_LOCALS);
  },

  methods: {},
});
This is where you will find all your client-side javascript for this page. Parasails uses registerPage to bind the javascript to the history section of your document. In order for your document to use it, you need to wrap your HTML/ejs/vue markup under a root div node with id history. Parasails will find the history div and bind this javascript to it. Then, you can attach the initial data from the server using _extend(this, window.SAILS_LOCALS) and make it ready to use for your view. Here, you’ve defined your data as gardenData and bound it to the gardenData that was returned from the action. Because this page doesn’t have much in the way of functionality there aren’t any methods here, but you can see on the dashboard page how those are used.
Add a new file under views/pages called dashboard.ejs and add the following code.
<div id="dashboard">
<div class="row">
<div class="col-lg-4 col-sm-12">
<div class="card">
<div class="card-header bg-danger">
Current Temperature
</div>
<div class="card-body">
<i class="fa fa-3x fa-thermometer-three-quarters text-primary"></i>
<span class="pull-right h3">
{{currentData.temperature}}˚
</span>
</div>
</div>
</div>
<div class="col-lg-4 col-sm-12">
<div class="card">
<div class="card-header">
Current Moisture Content
</div>
<div class="card-body">
<i class="fa fa-3x fa-tint text-primary"></i>
<span class="pull-right h3">
{{currentData.moistureContent}}
</span>
</div>
</div>
</div>
<div class="col-lg-4 col-sm-12">
<div class="card">
<div class="card-header bg-warning text-dark">
Current Sunlight
</div>
<div class="card-body">
<i class="fa fa-3x fa-sun-o text-warning"></i>
<span class="pull-right h3">
{{currentData.sunlight}}
</span>
</div>
</div>
</div>
</div>
<div class="row pt-4">
<div class="col-lg-4 col-sm-12">
<div class="card">
<div class="card-header bg-secondary">
Soil PH
</div>
<div class="card-body">
<i class="fa fa-3x fa-balance-scale text-secondary"></i>
<span class="pull-right h3">
{{currentData.ph}}
</span>
</div>
</div>
</div>
<div class="col-lg-4 col-sm-12">
<div class="card">
<div class="card-header bg-primary">
Stored Water
</div>
<div class="card-body">
<i class="fa fa-3x fa-chevron-up text-primary"></i>
<span class="pull-right h3">
{{currentData.storedWater}} Gallons
</span>
</div>
</div>
</div>
<div class="col-lg-4 col-sm-12">
<div class="card">
<div class="card-header bg-info">
Fountain Status
</div>
<div class="card-body">
<i class="fa fa-3x fa-shower text-info"></i>
<span class="pull-right h3">
<label class="switch">
<input
@change="toggleFountain"
name="on"
type="checkbox"
:checked="currentData.fountainStatus"
/>
<span class="slider round"></span>
</label>
</span>
</div>
</div>
</div>
</div>
</div>
<%- exposeLocalsToBrowser() %>
<style>
/* The switch - the box around the slider */
.switch {
position: relative;
display: inline-block;
width: 60px;
height: 34px;
}
/* Hide default HTML checkbox */
.switch input {
opacity: 0;
width: 0;
height: 0;
}
/* The slider */
.slider {
position: absolute;
cursor: pointer;
top: 0;
left: 0;
right: 0;
bottom: 0;
background-color: #ccc;
-webkit-transition: 0.4s;
transition: 0.4s;
}
.slider:before {
position: absolute;
content: "";
height: 26px;
width: 26px;
left: 4px;
bottom: 4px;
background-color: white;
-webkit-transition: 0.4s;
transition: 0.4s;
}
input:checked + .slider {
background-color: #2196f3;
}
input:focus + .slider {
box-shadow: 0 0 1px #2196f3;
}
input:checked + .slider:before {
-webkit-transform: translateX(26px);
-ms-transform: translateX(26px);
transform: translateX(26px);
}
/* Rounded sliders */
.slider.round {
border-radius: 34px;
}
.slider.round:before {
border-radius: 50%;
}
</style>
Next, under assets/js/pages add a new file for dashboard.page.js and add this code.
parasails.registerPage("dashboard", {
  data: {
    currentData: undefined,
  },

  beforeMount: function () {
    // Attach any initial data from the server.
    _.extend(this, window.SAILS_LOCALS);
  },

  methods: {
    toggleFountain: function (e) {
      $.post("device/toggle-fountain", {
        on: e.target.checked,
        _csrf: window.SAILS_LOCALS._csrf,
      });
    },
  },
});
As you can see, you are giving a method for toggleFountain that will make a call back to the server to input a new record.
Run your Application
Finally, you’re ready to start your application. From the terminal run sails lift and use a browser to navigate to localhost:1337.
If you run into an issue or simply want to compare your code, the complete source code for this tutorial is available on GitHub.
Sails.js is a great tool for helping you quickly build and prototype websites. The configuration options are immense and far more than can be covered in this article. I highly recommend taking the time to work with Sails.js with many different frameworks. Once you become comfortable integrating your favorite tools with Sails.js it makes your development experience much quicker and more enjoyable.
Learn More About Building Apps with Node.js
If you’d like to learn more about Node.js, check out some of our other great tutorials!
- How to Build a Secure AWS Lambda API with Node.js and React
- Build a Weight Tracker App with Node.js and PostgreSQL
- Get Started with Koa.js for Node Applications
We are always posting new content. If you like this content, be sure to follow us on Twitter and subscribe to our YouTube Channel.
Okta Developer Blog Comment Policy
We welcome relevant and respectful comments. Off-topic comments may be removed.