Build and Deploy Secure Serverless Functions with Netlify

Serverless computing, sometimes referred to as “functions as a service” (FaaS), is an on-demand approach to providing backend application services. The serverless architecture is an excellent solution for many use cases where an application needs backend services occasionally, periodically (e.g., once a day), or dynamically scaled to meet demand.
In this tutorial, you will learn to build serverless functions with the JavaScript language, deploy them to Netlify, and secure them using Okta. Netlify is a hosting company that dramatically simplifies deploying web sites and serverless functions (called Netlify Functions) with continuous integration and many more features. Okta is an identity and access management company that makes adding authentication to your applications a breeze.
By the way, a full walkthrough of this tutorial is also available on our YouTube channel, if you would rather follow along by watching a video!
Note: In May 2025, the Okta Integrator Free Plan replaced Okta Developer Edition Accounts, and the Okta CLI was deprecated.
We preserved this post for reference, but the instructions no longer work exactly as written. Replace the Okta CLI commands by manually configuring Okta following the instructions in our Developer Documentation.
Requirements
To complete this tutorial, you need the following.
- Node.js version 12 or higher
- A free Netlify account
- A free Okta developer account
- A good code editor, such as Visual Studio Code
Create Your Serverless Project
To get started, open up your terminal or command prompt, go to the folder where you store your application projects, and create a new folder for the project.
mkdir secure-serverless-demo
cd secure-serverless-demo
Next, initialize your JavaScript project using npm init.
npm init -y
Now install the following dependencies using the npm command.
npm install @okta/okta-signin-widget@4.2 axios@0.19 netlify-lambda@1.6 parcel@1.12
npm install --save-dev rimraf@3.0
Here is a summary of the dependencies you installed.
| Dependency | Description |
|---|---|
okta-signin-widget |
A client-side JavaScript widget you can use to log in and receive an access token. The access token is like a key you can use to access secure information. |
axios |
A module for making API requests. This module uses the access token to make requests to your serverless API built with Netlify Functions. |
netlify-lambda |
You use this during the build process to package serverless functions. |
parcel |
You use this during the build process to bundle all the front end HTML, JavaScript, CSS, and other assets. |
rimraf |
You use this to clear builds before running the application locally for testing. |
Open your project in your editor of choice. The next step is to add a couple of npm scripts to the package.json file. Open the package.json file and replace the scripts with the following code.
  "scripts": {
    "dev": "rimraf dist && parcel client/index.html",
    "build": "rimraf dist && netlify-lambda install && parcel build client/index.html"
  },
Use Okta to Secure Your Application
Adding security, such as account registration, logins, password policies, and profile management, to any application is no trivial task. And getting any part of it wrong can have awful consequences for you and your customers. That’s where a service like Okta makes your life as a developer so much easier!
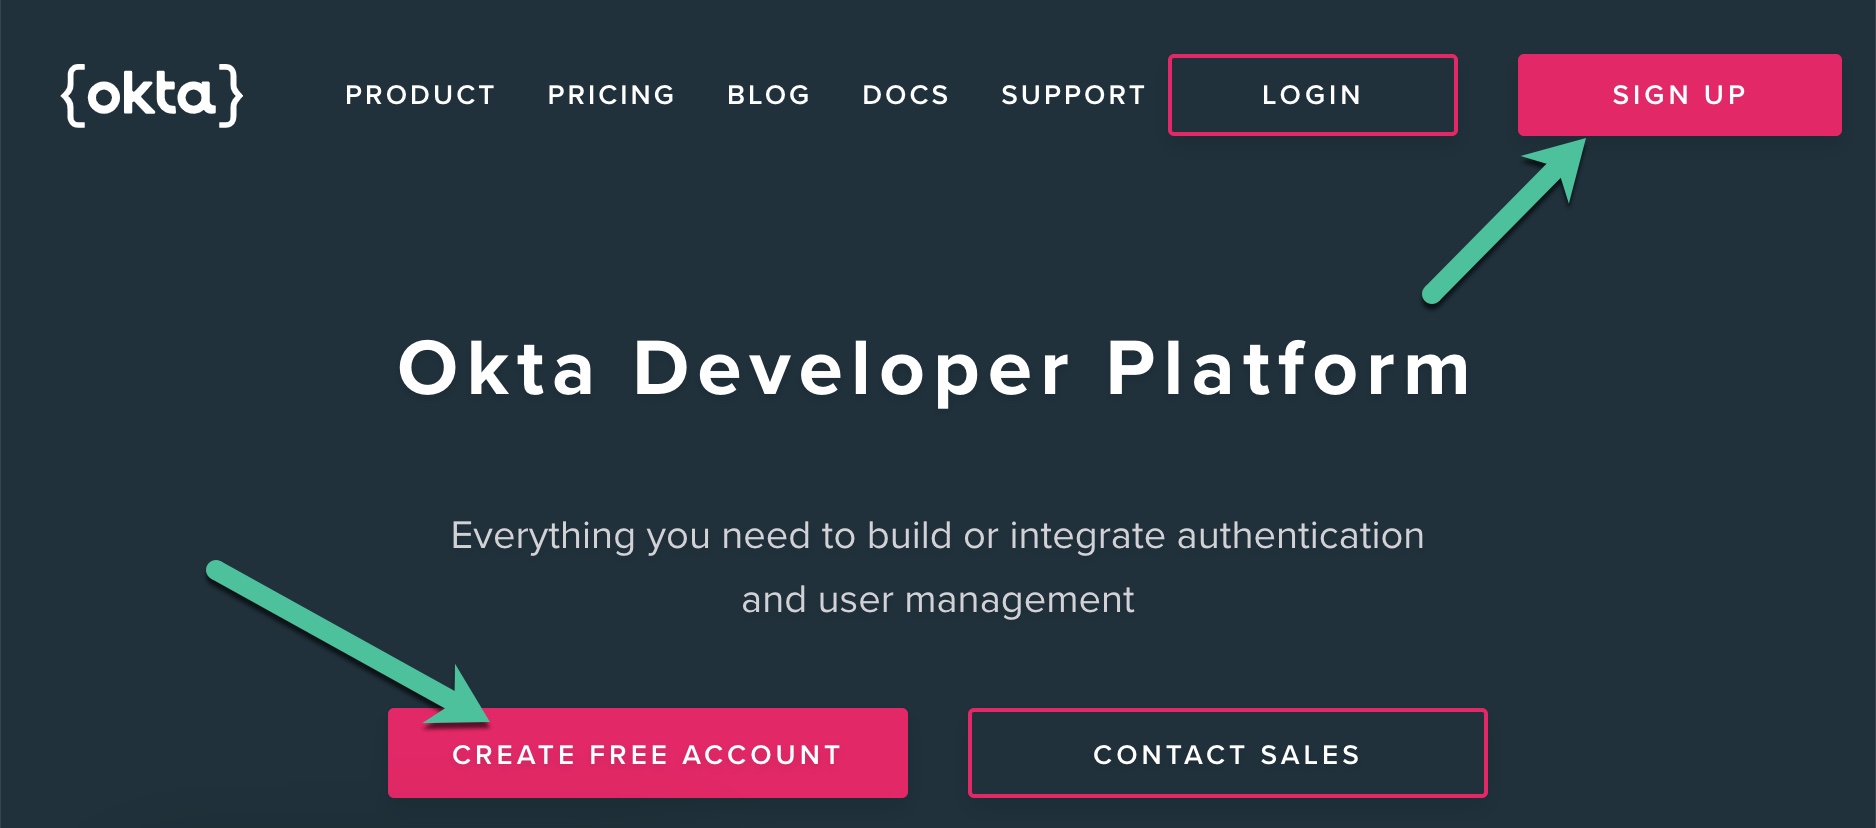
To complete the next steps, you must create a free Okta developer account. Go to Okta Developer homepage and click the Sign Up button. Or, click Login if you already have an account.
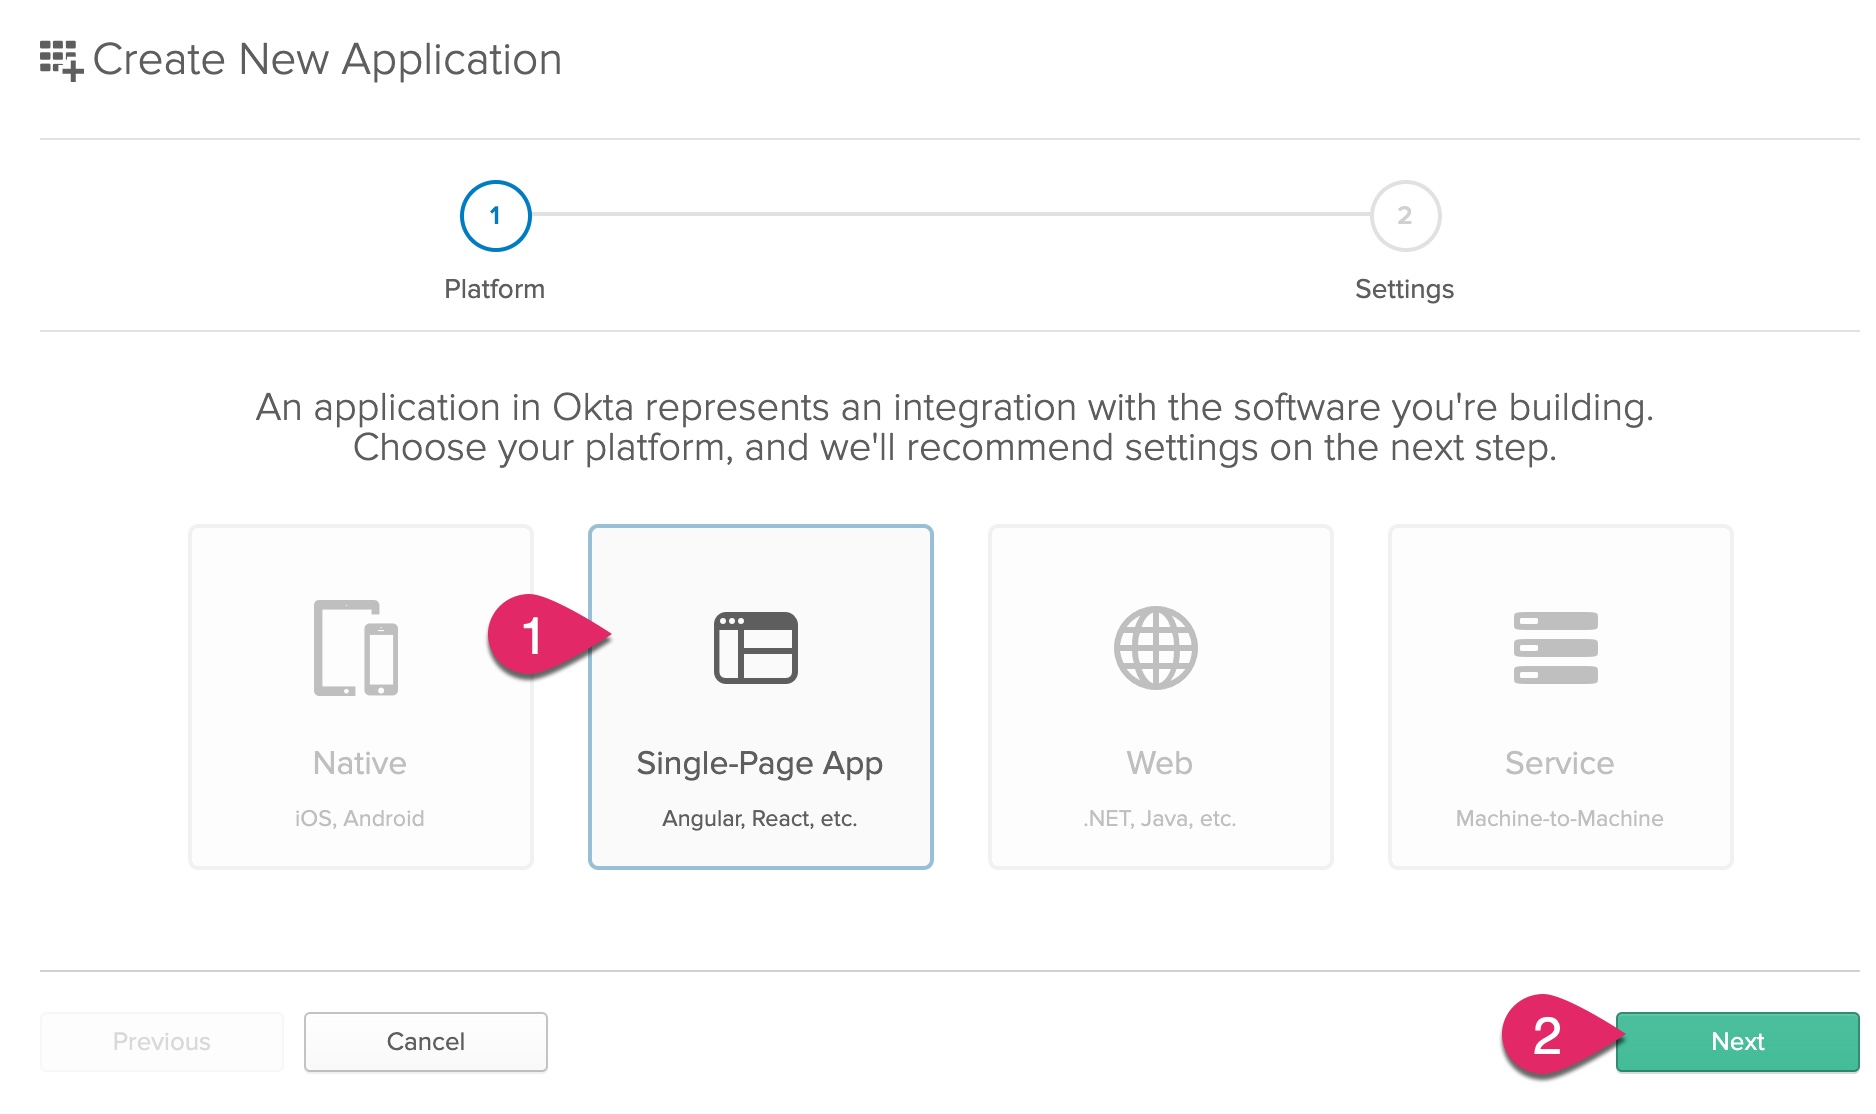
After signing into your Okta developer account, you need to add an application. Click Applications and then click Add Application.

Click on Single-Page App and click Next.
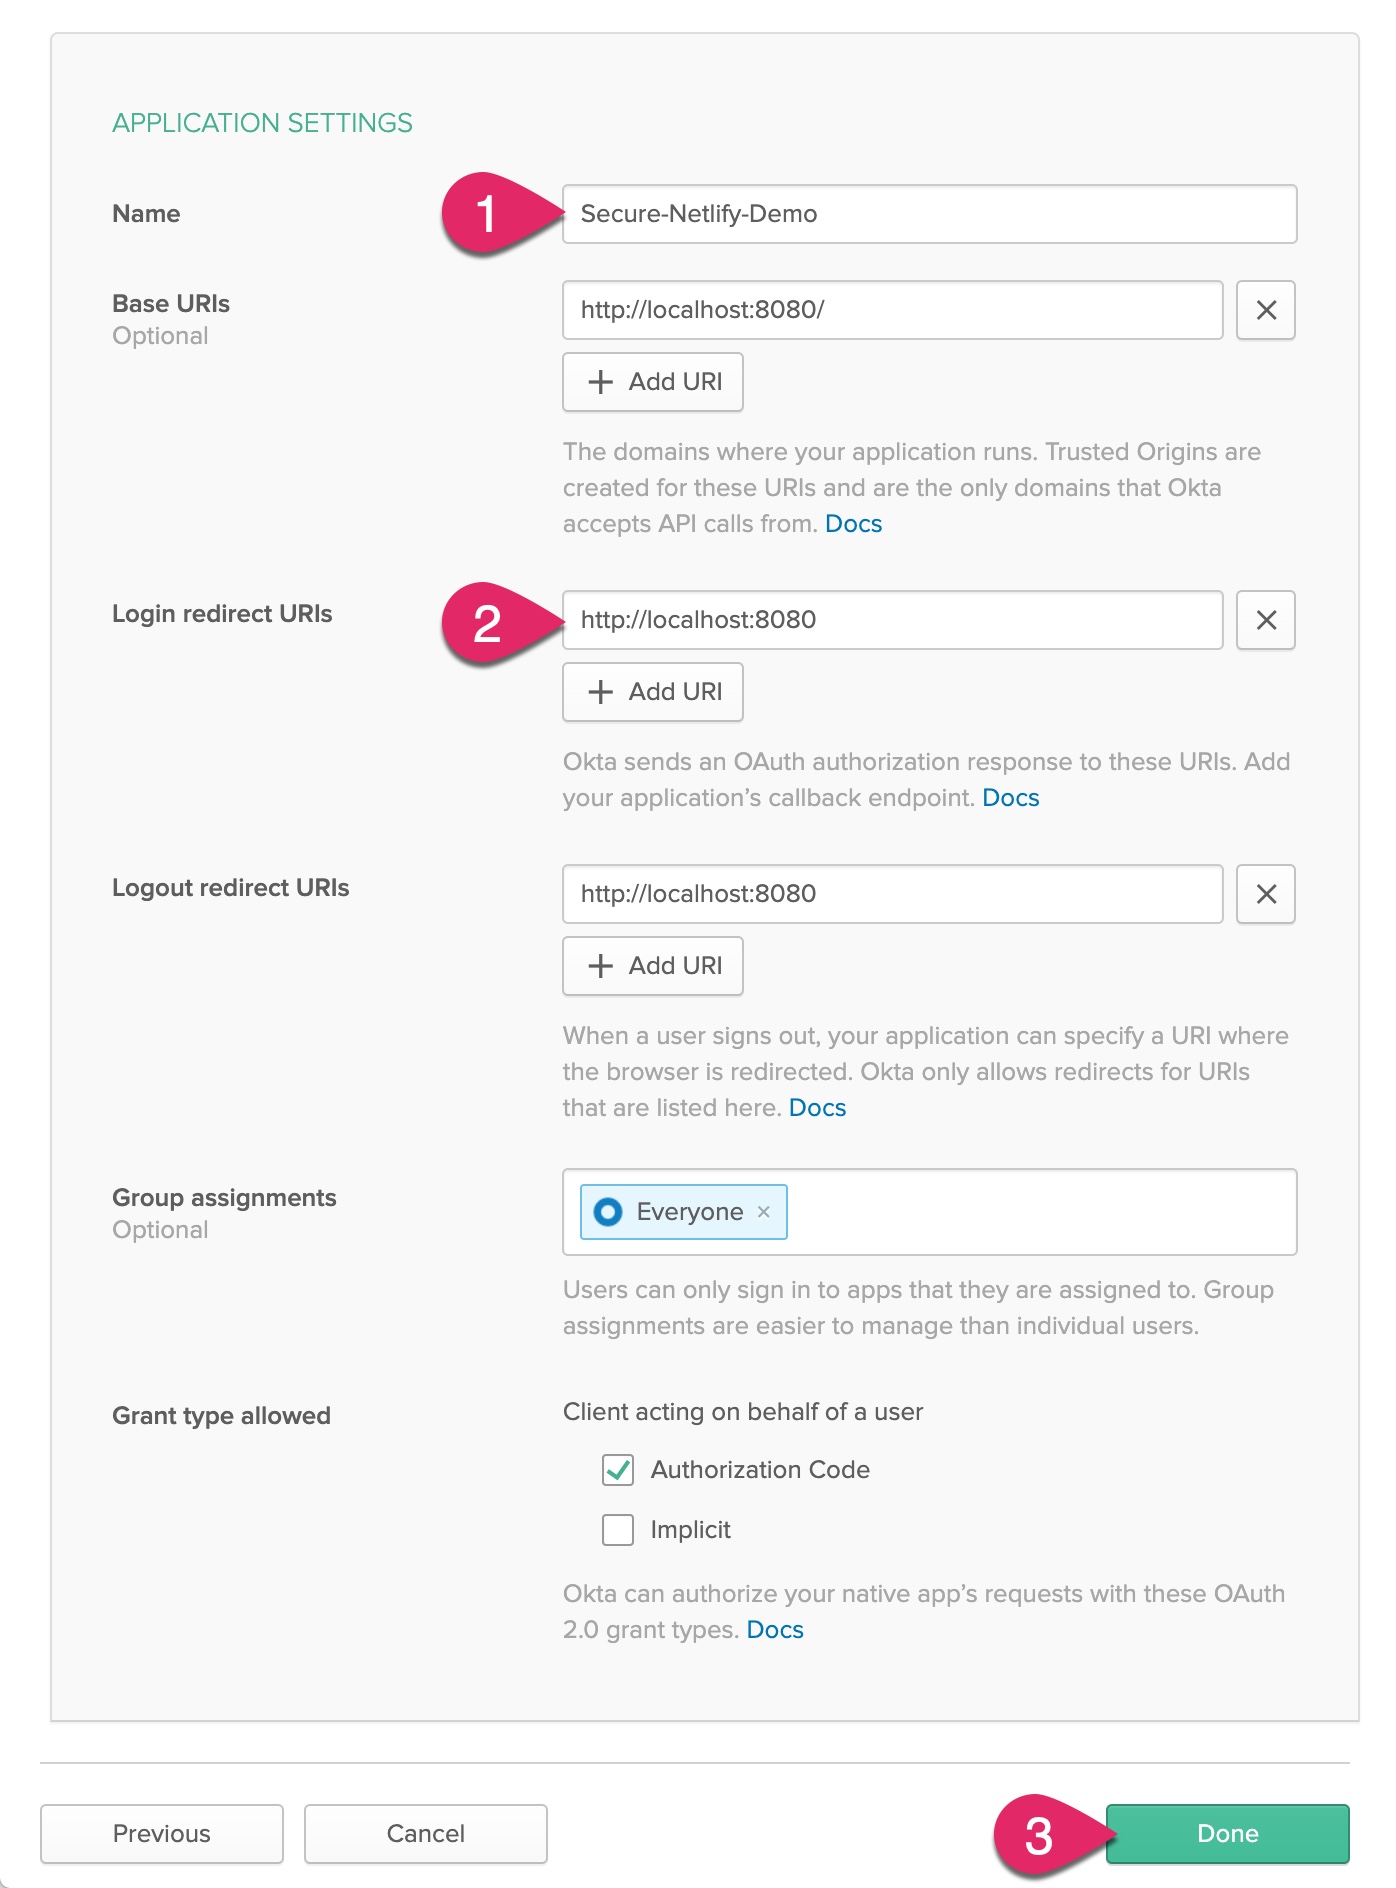
Enter a name for the application, such as “Secure-Netlify-Demo.” Change the Login redirect URIs to http://localhost:8080 with no trailing slash and click Done.
After creating the application, scroll down to the bottom of the application settings page and copy the Client ID.
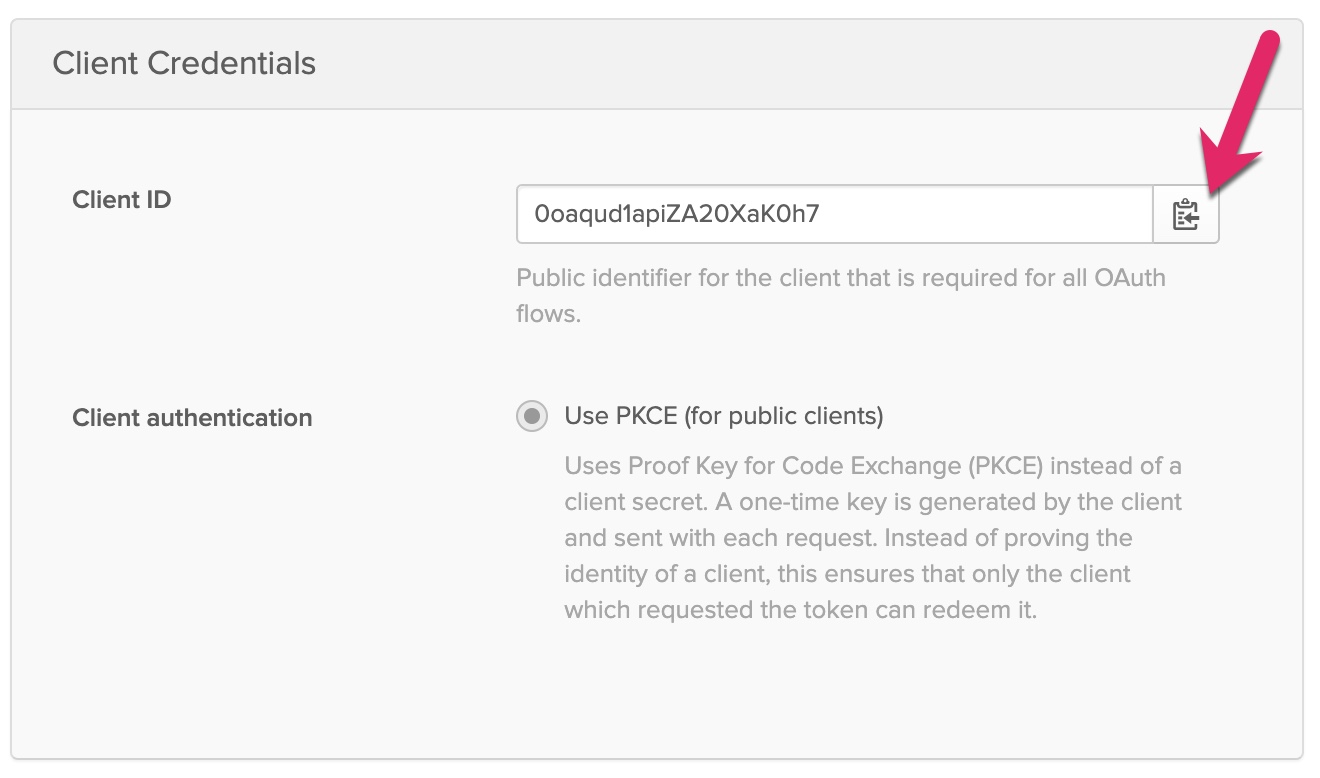
Create a new file in the root of the project named .env. Add the following text. Replace {yourClientId} with the actual value in your Okta application.
OKTA_ORG_URL={yourOrgUrl}
OKTA_CLIENT_ID={yourClientId}
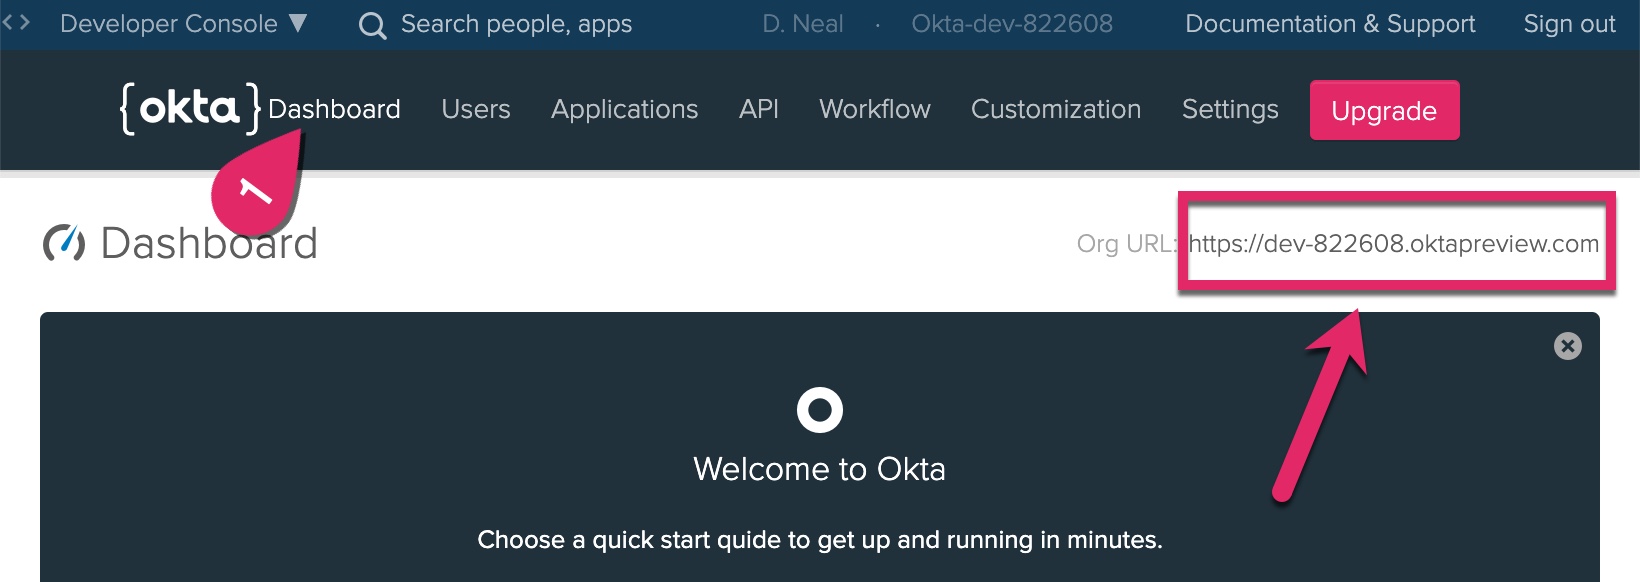
To find your Okta Org URL, click on the Dashboard at the top of the page, and copy the Org URL text on the right side of the page to the .env file.
Build Your Client Application
Create a new folder in your project and name it client. Add a new file, name it index.html, and add the following HTML.
<!DOCTYPE html>
<html>
<head>
  <title>Secure Netlify Demo</title>
  <meta name="viewport" content="width=device-width, initial-scale=1.0" />
</head>
<body>
  <h1>Netlify Function Tester</h1>
  <button id="publicButton" type="button">Test public API</button>
  <button id="secureButton" type="button">Test secure API</button>
  <button id="signOut" type="button" style="visibility:hidden;">Sign out</button>
  <div id="results"></div>

  <div id="widget-container"></div>

  <script src="./index.js"></script>
</body>
</html>
Add a new file to the client folder, name it site.css, and add the following CSS.
html {
  font-family: Arial, Helvetica, sans-serif;
  margin: 1rem;
}
body {
  padding: 0 1rem;
}
h1 {
  margin-top: 0;
  font-size: 1.5rem;
}
#results {
  margin: 1rem 0;
}
Add a new file to the client folder, name it index.js, and add the following JavaScript. Update the two constants near the beginning of the code to replace {yourOrgUrl} and {yourClientId} with your Okta Org Url and client ID, respectively. These are the same values you added to the .env file.
import axios from "axios";
import OktaSignIn from "@okta/okta-signin-widget";
import "@okta/okta-signin-widget/dist/css/okta-sign-in.min.css";
import "./site.css";

const oktaOrgUrl = "{yourOrgUrl}";
const oktaClientId = "{yourClientId}";

// helper function to update the results text
const displayMessage = msg => {
  document.getElementById( "results" ).innerHTML = msg;
};

// Displays a welcome message and enables the "Sign out" button
const updateProfile = idToken => {
  try {
    // Show Sign Out button
    document.getElementById( "signOut" ).style.visibility = "visible";
    displayMessage( `Hello, ${ idToken.claims.name } (${ idToken.claims.email })` );
  } catch ( err ) {
    console.log( err );
    displayMessage( err.message );
  }
};

const signOut = ( signInWidget ) => {
  displayMessage( "" );

  // clear local stored tokens and sign out of Okta
  signInWidget.authClient.tokenManager.clear();
  signInWidget.authClient.signOut();

  // reload page
  window.location.reload();
};

const registerButtonEvents = async ( signInWidget ) => {
  // "Test public API" button click event handler
  document.getElementById( "publicButton" ).addEventListener( "click", async function () {
    try {
      displayMessage( "" );
      // Use axios to make a call to the public serverless function
      const res = await axios.get( "/api/public-test" );
      displayMessage( JSON.stringify( res.data ) );
    } catch ( err ) {
      console.log( err );
      displayMessage( err.message );
    }
  } );

  // "Test secure API" button click event handler
  document.getElementById( "secureButton" ).addEventListener( "click", async function () {
    displayMessage( "" );
    try {
      // get the current access token to make the request
      const accessToken = await signInWidget.authClient.tokenManager.get( "accessToken" );
      if ( !accessToken ) {
        displayMessage( "You are not logged in" );
        return;
      }
      // use axios to make a call to the secure serverless function,
      // passing the access token in the Authorization header
      const res = await axios.get( "/api/secure-test", {
        headers: {
          Authorization: "Bearer " + accessToken.accessToken
        }
      } );
        // display the returned data
      displayMessage( JSON.stringify( res.data ) );
    }
    catch ( err ) {
      displayMessage( err.message );
    }
  } );

  // "Sign out" button click event handler
  document.getElementById( "signOut" ).addEventListener( "click", async function() {
    signOut( signInWidget );
  } );
};

const showSignIn = ( signInWidget ) => {
  signInWidget.showSignInToGetTokens( {
    clientId: oktaClientId,
    redirectUri: window.location.origin,
    // Return an access token from the authorization server
    getAccessToken: true,
    // Return an ID token from the authorization server
    getIdToken: true,
    scope: "openid profile email",
  } );
};

const runOktaLogin = async ( signInWidget ) => {
  try {
    // Check if there's an existing login session
    const session = await signInWidget.authClient.session.get();

    if ( session.status === "ACTIVE" ) {
      // Check if there are tokens in the URL after a redirect
      if ( signInWidget.hasTokensInUrl() ) {
        const res = await signInWidget.authClient.token.parseFromUrl();
        signInWidget.authClient.tokenManager.add( "idToken", res.tokens.idToken );
        signInWidget.authClient.tokenManager.add( "accessToken", res.tokens.accessToken );
      }

      // See if the idToken has already been added to the token manager
      const idToken = await signInWidget.authClient.tokenManager.get( "idToken" );
      if ( idToken ) {
        // There's already a login session and tokens, so update the welcome message
        return updateProfile( idToken );
      }

      // It's possible to have logged in somewhere else and have an active session,
      // but not have the idToken we want for this application
      showSignIn( signInWidget );

    } else {
      // User has not yet logged in, so show the login form
      showSignIn( signInWidget );
    }
  } catch ( err ) {
    console.log( err );
    displayMessage( err.message );
  }
};

document.addEventListener( "DOMContentLoaded", async () => {
  try {
    // create an instance of the Okta Sign-In Widget
    const signInWidget = new OktaSignIn( {
      baseUrl: oktaOrgUrl,
      el: "#widget-container",
      redirectUrl: window.location.origin,
      clientId: oktaClientId,
      authParams: {
        pkce: true,
        display: "page",
        issuer: `${ oktaOrgUrl }/oauth2/default`
      },
      features: {
        registration: true
      }
    } );
    await registerButtonEvents( signInWidget );
    await runOktaLogin( signInWidget );
  } catch ( err ) {
    console.log( err );
    displayMessage( err.message );
  }
}, false );
There’s a fair amount of JavaScript code here. The comments explain each of the steps. This example uses plain “vanilla” JavaScript to wire up event handlers for the buttons and display updates. You could refactor this code to use a frontend framework such as React, Angular, or Vue.
The main thing to understand from the frontend code is you are using the Okta sign-in widget to log in and receive an OAuth access token and an OpenID Connect (OIDC) ID token. The access token is the “key” that proves the person who possesses the token is authorized to access a secure resource. The ID token includes information about the identity of the person logged in, such as their name and email address.
Add Netlify Serverless Functions
Under the hood, Netlify Functions are AWS Lambdas. Netlify makes it much easier to create, deploy, and maintain AWS Lambda functions.
One thing you need to know about serverless functions is they are entirely self-contained and independent of one another and the rest of your project. That means if your function has any dependencies, you must install those dependencies separate from the main project. You package up those dependencies during the build and deploy them with the function.
The first step is to install the Netlify CLI tool. Go to your command line and install the Netlify CLI as a global module.
npm install -g netlify-cli
Next, add some configuration to the project. The Netlify CLI tool uses this configuration when creating Netlify Functions and when building and deploying the application. In the root of your project, create a file named netlify.toml and add the following text.
[build]
  command = "npm run build"
  functions = "src/functions"
  NODE_ENV = "12"
  publish = "/dist"

[dev]
  port = 8080
  publish = "/dist"
  command = "npm run dev"

[[redirects]]
  from = "/api/*"
  to = "/.netlify/functions/:splat"
  status = 200
Next, use the Netlify CLI to create two Netlify Functions. When Netlify prompts you, choose the default “hello world” basic function for both new functions.
netlify functions:create --name public-test
netlify functions:create --name secure-test
Next, you need to install a dependency the secure-test function uses. Change to the secure-test folder and initialize a new package.json file. Then, install the Okta JWT Verifier.
cd src/functions/secure-test
npm init -y
npm install @okta/jwt-verifier@1
Now in your editor, open the src/functions/secure-test/secure-test.js file and replace the contents with the following code.
"use strict";

// Import the Okta JWT verifier
const OktaJwtVerifier = require( "@okta/jwt-verifier" );

// Verify the access token passed to the function
const verifyToken = async ( authHeader ) => {
  try {
    const parts = authHeader.split( " " );
    if ( parts.length !== 2 || parts[0] !== "Bearer" ) {
      // No access token was passed
      return null;
    }
    const accessToken = parts[1];

    // Create an instance of the verifier using the Okta application's
    // Org URL and client ID
    const jwtVerifier = new OktaJwtVerifier( {
      issuer: `${ process.env.OKTA_ORG_URL }/oauth2/default`,
      clientId: process.env.OKTA_CLIENT_ID
    } );

    // verify the token
    // if there's a problem with the token, such as expired or it has been
    // tampered with, the verifier will throw an exception
    const jwt = await jwtVerifier.verifyAccessToken( accessToken, "api://default" );

    // returned the decoded JWT
    return jwt;
  } catch ( err ) {
    console.log( err );
    return null;
  }
};

exports.handler = async ( event, context ) => {
  try {
    const jwt = await verifyToken( event.headers.authorization );

    // if no access token was provided, return a 401 unauthorized
    if ( !jwt ) {
      return {
        statusCode: 401,
        body: "You are not authorized to access this resource"
      };
    }
    // Return a message using the decoded JWT subject (user name)
    return {
      statusCode: 200,
      headers: {
        "Content-Type": "application/json"
      },
      body: JSON.stringify( { message: `Hello ${ jwt.claims.sub }` } )
    };
  } catch ( err ) {
    console.log( err );
    return { statusCode: 500, body: err.toString() };
  }
};
The serverless function looks for an access token passed in the Authorization header. The access token is a JSON Web Token (JWT), which includes encoded JSON and a cryptographic signature. The jwt-verifier checks if the token is valid by looking at the token expiration and seeing if the signature matches the data.
Test Secure Serverless Application Locally
You are now ready to test your application locally! Change your command line back to the root of your project.
cd ..
cd ..
cd ..
Start a local development server using the Netlify CLI. The Netlify CLI tool reads the netlify.toml file and runs the build steps to set up the project and serverless functions.
netlify dev
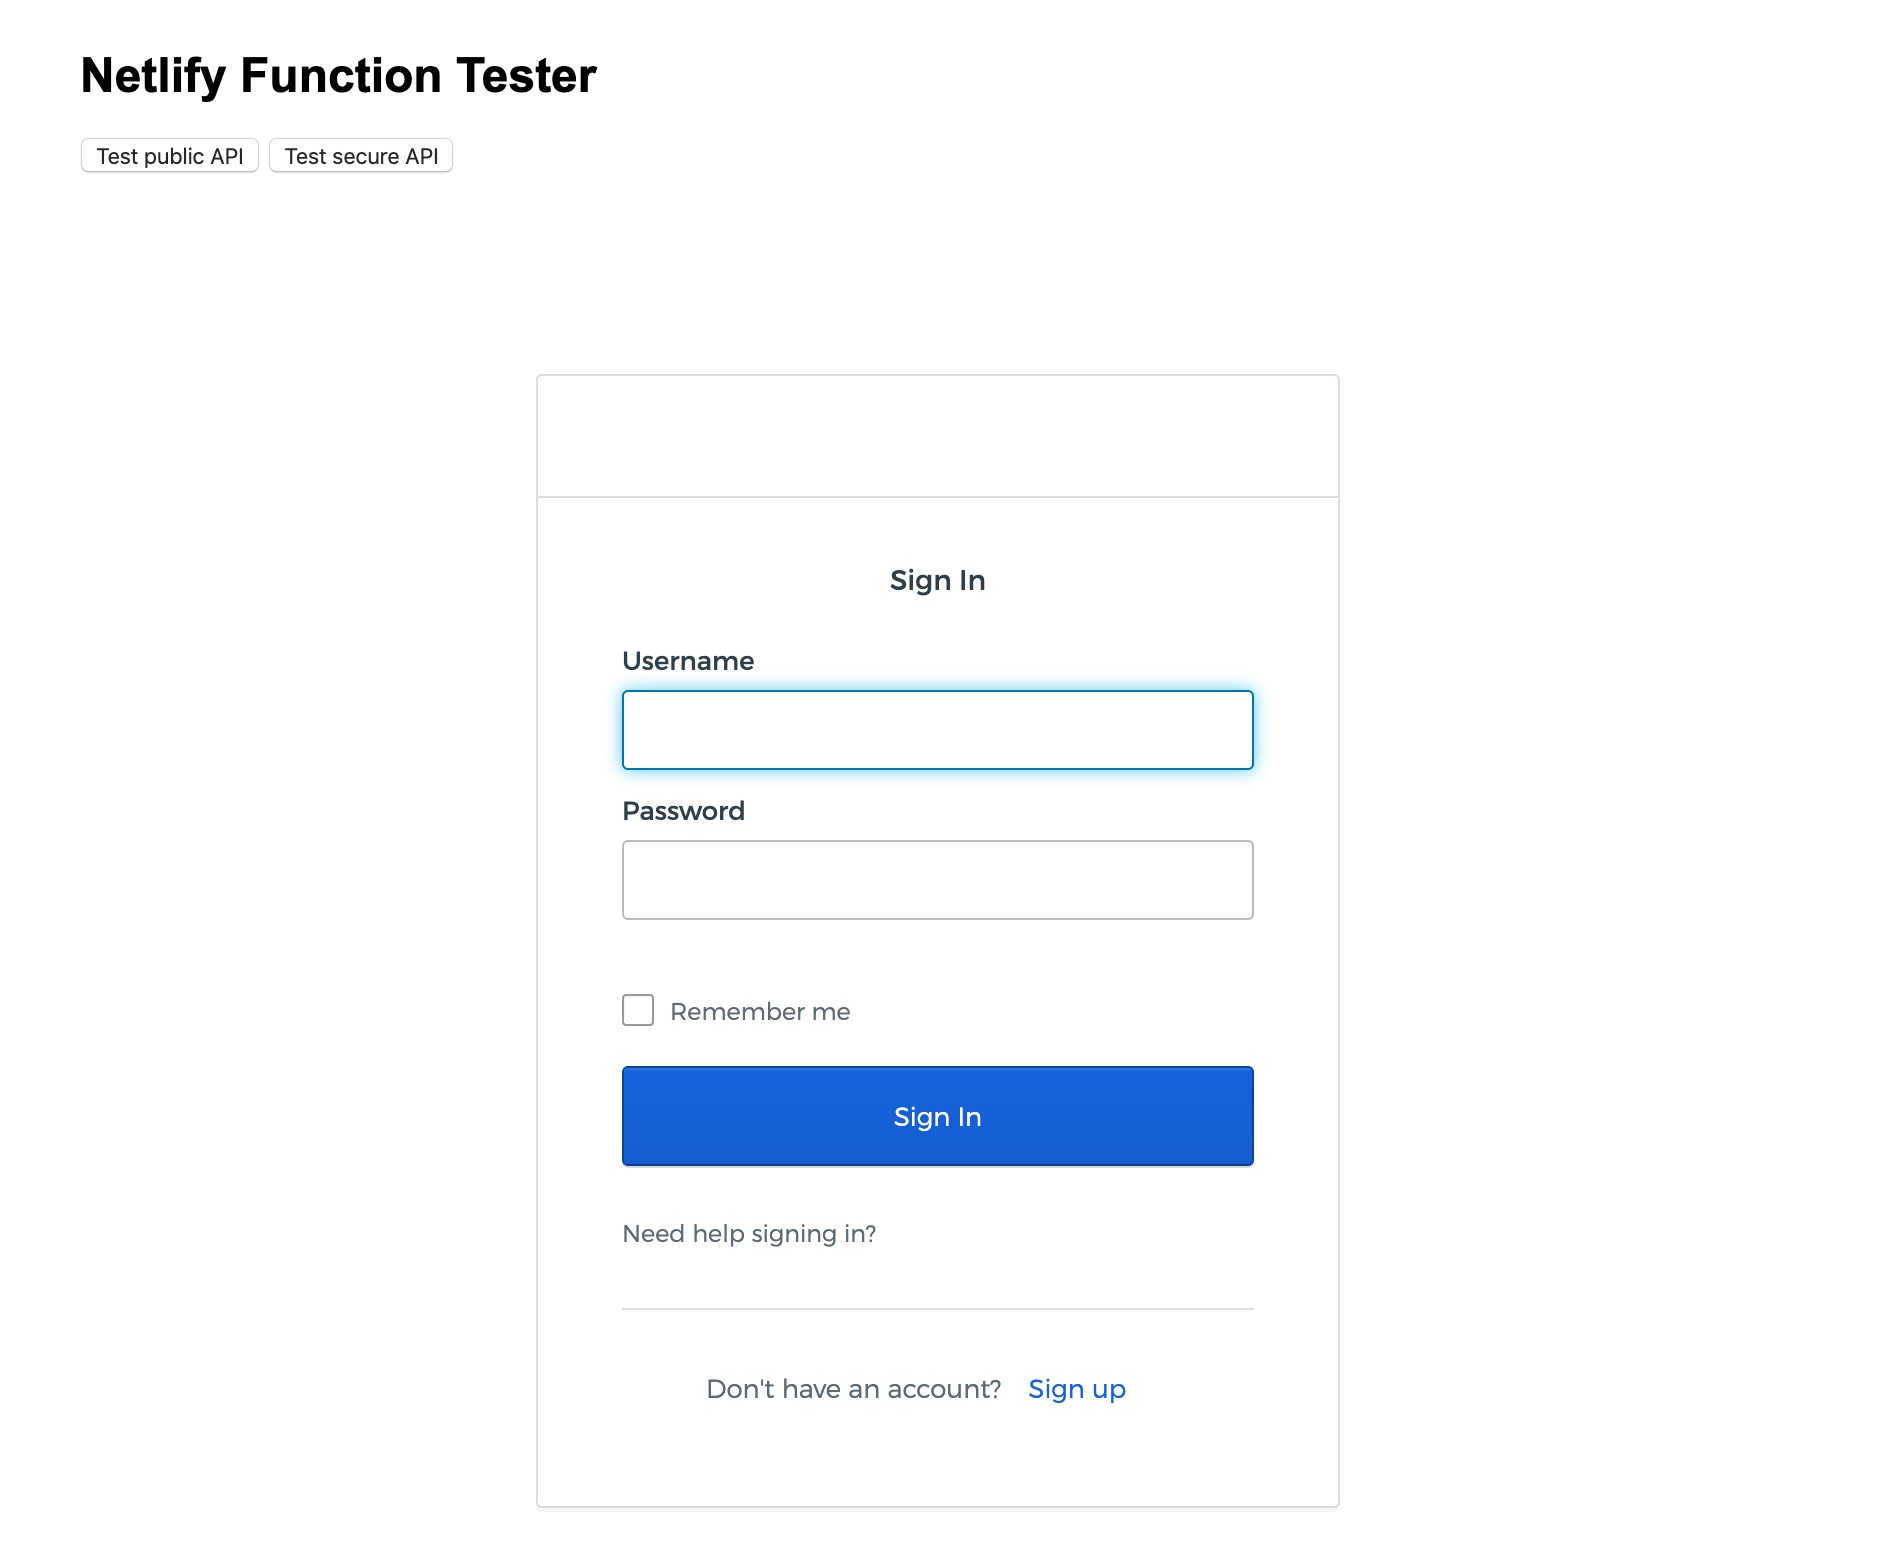
Open your browser and navigate to http://localhost:8080.
Note: To thoroughly test the login and logout functionality, I recommend you use a private/incognito browser window.
Set up Continuous Deployment with Netlify
Now that the application works locally, it’s time to deploy the application and Netlify Functions to production! Netlify makes this super easy.
The first step is to commit all the source code to a Git repository. Netlify supports GitHub, GitLab, and Bitbucket, which all offer free editions. I recommend you follow the instructions provided by your Git host of choice to create a new repository for your project.
You only need to commit specific files in your project to your Git repository. You specify which files and folders to ignore using a .gitignore file. Create a file named .gitignore in the root of your project and add the following text.
# dependencies installed by npm
node_modules

# dev environment variables
.env

# macOS related files
.DS_Store

# Local Netlify folder
.netlify

# Distribution folder
dist/

# cache folder
.cache
Next, initialize your project to use Git, add your new repository as origin, commit changes, and push your code to the repository. Change [your-repository-address] with the address your Git provider assigned you.
git init
git remote add origin [your-repository-address]
git add .
git commit -m "initial commit"
git push -u origin master
Note: You only need to run the previous command
git push -u origin masterthe first time. After the initial commit, you can usegit push, and Git will assumeorigin/master.
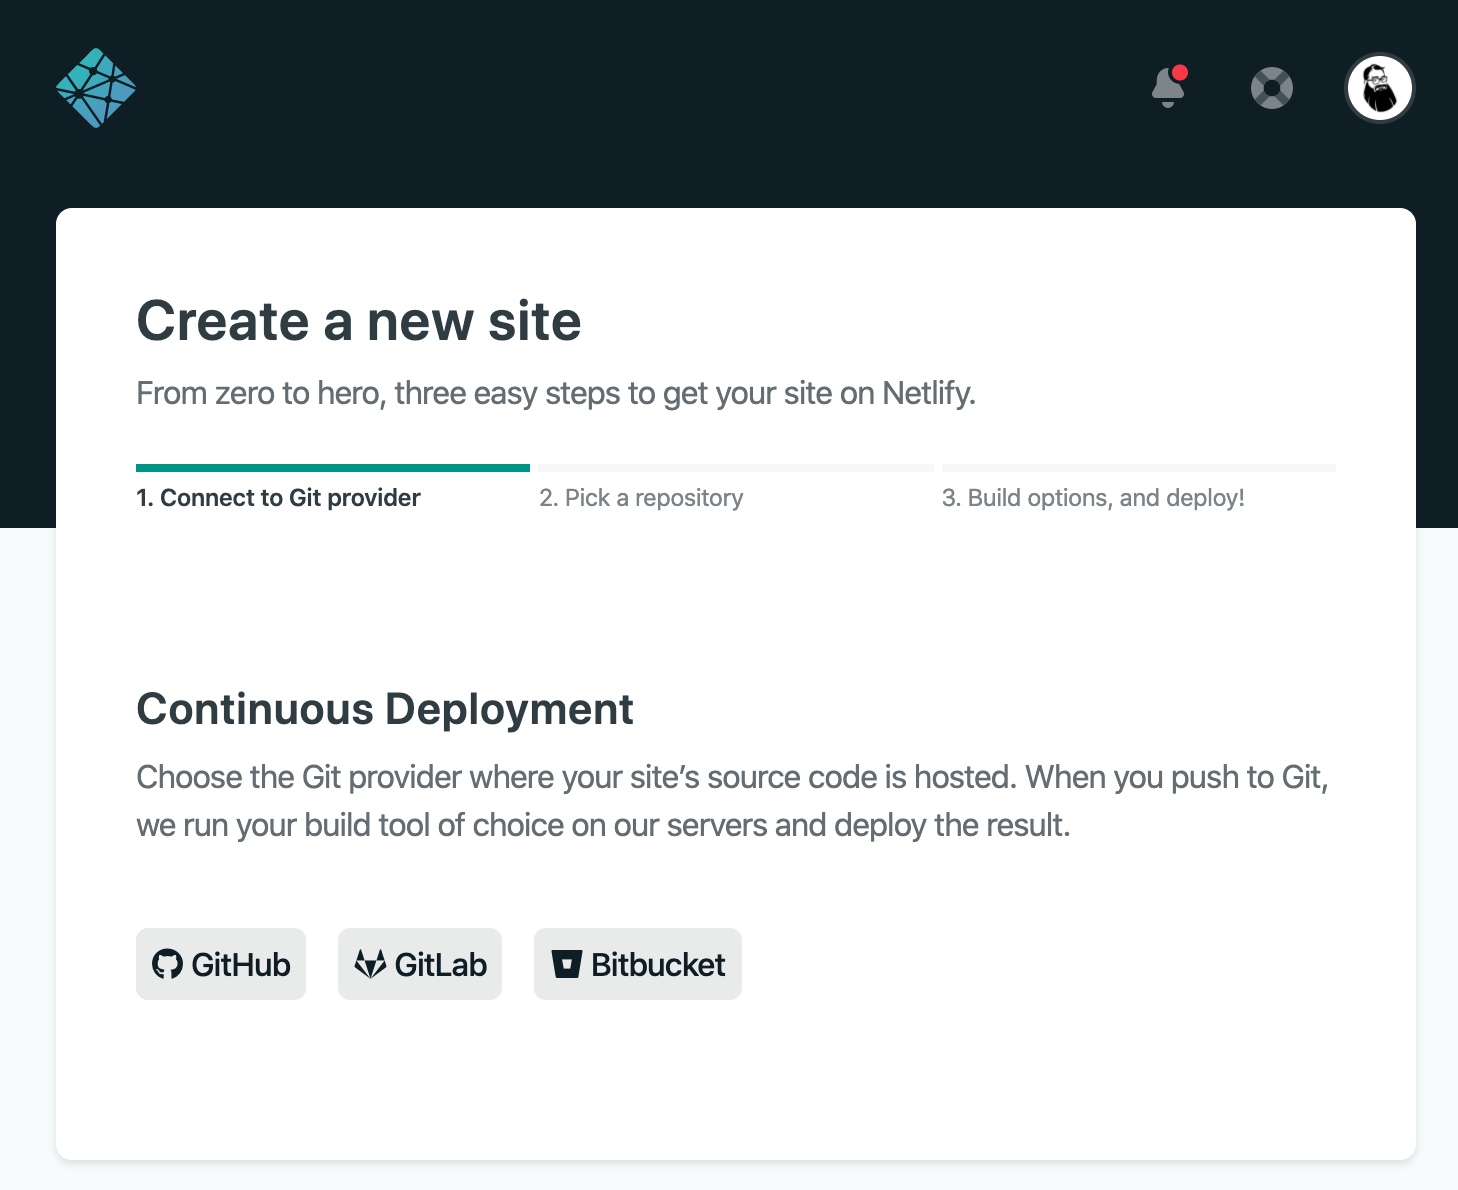
Now that your code is in Git repository, you are ready to set up a new site at Netlify. Sign up for a free Netlify account to get started. Once you have created an account (or logged into your existing account), click New site from Git.

Choose your Git provider and authorize Netlify to access your repositories.
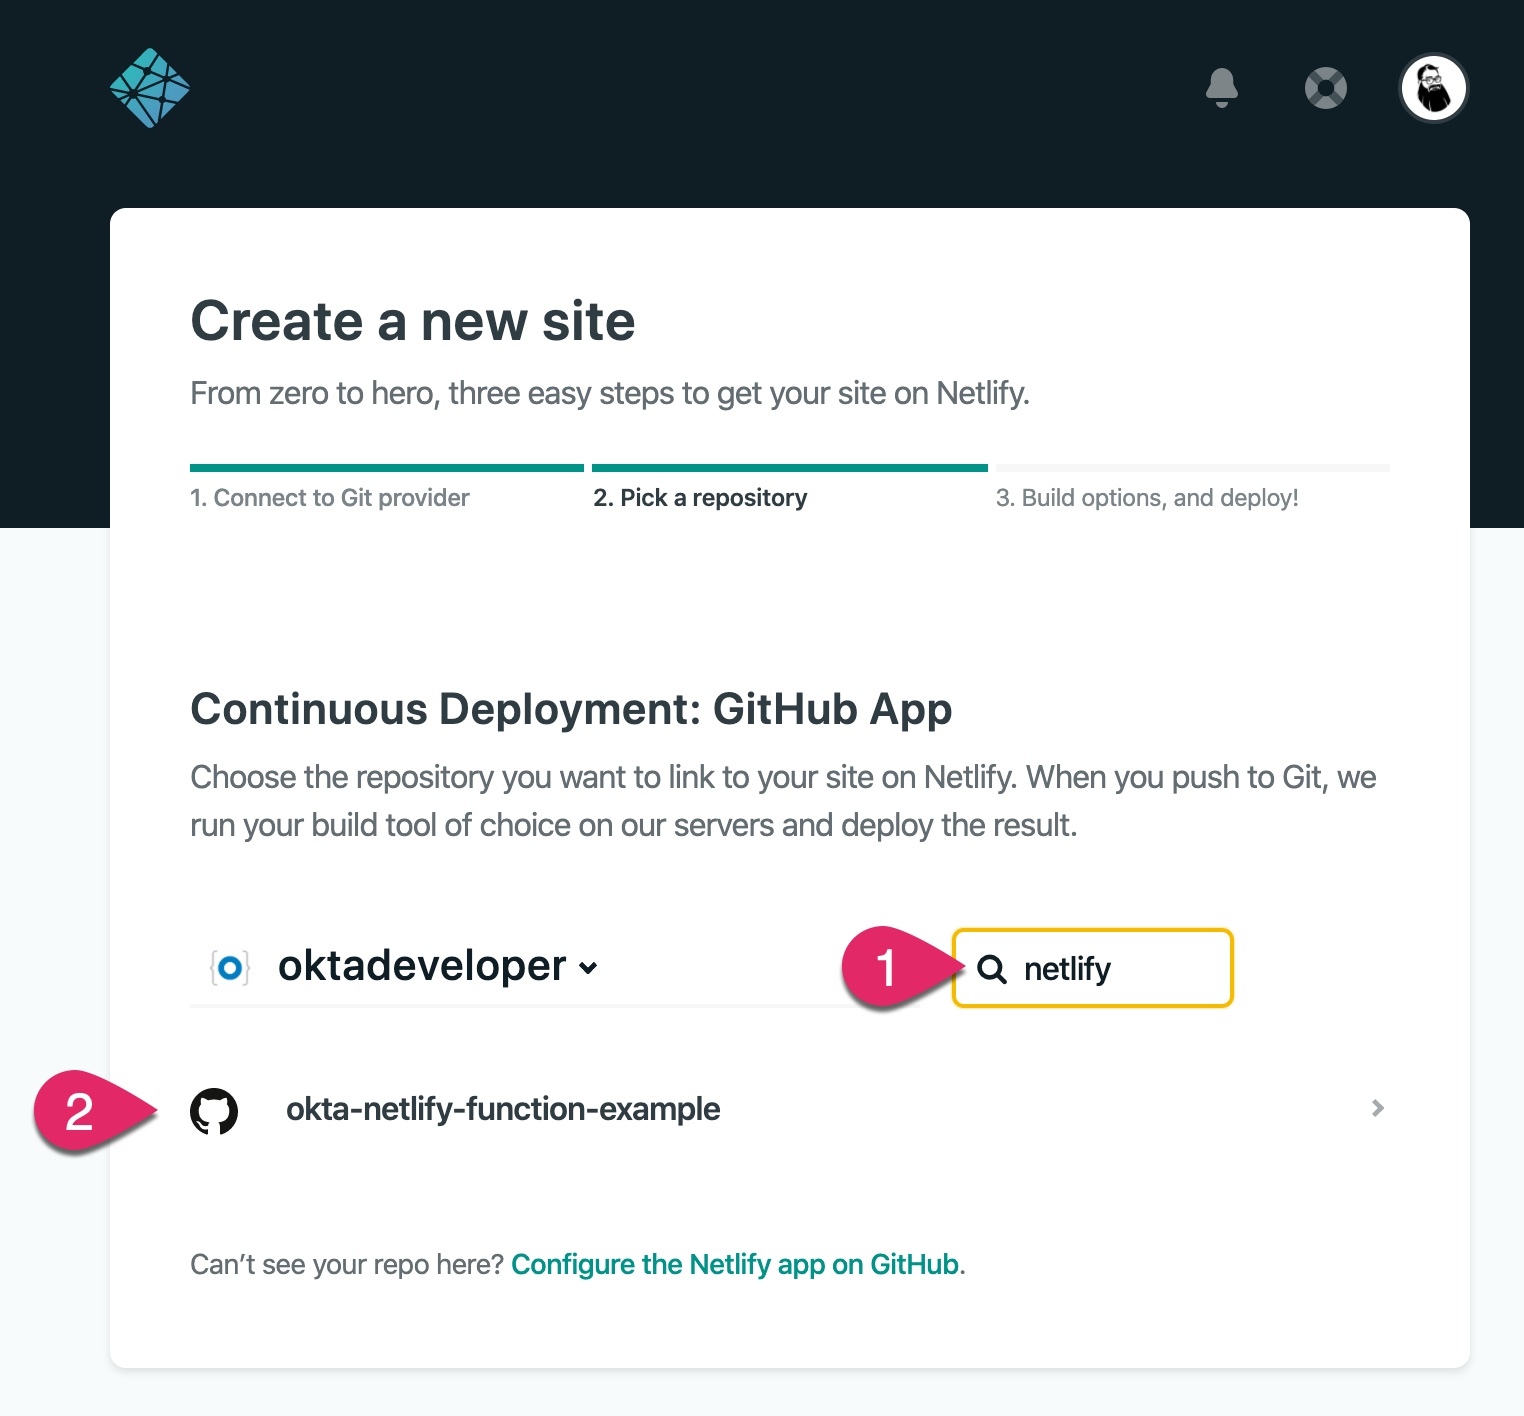
Choose your newly created repository. If you have lots of repositories, you can use the search box to locate your repository. (I named my repository in this example okta-netlify-function-example.)
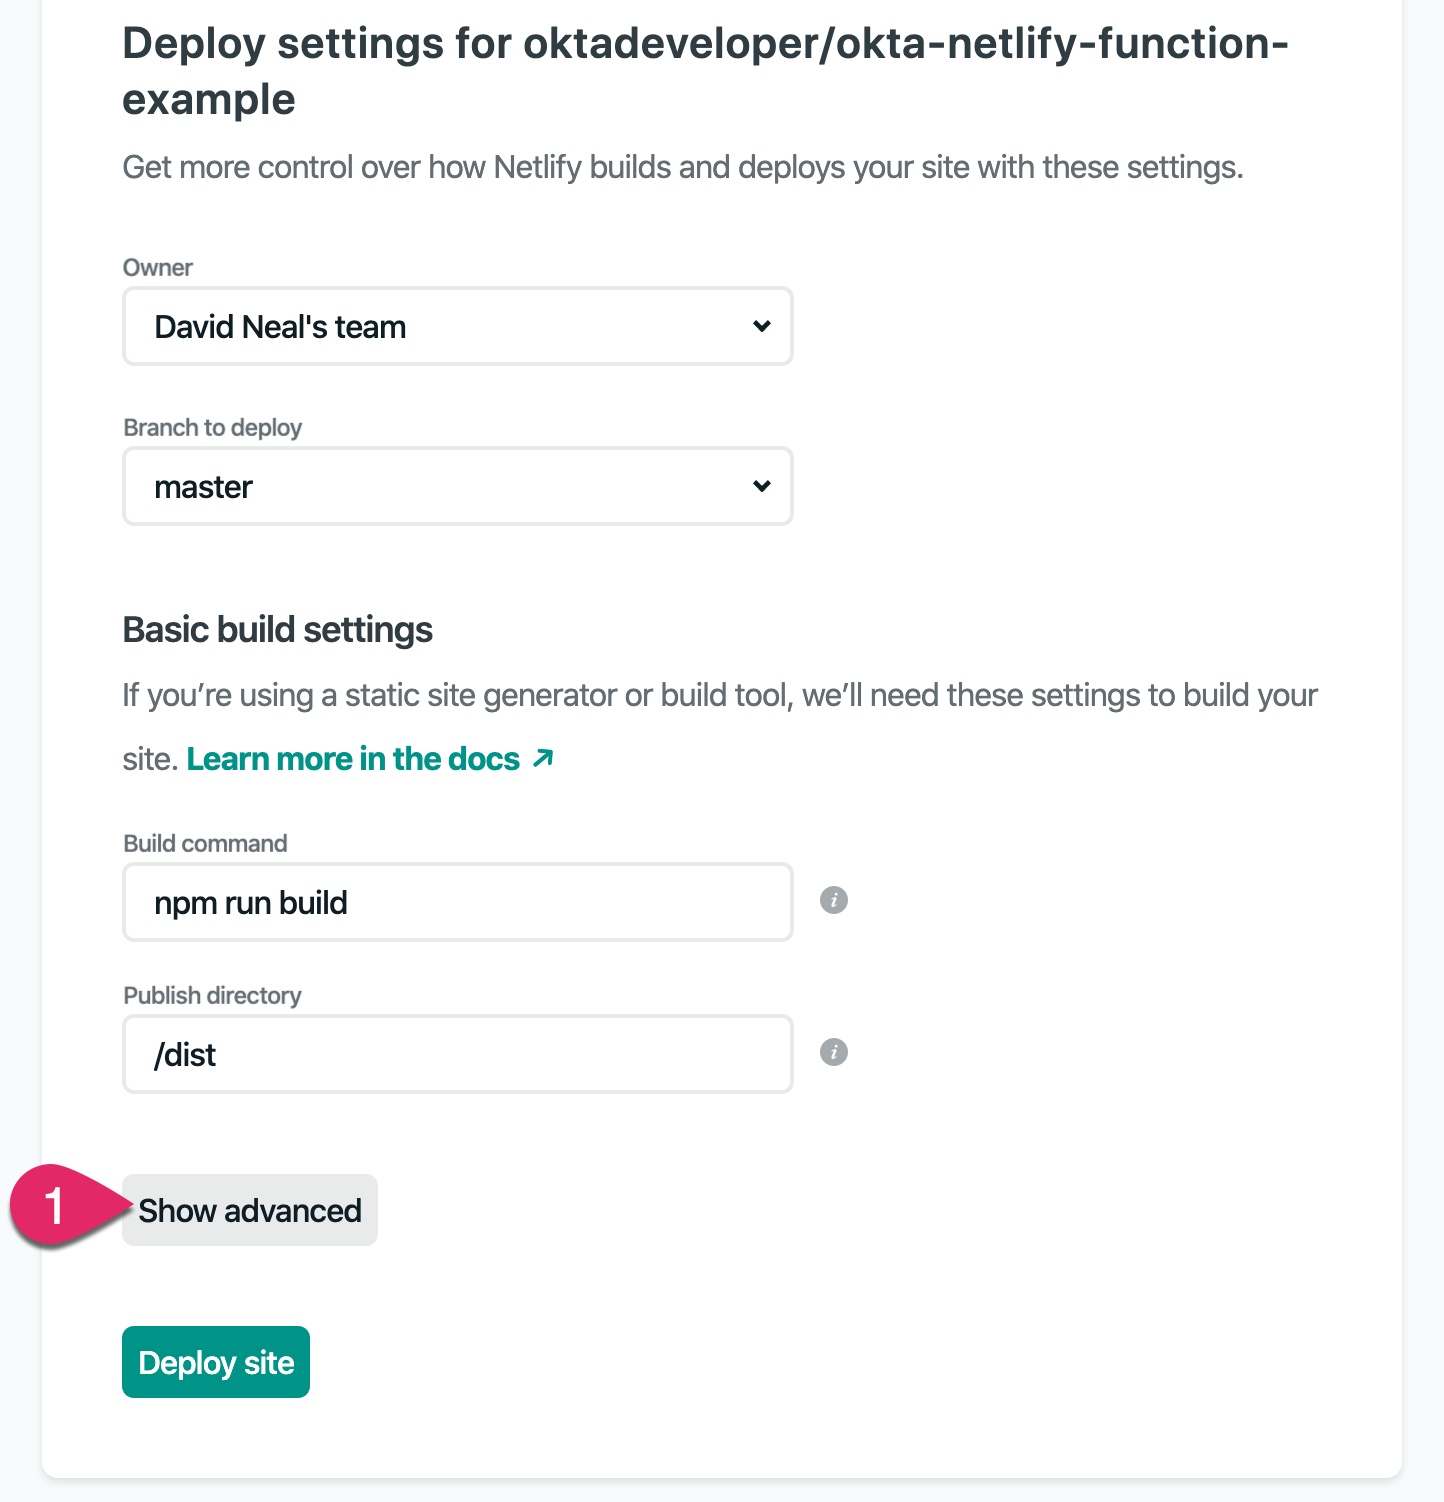
The next step is to configure deploy settings. Netlify reads the netlify.toml file in your repository and fills out the Build command and Publish directory. Click on the Show advanced button.
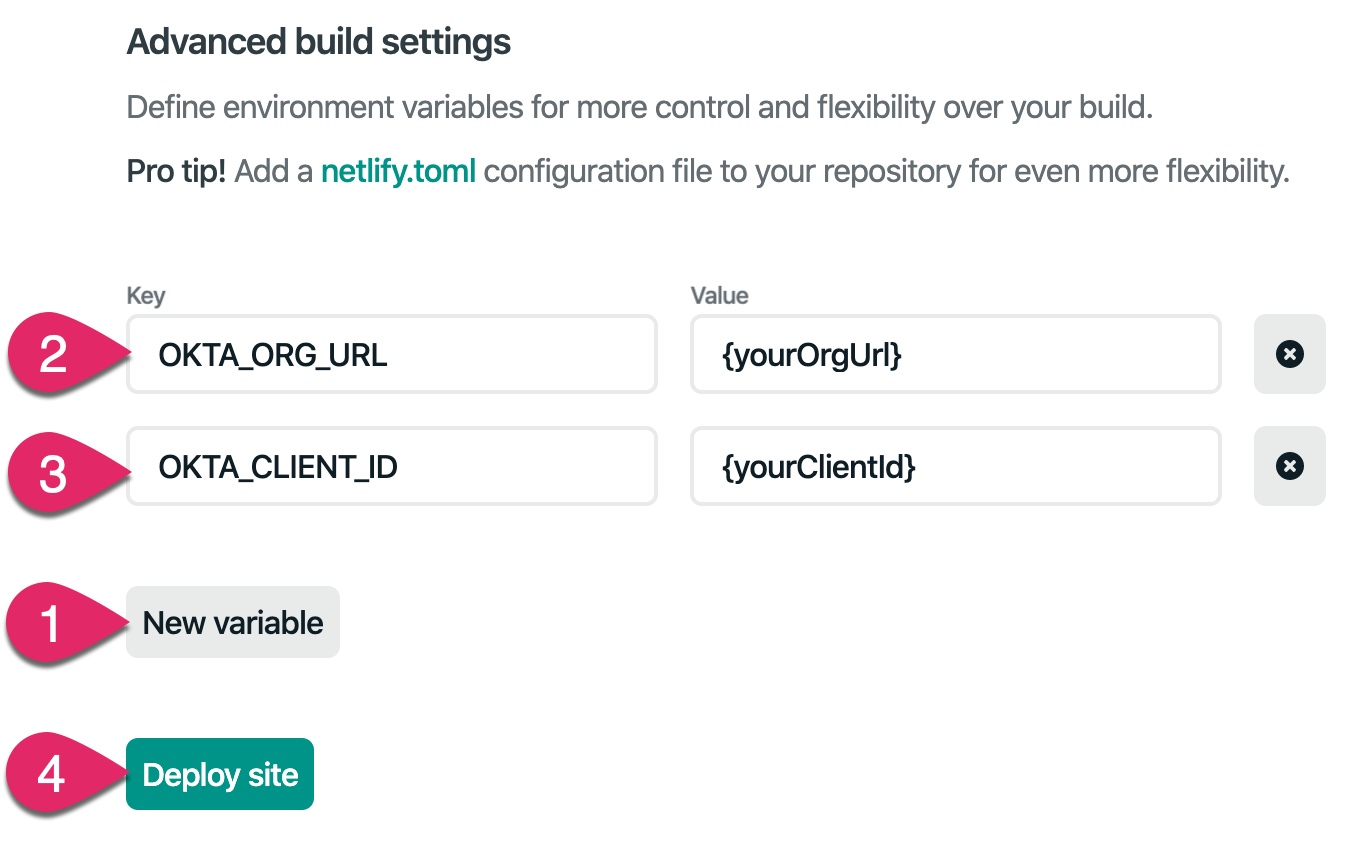
You need to add the two Okta environment variables for the secure serverless function to work correctly. Click the New variable button. Add OKTA_ORG_URL as the key and your Okta Org URL as the value. Add another variable with OKTA_CLIENT_ID as the key and your application’s client ID as the value. Both of these values should be in your project’s .env file. Then click the Deploy button.
Once the application deploys, Netlify assigns a random name and URL to your application.
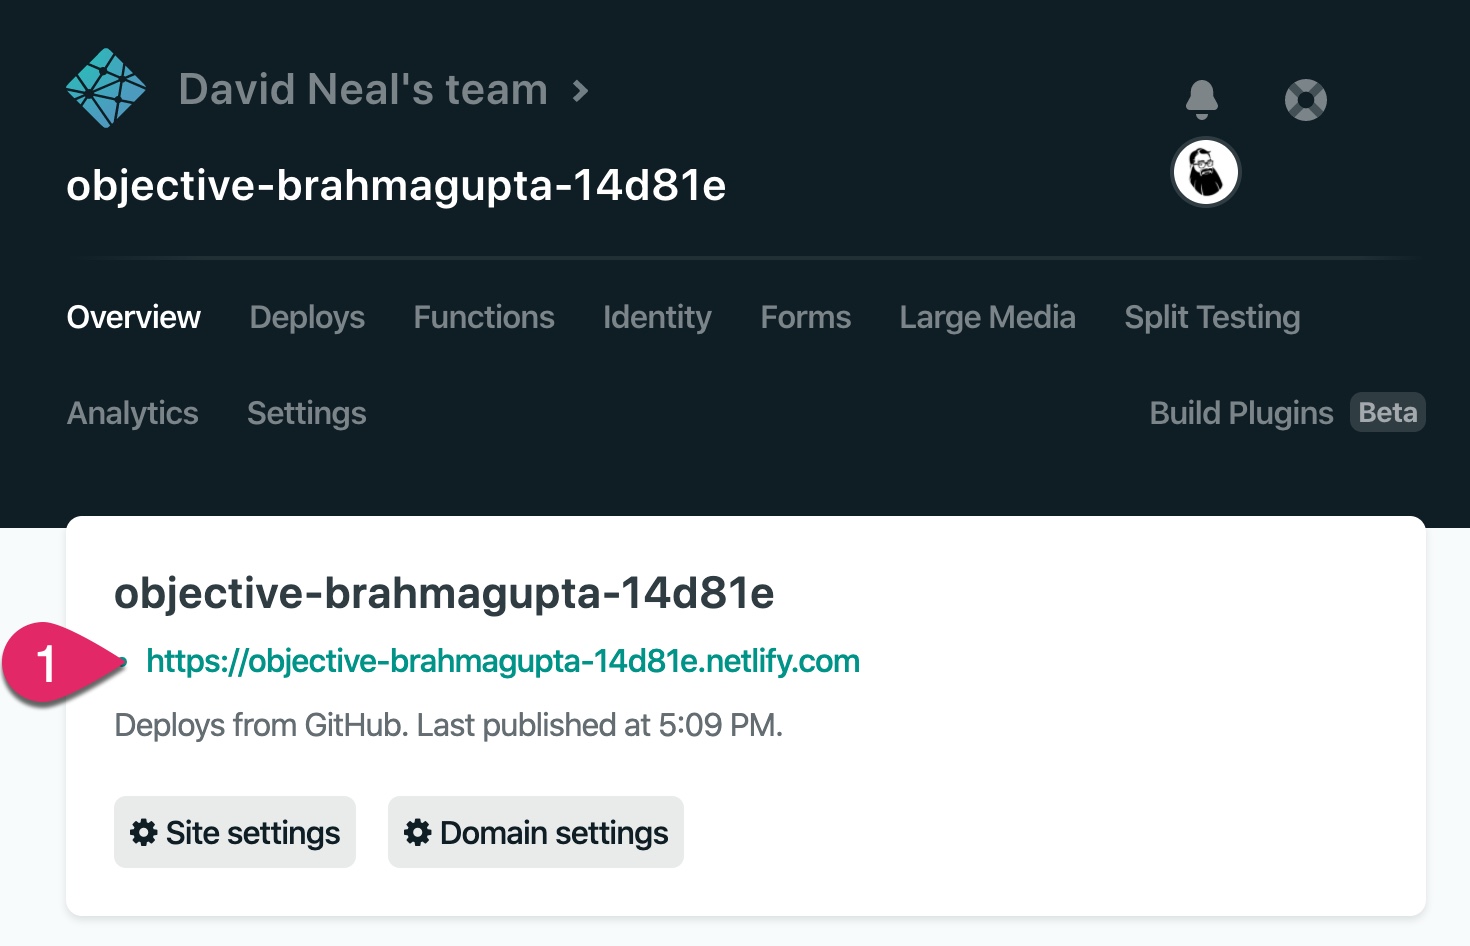
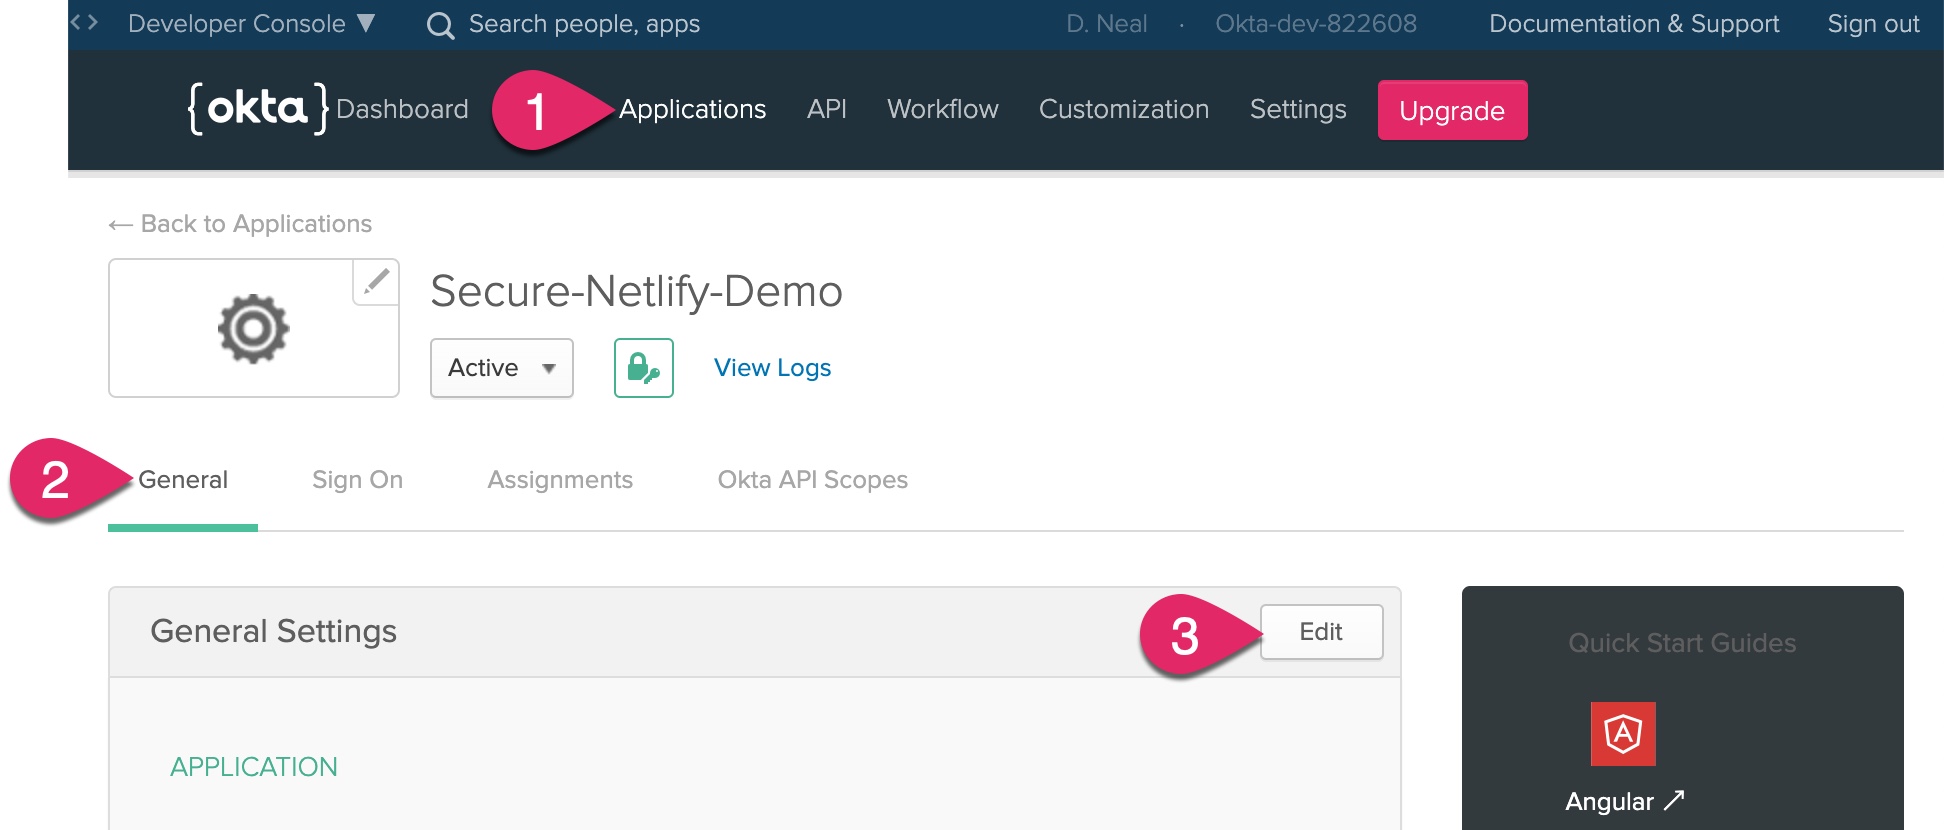
However, before you can test the application, you need to let Okta know about this new URL. Copy the URL Netlify assigned your application and head back to your Okta developer dashboard. Click on Applications, click on the General tab, and then click Edit.
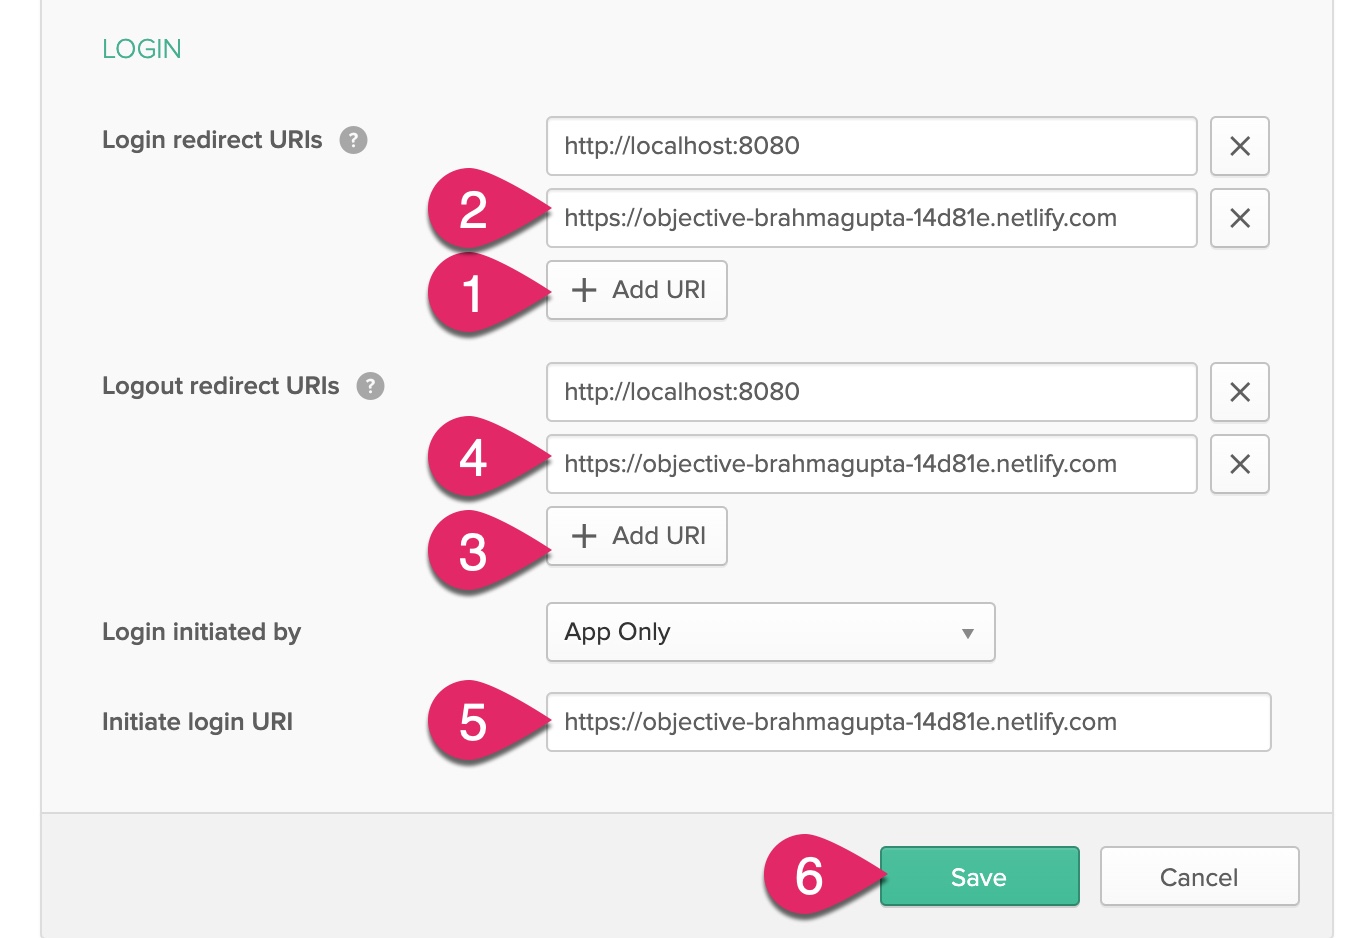
Under Login, add a new URI to the Login redirect URIs and Logout redirect URIs and paste in the value of your Netlify application’s URL. Be sure to remove any trailing slash at the end of the URL. Optionally, you can change the Initiate login URI as well. Click the Save button.
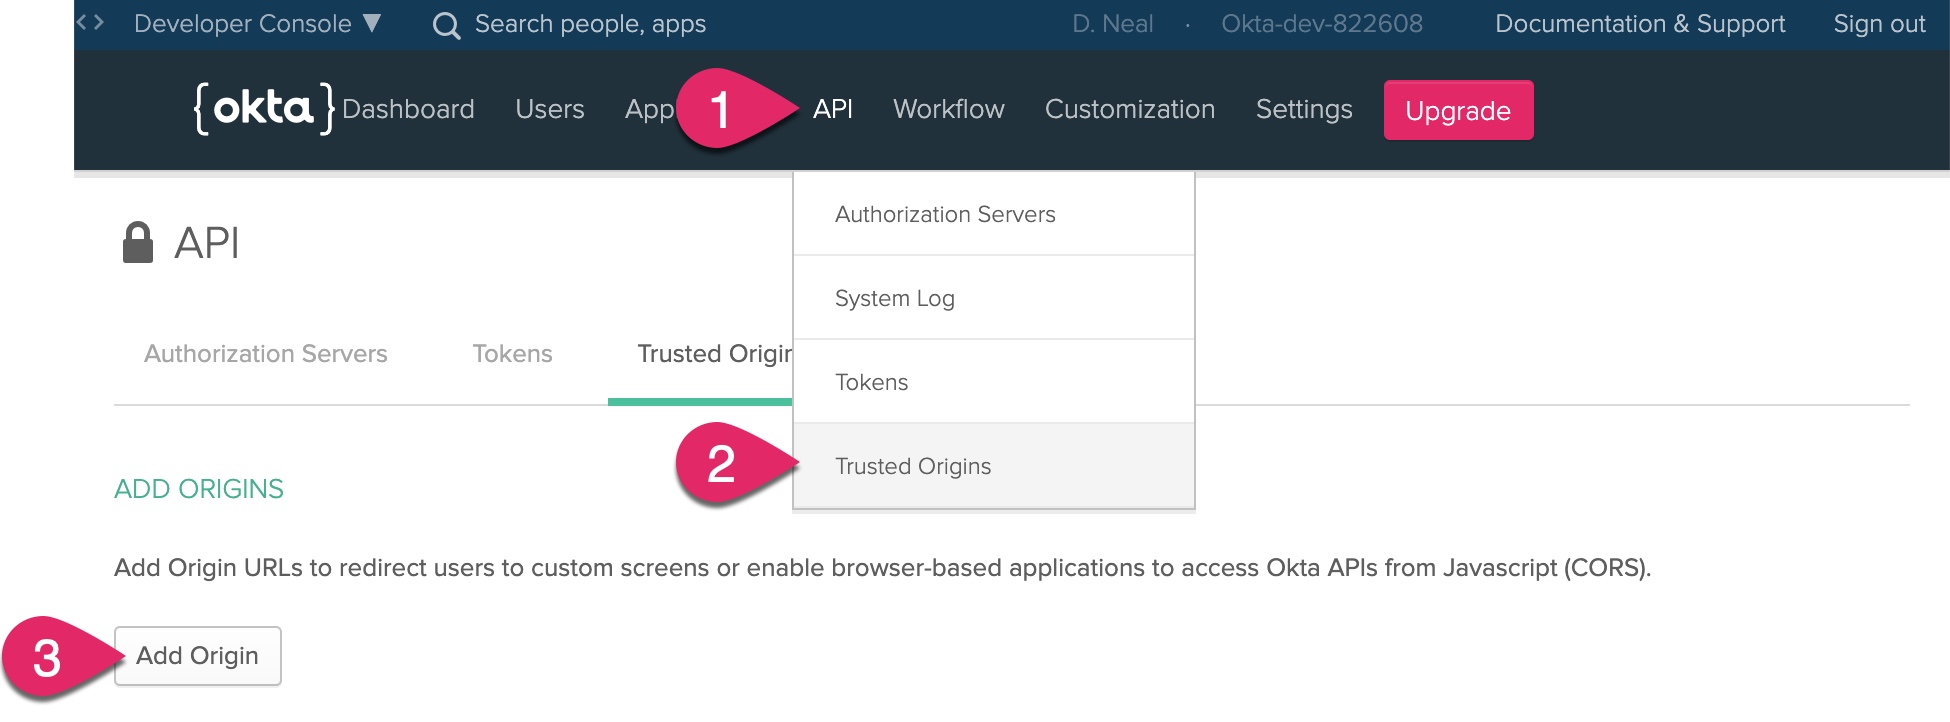
Next, you need to add the Netlify application URL to the list of trusted origins. Click on API, click Trusted Origins, and then click the Add Origin button.
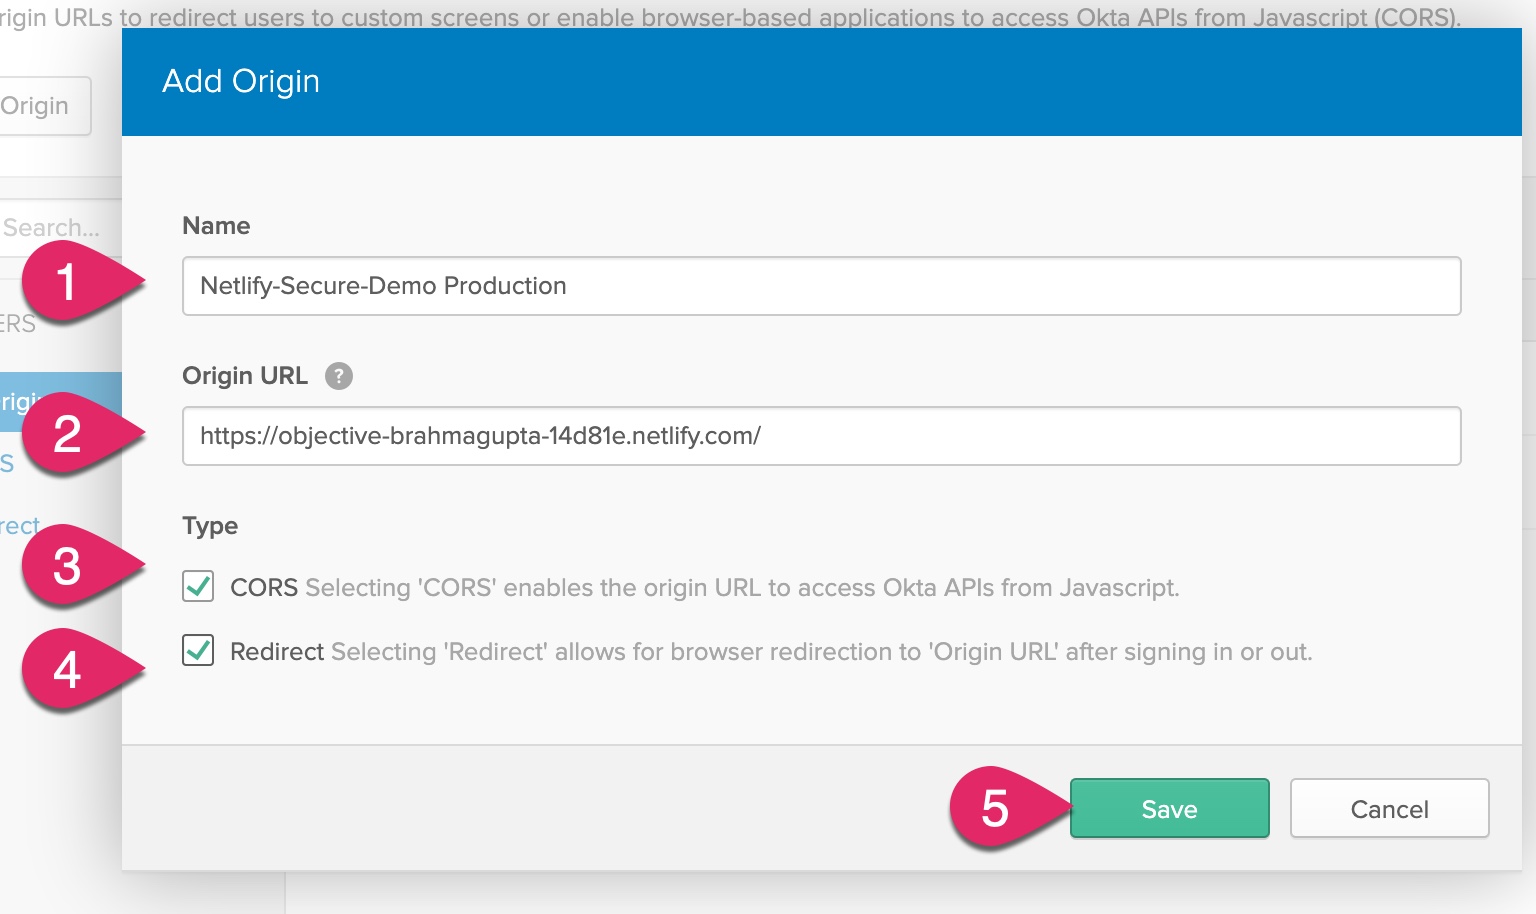
Enter a name for the origin, such as “Netlify-Secure-Demo Production.” Paste the URL for your Netlify application into the Origin URL. Check both CORS and Redirect and then click Save.
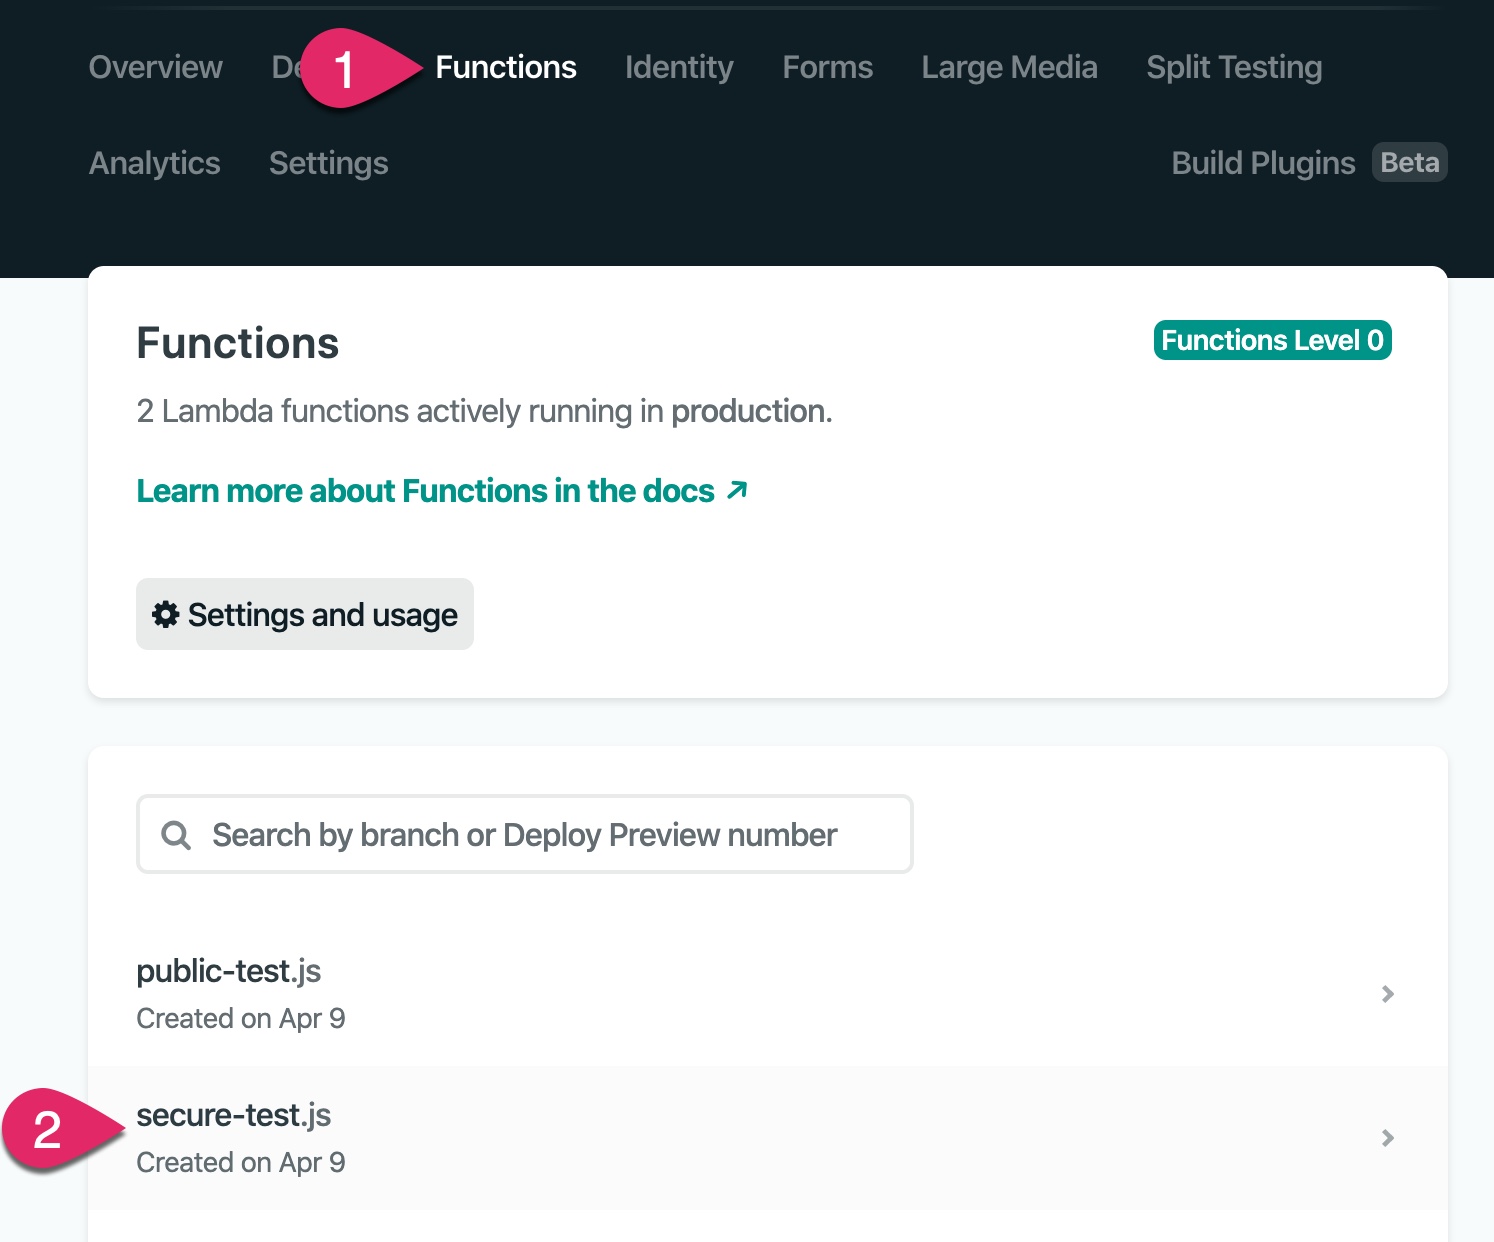
You are now ready to test your site! Navigate to your Netlify application’s URL, test the login and functions. If you run into issues, you can access the console logs for your Netlify Functions by clicking on the Functions menu and then clicking on the name of the function.
One of the awesome features of Netlify is any change you commit and push to your Git repository automatically triggers a build and deployment! Make a change to the client or one of the serverless functions, commit the change, and push the update.
git add .
git commit -m "making a change"
git push
Go to the Netlify dashboard and click on the Deploys menu. You can watch the new version of your application as Netlify builds and deploys it!
More Resources
I hope you’ve enjoyed learning about creating secure serverless functions with Netlify and Okta as much as I have! Here are some other great posts that may interest you.
- Build a Secure Blog with Gatsby, React, and Netlify
- How to Configure Better Web Site Security with Cloudflare and Netlify
- An Illustrated Guide to OAuth and OpenID Connect
- Stop Writing Server-Based Web Apps
If you liked this blog post and want to see more like it, follow @oktadev on Twitter, subscribe to the OktaDev YouTube channel, or follow OktaDev on LinkedIn!
Okta Developer Blog Comment Policy
We welcome relevant and respectful comments. Off-topic comments may be removed.