Build A Secure Node.js API with KoaJS

Koa is a web framework from the makers of Express. Koa is designed to be middleware-driven and extremely lightweight. It is so lightweight that it comes without any middleware on its own. But not to fear, there are plenty of packages available for basic functionality such as routing, authentication, body parsing, and more. You can also write your own custom middleware— I’ll show you how in this tutorial. Koa prides itself on using async functions allowing developers to move away from callbacks.
In this application, you will continue with the Garduino project you started earlier. In that tutorial, we created a web application that would display various statistics about a home garden, and let you turn a water fountain on or off remotely. This was accomplished with an Arduino board connected to a series of sensors and a GSM module in the garden. The board would be able to call a REST API to post the data from the garden and check for any fountain requests. It would also be able to respond to those requests to let the web application know it was completed.
In this project, you will work on the REST API portion of the project. To ensure incoming requests to the API are authorized, you will leverage Okta to issue a JSON Web Token (JWT) which will then be validated in your API. You’ll see how easy it is to use Okta to set up an authorization server and request a secure JWT from that server. You will also leverage the Okta JWT Verifier to make the authorization process as easy as possible.
It will be the responsibility of the Arduino to obtain or refresh a web token before making a request. For this project, you will use Postman or Advanced Rest Client to make your requests to the API.
Create Your Authentication Server
One of the best things about using Okta is that you can use it as an authentication server to issue JWT tokens to your users. In this case, you will be authenticating the application itself rather than individual users. To do so, you’ll need to set up a new application. Head to your Okta developer console and click on Applications. Next, click Add Application. On the next page select Service as your application type. Give your application a meaningful name. I named my GarduinoAPI. This will bring you to your application home page. Take note of your client Id and client secret as you will need these for testing your application.
Next click on API in the header bar then Authorization Servers. By default, Okta will add one for you—it’s fine to use for development purposes. In production, you will want to add a new one. Click on default to open the authorization server. Click on Scopes and Add Scope. Name this scope API, you will need this when testing your application. Under settings, note your Issuer URL, this is the base of your endpoint for requesting tokens. Finally, you can test your settings by going to Token Preview. Change Grant type to Client Credentials, OAuth/OIDC client to GarduinoAPI, and Scopes to API. Then click Preview Token. You should see some sample data appear in the preview window with the JWT redacted.
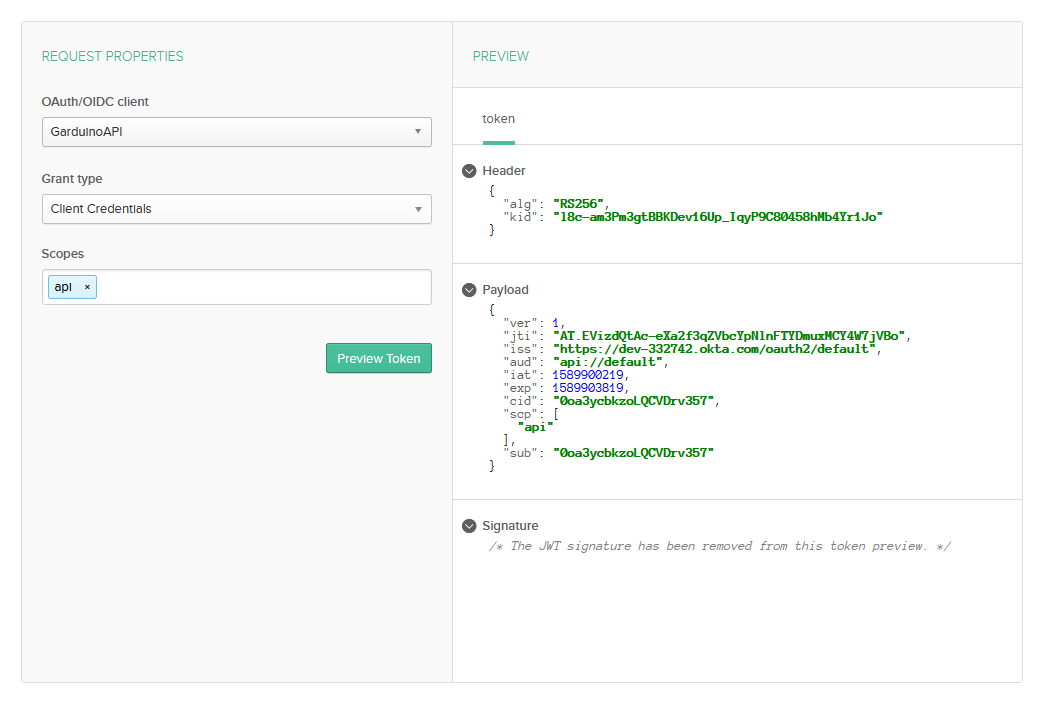
Once you see the successful preview, your authorization server is ready for use.
Create the Koa API
With your authorization server set up, it’s time to create your API. Create a new folder and run the command npm init. This will walk you through the stages of naming your application and setting up basic configuration details. With that done, it’s time to start installing the packages you’ll need for this application.
First, you will want to get Koa and any related middleware that will be helpful for the project.
npm i koa@2.9.0
npm i koa-bodyparser@4.3.0
npm i @koa/router@8.0.8
Since Koa doesn’t come with any built-in middleware, you need to install a couple of essentials, notably a router and a body-parser.
Next, install the Okta JWT Verifier.
npm i @okta/jwt-verifier@1.0.0
This package will make verifying the token from your authorization server as simple as can be. And that’s it. Koa prides itself on being very lightweight—So far, so good. Of course, you will add more packages as you build more complex applications and take them to production.
Finally, you will need dotenv for access to sensitive data from your .env file.
npm i dotenv
At this point, you can add your .env file to the root and add the following entries.
OKTA_CLIENT_ID={yourOktaClientID}
OKTA_ISSUER={yourOktaDomain}/oauth2/default
OKTA_AUDIENCE=api://default
The OKTA_ISSUER and OKTA_AUDIENCE assume you are using the default authorization server. If you are using a different server you will need to amend that to match.
Custom KOA Middleware
You will write three pieces of custom middleware. The first is a wrapper for the Okta JWT Verifier. You’ll see how that works shortly, but essentially you are just adding more robust error handling to the built-in functionality. The second is a data validation piece that will ensure the required data exists before allowing it to post. The third is a repository layer that will handle the data access.
JWT Verifier
Create a new file called jwtverifier.js in your root and add the following code:
const OktaJwtVerifier = require('@okta/jwt-verifier')

const oktaJwtVerifier = new OktaJwtVerifier({
  issuer: process.env.OKTA_ISSUER,
  clientId: process.env.OKTA_CLIENT_ID
})

module.exports = async (ctx, next) => {

  const { authorization } = ctx.headers;

  if (!authorization) {
    ctx.throw(401);
  }

  const [authType, token] = authorization.trim().split(' ');

  try {
    const { claims } = await oktaJwtVerifier.verifyAccessToken(token, process.env.OKTA_AUDIENCE)

    if (!claims) {
      ctx.throw(401);
    }
    if (!claims.scp.includes('api')) {
      ctx.throw(401);
    }
  }
  catch (err) {
    ctx.throw(401);
  }

  next();
}
There’s a little bit of magic happening in this simple code. Of course, you’re verifying that an authorization header was sent, and then passing it into the JWT verifier to check its status. That much is pretty simple. The trick though, is the function signature that Koa expects, (ctx, next). Specifically ctx, which will hold all the information about your request and response models. Using ctx, you can return status codes, throw errors, access the headers, read the body, or anything else you would expect from the request or response.
The Okta JWT Verifier used here is very simple. It will throw an error if the token is invalid, hence the try/catch. Otherwise, it will accept the token and provide you with the claims. You can check the claims to ensure the application scope includes the api scope you added during your authorization phase.
Data Validation
Next is a short data validation class. Add a new folder called dataValidation and inside that folder, add a file called dataval.js. Place the following code there.
module.exports = {
  fountainRequest: async (ctx, next) => {
    const { fountainRequest } = ctx.request.body;

    if (!fountainRequest) {
      ctx.throw(400);
    }

    if (!fountainRequest.id) {
      ctx.throw(400);
    }

    next();
  },

  gardenData: async (ctx, next) => {
    const { gardenData } = ctx.request.body;

    if (!gardenData) {
      ctx.throw(400);
    }

    next();
  },
};
Here you have two functions, each validating a different model. When the Arduino requests to update a fountain request, it needs to ensure the request model is populated and the id of that model is populated. With the post to save garden data, you are just checking to ensure the garden object is included in the request. If these fail, you return an error 400, Bad Request.
Data Access
Next is the data access. This work is stubbed out, and it’s left to you to integrate into your database of choice using your ORM of choice. But you can see how this works. Add a new folder called data and add two files, fountainRequest.repo.js and gardenData.repo.js.
Add the following code to gardenData.repo.js.
module.exports = {
  save: async (ctx, next) => {
    const { gardenData } = ctx.request.body;
    next();
  },
};
Next, add the code for fountainRequest.repo.js.
module.exports = {
  get: async (ctx, next) => {
    ctx.body = {
      requestId: 15,
      respondedTo: true,
      toggle: false,
      createdDate: 1588953915653,
    };

    next();
  },

  save: async (ctx, next) => {
    next();
  },
};
As you can see you are just sending some sample data back to the client. When saving data, if the model was validated and correct, you can allow the application to proceed to the next function.
Note that you are passing the data back using the ctx. In this case, ctx.body is what will be returned to the client. Another useful property is ctx.state which is the preferred way to pass data between middlewares without exposing it back to the client.
Add the Node.js Middleware to the Koa API
The last thing left is to tie it all together. You will do that in your index.js file. If you don’t have one, add it to your root.
require("dotenv").config();
const Koa = require("koa");
const router = require("@koa/router")();
const app = new Koa();
const bodyParser = require("koa-bodyparser");
const jwtVerifier = require("./jwtVerifier");

const fountainRequestRepo = require("./data/fountainRequest.repo");
const gardenDataRepo = require("./data/gardenData.repo");

const dataval = require("./dataValidation/dataval");

app.use(bodyParser());

router.use(["/gardenData", "/fountainRequest"], jwtVerifier);

router.get("/echo", (ctx, next) => {
  ctx.body = ctx.request.query.message;
});

router.post(
  "/gardenData",
  dataval.gardenData,
  gardenDataRepo.save,
  (ctx, next) => {
    ctx.status = 200;
    next();
  }
);

router.get("/fountainRequest", fountainRequestRepo.get, (ctx, next) => {
  ctx.status = 200;
  next();
});

router.post(
  "/fountainRequest",
  dataval.fountainRequest,
  fountainRequestRepo.save,
  (ctx, next) => {
    ctx.status = 200;
    next();
  }
);

app.use(router.routes());
app.listen(3000);
At the top, you will see the requisite require statements for importing the various packages you will need. Then you are telling Koa to use the koa-bodyparser package.
Then you define which routes should use the jwtVerifier middleware you wrote earlier. Because the jwtVerifier is acting as your authorization by telling the router to use it on the /gardenData and /fountainRequest paths, you are essentially telling Koa that those are under authentication and/or authorization. There are several authentication and authorization middleware packages available depending on how you plan on authenticating users in other applications. But given that you are using Okta here, the custom jwtVerifier is perfect.
Next, you are defining the routes the application will have. The GET /echo route is for testing the application once it’s up and running.
Since the Arduino does not need historical data, there is no need to implement a get on the POST /gardenData path. Taking a closer look at this route, you see how all the middleware comes together. First, you define the path, then you pass in middleware functions that are executed. The data is validated, saved, and finally, an inline function returns a status code 200 to the client. Of course, the last function doesn’t need to be defined here, you could have defined it in its own module and pass it in the save() as dataval.gardenData or gardenDataRepo.save.
The GET /fountainRequest route gets the latest fountainRequest. As you saw earlier, the fountain repo will attach the object to the ctx.body so there is no need to reattach it. The final function sets the status to 200.
Finally, the POST fountainRequest route validates the data, then passes it to the repo for processing against your database.
Once your routes are defined, you can register them with app.use(router.routes()). Then kick off your server with app.listen(3000) to start listening on port 3000.
Testing your Node.js Koa API
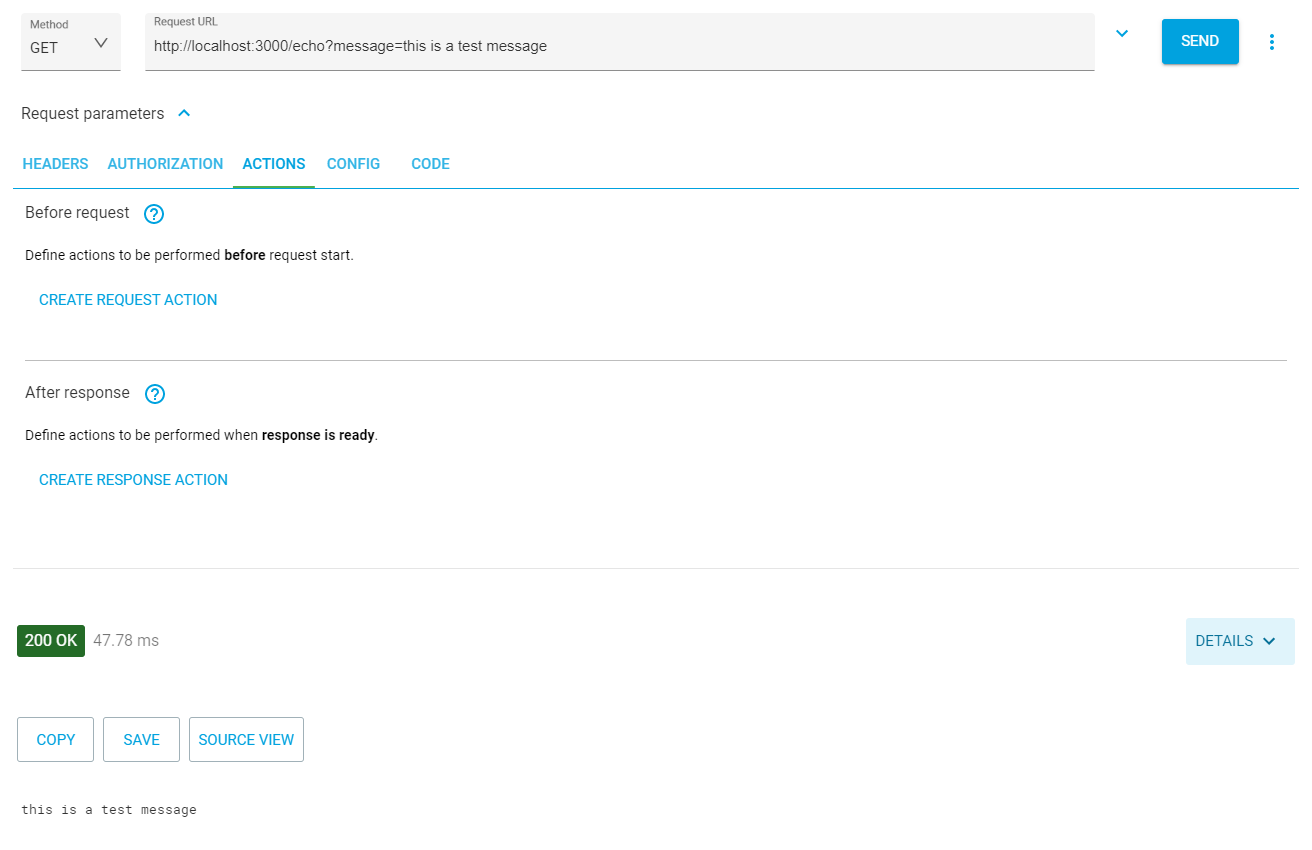
Your application is now built and ready for use. You can start it up with the node index.js command from the terminal. Once the application is started, you can use your favorite API client to test the GET echo route. For this task, I like to use Advanced REST Client. Postman is another great option. Try requesting http://localhost:3000/echo?message=this+is+a+test. You won’t need an authorization header for this call.
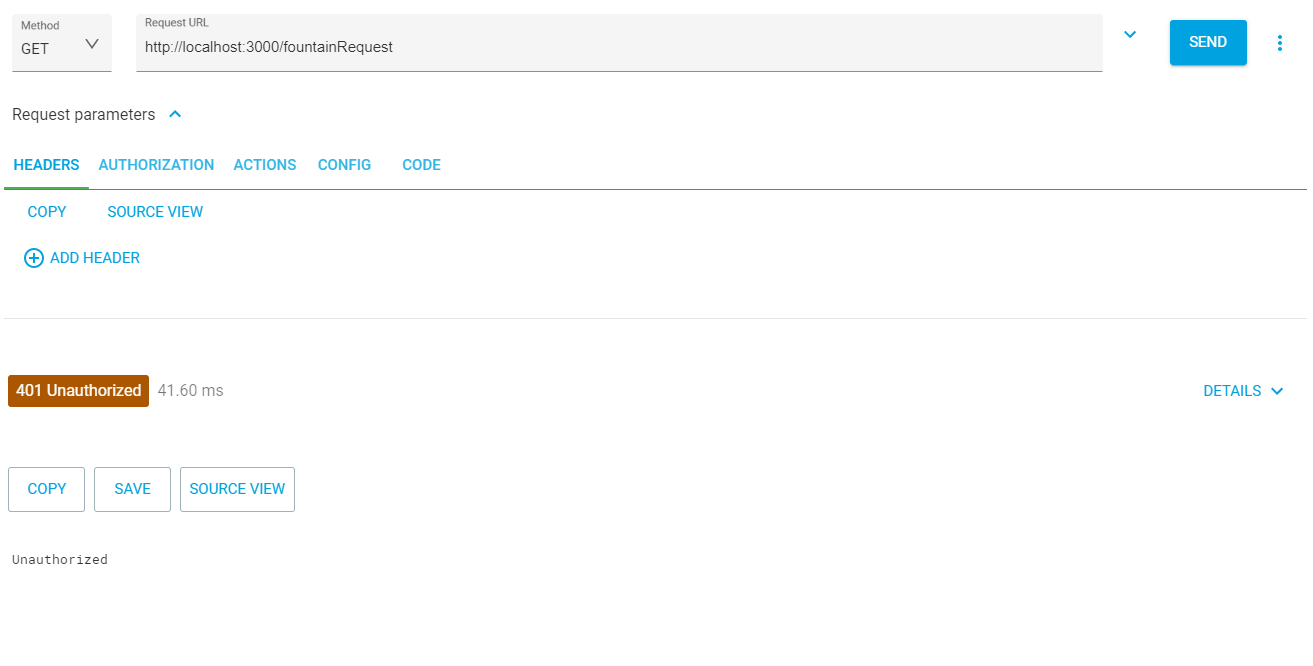
Next, you can test the GET /fountainRequest method. First, try it with no authorization header. The API returns a 401 emanating from the custom token verification middleware you wrote.
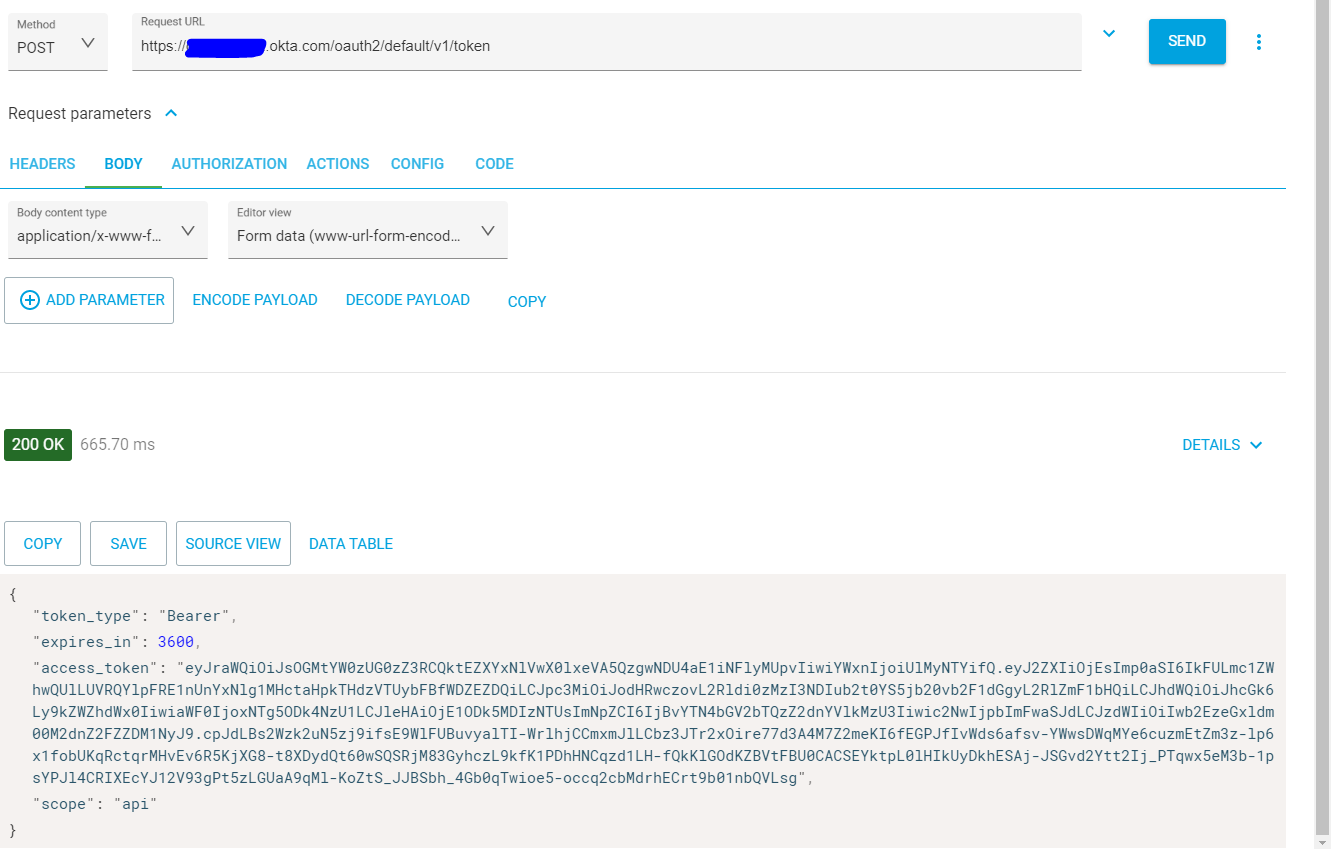
To get a token, POST a request to your authorization’s token endpoint, https://{yourOktaOrgUrl}/oauth2/default/v1/token. To do this you will need to set the Content-Type to application/x-www-form-urlencoded and include the following parameters: grant_type = client_credentials, scope= api, client_id = {yourOktaClientId}, client_secret={yourOktaClientSecret}. Sending this request should return a JWT with some additional information about the token.
Copy the access_token value. Use that token in the fountainRequest by setting the Authorization header value to Bearer {yourToken}.
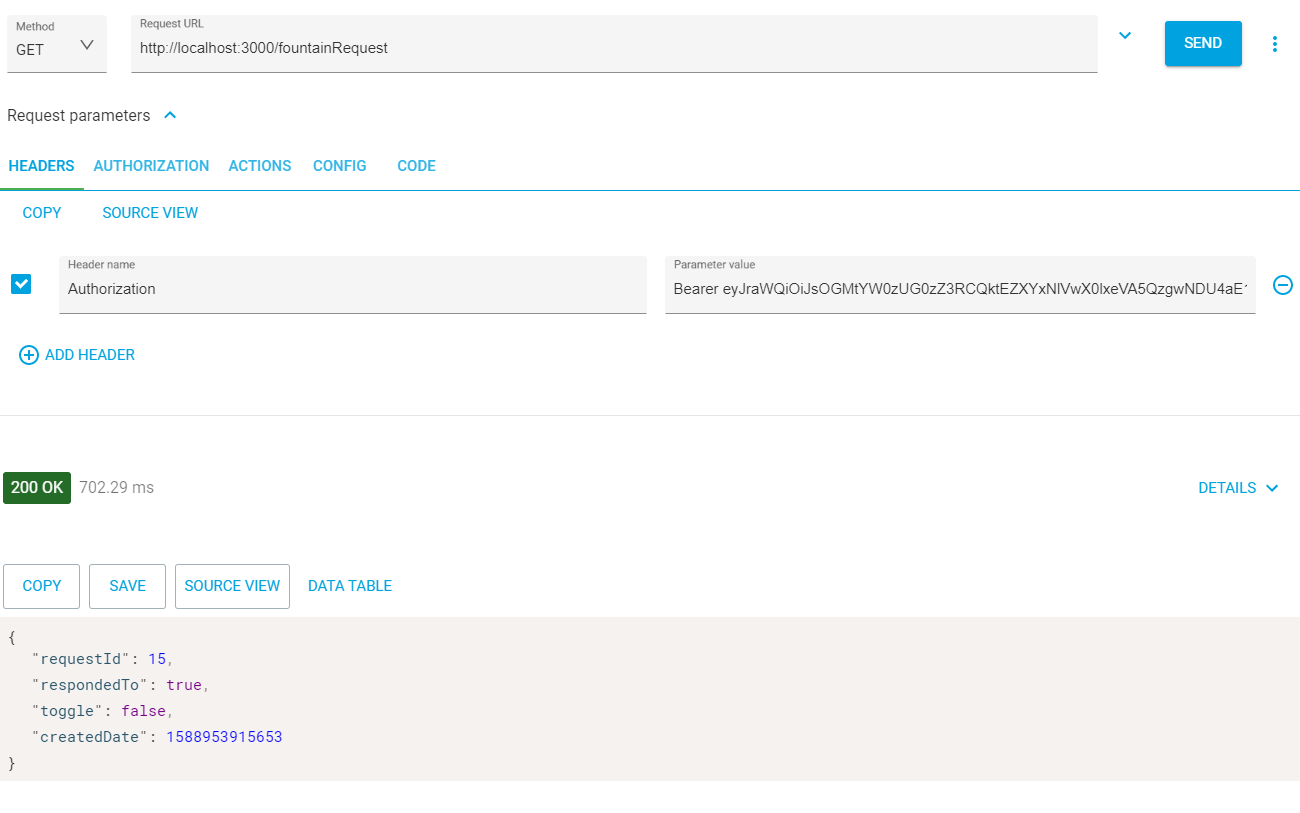
You can repeat the above steps for your fountainRequest/post and gardenData/post methods as well to ensure your authentication mechanism is working. Each time your client makes a call to your API, you need to make sure it sends a valid JWT in the header.
Learn More About Node.js and Okta
In this tutorial, you learned how to build an API with Koa, how to use Okta as an authorization server, and how to request a JWT token from Okta and verify it in your Koa API. I hope you liked seeing the power and speed of combining Okta’s Authentication model with the slick Koa framework.
The source code for this tutorial is available on GitHub.
For more excellent Node.js content, check out these blog posts:
- Quickly Build Node.js Apps with Sails.js
- Node.js Login with Express and OIDC
- Build a Weight Tracker App with Node.js and PostgreSQL
If you like this post, make sure to follow us on Twitter and subscribe to our YouTube Channel.
Okta Developer Blog Comment Policy
We welcome relevant and respectful comments. Off-topic comments may be removed.