Build a Weight Tracker App with Node.js and PostgreSQL
Did you make any resolutions this year? One resolution I seem to make every year is to lose weight and exercise. Sometimes I even stick to it.
A good way I have found to keep on track with any resolution is to record progress. There’s something about visualizing progress that helps me stay motivated.
In this tutorial, you are going to create a modern Node.js application to keep track of weight measurements. We’ll use technologies like PostgreSQL, a new and exciting Postgres client for Node.js, hapi, Vue.js, and Okta to secure the API and provide account registration and login!
![]()
By the way, this tutorial is also available on our YouTube channel, if you would rather follow along by watching a video!
Before we begin, let’s first check some requirements.
- Node.js version 12.x or higher.
- A PostgreSQL database. If you don’t already have PostgreSQL, you can install it using Docker. More details on this later in the tutorial!
- A free Okta developer account for account registration, login, and security.
Note: In May 2025, the Okta Integrator Free Plan replaced Okta Developer Edition Accounts, and the Okta CLI was deprecated.
We preserved this post for reference, but the instructions no longer work exactly as written. Replace the Okta CLI commands by manually configuring Okta following the instructions in our Developer Documentation.
Create Your Node.js Project
Let’s dive straight into creating the Node.js project. Open your terminal or command prompt, change to the folder where you store projects, and create a new folder for this project.
mkdir node-weight-tracker
cd node-weight-tracker
Next, use npm to initialize the project’s package.json file.
npm init -y
In this tutorial, you will use hapi, an excellent application framework that supports all the latest features of Node.js and the JavaScript language. Here is an overview of the modules you will use in this project.
| Module | Description |
|---|---|
hapi |
A web application framework for Node.js |
bell |
A hapi plugin to support third-party logins |
boom |
A hapi plugin for HTTP errors |
cookie |
A hapi plugin for cookie-based authentication |
inert |
A hapi plugin for serving static files |
joi |
A hapi plugin for validating request and response data |
vision |
A hapi plugin for rendering server-side HTML templates |
dotenv |
A module to manage configuration using environment variables |
ejs |
A template engine based on JavaScript |
postgres |
A PostgreSQL client |
nodemon |
A developer utility that monitors file changes and automatically restarts the Node.js application (not to be used in production) |
Install the project dependencies using the following npm commands.
npm install @hapi/hapi@19 @hapi/bell@12 @hapi/boom@9 @hapi/cookie@11 @hapi/inert@6 @hapi/joi@17 @hapi/vision@6 dotenv@8 ejs@3 postgres@1

npm install --save-dev nodemon@2
Note: To ensure compatibility, the previous commands install specific versions available at the time of this writing.
Now open the project in your editor of choice.
If you don’t already have a favorite code editor, I recommend installing Visual Studio Code. VS Code has exceptional support for JavaScript and Node.js, such as smart code completion and debugging. There’s also a vast library of free extensions contributed by the community.
Create a new file named .env in the root of the project and add the following configuration.
# Host configuration
PORT=8080
HOST=localhost
Next, create a folder in the project named src. In the src folder, create folders named assets, plugins, routes, and templates. We will use each of these folders in the future to organize code. Your project should currently look something like the following.
> node_modules
> src
   > assets
   > plugins
   > routes
   > templates
.env
package-lock.json
package.json
Create a “Hello World” Web App With hapi
In the src folder, create a new file named index.js, and add the following code to this file.
"use strict";

const dotenv = require( "dotenv" );
const Hapi = require( "@hapi/hapi" );

const routes = require( "./routes" );

const createServer = async () => {
  const server = Hapi.server( {
    port: process.env.PORT || 8080,
    host: process.env.HOST || "localhost"
  } );

  server.route( routes );

  return server;
};

const init = async () => {
  dotenv.config();
  const server = await createServer();
  await server.start();
  console.log( "Server running on %s", server.info.uri );
};

process.on( "unhandledRejection", ( err ) => {
  console.log( err );
  process.exit( 1 );
} );

init();
In the previous code, the init() function uses dotenv to read in the .env configuration file, creates the web server, starts the server, and outputs the address of the web server. The createServer() function creates an instance of the hapi server based on the port and host environment variables, which are configured in the .env file. It then registers the routes defined in the routes module.
There’s also an event handler for unhandledRejection in case an exception occurs anywhere in the application that doesn’t have error handling, which outputs the error and shuts down the server.
Next, you need to define at least one route for the routes module. Create a new file in the src/routes folder named index.js. Add the following code to this file.
"use strict";

const home = {
  method: "GET",
  path: "/",
  handler: ( request, h ) => {
    return "hello world!";
  }
};

module.exports = [ home ];
The previous code defines one route, home, which returns the text “hello world!” The module exports an array of routes (you will be adding more routes to this module later).
Open the package.json file and find the scripts section. Add the following script to this section.
"dev": "nodemon --watch src -e ejs,js src/index.js",
Now, go to the command line and type the following command to start the development web server.
npm run dev
Open your browser and navigate to http://localhost:8080. You should see your “hello world!” message.
Go back to the src/routes/index.js file and make a change to the “hello world!” message and save the file. You should see nodemon automatically detect the change and restart the server. Refresh the browser and you should see the change reflected. You are on your way to developing a happy little web application!
Create a PostgreSQL Server with Docker
Note: If you already have an instance of PostgreSQL you can work with, great! You can skip ahead to the next section.
We are going to use PostgreSQL to store weight measurements. However, installing server software like PostgreSQL on a development machine is no trivial task. That’s where a container system like Docker can make development so much easier! If you don’t already have Docker installed, follow the install guide and then come back.
With Docker installed, run the following command to download the latest PostgreSQL container.
docker pull postgres:latest
Next, create an instance of a PostgreSQL database server. Feel free to change the administrator password value.
docker run -d --name measurements -p 5432:5432 -e 'POSTGRES_PASSWORD=p@ssw0rd42' postgres
Here is a quick explanation of the previous Docker command line arguments.
| Argument | Description |
|---|---|
-d |
This launches the container in daemon mode, so it runs in the background. |
--name |
This gives your Docker container a friendly name. |
-p |
This maps a TCP port on the host (your computer) to a port in the container. By default, PostgreSQL uses port 5432 for connections. |
-e |
This sets an environment variable in the container. |
postgres |
This final argument tells Docker to use the postgres image. |
Note: If you restart your computer, you may need to restart the Docker container. You can do that from the command line using the following command:
docker start measurements.
Add PostgreSQL Configuration
Add the following settings to the end of the .env file.
# Postgres configuration
PGHOST=localhost
PGUSERNAME=postgres
PGDATABASE=postgres
PGPASSWORD=p@ssw0rd42
PGPORT=5432
Note: If you changed the database administrator password, or you have different credentials for an existing server, be sure to update the values to match your specific environment.
Add a PostgreSQL Database Build Script
To use a new database, you need a way to create tables, add initial data, and so forth. One way to do that is to create a script. Here you’ll use Node.js to execute a build script that will add the schema needed for the application.
Create a folder in the root of the project named tools. In this folder, create a new file named initdb.js and add the following code.
"use strict";

const dotenv = require( "dotenv" );
const postgres = require( "postgres" );

const init = async () => {
  // read environment variables
  dotenv.config();

  try {
    // connect to the local database server
    const sql = postgres();

    console.log( "dropping table, if exists..." );
    await sql`DROP TABLE IF EXISTS measurements`;

    console.log( "creating table..." );
    await sql`CREATE TABLE IF NOT EXISTS measurements (
      id INT NOT NULL PRIMARY KEY GENERATED ALWAYS AS IDENTITY
      , user_id varchar(50) NOT NULL
      , measure_date date NOT NULL
      , weight numeric(5,1) NOT NULL
    )`;

    await sql.end();
  } catch ( err ) {
    console.log( err );
    throw err;
  }
};

init().then( () => {
  console.log( "finished" );
} ).catch( () => {
  console.log( "finished with errors" );
} );
Next, update the scripts section in the package.json file to include the following command.
"initdb": "node tools/initdb.js",
Now, you can run the build script at the command line with the following command.
npm run initdb
You should see the message finished at the console. A new table named measurements is in your database! Any time you want to reset your database, just rerun the script.
Add Authentication to Node and hapi
When building an application like this weight tracker, you will probably want your data kept private and safe. It would be nice to share this application with others so they can take advantage of it, too. However, to build user registration and login (authentication) from scratch is no trivial task. There are registration, login, and password reset forms, email verification steps, encrypting passwords, and the list goes on and on. Oh, and how about keeping up with all the latest attacks and keeping your data secure? Yikes!
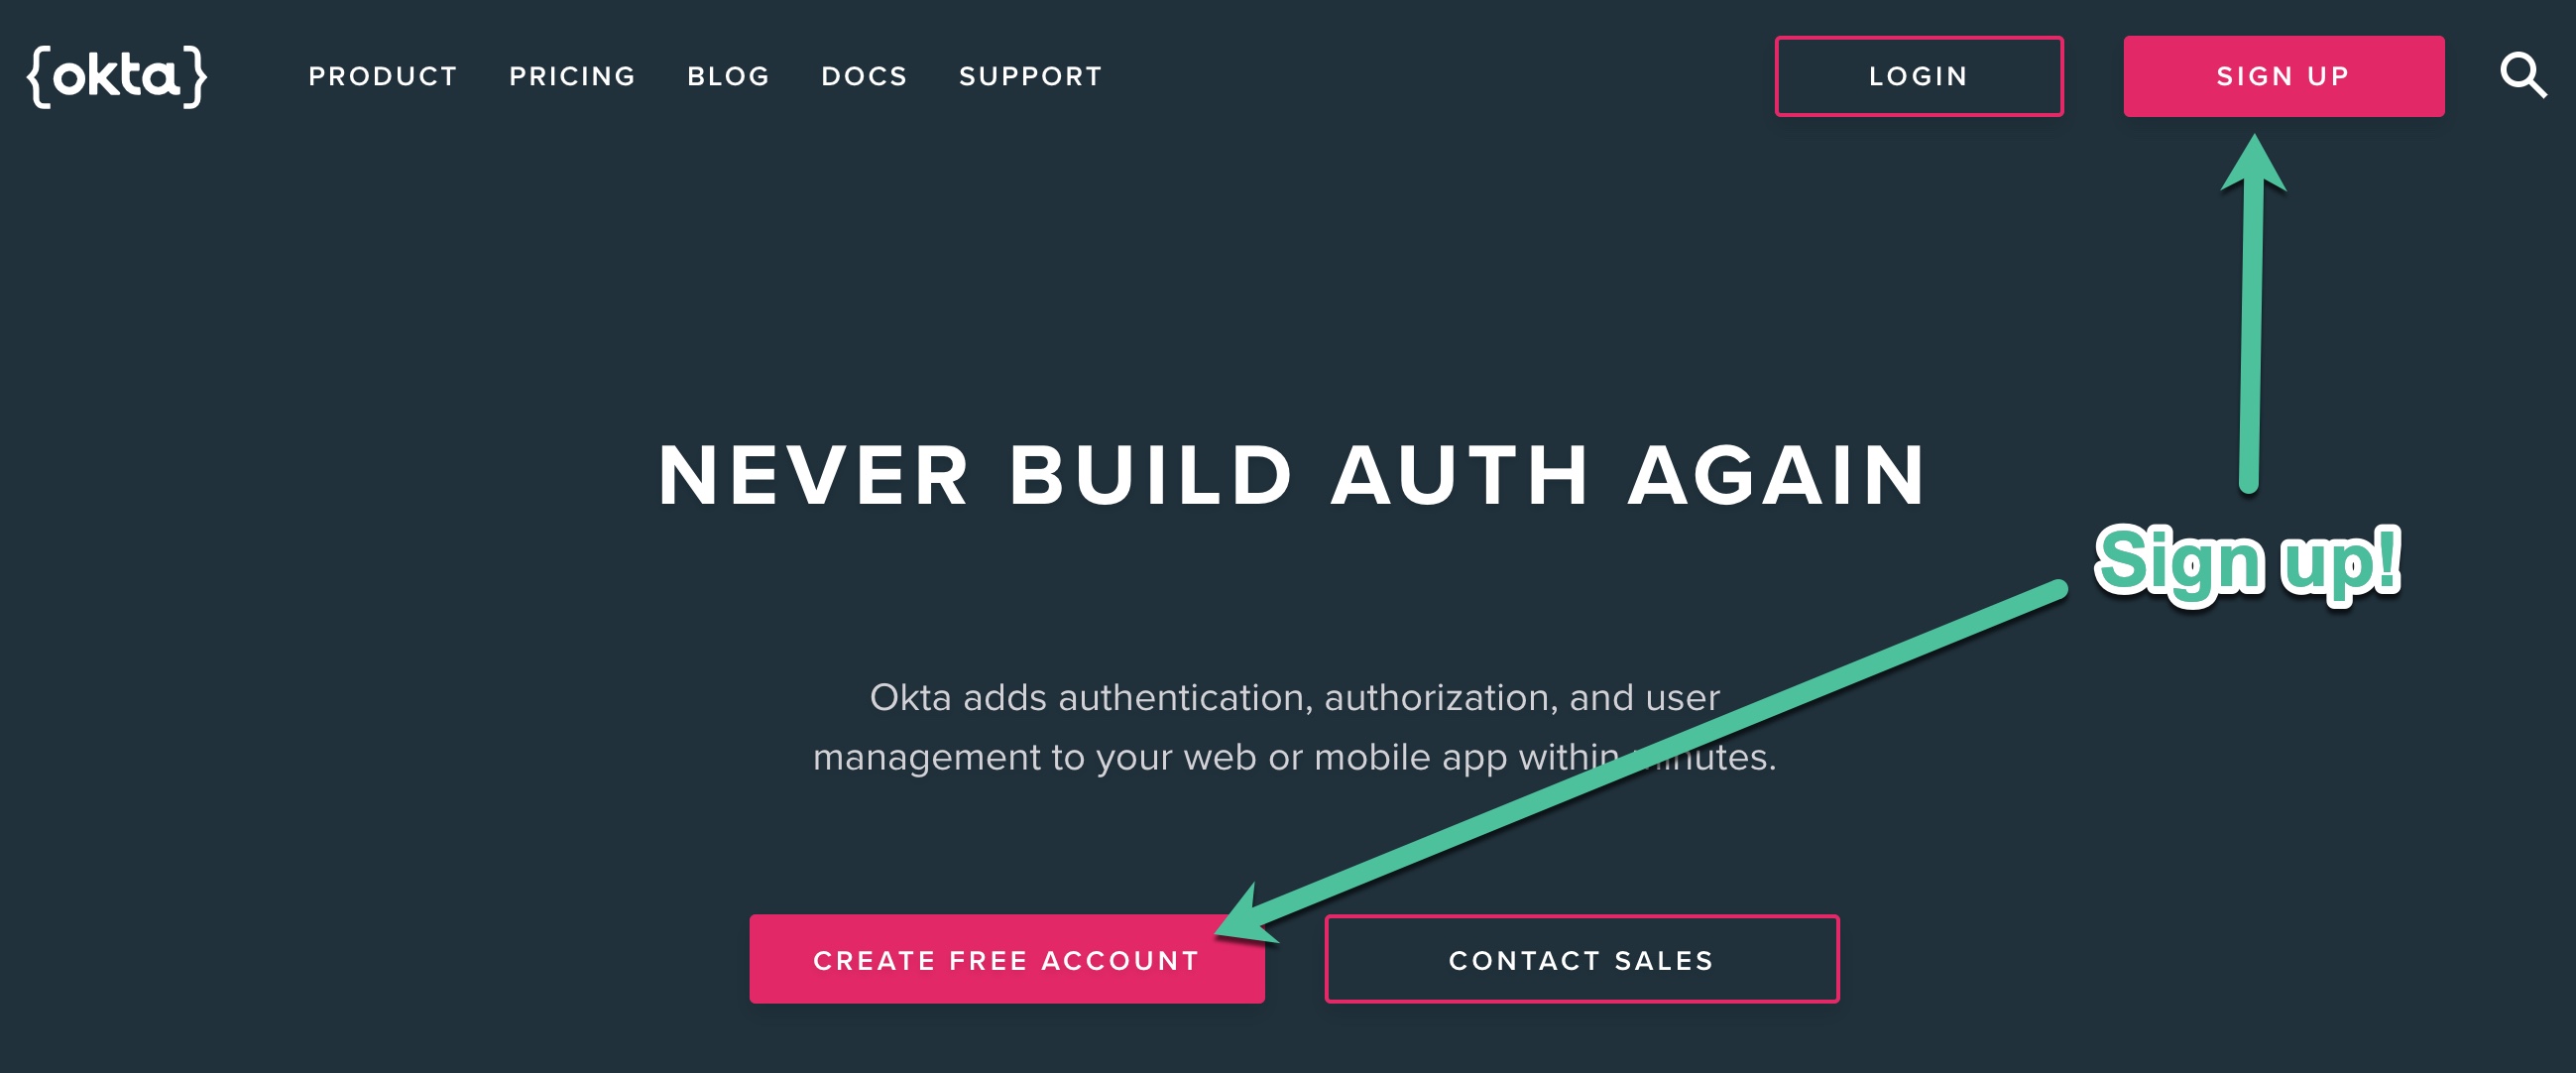
The good news is Okta makes all of this a breeze! To begin, go to developer.okta.com and create a free developer account.
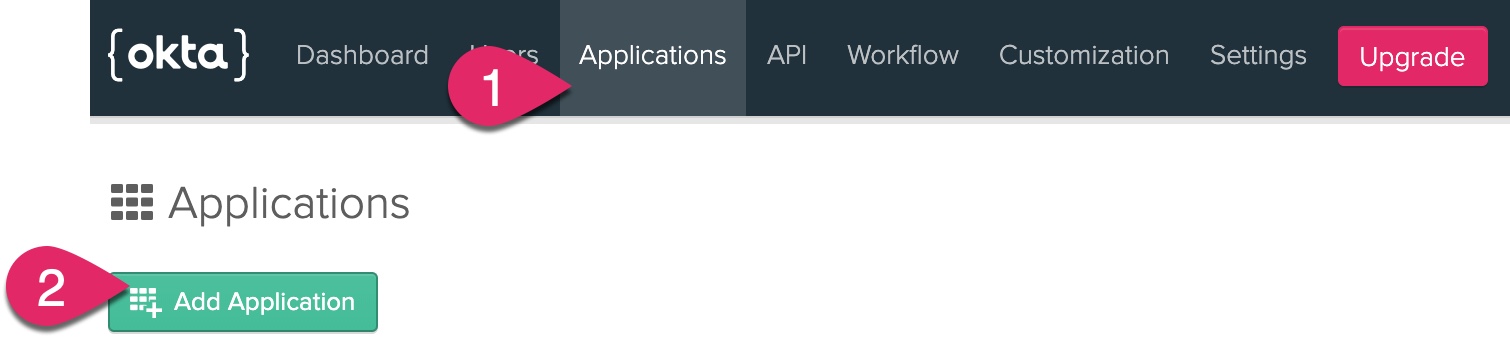
After you create your account, click the Applications link at the top, and then click Add Application.
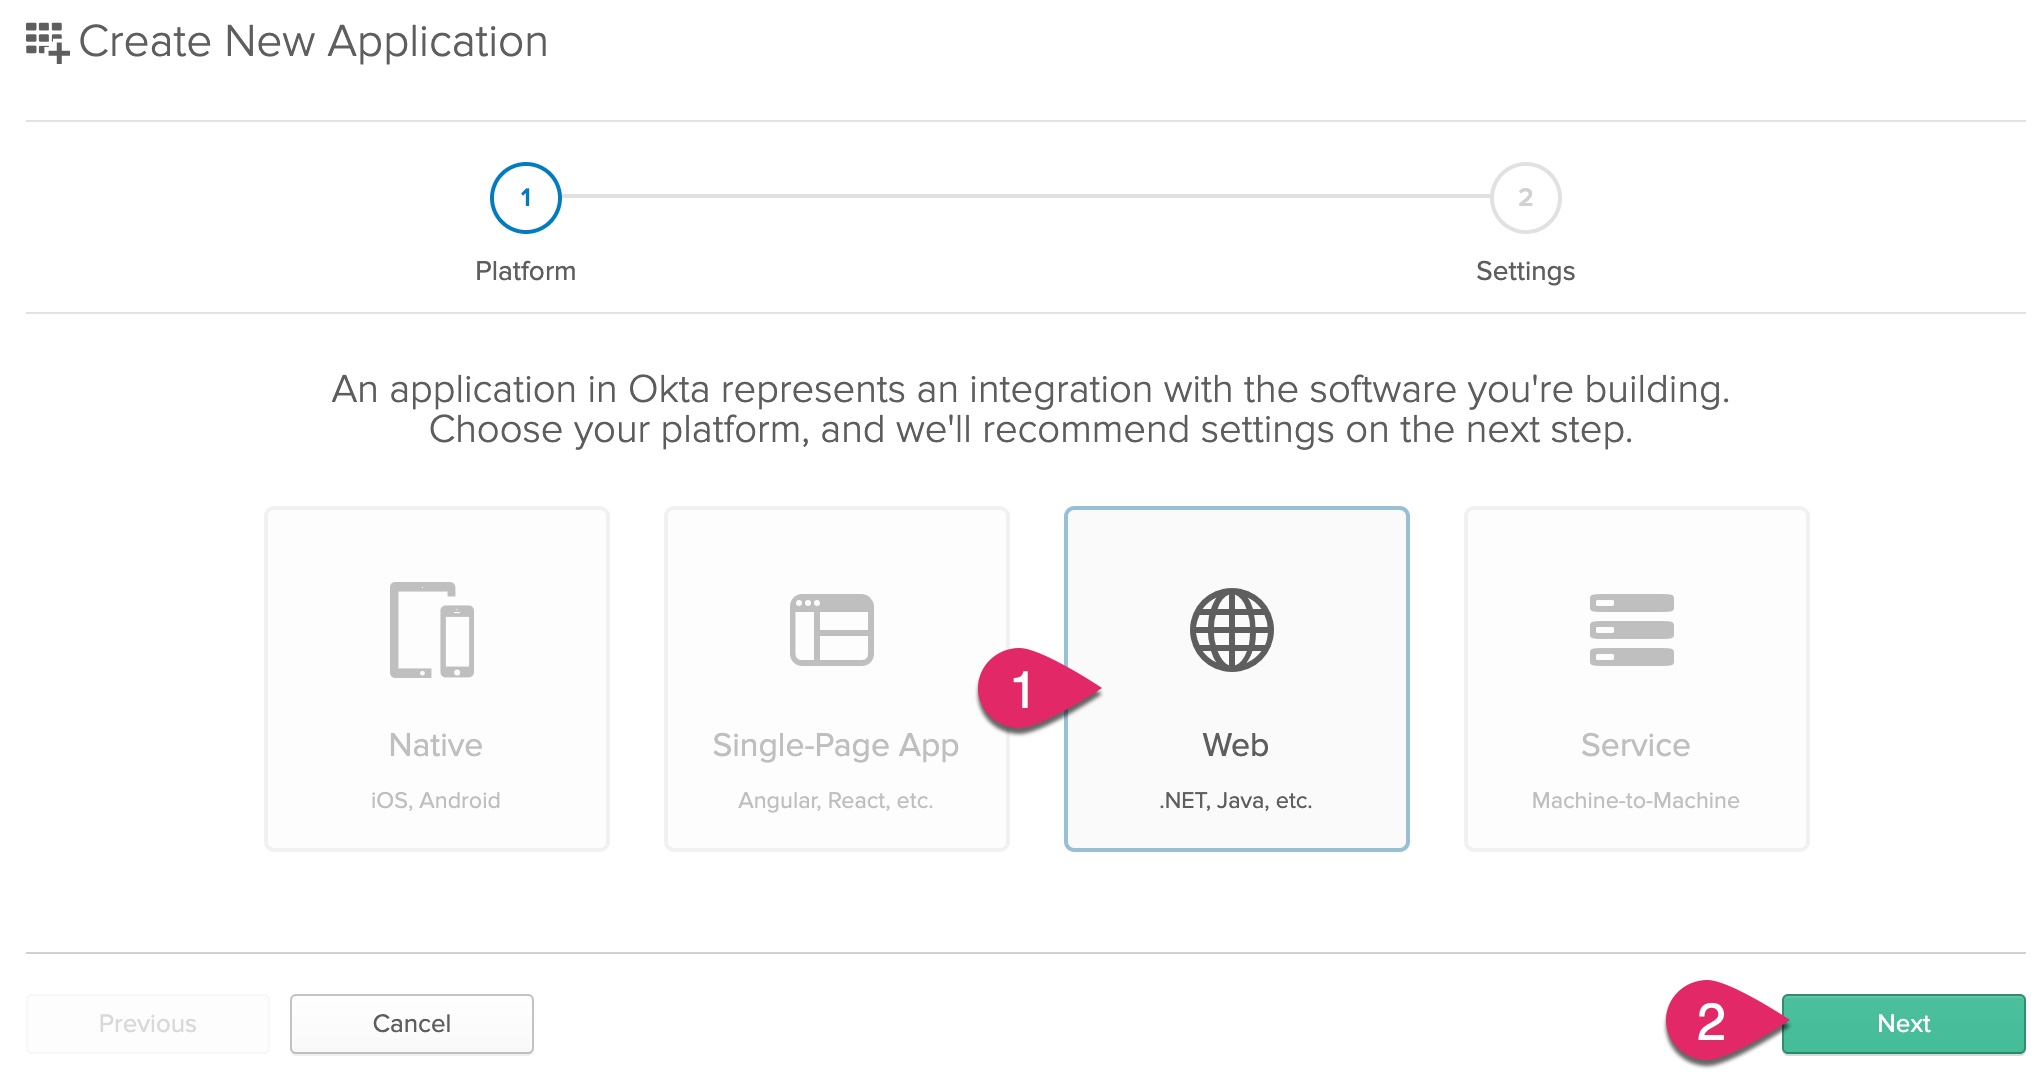
Next, choose to create a Web Application and click Next.
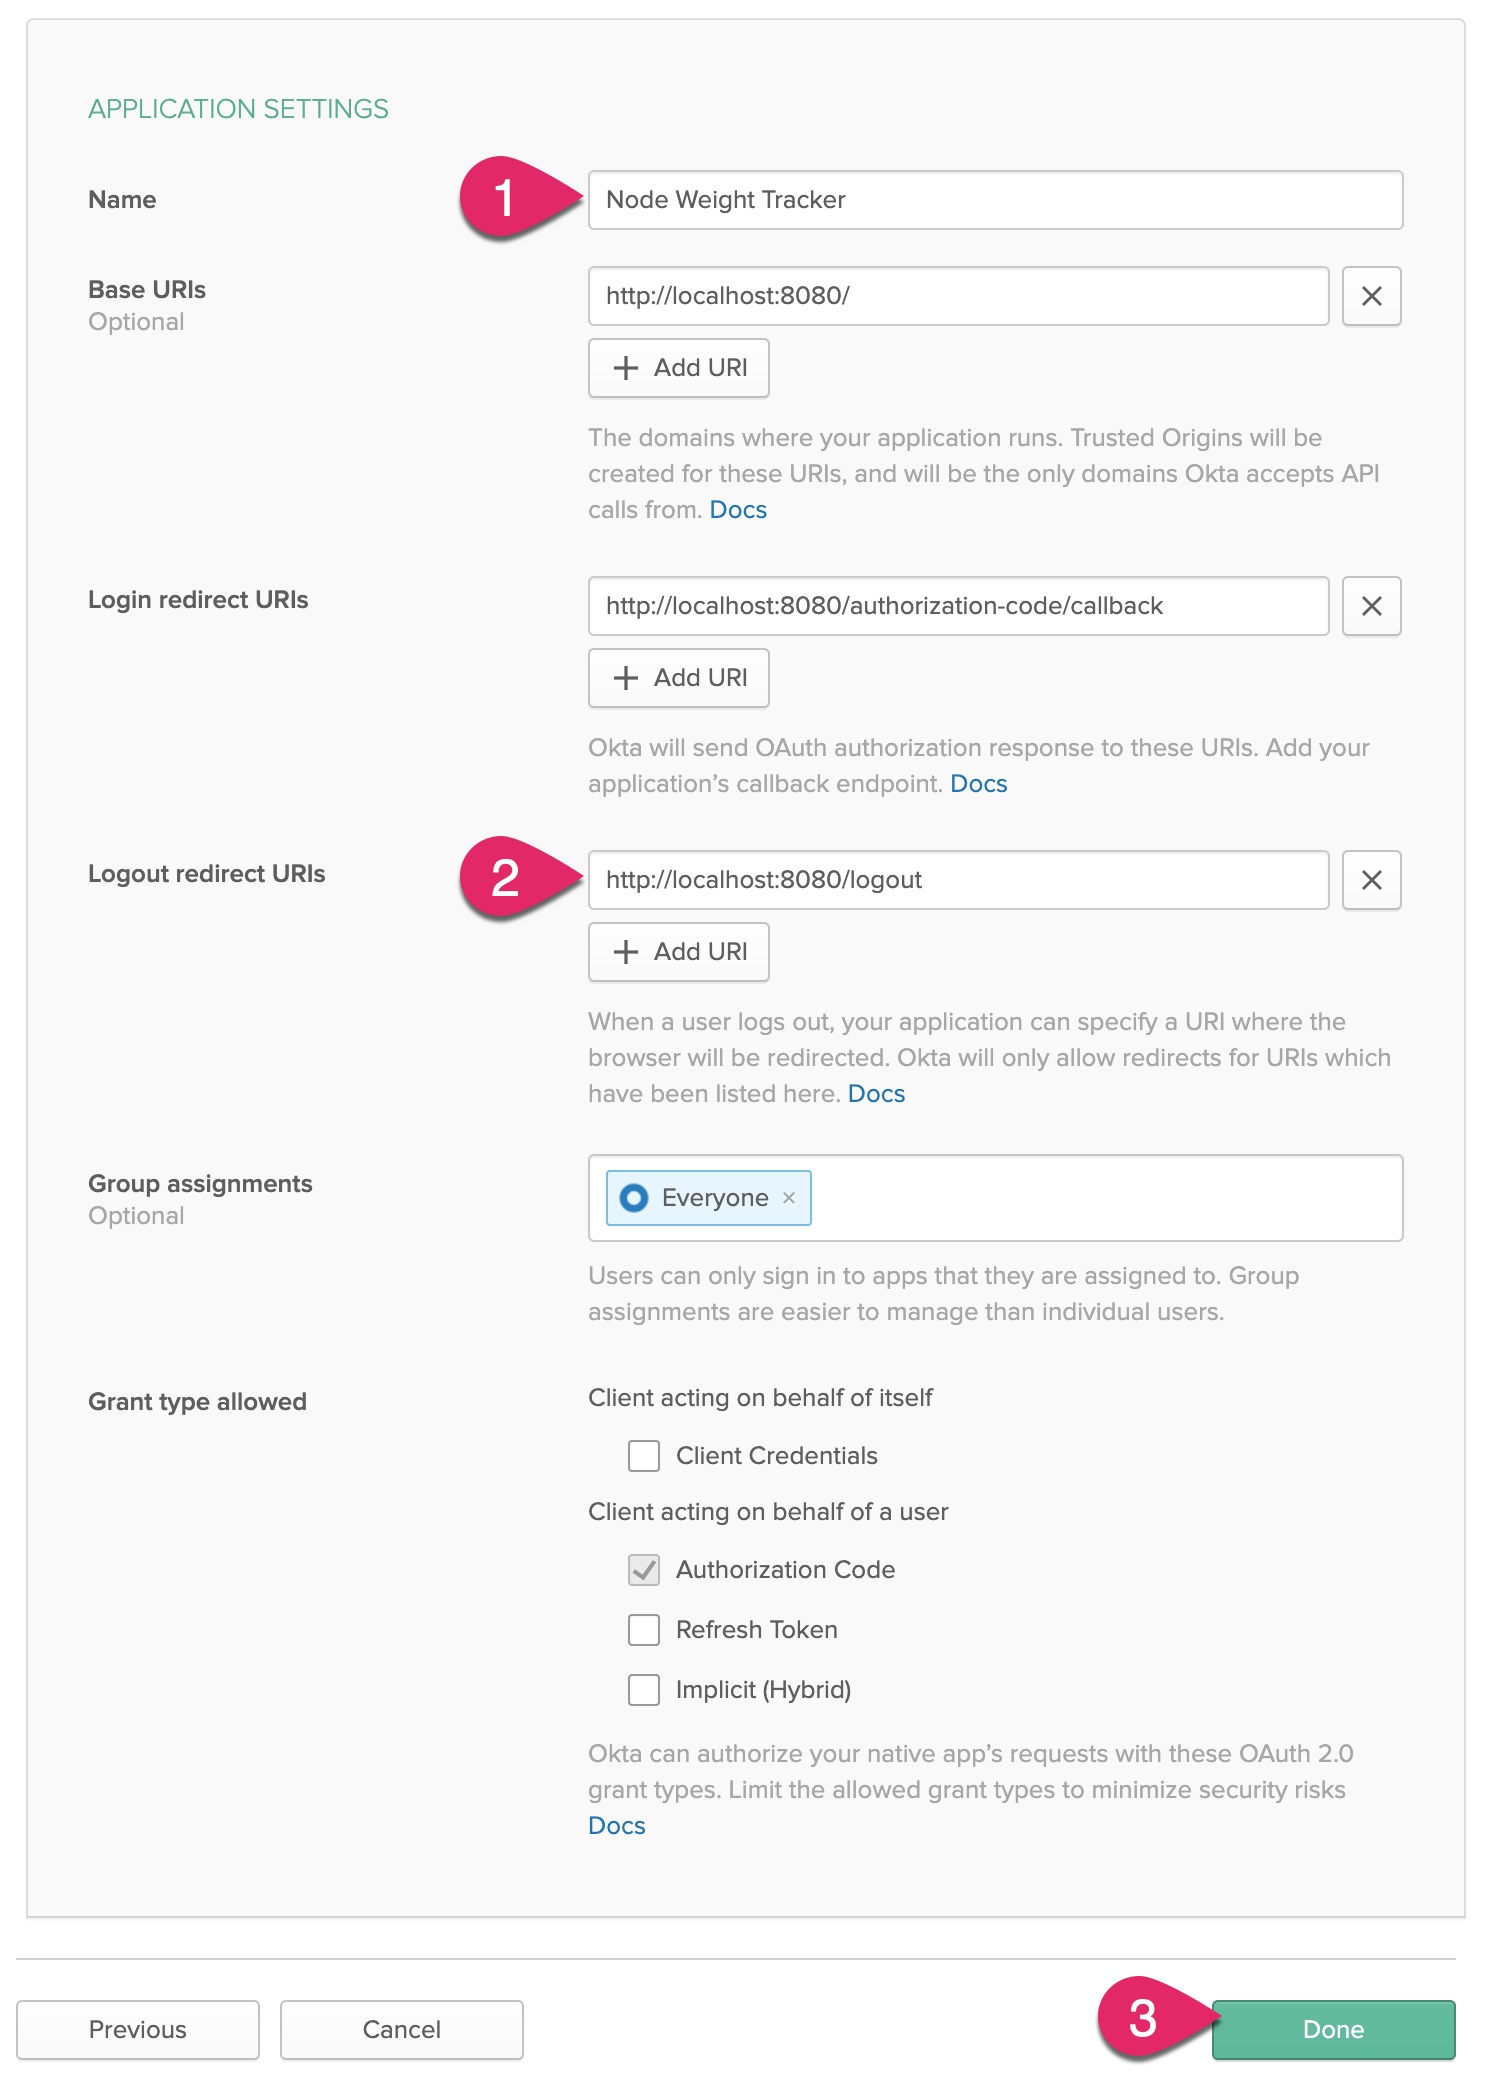
Enter a name for your application, such as Node Weight Tracker. Update the Logout redirect URIs to http://localhost:8080/logout. Then, click Done to finish creating the application.
Copy the following configuration to your .env file.
HOST_URL=http://localhost:8080
COOKIE_ENCRYPT_PWD=superAwesomePasswordStringThatIsAtLeast32CharactersLong!
NODE_ENV=development

# Okta configuration
OKTA_ORG_URL=https://{yourOrgUrl}
OKTA_CLIENT_ID={yourClientId}
OKTA_CLIENT_SECRET={yourClientSecret}
In the Okta application console, click on your new application’s General tab, and find near the bottom of the page a section titled “Client Credentials.” Copy the Client ID and Client secret values and paste them into your .env file to replace {yourClientId} and {yourClientSecret}, respectively.
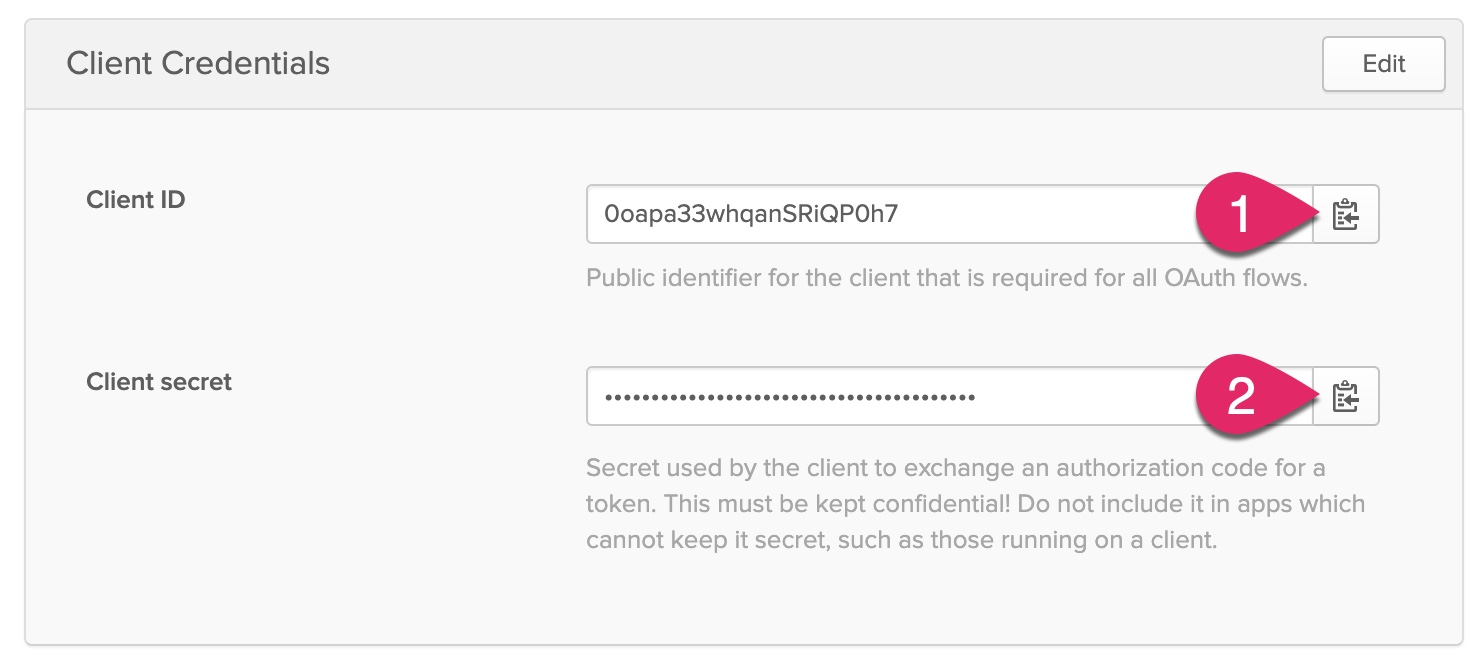
Click on the Dashboard link at the top. Find your Org URL to the right of the page. Copy this URL and paste it into your .env file to replace {yourOrgUrl}.

Enable Self-Service Registration
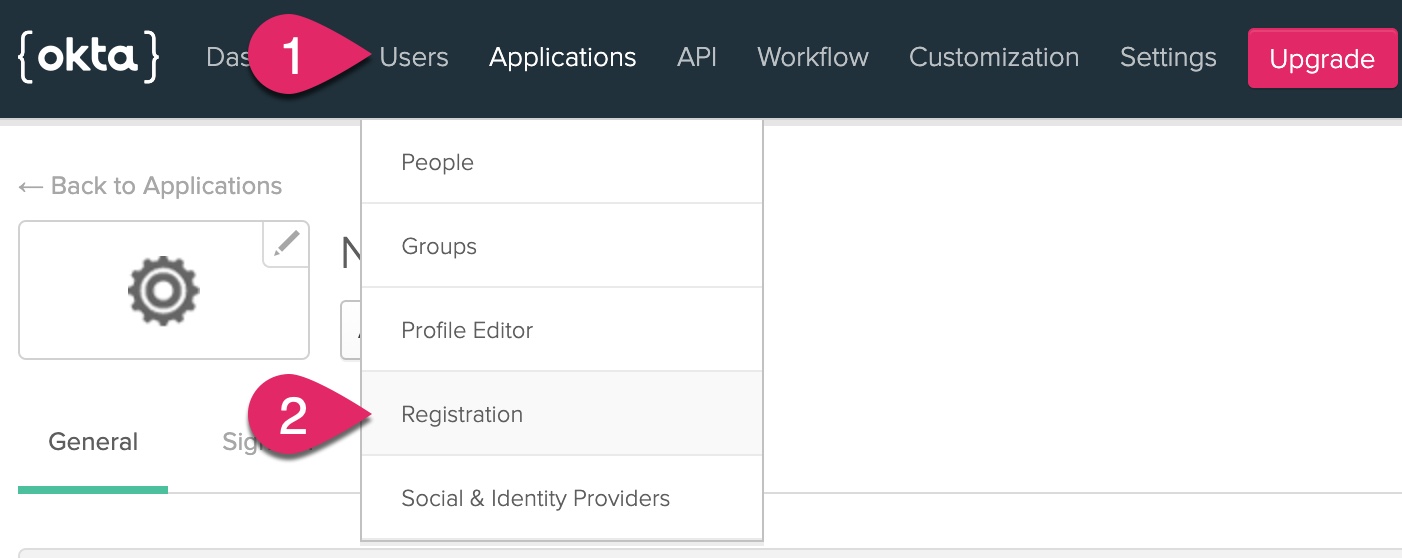
To allow other people to sign up for an account in your application, you need to enable the self-service registration feature. Click on the Users menu and select Registration.
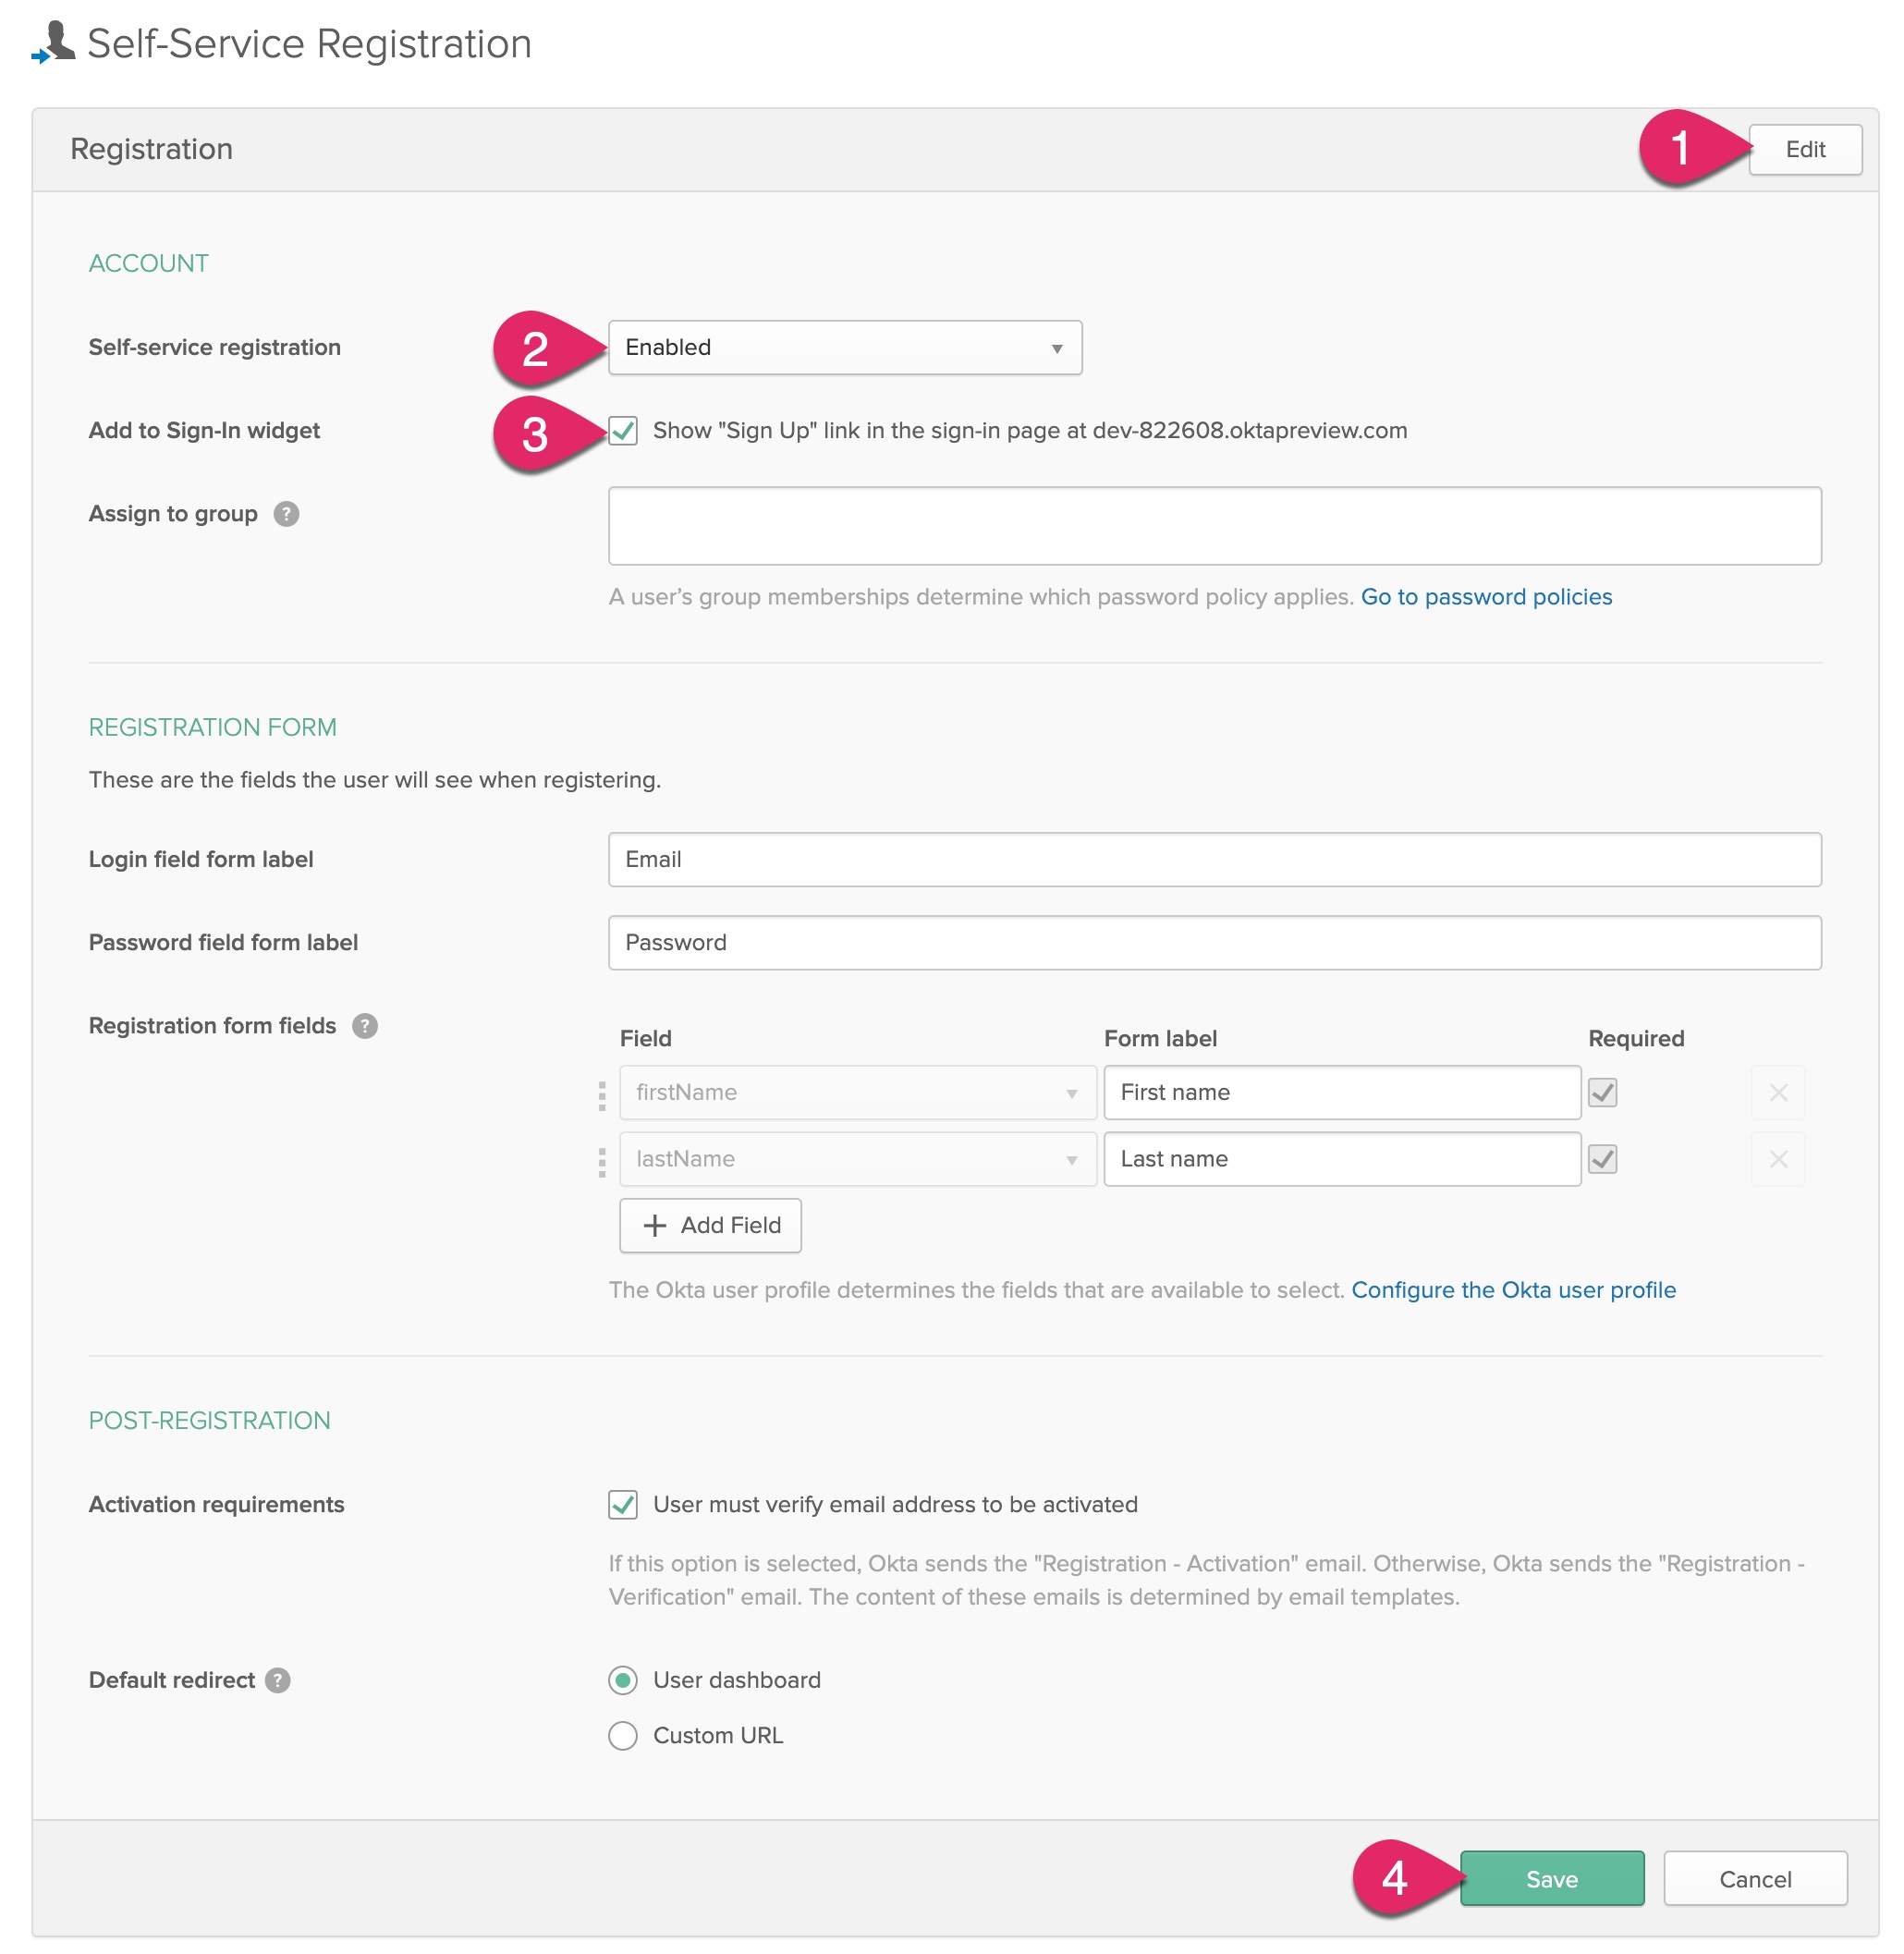
Next, click the Edit button. Change Self-service registration to Enabled. Make sure the Show “Sign Up” link” is checked.
Finally, click the Save button at the bottom of the form.
Secure Your Node.js Application
Now that you have an Okta account and application, it’s time to configure the hapi application to verify only authenticated users can access protected resources. If not, the app will prompt them to login using Okta.
Under src/plugins, create a new file named auth.js. Copy the following code into this file.
"use strict";

const bell = require( "@hapi/bell" );
const cookie = require( "@hapi/cookie" );

const isSecure = process.env.NODE_ENV === "production";

module.exports = {
  name: "auth",
  version: "1.0.0",
  register: async server => {

    await server.register( [ cookie, bell ] );

    // configure cookie authorization strategy
    server.auth.strategy( "session", "cookie", {
      cookie: {
        name: "okta-oauth",
        path: "/",
        password: process.env.COOKIE_ENCRYPT_PWD,
        isSecure // Should be set to true (which is the default) in production
      },
      redirectTo: "/authorization-code/callback", // If there is no session, redirect here
    } );

    // configure okta oauth strategy
    server.auth.strategy( "okta", "bell", {
      provider: "okta",
      config: { uri: process.env.OKTA_ORG_URL },
      password: process.env.COOKIE_ENCRYPT_PWD,
      isSecure,
      location: process.env.HOST_URL,
      clientId: process.env.OKTA_CLIENT_ID,
      clientSecret: process.env.OKTA_CLIENT_SECRET
    } );

    // set the default authorization strategy for all routes
    server.auth.default( "session" );

    // Hook into onPreResponse event to add authentication info to every view
    server.ext( "onPreResponse", ( request, h ) => {
      if ( request.response.variety === "view" ) {
        const auth = request.auth.isAuthenticated ? {
          isAuthenticated: true,
          isAnonymous: false,
          email: request.auth.artifacts.profile.email,
          firstName: request.auth.artifacts.profile.firstName,
          lastName: request.auth.artifacts.profile.lastName
        } : {
          isAuthenticated: false,
          isAnonymous: true,
          email: "",
          firstName: "",
          lastName: ""
        };
        request.response.source.context.auth = auth;
      }
      return h.continue;
    } );
  }
};
Now add a new file to src/plugins named index.js and paste the following code.
"use strict";

const Inert = require( "@hapi/inert" );
const Vision = require( "@hapi/vision" );
const ejs = require( "ejs" );

const auth = require( "./auth" );

module.exports = {
  register: async server => {
    await server.register( [ Inert, Vision, auth ] );

    // configure view templates
    server.views( {
      engines: { ejs },
      relativeTo: __dirname,
      path: "../templates",
      layout: true
    } );
  }
};
In addition to registering the new auth plugin, this code also configures the ejs, inert, and vision plugins to render HTML content. Let’s set up a few EJS templates.
Next, update src/index.js to import the new plugins module and call the plugins.register() function.
"use strict";

const dotenv = require( "dotenv" );
const Hapi = require( "@hapi/hapi" );

const plugins = require( "./plugins" );
const routes = require( "./routes" );

const createServer = async () => {
  const server = Hapi.server( {
    port: process.env.PORT || 8080,
    host: process.env.HOST || "localhost"
  } );

  await plugins.register( server );
  server.route( routes );

  return server;
};

const init = async () => {
  dotenv.config();
  const server = await createServer();
  await server.start();
  console.log( "Server running on %s", server.info.uri );
};

process.on( "unhandledRejection", ( err ) => {
  console.log( err );
  process.exit( 1 );
} );

init();
Add HTML Templates
In the src/templates folder, create a new file named layout.ejs. The layout is the main template all views will use. Paste the following markup into layout.ejs.
<!DOCTYPE html>
<html>

<head>
  <meta charset="utf-8">
  <meta name="viewport" content="width=device-width, initial-scale=1">
  <title><%= title %></title>
  <link rel="stylesheet" href="https://cdn.jsdelivr.net/npm/bulma@0.8.0/css/bulma.min.css">
  <link rel="stylesheet" href="/assets/css/site.css">
  <script src="https://cdn.jsdelivr.net/npm/vue@2.6.11"></script>
  <script defer src="https://use.fontawesome.com/releases/v5.3.1/js/all.js"></script>
  <script src="/assets/js/site.js"></script>
</head>

<body>
  <%- include( "includes/navigation" ); %>
  <section class="section">
    <div class="container">
      <%- content %>
    </div>
  </section>
</body>

</html>
You might notice there’s an include in this template for navigation. The next step is to create a navigation template to render for every page. In the src/templates folder, create a new folder named includes. In the includes folder, create a file named navigation.ejs and paste in the following markup.
<nav class="navbar" role="navigation" aria-label="main navigation">
  <div class="navbar-brand">
    <a class="navbar-item navbar-logo" href="/">
      Weight Tracker
    </a>

    <a role="button" class="navbar-burger burger" aria-label="menu" aria-expanded="false"
      data-target="navbarBasicExample">
      <span aria-hidden="true"></span>
      <span aria-hidden="true"></span>
      <span aria-hidden="true"></span>
    </a>
  </div>

  <div id="navbarBasicExample" class="navbar-menu">
    <div class="navbar-start">
      <a class="navbar-item" href="/">
        Home
      </a>

      <a class="navbar-item" href="/list">
        Progress
      </a>
      <a class="navbar-item" href="/add">
        Add Measurement
      </a>

    </div>
  </div>

  <div class="navbar-end">
    <% if ( auth.isAuthenticated ) { %>
      <div class="navbar-item">Welcome, <%= auth.firstName %>!</div>
    <% } %>
    <div class="navbar-item">
      <div class="buttons">
        <% if (!auth.isAuthenticated) { %>
        <a href="/login" class="button is-primary">
          <strong>Log in</strong>
        </a>
        <% } else { %>
        <a href="/logout" class="button is-light">
          <strong>Log Out</strong>
        </a>
        <% } %>
      </div>
    </div>
  </div>
  </div>
</nav>
As you can see, there are some conditional statements in the template based on whether or not the current user is authenticated. If the user is not authenticated, a Login button is displayed. If a user is currently logged in, a welcome message and a Logout button are displayed.
Next, you will add an EJS template for the home page. In the templates folder, create a new file named index.ejs and paste in the following markup.
<h1 class="title">Node.js Weight Tracker</h1>

<p>Welcome to the <b>Node.js Weight Tracker</b> sample project!</p>

<% if ( auth.isAnonymous ) { %>
  <p><a href="/login">Click here</a> to login or create an account.</p>
<% } %>

<% if ( auth.isAuthenticated ) { %>
  <p><a href="/add">Add</a> a weight measurement or <a href="/list">view</a> your progress.</p>
<% } %>
While you’re adding templates, go ahead and add a template for a custom 404 (Not Found) response. Create a 404.ejs file in the templates folder and paste in the following markup.
<h1 class="title">Oh no!</h1>

<p>That page was not found!</p>
Configure Public and Secure Routes
Now you need to update the routes to return the home page view and configure which routes require authentication. In the src/routes folder, create a new file named auth.js and paste the following code.
"use strict";

const boom = require( "@hapi/boom" );

const login = {
  method: "GET",
  path: "/login",
  options: {
    handler: request => {
      if ( !request.auth.isAuthenticated ) {
        return `Authentication failed due to: ${ request.auth.error.message }`;
      }
    }
  }
};

const oAuthCallback = {
  method: "GET",
  path: "/authorization-code/callback",
  handler: ( request, h ) => {
    if ( !request.auth.isAuthenticated ) {
      throw boom.unauthorized( `Authentication failed: ${ request.auth.error.message }` );
    }
    // save the credentials to the session cookie
    request.cookieAuth.set( request.auth.credentials );
    return h.redirect( "/" );
  },
  options: {
    auth: "okta"
  }
};

const logout = {
  method: "GET",
  path: "/logout",
  handler: ( request, h ) => {
    try {
      if ( request.auth.isAuthenticated ) {
        // clear the local session
        request.cookieAuth.clear();
      }

      return h.redirect( "/" );
    } catch ( err ) {
      request.log( [ "error", "logout" ], err );
    }
  },
  options: {
    auth: {
      mode: "try"
    }
  }
};

module.exports = [
  login,
  oAuthCallback,
  logout
];
The previous code defines three new routes. The /login route by default requires authentication because it was defined in the src/plugins/auth.js module with the statement server.auth.default( "session" );. Any request to /login while the user is not logged in will result in being redirected to the /authorization-code/callback route.
The /authorization-code/callback route is configured to use the “okta” authentication strategy. Any request to this route while the user is not logged in will result in being redirected to the Okta login (which includes a link to sign up for an account). After successfully logging into Okta, the user will be redirected back to this route. The user’s credentials are saved in the session cookie and the user is redirected back to the home page.
The /logout route clears the session cookie and redirects the user back to the home page.
Next, update src/routes/index.js with the following code.
"use strict";

const path = require( "path" );

const auth = require( "./auth" );

const home = {
  method: "GET",
  path: "/",
  options: {
    auth: {
      mode: "try"
    },
    handler: ( request, h ) => {
      return h.view( "index", { title: "Home" } );
    }
  }
};

const staticAssets = {
  method: "GET",
  path: "/assets/{param*}",
  handler: {
    directory:{
      path: path.join( __dirname, "..", "assets" )
    }
  },
  options: { auth: false }
};

const error404 = {
  method: "*",
  path: "/{any*}",
  handler: function ( request, h ) {
    return h.view( "404", { title: "Not Found" } ).code( 404 );
  },
  options: { auth: false }
};

module.exports = [
  home,
  staticAssets,
  error404
].concat( auth );
The previous code updates the home page route with an auth mode try. The try mode checks to see if the user is authenticated, but doesn’t require authentication. The code also imports the authentication routes, and sets up routes for static assets and the custom 404 page.
Add Static Assets
Speaking of static assets, add a new folder to src/assets named css. In the css folder, create a new file named site.css and paste the following code.
.navbar-logo {
  font-weight: bold;
  font-size: 1.2em;
}
Add a new folder to src/assets named js. In the js folder, create a new file named site.js and paste the following code.
"use strict";

document.addEventListener( "DOMContentLoaded", () => {

  // Get all "navbar-burger" elements
  const $navbarBurgers = Array.prototype.slice.call( document.querySelectorAll( ".navbar-burger" ), 0 );

  // Check if there are any navbar burgers
  if ( $navbarBurgers.length > 0 ) {

    // Add a click event on each of them
    $navbarBurgers.forEach( el => {
      el.addEventListener( "click", () => {

        // Get the target from the "data-target" attribute
        const target = el.dataset.target;
        const $target = document.getElementById( target );

        // Toggle the "is-active" class on both the "navbar-burger" and the "navbar-menu"
        el.classList.toggle( "is-active" );
        $target.classList.toggle( "is-active" );

      } );
    } );
  }
} );
This client-side JavaScript is to enable a better navigation experience for mobile and tablet browsers.
Test Login
You are now ready to test authentication! If the application is not already running, start it by using the following command.
npm run dev
Navigate to http://localhost:8080 and try clicking on the Log in button. You should be authenticated and redirected back to the home page, which now displays the welcome message and Logout button.
Note: To ensure you see the entire login experience, I recommend opening a different browser or using an incognito/private browser window.
Create a Secure API with PostgreSQL
Now that authentication is working, you can focus on building a secure API the application can use to create, retrieve, update, and delete (CRUD) weight measurements. Basic CRUD operations are found in nearly every application that collects and stores data.
The first step is to create a new hapi plugin to provide every route easy access to the PostgreSQL client. In the src/plugins folder, create a new file named sql.js and add the following code.
"use strict";

const postgres = require( "postgres" );

module.exports = {
  name: "sql",
  version: "1.0.0",
  register: async server => {

    // create the sql client
    const sql = postgres();

    // add to the request toolkit e.g. h.sql
    server.decorate( "toolkit", "sql", sql );
  }
};
The sql plugin creates one instance of the PostgreSQL client for the entire application and adds it to hapi’s response toolkit. The response toolkit is the h argument you may have noticed passed to every route handler. Using the server.decorate() function in the plugin means you can now access the SQL client from any route using h.sql!
Next, update the src/plugins/index.js module to include the new sql plugin.
"use strict";

const Inert = require( "@hapi/inert" );
const Vision = require( "@hapi/vision" );
const ejs = require( "ejs" );

const auth = require( "./auth" );
const sql = require( "./sql" );

module.exports = {
  register: async server => {
    await server.register( [ Inert, Vision, auth, sql ] );

    // configure view templates
    server.views( {
      engines: { ejs },
      relativeTo: __dirname,
      path: "../templates",
      layout: true
    } );
  }
};
Under the src/routes folder, create a new folder named api. Inside the api folder, create a new file named index.js and paste the following code into this file.
"use strict";

const boom = require( "@hapi/boom" );
const joi = require( "@hapi/joi" );

// add a new measurement for the current user
const addMeasurementForCurrentUser = {
  method: "POST",
  path: "/api/measurements",
  handler: async ( request, h ) => {
    try {
      if ( !request.auth.isAuthenticated ) {
        return boom.unauthorized();
      }
      const userId = request.auth.credentials.profile.id;
      const { measureDate, weight } = request.payload;
      const res = await h.sql`INSERT INTO measurements
        ( user_id, measure_date, weight )
        VALUES
        ( ${ userId }, ${ measureDate }, ${ weight } )

        RETURNING
            id
            , measure_date AS "measureDate"
            , weight`;
      return res.count > 0 ? res[0] : boom.badRequest();
    } catch ( err ) {
      console.log( err );
      return boom.serverUnavailable();
    }
  },
  options: {
    auth: { mode: "try" },
    validate: {
      payload: joi.object( {
        measureDate: joi.date(),
        weight: joi.number()
      } )
    }
  }
};

// retrieve all measurements for the current user
const allMeasurementsForCurrentUser = {
  method: "GET",
  path: "/api/measurements",
  handler: async ( request, h ) => {
    try {
      if ( !request.auth.isAuthenticated ) {
        return boom.unauthorized();
      }
      const userId = request.auth.credentials.profile.id;
      const measurements = await h.sql`SELECT
            id
            , measure_date AS "measureDate"
            , weight
        FROM  measurements
        WHERE user_id = ${ userId }
        ORDER BY
            measure_date`;
      return measurements;
    } catch ( err ) {
      console.log( err );
      return boom.serverUnavailable();
    }
  },
  options: {
    auth: { mode: "try" }
  }
};

// delete a measurement for the current user by id
const deleteMeasurementForCurrentUserById = {
  method: "DELETE",
  path: "/api/measurements/{id}",
  handler: async ( request, h ) => {
    try {
      if ( !request.auth.isAuthenticated ) {
        return boom.unauthorized();
      }
      const userId = request.auth.credentials.profile.id;
      const id = request.params.id;
      const res = await h.sql`DELETE
        FROM  measurements
        WHERE id = ${ id }
            AND user_id = ${ userId }`;
      return res.count > 0 ? h.response().code( 204 ) : boom.notFound();
    }
    catch( err ) {
      console.log( err );
      return boom.serverUnavailable();
    }
  },
  options: {
    auth: { mode: "try" },
    validate: {
      params: joi.object( {
        id: joi.number().integer()
      } )
    }
  }
};

// get one measurement for the current user by id
const getMeasurementForCurrentUserById = {
  method: "GET",
  path: "/api/measurements/{id}",
  handler: async ( request, h ) => {
    try {
      if ( !request.auth.isAuthenticated ) {
        return boom.unauthorized();
      }
      const userId = request.auth.credentials.profile.id;
      const id = request.params.id;
      const res = await h.sql`SELECT
            id
            , measure_date AS "measureDate"
            , weight
        FROM  measurements
        WHERE user_id = ${ userId }
            AND id = ${ id }`;
      return res.count > 0 ? res[0] : boom.notFound();
    } catch ( err ) {
      console.log( err );
      return boom.serverUnavailable();
    }
  },
  options: {
    auth: { mode: "try" },
    validate: {
      params: joi.object( {
        id: joi.number().integer().message( "id parameter must be number" )
      } )
    }
  }
};

// update a measurement for the current user by id
const updateMeasurementForCurrentUserById = {
  method: "PUT",
  path: "/api/measurements/{id}",
  handler: async ( request, h ) => {
    try {
      if ( !request.auth.isAuthenticated ) {
        return boom.unauthorized();
      }
      const userId = request.auth.credentials.profile.id;
      const id = request.params.id;
      const { measureDate, weight } = request.payload;
      const res = await h.sql`UPDATE measurements
        SET measure_date = ${ measureDate }
            , weight = ${ weight }
        WHERE id = ${ id }
        AND user_id = ${ userId }

        RETURNING
        id
        , measure_date AS "measureDate"
        , weight`;
      return res.count > 0 ? res[0] : boom.notFound();
    }
    catch( err ) {
      console.log( err );
      return boom.serverUnavailable();
    }
  },
  options: {
    auth: { mode: "try" },
    validate: {
      params: joi.object( {
        id: joi.number().integer()
      } ),
      payload: joi.object( {
        measureDate: joi.date(),
        weight: joi.number()
      } )
    }
  }
};

module.exports = [
  addMeasurementForCurrentUser,
  allMeasurementsForCurrentUser,
  deleteMeasurementForCurrentUserById,
  getMeasurementForCurrentUserById,
  updateMeasurementForCurrentUserById
];
For each of the API routes, the auth mode is set to try. Then for each route, the code first checks to see if the user is authenticated. If not, the handler immediately returns a “401 (unauthorized)” error.
Some of the routes accept a parameter as part of the path (e.g. getMeasurementForCurrentUserById()) or values as a payload (e.g. addMeasurementForCurrentUser()). These routes use joi to validate all required values and values are the correct types.
The postgres client is used for each of these routes to execute SQL statements. These statements are expressed as JavaScript template literals. The currently authenticated user id is used with every statement to ensure no data is leaked between accounts. The SQL client returns data as JSON, which hapi transparently returns to the browser or whatever HTTP client is requesting the API.
Does something look fishy with those SQL statements built with JavaScript template literals? No need to worry! SQL parameters are automatically inferred by the
postgresclient to prevent SQL injection attacks.
Create Views for Adding Measurements and Tracking Progress
Now that the application has an API for weight measurements, the final step is to create the user interface. To make the UI a little more dynamic as well as easier to program, you will use the Vue.js framework. You may have noticed there is already a reference for this framework in the layout.ejs template. How to use Vue.js is out of the scope of this tutorial, but hopefully, you will be able to follow how the code works.
Go to the src/templates folder, create a new file named add.ejs, and add the following markup and client-side code.
<div id="app">
  <h1 class="title">Add Measurement</h1>
  <form @submit.prevent="addWeight">
    <fieldset :disabled="disabled">
      <div class="field">
        <label class="label">Date</label>
        <div class="control">
          <input class="input" type="date" placeholder="Text input" v-model.trim="measureDate">
        </div>
      </div>

      <div class="field">
        <label class="label">Weight</label>
        <div class="control">
          <input class="input" type="number" step="0.1" min="0" max="2000" placeholder="Your weight"
            v-model.number="weight">
        </div>
      </div>

      <div class="field is-grouped">
        <div class="control">
          <input type="submit" class="button is-link" value="Submit">
        </div>
        <div class="control">
          <button class="button is-link is-light">Cancel</button>
        </div>
      </div>
    </fieldset>
  </form>
  <div class="section">
    <div v-if="message" class="notification is-success" v-text="message"></div>
    <div v-if="errorMessage" class="notification is-danger" v-text="errorMessage"></div>
  </div>
</div>

<script>
  const app = new Vue({
    el: "#app",
    data() {
      return {
        measureDate: this.formatDate(new Date()),
        weight: undefined,
        disabled: false,
        message: "",
        errorMessage: ""
      }
    },
    methods: {
      addWeight: async function (e) {
        // disable form while submitting to API
        this.disabled = true;
        this.message = "";
        this.errorMessage = "";
        const response = await fetch("/api/measurements", {
          method: "POST",
          credentials: "same-origin",
          headers: {
            "Content-Type": "application/json"
          },
          body: JSON.stringify({
            measureDate: this.measureDate,
            weight: this.weight
          })
        });
        if (response.status === 200) {
          this.weight = undefined;
          this.message = "Weight measurement added!";
          // clear message after 2 seconds
          setTimeout(() => this.message = "", 2000);
        } else {
          const json = await response.json();
          this.errorMessage = `There was an error. ${json.error} - ${json.message}`;
        }
        this.disabled = false;
      },
      formatDate: function (dt) {
        const offset = dt.getTimezoneOffset();
        const date = new Date(dt.getTime() - (offset * 60 * 1000));
        return date.toISOString().split("T")[0];
      }
    }
  });
</script>
The add.ejs view displays a form with input fields for a date and a measurement, and a button to record the measurement. When a user clicks the Submit button, the addWeight() method is called. The addWeight() method uses the browser’s fetch API to post the form data as JSON to the application’s /api/measurements API route. If successful, a message is briefly displayed to let the user know the measurement was recorded. If an error occurs, an error message is displayed and the user can correct any issue and try submitting the form again.
In the src/templates folder, create a new file named list.ejs, and add the following markup and client-side code.
<script src="https://unpkg.com/chart.js@2.8.0/dist/Chart.bundle.js"></script>
<script src="https://unpkg.com/vue-chartkick@0.5.1"></script>
<div id="app">
  <h1 class="title">Measurements</h1>
  <div class="section" v-if="errorMessage">
    <div class="notification is-danger" v-text="errorMessage"></div>
  </div>
  <div v-if="fetching">Getting your measurements...</div>
  <div v-if="hasData">
    <line-chart :data="chartData" :min="chartMinimum"></line-chart>
    <table class="table is-striped is-narrow">
      <thead>
        <tr>
          <th>Date</th>
          <th>Weight</th>
          <th></th>
        </tr>
      </thead>
      <tbody>
        <tr v-for="m in measurements">
          <td v-text="m.measureDate"></td>
          <td v-text="m.weight"></td>
          <td><button class="button is-danger is-light is-small" @click="remove(m)">Delete</button></td>
        </tr>
      </tbody>
    </table>
  </div>
  <div v-if="noData">No measurements to display</div>
</div>

<script>
  Vue.use(Chartkick.use(Chart));
  const app = new Vue({
    el: "#app",
    computed: {
      noData: function () {
        return this.measurements.length === 0;
      },
      hasData: function () {
        return this.measurements.length > 0;
      },
      chartData: function () {
        // maps the data returned from the API into a format the chart component understands
        const data = {};
        this.measurements.forEach(m => data[m.measureDate] = m.weight);
        return data;
      },
      chartMinimum: function () {
        // Min value is the lowest measurement down to the nearest multiple of 10
        return Math.floor(this.measurements.reduce((prev, current) => {
          return prev.weight < current.weight ? prev.weight : current.weight;
        }, 0) / 10) * 10;
      }
    },
    data() {
      return {
        measurements: [],
        fetching: false,
        errorMessage: ""
      }
    },
    mounted() {
      this.fetchMeasurements();
    },
    methods: {
      fetchMeasurements: async function () {
        this.measurements = [];
        this.fetching = true;
        this.errorMessage = "";

        const response = await fetch("/api/measurements", {
          method: "GET",
          credentials: "same-origin"
        });

        this.fetching = false;

        if (response.status === 200) {
          const json = await response.json();
          const now = new Date();
          const offset = now.getTimezoneOffset();
          this.measurements = json.map(m => {
            const dt = new Date(m.measureDate);
            const dt2 = new Date(dt.getTime() + (offset * 60 * 1000));
            return {
              id: m.id,
              measureDate: dt2.toLocaleDateString(undefined, "short"),
              weight: m.weight
            }
          });
        } else {
          const json = await response.json();
          this.errorMessage = `There was an error. ${json.error} - ${json.message}`;
        }
      },
      remove: async function (m) {
        if (confirm(`Are you sure you want to delete ${m.measureDate} - ${m.weight}?`)) {
          const response = await fetch(`/api/measurements/${m.id}`, {
            method: "DELETE",
            credentials: "same-origin"
          });
          if (response.status === 204) {
            this.fetchMeasurements();
          } else {
            const json = await response.json();
            this.errorMessage = `There was an error. ${json.error} - ${json.message}`;
          }
        }
      }
    }
  });
</script>
When the list.ejs view first loads, a “Getting your measurements…” message is displayed. As soon as the Vue component finishes initializing (mounts), it uses the browser’s fetch API to retrieve all the measurements for the current user. A little bit of work is done to format the measurement dates into a friendly format. The Vue component then renders the measurement data as a line chart and table.
Each measurement listed in the table includes a Delete button. The user may click on this button to remove a measurement. The remove() method first prompts the user to confirm deleting the measurement, calls the API to delete the measurement, and refreshes the list of measurements.
The last step is to update the routes! In the src/routes folder, create a new file named measurements.js and add the following code to this file.
"use strict";

const addMeasurements = {
  method: "GET",
  path: "/add",
  handler: ( request, h ) => {
    return h.view( "add", { title: "Add Measurement" } );
  }
};

const listMeasurements = {
  method: "GET",
  path: "/list",
  handler: ( request, h ) => {
    return h.view( "list", { title: "Measurements" } );
  }
};

module.exports = [
  addMeasurements,
  listMeasurements
];
Now update the src/routes/index.js file to include the api and measurements modules.
"use strict";

const path = require( "path" );

const auth = require( "./auth" );
const api = require( "./api" );
const measurements = require( "./measurements" );

const home = {
  method: "GET",
  path: "/",
  options: {
    auth: {
      mode: "try"
    },
    handler: ( request, h ) => {
      return h.view( "index", { title: "Home" } );
    }
  }
};

const staticAssets = {
  method: "GET",
  path: "/assets/{param*}",
  handler: {
    directory:{
      path: path.join( __dirname, "..", "assets" )
    }
  },
  options: { auth: false }
};

const error404 = {
  method: "*",
  path: "/{any*}",
  handler: function ( request, h ) {
    return h.view( "404", { title: "Not Found" } ).code( 404 );
  },
  options: { auth: false }
};

module.exports = [
  home,
  staticAssets,
  error404
].concat( api, auth, measurements );
You are now ready to test your weight tracker app! You should be able to add measurements and track your progress.
Learn More About Building Secure Node.js Apps
The entire source code for this project is available at GitHub. I believe this project would be a great foundation for many types of Web applications built using Node.js.
Note: When deploying the application to a production environment, you must create a new
.envfile or use real environment variables to configure the application. Values such as the PostgreSQL connection information,HOST_URL,COOKIE_ENCRYPT_PWD, andNODE_ENVconfiguration must be updated to reflect the new environment.
If you liked this post, you may also enjoy some of my other posts related to Node.js and security on the Okta developer blog!
- Use TypeScript to Build a Node API with Express
- Build a Secure Node.js App with SQL Server
- Add Authentication and Personalization to VuePress
- Build a Command Line Application with Node.js
- Top 10 Visual Studio Code Extensions for Node.js
- An Illustrated Guide to OAuth and OpenID Connect
If you have any questions, please leave a comment below. Follow us @oktadev on Twitter and subscribe to our popular YouTube channel for more great posts and tutorials!
Okta Developer Blog Comment Policy
We welcome relevant and respectful comments. Off-topic comments may be removed.