Build a Command Line Application with Node.js
Command line applications (CLI) are often the core tools for automating tasks, such as deploying production applications, running tests, building reports, migrating data, DevOps, and the list goes on and on. If you find yourself doing the same things over and over again, chances are you can automate those steps with a script and save yourself a lot of time!
Node.js is a great solution for writing CLI apps. Node.js itself has built-in libraries for reading and writing files, launching other applications, and basic network communication. Beyond that, there are thousands of packages available on npm for just about any kind of task imaginable.
In this tutorial, you will learn how to create a Command Line Application with Node.js that can be used on Windows, macOS, or Linux. You will also learn how to style the output of a Node.js CLI application, accept arguments (parameters), and how to authenticate an API from the command line using OAuth 2.0 and PKCE.
Note: In May 2025, the Okta Integrator Free Plan replaced Okta Developer Edition Accounts, and the Okta CLI was deprecated.
We preserved this post for reference, but the instructions no longer work exactly as written. Replace the Okta CLI commands by manually configuring Okta following the instructions in our Developer Documentation.
Build Your First Node.js Command Line Application
First, let’s make sure you have the tools required. To complete this tutorial, you will need the following:
- A recent version of Node.js downloaded and installed
- A good text editor, such as Visual Studio Code
- A free Okta developer account
Next, open your computer’s command prompt (Windows) or terminal (macOS/Linux). Change the current directory to the folder where you save your documents or projects. Enter the following commands to create a new project folder and initialize the project.
mkdir hello-cli
cd hello-cli
npm init
Next, open the hello-cli folder in your favorite text editor. create a folder named bin and add a new file to the bin folder named index.js. Open the index.js file in your text editor and copy the following code.
#!/usr/bin/env node

console.log( "Hello!" );
The first line that begins with #! is usually called a “shebang.” This is normally only used on Linux or UNIX operating systems to inform the system what type of script is included in the rest of the text file. However, this first line is also required for Node.js scripts to be installed and run properly on macOS and Windows.
Next, open the package.json file in the root of the project in your text editor. Change the main value to bin/index.js. Add a new key for bin with the following text.
 "bin": {
   "hello": "./bin/index.js"
 }
Note: Don’t forget to add a comma after the previous value. All key/value pairs are separated by commas. The most common mistake when editing a JSON file is leaving out a comma.
Your entire package.json file should look similar to the following.
{
 "name": "hello-cli",
 "version": "1.0.0",
 "description": "",
 "main": "bin/index.js",
 "scripts": {
   "test": "echo \"Error: no test specified\" && exit 1"
 },
 "keywords": [],
 "author": "David Neal (https://reverentgeek.com)",
 "license": "MIT",
 "bin": {
   "hello": "./bin/index.js"
 }
}
At this point, you can run the script just like any other Node.js application. Try entering the following from the command line.
node .
However, the goal of writing a script like this is to be able to run it from anywhere. You can do that with the npm install command.
npm install -g .
This installs your script “globally.” Any commands listed in the bin section of the package.json file will be made available as command line applications. You can now run your script by typing hello at the command line!
hello
To uninstall your script, run the following command.
npm uninstall -g hello-cli
Tip: You can list all globally installed Node.js modules using
npm ls -g --depth=0.
Make Text Stand Out with Color and Borders
Writing plain text directly to the console will get the job done, but sometimes it is nice (or even necessary) to have content stand out. For example, you may want to display error messages using the color red.
To modify the color of text and background color, you can use chalk. To add borders around your text to make it more visible, you can use a module named boxen. Add both of these to your project.
npm install chalk@2.4 boxen@4.0
Next, replace the contents of bin/index.js with the following code.
#!/usr/bin/env node

const chalk = require("chalk");
const boxen = require("boxen");

const greeting = chalk.white.bold("Hello!");

const boxenOptions = {
 padding: 1,
 margin: 1,
 borderStyle: "round",
 borderColor: "green",
 backgroundColor: "#555555"
};
const msgBox = boxen( greeting, boxenOptions );

console.log(msgBox);
Next, install the updated script and run it.
npm install -g .
hello
The message in your console should look similar to this image.

Add Support for Command Line Arguments
Most CLI applications accept one or more command line arguments, such as optional/required parameters, commands, flags/switches, or other configuration values. Although you can parse command line parameters by inspecting the Node.js process.argv value, there are modules available that will save you a lot of time and effort. The yargs module is one such module for Node.js designed to support the most common CLI scenarios.
First, install the yargs module as a dependency for your application.
npm install yargs@13.2
Next, update the bin/index.js file with the following code.
#!/usr/bin/env node

const yargs = require("yargs");

const options = yargs
 .usage("Usage: -n <name>")
 .option("n", { alias: "name", describe: "Your name", type: "string", demandOption: true })
 .argv;

const greeting = `Hello, ${options.name}!`;

console.log(greeting);
The previous code imports the yargs module and configures it to require one argument for name. Next, install the updated script globally.
npm install -g .
The name parameter is required (demandOption: true), so if you try to run the hello script the same as before, you should see something like the following:
> hello

Usage: -n <name>

Options:
 --help      Show help                                                [boolean]
 --version   Show version number                                      [boolean]
 -n, --name  Your name                                      [string] [required]

Missing required argument: n
The yargs module automatically builds a great response for displaying help! Your CLI is not only ready to accept -n and --name arguments but also --help and --version. Try running your CLI application with any of the arguments.
> hello -n me

Hello, me!

> hello --version

0.1.0
Note: The value displayed for
--versioncomes from the version number in thepackage.jsonfile.
Call Your Node.js API from the Command Line
A common scenario in automating tasks is to call an API endpoint to get data or to send data to an API endpoint. In this part of the tutorial, you are going to fetch a random joke from a joke API and display it in the console.
One of the most popular libraries for retrieving and sending data to an API in Node.js is axios. Start by adding axios as a dependency.
npm install axios@0.21.1
Next, replace the contents of bin/index.js with the following code.
#!/usr/bin/env node

const yargs = require("yargs");
const axios = require("axios");

const options = yargs
 .usage("Usage: -n <name>")
 .option("n", { alias: "name", describe: "Your name", type: "string", demandOption: true })
 .argv;

const greeting = `Hello, ${options.name}!`;
console.log(greeting);

console.log("Here's a random joke for you:");

const url = "https://icanhazdadjoke.com/";

axios.get(url, { headers: { Accept: "application/json" } })
 .then(res => {
   console.log(res.data.joke);
 });
In addition to responding with a greeting, the CLI application will now retrieve a random joke using axios and display it immediately after the greeting.
Add a Search Argument to Your Node.js Command Line Application
You can take the CLI application one step further by supporting a search argument. Replace the contents of bin/index.js with the following code.
#!/usr/bin/env node

const yargs = require("yargs");
const axios = require("axios");

const options = yargs
 .usage("Usage: -n <name>")
 .option("n", { alias: "name", describe: "Your name", type: "string", demandOption: true })
 .option("s", { alias: "search", describe: "Search term", type: "string" })
 .argv;

const greeting = `Hello, ${options.name}!`;
console.log(greeting);

if (options.search) {
 console.log(`Searching for jokes about ${options.search}...`)
} else {
 console.log("Here's a random joke for you:");
}

// The url depends on searching or not
const url = options.search ? `https://icanhazdadjoke.com/search?term=${escape(options.search)}` : "https://icanhazdadjoke.com/";

axios.get(url, { headers: { Accept: "application/json" } })
 .then(res => {
   if (options.search) {
     // if searching for jokes, loop over the results
     res.data.results.forEach( j => {
       console.log("\n" + j.joke);
     });
     if (res.data.results.length === 0) {
       console.log("no jokes found :'(");
     }
   } else {
     console.log(res.data.joke);
   }
 });
In the previous code, you added support for a new --search argument. Depending on retrieving a random joke or searching for specific jokes, the code uses a different URL and must handle the results differently.
Try it out!
> npm install -g .
> hello -n me -s orange
Add Support for Secure Authorization with PKCE
An API that requires basic authentication is fairly straight-forward. But, what if an API uses OAuth for authentication? Yes, it is possible to support APIs that use the latest OAuth open standards from the command line, too!
Proof Key for Code Exchange (PKCE) is a better solution for mobile and native applications to exchange private keys with an authorization server. For this step in the tutorial, you are going to use the Okta API. However, it should be possible to adapt the code to work with any OAuth 2.0 service you’re using. Okta is a free-to-use API service for user accounts and simplifies handling user authentication, authorization, social login, password reset, and so forth. Okta utilizes open standards like OAuth 2.0 to make integration seamless.
Create an Okta Application
Before you begin, you’ll need a free Okta developer account. Install the Okta CLI and run okta register to sign up for a new account. If you already have an account, run okta login.
Then, run okta apps create. Select the default app name, or change it as you see fit.
Choose Native and press Enter.
Use http://localhost:8080/callback for the Redirect URI and set the Logout Redirect URI to http://localhost:8080
.
What does the Okta CLI do?
The Okta CLI will create an OIDC Native App in your Okta Org. It will add the redirect URIs you specified and grant access to the Everyone group. You will see output like the following when it’s finished:
Okta application configuration:
Issuer:    https://dev-133337.okta.com/oauth2/default
Client ID: 0oab8eb55Kb9jdMIr5d6
NOTE: You can also use the Okta Admin Console to create your app. See Create a Native App for more information.
Create a file named .env in the root of your Node.js CLI project. Open this file and add the following information.
OKTA_ORG_URL=https://{yourOktaOrgUrl}
OKTA_CLIENT_ID={yourClientID}
OKTA_SCOPES="openid profile email"
OKTA_REDIRECT_PORT=8080
Update the Node.js Command Line Application
To support the PKCE authentication flow, your CLI application needs a few more libraries. In this tutorial, you will use hapi to create a web server to handle the authentication callback. dotenv is used to read configuration settings from the .env file. You will use open to launch the default browser for login. And, uuid is used to help generate a unique private key to exchange with the authentication server.
npm install @hapi/hapi@18.3 dotenv@8.0 open@6.3 uuid@3.3
Now, create a new folder in the root of the project named src. In this folder, create a new file named authClient.js. Add the following code to the src/authClient.js file.
"use strict";

const axios = require( "axios" );
const crypto = require( "crypto" );
const hapi = require( "@hapi/hapi" );
const open = require( "open" );
const querystring = require( "querystring" );
const uuid = require( "uuid/v1" );

const base64url = str => {
 return str.replace( /\+/g, "-" ).replace( /\//g, "_" ).replace( /=+$/, "" );
};
 module.exports = ( { oktaOrgUrl, clientId, scopes, serverPort } ) => {
 if ( !oktaOrgUrl || !clientId || !scopes || !serverPort ) {
   throw new Error( "Okta organization URL, client ID, scopes, and server port are required." );
 }
 // code verifier must be a random string with a minimum of 43 characters
 const codeVerifier = uuid() + uuid();
 const redirectUri = `http://localhost:${serverPort}/callback`;

 const buildAuthorizeUrl = ( codeChallenge ) => {
   const data = {
     client_id: clientId,
     response_type: "code",
     scope: scopes,
     redirect_uri: redirectUri,
     state: uuid(),
     code_challenge_method: "S256",
     code_challenge: codeChallenge
   };
   const params = querystring.stringify( data );
   const authorizeUrl = `${oktaOrgUrl}/oauth2/v1/authorize?${params}`;
   return authorizeUrl;
 };

 const getUserInfo = async accessToken => {
   try {
     const config = {
       headers: { Authorization: `Bearer ${accessToken}` }
     };
     const url = `${oktaOrgUrl}/oauth2/v1/userinfo`;
     const res = await axios.get( url, config );
     return res.data;
   } catch ( err ) {
     console.log( "error getting user info", err ); // eslint-disable-line no-console
     throw err;
   }
 };

 const getToken = async code => {
   try {
     const request = {
       grant_type: "authorization_code",
       redirect_uri: redirectUri,
       client_id: clientId,
       code,
       code_verifier: codeVerifier
     };
     const url = `${oktaOrgUrl}/oauth2/v1/token`;
     const data = querystring.stringify( request );
     const res = await axios.post( url, data );
     return res.data;
   } catch ( err ) {
     console.log( "error getting token", err ); // eslint-disable-line no-console
     throw err;
   }
 };
  // Start server and begin auth flow
 const executeAuthFlow = () => {
   return new Promise( async ( resolve, reject ) => {
     const server = hapi.server( {
       port: serverPort,
       host: "localhost"
     } );

     server.route( {
       method: "GET",
       path: "/callback",
       handler: async request => {
         try {
           const code = request.query.code;
           const token = await getToken( code );
           const userInfo = await getUserInfo( token.access_token );
           resolve( { token, userInfo } );
           return `Thank you, ${userInfo.given_name}. You can close this tab.`;
         } catch ( err ) {
           reject( err );
         } finally {
           server.stop();
         }
       }
     } );
     await server.start();

     const codeChallenge = base64url( crypto.createHash( "sha256" ).update( codeVerifier ).digest( "base64" ) );
     const authorizeUrl = buildAuthorizeUrl( codeChallenge );
     open( authorizeUrl );
   } );
 };
  return {
   executeAuthFlow
 };
};
There’s a lot going on in this module, so here’s a breakdown of how to use the module and what it is doing.
The authClient.js module exports one function that accepts an object with the properties oktaOrgUrl, clientId, scopes, and serverPort. Calling this function will initialize the module with the configuration it needs. After initializing, the function returns an object with exactly one function, executeAuthFlow.
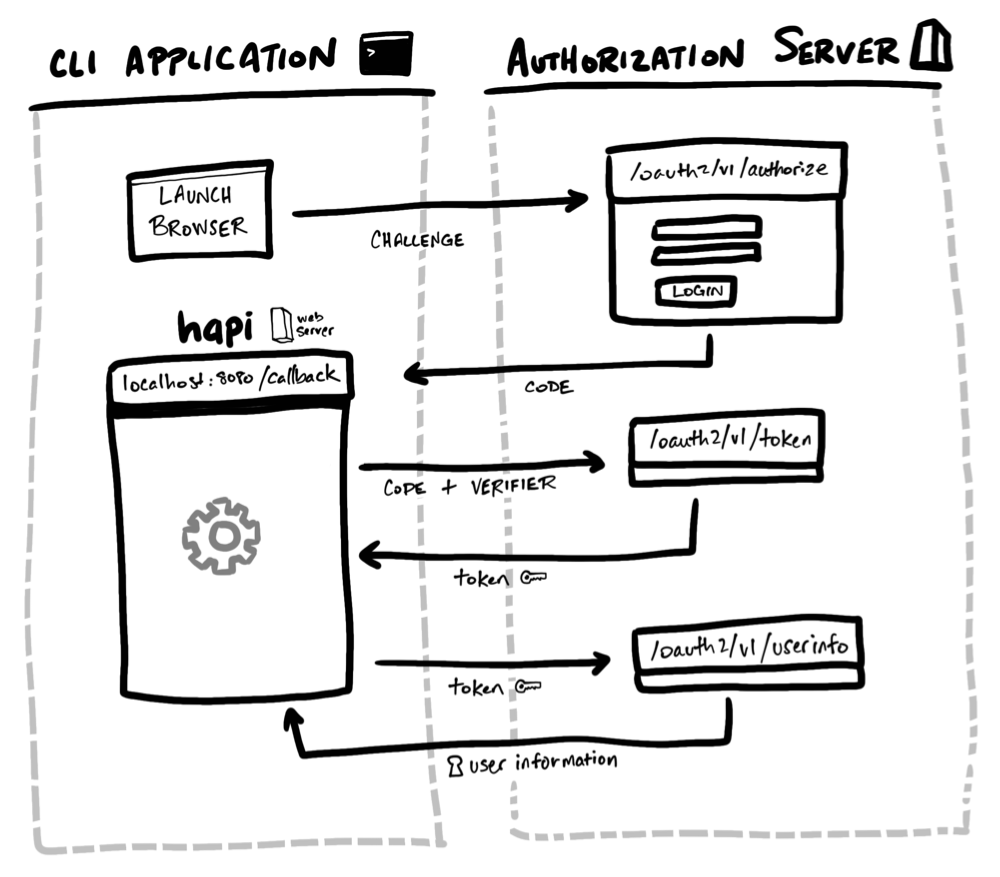
Calling executeAuthFlow goes through the following steps:
- A new web server is created using
hapiwith one/callbackroute (e.g.http://localhost:8080/callback). - The
codeVerifierprivate key is generated and hashed to create thecodeChallenge. - The function opens the default browser and navigates to the authorization server.
- If not already logged in, the user must log in to the authentication server.
- Once authenticated, the browser is redirected to the
/callbackURL with a code. - The callback handler uses the code and the
codeVerifiervalue to request an authentication token. - The authorization server verifies the
code, hashes thecodeVerifierand compares it to thecodeChallengevalue it stored earlier and replies with an authentication token. - The function uses the returned token to call another API endpoint to retrieve account information.
- The token and account information are returned to the caller that invoked
executeAuthFlow.
Note: Retrieving account information is not part of the PKCE authentication flow. This step is only included as an example of how to use the token once it is acquired!
Next is to update the CLI to use the authClient.js module. Create a new file under bin named pkceLogin.js. Add the following code to the pkceLogin.js file.
#!/usr/bin/env node
"use strict";

const chalk = require( "chalk" );
const dotenv = require( "dotenv" );
const authClient = require( "../src/authClient" );

// read in settings
dotenv.config();

const config = {
 oktaOrgUrl: process.env.OKTA_ORG_URL,
 clientId: process.env.OKTA_CLIENT_ID,
 scopes: process.env.OKTA_SCOPES,
 serverPort: process.env.OKTA_REDIRECT_PORT
};

const main = async () => {
 try {
   const auth = authClient( config );
   const { token, userInfo } = await auth.executeAuthFlow();
   console.log( token, userInfo );
   console.log( chalk.bold( "You have successfully authenticated your CLI application!" ) );
 } catch ( err ) {
   console.log( chalk.red( err ) );
 }
};

main();
Update the package.json file to include another command in the bin section.
 "bin": {
   "hello": "./bin/index.js",
   "pkce-login": "./bin/pkceLogin.js"
 },
Update the CLI applications that are installed globally.
npm install -g .
Now, you are ready to test your new CLI authentication! After logging in, you should see in your console, You have successfully authenticated your CLI application!
pkce-login
Learn More About Command Line Applications and PKCE in Node.js
In this tutorial, you have learned the basics for creating command line applications using Node.js. You also have a valuable authentication module you can easily reuse with any OAuth 2.0 PKCE flow. You can find all the source code for this tutorial on GitHub.
- OAuth 2.0 from the Command Line
- Use Multi-factor Authentication from the Command Line
- Authorization Code with PKCE Flow
- Implementing the Authorization Code Flow with PKCE
- Build a Secure Node.js App with SQL Server
- Okta Node.js SDK
If you liked learning about Node.js CLI applications and authentication, chances are you’ll like some of our other posts. Please follow @oktadev on Twitter to be notified when we publish new blog posts. You can also subscribe to our YouTube channel for our screencasts!
Changelog:
- Apr 5, 2021: Updated to use the Okta CLI for setup and upgrade to axios 0.21.1. Changes to this post can be viewed in okta-blog#676.
Okta Developer Blog Comment Policy
We welcome relevant and respectful comments. Off-topic comments may be removed.