How to Build a Secure AWS Lambda API with Node.js and React

Serverless architecture with AWS Lambdas is quickly becoming a popular option for companies looking to deploy applications without the overhead of maintaining servers. AWS Lambda functions are event-driven and serverless—triggered to process a piece of code and return a result. AWS Lambdas can be written in most common languages today on a variety of platforms including .NET Core, Java, Go and, in the case of this post, Node.js.
The example in this post uses Node.js 12.x, the latest version available on AWS to date. You’ll be using AWS APIs to access AWS Lambdas from your application. This post will teach you how to write your API documentation in YAML and import it into AWS APIs. Additionally, you’ll learn how to deploy that API and enable CORS so that your application can access it.
For this project, you’ll be using React.js for the front end. React.js is one of the most popular JavaScript front end frameworks. React makes creating interactive UIs simple and intuitive. To authenticate users, you’ll be using Okta’s Single Sign-on Provider as well as Okta’s React libraries, which make handling authentication very simple, allowing you more time to focus on your business code.
This post outlines how to make a simple version of one of my favorite game shows as a kid, Card Sharks. The premise of the game is simple enough: A player is shown six cards, one face-up and five face-down. The player must guess if the first face-down card is higher or lower than the current face-up card. If the player is correct they gain a point and move to the next card. If the card has the same rank, no point is awarded and the game continues. If the player is incorrect, the game is over. If the player gets all the cards correct they are allowed to reshuffle the deck and draw a fresh set of 6 cards. At the end of the game, the player can submit their high score.
Note: In May 2025, the Okta Integrator Free Plan replaced Okta Developer Edition Accounts, and the Okta CLI was deprecated.
We preserved this post for reference, but the instructions no longer work exactly as written. Replace the Okta CLI commands by manually configuring Okta following the instructions in our Developer Documentation.
Get Started with Okta
First thing’s first, create an Okta developer account and register an application. Log in to your Okta admin portal and navigation to Applications. Click the button labeled Add Application, select Single-Page App, then click Next. Name your application something that will represent its role for you. In my case, I used “Card Sharks.” If your application uses port 8080, you can continue to use http://localhost:8080 for your URLs. However, if you aren’t planning on specifically designating port 8080 for your application you will most likely use port 3000 for the application and will need to change these URLs to reflect that.
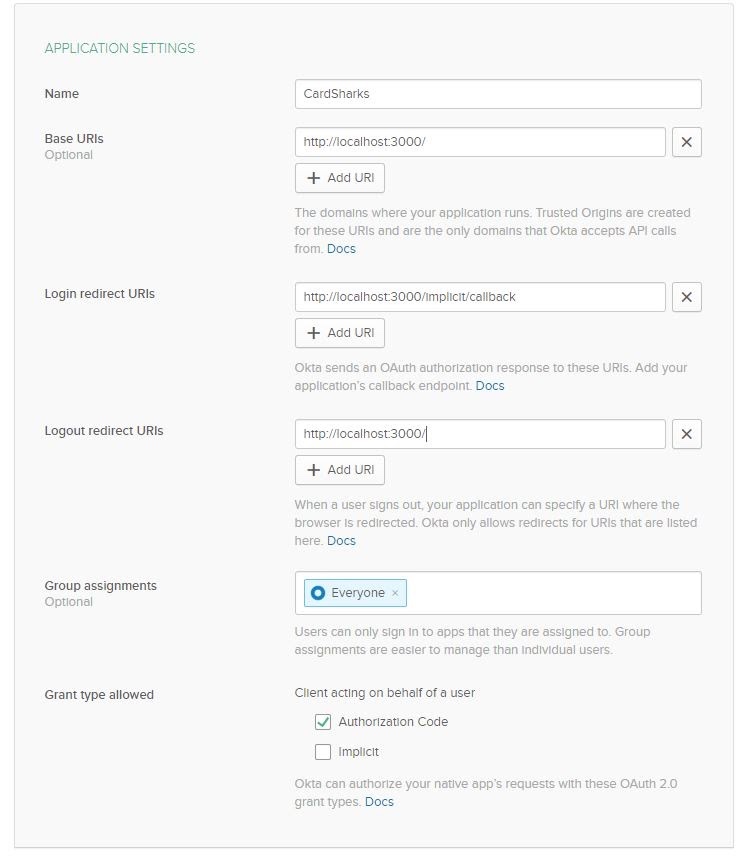
Your completed Okta set up should look similar to this.
Click Done to review your application setup. Make sure to grab the Client ID listed under Client Credentials as it will be needed in your React.js application.
Configure AWS
Next, set up AWS to handle your serverless operations.
Create Lambda Functions
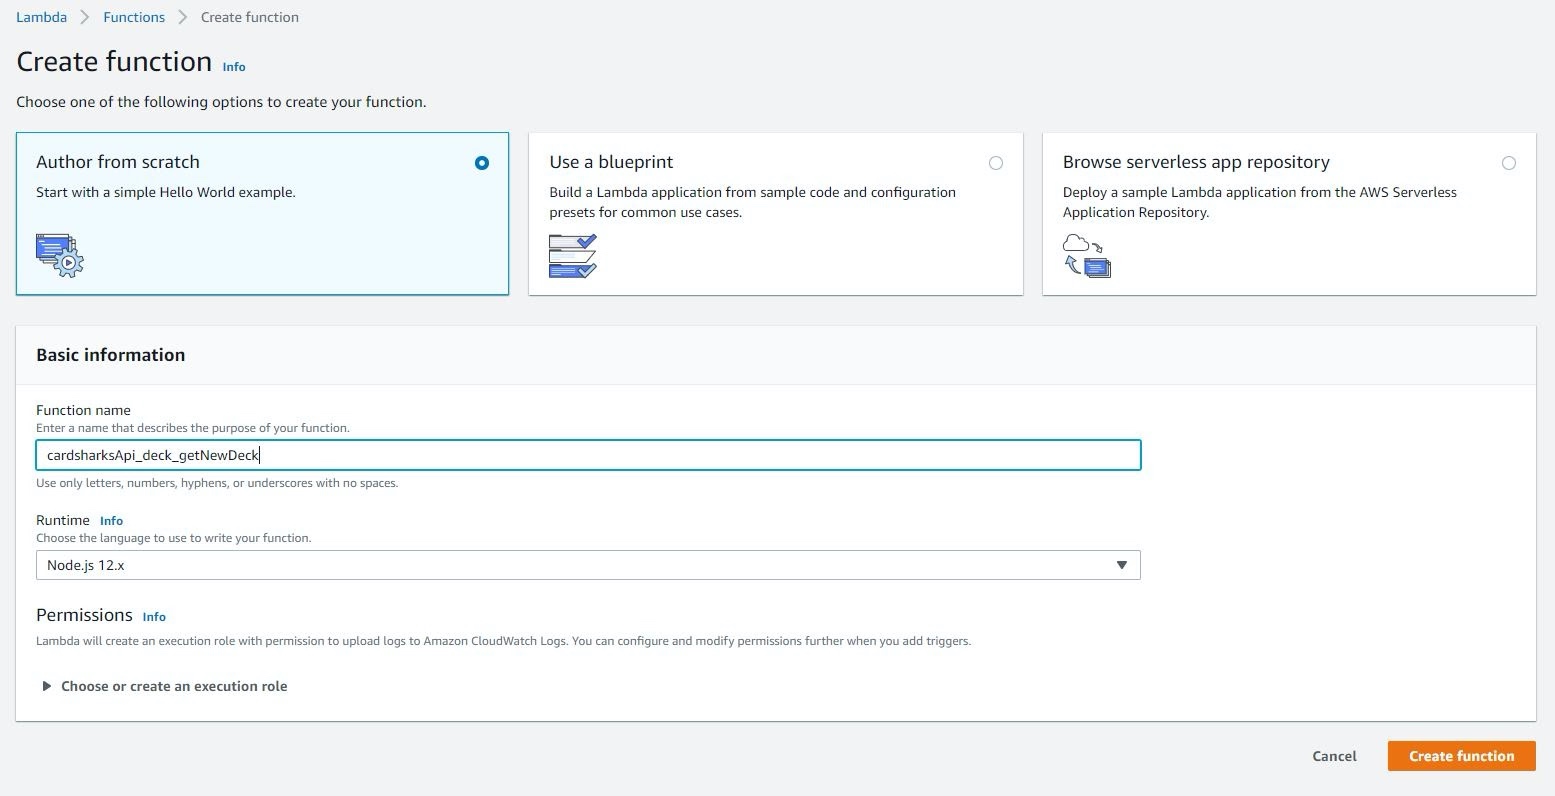
First, navigate to AWS Lambda Home. Click on Functions to see your functions’ home screen. Here you will see a button labeled Create Function. Click that to start setting up your first function. This function will be responsible for creating a standard deck of 52 cards, shuffling it, and returning 6 cards for the React.js application to use. For the purposes of this project, select the Author From Scratch option. The blueprints and serverless app repository are available for more complex applications, but you won’t need that today. Name your function something relevant to your application. I named mine “cardsharksApi_deck_getNewDeck”. Make sure to select the runtime as Node.js 12.x. Once you’ve clicked Create Function, you will be brought to the function configuration screen. This is where you can add code, triggers, and anything else you may need.
Add the following to the function code section.
exports.handler = async( event ) => {

  const getSuit = ( suitId ) => {
    switch ( suitId ) {
    case 0:
      return "diams";
    case 1:
      return "hearts";
    case 2:
      return "spades";
    case 3:
      return "clubs";
    default:
      throw "only 4 suits";
    }
  };

  const getRank = ( rankId ) => {
    if ( rankId > 13 || rankId < 1 )
      throw "invalid rank " + rankId;
    switch ( rankId ) {
    case 11:
      return "J";
    case 12:
      return "Q";
    case 13:
      return "K";
    case 1:
      return "A";
    default:
      return rankId.toString();
    }
  };

  const buildDeck = () => {
    let deck = [];

    for ( let suit = 0; suit < 3; suit++ ) {
      for ( let value = 1; value <= 13; value++ ) {
        deck.push( {
          suit: getSuit( suit ),
          rank: getRank( value ),
          value: value,
          visible: false
        } );
      }
    }

    return deck;
  };

  const getCards = () => {

    let deck = buildDeck();
    deck.sort( ( a, b ) => 0.5 - Math.random() );

    let cards = [];

    for ( let i = 0; i < 6; i++ ) {
      let card = deck[i];

      if ( i == 0 )
        card.visible = true;

      card.order = i;

      cards.push( card );
    }
    return cards;
  };

  const response = {
    statusCode: 200,
    body: JSON.stringify( getCards() )
  };
  return response;
};
AWS provides a simple blank, “Hello World,” output with a response code of 200. Keep that code, but replace your body with the getCards() function call. getCards() calls buildDeck() which creates your 52 cards—ace through King of each suit. In this game, aces will be considered low, making their value 1. If you wish to make them high, change the value to 14. For an added challenge, consider how you would handle Aces being low or high.
Next, you need to test your function. This is relatively easy—click the Test button on the top of your screen. You should then see a screen that says “Configure Test Event” with some JSON dummy values in it. These values will be passed to your function in the event object. Since building the deck doesn’t require any input, feel free to leave this as an empty JSON object.
Name your test trigger something that is relevant to you. I named mine “TestTrigger” as I only anticipate needing it this once. After you’ve done this, press Create. Now, when you press Test, you can select the Trigger from your dropdown box next to the Test button. When you press Test again, the response will be listed after the code in the Function Code window. Ideally, you should see statusCode: 200 along with a JSON array that contains some information about six cards.
At this point, there are still two more functions you need to implement that will allow you to both get and save high scores. For these, you will need to connect your AWS lambda function to the storage system of your choice. For this application, you can stub these two functions out until you are ready to connect to your storage.
Create another function for cardsharksApi_highScores_postHighScore. In the Function Code section of the lambda, screen add the following code.
exports.handler = async ( event ) => {

  const response = {
    statusCode: 200,
    body: JSON.stringify( {
      player: event.player,
      score: event.score
    } ),
  };
  return response;
};
Feel free to add whatever error-handling or data validation you need here before sending it to your repository. Next, click on Test and add a new test. For this, you will need to add some simple JSON.
{
  "player": "player 1",
  "score": "1"
}
Your React app will send your player’s name along with their score to the server. This JSON represents what the function is expecting to receive from the React.js app. These parameters can be accessed in the event property provided by the boilerplate from Amazon. You can add up to 10 cases once you’ve fleshed out your data validation to ensure that your test cases are covered.
Lastly, create a function for cardsharksApi_highScores_getHighScores. Add the following code to it:
exports.handler = async( event ) => {

  const getHighScores = () => {

    const scores = [];

    scores.push( {
      player: "Roger Rabbit",
      score: 100
    } );

    scores.push( {
      player: "Donald Duck",
      score: 50
    } );

    scores.push( {
      player: "Goofy",
      score: 40
    } );

    scores.push( {
      player: "John Daly",
      score: 30
    } );

    scores.push( {
      player: "Mike Tyson",
      score: 20
    } );

    return scores;

  };

  const response = {
    statusCode: 200,
    body: JSON.stringify( getHighScores() ),
  };
  return response;
};
Again, this is sending back dummy data for the application to use. Once you’ve connected to your repository, you can replace this code with your data access logic.
Create Your YAML API
With your lambda functions complete, it’s time to set up your API endpoints which will interface with your React.js application and your lambda functions. One great thing about AWS API is that it will take a YAML definition of your API and implement it to your endpoints automatically. If you are comfortable creating the endpoints yourself and don’t wish to write out a YAML definition, you can skip this section. However, in a real-world setting, the advantages of being able to document your API and implement it in one step makes this approach very useful. This is doubly true when you’re dealing with large APIs that many developers will need to access.
You can review my version of the YAML below.
openapi: 3.0.0
# Added by API Auto Mocking Plugin
servers:
  - description: SwaggerHub API Auto Mocking
    url: https://virtserver.swaggerhub.com/FishbowlLLC/CardSharks/1.0.0
info:
  description: This is the API to backend the card sharks React app using Okta Single Sign on Provider
  version: "1.0.0"
  title: Cardsharks API
  contact:
    email: nik@fishbowlllc.com
  license:
    name: Apache 2.0
    url: 'http://www.apache.org/licenses/LICENSE-2.0.html'
tags:
  - name: deck
    description: Calls for getting a new deck
  - name: highscore
    description: Calls for getting and saving high scores
paths:
  /deck:
    get:
      tags:
        - deck
      summary: Gets deck for a new game
      operationId: getdeck
      description: |
        Gets a 52 card deck and shuffles it and returns 6 cards for the game
      responses:
        '200':
          description: 6 cards in an ordered array
          content:
            application/json:
              schema:
                type: array
                items:
                  $ref: '#/components/schemas/Card'
  /highscore:
    get:
      tags:
        - highscore
      summary: gets the high scores list
      responses:
        '200':
          description: Top 10 high scores
          content:
            application/json:
              schema:
                type: array
                items:
                  $ref: '#/components/schemas/HighScore'
    post:
      tags:
        - highscore
      summary: adds a score to the high scores
      responses:
       '200':
          description: Score Accepted
components:
  schemas:
    Card:
      type: object
      properties:
        suit:
          type: string
        rank:
          type: string
          description: the face of the card, A, 1, 2, 3, 4, 5, 6, 7, ,8 ,9, 10, J, Q, K
          example: K
        value:
          type: integer
          description: the corresponding values of each rank. Ace = 1, J = 11, Q = 12, K = 13, numerical ranks are the same value as rank
          example: 13
        visible:
          type: boolean
          description: describes if the card is visible to the player
    HighScore:
      type: object
      properties:
        name:
          type: string
          description: username of high score owner
        score:
          type: integer
Import Swagger into AWS API
Now, navigate to Amazon API Gateway and start setting up your API. Click Create API, then select REST API using the Build button. Name your API something relevant and click Create API. You can leave the rest of the fields on the default.
This will direct you to your API Gateway home. Click Actions and select Import API. From here, copy and paste the YAML into the definition window and click Import. Your API is now set up!
If you chose to skip the last section, you can click Actions then Create Resource and Create Method to create your endpoints and manually define them.
Connect AWS Lambda to APIs
Next, you’ll want to connect Lambda to your APIs. Open the method integration window by clicking GET under the /deck options Lambda Function should be preselected by default but, if it isn’t, make sure to select it before continuing. Next, enter the name of your function in the Lambda Function text box. When you click Save, you will see a notification about adding permissions to the Lambda function. Click Ok to be directed to the method execution page. Here, you’ll notice that the method request is passed to the integration request which connects first to your lambda function and then back through the response chain to the client. Repeat the above steps for /highscore/GET by mapping it to your lambda function cardsharksApi_highScores_getHighScores and /highscore/POST to cardsharksApi_highScores_postHighScore.
Enable CORS and Deploy
Now that you’ve connected AWS lambdas to the API endpoints, it’s time to deploy your API. First, make sure to enable CORS. Click /deck and select Actions, then Enable CORS. The default options should be enough for this application, but you’ll likely want to review the full capabilities later. Select Enable CORS and replace existing CORS headers in the lower right.
A window with a list of tasks will appear and, as AWS executes them, they will display a green check mark or red X. You’ll need to review any errors that you see. A quick warning—when AWS creates the OPTIONS method it doesn’t set up the responses which usually causes CORS to fail. To fix this, click Options under the /deck resource.
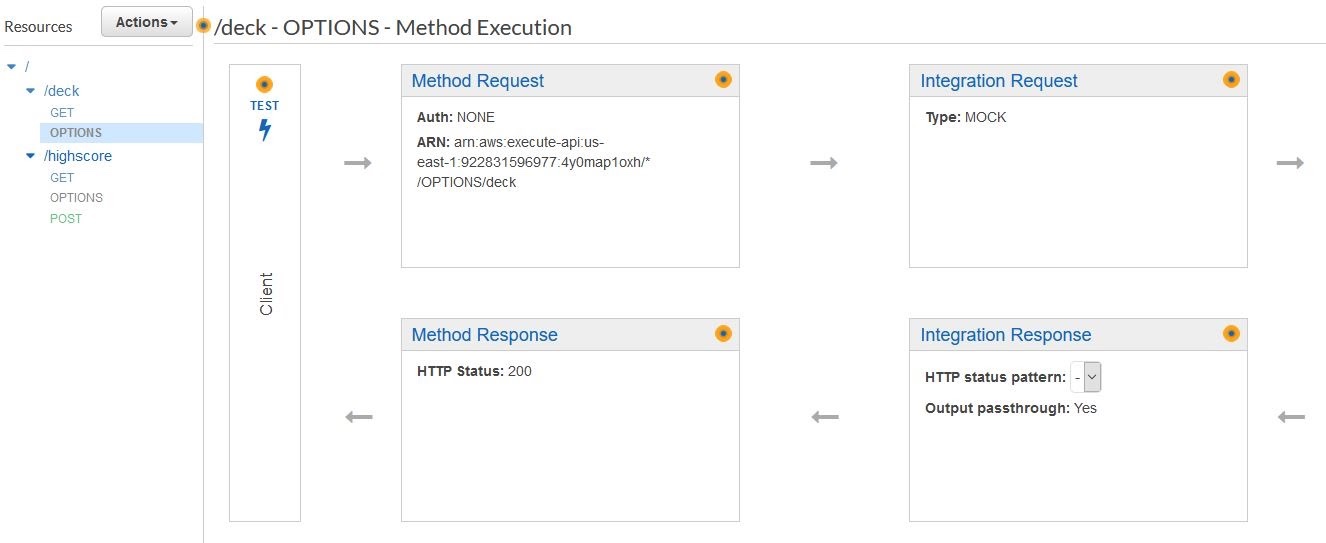
Click Method Response —> Add Response.

Add status code 200 and save.

Next, return to the /deck resource and click Actions and Enable Cors. Repeat the workflow and the errors should be gone. Repeat this step for the /highscore resource.

Once again, click Actions and then Deploy API. For Development Stage select [New Stage] and give your stage a relevant name. These stages are intended to break the production code away from the testing code. Since you only have one stage, you can name this whatever you like. Click Deploy and your API is ready for use. You can verify this with ARC or Postman.
After clicking deploy, you should land on the Stages page on your API. You can open any of the stages you have created and select the /deck/get method. There you will see an alert with the text Invoke URL: {some url}. This URL is what your application will need to call.
Build Your Frontend React.js Application
With your API set up and ready to go, you can begin to work on the React.js application.
Create Your React.js Application
To set up your app, use the Create React App tool chain defined here. This provides a quick and handy way to fire up a new React.js application. Navigate to the parent folder where your React.js application will be. Then, use the npx package runner with the command npx create-react-app {folder}. Then, go grab a cup of tea or coffee as this process takes a few minutes.
Once it is complete, you can install the dependencies for the application.
First, get the Okta React libraries.
npm install @okta/okta-auth-js@3.1
npm install @okta/okta-react@3.0 react-router-dom@5.1
npm install @okta/okta-signin-widget@3.9
Next, use Bootstrap for styling. To do this, install React Bootstrap as well as Bootstrap. React Bootstrap is used to bridge the gap between React.js and Bootstrap, however, it does not ship with the Bootstrap CSS so you will need to install that as well.
npm i react-bootstrap@1.0 bootstrap@4.4
Finally, you will use dotenv to store your sensitive values.
npm i dotenv@8.2
In your root, create a file named .env and add the following keys.
REACT_APP_OKTA_CLIENTID={yourClientId}
REACT_APP_OKTA_URL_BASE={yourOktaDomain}
REACT_APP_OKTA_APP_BASE_URL=http://localhost:3000
REACT_APP_AMAZON_API_BASE=
You can get REACT_APP_AMAZON_API_BASE from the base of your invoke URL from Amazon API. You may need to change your REACT_APP_OKTA_APP_BASE_URL to a different port if you are developing against one other than 3000. Note here that all of your keys start with REACT_APP_*. This is required for React.js to read the values.
For the cards styling, you will use this CSS playing cards library provided by selfthinker on GitHub. Add the cards.css from this repo to your src directory. If required, you can also bring in the IE and IE9 libraries. You will also need to add the faces directory from the repo to your src directory.
To allow React Bootstrap to do its job, add import 'bootstrap/dist/css/bootstrap.min.css'; to the top of your App.js file. This will give React Bootstrap access to the CSS libraries from Bootstrap.
Add a file to the src directory called AppWithRouterAccess.jsx. You will implement the code for this shortly.
Finally, add two folders, Components and Pages under your src folder. In Components add the following files: Card.jsx, GameBoard.jsx, GameHome.jsx, GameOver.jsx, Header.jsx, and LoginForm.jsx. These components will be reused or enable you to compartmentalize logically separate screens from each other.
In pages, add the following files: Game.jsx, Home.jsx, Login.jsx. You can now work on implementing each of these pages.
Implement the React.js Components
First you can implement the AppWithRouterAccess.jsx file.
import React from "react";
import { Route, useHistory } from "react-router-dom";
import { Security, SecureRoute, LoginCallback } from "@okta/okta-react";
import Home from "./Pages/Home";
import Game from "./Pages/Game";
import Login from "./Pages/Login";

const AppWithRouterAccess = () => {
  const history = useHistory();
  const onAuthRequired = () => {
    history.push( "/login" );
  };

  const baseDomain = process.env.REACT_APP_OKTA_URL_BASE;
  const issuer = baseDomain + "/oauth2/default";
  const clientId = process.env.REACT_APP_OKTA_CLIENTID;
  const redirect = process.env.REACT_APP_OKTA_APP_BASE_URL + "/implicit/callback";

  return (
    <Security issuer={issuer}
      clientId={clientId}
      redirectUri={redirect}
      onAuthRequired={onAuthRequired}
      pkce={true} >
      <Route path='/' exact={true} component={Home} />
      <SecureRoute path='/Game' component={Game} />
      <Route path='/login' render={() => <Login baseUrl={baseDomain} issuer={issuer} />} />
      <Route path='/implicit/callback' component={LoginCallback} />
    </Security>
  );
};
export default AppWithRouterAccess;
This component does the major lifting between Okta and your React.js application. Its primary responsibility is to set up your routes for your application. Notice that the /Game route is labeled as a SecureRoute. This enables your application to enforce authentication on that route. Unauthenticated users won’t be able to access that route. Instead, they will be redirected to the Login page. You also want to set up the route for /implicit/callback that Okta uses for its authentication workflow.
Now, shift your focus to the Components folder. Start by setting up your Header component.
import React from "react";
import { useOktaAuth } from "@okta/okta-react";
import { Navbar, Nav, Form, Button } from "react-bootstrap";

const Header = () => {
  const { authState, authService } = useOktaAuth();

  if ( authState.isPending ) {
    return <div>Loading...</div>;
  }

  const button = authState.isAuthenticated ?
    <Button variant="secondary" onClick={() => { authService.logout(); }}>Logout</Button> :
    <Button variant="secondary" onClick={() => { authService.login(); }}>Login</Button>;

  return (

    <Navbar bg="light" expand="lg">
      <Navbar.Brand href="/">Card Sharks</Navbar.Brand>
      <Navbar.Toggle aria-controls="basic-navbar-nav" />
      <Navbar.Collapse id="basic-navbar-nav">
        <Nav className="mr-auto">
          <Nav.Link href="/">Home</Nav.Link>
          <Nav.Link href="/game">New Game</Nav.Link>
        </Nav>
        <Form inline>
          {button}
        </Form>
      </Navbar.Collapse>
    </Navbar>

  );
};
export default Header;
This simple component gives your users a nav bar that will be used on each page and a button that is changed from a login button to a logout button once the user is authenticated. Again, since /game is a SecureRoute if the user clicks Game they will be directed to the login page.
Next, implement the LoginForm component.
import React, { useState } from "react";
import OktaAuth from "@okta/okta-auth-js";
import { useOktaAuth } from "@okta/okta-react";
import { Form, Button, Row, Col } from "react-bootstrap";

const LoginForm = ( { baseUrl, issuer } ) => {

  const { authService } = useOktaAuth();
  const [ sessionToken, setSessionToken ] = useState();
  const [ username, setUsername ] = useState();
  const [ password, setPassword ] = useState();

  const handleSubmit = ( e ) => {
    e.preventDefault();
    const oktaAuth = new OktaAuth( { url: baseUrl, issuer: issuer } );
    oktaAuth.signIn( { username, password } )
      .then( res => setSessionToken( res.sessionToken ) )
      .catch( err => console.log( "Found an error", err ) );
  };

  const handleUsernameChange = ( e ) => {
    setUsername( e.target.value );
  };

  const handlePasswordChange = ( e ) => {
    setPassword( e.target.value );
  };

  if ( sessionToken ) {
    authService.redirect( { sessionToken } );
    return null;
  }

  return (

    <Row>
      <Col sm={3}>
        <Form onSubmit={handleSubmit}>

          <Form.Group controlId="username">
            <Form.Label>Username</Form.Label>
            <Form.Control type="text" placeholder="Enter Username" value={username} onChange={handleUsernameChange} />
          </Form.Group>

          <Form.Group controlId="password">
            <Form.Label>Password</Form.Label>
            <Form.Control type="password" placeholder="password" value={password} onChange={handlePasswordChange} />
          </Form.Group>

          <Button variant="primary" type="submit">
            Login
          </Button>

        </Form>
      </Col>
    </Row>
  );
};

export default LoginForm;
When the user submits the form, your application will override that action and direct the user into the Okta workflow. This is done with oktaAuth.signIn() which returns a promise that must be handled appropriately. If the user has successfully logged in, set the sessionToken that allows the user to proceed authenticated.
Now, turn your attention to the game components themselves. The Game page will have 3 main stages. When the user lands on the page, they are offered the chance to start a new game. After this, the user enters the “game play” phase. Finally, after the game is over the user is presented with the opportunity to start a new game or submit a high score.
Let’s start with the Card component that will be used in the game.
import React from "react";
import "../cards.css";

const Card = ( { card } ) => {

  let content;

  if ( card.visible ) {
    const cardClass = "card rank-" + card.rank.toLowerCase() + " " + card.suit;
    content =
            <div className={cardClass}>
              <div className="rank">{card.rank}</div>
              <div className="suit"></div>
            </ div>;
  }
  else {
    content = <div className="card back">*</div>;
  }

  return (
    <div className="playingCards faceImages">
      {content}
    </div>
  );
};

export default Card;
If the card is listed as visible, you will display the card rank and suit based on the CSS provided by the CSS-Playing-Cards library. If it is not, show the back of the card.
With that done you can work on the GameHome component.
import React from "react";
import { Row, Col, Table, Button } from "react-bootstrap";

const GameHome = ( { newGameClick, highScores, submitHighScore } ) => {

  return (

    <div>
      <Row>
        <Col lg={12}>
          <h4>Recent High Scores</h4>
        </Col>
      </Row>

      <Row>
        <Col lg={12}>
          <Table striped bordered hover>
            <thead>
              <tr>
                <th>Player</th>
                <th>Score</th>
              </tr>
            </thead>
            <tbody>
              {
                highScores.map( ( highScore, i ) => {
                  return (
                    <tr key={i}>
                      <td>{highScore.player}</td>
                      <td>{highScore.score}</td>
                    </tr>
                  );
                } )}

            </tbody>
          </Table>

          <Button variant="primary" onClick={newGameClick}> Start a new game</Button>
        </Col>
      </Row>
    </div>
  );
};

export default GameHome;
Here, you are displaying a table with the high scores. These high scores will be passed in as a property from the Game page and retrieved from the Amazon API. You also are providing the user with a button to start a new game.
Next, implement the GameOver component. This is the screen that is shown when the player completes the game.
import React from "react";
import { Row, Col, Button } from "react-bootstrap";

const GameOver = ( { score, playAgain, submitHighScore } ) => {

  return (
    <div>
      <Row>
        <Col lg={12} className="text-center">
          Game over! Your score was <strong>{score}</strong>.
        </Col>
      </Row>
      <Row>
        <Col lg={12} className="text-center">
          <Button onClick={submitHighScore} variant="secondary">Submit High Score</Button>
          <Button onClick={playAgain} variant="primary">Play Again</Button>
        </Col>
      </Row>
    </div>
  );
};

export default GameOver;
This component displays the user score and presents two buttons: one to submit the player’s score and one to play again. Both of the handlers for these functions are passed in as properties to this component from the Game page.
Finally, the GameBoard itself. This is the most complex component.
import React, { Component } from "react";
import Card from "./Card";
import { Row, Col, Button } from "react-bootstrap";

class GameBoard extends Component {

  constructor( props, context ) {
    super( props, context );

    this.state = {
      cards: [],
      activeCard: {},
      lastResult: "",
      gameOver: false,
      needsNewDeck: false,
      score: 0
    };
  }

  componentDidMount() {
    this.getNewDeck();
  }

  getNewDeck() {
    this.setState( { loading: true } );

    fetch( process.env.REACT_APP_AMAZON_API_BASE + "/deck" )
      .then( res => res.json() )
      .then(
        ( result ) => {

          const cards = JSON.parse( result.body );

          this.setState(
            {
              cards: cards,
              activeCard: cards[0],
              needsNewDeck: false,
              loading: false
            }
          );
        }
      );

  }

  guess( higherOrLower ) {

    let correct;
    let push;
    let activeCard = this.state.activeCard;

    let nextCardIdx = activeCard.order + 1;
    let nextCard = this.state.cards[nextCardIdx];

    if ( nextCard.value > activeCard.value && higherOrLower === "higher" ) {
      correct = true;
    }
    else if ( nextCard.value < activeCard.value && higherOrLower === "lower" ) {
      correct = true;
    }
    else if ( nextCard.value === activeCard.value ) {
      push = true;
    }

    if ( correct ) {
      this.setState( {
        score: this.state.score + 1,
        lastResult: "Correct! ",
        needsNewDeck: nextCardIdx === 5
      } );
    }
    else if ( push ) {
      this.setState( {
        lastResult: "A push!  Keep playing. ",
        needsNewDeck: nextCardIdx === 5
      } );
    }
    else {
      this.setState( {
        lastResult: "Aww, that was incorrect",
        gameOver: true
      } );
    }

    nextCard.visible = true;
    this.setState( {
      activeCard: nextCard
    } );
  }

  render() {

    if ( this.state.loading ) {
      return <h4>Loading, please wait.</h4>;
    }

    let leaveButton;
    if ( this.state.gameOver || this.state.needsNewDeck ) {
      leaveButton = <Button style={{ width: "100%" }} variant={"danger"} onClick={() => this.props.endGame( this.state.score )}>End Game</Button>;
    }

    let newDeckButton;
    if ( this.state.needsNewDeck ) {
      newDeckButton = <Button style={{ width: "100%" }} variant={"primary"} onClick={() => this.getNewDeck()}>New Deck</Button>;
    }

    let disableButtons = this.state.gameOver || this.state.needsNewDeck;

    return (

      <div>

        <h4>Lets Play Card Sharks</h4>

        <Row>
          {this.state.cards.map( ( card, i ) => {
            return ( <Col key={i} sm={2}>
              <Card card={card} />
            </Col>
            );
          } )}
        </Row>

        <Row className="mt-3">
          <Col sm={2}>
            <strong>Current Card</strong>
            <Card card={this.state.activeCard} />
          </Col>

          <Col sm={4}>

            <strong>Higher or Lower?</strong>
            <br></br>

            <Button style={{ width: "50%" }} variant="primary" disabled={disableButtons} onClick={() => this.guess( "higher" )}>Higher</Button> <br></br>
            <Button style={{ width: "50%" }} variant="warning" disabled={disableButtons} onClick={() => this.guess( "lower" )}>Lower</Button>

          </Col>
          <Col sm={2}>
            Current Score: {this.state.score}
          </Col>
          <Col sm={2}>
            Last Card: {this.state.lastResult}
            {leaveButton} <br></br>
            {newDeckButton}
          </Col>
        </Row>
      </div >
    );
  }

}

export default GameBoard;
This component is presented while the player is playing. It shows their board, which displays 6 cards—either face up or face down depending on how far through the game the player is. Additionally, there is a display that shows the player their current card and provides controls for guessing higher or lower.
If the user guesses incorrectly, they are presented with the option to leave this screen, bringing them to the GameOver component. If the user successfully completes all 5 cards, they are presented with the option to continue playing or to end the game. In both options, the guess buttons should be disabled.
This is also the first time you’ll be using the Amazon APIs directly in your application. Use the fetch method to call deck\get. Once the results are returned, you can change the state from loading: true to loading: false.
Implement the React.js Pages
Let’s focus on the Pages folder now; we’re going to connect everything together.
First, implement Home.jsx.
import React from "react";
import { Link } from "react-router-dom";

import Header from "../Components/Header";
import { Container, Row, Col, Card } from "react-bootstrap";

const Home = () => {

  return (
    <Container>

      <Header></Header>

      <Row>
        <Col sm={12} className="text-center">
          <h3>Card Sharks!</h3>
          <h4>A React Demo using Okta</h4>
        </Col>
      </Row>

      <br></br>

      <Row >
        <Col sm={12} className="text-center">
          <Card style={{ width: "21.5em", margin: "0 auto" }}>
            <Card.Header>
              Already have an Okta Account?
            </Card.Header>
            <Card.Body>
              <Link to='/Game'>Play Now</Link>
            </Card.Body>
          </Card>
        </Col>
      </Row>

    </Container>
  );
};
export default Home;
This is a simple introduction page. It uses the Header component you wrote earlier and just tells the user a little about the application.
Next, you can implement the Login page.
import React from "react";
import { Redirect } from "react-router-dom";
import LoginForm from "../Components/LoginForm";
import { useOktaAuth } from "@okta/okta-react";
import { Container } from "react-bootstrap";
import Header from "../Components/Header";

const Login = ( { baseUrl, issuer } ) => {
  const { authState } = useOktaAuth();

  if ( authState.isPending ) {
    return <div>Loading...</div>;
  }
  return authState.isAuthenticated ?
    <Redirect to={{ pathname: "/" }} /> :

    <Container>
      <Header></Header>
      <br></br>
      <h4>Please Login with your Okta Account</h4>
      <LoginForm baseUrl={baseUrl} issuer={issuer} />
    </Container>;
};

export default Login;
Again, this is a straight-forward page that presents the LoginForm to the user and checks the authState. If the user is already logged in you will redirect them to the home page. If they are not, you will allow the user to use the LoginForm.
Lastly, the Game page.
import React, { Component } from "react";

import GameHome from "../Components/GameHome";
import GameBoard from "../Components/GameBoard";
import GameOver from "../Components/GameOver";

import Header from "../Components/Header";

import { Container } from "react-bootstrap";
import { withOktaAuth } from "@okta/okta-react";

class Game extends Component {

  constructor( props, context ) {
    super( props, context );

    this.state = {
      gameState: "none",
      lastScore: 0,
      loading: false,
      highScores: [],
      player: ""
    };

    this.submitHighScore = this.submitHighScore.bind( this );
  }

  componentDidMount() {
    this.setState( { loading: true } );
    fetch( process.env.REACT_APP_AMAZON_API_BASE + "/highscore" )
      .then( res => res.json() )
      .then(
        ( result ) => {
          this.setState( { highScores: JSON.parse( result.body ) } );
        } )
      .then( () => this.props.authService.getUser() )
      .then( user => {
        this.setState( { loading: false, player: user.email } );
      } );
  }

  submitHighScore() {

    fetch( process.env.REACT_APP_AMAZON_API_BASE + "/highscore",
      {
        headers: {
          "Accept": "application/json",
          "Content-Type": "application/json"
        },
        method: "POST",
        body: JSON.stringify( { player: this.state.player, score: this.state.lastScore } )
      } )
      .then( function ( res ) {
        //display message however you wish
      } );
  }

  newGameClick() {
    this.gameBoardLoaded();
  }

  gameBoardLoaded() {
    this.setState( { gameState: "playing" } );
  }

  endGame( score ) {
    this.setState( { gameState: "finished", lastScore: score } );
  }

  render() {

    let content;

    if ( this.state.loading ) {
      content = <h3>Loading, please wait</h3>;
    }
    if ( this.state.gameState === "none" ) {
      content = <GameHome newGameClick={this.newGameClick} highScores={this.state.highScores} >  </GameHome>;
    }
    else if ( this.state.gameState === "loading" ) {
      content = <div>Please wait while we load your deck...</div>;
    }
    else if ( this.state.gameState === "playing" ) {
      content = <GameBoard loaded={this.gameBoardLoaded} endGame={this.endGame}></GameBoard>;
    }
    else if ( this.state.gameState === "finished" ) {
      content = <GameOver score={this.state.lastScore} playAgain={this.newGameClick} submitHighScore={this.submitHighScore}></GameOver>;
    }

    return (
      <div>
        <Container>
          <Header></Header>
          <br></br>
          {content}
        </Container>
      </div>
    );
  }
}
export default withOktaAuth( Game );
This page takes your game components from earlier and manages the state of the player. It will also display the proper components based on the game state and contains functions that receive or post high scores to your Amazon API. These functions can be called by any of your components.
Finally, you need to update your App.js file in the src folder to properly start the application and display the AppWithRouterAccess component.
import React from "react";
import { BrowserRouter as Router } from "react-router-dom";
import AppWithRouterAccess from "./AppWithRouterAccess";
import "bootstrap/dist/css/bootstrap.min.css";

const App = () => {
  return (
    <Router>
      <AppWithRouterAccess/>
    </Router>
  );
};

export default App;
Test Your Node.js React Application
With all your pages set up, type npm run start in your terminal. You’ll be presented with your home page and the opportunity to start a new game or log in to Okta. Click on New Game and you will be asked to log in using your Okta account. Log in and give the game a shot!
If you need to compare any code to the original, you can grab the source code for this example on GitHub.
More AWS Lambda, Node.js, and React.js Resources
If you are interested in learning more about React.js, Node.js, or Serverless, check out some of these other great posts!
- Okta’s React Guide
- Build a Basic CRUD App with Node and React
- Build Reusable React Components
- AWS Lambda vs Azure Functions for C# Serverless
Want to be notified when we publish more of these? Follow @oktadev on Twitter, subscribe to our YouTube channel, or follow us on LinkedIn. If you have a question, please leave a comment below!
Okta Developer Blog Comment Policy
We welcome relevant and respectful comments. Off-topic comments may be removed.