Web Forms Migration to Blazor in .NET Core
ASP.NET Web Forms framework has been the cornerstone technology of .Net for web development since the release of .Net Framework in 2002. ASP.NET Web Forms includes a layer of abstraction for developers so that you don’t need to care about HTML, JavaScript, or any other front-end technology. It provides a development flow similar to building desktop apps, a way for developers to build a web page by drag and drop, an event-driven programming model, and stateful controls thanks to the built-in state management. These features incurred lots of complexity, but it was worthwhile when web development was still in its infancy.
Web development has evolved a lot in recent years. Browsers have become more powerful and implement various standards that allow access to users’ devices. Client-side frameworks such as React and Angular simplify client-side development and have become increasingly popular. These frameworks and other benefits are available only if you can write the front-end JavaScript code.
Maintaining the back end and front end in two different languages comes with a cost. There isn’t much code reuse, tools and frameworks are different, and it’s challenging to keep up with constantly evolving technologies.
Note: In May 2025, the Okta Integrator Free Plan replaced Okta Developer Edition Accounts, and the Okta CLI was deprecated.
We preserved this post for reference, but the instructions no longer work exactly as written. Replace the Okta CLI commands by manually configuring Okta following the instructions in our Developer Documentation.
Introduction to Blazor
WebAssembly and Blazor come into play to address the challenge of managing front-end and back-end development effectively. WebAssembly is a new open standard of byte code for the Web that runs in every modern browser. Blazor is a C# based client-side UI framework that runs directly in the browser via WebAssembly. It can also run on the server-side and process user interaction over a real-time connection with the browser.
Blazor and ASP.NET Web Forms have a lot in common: They are both component-oriented, event-driven, and provide a stateful programming model. If you are an ASP.NET Web Forms developer, Blazor will feel familiar.
In this article, I will describe how to migrate a simple ASP.NET Web Forms project to Blazor.
To continue, you will need:
- A basic knowledge of C#
- Visual Studio 2019 or Visual Studio Code
- .NET Core SDK
- An Okta Developer Account (free forever, to handle your OAuth needs)
Overview of the Web Forms Project
The project that I will migrate is a simple web app where I can track my daily intake of calories and calories burned by exercise. The project looks like this:

The Web Forms markup and underlying code looks like this:
<asp:Content ID="BodyContent" ContentPlaceHolderID="MainContent" runat="server">

<div class="row">
 <div class="col-md-12">
   <h1>Daily consumed and burned calories</h1>
   <br/>
   Showing data for:
   <asp:TextBox runat="server" TextMode="Date" Text='<%# DateTime.Today.ToString("yyyy-MM-dd") %>' ID="dateTextBox"></asp:TextBox>
   <asp:Button runat="server" Text="Show" OnCommand="ShowData"/>
   <br />
   <br />

   <asp:GridView runat="server" ItemType="CaloriesTracker.WebForms.Data.CalorieDiary" DataKeyNames="Id" CssClass="myGridClass"
     AutoGenerateColumns="False" ID="diaryGridView" OnRowDeleting="DiaryDeleting" BorderWidth="0">
     <EmptyDataRowStyle CssClass="empty" />
     <EmptyDataTemplate>
       <h2>No records found for <asp:Label runat="server" Text='<%# dateTextBox.Text %>'></asp:Label></h2>
     </EmptyDataTemplate>
     <Columns>
       <asp:TemplateField HeaderText="Description">
         <ItemStyle Width="300px" HorizontalAlign="Left" />
         <HeaderStyle HorizontalAlign="Center" />
         <ItemTemplate>
           <asp:Label ID="descriptionLabel" runat="server"
             Text='<%# Item.Exercise?.Name ?? Item.Food?.Name %>'></asp:Label>
         </ItemTemplate>
       </asp:TemplateField>
       <asp:TemplateField HeaderText="Calories">
         <ItemStyle Width="100px" HorizontalAlign="Center" />
         <HeaderStyle HorizontalAlign="Center" />
         <ItemTemplate>
           <asp:Label ID="CaloriesLabel" runat="server"
             Text='<%# -Item.Exercise?.Calories ?? Item.Food?.Calories %>'></asp:Label>
         </ItemTemplate>
       </asp:TemplateField>
       <asp:CommandField ShowDeleteButton="True">
         <ItemStyle Width="100px" HorizontalAlign="Center"></ItemStyle>
       </asp:CommandField>
     </Columns>
   </asp:GridView>

   <h3>Total Consumed: <asp:Label runat="server" ID="totalConsumedLabel" ></asp:Label> Total Burned: <asp:Label runat="server" ID="totalBurnedLabel" ></asp:Label></h3>
 </div>
  </div>

  <div class="row">
 <div class="col-md-6">
   <h2>Add Food</h2>
   Select Food:
   <asp:DropDownList runat="server" ID="foodDropDown" ItemType="CaloriesTracker.WebForms.Data.Food"
     DataValueField="Id" DataTextField="Name" AppendDataBoundItems="True">
     <Items>
       <asp:ListItem Selected="True" Value="-1" Text=""></asp:ListItem>
     </Items>
   </asp:DropDownList>
   <asp:Button runat="server" Text="Add" OnCommand="AddFoodClicked" />
 </div>
 <div class="col-md-6">
   <h2>Add Exercise</h2>
   Select Exercise:
   <asp:DropDownList runat="server" ID="exerciseDropDown" ItemType="CaloriesTracker.WebForms.Data.Exercise"
     DataValueField="Id" DataTextField="Name" AppendDataBoundItems="True">
     <Items>
       <asp:ListItem Selected="True" Value="-1" Text=""></asp:ListItem>
     </Items>
   </asp:DropDownList>
   <asp:Button runat="server" Text="Add" OnCommand="AddExerciseClicked" />
 </div>
</div>

</asp:Content>
public partial class _Default : Page
{
    private CaloriesTrackerService service = new CaloriesTrackerService();

    protected void Page_Load(object sender, EventArgs e)
    {
        if (!IsPostBack)
        {
            foodDropDown.DataSource = service.GetFood();
            exerciseDropDown.DataSource = service.GetExercises();

            DisplayDiary();

            Page.DataBind();
        }
    }

    protected void ShowData(object sender, CommandEventArgs e)
    {
        DisplayDiary();
    }

    private void DisplayDiary()
    {
        var date = string.IsNullOrEmpty(dateTextBox.Text) ? DateTime.Today : DateTime.Parse(dateTextBox.Text);

        var list = service.GetDailyList(date);
        diaryGridView.DataSource = list;

        var totalConsumed = list.Sum(d => d.Food?.Calories);
        var totalBurned = list.Sum(d => d.Exercise?.Calories);

        totalConsumedLabel.Text = totalConsumed.ToString();
        totalBurnedLabel.Text = totalBurned.ToString();

        diaryGridView.DataBind();
    }

    protected void AddFoodClicked(object sender, CommandEventArgs e)
    {
        var date = string.IsNullOrEmpty(dateTextBox.Text) ? DateTime.Today : DateTime.Parse(dateTextBox.Text);

        service.AddFood(int.Parse(foodDropDown.SelectedValue), date);

        DisplayDiary();
    }

    protected void AddExerciseClicked(object sender, CommandEventArgs e)
    {
        var date = string.IsNullOrEmpty(dateTextBox.Text) ? DateTime.Today : DateTime.Parse(dateTextBox.Text);

        service.AddExercise(int.Parse(exerciseDropDown.SelectedValue), date);

        DisplayDiary();
    }

    protected void DiaryDeleting(object sender, GridViewDeleteEventArgs e)
    {
        var id = (int) e.Keys[0];

        service.DeleteRecord(id);

        DisplayDiary();
    }
}
CaloriesTrackerService is a class that manages data access using Entity Framework Core and SQLite for data storage:
public class CaloriesTrackerService
{
    public List<Food> GetFood()
    {
        using (var caloriesContext = new CaloriesContext())
        {
            return caloriesContext.Food.ToList();
        }
    }

    public List<Exercise> GetExercises()
    {
        using (var caloriesContext = new CaloriesContext())
        {
            return caloriesContext.Exercises.ToList();
        }
    }

    public void AddFood(int foodId, DateTime date)
    {
        using (var caloriesContext = new CaloriesContext())
        {
            caloriesContext.CalorieDiaries.Add(new CalorieDiary()
            {
                AddedAt = date,
                FoodId = foodId
            });

            caloriesContext.SaveChanges();
        }
    }

    public void AddExercise(int exerciseId, DateTime date)
    {
        using (var caloriesContext = new CaloriesContext())
        {
            caloriesContext.CalorieDiaries.Add(new CalorieDiary
            {
                AddedAt = date,
                ExerciseId = exerciseId
            });

            caloriesContext.SaveChanges();
        }
    }

    public void DeleteRecord(int id)
    {
        using (var caloriesContext = new CaloriesContext())
        {
            caloriesContext.CalorieDiaries.Remove(new CalorieDiary { Id = id });
            caloriesContext.SaveChanges();
        }
    }

    public List<CalorieDiary> GetDailyList(DateTime date)
    {
        using (var caloriesContext = new CaloriesContext())
        {
            var list = caloriesContext.CalorieDiaries.Where(diary => diary.AddedAt == date)
                .Include(d => d.Food).Include(d => d.Exercise)
                .OrderByDescending(diary => diary.Id).ToList();
            return list;
        }
    }
}

public class CaloriesContext : DbContext
{
    public DbSet<Food> Food { get; set; }
    public DbSet<Exercise> Exercises { get; set; }
    public DbSet<CalorieDiary> CalorieDiaries { get; set; }

    protected override void OnConfiguring(DbContextOptionsBuilder options)
    => options.UseSqlite("Data Source=CaloriesTracker.db");

    protected override void OnModelCreating(ModelBuilder modelBuilder)
    {
        //None
    }
}

public class CalorieDiary
{
    public int Id { get; set; }
    public DateTime AddedAt { get; set; }

    public int? FoodId { get; set; }
    public Food Food { get; set; }

    public int? ExerciseId { get; set; }
    public Exercise Exercise { get; set; }
}

public class Food
{
    public int Id { get; set; }
    public string Name { get; set; }
    public int Calories { get; set; }
}

public class Exercise
{
    public int Id { get; set; }
    public string Name { get; set; }
    public int Calories { get; set; }
}
Now, let’s migrate the project to Blazor. First, I will create a new Blazor project.
Create a Blazor Project
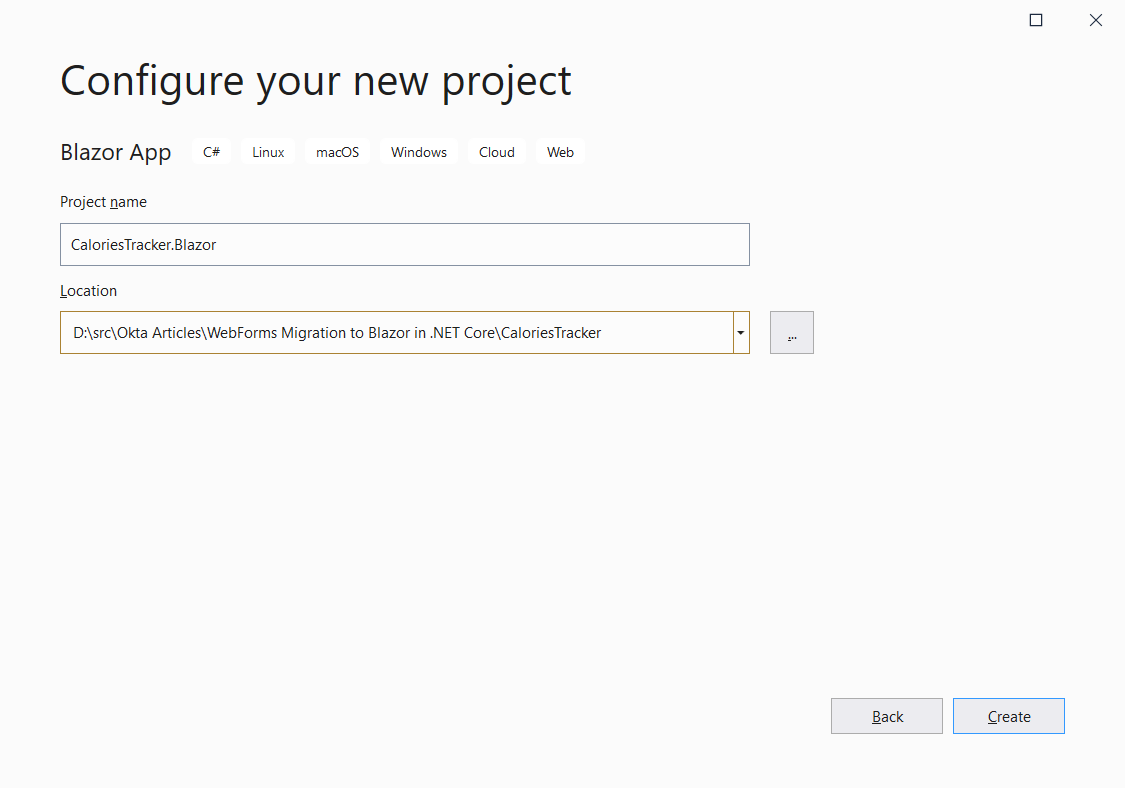
Fire up Visual Studio, create a new project by clicking File>New Project, select Blazor App, and click Next. Name the app CaloriesTracker.Blazor and click Create.
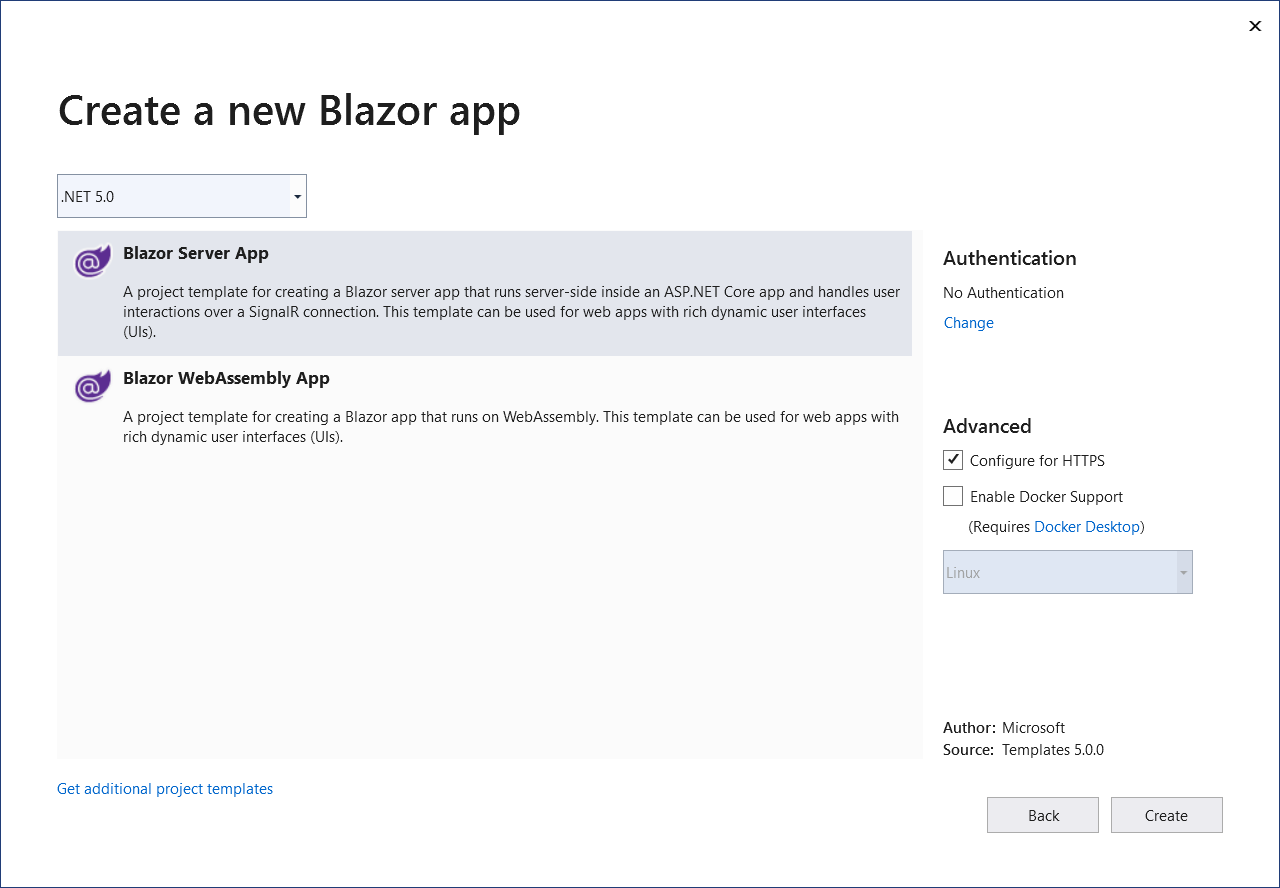
In the next window, select Blazor Server App. Now, click Create, and Visual Studio will create a new server-side Blazor project.
Alternatively, you can create the project by running the following command in a command shell:
dotnet new blazorserver -o CaloriesTracker.Blazor
Blazor Server hosts Razor components on the server in an ASP.NET Core app and handles UI updates over a SignalR connection. The Blazor runtime sends events from browser to server and applies UI updates to the components that the server sends back. This strategy is similar to the approach used by the ASP.NET AJAX UpdatePanel control that handles partial page updates in response to trigger events. The main difference is that Blazor Server maintains an active connection to the server, and all the UI state stays on the server instead of ViewState.
Let’s see what you get when you create a new project:
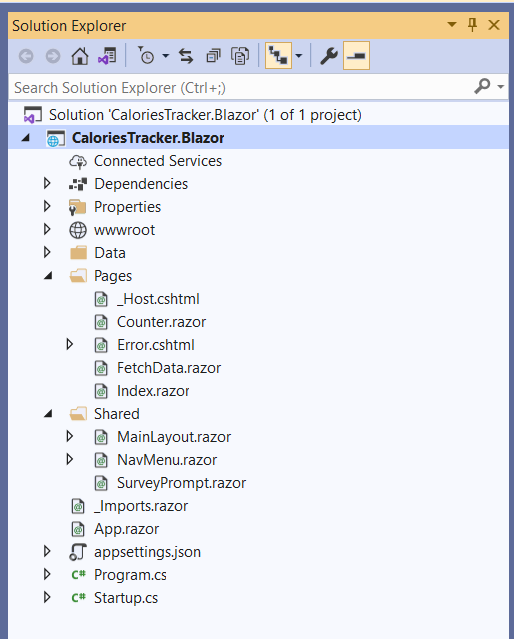
Since the Blazor Server is hosted in the ASP.NET Core project, Startup.cs and Program.cs serve the same purpose. Specifically, Startup.cs configures services and the app’s request pipeline. The Pages folder contains _Host.cshtml, which hosts the Blazor app. The razor files in the Pages folder are the Blazor pages that comprise the app. Similarly, the Shared folder contains shared layouts such as the app’s main layout and reusable components such as the navigation menu. You can think of MainLayout.razor as a Site.Master file in the WebForms project and NavMenu.razor as some ascx component.
Click F5 in Visual Studio or run dotnet run to run the project. You should see:
NewProject Run
Next, I will migrate Entity Framework Core configuration and CaloriesTrackerService to the Blazor project.
Migrate Entity Framework Core to Blazor
Migrating non-UI-related code is pretty straightforward. I will use SQLite in the Blazor project, too, so first, add the necessary package to the project:
dotnet add package Microsoft.EntityFrameworkCore.Design
dotnet add package Microsoft.EntityFrameworkCore.Sqlite
Now, copy the Model.cs file from the WebForms project to the Data folder in the Blazor project. Next, I need to create an initial migration and apply the migration, so I will run:
dotnet ef database update
dotnet ef migrations add InitialCreate
This code creates CaloriesTracker.db database in the root of the folder.
Finally, copy CaloriesTrackerService.cs to the Data folder as well. The code works without making any changes to it, but I will go ahead and use C# 8.0 syntax to save a couple of lines:
public class CaloriesTrackerService
{
    public List<Food> GetFood()
    {
        using var caloriesContext = new CaloriesContext();
        return caloriesContext.Food.ToList();
    }

    public List<Exercise> GetExercises()
    {
        using var caloriesContext = new CaloriesContext();
        return caloriesContext.Exercises.ToList();
    }

    public void AddFood(int foodId, DateTime date)
    {
        using var caloriesContext = new CaloriesContext();

        caloriesContext.CalorieDiaries.Add(new CalorieDiary()
        {
            AddedAt = date,
            FoodId = foodId
        });

        caloriesContext.SaveChanges();
    }

    public void AddExercise(int exerciseId, DateTime date)
    {
        using var caloriesContext = new CaloriesContext();

        caloriesContext.CalorieDiaries.Add(new CalorieDiary
        {
            AddedAt = date,
            ExerciseId = exerciseId
        });

        caloriesContext.SaveChanges();
    }

    public void DeleteRecord(int id)
    {
        using var caloriesContext = new CaloriesContext();
        caloriesContext.CalorieDiaries.Remove(new CalorieDiary { Id = id });
        caloriesContext.SaveChanges();
    }

    public List<CalorieDiary> GetDailyList(DateTime date)
    {
        using var caloriesContext = new CaloriesContext();
        var list = caloriesContext.CalorieDiaries.Where(diary => diary.AddedAt == date)
                        .Include(d => d.Food).Include(d => d.Exercise)
                        .OrderByDescending(diary => diary.Id).ToList();

    return list;
    }
Finally, I will register CaloriesTrackerService with the DI in Startup.cs. In the ConfigureServices method add the following line:
services.AddSingleton<CaloriesTrackerService>();
Now you are ready to migrate the UI portion of the project to Blazor.
Migrate Web Forms Markup to Blazor
First, right-click on the Pages folder, click Add, select Razor Component and call it CaloriesTracking. You can also create the page by running:
dotnet new razorcomponent -n CaloriesTracking -o Pages
The top section of the page will contain the markup for this page, and the @code section contains the code that handles events of various components on the page.
Now, add a @page directive at the top of the component, set URL to caloriestracking, and inject an instance of CaloriesTrackerService:
@page "/caloriestracking"
@using CaloriesTracker.Blazor.Data
@inject CaloriesTrackerService CaloriesTrackerService
Next, add the CaloriesTracking component to the menu in NavMenu component:
<div class="@NavMenuCssClass" @onclick="ToggleNavMenu">
  <ul class="nav flex-column">
    <li class="nav-item px-3">
    <NavLink class="nav-link" href="" Match="NavLinkMatch.All">
        <span class="oi oi-home" aria-hidden="true"></span> Home
    </NavLink>
    </li>
    <li class="nav-item px-3">
    <NavLink class="nav-link" href="caloriestracking">
        <span class="oi oi-plus" aria-hidden="true"></span> Calories Tracker
    </NavLink>
    </li>
  </ul>
</div>
Run dotnet watch run in a command shell and navigate to the page by clicking on Calories Tracker in the navigation menu. Leave the app running, and every time you save a file, the app rebuilds, and the browser reloads the page.
Go back to the CaloriesTracking.razor file and add the following markup:
@if (!initialized)
{
  <p><em>Loading...</em></p>
}
else
{
  <div class="row">
    <div class="col-md-6">
    <h2>Add Food</h2>

    <EditForm Model="addItemModel" OnValidSubmit="@HandleAddFoodValidSubmit">
        Select Food:
        <InputSelect @bind-Value="addItemModel.FoodId" style="width: 150px">
        @foreach (var value in food)
            {
            <option value="@value.Id">@value.Name</option>
            }
        </InputSelect>
        <button type="submit" class="btn btn-secondary">Add</button>
    </EditForm>
    </div>
    <div class="col-md-6">
    <h2>Add Exercise</h2>

    <EditForm Model="addItemModel" OnValidSubmit="@HandleAddExerciseValidSubmit">
        Select Food:
        <InputSelect @bind-Value="addItemModel.ExerciseId" style="width: 150px">
        @foreach (var value in exercises)
            {
            <option value="@value.Id">@value.Name</option>
            }
        </InputSelect>
        <button type="submit" class="btn btn-secondary">Add</button>
    </EditForm>
    </div>
  </div>
}
In the code section, add the following code:
private bool initialized = false;

private List<Food> food;
private List<Exercise> exercises;

AddItemModel addItemModel = new AddItemModel();

protected override void OnInitialized()
{
    food = CaloriesTrackerService.GetFood();
    exercises = CaloriesTrackerService.GetExercises();

    initialized = true;
}

private void HandleAddFoodValidSubmit()
{
    CaloriesTrackerService.AddFood(addItemModel.FoodId, DateTime.Today);
    dailyList = CaloriesTrackerService.GetDailyList(DateTime.Today);
    addItemModel.FoodId = -1;
}

private void HandleAddExerciseValidSubmit()
{
    CaloriesTrackerService.AddExercise(addItemModel.ExerciseId, DateTime.Today);
    dailyList = CaloriesTrackerService.GetDailyList(DateTime.Today);
    addItemModel.ExerciseId = -1;
}

class AddItemModel
{
    public int FoodId { get; set; }
    public int ExerciseId { get; set; }
}
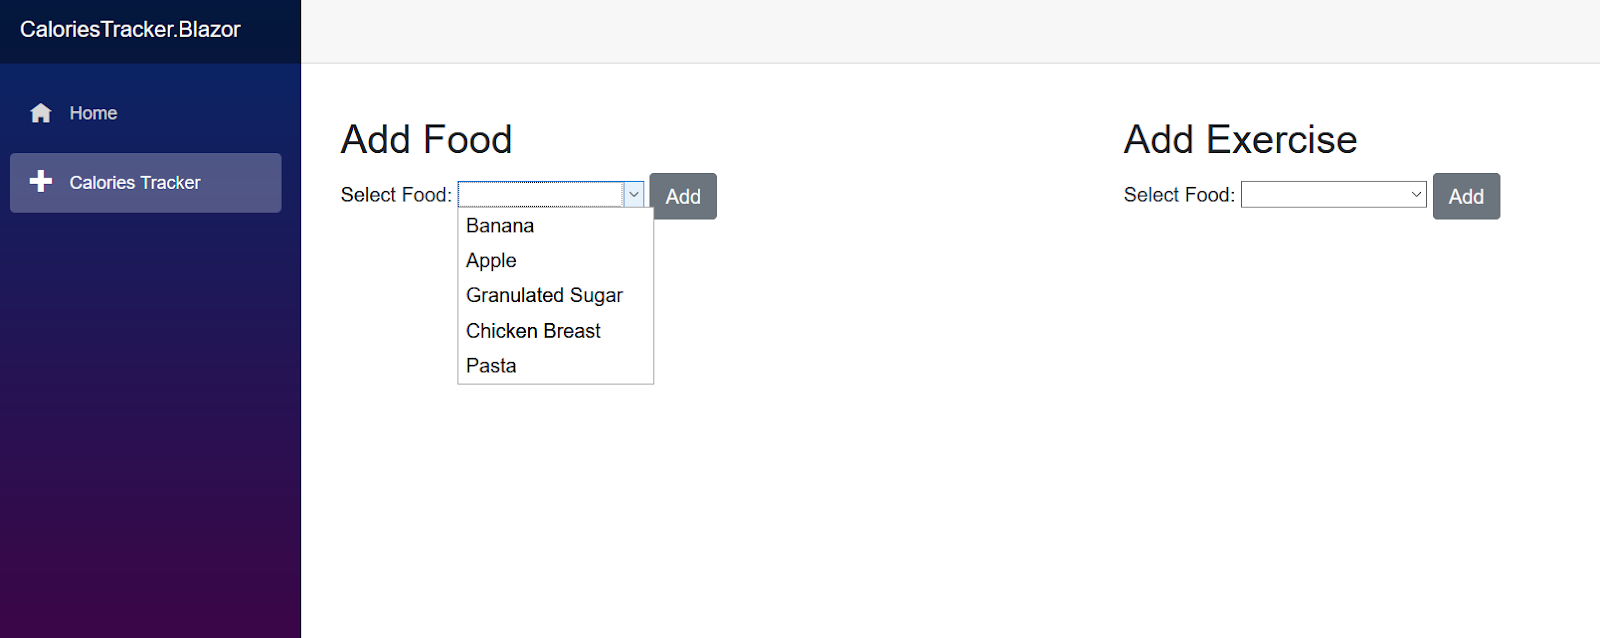
Let’s go through the markup and the code. First, check if the data has been loaded. If data hasn’t loaded, display a Loading text in the browser.
Once the list of foods and exercises loads, the markup renders two forms: a food intake form and an exercise form. Both forms display a select element that shows items from a list of foods or exercises. The select value is bound to either the addItemModel.FoodId or the addItemModel.ExerciseId property using the bind-Value attribute. Both forms are bound to the addItemModel model, and when the form is submitted, it will invoke either the HandleAddFoodValidSubmit or the HandleAddExerciseValidSubmit method.
The OnInitialized method runs when the component initializes, and I use it to load data for the food and exercise elements. If you need to perform asynchronous initialization, override the OnInitializedAsync method instead. After the data is loaded, and initialized is set to true, Blazor will re-render the component. The HandleAddFoodValidSubmit and HandleAddExerciseValidSubmit methods handle the form submission and saving of the selected food or exercise items to the database. Switch to the browser, and you should see the two select boxes:
Finally, let’s add a grid to show the records from the database and switch between different dates. Add the following markup at the start of the else code block:
<div class="row">
  <div class="col-md-12">
    <h1>Daily consumed and burned calories</h1>
    <br />

    <EditForm Model="@changeDateModel" OnValidSubmit="@FilterByDate">
    Showing data for:
    <InputDate @bind-Value="changeDateModel.FilterDate" />
    <button type="submit" class="btn btn-primary">Show</button>
    </EditForm>

    <br />
    <br />

    @if (dailyList.Count != 0)
    {
    <table class="table">
        <thead>
        <tr>
            <td>Description</td>
            <td>Calories</td>
            <td></td>
        </tr>
        </thead>
        <tbody>
        @foreach (var item in dailyList)
        {
            <tr>
            <td>@(item.Exercise?.Name ?? item.Food.Name)</td>
            <td>@(-item.Exercise?.Calories ?? item.Food.Calories)</td>
            <td><button @onclick="@(e => DeleteRecord(item.Id))" class="btn btn-danger">Delete</button></td>
            </tr>
        }
        </tbody>
    </table>
    <h3>Total Consumed: @dailyList.Sum(d => d.Food?.Calories) Total Burned: @dailyList.Sum(d => d.Exercise?.Calories)</h3>
    }
    else
    {
        <h3>No Records Found</h3>
    }
    </div>
</div>
The EditForm shows input for selecting a date, and the grid renders the records returned from the database. Just like the other forms, it is bound to changeDateModel.FilterDate, and the FilterByDate method loads data from the database:
private void FilterByDate()
{
    dailyList = CaloriesTrackerService.GetDailyList(changeDateModel.FilterDate);
}
When you click the Delete button in the grid, the DeleteRecord method will receive the ID of the record that you want to delete:
private void DeleteRecord(int id)
{
    CaloriesTrackerService.DeleteRecord(id);
    dailyList = CaloriesTrackerService.GetDailyList(changeDateModel.FilterDate);
}
The final code for the CaloriesTracking component looks like this:
private bool initialized = false;

private List<Food> food;
private List<Exercise> exercises;
private List<CalorieDiary> dailyList;

AddItemModel addItemModel = new AddItemModel();
ChangeDateModel changeDateModel = new ChangeDateModel { FilterDate = DateTime.Today };

protected override void OnInitialized()
{
    food = CaloriesTrackerService.GetFood();
    exercises = CaloriesTrackerService.GetExercises();
    dailyList = CaloriesTrackerService.GetDailyList(changeDateModel.FilterDate);

    initialized = true;
}

private void DeleteRecord(int id)
{
    CaloriesTrackerService.DeleteRecord(id);
    dailyList = CaloriesTrackerService.GetDailyList(changeDateModel.FilterDate);
}

private void FilterByDate()
{
    dailyList = CaloriesTrackerService.GetDailyList(changeDateModel.FilterDate);
}

private void HandleAddFoodValidSubmit()
{
    CaloriesTrackerService.AddFood(addItemModel.FoodId, changeDateModel.FilterDate);
    dailyList = CaloriesTrackerService.GetDailyList(changeDateModel.FilterDate);
    addItemModel.FoodId = -1;
}

private void HandleAddExerciseValidSubmit()
{
    CaloriesTrackerService.AddExercise(addItemModel.ExerciseId, changeDateModel.FilterDate);
    dailyList = CaloriesTrackerService.GetDailyList(changeDateModel.FilterDate);
    addItemModel.ExerciseId = -1;
}

class AddItemModel
{
    public int FoodId { get; set; }
    public int ExerciseId { get; set; }
}

class ChangeDateModel
{
    public DateTime FilterDate { get; set; }
}
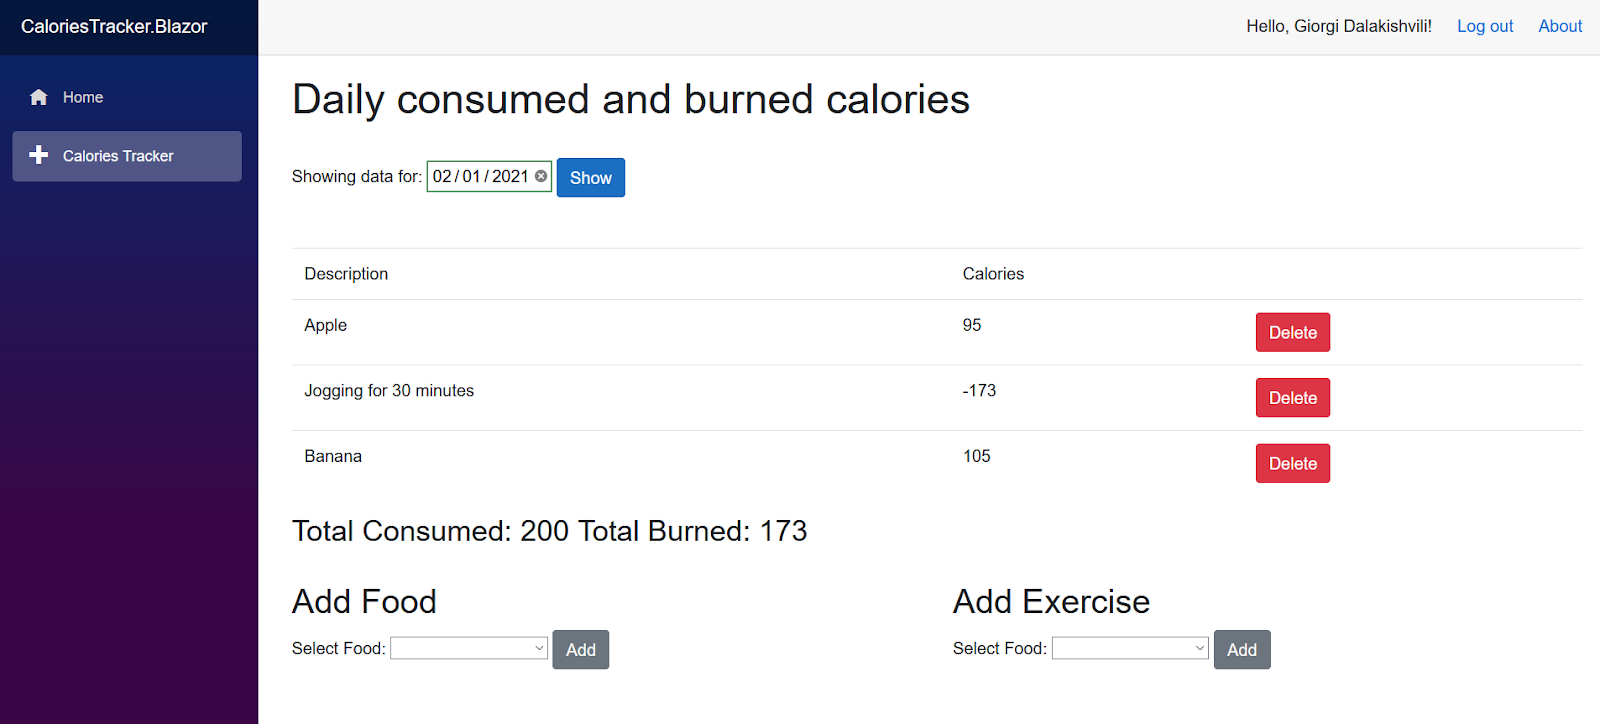
Go back to the browser, and you should be able to track your calories:

Now that I have finished migrating the code from WebForms to Blazor, I will secure the app so that no one except me knows how much sweets I eat 😃.
Securing Your Blazor Application
In this tutorial, I will use Okta to quickly secure the API in order not to have to roll my own identity provider and deal with all the tricky details. Okta supports user authentication, multi-factor authentication, social authentication, and all OpenID Connect flows out of the box. These features take care of all the scenarios you might ever need.
I will use Okta CLI to manage my Okta account and register a new application for this project.
Run okta start if you don’t have an Okta account, or run okta login if you already have one.
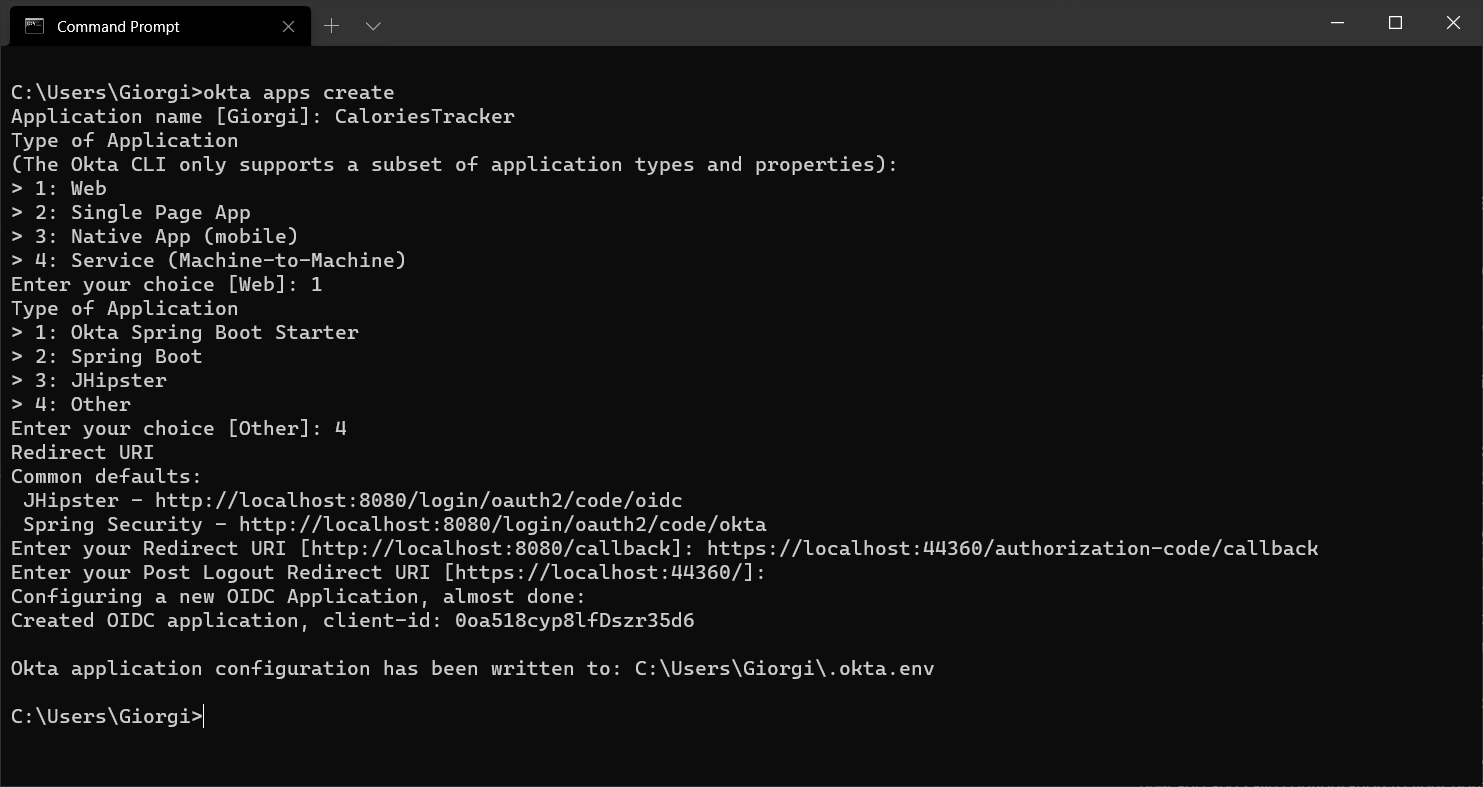
Once you configure Okta CLI with your account, run okta apps create to create a new Okta application. I will use CaloriesTracker again as the name of the app.
On the Type of Application step, enter 1 to select Web, and on the next step, enter 4 for Other.
I will use https://localhost:44360/authorization-code/callback and accept the suggested URL for Post Logout Redirect URI for the redirect URI. When you hit enter, the Okta CLI creates a new app and saves the configuration to your home directory in .okta.env file:
Next, go back to Visual Studio and add Okta.AspNetCore package:
dotnet add package Okta.AspNetCore
Next, open the appsettings.Development.json file, add a new section Okta below the Logging section, and put in your app’s details. Copy clientId and clientSecret from the .okta.env:
{
  "Logging": {
    "LogLevel": {
    "Default": "Information",
    "Microsoft": "Warning",
    "Microsoft.Hosting.Lifetime": "Information"
    }
  },
  "Okta": {
    "ClientId": "{clientId}",
    "ClientSecret": "{clientSecret}",
    "Domain": "https://{yourOktaDomain}"
  }
}
Now, go the Startup class and add this code in ConfigureServices method:
services.AddAuthentication(options =>
{
    options.DefaultAuthenticateScheme = CookieAuthenticationDefaults.AuthenticationScheme;
    options.DefaultSignInScheme = CookieAuthenticationDefaults.AuthenticationScheme;
    options.DefaultChallengeScheme = OktaDefaults.MvcAuthenticationScheme;
})
.AddCookie()
.AddOktaMvc(new OktaMvcOptions
{
    OktaDomain = Configuration["Okta:Domain"],
    ClientId = Configuration["Okta:ClientId"],
    ClientSecret = Configuration["Okta:ClientSecret"]
});
Also, add the following line to the Configure() method after the app.UseRouting(); line:
app.UseAuthentication();
Next, let’s create login and logout pages. As Blazor uses SignalR for the client and server-side communication and Okta uses the OpenID protocol that relies on HTTP, you need to perform authentication outside of the Blazor app.
To solve this issue, I will create two Razor pages for these endpoints. Run the following commands in a command shell:
dotnet new page -n Login -na CaloriesTracker.Blazor.Pages -o Pages
dotnet new page -n Logout -na CaloriesTracker.Blazor.Pages -o Pages
This code will create Login.cshtml and Logout.cshtml pages in the project’s Pages folder.
Open the Login.cshtml.cs and change the OnGet method like this:
public async Task OnGet(string redirectUri)
{
    await HttpContext.ChallengeAsync(OktaDefaults.MvcAuthenticationScheme, new AuthenticationProperties
    {
        RedirectUri = redirectUri
    });
}
The HttpContext.ChallengeAsync method starts the authentication process with Okta based on the configuration I did in the Startup class.
Similarly, replace the OnGet method in Logout.cshtml.cs with this:
public async Task OnGet()
{
    await HttpContext.SignOutAsync(OktaDefaults.MvcAuthenticationScheme, new AuthenticationProperties { RedirectUri = "/" });
    await HttpContext.SignOutAsync(CookieAuthenticationDefaults.AuthenticationScheme);
}
This code ends the Okta session and signs out the user.
Now, let’s plug these pages into the Blazor app.
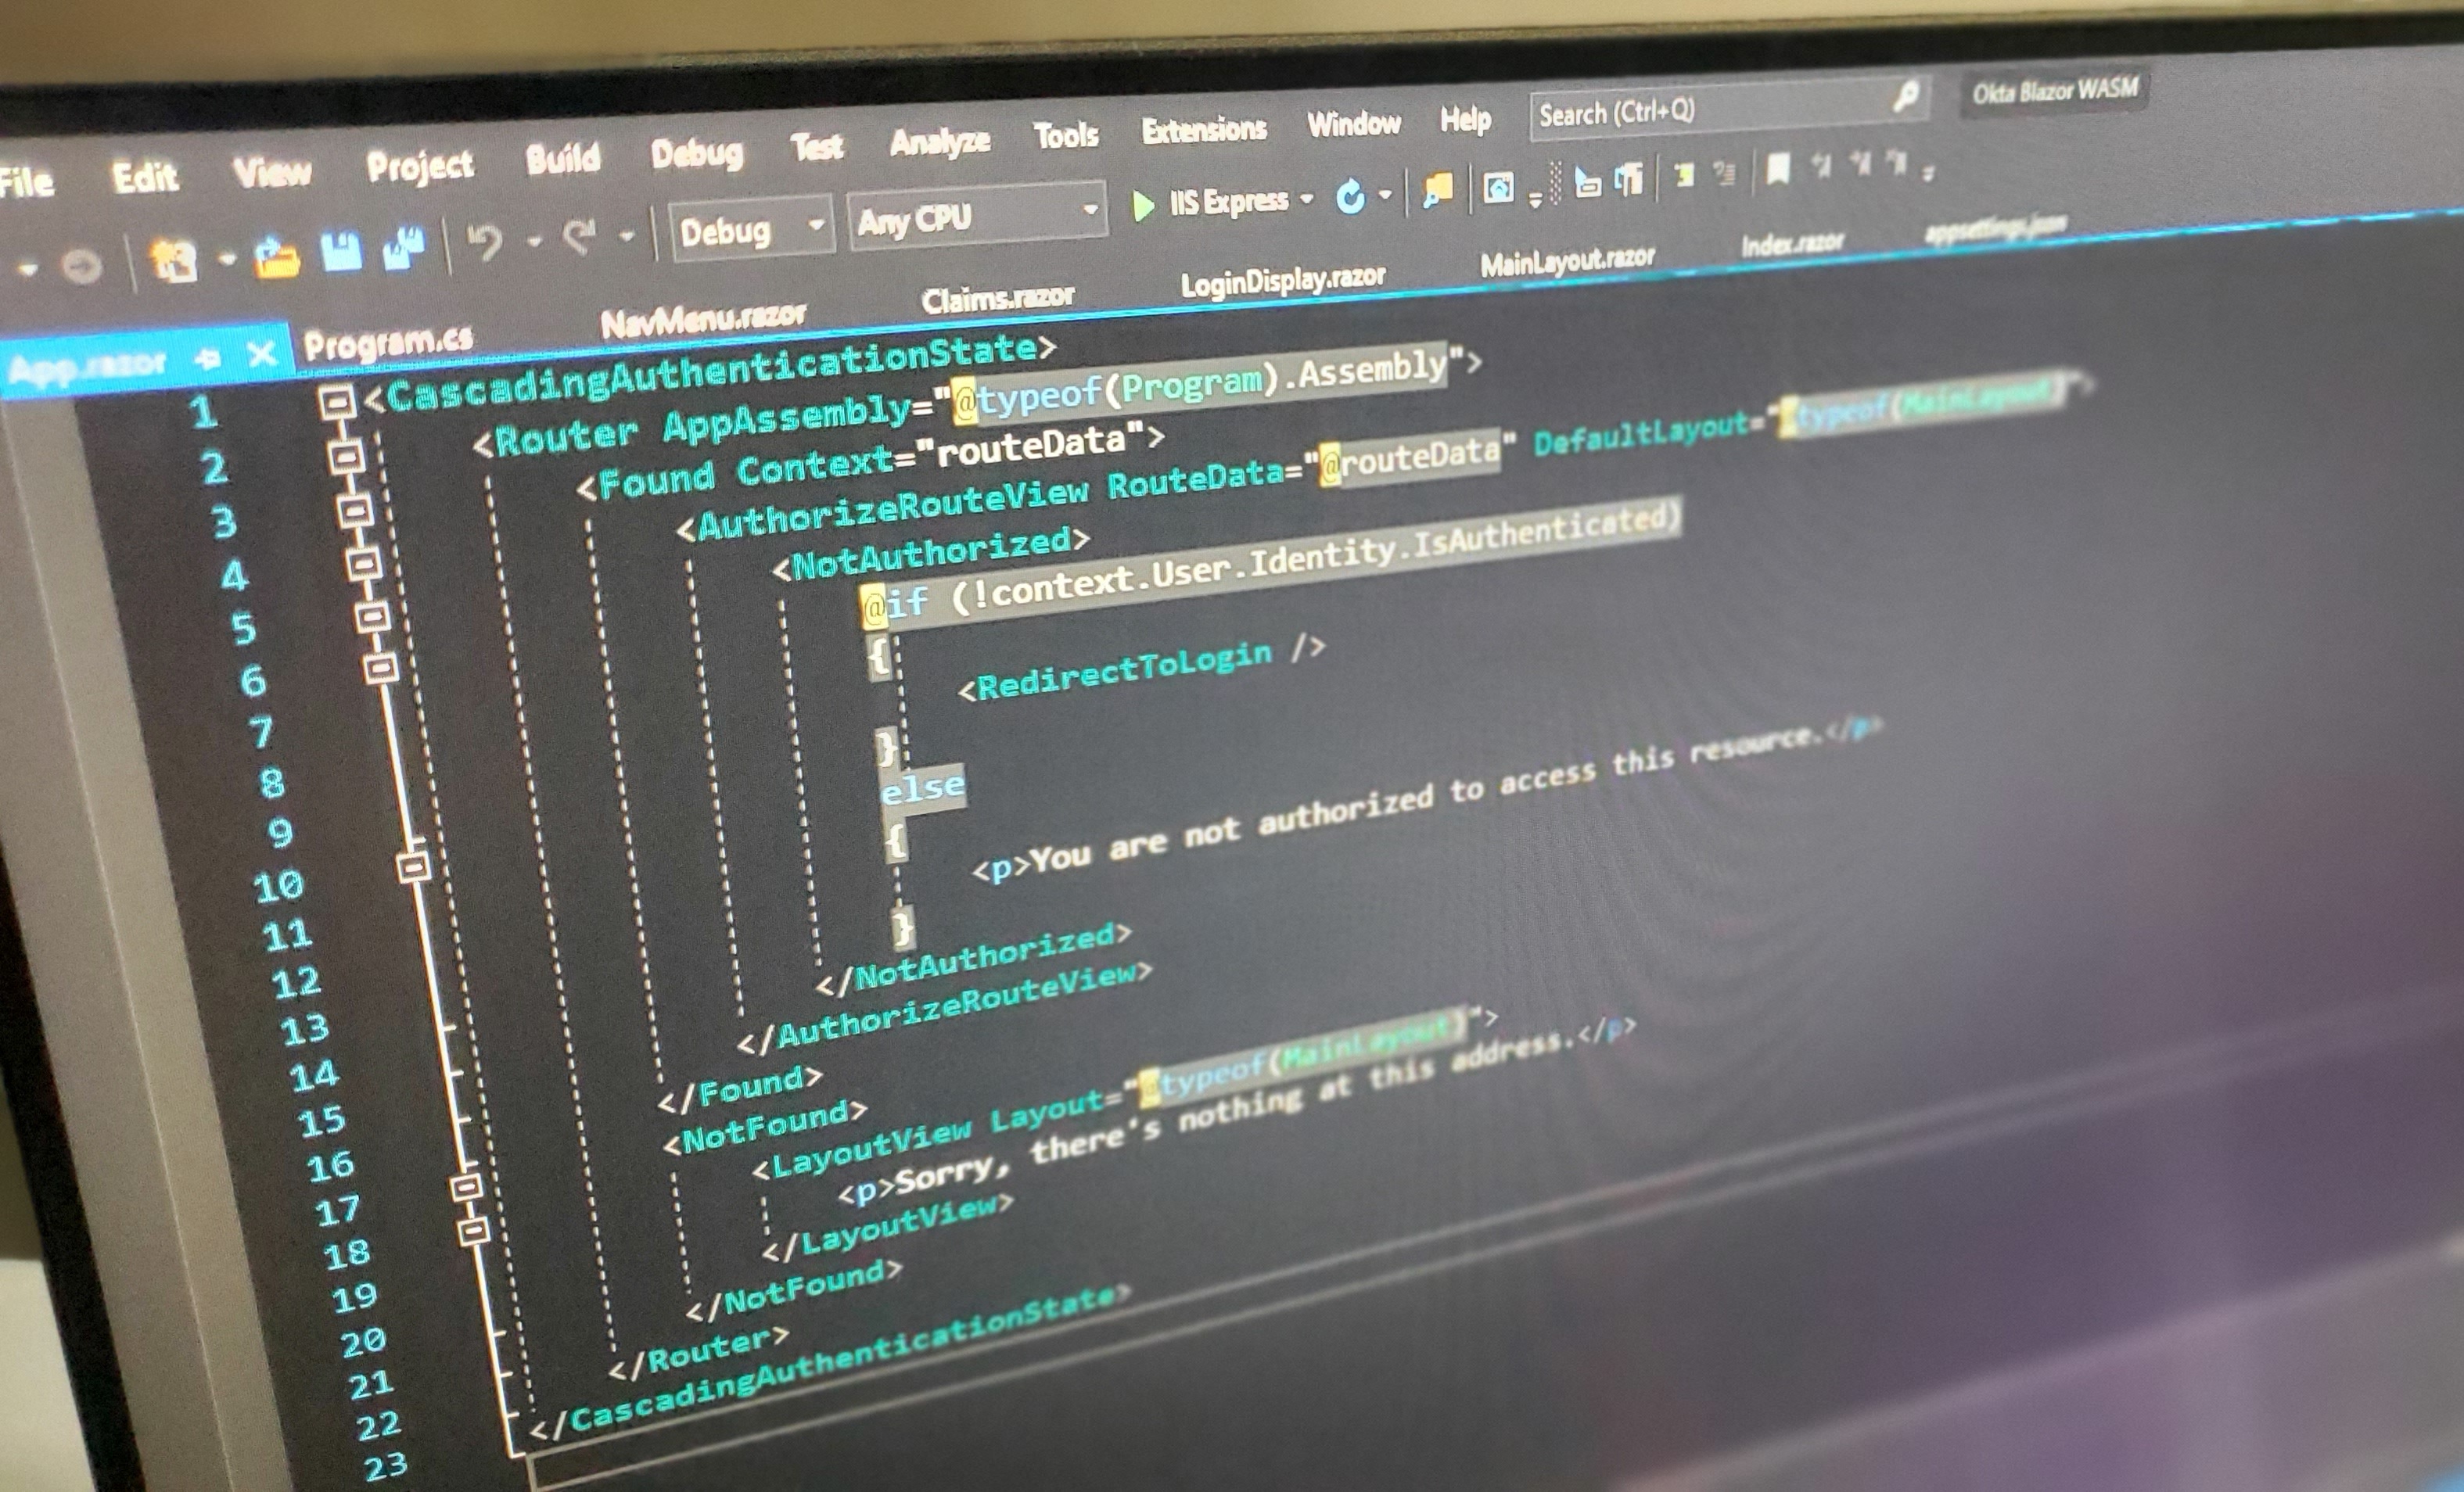
Open the App.razor file and replace it’s content with this:
<Router AppAssembly="@typeof(Program).Assembly">
    <Found Context="routeData">
        <AuthorizeRouteView RouteData="@routeData" DefaultLayout="@typeof(MainLayout)">
        <Authorizing>
            <p>Authorizing please wait...</p>
        </Authorizing>
        <NotAuthorized>
            <h1>Sorry</h1>
            <p>You're not authorized to see this page. You need to log in.</p>
        </NotAuthorized>
        </AuthorizeRouteView>
    </Found>
    <NotFound>
        <p>Sorry, there's nothing at this address.</p>
    </NotFound>
</Router>
The AuthorizeRouteView component ensures that you can see only the pages that the user is authorized to visit.
After this, open the CaloriesTracking.razor component and add @attribute [Authorize] at the top of the code so that only authorized users can view it.
Finally, you need a way to authenticate users. I will create a new component, AccountControl in the Shared folder and add in the following code:
@inject NavigationManager NavigationManager

<AuthorizeView>
    <Authorized>
        <span>Hello, @context.User.Identity.Name!</span>
        <a href="logout">Log out</a>
    </Authorized>
    <NotAuthorized>
        <a href="login?redirectUri=@(NavigationManager.Uri)">Log in</a>
    </NotAuthorized>
</AuthorizeView>
The AuthorizeView view will either display a Log out link for the user or a Log in link for authentication. The AuthorizeView component exposes a context variable, which I use to get the information about the logged-in user.
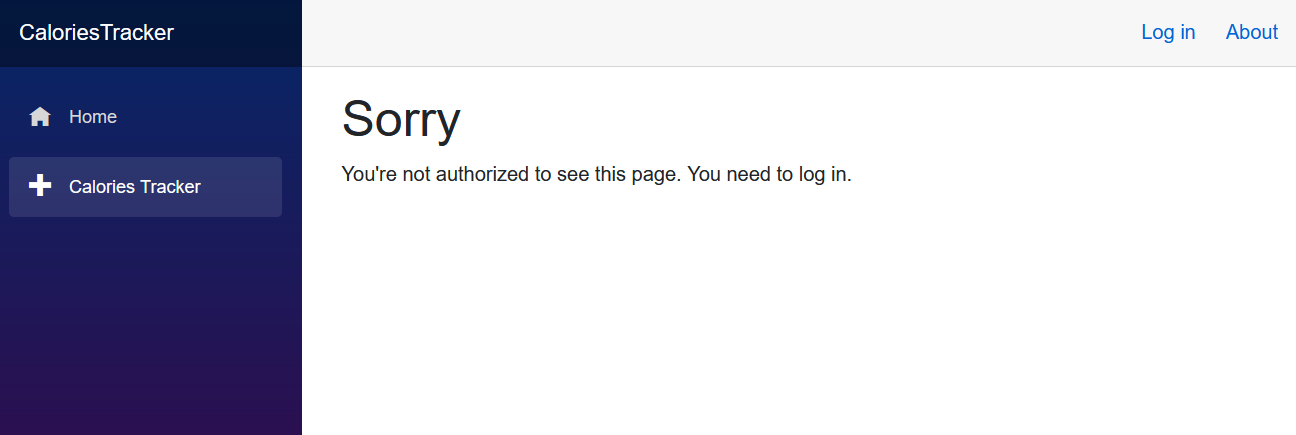
Put the component in the MainLayout.razor file above the About link and run the app. When you click the Calories Tracker you will see a message that you don’t have access to this page:
Click the Log in link, and the app will redirect you to Okta for authentication. When you log in, Okta sends you back to the app, where you’ll be able to access the page that only authenticated users can see:
That’s it! You have now finished migrating a WebForms project to Blazor and secured it with Okta.
Give Blazor a try. Get the complete source code of the project from GitHub, and let us know what you think in the comments below.
- Goodbye Javascript! Build an Authenticated Web App in C# with Blazor + ASP.NET Core 3.0
- How to Build Securely with Blazor WebAssembly (WASM)
- ASP.NET Core 3.0 MVC Secure Authentication
Make sure to follow us on Twitter, subscribe to our YouTube Channel, and check out our new Twitch live stream so that you never miss any awesome content!
Okta Developer Blog Comment Policy
We welcome relevant and respectful comments. Off-topic comments may be removed.