Goodbye Javascript! Build an Authenticated Web App in C# with Blazor + ASP.NET Core 3.0

Curious what the experience would be like to trade in Javascript for C# on the front end? You are about to find out!
For many years, Javascript (and it’s child frameworks) have had their run of the DOM (Document Object Model) in a browser, and it took having that scripting knowledge to really manipulate client-side UI. About 2 years ago, all of that changed with the introduction of Web Assembly - which allows compiled languages to be interpreted client-side and is fully supported across all browsers now. Microsoft’s answer to this was the creation of Blazor. Allowing C# developers to build their entire stack in .NET, including UI, was an exciting proposition. For some time Blazor has been in preview but is now included as a general release on September 23rd, 2019 along with the next iteration of .NET Core - version 3.0.
In order to build with Blazor and ASP.NET Core 3.0, you need the following prerequisites installed and ready to go:
- Visual Studio 2019, Visual Studio 2019 for Mac (see the comparison here) or Visual Studio Code (we will be using VS Code for the samples in this article since it runs on everything including Linux)
- .NET Core 3.0 SDK
- C# Intellisense extension (if using VS Code)
- An Okta Developer Account (free forever, to handle your OAuth needs)
Note: In May 2025, the Okta Integrator Free Plan replaced Okta Developer Edition Accounts, and the Okta CLI was deprecated.
We preserved this post for reference, but the instructions no longer work exactly as written. Replace the Okta CLI commands by manually configuring Okta following the instructions in our Developer Documentation.
Build a Basic Website with ASP.NET Core 3.0 + Blazor
Now that you have your dev environment handy, let’s get familiar with what a basic website walkthrough would be like. There are two ways you can utilize this technology: client-side or server-side Blazor. For this example, the server-side option is the best choice for stability, as client-side Blazor is still new and working on the final release. Stay tuned for that implementation!
First, you’ll need to create a Blazor project. As long as you’ve installed the .NET Core 3.0 SDK, Visual Studio (16.3 or later) will detect that the templates have been installed and surface them to you without the need for any additional extensions. Now it’s time to scaffold your new project. From your parent directory of code repositories, execute the following command:
dotnet new blazorserver -o OktaBlazorAspNetCoreServerSide
Once it’s been run, open up the OktaBlazorAspNetCoreServerSide folder in Visual Studio Code. Once loaded, if you look in the bottom right-hand corner of the IDE you will see a permission request to add assets to the build. Select Yes.

Now that everything has been loaded up, return to your command line/terminal and run the project.
dotnet run
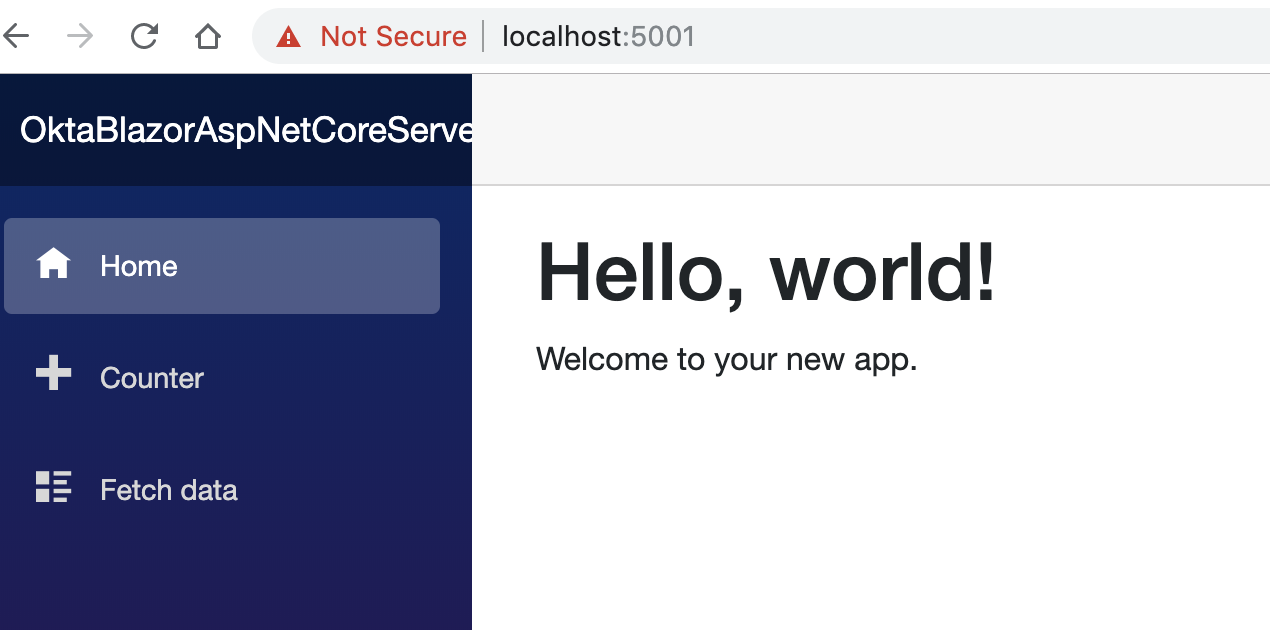
Launch your browser of choice and navigate to https://localhost:5001. You should see a templated website.
NOTE: When you see the app running initially on HTTPS you may get a certificate error. See this blog post to resolve certificates locally.
Add User Authentication your Blazor Web App
ASP.NET Core 3.0 has brought along with it some hefty changes to the libraries and dependencies from previous versions of .NET Core. To get started with using an external OAuth provider, like Okta, there is a NuGet package you need to add to the project. Fire up your command line/terminal window in VS Code and add the Okta .NET SDK:
dotnet add package Okta.Sdk --version 1.4.0
In 3.0, ASP.NET Core ships as part of the .NET Core shared framework. The metapackage that was used for 2.x apps is no longer used. The first line of your project file that references the Web SDK is what pulls in the shared assemblies for ASP.NET Core.
For user authentication with OAuth, there is an additional layer of information you will use, called Open ID Connect (OIDC). While much of handling authentication is baked into the new 3.0 framework, OIDC is not included, so you’ll need to add a quick reference to that.
dotnet add package Microsoft.AspNetCore.Authentication.OpenIdConnect --version 3.0.0-preview9.19424.4
Authentication works by redirecting users to the Okta website, where they will log in with their credentials, and then be returned to your site via the URL you will configure in the next section.
Add the following code to the very top of your appsettings.json file, inside of the first brackets, and separate it from the rest of the settings by adding a comma after it.
"Okta": {
    "Issuer": "https://okta.okta.com/oauth2/default",
    "ClientId": "{yourClientId}",
    "ClientSecret": "{yourClientSecret}"
  }
Your file should look like this:
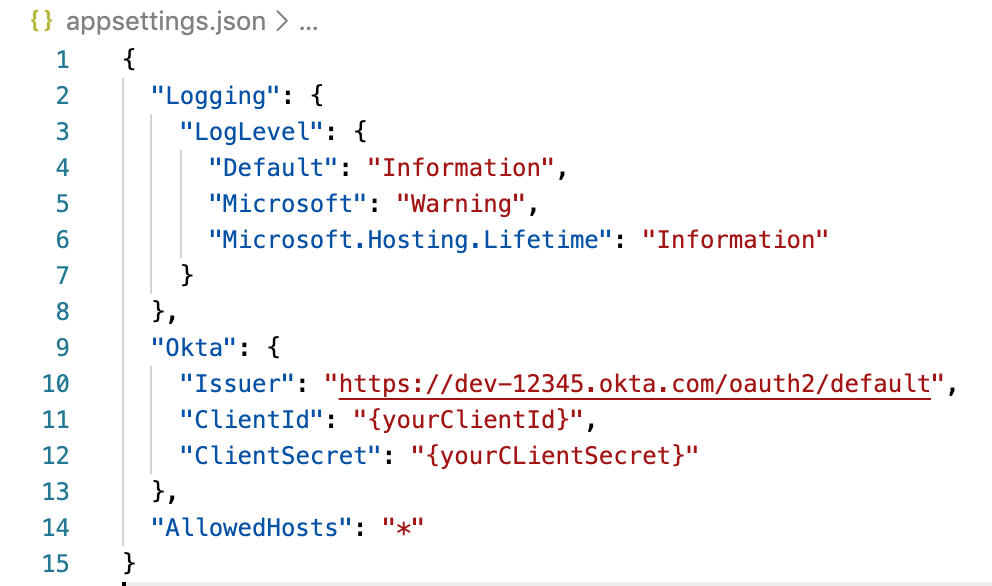
NOTE: If necessary, edit the Login redirect URL and update it to include any ports you use to call it. Otherwise you get a 400 Bad Request from Okta. See this documentation to troubleshoot.
Just to make sure everything still can run, go ahead and execute dotnet run again.
Set Up Your Okta Account to handle the ASP.NET Core 3.0 Blazor App
Execute the following steps to configure Okta so that users can register themselves for an account.
From the Administrative Dashboard, hover over Users and click Registration
Click Enable Registration
Save the changes
Once you have access to your account you can proceed to the Dashboard using a link like the one below:
https://dev-12345.okta.com/admin/dashboard
On the Dashboard, click Applications in the main menu and on the Application screen, click Add Application. Then select Web and click Next.
On the Create New Application screen, set the following values:
- Name: OktaBlazorAspNetCoreServerSide
- Base URIs:
https://localhost:5001/ - Login redirect URIs:
https://localhost:5001/authorization-code/callback
Click Done, then click Edit next to General Settings on your newly created Okta app. Edit the following values:
-Logout redirect URIs: https://localhost:5001/signout-callback-oidc
-Initiate login URI: https://localhost:5001/authorization-code/callback
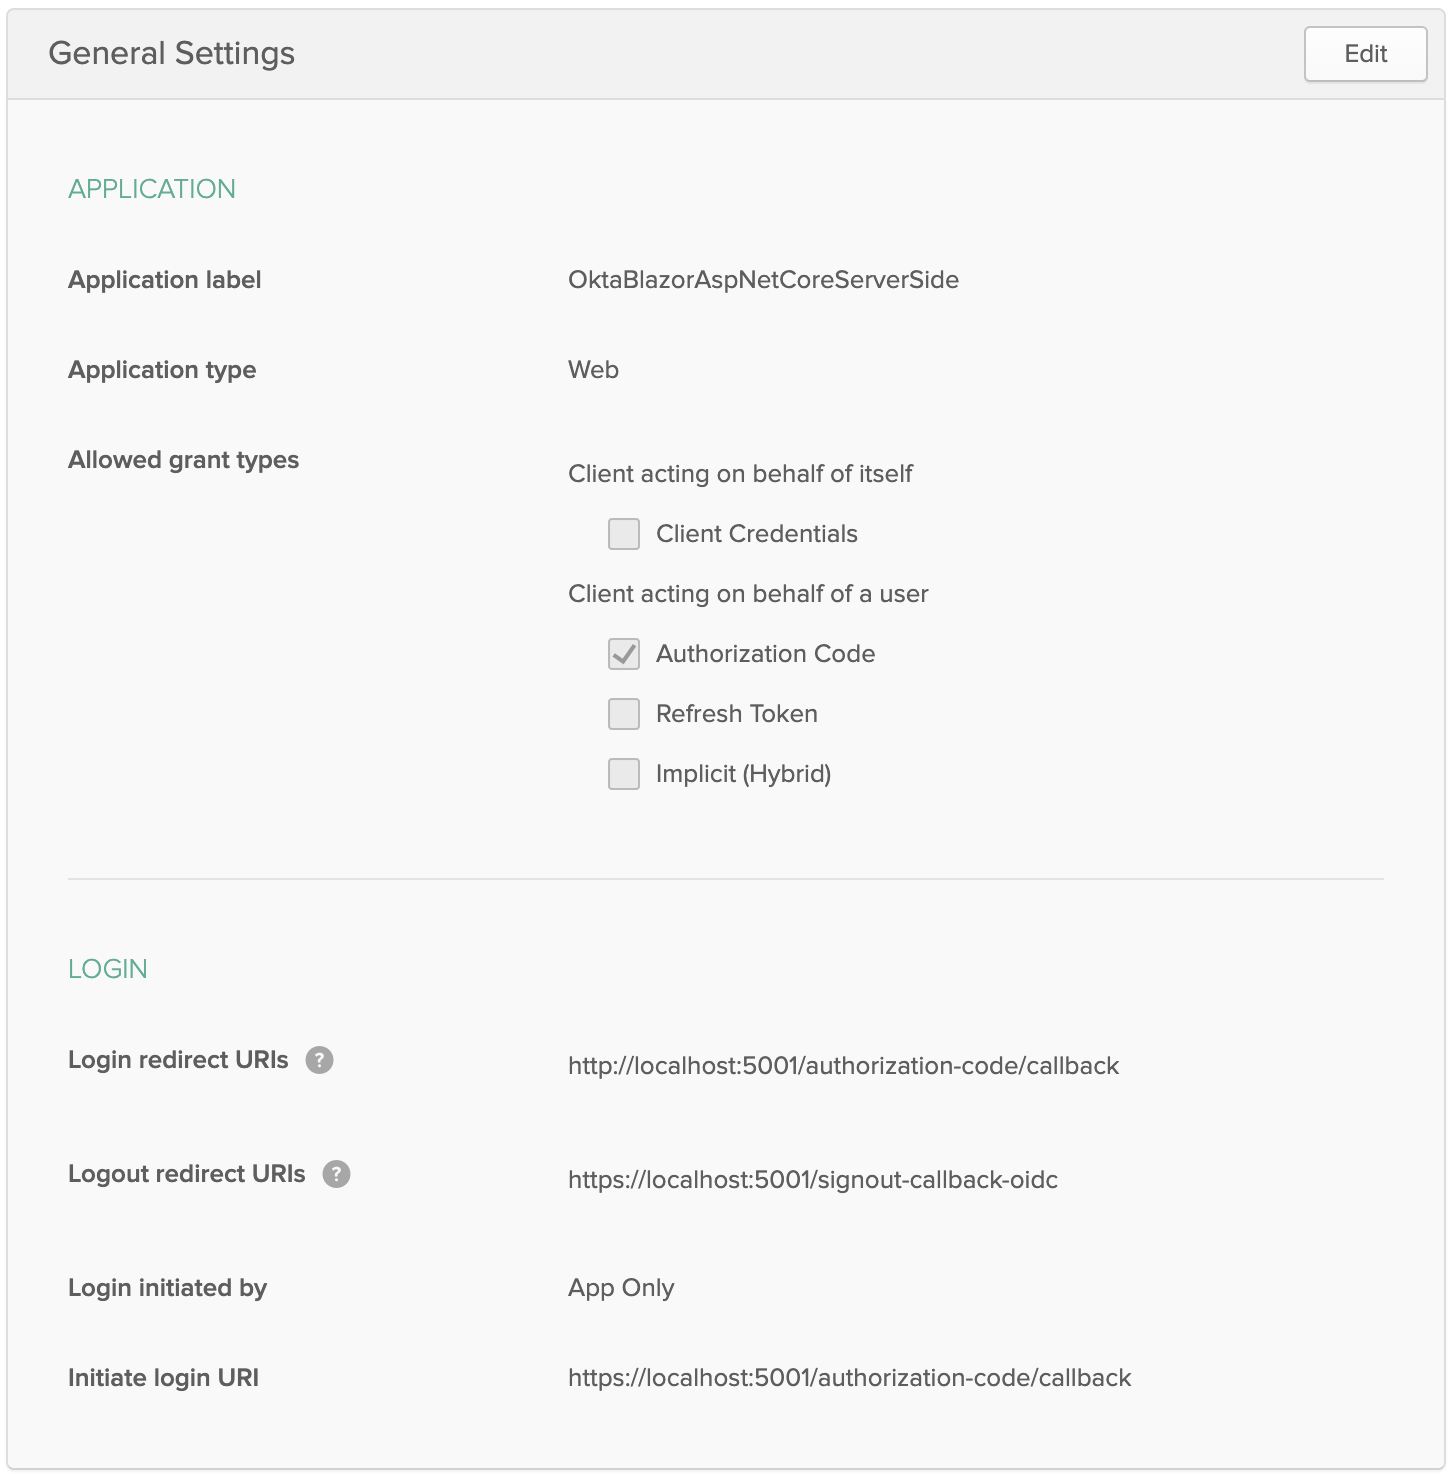
Once you’ve saved those values, scroll down and take note of the ClientID and ClientSecret.
ClientId refers to the client ID of the Okta application ClientSecret refers to the client secret of the Okta application Issuer will need the text {yourOktaDomain} replaced with your Okta domain, found at the top-right of the Dashboard page.
You will use your Okta account settings to update those values in the appsettings.json file in your project. For an even more secure way to store those values, check out this post if you are using Azure to host your .NET Core app.
Configure Your Blazor App to use Okta as the External Auth Provider
Great! Now that Okta has been configured and is ready to go, there are a few changes that need to be made to the application startup.
Add these using statements to your Startup.cs file:
using Microsoft.AspNetCore.Authentication.OpenIdConnect;
using Microsoft.AspNetCore.Authentication.Cookies;
using Microsoft.IdentityModel.Logging;
Replace all the code in the ConfigureServices method with the code below.
public void ConfigureServices(IServiceCollection services)
{
    services.AddRazorPages();
    services.AddServerSideBlazor();
    services.AddSingleton<WeatherForecastService>();

    services.AddAuthentication(sharedOptions =>
    {
        sharedOptions.DefaultAuthenticateScheme = CookieAuthenticationDefaults.AuthenticationScheme;
        sharedOptions.DefaultSignInScheme = CookieAuthenticationDefaults.AuthenticationScheme;
        sharedOptions.DefaultSignOutScheme = CookieAuthenticationDefaults.AuthenticationScheme;
        sharedOptions.DefaultChallengeScheme = OpenIdConnectDefaults.AuthenticationScheme;
    })
    .AddOpenIdConnect(options =>
    {
        options.ClientId = Configuration["Okta:ClientId"];
        options.ClientSecret = Configuration["Okta:ClientSecret"];
        options.CallbackPath = "/authorization-code/callback";
        options.Authority = Configuration["Okta:Issuer"];
        options.ResponseType = "code";
        options.SaveTokens = true;
        options.Scope.Add("openid");
        options.Scope.Add("profile");
        options.TokenValidationParameters.ValidateIssuer = false;
        options.TokenValidationParameters.NameClaimType = "name";
    })
    .AddCookie();
}
ASP.NET Core 3.0 has new options to configure the services in this file. UseAuthorization has been newly added to 3.0 project templates.
In the Configure() method of your Startup.cs file add this line just before the app.UseEndpoints() method:
//Add Auth to app
app.UseAuthentication();
app.UseAuthorization();
Inside of the app.UseEndpoints object add the MapControllers() as shown.
app.UseEndpoints(endpoints =>
{
    //Add MapControllers to app
    endpoints.MapControllers();
    endpoints.MapBlazorHub();
    endpoints.MapFallbackToPage("/_Host");
});
In this example, you’ll see there’s a new UseEndpoints method in Startup.cs. This is what enables the new endpoint routing system in ASP.NET Core. All 3.0 project templates use that now. Think of this as a more performant routing system.
NOTE: In the context of Blazor apps, endpoint routing is the more holistic way of handling redirects. This is covered here in depth. Also, see this documentation to learn more about it. Endpoint routing shipped in ASP.NET Core 2.2, but it didn’t become the default in the templates until 3.0.
Now add a new folder at the top level called Controllers to your application. Next, add a new file called LoginController.cs and paste in the following code below:
using Microsoft.AspNetCore.Authentication;
using Microsoft.AspNetCore.Mvc;
using System.Threading.Tasks;

namespace BlazorServerWithOkta.Controllers
{
    public class LoginController : Controller
    {
        [HttpGet("Login")]
        public IActionResult Login([FromQuery]string returnUrl)
        {
            if (User.Identity.IsAuthenticated)
            {
                return LocalRedirect(returnUrl ?? Url.Content("~/"));
            }

            return Challenge();
        }

        [HttpGet("Logout")]
        public async Task<IActionResult> Logout([FromQuery]string returnUrl)
        {
            if (!User.Identity.IsAuthenticated)
            {
                return LocalRedirect(returnUrl ?? Url.Content("~/"));
            }

            await HttpContext.SignOutAsync();

            return LocalRedirect(returnUrl ?? Url.Content("~/"));
        }

        [HttpPost("Logout")]
        [ValidateAntiForgeryToken]
        public IActionResult PostLogout([FromQuery]string returnUrl)
        {
            returnUrl ??= Url.Content("~/");
            returnUrl = Url.IsLocalUrl(returnUrl) ? returnUrl : Url.Content("~/");

            if (User.Identity.IsAuthenticated)
            {
                HttpContext.SignOutAsync();
            }

            return LocalRedirect(returnUrl);
        }

    }
}
This LoginController contains all of the logic we need to do the routing based on the Identity model provided by default. Since the LoginController has been registered by convention via the MapControllers() method you previously added to the Startup file, your Blazor app will know how to reach it.
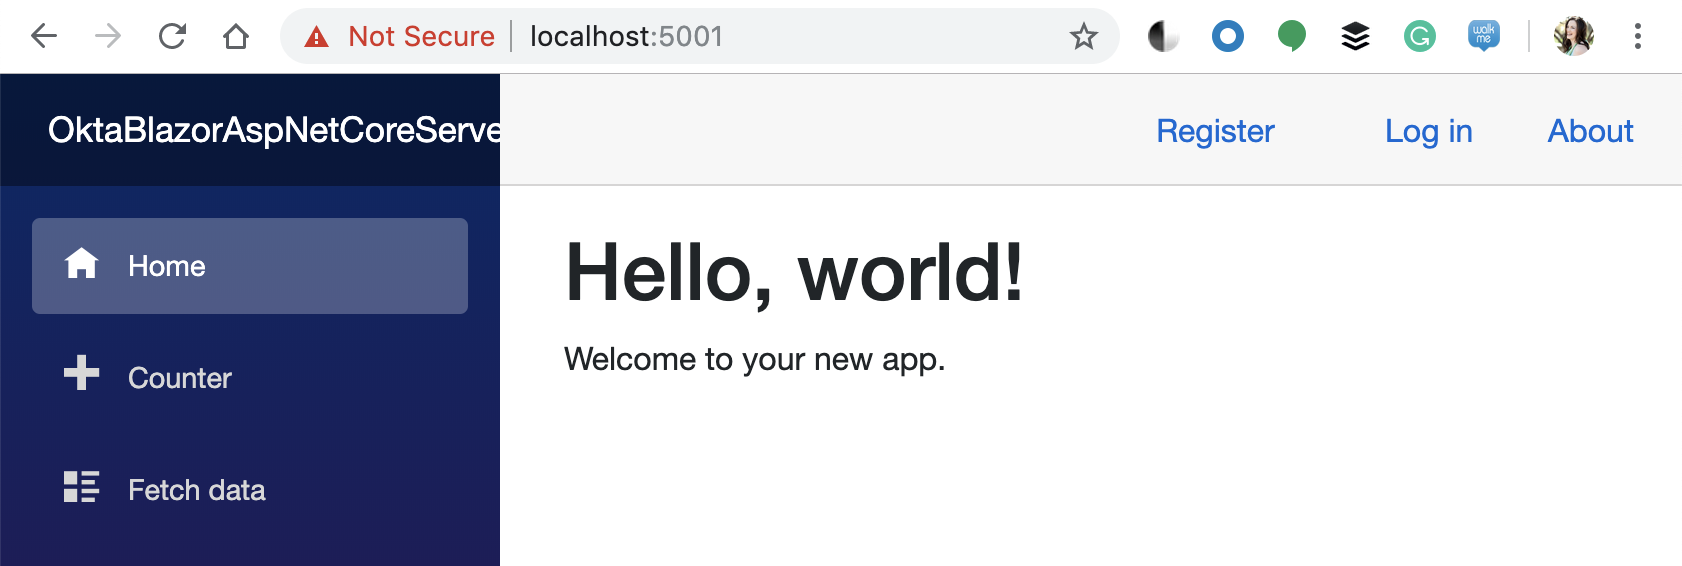
Add User Login to your Blazor Web App UI
Time to add some user personalization to this app! Go inside the Shared folder and create a new file called LoginDisplay.razor. Paste in the code below:
<AuthorizeView>
    <Authorized>
        <a href="#">Hello, @context.User.Identity.Name!</a>
        <a href="Logout">Logout</a>
    </Authorized>
    <NotAuthorized>
        <a href="Login">Log in</a>
    </NotAuthorized>
</AuthorizeView>
You’ve just created your first custom razor view! Let’s use it in the existing app now. Open Shared/MainLayout.razor and add the LoginDisplay view right before the About link as shown below:
<div class="top-row px-4">
    <LoginDisplay />
    <a href="https://docs.microsoft.com/aspnet/" target="_blank">About</a>
</div>
Using <AuthorizeView> is the easiest way to access authentication data, and is useful when you need to display a user’s name.
The <AuthorizeView> component exposes a context variable of type AuthenticationState. It’s useful to make the AccessToken returned by the identity provider available to the entire app’s scope. In order to add this state to our app, open App.razor and wrap the HTML you see with <CascadingAuthenticationState> tags at the parent level. Replace all of the HTML with the snippet below to see the completed alteration:
<CascadingValue Name="AccessToken" Value="AccessToken">
    <CascadingAuthenticationState>
        <Router AppAssembly="@typeof(Program).Assembly">
            <Found Context="routeData">
                <AuthorizeRouteView RouteData="@routeData" DefaultLayout="@typeof(MainLayout)" />
            </Found>
            <NotFound>
                <LayoutView Layout="@typeof(MainLayout)">
                    <p>Sorry, there's nothing at this address.</p>
                </LayoutView>
            </NotFound>
        </Router>
    </CascadingAuthenticationState>
</CascadingValue>
@code{
    [Parameter] public string AccessToken { get; set; }
}
Test Okta Registration and Login for Your Blazor App
That’s it! To test it out, go back to the command line/terminal and execute dotnet run.
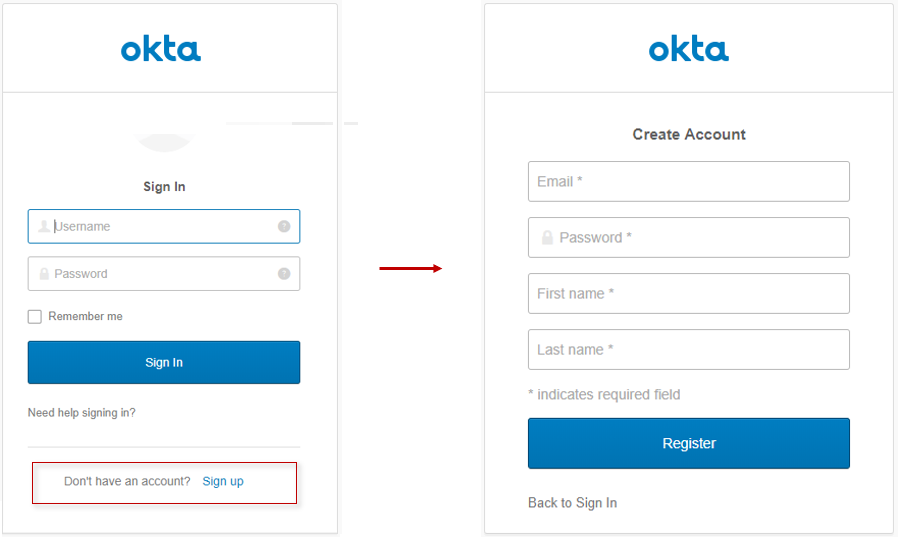
Then navigate to http://localhost:5001 in your browser. Click Login and you should be redirected to the Okta Sign-In Page.
Because you configured your Okta org for self-registration, there should be an option at the bottom of the widget to allow users to register for a new account.
Now you have a website with a working login and user registration form. Your website also allows users to recover lost passwords. By repeating these steps you can create a network of tools that your users can access all with the same login.
All of that and not one line of Javascript. The future is looking bright for C#, give it a go with Blazor!
(Updated February 21st, 2020 to reflect the new changes with Blazor in .NET Core 3.0)
Learn More about ASP.NET Core, Blazor and Authentication
Like what you learned today? Here are some other resources that will help learn more about adding secure authentication and user management in your .NET Core projects:
Okta Developer Blog Comment Policy
We welcome relevant and respectful comments. Off-topic comments may be removed.