Store ASP.NET Secrets Securely with Azure KeyVault

Nothing ruins your weekend quite as wholly as getting paged at 2 am on Saturday to tell you that there’s been a data breach at your company. In this post, I’m going to talk about how you can reduce the risk of that happening by keeping secrets out of your source code.
By following this guide, you’ll create an ASP.NET Core MVC web application that uses Okta for identity management. Rather than working through a sample that doesn’t reflect how you’d do stuff in real life; you’ll create a production-ready deployment, and you’ll see how you can leverage the Azure KeyVault to deal with secrets securely without storing them in your source code.
To work through this post, you’ll need a few things:
- Okta Developer Account
- Azure Subscription
- ASP.NET Core SDK and a suitable IDE
Note: In May 2025, the Okta Integrator Free Plan replaced Okta Developer Edition Accounts, and the Okta CLI was deprecated.
We preserved this post for reference, but the instructions no longer work exactly as written. Replace the Okta CLI commands by manually configuring Okta following the instructions in our Developer Documentation.
Create an Azure KeyVault
To get started you’ll need an Azure Subscription and a CLI session. This walkthrough was created using a bash session on Azure cloud shell. However, if you have the Azure CLI installed locally or prefer to use a PowerShell session, you should be able to run these commands with minor modifications except where noted.
Create a new resource group to contain your KeyVault:
az group create --name OKTA-NOSECRETS --location eastus
This command creates a resource group called OKTA-NOSECRETS in the US East region. Once you’ve done that, create a KeyVault:
az keyvault create -n kv-okta-nosecrets -g OKTA-NOSECRETS --location eastus
Note: Azure KeyVault names must be globally unique. This command creates a KeyVault named ‘kv-okta-nosecrets’ - it’s possible that this name will already be in use. If so, feel free to replace the KeyVault name with one of your choosing.
Configure Identity Management
First things first, let’s set up an application that will provide us with identity management using the Okta developer console. Okta is an identity access and management company that provides a whole host of software-as-service identity products.
Our API enables you to:
- Authenticate and authorize your users
- Store data about your users
- Perform password-based and social login
- Secure your application with multi-factor authentication
- And much more! Check out our product documentation for more information
Register for a forever-free developer account, and when you’re done, come back to learn more about storing secrets in Azure KeyVault.
Once you’ve signed in, select Applications from the top menu and click on the Add Application button. Choose Web and click Next.
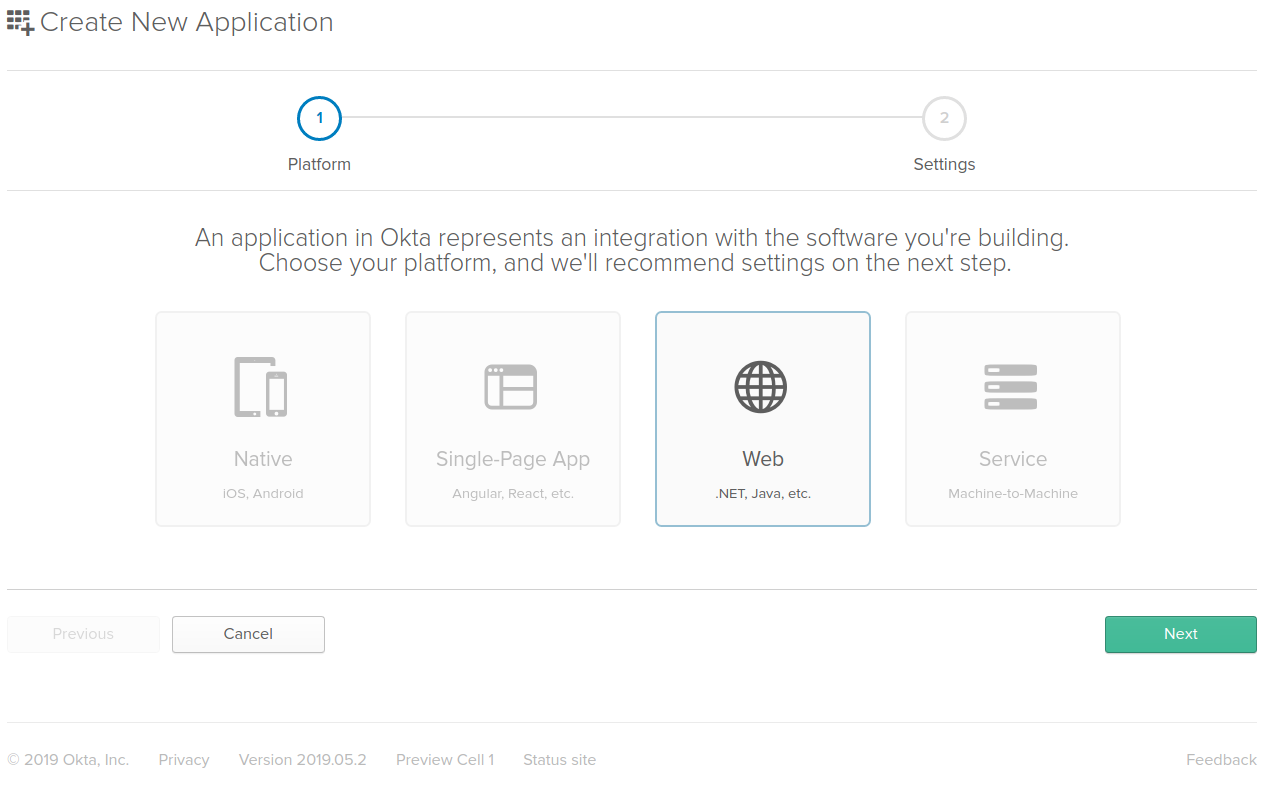
Update the application settings to match the image below.
Once you’ve created the application, click Edit to change a few settings.
- Logout redirect URIs: https://localhost:5001/signout-callback-oidc
- Initiate login URI: https://localhost:5001/authorization-code/callback

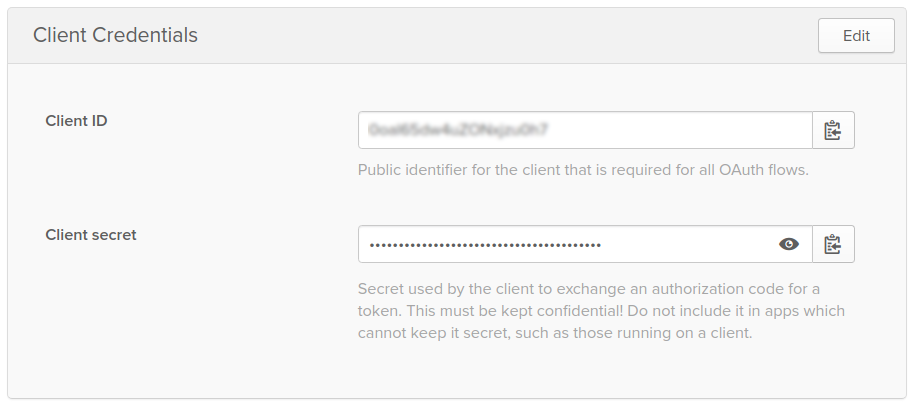
At the bottom of the page, you’ll see Client Credentials, including a ClientID and a Client secret. As the name suggests, the Client secret should be stored securely, and the remainder of this post will look at how you can do that.
Add Secrets to Azure KeyVault
With the KeyVault up and running and Identity Management configured, you can add your Client ID and Client Secret. Your ClientId and ClientSecret values are visible in the Client Credentials section when configuring identity management in the Okta dashboard as described above. Your Issuer is your Org Url as shown on the Okta dashboard with /oauth2/default as the path. For example, https://dev-######.okta.com/oauth2/default. The value for ‘vault-name’ should match the KeyVault name used above.

az keyvault secret set --vault-name kv-okta-nosecrets --name okta--ClientId --value {yourClientId}
az keyvault secret set --vault-name kv-okta-nosecrets --name okta--ClientSecret --value {yourClientSecret}
az keyvault secret set --vault-name kv-okta-nosecrets --name okta--Issuer --value {yourOktaDomain}/oauth2/default
Note: Azure KeyVault exposes secrets via a REST API. As a consequence, the secret names must be valid URL fragments. Since the ASP.NET Core hierarchical configuration system uses a colon ‘:’ as a delimiter which isn’t valid in a URL fragment, we replace it with double hyphens ‘—’ in the secret name. The ASP.NET Core configuration provider takes care of the translation automatically.
Building a Basic ASP.NET MVC Application
Now that you’ve set up your identity management system and stored your configuration in your Azure KeyVault, you can start building your app. To carry out these steps, you’ll need the ASP.NET Core SDK and an IDE. You can create a new MVC application using:
mkdir OktaNoSecrets
cd OktaNoSecrets
dotnet new MVC
Configure Authentication
With a blank template in place, you can move on to adding the nuts and bolts of application. Starting with your Startup.cs file, add some using statements at the top of the page.
using Microsoft.AspNetCore.Authentication.Cookies;
using Microsoft.AspNetCore.Authentication.OpenIdConnect;
using Microsoft.IdentityModel.Tokens;
Then in your ConfigureServices() method, add this code to hook up Okta using the ASP.NET Core OpenID Connect provider.
services.AddAuthentication(sharedOptions =>
{
  sharedOptions.DefaultAuthenticateScheme = CookieAuthenticationDefaults.AuthenticationScheme;
  sharedOptions.DefaultSignInScheme = CookieAuthenticationDefaults.AuthenticationScheme;
  sharedOptions.DefaultChallengeScheme = OpenIdConnectDefaults.AuthenticationScheme;
})
.AddCookie()
.AddOpenIdConnect(options =>
{
  options.ClientId = Configuration["okta:ClientId"];
  options.ClientSecret = Configuration["okta:ClientSecret"];
  options.Authority = Configuration["okta:Issuer"];
  options.CallbackPath = "/authorization-code/callback";
  options.ResponseType = "code";
  options.SaveTokens = true;
  options.UseTokenLifetime = false;
  options.GetClaimsFromUserInfoEndpoint = true;
  options.Scope.Add("openid");
  options.Scope.Add("profile");
  options.TokenValidationParameters = new TokenValidationParameters
  {
    NameClaimType = "name"
  };
});
With the AuthenticationService configured to use OpenIdConnect, the next step is to tell your application to use authentication. You can do that by adding app.UseAuthentication(); to the Configure() method before the call to app.UseMvc().
Add ASP.NET MVC Elements
So far so good, your application is now set up to authenticate users using Okta as the Identity Provider via OpenID Connect over OAuth2. However, it doesn’t do anything. You’ll need to add some models, views, and controllers before the fun can begin. In the Controllers folder, add a new controller called AccountController.cs with the following code:
using Microsoft.AspNetCore.Authentication.OpenIdConnect;
using Microsoft.AspNetCore.Mvc;

namespace OktaNoSecrets.Controllers
{
  public class AccountController : Controller
  {
    public IActionResult Login()
    {
      if (!HttpContext.User.Identity.IsAuthenticated)
      {
        return Challenge(OpenIdConnectDefaults.AuthenticationScheme);
      }
      return RedirectToAction("Index", "Home");
    }
  }
}
The controller is pretty simple. It provides a Login() action that returns an HTTP Challenge() response if the user hasn’t authenticated. You determine the implementation of the challenge response via the authentication configuration that you added to Startup.cs. In this application, you’re using OpenID Connect. If the user has authenticated, then the action redirects to the Index() action on the Home controller. So that you can see the authentication mechanism in action, make some changes to the default _Layout.cshtml file in the Views/Shared folder. In the header navbar add:
@if (User.Identity.IsAuthenticated)
{
  <ul class="nav navbar-nav navbar-right">
      <li><p class="navbar-text">Hello, @User.Identity.Name</p></li>
  </ul>
}
else
{
  <ul class="nav navbar-nav navbar-right">
      <li><a asp-controller="Account" asp-action="Login">Log in</a></li>
  </ul>
}
This UI change will show the name of the authenticated user. If there isn’t an authenticated user, it will provide a login button that will call the Login() action that you added to the AccountController.
So now you’ve got an application that does something. You can run it using:
dotnet run
Then, when you navigate to https://localhost:5001 you should see:
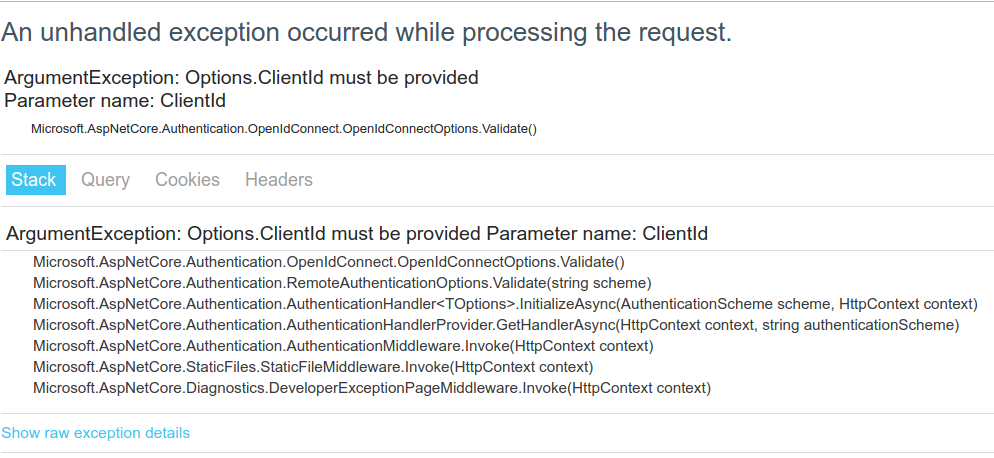
Bam. The wheels fall off at the first turn. This error occurs because you haven’t added the necessary configuration to your source code. Great stuff, you’re super secure, but the application doesn’t work!
The code changes you made in Startup.cs require configuration values for okta:ClientId, okta:ClientSecret and okta:Issuer. In a development environment we’d add the configuration to appsettings.json or use the Secret Manager feature of ASP.NET Core but that won’t cut the mustard in a secure production environment.
At first glance, it may seem that there isn’t a huge risk in having secrets in your source code since it will ultimately be compiled to run on a web server. After all, the attacker would need to access the web server to get to the binaries, and if they’ve gotten that far, the ship has already set sail. However, when you step back and look at the bigger picture, you see that the problem isn’t with the compiled binaries. Instead, it’s with the source code itself. Copies may exist on multiple developer machines, on build servers, or test installations. Each copy is another target for the would-be attacker. If any of these machines are infected with malware or are part of a compromised network, then your secrets are no longer secret. If that day ever comes, brace yourself for impact.
Put the Wheels Back On Using Azure KeyVault
Azure KeyVault provides a REST API that allows you to access keys, secrets and certificates. You store secrets there, and the ASP.NET core configuration system picks them up automatically (once you jump through a few hoops!). KeyVault secrets are stored securely in the cloud using various levels of encryption depending on the service level that you choose when setting up the KeyVault. Since Microsoft provides the KeyVault on a software-as-a-service basis, they offer an SLA and take care of managing the underlying infrastructure, so you don’t need to think about it. What’s not to love?
In the real-world, production environment configuration is usually managed by DevOps or SecOps teams to limit exposure of sensitive information. Using an external key store makes this easy by providing a secure central location for information that has access control policies, meaning that only those with appropriate rights can view or update the stored data. Let’s see how you can add this capability to your application.
The Chicken or the Egg
Earlier you created an Azure KeyVault and added your configuration values. All you need to do now is point your application to your configuration values, and you’re done, right? Not quite. You’ll remember that one of the benefits of the KeyVault is access control. Users and applications need to authenticate and be authorized to perform any action against a KeyVault, including reading secrets. That presents something of a dilemma. You’re using the KeyVault to store secrets securely but to get access to those secrets your application needs to authenticate, and authentication requires some secret. You need a secret to get access to your secrets! Later you’ll see that there are a few ways to address this problem, but first, you need to create a service principal for your application.
Create an Azure Service Principal
By default, Azure uses Active Directory for authentication, and most of the services provided by Azure have authorization mechanisms. So that your application can access the KeyVault, you need to create a Service Principal and grant that principal the required permissions. We can create a service principal using the Azure CLI on Azure cloud shell:
app=$(az ad app create --display-name "OktaNoSecretsApp")
az ad sp create --id $(echo $app | jq .appId -r)
We can grant permissions to Get and List secrets in the KeyVault using:
spn=$(az ad sp list --display-name OktaNoSecretsApp)
az keyvault set-policy --object-id "$(echo $spn |jq .[0].objectId -r)" --name kv-okta-nosecrets --secret-permissions get list
Note: Be sure to use the name of the Azure KeyVault that you created earlier.
Connect You App to Azure KeyVault
The final piece of the puzzle is to configure your application to use your new service principal to connect to the KeyVault to retrieve secret configuration values. To make this work with your ASP.NET core application, you should reference the KeyVault configuration provider.
dotnet add package Microsoft.Extensions.Configuration.AzureKeyVault
Then you need a mechanism to authenticate with the KeyVault. The KeyVault configuration provider only supports certificate-based authentication so you’ll need to create a self-signed certificate and add it to your service principal as a credential. Using this approach, you can deploy the certificate with your application or take advantage of the automatic certificate management capabilities for various Azure services.
Create a Certificate-Based Credential
To create a self-signed certificate and associated credential using the Azure CLI:
Note: if you’re using the Azure CLI in a PowerShell session, at the time of writing these commands don’t work correctly. To guarantee success, execute the commands in a bash cloud shell.
openssl req -x509 -newkey rsa:4096 -keyout key.pem -out cert.pem -days 365 -nodes
az ad sp credential reset --name OktaNoSecretsApp --cert "$(cat cert.pem)"
openssl pkcs12 -export -out spn.pfx -inkey key.pem -in cert.pem -passout pass:
If you’re using the Azure cloud shell, be sure to download the spn.pfx file to the root of your application. Modify your Program.cs file to initialize the KeyVault configuration provider using your certificate:
using System.Linq;
using System.Security.Cryptography.X509Certificates;
using Microsoft.AspNetCore;
using Microsoft.AspNetCore.Hosting;
using Microsoft.Azure.KeyVault;
using Microsoft.Azure.Services.AppAuthentication;
using Microsoft.Extensions.Configuration;
using Microsoft.Extensions.Configuration.AzureKeyVault;

namespace OktaNoSecrets
{
  public class Program
  {
    public static void Main(string[] args)
    {
      CreateWebHostBuilder(args).Build().Run();
    }

    public static IWebHostBuilder CreateWebHostBuilder(string[] args) =>
        WebHost.CreateDefaultBuilder(args)
         .ConfigureAppConfiguration((context, config) =>
            {
              if (context.HostingEnvironment.IsProduction())
              {
                var builtConfig = config.Build();
                Pickup local certificate
                config.AddAzureKeyVault(
                   $"https://{builtConfig["KeyVaultName"]}.vault.azure.net/",
                  builtConfig["SpnAppId"],
                   new X509Certificate2("spn.pfx"));
              }
            })
            .UseStartup<Startup>();
  }
}
Add SPN Configuration Values
You’ll notice that the code looks for configuration values for KeyVaultName and SpnAppId. You can add those to appsettings.json:
{
  ...
  "KeyVaultName":"<your-keyvault-name>",
  "SpnAppId":"<your-spn-app-id>"
}
You can find your SPN App Id using the Azure Cloud shell or the Azure CLI:
app=$(az ad app list --display-name OktaNoSecretsApp)
echo $app | jq .[0].appId -r
Add a Production Launch Profile
So that you can easily switch between Development and Production, update Properties/launchSettings.json to include a Production launch profile:
{
  ...
  "profiles": {
    "OktaNoSecrets": {
      "commandName": "Project",
      "launchBrowser": true,
      "applicationUrl": "https://localhost:5001;http://localhost:5000",
      "environmentVariables": {
        "ASPNETCORE_ENVIRONMENT": "Development"
      }
    },
    "Production": {
      "commandName": "Project",
      "launchBrowser": true,
      "applicationUrl": "https://localhost:5001;http://localhost:5000",
      "environmentVariables": {
        "ASPNETCORE_ENVIRONMENT": "Production"
      }
    }
  }
}
You can then test your Production deployment using KeyVault integration by running:
dotnet run --launch-profile Production
If everything is working correctly, the KeyVault configuration provider will authenticate with Azure using your certificate and the SPN app id that you created earlier. Secret config values will be retrieved automatically using the ASP.NET core config system.
You can confirm that the KeyVault is being used by looking at the request statistics in the Azure Portal.
Remove the Local Certificate
Astute readers will notice a problem - you’re using a pfx file at the root of our project to authenticate. From a practical perspective, this isn’t much different to the problem that you’re trying to solve – keeping secrets separate from source code! Thankfully there are a few easy solutions to this problem. The first is to use the native certificate management capabilities of your hosting operating system. On Linux-based systems you can copy the pfx file that you generated earlier to the local certificate store using:
cp spn.pfx ~/.dotnet/corefx/cryptography/x509stores/my
rm spn.pfx
Whereas, on Windows-based systems, you can install the certificate in the local user certificate store by right-clicking on the pfx file and selecting Install.
Once You’ve installed the certificate, you can modify Program.cs so that instead of referencing a local pfx file, you reference the installed certificate using its thumbprint. You can achieve this by adding the thumbprint to appsettings.json:
{
  ...
  "KeyVaultName":"kv-okta-nosecrets",
  "SpnAppId":"<Your-spn-app-id>",
  "SpnCertThumbprint":"<your-certificate-thumbprint>"
}
On a Linux based system or using the Azure cloud shell you can get the certificate thumbprint using OpenSSL:
openssl pkcs12 -in spn.pfx -nodes -passin pass: |openssl x509 -noout -fingerprint
The thumbprint value is the SHA1 fingerprint without the colons. For example, 12E8007BF647B7022AAE618C387BDC3EEE451DDB. On a Windows-based system, you can find the thumbprint by examining the certificate properties in the certificate store. Once you’ve set the additional configuration, the final step is to modify the code in Program.cs. Add the following using statement:
using System.Linq;
Then replace the existing code block in the CreateWebHostBuilder() function that begins with if(context.HostingEnviroment.IsProduction()) with:
if (context.HostingEnvironment.IsProduction())
{
  var builtConfig = config.Build();
  //Pickup local certificate
  //config.AddAzureKeyVault(
  //	$"https://{builtConfig["KeyVaultName"]}.vault.azure.net/",
  //   builtConfig["SpnAppId"],
  //	new X509Certificate2("spn.pfx"));
  using (var store = new X509Store(StoreName.My, StoreLocation.CurrentUser))
  {
    store.Open(OpenFlags.ReadOnly);
    var certs = store.Certificates.Find(X509FindType.FindByThumbprint, builtConfig["SpnCertThumbprint"], false);
    config.AddAzureKeyVault(
        $"https://{builtConfig["KeyVaultName"]}.vault.azure.net/",
        builtConfig["SpnAppId"],
        certs.OfType<X509Certificate2>().Single());
    store.Close();
  }
}
You can then test your Production deployment using KeyVault integration by running:
dotnet run --launch-profile Production
In the interests of brevity, most technical tutorials will get right to the nuts and bolts of a particular problem, often leaving security best-practice as a footnote to avoid muddying the waters. This post aims to provide a guide to implementing a production-ready secure configuration using the Azure KeyVault.
By working through this guide, you’ve learned how to:
- Create and configure an Azure KeyVault service
- Create and utilize an Azure Service Principal
- Store configuration information in an Azure KeyVault and use it in an ASP.NET Core application
Learn More About Identity Management and ASP.NET Core
To learn more about identity management and ASP.NET Core, be sure to check out more of these posts.
- Build a CRUD App with ASP.NET Core 2.2 and SQL Server
- Build a GraphQL API with ASP.NET Core
- Build a CRUD App with ASP.NET Core 2.2 and Entity Framework Core
As always, leave comments below and don’t forget to follow us on Twitter and YouTube.
I hope you found this post useful and that the practices described here mean you can enjoy your weekends free from early morning pages.
Okta Developer Blog Comment Policy
We welcome relevant and respectful comments. Off-topic comments may be removed.