Build a CRUD App with ASP.NET Core 2.2 and SQL Server

I’ve always said that you can tell a lot about a person by the kind of music they listen to. Don’t tell me you haven’t had serious doubts about whether you can be friends with someone when you find out that they like a particular band or artist. In that spirit, I created JudgeMyTaste, an ASP.NET Core web application where people can enter their favorite band or artist so that people on the Internet can judge them openly.
The combination of ASP.NET and SQL Server is probably the most common pairing in the enterprises that use ASP.NET. With ASP.NET Core and SQL Server both being cross-platform, you don’t have to run this combination on Windows anymore! I’ll show you how to create a basic CRUD application using ASP.NET Core 2.2 and SQL Server 2017. I’ll be running on Linux, but with the free tools used here, it won’t matter what operating system you’re using!
The tools I’ll be using that are available for all platforms are:
- SQL Server 2017 (I’ll be running on Ubuntu 18.04)
- Visual Studio Code
- Azure Data Studio
- ASP.NET Core 2.2
Once you’ve got all the tools installed for your platform, let’s rock and roll!
Note: In May 2025, the Okta Integrator Free Plan replaced Okta Developer Edition Accounts, and the Okta CLI was deprecated.
We preserved this post for reference, but the instructions no longer work exactly as written. Replace the Okta CLI commands by manually configuring Okta following the instructions in our Developer Documentation.
Scaffold Your ASP.NET Core 2.2 Application
No matter the platform you’re on, the dotnet CLI is available. The commands used here should be the same for everyone. To scaffold the ASP.NET Core 2.2 MVC application, create a new folder for it:
mkdir JudgeMyTaste
Change into that new directory:
cd JudgeMyTaste
Then run the following command:
dotnet new mvc
Then open the new application in VS Code.
code .
When you open the new application in VS Code, you should get a warning in the bottom right corner asking to add some missing assets. Go ahead and add the missing assets. You’ll see the .vscode folder added with a launch.json and a tasks.json file.
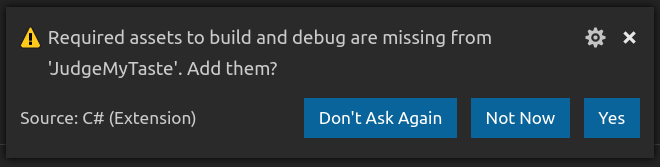
These will allow you to run the application from VS Code. To verify that everything scaffolded properly, run the base application by typing F5. This will build the application, run it, and open it in a new browser window.
You may notice a strange error page come up, if you’ve never run an ASP.NET Core 2.x application before. By default ASP.NET Core wants to run on HTTPS. This is a recommended practice for web applications. You could avoid this message by removing the redirect to HTTPS in your Startup.cs or by generating a certificate for your local machine, but this error screen only comes up once in a great while, so I just side step it by clicking on Advanced and telling the browser that it’s okay to visit this site even though there is no certificate for it.
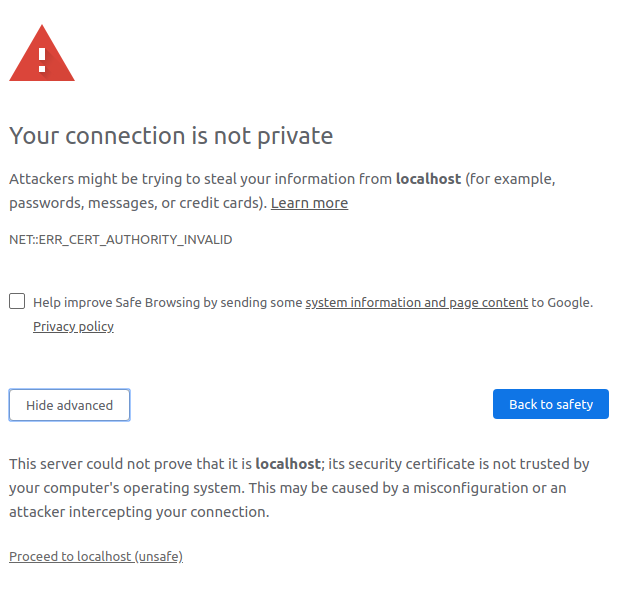
For your daily work, it will probably behoove you to create a local certificate for development so that you never have to see this message again.
Create Your SQL Server Database
Open Azure Data Studio and connect to your localhost server with the SA password you created when installing SQL Server on your machine. You’ll notice it is arranged very much like VS Code. In the Connections Explorer, you will see localhost as a connection. Right-click on the connection and choose New Query, which will open a new query window on the right side. Start typing the word CREATE and an intellisense drop down will open and one of the choices will be sqlCreateDatabase. Choose that option and a query will be scaffolded with the database name highlighted in the three places that it occurs in the query. You can just start typing the database name “JudgeMyTaste” and it will be replaced in all three places so that the final query looks like this.
-- Create a new database called 'JudgeMyTaste'
-- Connect to the 'master' database to run this snippet
USE master
GO
-- Create the new database if it does not exist already
IF NOT EXISTS (
  SELECT [name]
    FROM sys.databases
    WHERE [name] = N'JudgeMyTaste'
)
CREATE DATABASE JudgeMyTaste
GO
Now you can just click the green Run arrow at the top of the window to create the database. Simple, no?
Now when you expand the Databases folder in the Connection Explorer, you will see the JudgeMyTaste database in the list. Right-click on the new database and choose New Query again. Start typing CREATE again and this time choose sqlCreateTable from the options presented. Again, you can start typing the table name FavoriteBands and it will be filled in all the places it occurs in the query.
You’ll also need to add some other columns to the table. Add the columns for Id, Name, EnteredBy, and EnteredOn so that the query looks like this:
-- Create a new table called '[FavoriteBands]' in schema '[dbo]'
-- Drop the table if it already exists
IF OBJECT_ID('[dbo].[FavoriteBands]', 'U') IS NOT NULL
DROP TABLE [dbo].[FavoriteBands]
GO
-- Create the table in the specified schema
CREATE TABLE [dbo].[FavoriteBands](
  [Id] [int] IDENTITY(1,1) NOT NULL,
  [Name] [varchar](255) NULL,
  [EnteredBy] [varchar](255) NULL,
  [EnteredOn] [date] NULL
);
GO
Then run the query by clicking the green Run arrow as before.
It’s good practice to create a user specifically for your application to connect with the database. One that only has the permissions that it will need to interact with your database. Here’s a script to create a login and a user for the database and assign that user dbo permissions to the database.
USE master

GO

CREATE LOGIN webapp WITH PASSWORD=N'P@ssw0rd!', DEFAULT_DATABASE=JudgeMyTaste

GO

ALTER LOGIN webapp ENABLE

GO

USE JudgeMyTaste

GO

CREATE USER webapp FOR LOGIN webapp
EXEC sp_addrolemember 'db_owner', 'webapp'

GO
It might seem like a lot going on here, but it simply creates a login for SQL Server, makes that login a user for the JudgeMyTaste database, and add it to the db_owner role for the database. This will allow that login to do all the CRUD operations that the application will need. Now your database is ready to be used by your application!
Connect SQL Server to Your ASP.NET Core 2.2 MVC Application
Before anything else, you’ll need the Entity Framework Core NuGet package. To install it, run the following command in the terminal.
dotnet add package Microsoft.EntityFrameworkCore.SqlServer --version 2.2.4
Start by adding the connection string to your appsettings.json file in the root of your MVC project, so that it looks like this:
{
  "Logging": {
    "LogLevel": {
      "Default": "Warning"
    }
  },
  "AllowedHosts": "*",
  "ConnectionStrings": {
    "JudgeMyTasteDatabase": "Server=.;Database=JudgeMyTaste;user id=webapp;password=P@ssw0rd!"
  }
}
In the Models folder, create a class file called FavoriteBand.cs.
using System;
using System.ComponentModel.DataAnnotations;

namespace JudgeMyTaste.Models
{
  public class FavoriteBand
  {
    public int Id { get; set; }
    public string Name { get; set; }
    public string EnteredBy { get; set; }
    public DateTime EnteredOn { get; set; }
  }
}
This class will be used to work with the FavoriteBand entries.
In the root of the project, create a folder called Data to house the database context for the application. Create a C# file called JudgeMyTasteContext.cs with the following contents:
using JudgeMyTaste.Models;
using Microsoft.EntityFrameworkCore;

namespace JudgeMyTaste.Data
{
  public class JudgeMyTasteContext : DbContext
  {
    public JudgeMyTasteContext(DbContextOptions<JudgeMyTasteContext> options) : base(options)
    {
    }

    public DbSet<FavoriteBand> FavoriteBands { get; set; }
  }
}
In your Startup.cs file, in the ConfigureServices() method, right before the services.AddMvc()... line, add the newly created context with the connection string.
services.AddDbContext<JudgeMyTasteContext>(options => options.UseSqlServer(Configuration.GetConnectionString("JudgeMyTasteDatabase")));
Now your database is all hooked into your application. All you need to do is create some way for the user to enter their favorite bands. To get some more scaffolding goodness for the CLI, install the Code Generation tool.
dotnet add package Microsoft.VisualStudio.Web.CodeGeneration.Design
Now you can scaffold a controller to handle all the CRUD operations for the FavoriteBand class by running the following command from the terminal.
dotnet aspnet-codegenerator controller -name FavoriteBandsController -async -m JudgeMyTaste.Models.FavoriteBand -dc JudgeMyTaste.Data.JudgeMyTasteContext -namespace Controllers -outDir Controllers -udl
This is a long one but if you break it down into its component pieces, it’s easier to understand.
The first part just calls the dotnet CLI’s new aspnet-codegenerator command for a controller. You want the controller’s name to be “FavoriteBandsController” and for the controller actions to all be -async. The model being used to generate the controller is the JudgeMyTaste.Models.FavoriteBand class, and the database context will be the JudgeMyTaste.Data.JudgeMyTasteContext class you just created. The namespace and output directory for the controller will be Controllers and the -udl switch tells the generator to use the default layout for the views it will generate (yeah, it’s going to generate views for everything too!). Pretty cool, right?
Once you run the command, you should see the controller and all it’s views show up. The only thing left is to create a link so that users can get to the favorite bands section of the site easily.
In the Views/Shared folder open the Layout.cshtml file and add a link to the menu to get to the new section of the site.
<li class="nav-item">
  <a class="nav-link text-dark" asp-area="" asp-controller="FavoriteBands" asp-action="Index">Favorite Bands</a>
</li>
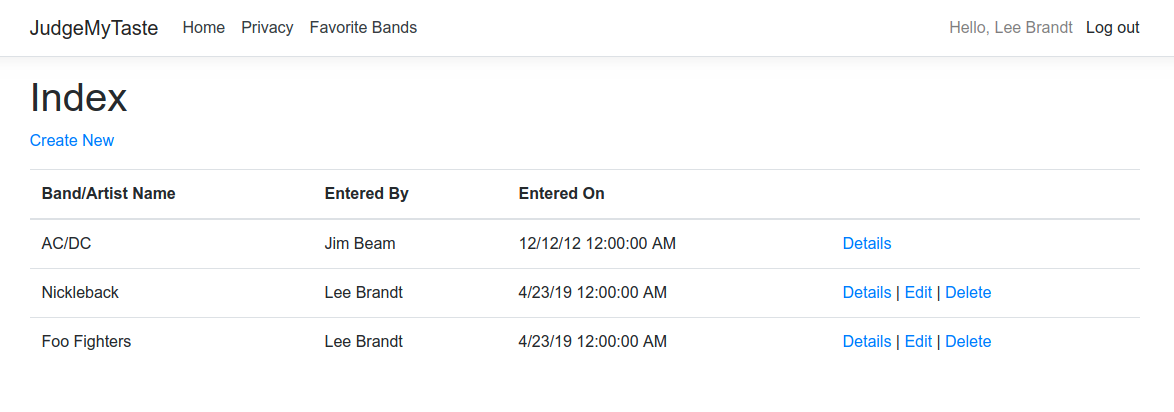
Now when you run the application, you can click on the Favorite Bands menu item and see a list of all the favorite bands that have been entered. Of course there aren’t any right now, so add one using the Create New link at the top of the page and see it show up in the listing.
Now it’s a little cumbersome to add the EnteredOn value manually, and the code generator you used can’t know that you can just add that field to the entry as it’s being saved, so change the Create() method of the FavoriteBandController to add it automatically.
// POST: FavoriteBands/Create
// To protect from overposting attacks, please enable the specific properties you want to bind to, for
// more details see http://go.microsoft.com/fwlink/?LinkId=317598.
[HttpPost]
[ValidateAntiForgeryToken]
public async Task<IActionResult> Create([Bind("Id,Name,EnteredBy")] FavoriteBand favoriteBand)
{
  if (ModelState.IsValid)
  {
    favoriteBand.EnteredOn = DateTime.Now;
    _context.Add(favoriteBand);
    await _context.SaveChangesAsync();
    return RedirectToAction(nameof(Index));
  }
  return View(favoriteBand);
}
The only things that have changed is that I removed the EnteredOn field from the Bind statement in the method signature, and I added the value DateTime.Now as the value right before saving it to the database.
Add Authentication to Your ASP.NET Core 2.2 MVC + SQL Server Application
What you have now is okay, but there’s currently no way to keep users from editing other user’s entries. We want to make sure to judge people for their favorite band that they actually entered, right?
No reason to write this yourself. You can easily integrate Okta to handle the authentication for you and easily:
- Authenticate and authorize your users
- Store data about your users
- Perform password-based and social login
- Secure your application with multi-factor authentication
- And much more! Check out our product documentation
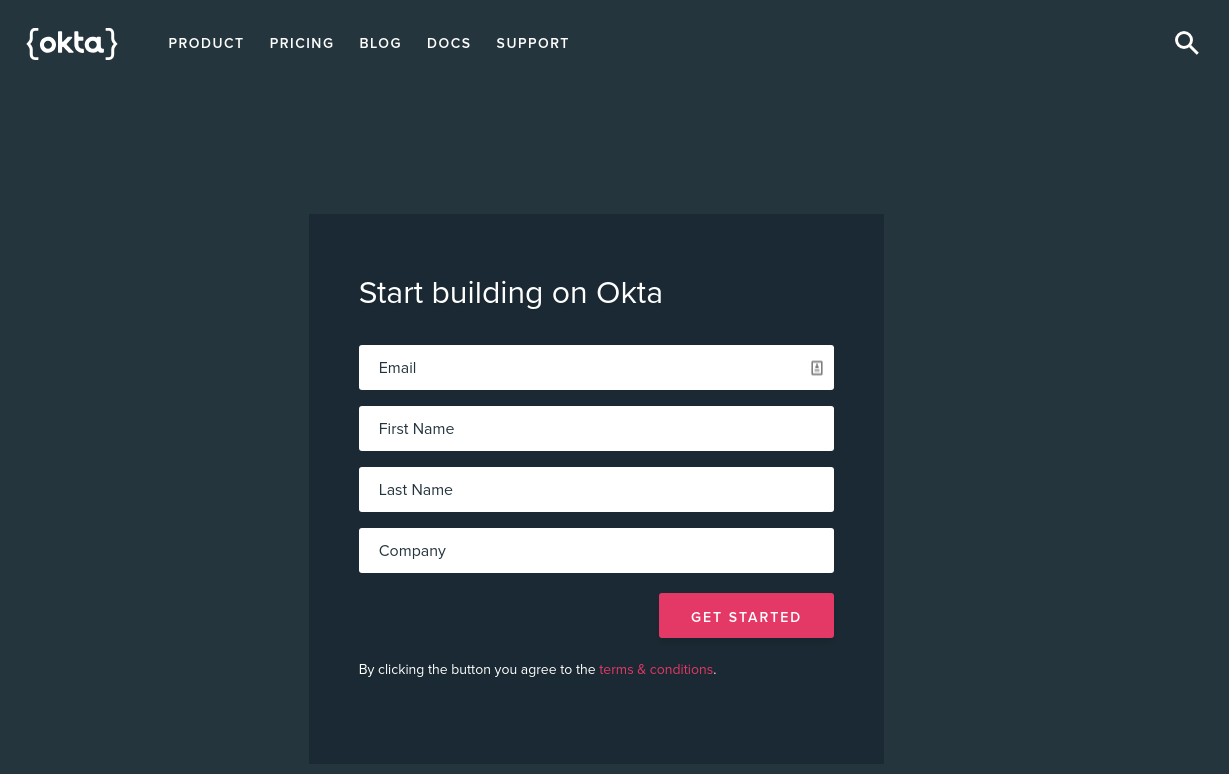
Sign up for a forever-free developer account (or log in if you already have one).
Once you have signed up and logged in, you’ll be taken to your dashboard. Make note of your Org URL in the top right corner.

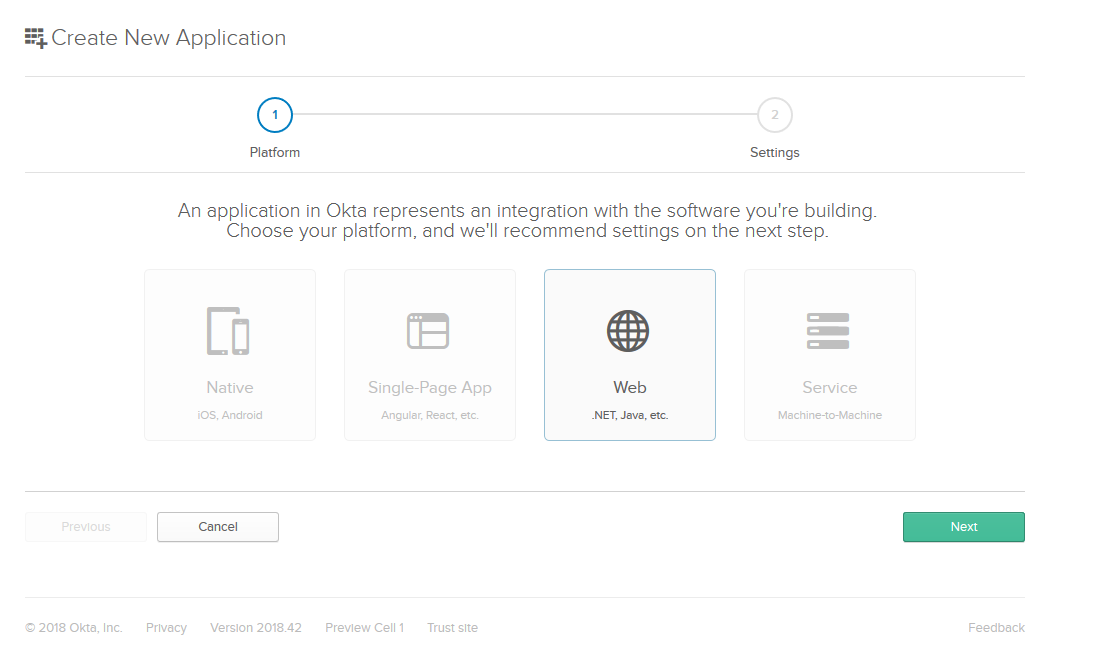
Click on the Applications menu item at the top, click Add Application, and from the first page of the wizard choose Web and click Next.
On the next screen, change the application name to “Judge My Taste App” and update the Base URIs value and the Login Redirect URIs to reflect to the correct port and the fact that you’re running on the HTTPS scheme.
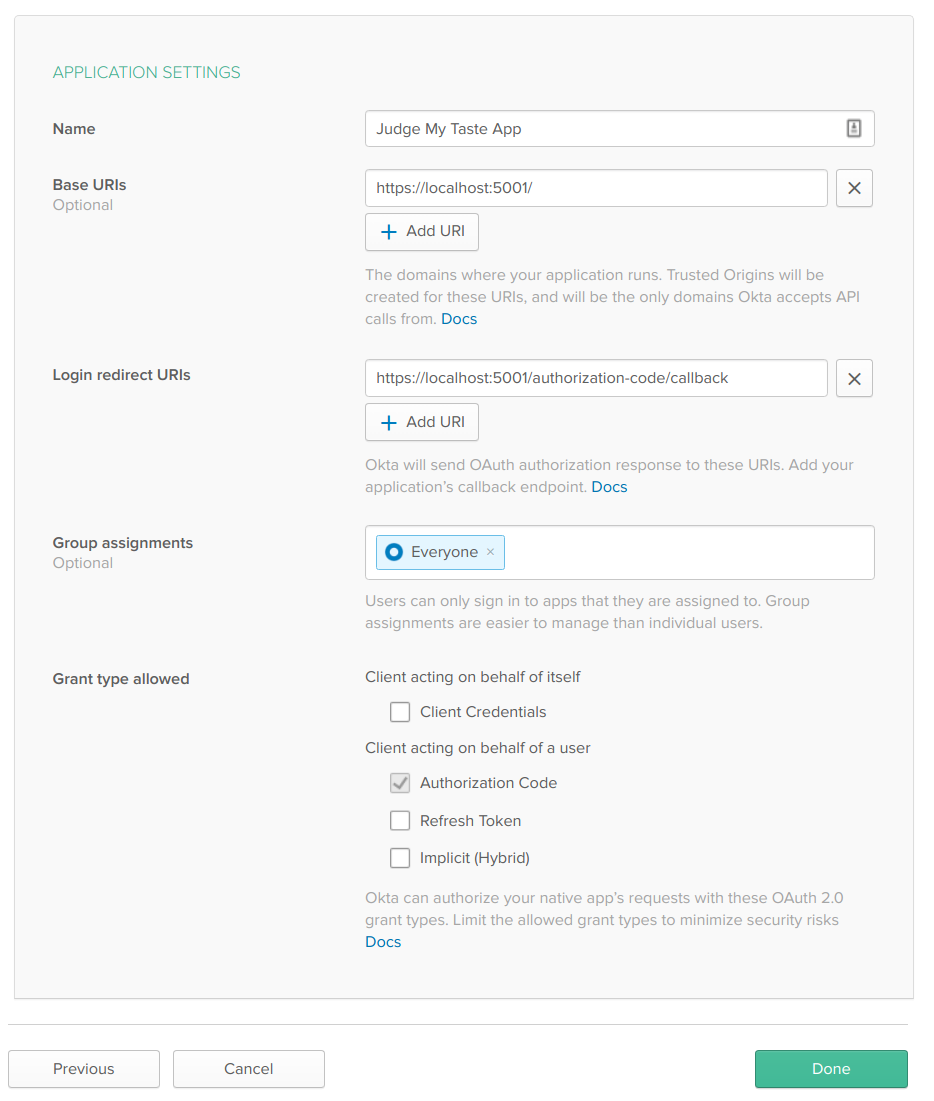
Then click Done and you’re taken to the application page. On the General Settings tab click Edit and add a URL to the Logout Redirect URIs with a value of https://localhost:5001/signout/callback. This is where Okta will redirect back to after the logout call. This is handled by the ASP.NET OIDC Middleware.
Configure Your ASP.NET Core 2.2 MVC Application for Authentication
Now you need to tell your application how to use Okta for authentication. The easiest way is to use the ASP.NET SDK from Okta. You can install it from NuGet using the following command:
dotnet add package Okta.AspNetCore --version 1.1.5
Add some configuration values to your appsettings.json file to that the final file looks like this:
{
  "Logging": {
    "LogLevel": {
      "Default": "Warning"
    }
  },
  "AllowedHosts": "*",
  "ConnectionStrings": {
    "JudgeMyTasteDatabase": "Server=.;Database=JudgeMyTaste;user id=webapp;password=P@ssw0rd!"
  },
  "Okta": {
    "ClientId": "{yourClientId}",
    "ClientSecret": "{yourClientSecret}",
    "OktaDomain": "https://{yourOktaDomain}",
    "PostLogoutRedirectUri": "https://localhost:5001/"
  }
}
This PostLogoutRedirectUri is the URL that the middleware will redirect to once Okta has redirected back to the signout/callback URL. You can use any valid URL in the MVC application. Here, I am just redirecting to the root of the application.
Back in the Startup.cs file, add the following using statements:
using Okta.AspNetCore;
using Microsoft.AspNetCore.Authentication.Cookies;
Then at the very beginning of the ConfigureServices() method add:
var oktaMvcOptions = new OktaMvcOptions();
Configuration.GetSection("Okta").Bind(oktaMvcOptions);
oktaMvcOptions.Scope = new List<string> { "openid", "profile", "email" };
oktaMvcOptions.GetClaimsFromUserInfoEndpoint = true;

services.AddAuthentication(options =>
{
  options.DefaultAuthenticateScheme = CookieAuthenticationDefaults.AuthenticationScheme;
  options.DefaultSignInScheme = CookieAuthenticationDefaults.AuthenticationScheme;
  options.DefaultChallengeScheme = OktaDefaults.MvcAuthenticationScheme;
})
.AddCookie()
.AddOktaMvc(oktaMvcOptions);
This is a pretty dense chunk of code, but most of it is boilerplate for the OIDC middleware that the Okta SDK is built on. The first part just binds all of those configuration values you just added in appsettings.json to the oktaMvcOptions. It also adds the scopes you want to receive (which are the OpenID information, the user’s profile, and the user’s email address). It also tells the middleware that it can get the claims from the user info endpoint, which all OIDC identity providers have.
When the code adds authentication, it tells the OIDC provider to use cookies for storing tokens and that you’ll be sending users to Okta from an MVC application.
To actually wire up authentication, you need to tell the Configure() method to use this service you just configured. Right before the app.UseMvc(...) line, add:
app.UseAuthentication();
Okta is now configured in your application! You still need to set up your application to challenge the user (send them to Okta to authenticate).
Create a new controller in the Controllers folder called AccountController with the following code:
using Microsoft.AspNetCore.Authentication.Cookies;
using Microsoft.AspNetCore.Mvc;
using Okta.AspNetCore;

namespace JudgeMyTaste.Controllers
{
  public class AccountController : Controller
  {
    public IActionResult Login()
    {
      if (!HttpContext.User.Identity.IsAuthenticated)
      {
        return Challenge(OktaDefaults.MvcAuthenticationScheme);
      }
      return RedirectToAction("Index", "Home");
    }

    public IActionResult Logout()
    {
      return new SignOutResult(new[]
      {
        OktaDefaults.MvcAuthenticationScheme,
        CookieAuthenticationDefaults.AuthenticationScheme
      });
    }
  }
}
This will give you a Login() and Logout() method to wire up some menu items. Speaking of which, add a new view in Views/Shared called _LoginPartial.cshtml. This will house all the code for the login menu items.
@if (User.Identity.IsAuthenticated)
{
<ul class="navbar-nav ml-auto">
<li>
<span class="navbar-text">Hello, @User.Identity.Name</span>
<a onclick="document.getElementById('logout_form').submit();" style="cursor: pointer;">Log out</a>
</li>
</ul>
<form asp-controller="Account" asp-action="Logout" method="post" id="logout_form"></form>
}
else
{
<ul class="navbar-nav">
<li><a asp-controller="Account" asp-action="Login">Log in</a></li>
</ul>
}
Change the main menu in Views/Shared/_Layout.cshtml to add this in and move the main menu to the left and have the login menu on the far right. The final div that houses the menu should look like this:
<div class="navbar-collapse collapse justify-content-between">
  <ul class="navbar-nav mr-auto">
    <li class="nav-item">
      <a class="nav-link text-dark" asp-area="" asp-controller="Home" asp-action="Index">Home</a>
    </li>
    <li class="nav-item">
      <a class="nav-link text-dark" asp-area="" asp-controller="Home" asp-action="Privacy">Privacy</a>
    </li>
    <li class="nav-item">
      <a class="nav-link text-dark" asp-area="" asp-controller="FavoriteBands" asp-action="Index">Favorite Bands</a>
    </li>
  </ul>
  <partial name="_LoginPartial" />
</div>
The class list for the navbar-collapse has changed to add the justify-content-between class that will keep the menus apart. The ul’s class also changed to mr-auto which will help keep it left. Lastly, the login partial is added at the end of the menu.
Don’t just sit there, fire this thing up and judge me for liking Nickleback!
Now you have a complete CRUD slice built in an ASP.NET Core 2.2 MVC application saving data to a SQL Server database! Now you can take the same path to add things like favorite movie, favorite food, and favorite beverage so that you can easily and completely judge people for their taste online!!!
Learn More About ASP.NET Core 2.2 and SQL Server
If you liked this post, you’ll really like some of the other content here on the Okta Developer Blog!
- Build a GraphQL API with ASP.NET Core
- Build a REST API with ASP.NET Core 2.2
- Build a CRUD App with ASP.NET Core and TypeScript
- Build a Secure Node app with SQL Server
As always, feel free to comment below and don’t forget to follow us on Twitter and watch us on YouTube!
Okta Developer Blog Comment Policy
We welcome relevant and respectful comments. Off-topic comments may be removed.