User Account Linking in Alexa with ASP.NET Web API

REST APIs are often written for enterprise-level companies as a way of allowing a client-side application to access core business logic. For many companies, simply extending their existing API by adding an endpoint for Alexa integration is the best way to manage that flow. For this example, you will use an existing Web API project on ASP.NET 4.7 and demonstrate how to link existing users to the Alexa skill the first time they access it, via Okta. Already got that Web API project going? Great! If not, create a new project in Visual Studio targeting 4.7 for ASP.NET Web API and let’s get started!
Note: In May 2025, the Okta Integrator Free Plan replaced Okta Developer Edition Accounts, and the Okta CLI was deprecated.
We preserved this post for reference, but the instructions no longer work exactly as written. Replace the Okta CLI commands by manually configuring Okta following the instructions in our Developer Documentation.
Create an Alexa Skill for Your Account Linking Demo
You will need an Amazon developer account to set up your skill. After your account is created and you are logged in, navigate to https://developer.amazon.com/alexa/console/ask and click on Create Skill. For this example, call it “My Company Skill”. Leave the default language. Be sure the Custom skill type is selected, and set the method to host your skill’s backend resources to Provision your own. Click Create Skill.
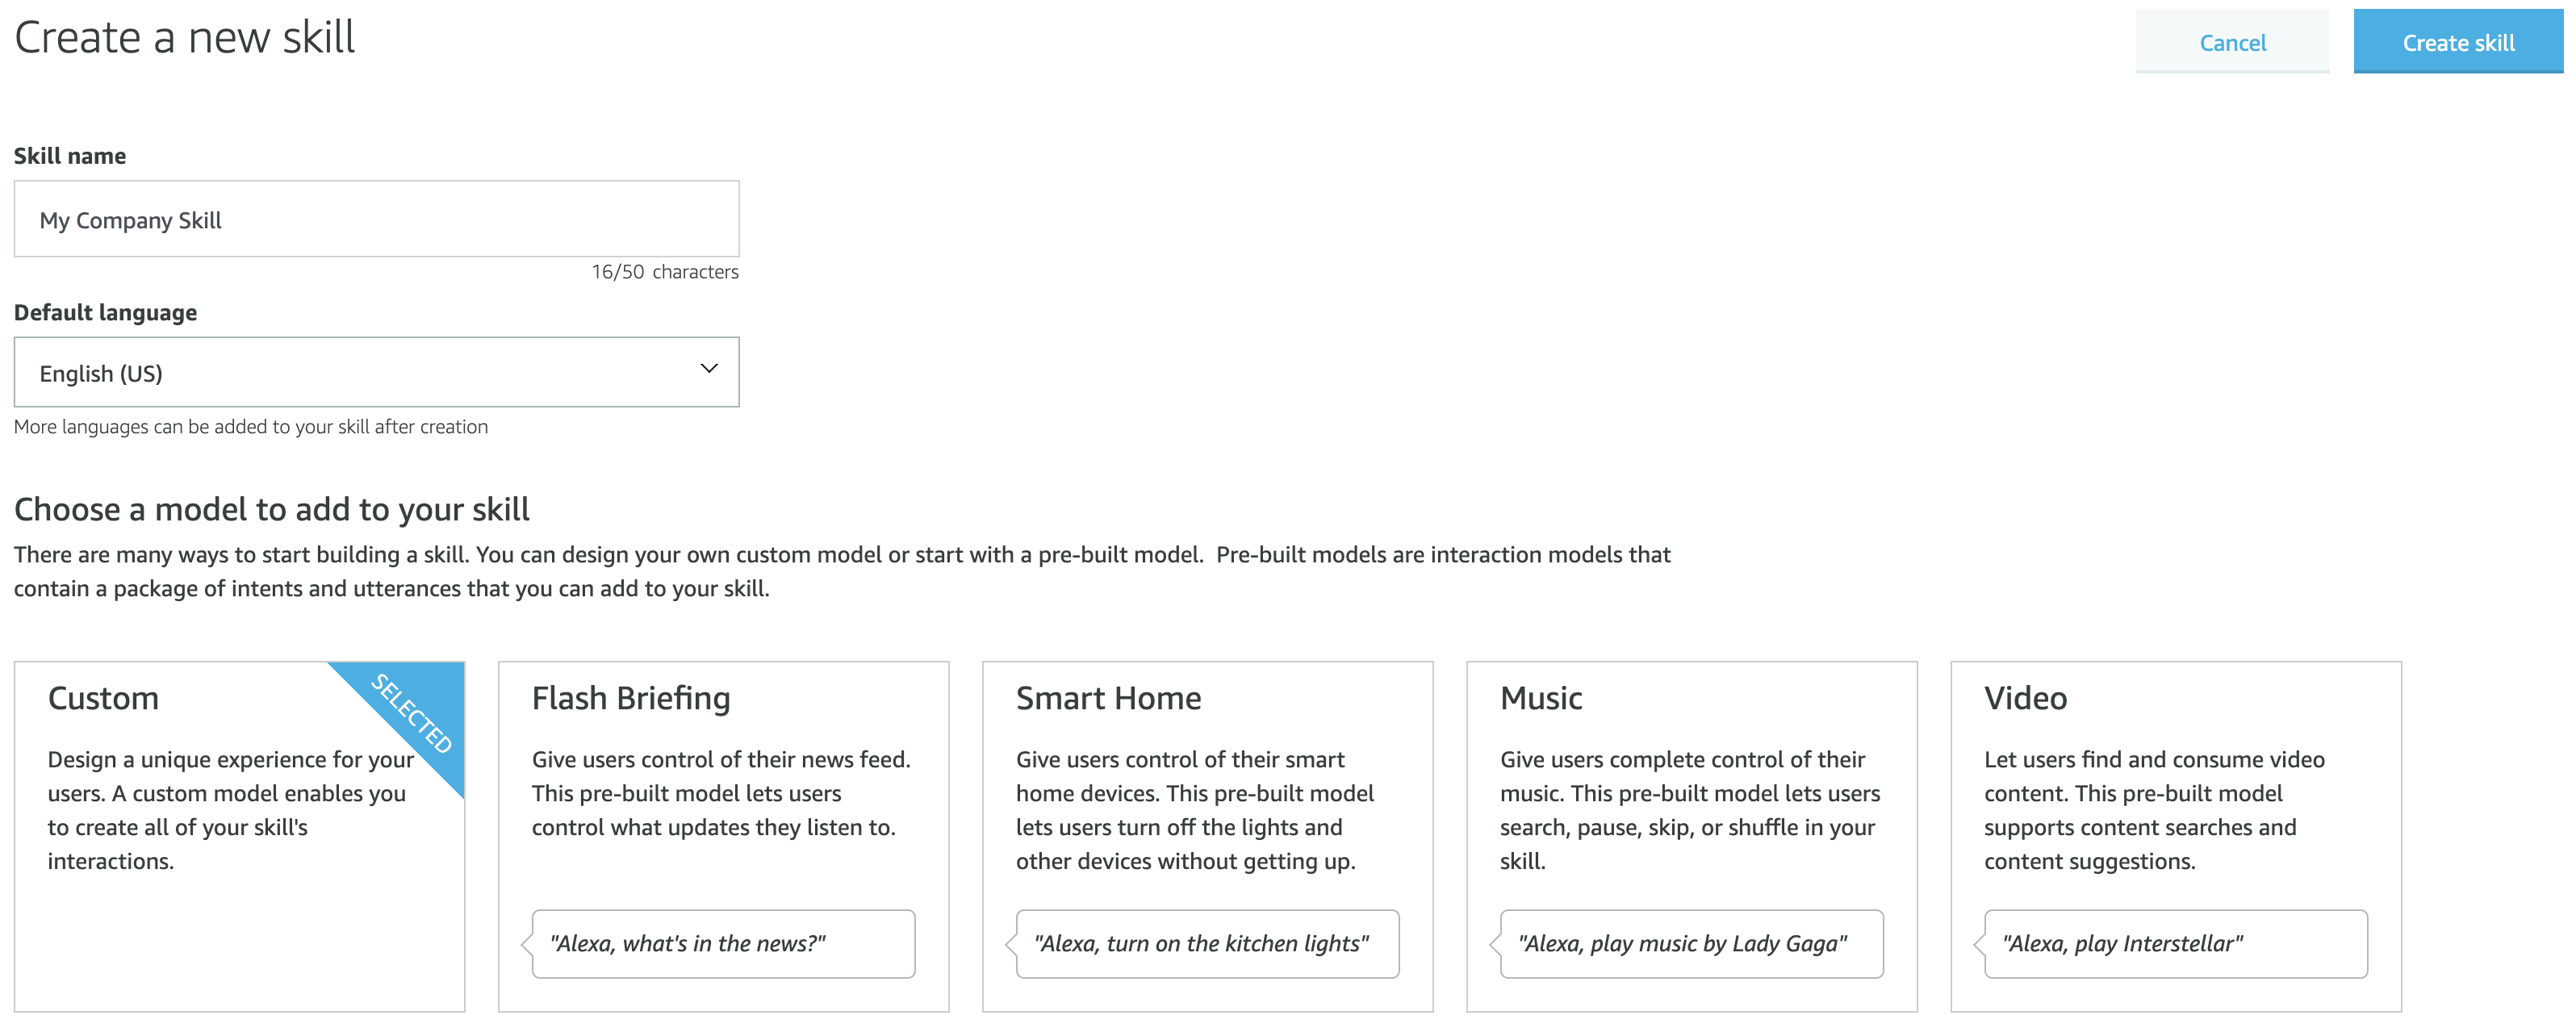
Now select the Start from scratch template and click Choose. You should land on the dashboard of your newly created Alexa skill!
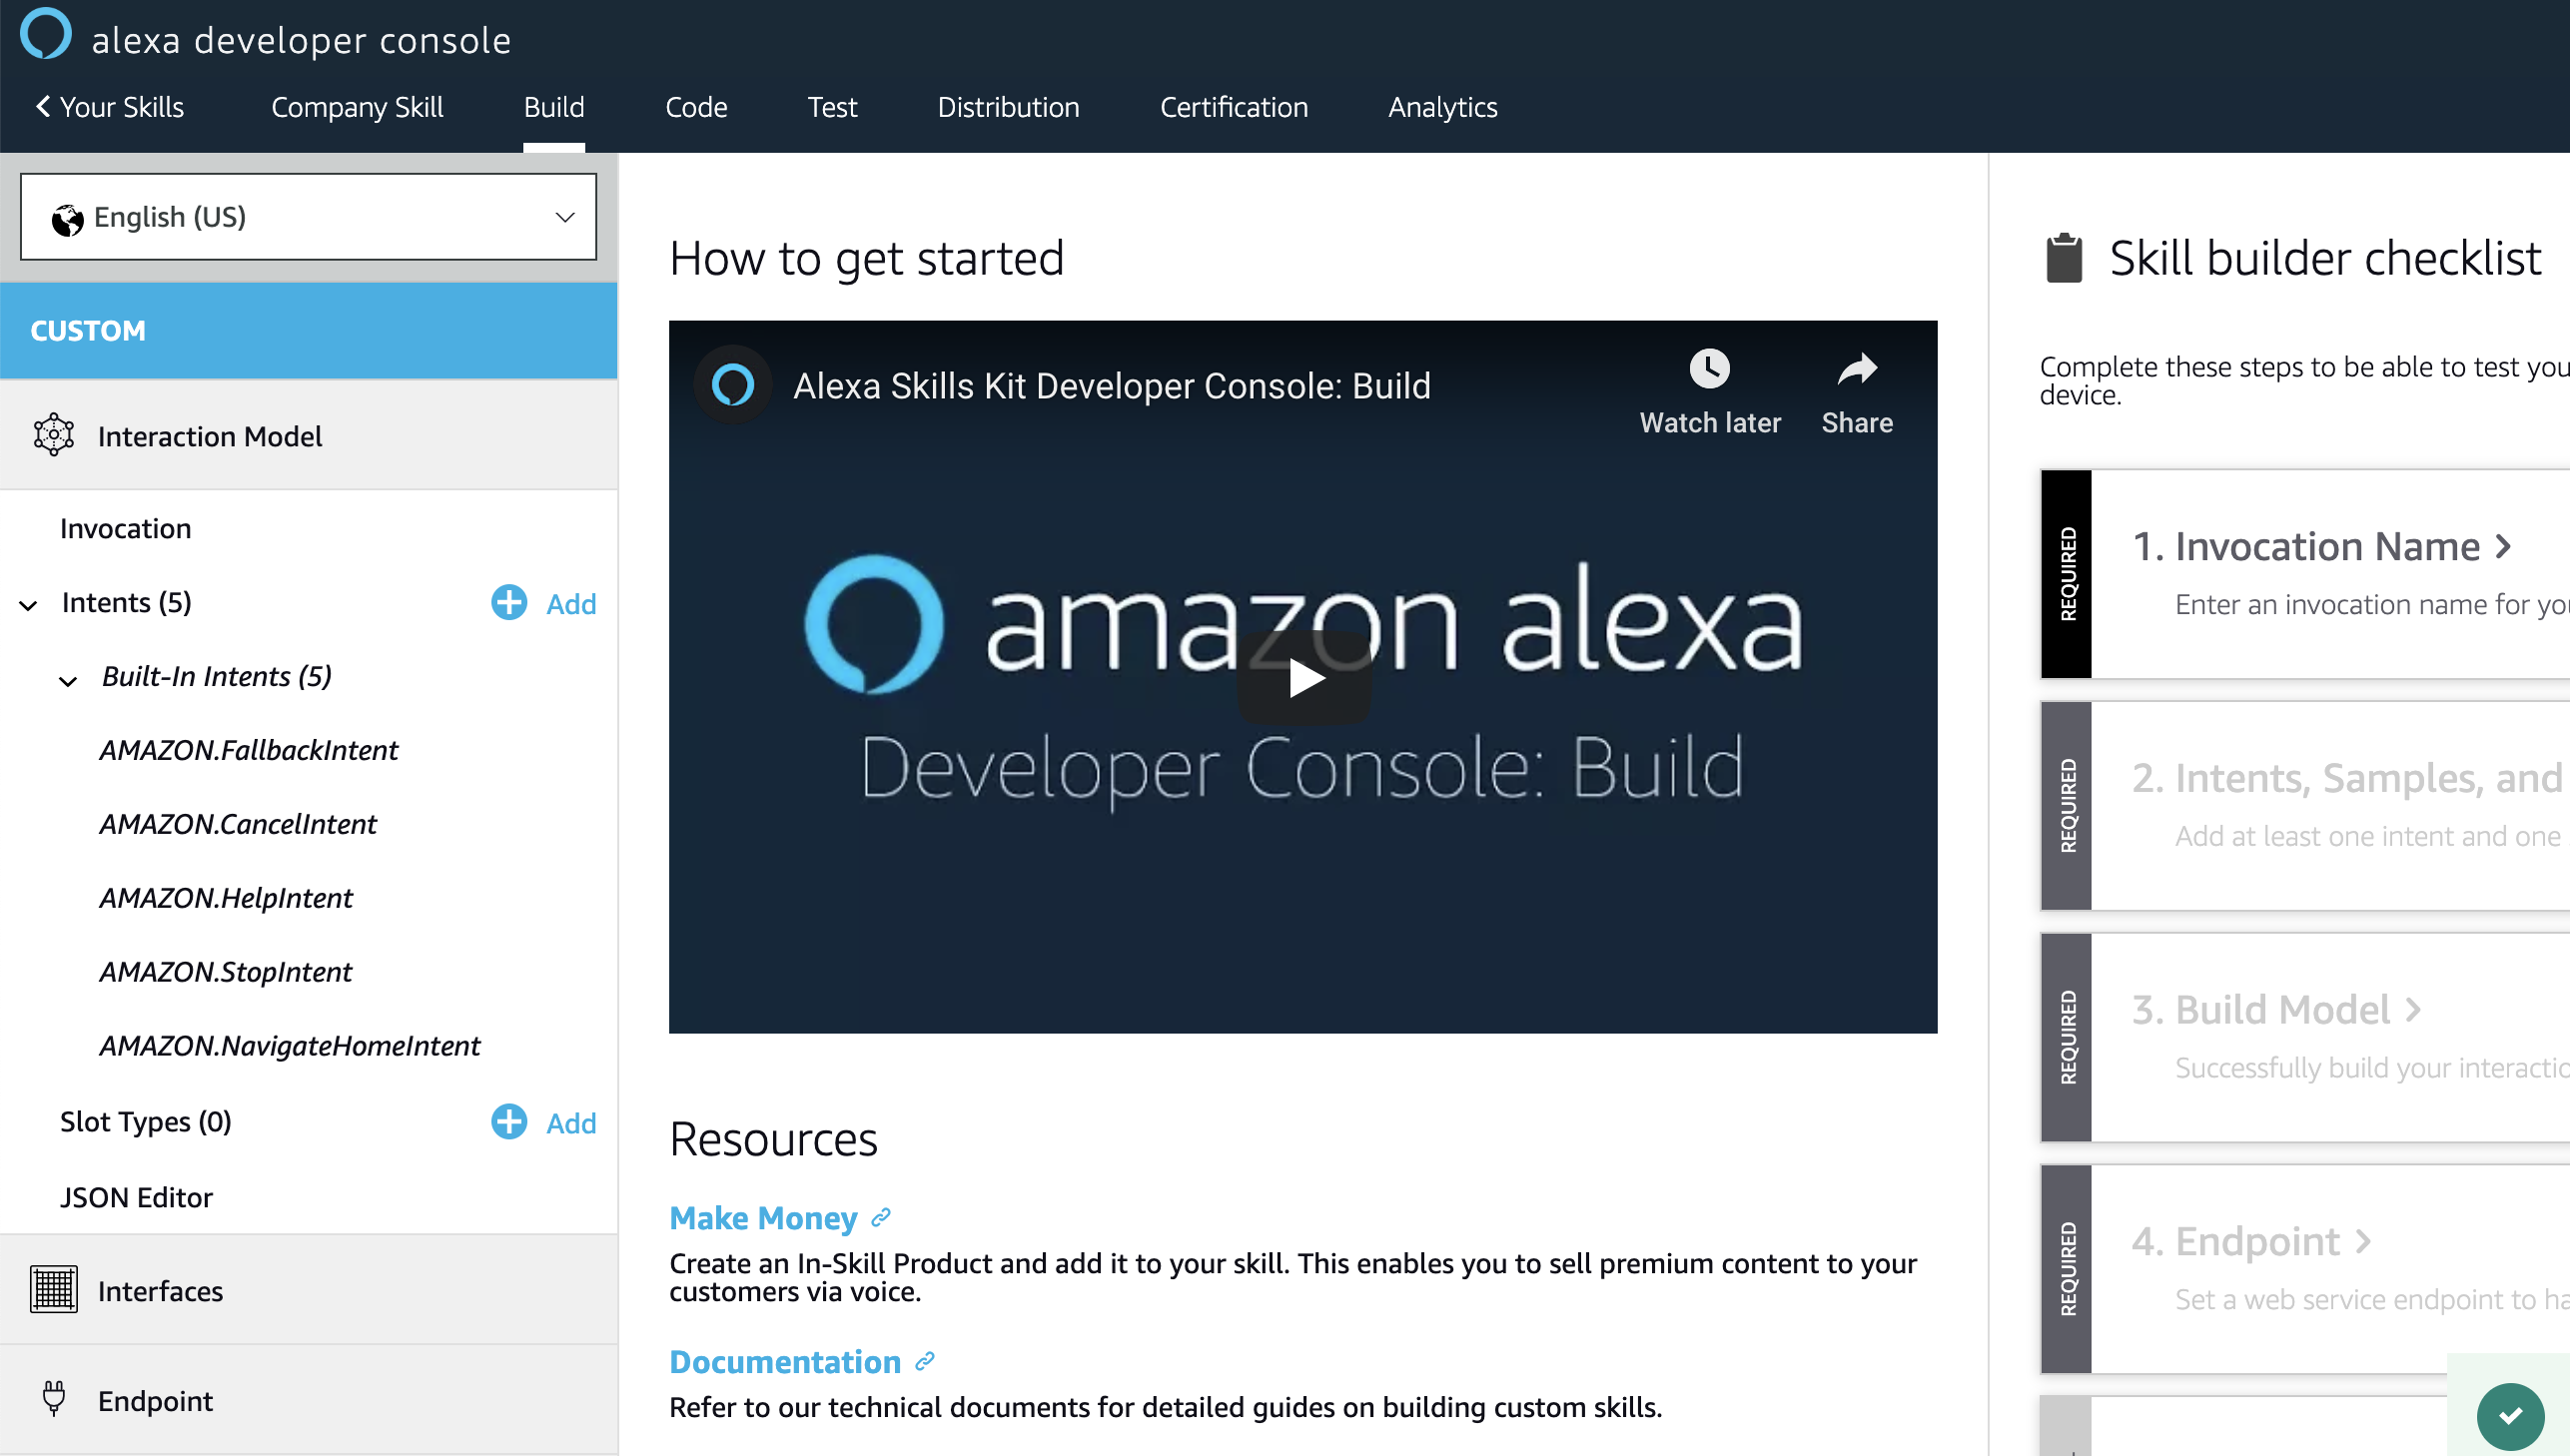
Click on Invocation, set the phrase to “my company skill” and click Save model. This is how Amazon knows to connect a user that speaks this phrase to your specific skill.
Now examine the Intents menu. The built-in ones listed are helpful, but we need to create an example Intent (a user-initiated question or command) for our service to handle. Click on the (+) Add button across from this section. Let’s do a simple one. Call it “HelloIntent” and click Create custom intent. Fill the sample utterances in the screenshot below that a user might say to map to this. Click Save model.

Great! Now add one more custom intent and call it “FavoriteBandIntent”. Fill out the sample phrases like the screenshot below. Click Save model.

In this tutorial, we are hosting a custom skill with a web service. In order to do that, we need to tell Alexa where to send requests. Navigate to Endpoint and select HTTPS. This is where you put in your Alexa skill service endpoint. We will build that next - but for now, let’s set the intended URL. Add your root API URL to the Default Region and append “/api/alexa/mycompanyskill” on the end.
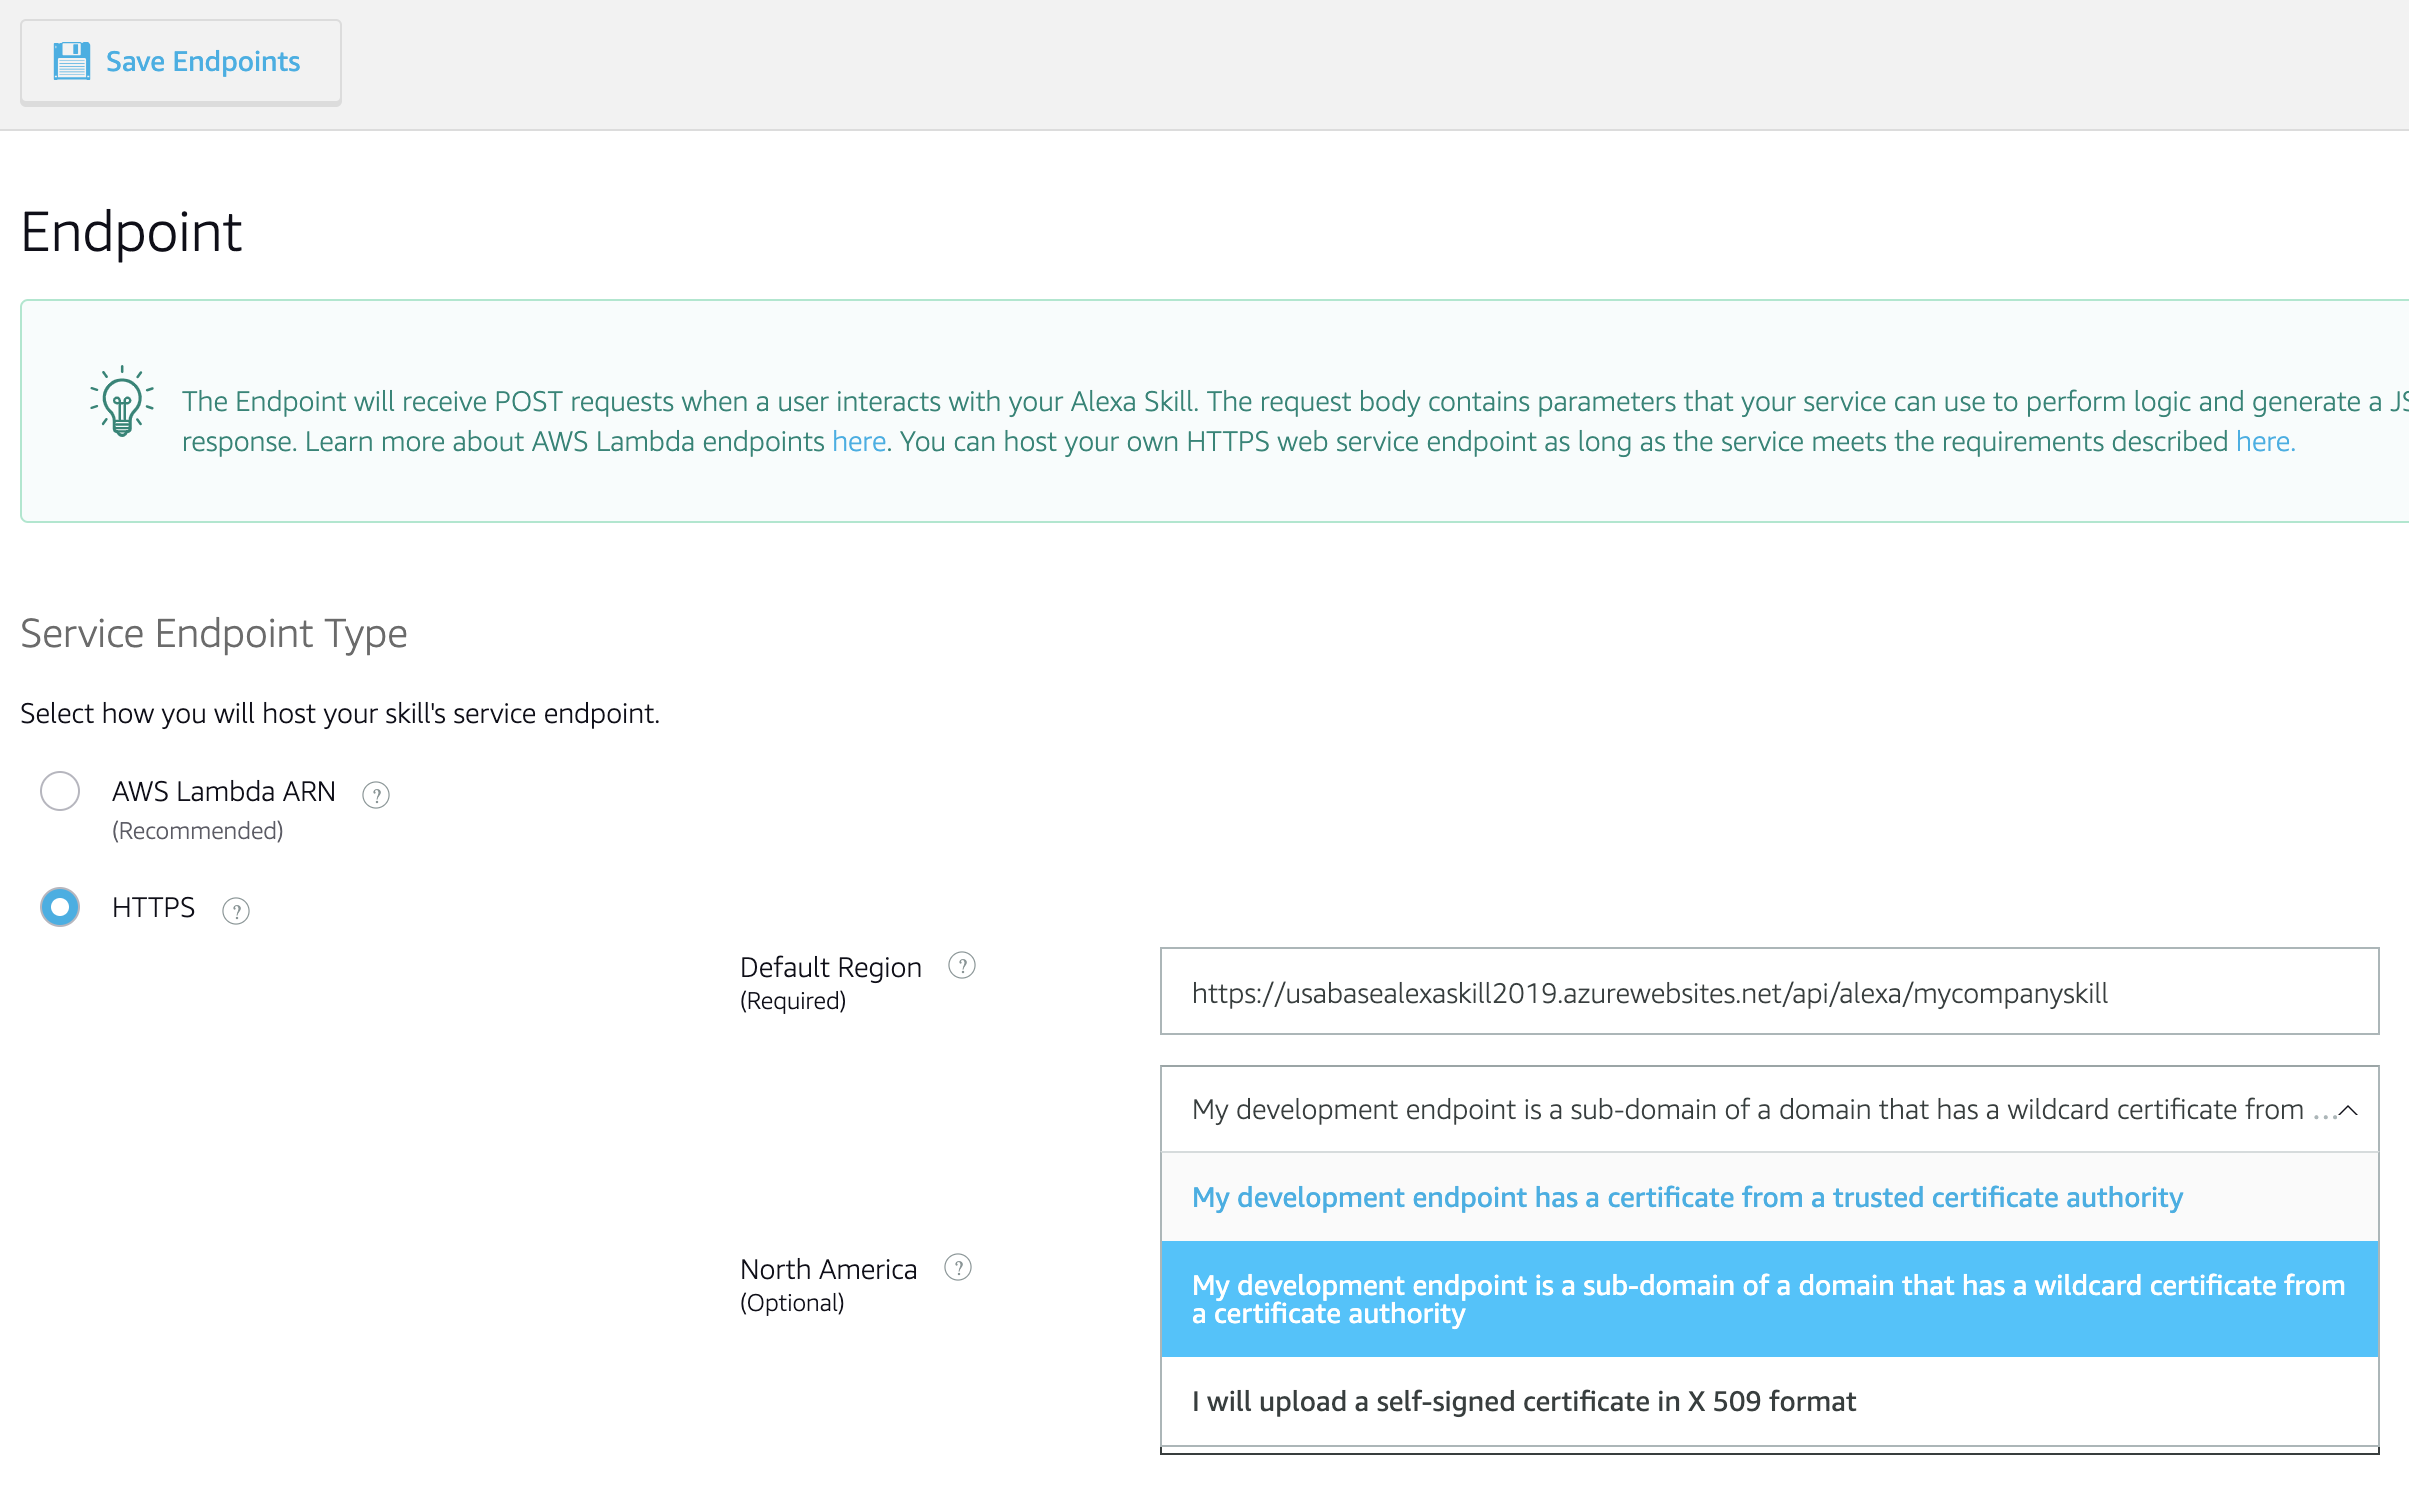
For this example, I had previously published the Web API project to Azure, as an Azure App Service. If you have done the same, then select the SSL certificate type sub-domain of a domain that has a wildcard certificate and click Save Endpoints.
Lastly, go back to Invocation and click Build Model. Make sure to wait until you get a successful build message on the right side. Now our service is connected to Alexa!
Extend Your Web API Project with an Alexa Endpoint
There are a few unofficial Alexa packages for .NET on NuGet, but they have dependencies on either .NET Standard, are targeting .NET Core, or have additional third party dependencies I find are not necessary. Since this is just JSON data sent via a POST method, we can easily handle that by adding a couple of C# classes for the Alexa request/response models. You can find the reference documentation for the request/response objects on Amazon’s site.
Open your existing Web API project in Visual Studio. Right click on the Models folder and add a new C# Class called “AlexaRequest.cs” and click Add. Replace the following code in your Usings section:
using System;
using System.Collections.Generic;
using Newtonsoft.Json;
Next, inside of your Models namespace, replace the empty AlexaRequest class with the following code:
[JsonObject]
public class AlexaRequest
{
    [JsonProperty("version")]
    public string Version { get; set; }

    [JsonProperty("session")]
    public SessionAttributes Session { get; set; }

    [JsonProperty("request")]
    public RequestAttributes Request { get; set; }

    [JsonObject("attributes")]
    public class SessionCustomAttributes
    {
        [JsonProperty("memberId")]
        public int MemberId { get; set; }

        [JsonProperty("lastIntentName")]
        public string LastIntentName { get; set; }
    }

    [JsonObject("session")]
    public class SessionAttributes
    {
        [JsonProperty("sessionId")]
        public string SessionId { get; set; }

        [JsonProperty("application")]
        public ApplicationAttributes Application { get; set; }

        [JsonProperty("attributes")]
        public SessionCustomAttributes Attributes { get; set; }

        [JsonProperty("user")]
        public UserAttributes User { get; set; }

        [JsonProperty("new")]
        public bool New { get; set; }

        [JsonObject("application")]
        public class ApplicationAttributes
        {
            [JsonProperty("applicationId")]
            public string ApplicationId { get; set; }
        }

        [JsonObject("user")]
        public class UserAttributes
        {
            [JsonProperty("userId")]
            public string UserId { get; set; }

            [JsonProperty("accessToken")]
            public string AccessToken { get; set; }
        }
    }

    [JsonObject("request")]
    public class RequestAttributes
    {
        private string _timestampEpoch;
        private double _timestamp;

        [JsonProperty("type")]
        public string Type { get; set; }

        [JsonProperty("requestId")]
        public string RequestId { get; set; }

        [JsonProperty("timestamp")]
        public string TimestampEpoch
        {
            get
            {
                return _timestampEpoch;
            }
            set
            {
                _timestampEpoch = value;

                if (Double.TryParse(value, out _timestamp) && _timestamp > 0)
                    Timestamp = new DateTime(1970, 1, 1, 0, 0, 0, DateTimeKind.Utc).AddMilliseconds(_timestamp);
                else
                {
                    var timeStamp = DateTime.MinValue;
                    if (DateTime.TryParse(_timestampEpoch, out timeStamp))
                        Timestamp = timeStamp.ToUniversalTime();
                }
            }
        }

        [JsonIgnore]
        public DateTime Timestamp { get; set; }

        [JsonProperty("intent")]
        public IntentAttributes Intent { get; set; }

        [JsonProperty("reason")]
        public string Reason { get; set; }

        public RequestAttributes()
        {
            Intent = new IntentAttributes();
        }

        [JsonObject("intent")]
        public class IntentAttributes
        {
            [JsonProperty("name")]
            public string Name { get; set; }

            [JsonProperty("slots")]
            public dynamic Slots { get; set; }

            public List<KeyValuePair<string, string>> GetSlots()
            {
                var output = new List<KeyValuePair<string, string>>();
                if (Slots == null) return output;

                foreach (var slot in Slots.Children())
                {
                    if (slot.First.value != null)
                        output.Add(new KeyValuePair<string, string>(slot.First.name.ToString(), slot.First.value.ToString()));
                }

                return output;
            }
        }
    }
}
Great! Add another C# class in the Models folder called “AlexaResponse.cs” and replace the usings section with the following code:
using Newtonsoft.Json;
Inside the Models namespace replace the empty AlexaResponse class with code below. Now we’ve got some Plain Old CSharp Objects (POCOs) to work with!
[JsonObject]
public class AlexaResponse
{
    [JsonProperty("version")]
    public string Version { get; set; }

    [JsonProperty("sessionAttributes")]
    public SessionAttributes Session { get; set; }

    [JsonProperty("response")]
    public ResponseAttributes Response { get; set; }

    public AlexaResponse()
    {
        Version = "1.0";
        Session = new SessionAttributes();
        Response = new ResponseAttributes();
    }

    public AlexaResponse(string outputSpeechText)
        : this()
    {
        Response.OutputSpeech.Text = outputSpeechText;
        Response.Card.Content = outputSpeechText;
    }

    public AlexaResponse(string outputSpeechText, bool shouldEndSession)
        : this()
    {
        Response.OutputSpeech.Text = outputSpeechText;
        Response.ShouldEndSession = shouldEndSession;

        if (shouldEndSession)
        {
            Response.Card.Content = outputSpeechText;
        }
        else
        {
            Response.Card = null;
        }
    }

    public AlexaResponse(string outputSpeechText, string cardContent)
        : this()
    {
        Response.OutputSpeech.Text = outputSpeechText;
        Response.Card.Content = cardContent;
    }

    [JsonObject("sessionAttributes")]
    public class SessionAttributes
    {
        [JsonProperty("memberId")]
        public int MemberId { get; set; }

        [JsonProperty("lastIntentName")]
        public string LastIntentName { get; set; }
    }

    [JsonObject("response")]
    public class ResponseAttributes
    {
        [JsonProperty("shouldEndSession")]
        public bool ShouldEndSession { get; set; }

        [JsonProperty("outputSpeech")]
        public OutputSpeechAttributes OutputSpeech { get; set; }

        [JsonProperty("card")]
        public CardAttributes Card { get; set; }

        [JsonProperty("reprompt")]
        public RepromptAttributes Reprompt { get; set; }

        public ResponseAttributes()
        {
            ShouldEndSession = true;
            OutputSpeech = new OutputSpeechAttributes();
            Card = new CardAttributes();
            Reprompt = new RepromptAttributes();
        }

        [JsonObject("outputSpeech")]
        public class OutputSpeechAttributes
        {
            [JsonProperty("type")]
            public string Type { get; set; }

            [JsonProperty("text")]
            public string Text { get; set; }

            [JsonProperty("ssml")]
            public string Ssml { get; set; }

            public OutputSpeechAttributes()
            {
                Type = "PlainText";
            }
        }

        [JsonObject("card")]
        public class CardAttributes
        {
            [JsonProperty("type")]
            public string Type { get; set; }

            [JsonProperty("title")]
            public string Title { get; set; }

            [JsonProperty("content")]
            public string Content { get; set; }

            public CardAttributes()
            {
                Type = "Simple";
            }
        }

        [JsonObject("reprompt")]
        public class RepromptAttributes
        {
            [JsonProperty("outputSpeech")]
            public OutputSpeechAttributes OutputSpeech { get; set; }

            public RepromptAttributes()
            {
                OutputSpeech = new OutputSpeechAttributes();
            }
        }
    }
}
It’s time to add the controller for our Alexa endpoint. Right-click on Controllers and select Add then Controller. Choose Web API 2 Controller - Empty and click Add. Set the Controller name to “AlexaController” and click Add.
Now add a RoutePrefix for the Controller above your AlexaController class:
[RoutePrefix("api/alexa")]
public class AlexaController : ApiController
Now copy and paste the code below inside of the class. Note that there are private methods for handling each intent after you examine the Alexa request object:
[HttpPost, Route("mycompanyskill")]
public AlexaResponse MyCompanySkill(AlexaRequest request)
{
    AlexaResponse response = null;

    switch (request.Request.Intent.Name)
    {
        case "HelloIntent":
            response = HelloIntentHandler();
            break;
        case "FavoriteBandIntent":
            response = FavoriteBandIntentHandler();
            break;
    }

    return response;
}

private AlexaResponse FavoriteBandIntentHandler()
{
    var favoriteBand = "unknown.";

    var response = new AlexaResponse("Your favorite band is " + favoriteBand + ".");
    response.Response.ShouldEndSession = true;
    return response;
}

private AlexaResponse HelloIntentHandler()
{
    var response = new AlexaResponse("Hello from My Company.");
    response.Response.Reprompt.OutputSpeech.Text =
        "You can tell me to say hello, what is my favorite band, or cancel to exit.";
    response.Response.ShouldEndSession = false;
    return response;
}
Be sure to add a reference to your Models folder in the Usings section in order to resolve the AlexaRequest and AlexaResponse class objects. Rebuild the project.
Deploy the Web API Service and Test Your Alexa Skill
Now you’ve got to test this API and make sure it works with Alexa. Deploy or republish your Web API project to wherever you have it hosted. Once your service has been deployed successfully, head back to the Alexa dashboard for “My Company Skill” and select Test. The testing will be disabled for the skill. To enable it, simply select Development from the drop down.
To test this skill, type “tell my company skill hello” in the textbox next to the language and hit your return/enter key. You should see the JSON response from your service right next to the JSON request along with an audible sound clip playback. If you have an Amazon Echo, you can say “Alexa, tell my company skill hello” and get the same audible response as long as the device is logged into your developer account.
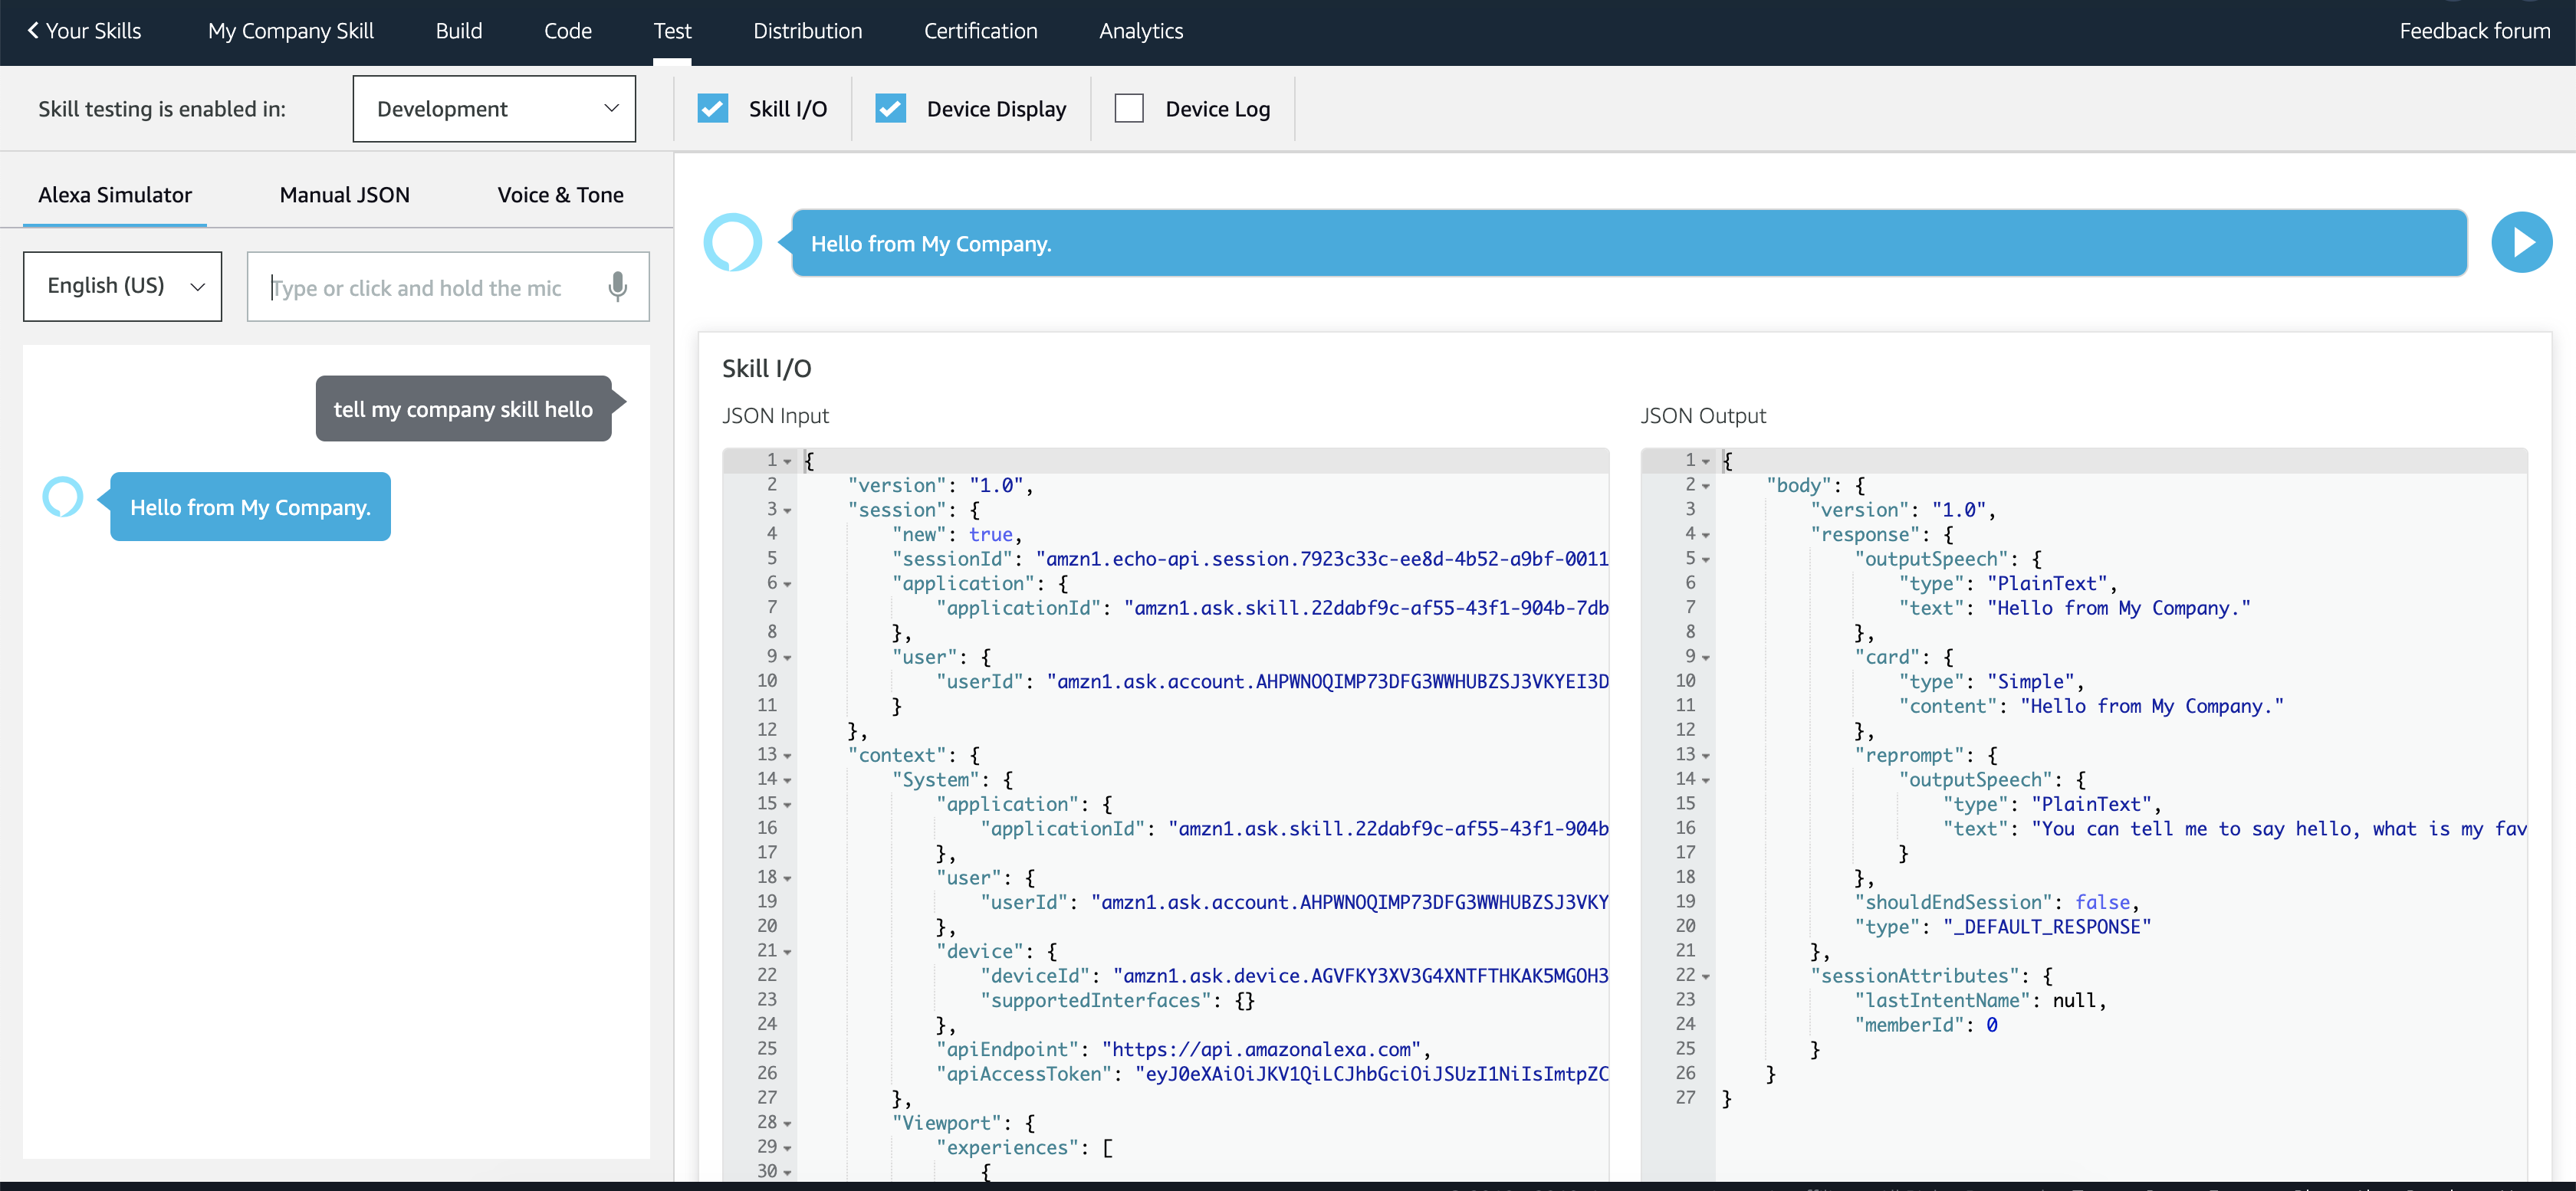
Congrats! You’ve got a working voice skill hooked up to your existing Web API project.
Add Secure Alexa Account Linking and User Management
You got the basic skill working, but currently, any Amazon user can access it. To secure the skill and know the identity of who is using it, Alexa offers an initial auth process called Account Linking which gates the enabling of the skill. Account linking in the Alexa Skills Kit uses OAuth 2.0 - so we will leverage Okta for managing login and user data with JSON Web Token (JWT) scopes and claims. Why use Okta? All the OAuth negotiations are configured between Okta and Amazon completely, so you don’t have to worry about how the access token was created - you simply use it when it gets to your API, making an otherwise cumbersome task an easy one.
To do this, head on over to the https://developer.okta.com/ and create an Okta org if you haven’t already. Log in with your Okta Super Administrator account. Click Applications then Add Application. Select Web and click Next.
This creates an application which will represent your custom Alexa skill. Even though you have a REST API and not a website, the login process for Alexa will go through the Alexa mobile app, and therefore will present a physical login page via OpenID Connect. The good news is - Okta manages that for you and you don’t have to build it!
You are presented with a screen to configure your Okta OpenID Connect application. Change the application name to “My Company Alexa Skill”. For the Login redirect URIs*, get this from your Alexa application on the skill page, scrolling down and clicking the Account Linking navigation bar. Toggle the switch for Do you allow users to create an account or link to an existing account with you?
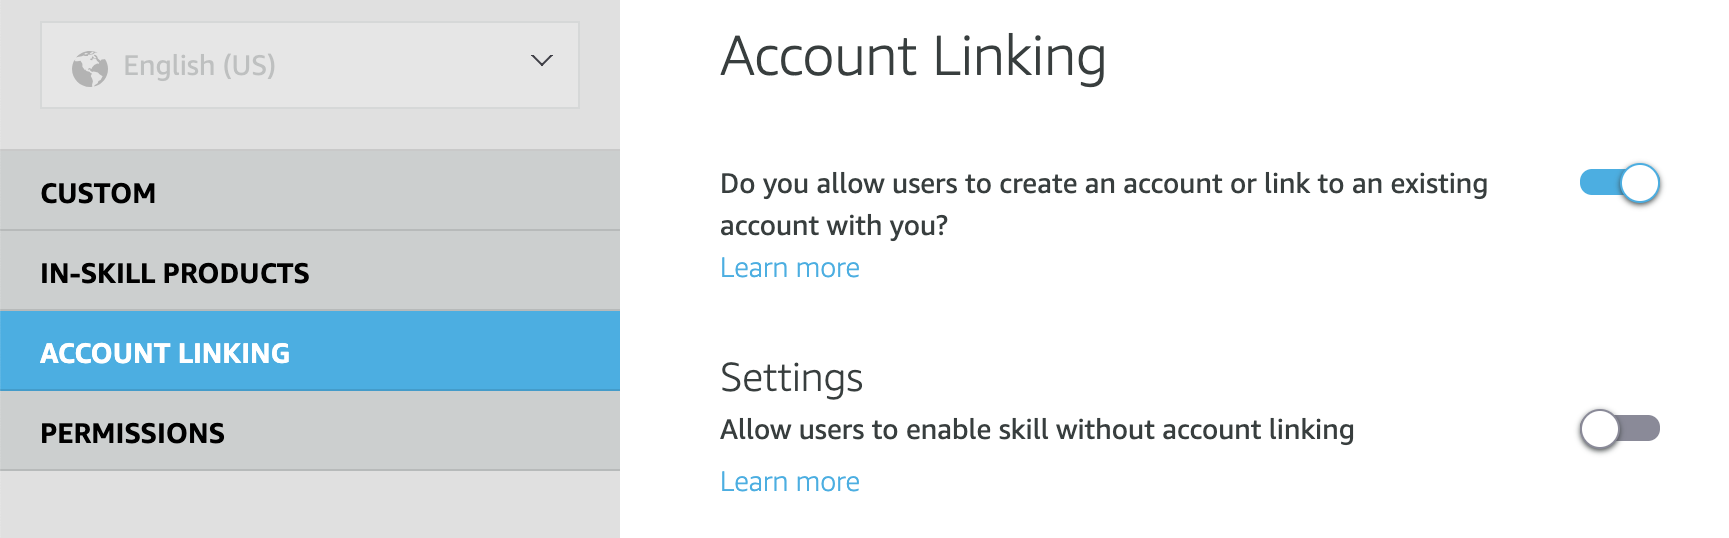
Scroll down. You will find the redirect URLs for this skill at the bottom. Add all three as separate entries to your Okta application.
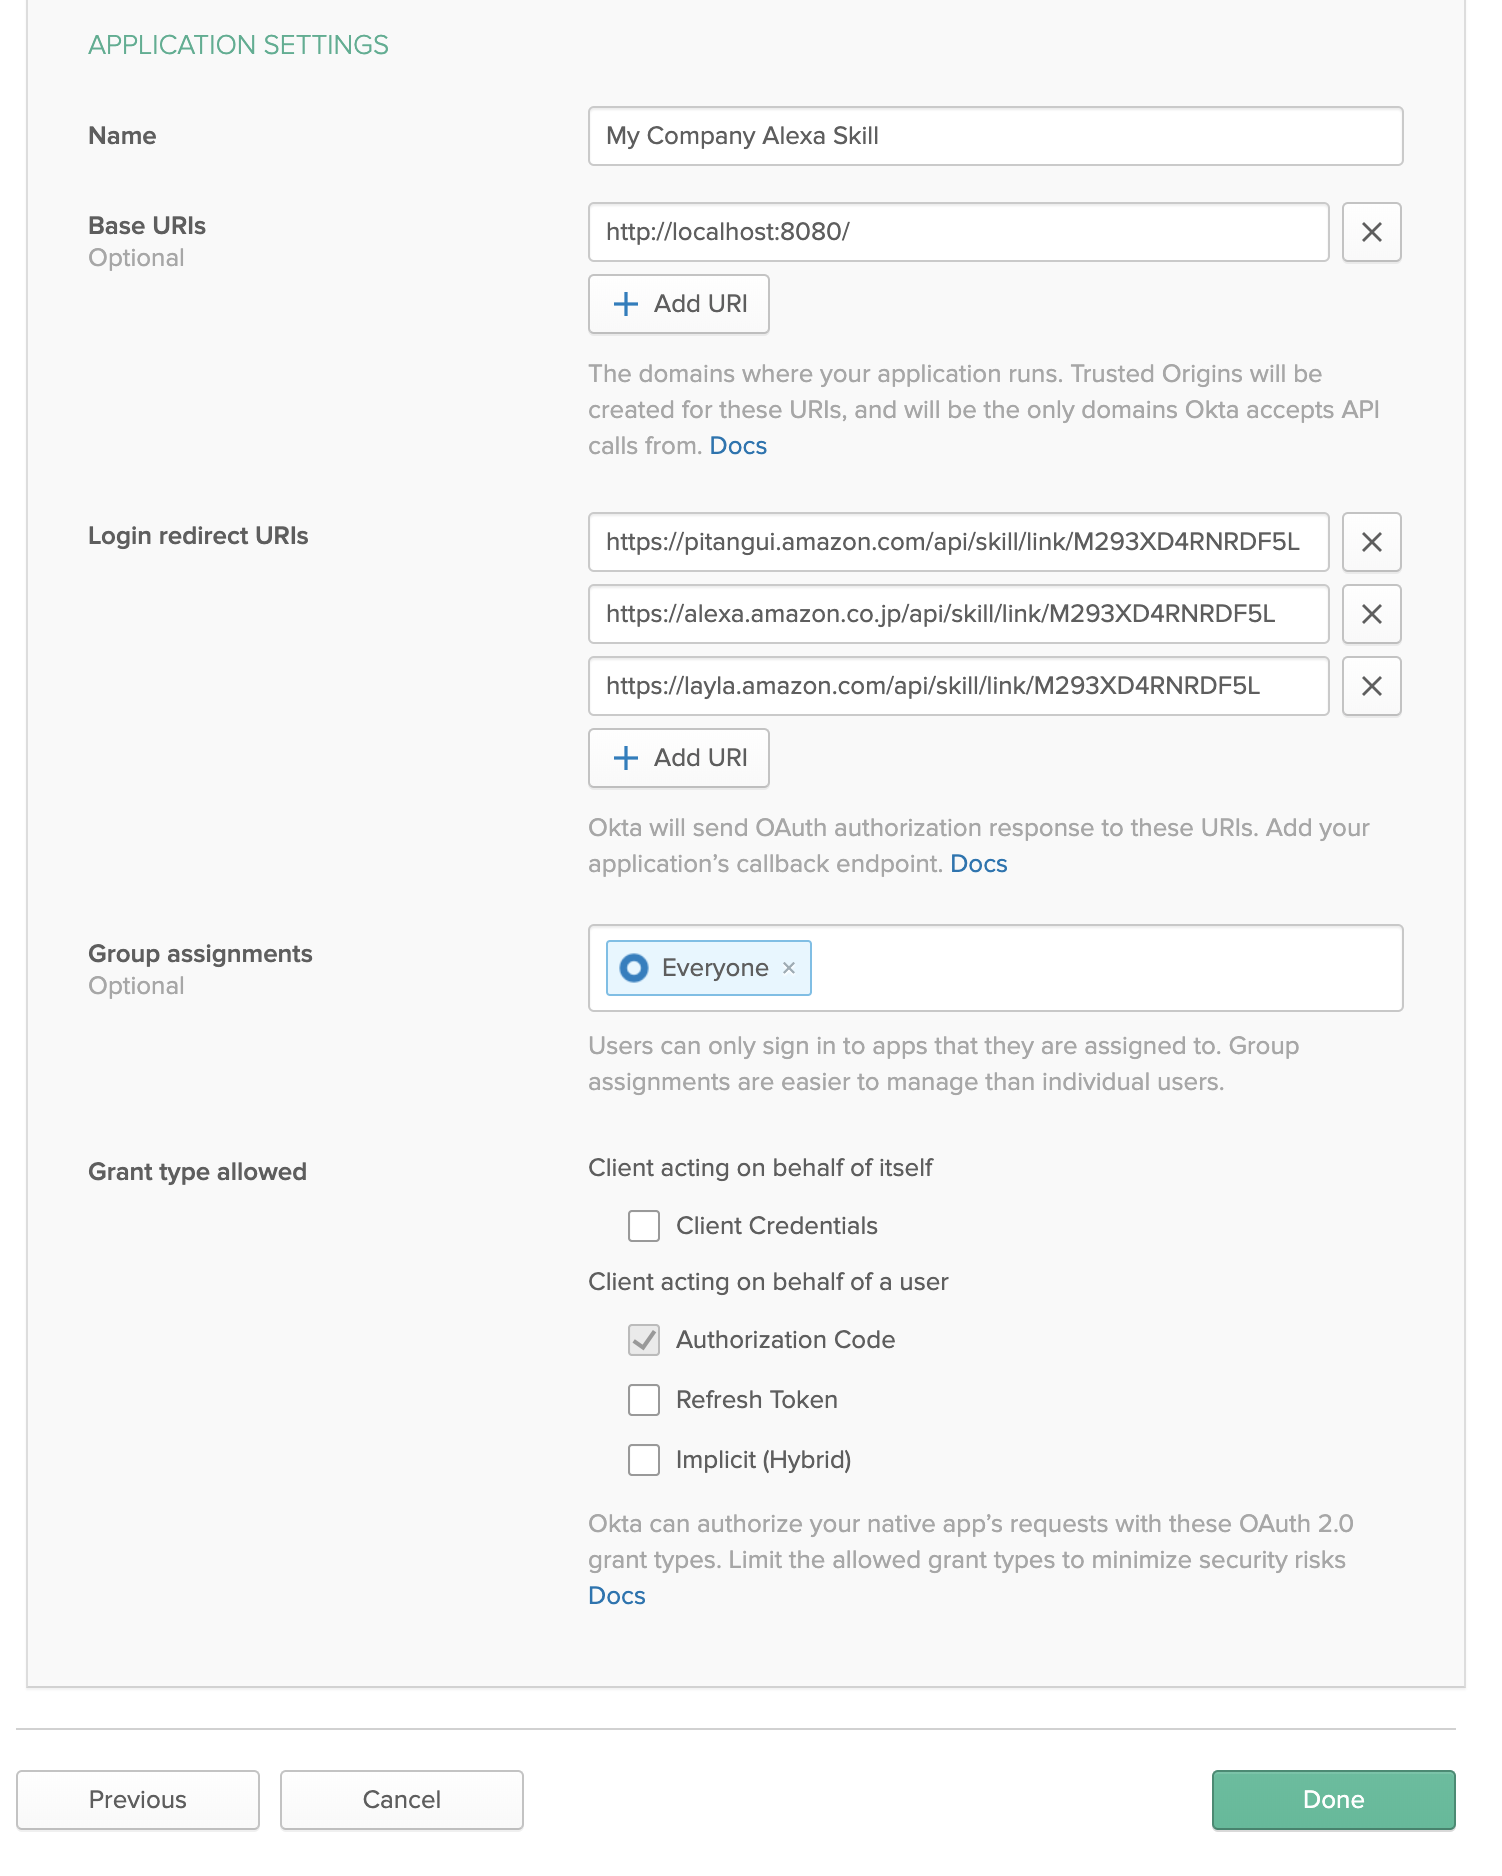
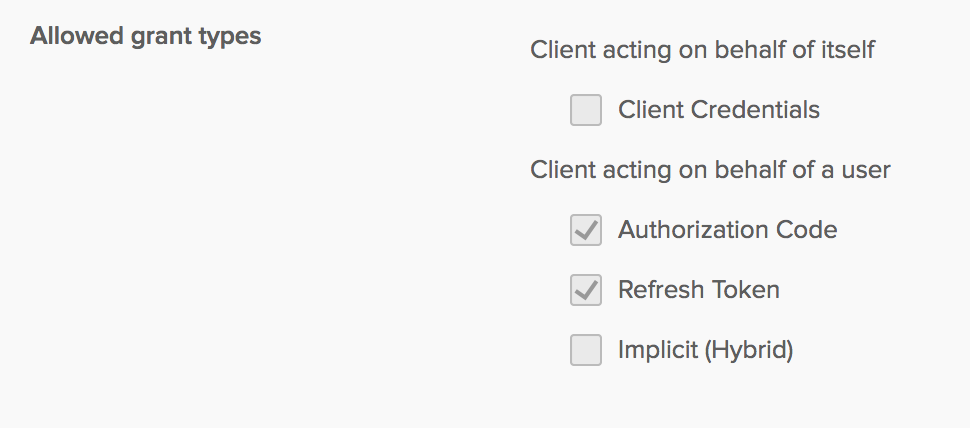
Okta registered apps have to explicitly request a refresh token using the offline_access scope. Okta won’t return a refresh token even if offline_access is requested - unless Refresh Token is enabled as an allowed grant type, so make sure to check that box.
Click Done when you’re finished. Note the Client ID and Secret, you’ll use it on the Account Linking page later.
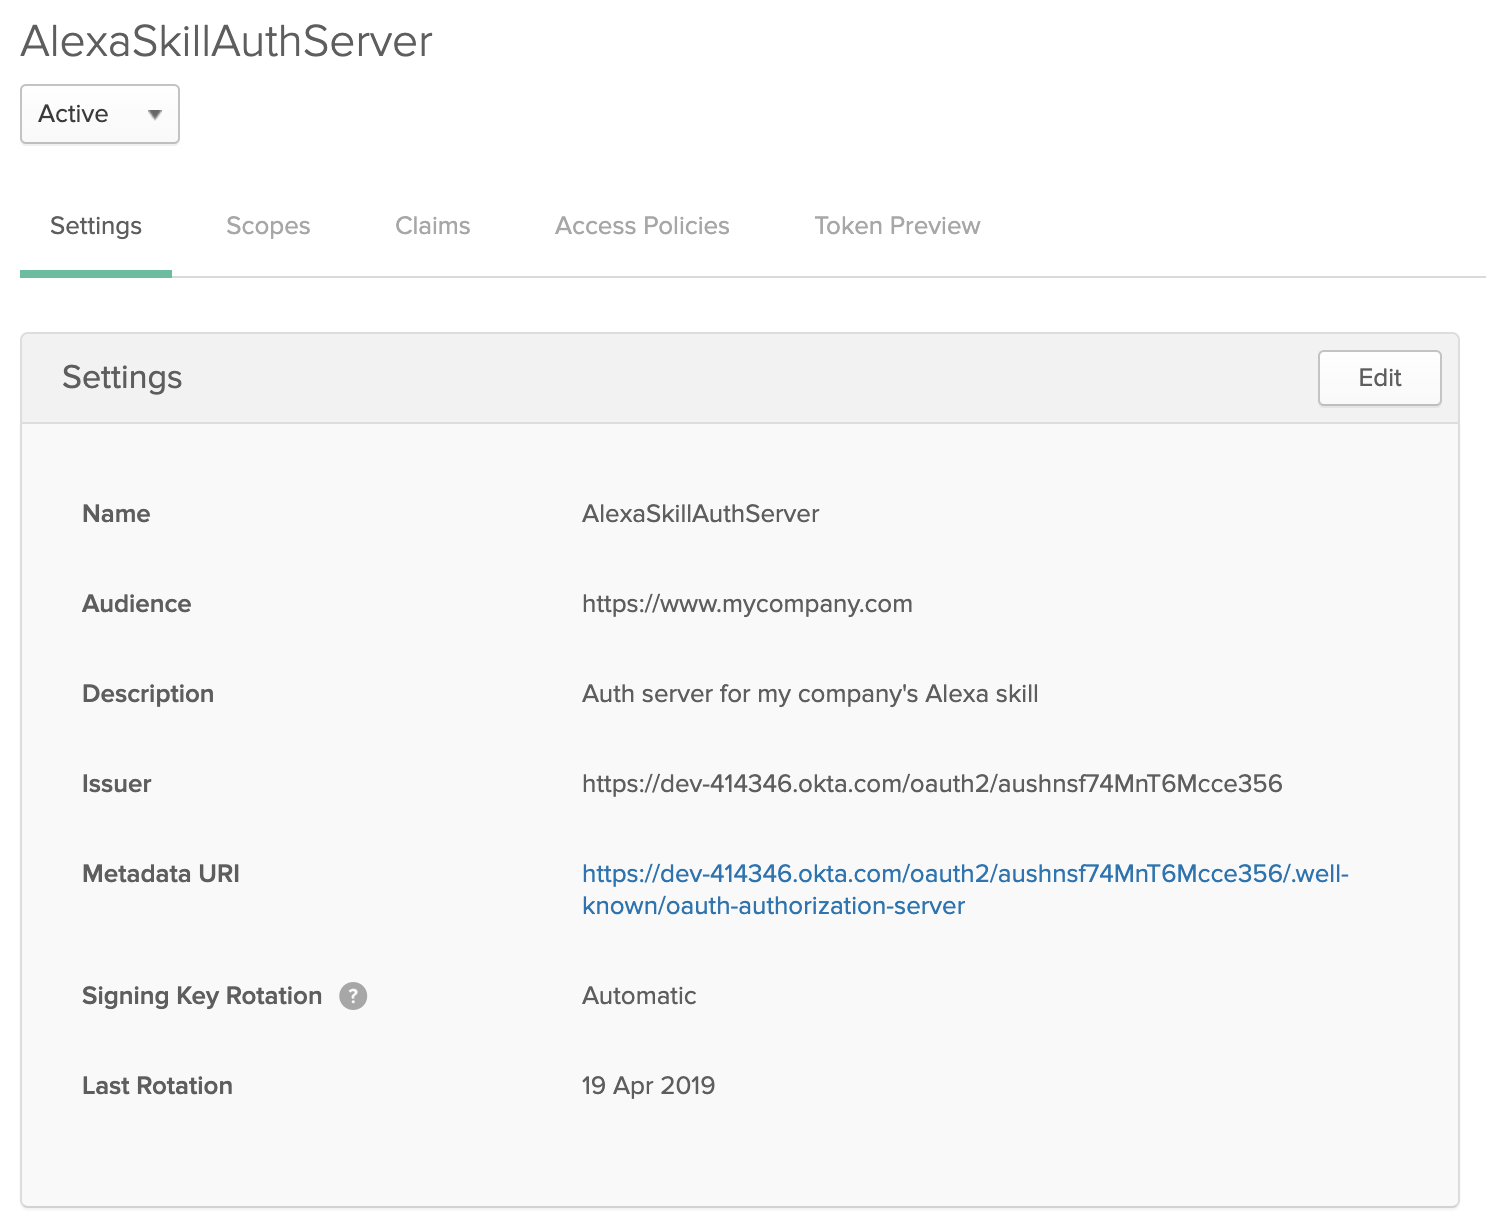
Create a Custom Authorization Server within Okta for your skill’s Account Linking feature. Navigate to: API > Authorization Servers. Choose Add Authorization Server. Put “AlexaSkillAuthServer” in the Name field. Put “http://mycompany.com” for the Audience field. Give it a description and click Save.
Now create some custom claims which will represent our favorite band and first name as well. Click the Claims tab. Click Add Claims. Add one for a user’s favorite band:
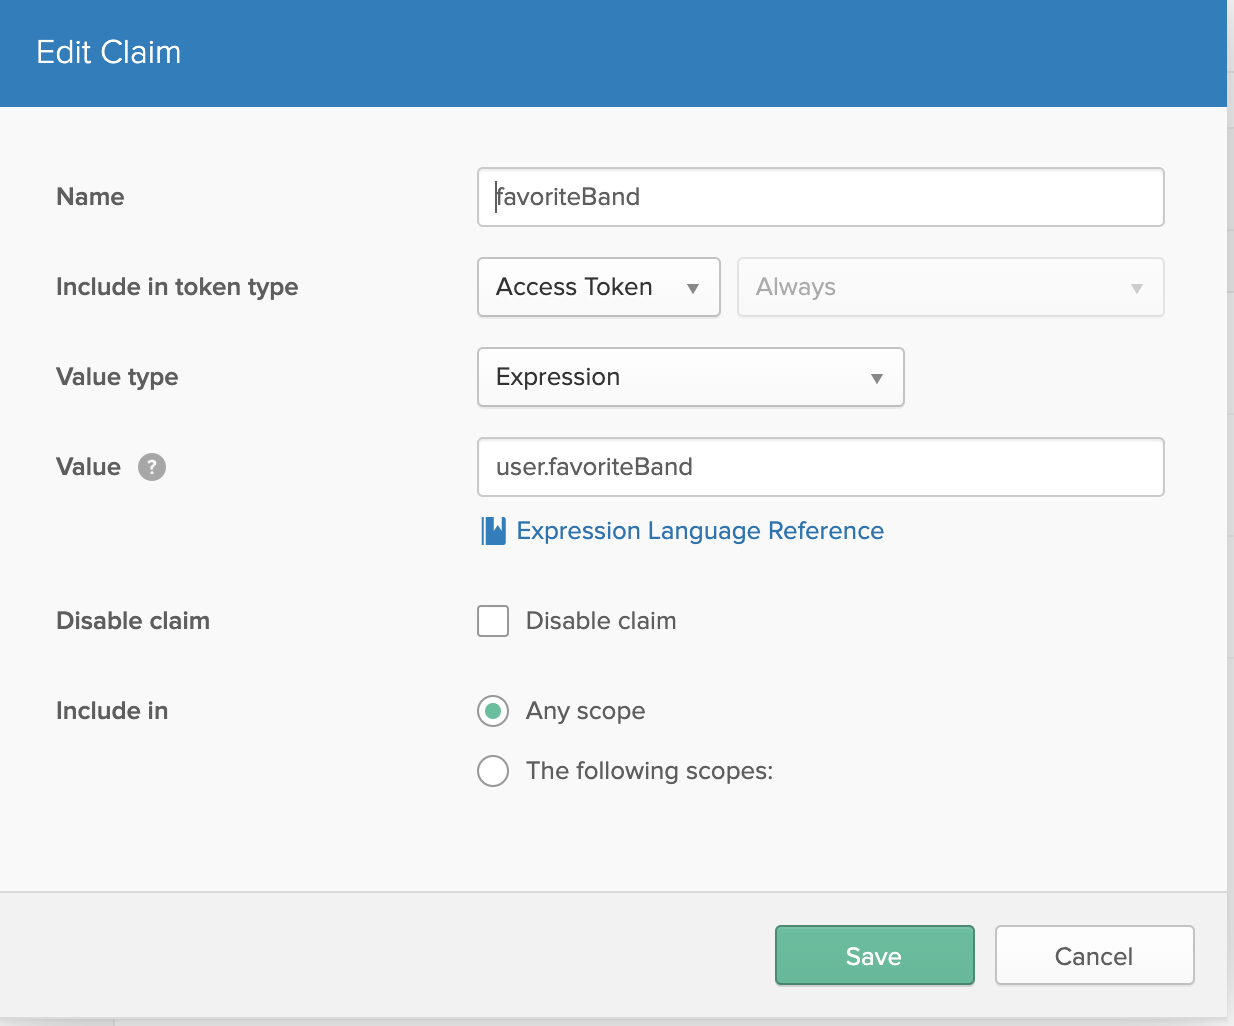
It’s important that you have configured the firstName and favoriteBand claims to be included ALWAYS for token requests and used in ANY scopes in the Okta portal.
Add another custom claim for the user’s first name. Call it “firstName” and set the value to “user.firstName”. Next, create an Access Policy. Click the Access Policies tab and click Add New Access Policy. Click Add Rule. Uncheck all the grant types except Authorization Code. You can adjust the life of the token if you wish. Leave the other defaults and click Save.
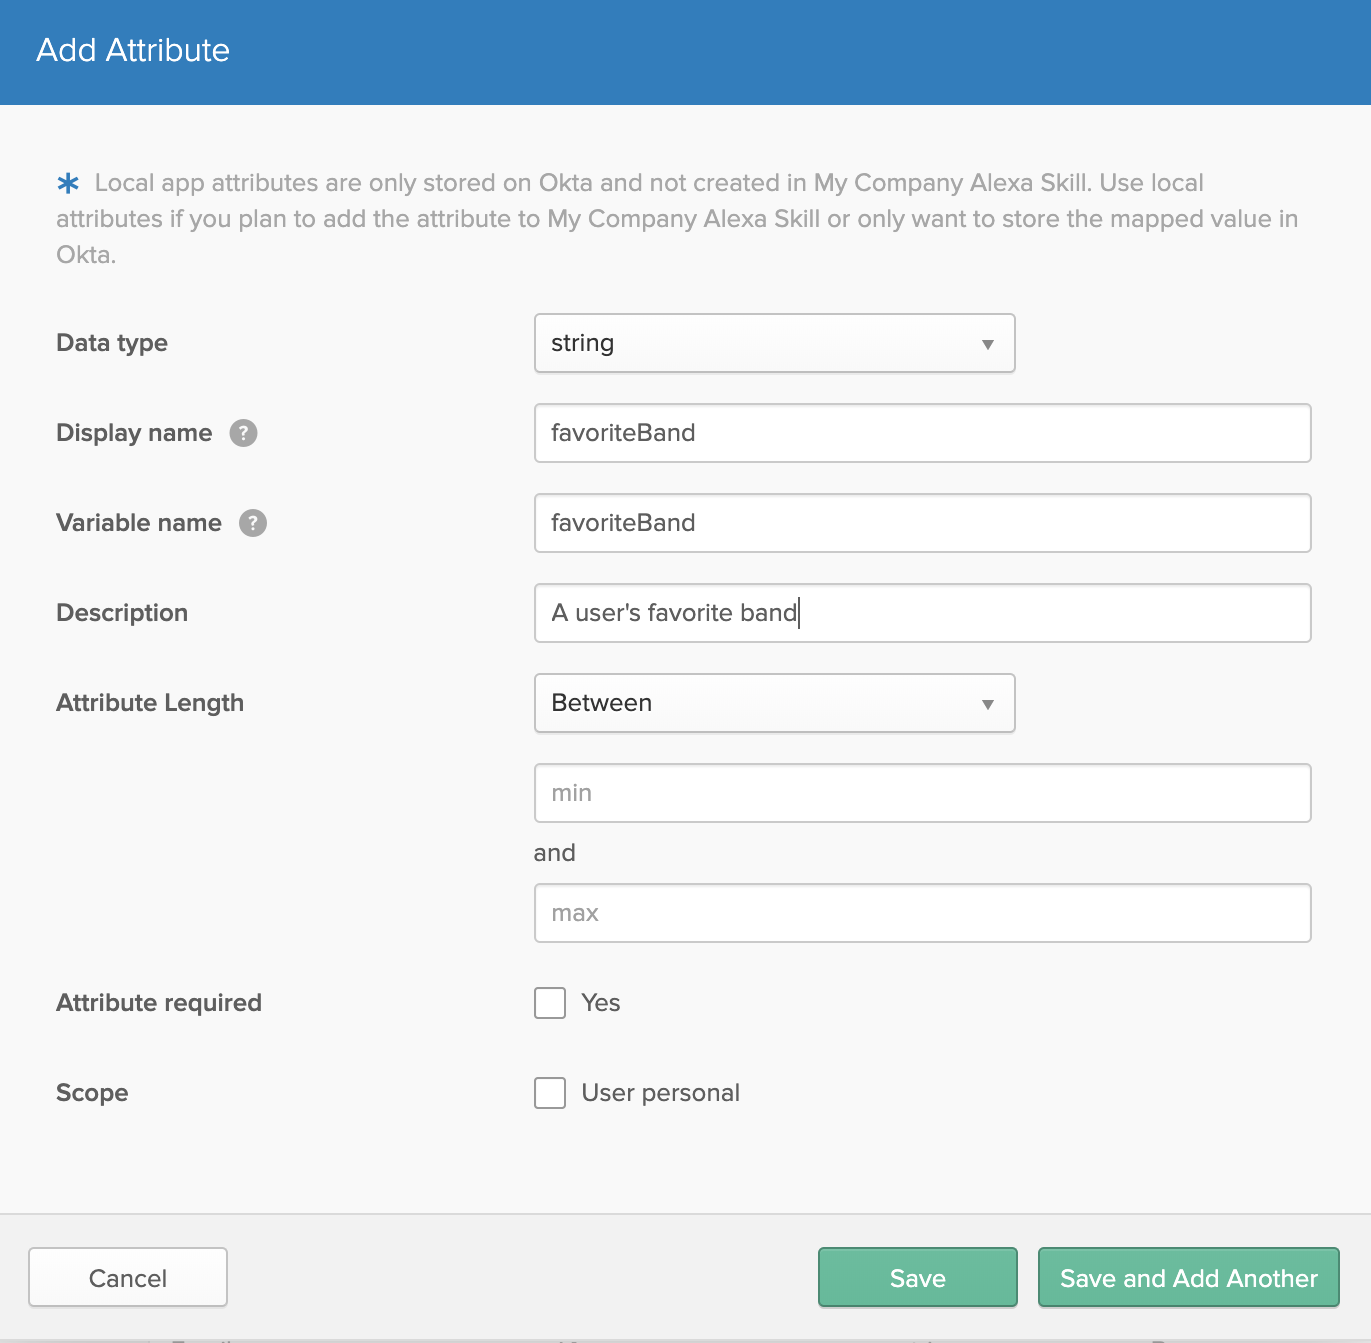
Now create a custom user profile attribute to store the user’s favorite band. Select Users > Profile Editor. Click the pencil icon to the right of the Okta logo.
Add a new attribute called favoriteBand. Click Add Attribute and enter “favoriteBand” for the Display name and Variable name. Fill in a description and click Save.
Since the user’s first name is already part of the default profile, you do not have to add the attribute again here. You’re all set with Okta for now!
Set Up Account Linking for Alexa Users
Go back to the Account Linking page for the skill in the Amazon portal. Once you are on that page, fill in the details from Okta. Information required will be the Authorization Grant Type to be used, Okta Authorization Server and Token URL, client ID of the Okta Alexa Application you created earlier, the permitted domains and default token expiration time.
To get your Authorization URI, go to your Okta Custom Authorization Server page and you should be able to see the metadata URI. Then append “/authorize”. The Access Token URI will be the same URL with “/token” appended to it. Set the Client Authentication Scheme to “Credentials in request body”.
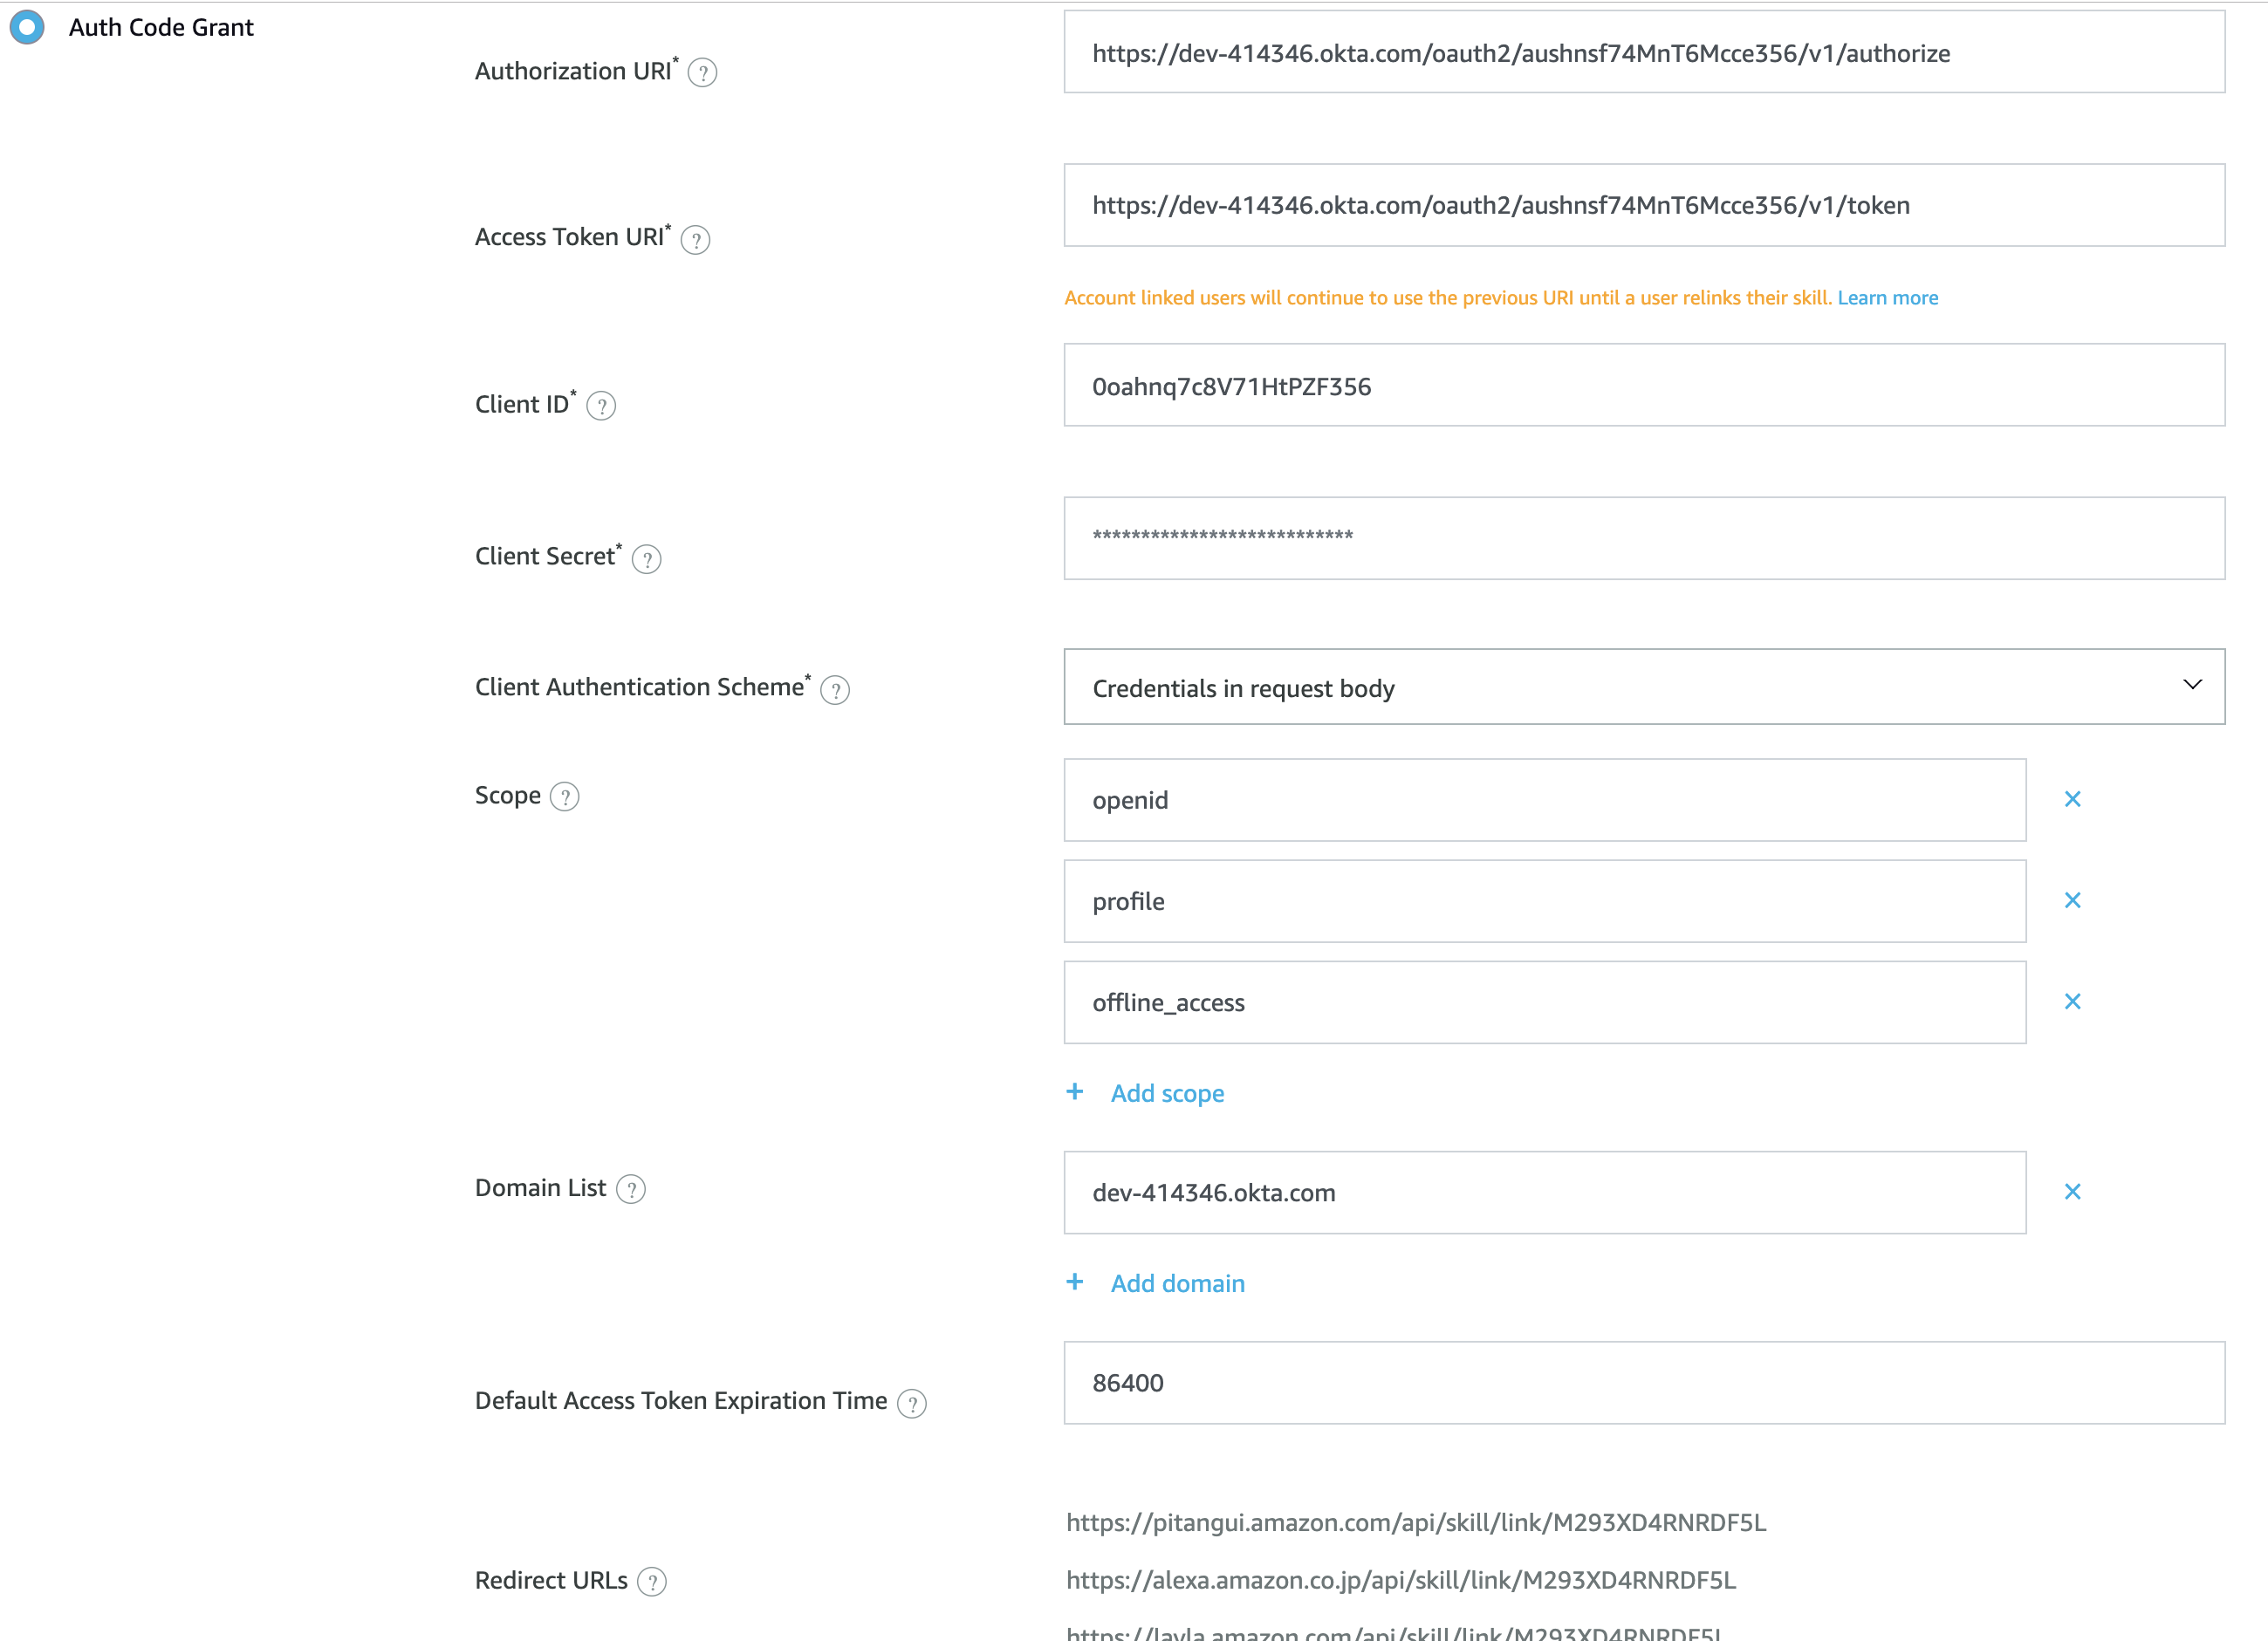
For Scope, it is important to add “openid”, “profile” and “offline_access” - which will allow the subsequent refresh tokens to work with Alexa along with the custom user data fields you added.
Decode the JSON Web Token to Get User Claims Data
Time for the good stuff, where the rubber meets the road! Install the following NuGet package:
System.IdentityModel.Tokens.Jwt
Replace the Usings section with the references below:
using System.IdentityModel.Tokens.Jwt;
using System.Linq;
using System.Web.Http;
using BaseAlexaSkill.Models;
Open your AlexaController and go to the FavoriteBandIntentHandler. To decode the access token created by Okta and set in the AccessToken property of the AlexaRequest (with the “Bearer” part removed) - replace the method with the code below:
private AlexaResponse FavoriteBandIntentHandler(AlexaRequest request)
{
    var jwtEncodedString = request.Session.User.AccessToken;

    if (request.Session.User.AccessToken != null)
    {
        //Decode name and favorite band from the access token
        var token = new JwtSecurityToken(jwtEncodedString: jwtEncodedString);
        var bandName = token.Claims.First(c => c.Type == "favoriteBand").Value;
        var name = token.Claims.First(c => c.Type == "firstName").Value;

        var response = new AlexaResponse(
            "Hello " + name + ", your favorite band is " + bandName + ".");
        response.Response.Card.Title = name + "'s Favorite Band";
        response.Response.Card.Content = bandName;
        response.Response.ShouldEndSession = true;

        return response;
    }
    else
    {
        var response = new AlexaResponse("You are not currently linked to this skill. Please go into your Alexa app and sign in.");
        response.Response.Card.Type = "LinkAccount";
        response.Response.ShouldEndSession = true;

        return response;
    }
}
Notice the else statement - if the access code is expired or null, sending a response with a card type of LinkAccount lets Alexa know to assist the user in the sign in process and will redirect them to enable or disable then reenable the skill and redirect them to Okta’s sign in screen. Finally, redeploy your service.
You can customize the Okta hosted sign-in page with your company logo and colors so the user doesn’t have to see that Okta is the provider. For more on Sign In widget customization, check out the docs.
Beta Test your Secure Account Linked Alexa Skill
Almost done! Create a sample user within Okta with an email address you can access that is different than your super admin one - in order to simulate an existing user. While you can use your super admin login to test, I always think it’s a better idea to set up a QA test account.
Go to Users > People and click Add Person. Fill in the details and click Save.
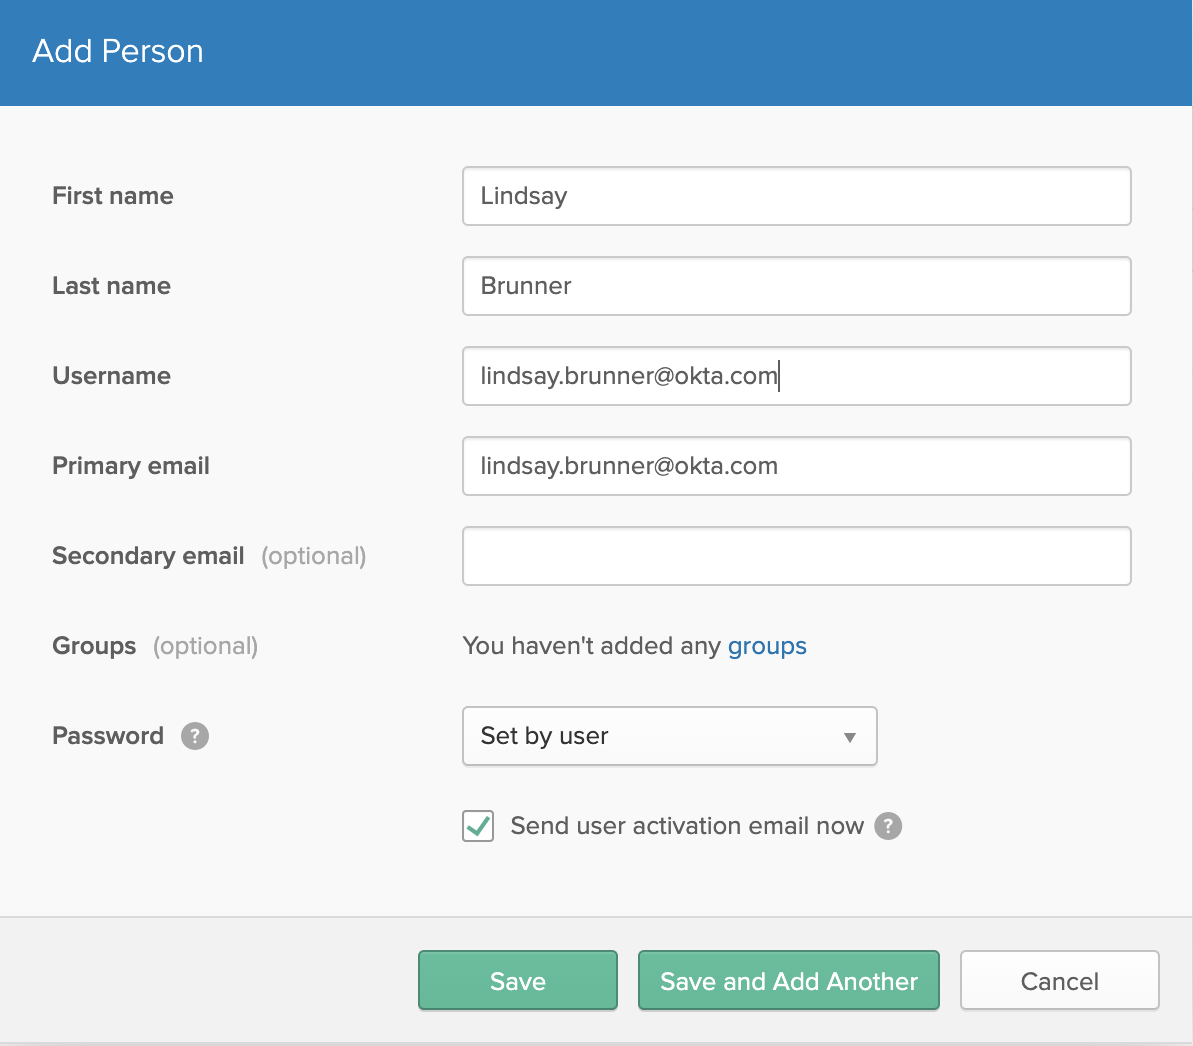
Now go back and edit that profile to add the name of a band in the favoriteBand field. For this example I used “Evanescence” but any band name will do. Click Save.
Check the email to activate the new Okta user account, following the steps to set up a password. Now you are ready to invite this test user to beta test your Alexa skill. Create a test Amazon account that you have access to via email as well. For this example, my test Amazon user happens to have the same email as we used for the Okta login - but it could be different. This is where Account Linking comes in.
Go back to your Alexa skill page and click Distribution and fill out all required items. Privacy Policy URL is not marked as required but in order to publish your skill, Amazon Alexa requires some URL information placed here - so make sure you provide a valid URL within the Privacy Policy URL field. Click Save and Continue. Complete the information required within the Privacy and Compliance page as well. Once done, click Save and Continue.
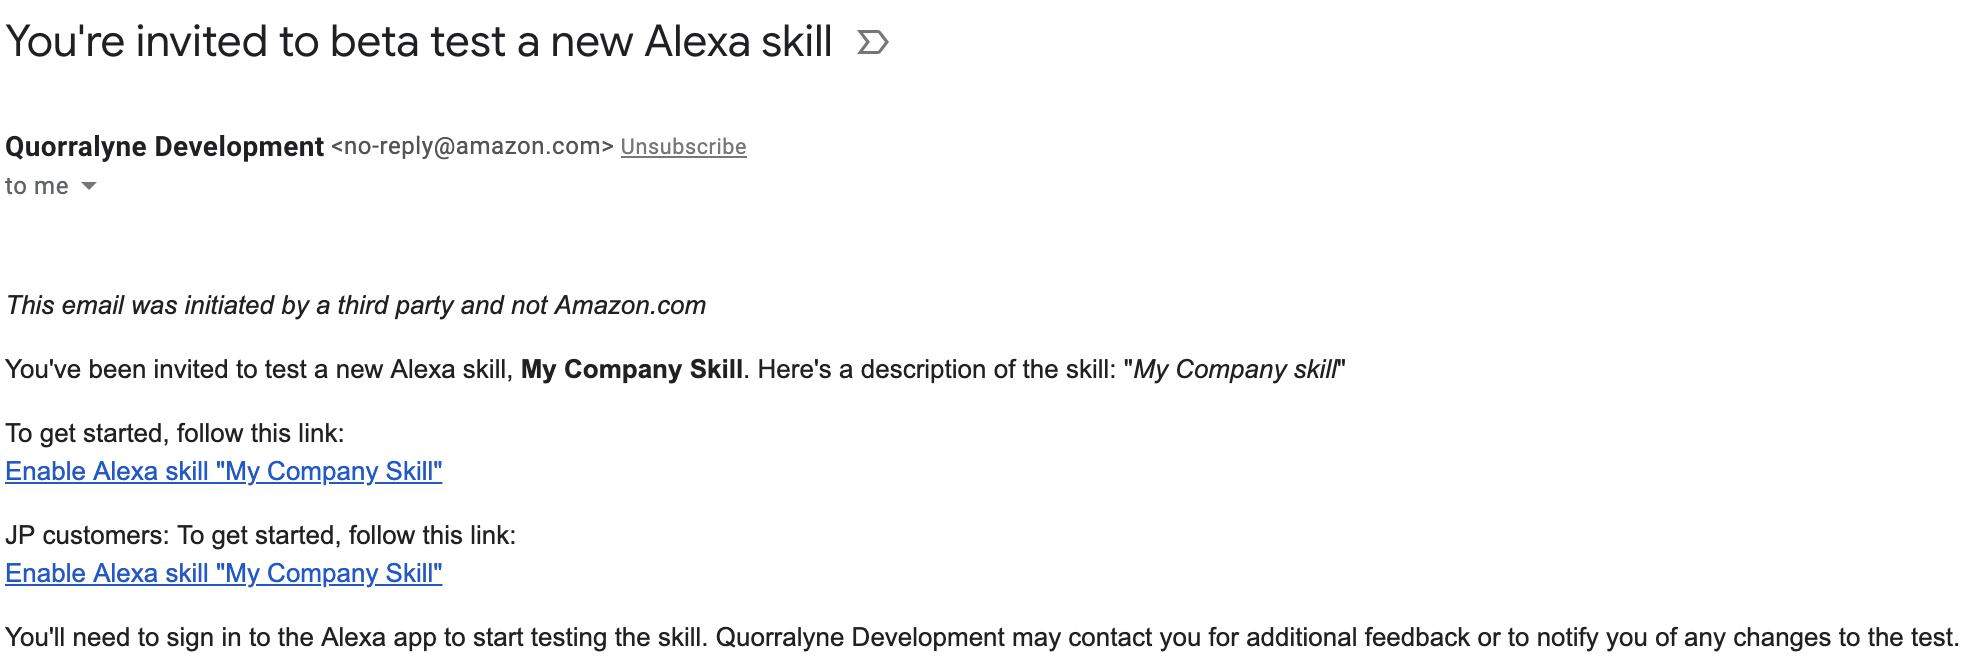
Under the Availability Page, you will be able to add which users can test the newly created Alexa skill you just developed. Add your test user’s Amazon email account and Amazon will send an email that will allow them to activate the skill on their Amazon user account. Take note that Amazon has a verification process before your skill can publicly be accessible across the Alexa skill store, and this is just the beta test. You should receive an email from Amazon regarding your Alexa skill invitation. Click the link so it can take you directly to the Alexa skill store page directed to your newly created custom skill.
Now, log in with your test user’s Okta credentials! You will be taken to the Alexa End User Skill page if you are already authenticated. Click I Accept. Click Settings in the upper right. Click Link Account. If you haven’t authenticated with Okta yet, then you will be prompted to log in with your Okta credentials. Once your authentication is successful, you should see a page saying your user’s Okta account is now linked with their Amazon one.
If you are using the mobile app, your skill page should now look like this:
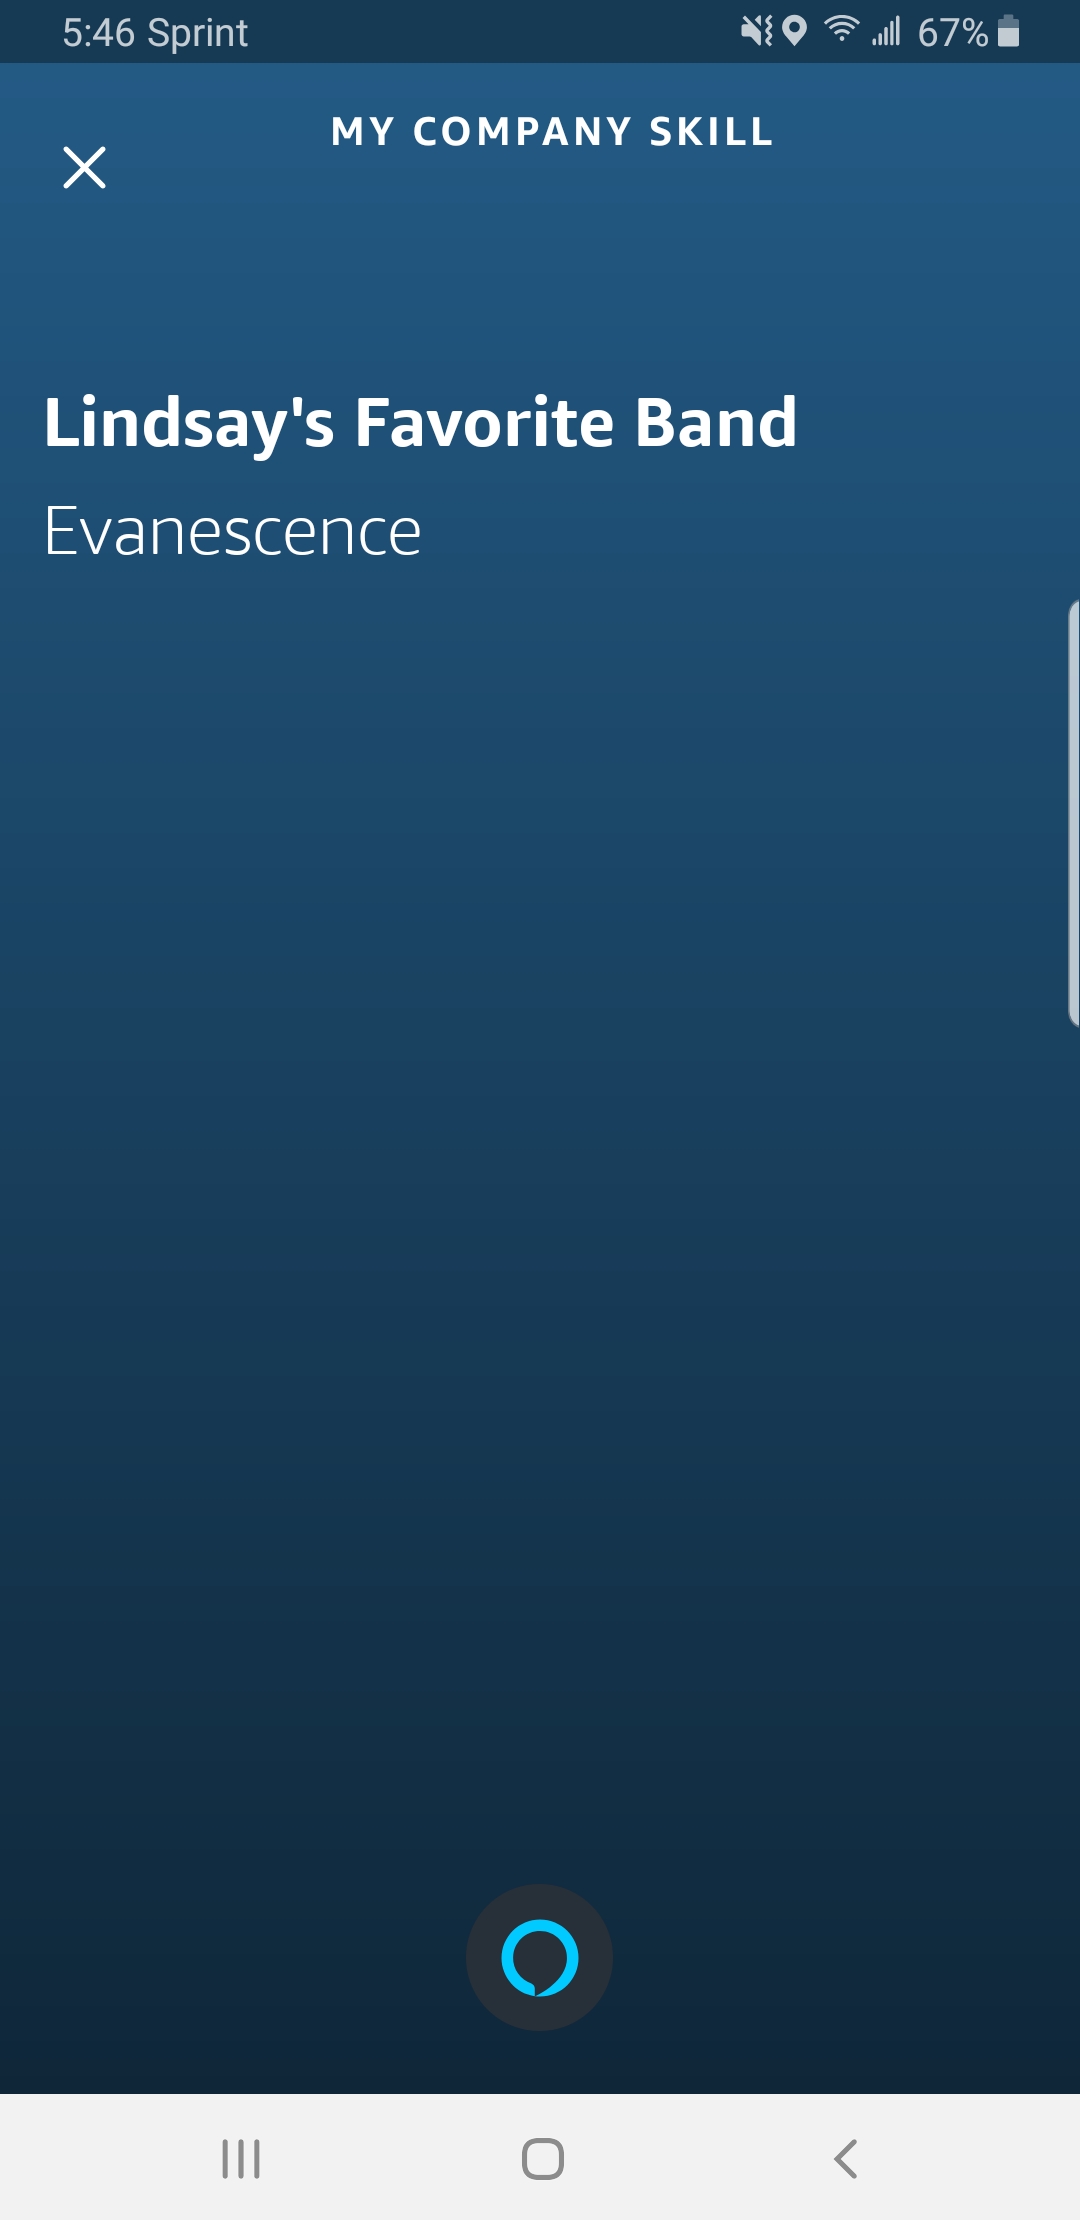
To test this skill, either log in an Echo device to your test user’s Amazon account or download the Alexa app onto your phone and use it there. You should also be able to test your Amazon developer account with the portal test simulator as well for this - as long as you have Account Linked your Okta admin user to it. Just say:
“Alexa, ask My Company Skill what is my favorite band?”.
If you asked this question with the mobile app by pressing on the Alexa icon, this is what you should see as a summary on the screen (in addition to hearing the audio response):
Awesome! You’ve successfully extended an existing ASP.NET API to support a secure Alexa custom skill. We’ve got more articles on Alexa skills coming, so comment below if you have given Alexa + Okta + C# a try!
Learn More About ASP.NET and Secure User Management
If you’d like to learn more about using secure OAuth and user management in ASP.NET, we’ve also published a number of posts that might interest you:
- How to Secure Your .NET Web API with Token Authentication
- Build a CRUD App with ASP.NET Framework 4.x Web API and Angular
- Secure Your ASP.NET Web Forms Application with OpenID Connect and Okta
- Use OpenID Connect for Authorization in Your ASP.NET MVC Framework 4.x App
As always if you have any questions or comments about this post feel free to leave a comment below. For other great content from the Okta Dev Team, follow us on Twitter and Facebook!
Okta Developer Blog Comment Policy
We welcome relevant and respectful comments. Off-topic comments may be removed.