Build a CRUD App with ASP.NET Framework 4.x Web API and Angular
Even with all the hype around ASP.NET Core, many .NET developers continue to develop applications with ASP.NET 4.x. The ASP.NET 4.X framework is still being developed, and will be supported for a long time to come. It’s a battle-tested web framework that has existed for over 15 years and is supported by a mature ecosystem.
On the client side, many developers prefer Angular, and it is outstanding for building enterprise-level, feature rich, applications.
The application we will be creating is a simple CRUD Sugar Level Tracker. First, we will learn how to build a REST service with our framework of choice, ASP.NET Web API 2. After that, we will implement SPA that will consume our API. Also, let’s not forget about security! We will learn how to easily secure our application with an external provider like Okta. In the end, we will have fully functional, and secure application for measuring sugar level.
We will be using .NET Framework 4.7.1 and Visual Studio 2017. Also, you should have Node and npm installed.
Note: In May 2025, the Okta Integrator Free Plan replaced Okta Developer Edition Accounts, and the Okta CLI was deprecated.
We preserved this post for reference, but the instructions no longer work exactly as written. Replace the Okta CLI commands by manually configuring Okta following the instructions in our Developer Documentation.
Get Started with ASP.NET
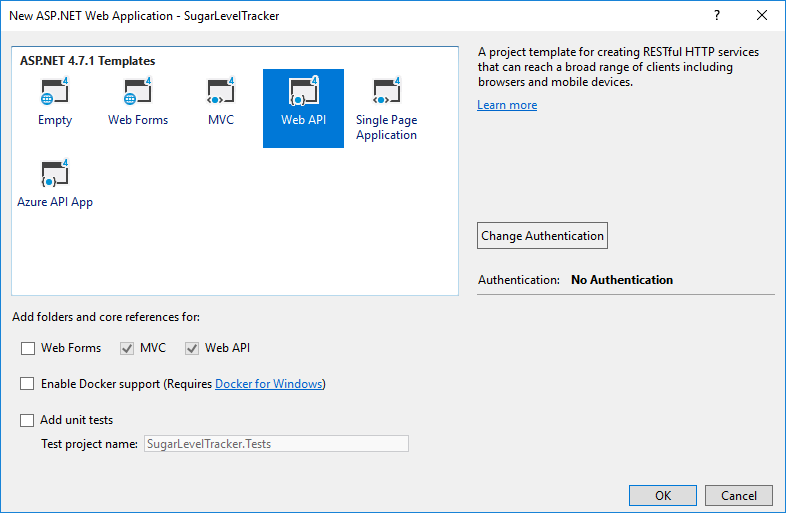
First, let’s create an API using a built-in template within Visual Studio. Let’s start from a scratch.
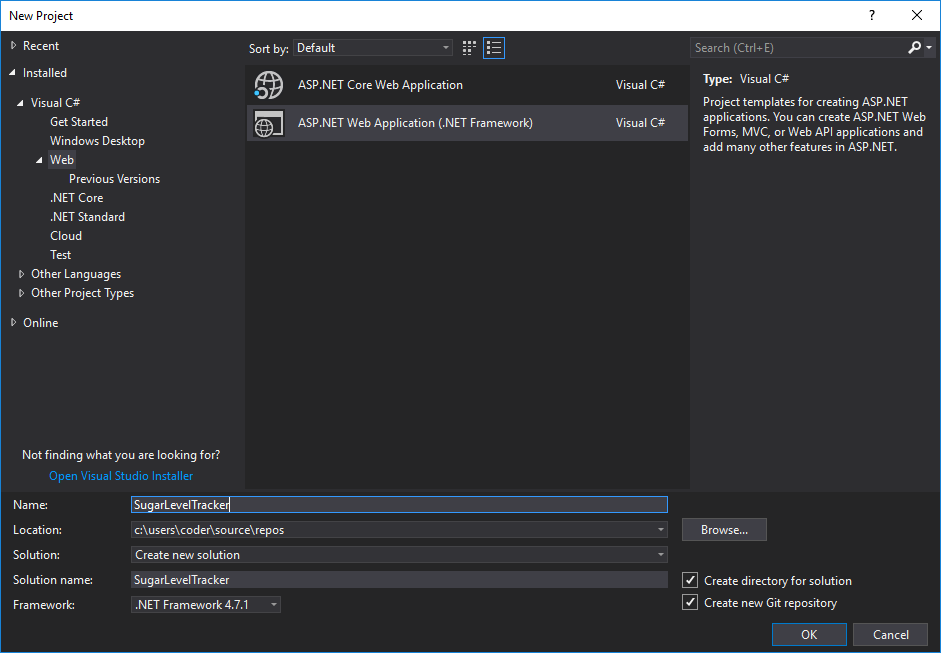
In Visual Studio, select File -> New Project
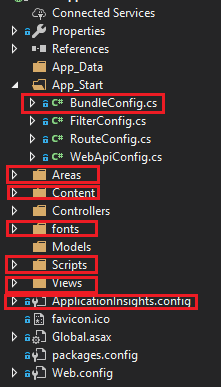
At this moment, we have a lot of boilerplate code that we really don’t need in our application.
Let’s clean up the boilerplate code and remove all redundant files and NuGet packages.
Since we are building an API, we don’t need UI related files or folders. We can remove all the following:
After you have done this, go to your Global.asax file and remove the using statement:
using System.Web.Optimization;
And also remove the Bundles registration part, since we will not be needing these for API:
BundleConfig.RegisterBundles(BundleTable.Bundles);
We will also remove some of the NuGet packages: Microsoft.ApplicationInsights related packages, Modernizr, WebGrease, Antlr, bootstrap, jQuery.
You can do it simply by running the following script into your Package Manager Console
Uninstall-Package Microsoft.ApplicationInsights.Web
Uninstall-Package Microsoft.ApplicationInsights.WindowsServer
Uninstall-Package Microsoft.ApplicationInsights.WindowsServer.TelemetryChannel
Uninstall-Package Microsoft.ApplicationInsights.PerfCounterCollector
Uninstall-Package Microsoft.ApplicationInsights.DependencyCollector
Uninstall-Package Microsoft.ApplicationInsights.Agent.Intercept
Uninstall-Package Microsoft.ApplicationInsights
Uninstall-Package Microsoft.AspNet.Web.Optimization
Uninstall-Package bootstrap
Uninstall-Package jQuery
Uninstall-Package WebGrease
Uninstall-Package Antlr
Uninstall-Package Modernizr
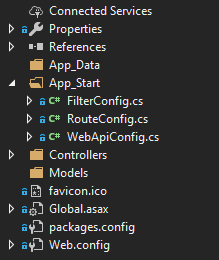
After finishing we should have a clean project solution and perfect starting ground. Our solution should now look like the following image:
Install ASP.NET API Project Dependencies
Now, that we have a clean solution let’s install all necessary packages and project dependencies. Later we will learn about each of the packages. Again, we will do it using the Package Manager Console by executing the following:
Install-Package Microsoft.Owin.Host.SystemWeb -Version 4.0.0
Install-Package Microsoft.IdentityModel.Protocols.OpenIdConnect -Version 5.2.1
Install-Package Microsoft.IdentityModel.Tokens -Version 5.2.1
Install-Package Microsoft.Owin.Security.Jwt -Version 4.0.0
Install-Package EntityFramework -Version 6.2.0
Install-Package Microsoft.AspNet.WebApi.Cors -Version 5.2.6
Install-Package Microsoft.AspNet.Identity.Owin -Version 2.2.1
Connect with Entity Framework 6
Entity Framework 6 is a mature ORM, built and supported by Microsoft. It allows us to interact with the database without the need to know or execute SQL queries. The classes from our code will map to database tables and will basically define database structure. EntityFramework has a migration concept, which allows us to track changes within our DB models which reflect database structure.
Let’s now set up our database connection. We will add a connection string to Web.Config. Make sure to add it inside of <configuration>, after <configSections></configSections>
<connectionStrings>
  <add name="OktaConnectionString" providerName="System.Data.SqlClient" connectionString="Server=.;Database=Okta; Integrated Security=True;" />
</connectionStrings>
Create an ASP.NET Model and DbContext
First, we will need a model for tracking sugar levels. Create a file in the Models folder called SugarLevel.cs.
using System;
using System.ComponentModel.DataAnnotations;

namespace SugarLevelTracker.Models
{
    public class SugarLevel
    {
        [Key]
        public int Id { get; set; }

        [Required]
        public float Value { get; set; }

        [Required]
        public string Description { get; set; }

        [Required]
        public DateTime MeasuredAt { get; set; }
    }
}
As you can see, we have standard property for unique identifier - Id, which will be picked up by Entity Framework and used as primary key. We need Value to store our trackings and Description to associate a name with it. We will also use MeasuredAt to indicate when we measured our sugar level.
Let’s create our ApplicationDbContext class, inside of new folder called Data. It will be pretty simple:
using System.Data.Entity;
using SugarLevelTracker.Models;

namespace SugarLevelTracker.Data
{
    public class ApplicationDbContext : DbContext
    {
        public ApplicationDbContext() :
          base("OktaConnectionString")
        {
        }

        public static ApplicationDbContext Create()
        {
            return new ApplicationDbContext();
        }

        public DbSet<SugarLevel> SugarLevels { get; set; }
    }
}
Our DbContext refers to the connection string, and contains a property for sugar levels that will map to a table in the database.
Set Up Migrations
First, we will enable migrations, run the following in Package Manager Console:
Enable-Migrations
Now we can add our initial migration, that will contain creation of SugarLevel table:
Add-Migration Initial
We can update the database now:
Update-Database -Verbose
Verbose flag will allow us to see the generated SQL statements, and this can help us in resolving errors, if any occur.
Create RESTful ASP.NET API Endpoints
Since we are building a RESTful API for simple CRUD functionality, we will have 5 simple endpoints:
-
Get All sugar levels
-
Get sugar level by ID
-
Update an existing sugar level
-
Create new sugar level
-
Delete existing sugar level
Let’s create a controller that will bring to life our endpoints. We will use scaffolding, a powerful feature that comes with Visual Studio. It will create a controller with CRUD actions, based on our model and DbContext.
Right click on Controllers folder, and choose Add -> Controller:
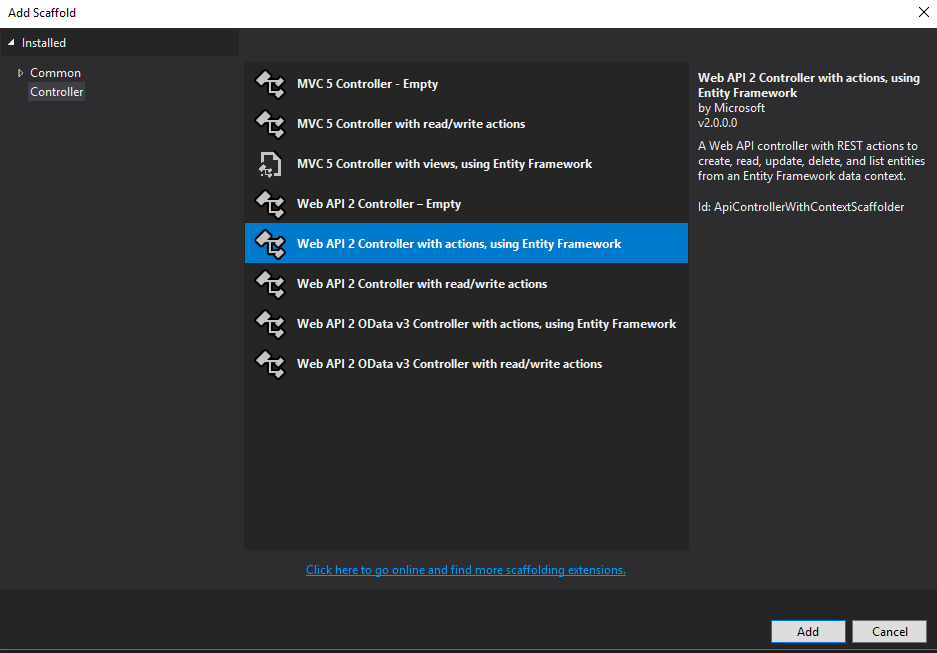
We will pick Web API 2 Controller with actions, using Entity Framework. On the next screen we will choose our model and DbContext classes, and tell Visual Studio to create async controller actions. Async controller actions will make use of async/await pattern.
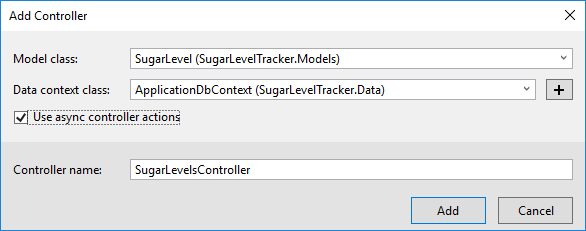
Using async/await pattern can help us avoid performance bottlenecks and increase overall responsiveness of our application. The catch with async/await pattern is that we have to use it on all methods of all layers in our application.
Enable CORS for ASP.NET and Angular
Since our client application will be running on a different port than our ASP.NET server, we will need to add CORS middleware to the pipeline.
We will enable CORS globally by adding a following to Register() method of our WebApiConfig class, which is located in the App_start folder.
You will also need to add the using statement for CORS.
using System.Web.Http.Cors;
Then add the following to the end of the Register() method.
// Enable CORS for the Angular App
var cors = new EnableCorsAttribute("http://localhost:4200", "*", "*");
config.EnableCors(cors);
Our SPA application will be served by Angular CLI and will be running at 4200 port we added http://localhost:4200 as the allowed origin. Since we will be running both, the frontend and backend locally, we can trust this origin. Therefore, we can use the * as a wildcard for headers and methods, allowing all headers and methods from this origin. In practice, you would want to only allow really needed headers and methods to your clients (origins).
Set a Default Formatter for ASP.NET Web API 2
Sadly, ASP.NET Web API 2 by default uses XML formatter. We will remove it and make sure JSON formatter is used. Add the following code at the end of Register method inside of WebApiConfig class:
// Set JSON formatter as default one and remove XmlFormatter

var jsonFormatter = config.Formatters.JsonFormatter;
jsonFormatter.SerializerSettings.ContractResolver = new CamelCasePropertyNamesContractResolver();
config.Formatters.Remove(config.Formatters.XmlFormatter);
jsonFormatter.SerializerSettings.DateTimeZoneHandling = Newtonsoft.Json.DateTimeZoneHandling.Utc;
You’ll also need to add the using statement for the JSON serializer to the file:
using Newtonsoft.Json.Serialization;
We also want to specify the port the API will be running on so that the Angular application can call it. To do so, right click on the project in the solution explorer and click properties. In the main properties window, choose Web from the left-hand menu and set the Project Url property to http://localhost:8080.
Build SPA application with Angular
First, let’s begin by using Angular CLI to create our application. Angular CLI is a great tool when it comes to creating angular apps without spending a considerable amount of time and effort configuring our application. We are not required to be experts at Webpack or waste time configuring project structure, module loaders, environment, and libraries before ever starting to write any code. Angular CLI does all of this for us, so we can focus on building SPA applications. For more information on Angular CLI you can check their documentation.
First we need to install Angular CLI globally by running the following command within Powershell or Command Prompt:
npm install -g @angular/cli
If you right click on the solution explorer, and choose command prompt from the context menu, make sure you are in the SugarLevelTracker folder and run :
ng new sugar-level-tracker --directory Angular
This command will create an Angular directory in root folder of project, and inside of that Angular directory the Angular CLI will create the Angular app.
We can bootstrap our app by running following command:
cd Angular
ng serve
Now we can start building our SPA.
First, let’s install the following packages: Angular Material, Angular CDK, Angular Date Time Picker, RxJS Compat
npm install @angular/material @angular/cdk ng-pick-datetime rxjs-compat --save
If the installation went well, we should see packages in package.json dependencies list.
To bring in the styles for Angular Material and the Owl DateTime Picker, put these two statements in the styles.css in the root of the Angular application folder:
@import '~@angular/material/prebuilt-themes/deeppurple-amber.css';
@import '~ng-pick-datetime/assets/style/picker.min.css';
Our app contains only one root module, AppModule, and one component AppComponent. The application we are making is a very simple one. Hence, we will use existing AppModule. If later our application gets more complex we can introduce features, routing and shared modules to better organize our code. Since our application will be able to track sugar level we will need to create an appropriate service: SugarLevelService, and components for listing and editing the sugar levels.
It would be nice to also create a TypeScript model for sugar level, to make it easier for us to work with sugar level objects. Let’s first create a folder shared inside of our app folder, which is part of Angular application that gets created by Angular CLI. Inside of the shared folder create a new folder called models, and this is where we will create the SugarLevel.ts file:
export default class SugarLevel {
  id: number;
  value: number;
  description: string;
  measuredAt: string;
}
After this, let’s create api folder inside of shared folder, and inside of it a new file called sugar-level.service.ts:
import { Injectable } from '@angular/core';
import { HttpClient } from '@angular/common/http';
import { Observable } from 'rxjs/Observable';
import SugarLevel from '../models/SugarLevel';

@Injectable()
export default class SugarLevelService {
  public API = 'http://localhost:8080/api';
  public SUGARLEVELS_API = `${this.API}/sugarlevels`;

  constructor(private http: HttpClient) {}

  getAll(): Observable<Array<SugarLevel>> {
    return this.http.get<Array<SugarLevel>>(this.SUGARLEVELS_API);
  }

  get(id: string) {
    return this.http.get(`${this.SUGARLEVELS_API}/${id}`);
  }

  save(sugarLevel: SugarLevel): Observable<SugarLevel> {
    let result: Observable<SugarLevel>;
    if (sugarLevel.id) {
      result = this.http.put<SugarLevel>(
        `${this.SUGARLEVELS_API}/${sugarLevel.id}`,
        sugarLevel
      );
    } else {
      result = this.http.post<SugarLevel>(this.SUGARLEVELS_API, sugarLevel);
    }
    return result;
  }

  remove(id: number) {
    return this.http.delete(`${this.SUGARLEVELS_API}/${id.toString()}`);
  }
}
Now we can add sugarlevel-list.component.ts. You can easily scaffold the component using the Angular CLI, by opening a command prompt in the Angular/src/app folder and running:
ng g c sugarlevel-list
This tells the Angular CLI (ng) to generate (g) a component (c) called sugarlevel-list. This will generate a folder called sugarlevel-list with four files in it:
sugarlevel-list.component.css
sugarlevel-list.component.html
sugarlevel-list.component.spec
sugarlevel-list.component.ts
The Typescript file is the one we care about at the moment. The contents of the sugarlevel-list.component.ts file should be replaced with:
import { Component, OnInit } from '@angular/core';
import SugarLevelService from '../shared/api/sugar-level.service';
import SugarLevel from '../shared/models/SugarLevel';

@Component({
  selector: 'app-sugarlevel-list',
  templateUrl: './sugarlevel-list.component.html',
  styleUrls: ['./sugarlevel-list.component.css']
})
export class SugarLevelListComponent implements OnInit {
  sugarLevels: Array<SugarLevel>;

  constructor(private sugarLevelService: SugarLevelService) {}

  ngOnInit() {
    this.sugarLevelService.getAll().subscribe(data => {
      this.sugarLevels = data;
    });
  }
}
And the code for sugarlevel-list.component.html:
<mat-card>
  <mat-card-header>Sugar Level List</mat-card-header>
  <mat-card-content>
	<mat-list>
  	<mat-list-item *ngFor="let sugarLevel of sugarLevels">
    	<h3 mat-line>
      	<a mat-button [routerLink]="['/sugarlevel-edit', sugarLevel.id]"> - </a>
    	</h3>
  	</mat-list-item>
	</mat-list>
  </mat-card-content>

  <button mat-fab color="primary" [routerLink]="['/sugarlevel-add']">Add</button>
</mat-card>
We can now use the same command that we used to generate the list component to create and edit component:
ng g c sugarlevel-edit
Replace the code in sugarlevel-edit.component.ts with:
import { Component, OnDestroy, OnInit } from '@angular/core';
import { Subscription } from 'rxjs/Subscription';
import { ActivatedRoute, Router } from '@angular/router';
import { NgForm } from '@angular/forms';

import SugarLevelService from '../shared/api/sugar-level.service';
import SugarLevel from '../shared/models/SugarLevel';

@Component({
  selector: 'app-sugarlevel-edit',
  templateUrl: './sugarlevel-edit.component.html',
  styleUrls: ['./sugarlevel-edit.component.css']
})
export class SugarLevelEditComponent implements OnInit, OnDestroy {
  sugarLevel: SugarLevel = new SugarLevel();

  sub: Subscription;

  constructor(
    private route: ActivatedRoute,
    private router: Router,
    private sugarLevelService: SugarLevelService
  ) {}

  ngOnInit() {
    this.sub = this.route.params.subscribe(params => {
      const id = params['id'];
      if (id) {
        this.sugarLevelService.get(id).subscribe((sugarLevel: any) => {
          if (sugarLevel) {
            this.sugarLevel = sugarLevel;
            this.sugarLevel.measuredAt = new Date(
              this.sugarLevel.measuredAt
            ).toISOString();
          } else {
            console.log(
              `Sugar Level with id '${id}' not found, returning to list`
            );
            this.gotoList();
          }
        });
      }
    });
  }

  ngOnDestroy() {
    this.sub.unsubscribe();
  }

  gotoList() {
    this.router.navigate(['/sugarlevel-list']);
  }

  save(form: any) {
    this.sugarLevelService.save(form).subscribe(
      result => {
        this.gotoList();
      },
      error => console.error(error)
    );
  }

  remove(id: number) {
    this.sugarLevelService.remove(id).subscribe(
      result => {
        this.gotoList();
      },
      error => console.error(error)
    );
  }
}
Code for sugarlevel-edit.component.html:
<mat-card>
  <form #sugarLevelForm="ngForm" (ngSubmit)="save(sugarLevelForm.value)">
	<mat-card-header>
  	<mat-card-title>
    	<h2>{{sugarLevel.value ? 'Edit' : 'Add'}} Sugar Level</h2>
  	</mat-card-title>
	</mat-card-header>
	<mat-card-content>
    	<input type="hidden" name="id" [(ngModel)]="sugarLevel.id">
  	<mat-form-field>
    	<input matInput placeholder="Sugar Level Description" [(ngModel)]="sugarLevel.description" required name="description">
  	</mat-form-field>
  	<mat-form-field>
    	<input matInput placeholder="Sugar Level Value" [(ngModel)]="sugarLevel.value" required name="value">
  	</mat-form-field>

  	<mat-form-field class="col-xs-12">
    	<input matInput [(ngModel)]="sugarLevel.measuredAt" [owlDateTime]="dt2" [owlDateTimeTrigger]="dt2" placeholder="Measured At"
      	name="measuredAt" required>
    	<owl-date-time #dt2></owl-date-time>
    	<mat-error>
      	Required
    	</mat-error>
  	</mat-form-field>
	</mat-card-content>
	<mat-card-actions>
  	<button mat-raised-button color="primary" type="submit" [disabled]="!sugarLevelForm.form.valid">Save
  	</button>
  	<button mat-raised-button color="secondary" (click)="remove(sugarLevel.id)" *ngIf="sugarLevel.id" type="button">Delete
  	</button>
  	<a mat-button routerLink="/sugarlevel-list">Cancel</a>
	</mat-card-actions>
	<mat-card-footer>

	</mat-card-footer>
  </form>
</mat-card>
After adding components we will need to navigate between them by implementing routing. First, we will import the RouterModule module and Routes type. Then we will create a route configuration of Routes type, and after, we will register RouterModule with route configuration on the root level.
Inside of app.module.ts, let’s add the routing configuration right at the top, below the import statements:
const appRoutes: Routes = [
  { path: '', redirectTo: '/sugarlevel-list', pathMatch: 'full' },
  {
    path: 'sugarlevel-list',
    component: SugarLevelListComponent
  },
  {
    path: 'sugarlevel-add',
    component: SugarLevelEditComponent
  },
  {
    path: 'sugarlevel-edit/:id',
    component: SugarLevelEditComponent
  }
];
Inside of imports array, we will add the following:
RouterModule.forRoot(appRoutes)
You’ll also need to import some components from the @angular/router, @angular/material and the ng-pick-datetime packages for the HTML files that were added.
This is how app.module.ts file should look after all this:
import { BrowserModule } from '@angular/platform-browser';
import { NgModule } from '@angular/core';
import { HttpClientModule } from '@angular/common/http';
import {
  MatButtonModule,
  MatCardModule,
  MatInputModule,
  MatListModule,
  MatToolbarModule
} from '@angular/material';
import { BrowserAnimationsModule } from '@angular/platform-browser/animations';
import { Routes, RouterModule } from '@angular/router';
import { FormsModule } from '@angular/forms';
import { OwlDateTimeModule, OwlNativeDateTimeModule } from 'ng-pick-datetime';

import { AppComponent } from './app.component';
import { SugarLevelListComponent } from './sugarlevel-list/sugarlevel-list.component';
import { SugarLevelEditComponent } from './sugarlevel-edit/sugarlevel-edit.component';
import SugarLevelService from './shared/api/sugar-level.service';

const appRoutes: Routes = [
  { path: '', redirectTo: '/sugarlevel-list', pathMatch: 'full' },
  {
    path: 'sugarlevel-list',
    component: SugarLevelListComponent
  },
  {
    path: 'sugarlevel-add',
    component: SugarLevelEditComponent
  },
  {
    path: 'sugarlevel-edit/:id',
    component: SugarLevelEditComponent
  }
];

@NgModule({
  declarations: [
    AppComponent,
    SugarLevelListComponent,
    SugarLevelEditComponent
  ],
  imports: [
    BrowserModule,
    HttpClientModule,
    MatButtonModule,
    MatCardModule,
    MatInputModule,
    MatListModule,
    MatToolbarModule,
    BrowserAnimationsModule,
    FormsModule,
    RouterModule.forRoot(appRoutes),
    OwlDateTimeModule,
    OwlNativeDateTimeModule
  ],
  providers: [SugarLevelService],
  bootstrap: [AppComponent]
})
export class AppModule {}
We will use the service, SugarLevelService to enable our components to communicate with our REST API. Also, it’s important to note that Angular HttpClient uses RxJS observables instead of promises, so the sooner we learn RxJS the better. SugarLevelService is registered in the AppModule, as a singleton service and is available everywhere across our app.
Create an Okta Application
Dealing with user authentication in web apps is a massive pain for every developer. This is where Okta shines: it helps you secure your web applications with minimal effort. To get started, you’ll need to create an OpenID Connect application in Okta. Sign up for a forever-free developer account (or log in if you already have one).
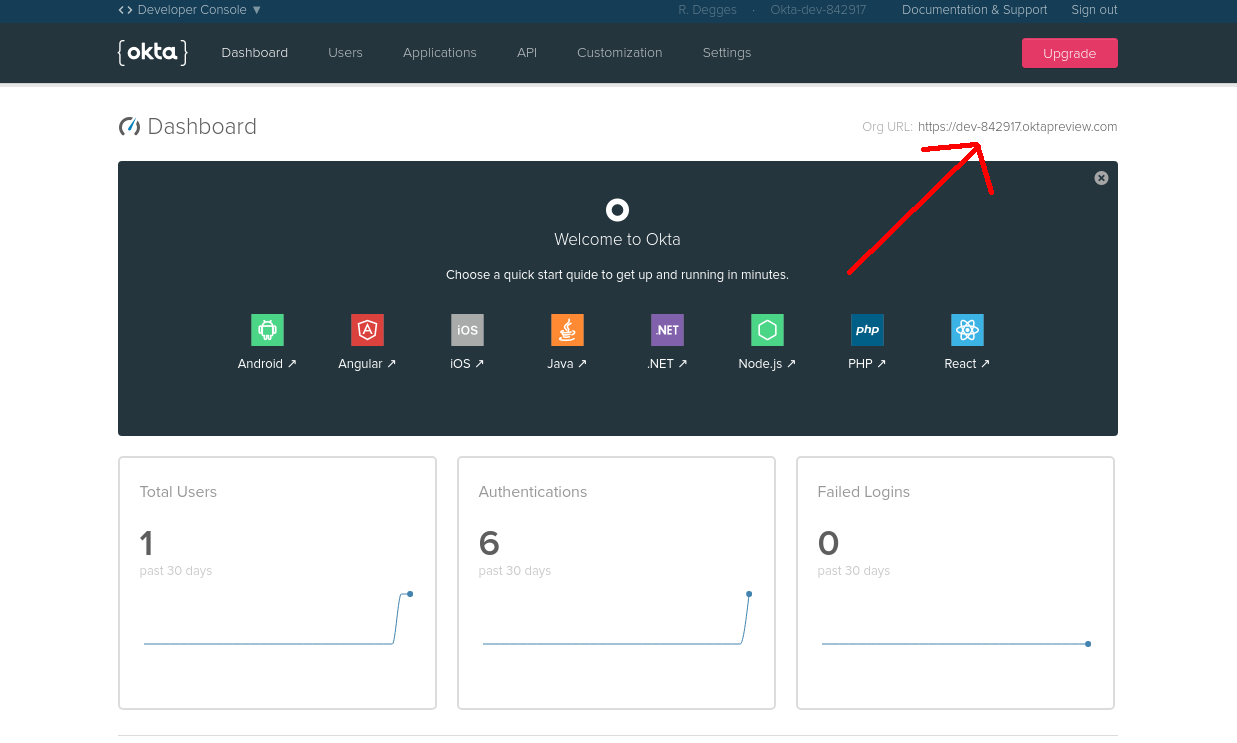
Once you’ve logged in and landed on the dashboard page, copy down the Org URL pictured below. You will need this later.
Then create a new application by browsing to the Applications tab and clicking Add Application, and from the first page of the wizard choose Single-Page App.
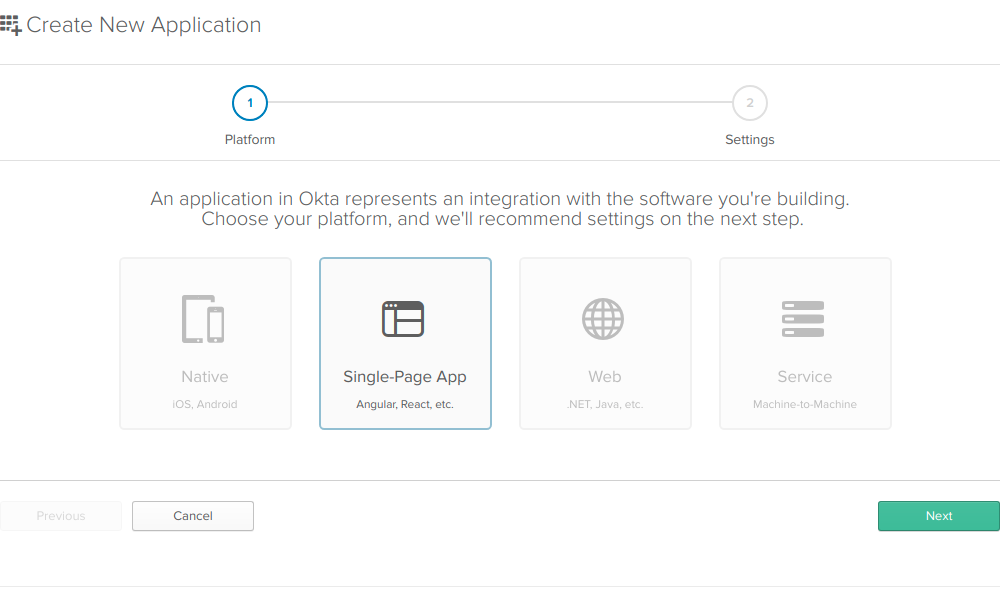
On the settings page, enter the following values:
- Name: AngularCrudApp
- Base URIs: http://localhost:4200
- Login redirect URIs: http://localhost:4200/implicit/callback
You can leave the other values unchanged, and click Done.

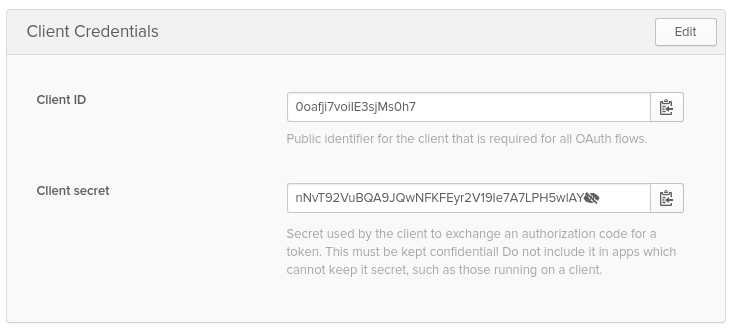
Now that your application has been created, copy down the Client ID and Client secret values on the following page, you’ll need them soon (of course, yours will be different).
Secure Your ASP.NET Core + Angular Application
If you don’t already have a Startup.cs file (OWIN Startup class), create one by right-clicking on your project and choosing Add - Class. Pick the OWIN Startup template and name the new class Startup.
Make sure you have these using statements at the top of your Startup.cs file:
using Microsoft.IdentityModel.Protocols;
using Microsoft.IdentityModel.Protocols.OpenIdConnect;
using Microsoft.IdentityModel.Tokens;
using Microsoft.Owin;
using Microsoft.Owin.Security;
using Microsoft.Owin.Security.Jwt;
using Owin;
using System.Threading.Tasks;
Add the following code to your Configuration method:
public void Configuration(IAppBuilder app)
{
   // Configure JWT Bearer middleware
   // with an OpenID Connect Authority

   var authority = "https://{yourOktaDomain}/oauth2/default";

   var configurationManager = new  ConfigurationManager<OpenIdConnectConfiguration>(
   authority + "/.well-known/openid-configuration",
   new OpenIdConnectConfigurationRetriever(),
   new HttpDocumentRetriever());

   app.UseJwtBearerAuthentication(new JwtBearerAuthenticationOptions
   {
       AuthenticationMode = AuthenticationMode.Active,
       TokenValidationParameters = new TokenValidationParameters
       {
       ValidAudience = "api://default",
       ValidIssuer = authority,
       IssuerSigningKeyResolver = (token, securityToken, identifier, parameters) =>
       {
       var discoveryDocument = Task.Run(() => configurationManager.GetConfigurationAsync()).GetAwaiter().GetResult();
       return discoveryDocument.SigningKeys;
       }
   }
   });
}
Protect Your ASP.NET API Endpoints
Now it’s time to protect all our endpoints for SugarLevel controller. Since we want to protect all actions we will simply apply the Authorize attribute at the controller level. We could also apply the attribute to specific actions, or even globally for all controllers and actions. If we applied it globally, we could exclude Authorize on specific actions and controllers by using the AllowAnonymous attribute.
Implement Authentication in Angular
To add authentication to our Angular app we will use Okta’s Angular SDK.
npm install @okta/okta-angular --save
In the app.module.ts file, add a config variable right below the appRoutes for the application.
const config = {
  issuer: 'https://{yourOktaDomain}/oauth2/default',
  redirectUri: 'http://localhost:4200/implicit/callback',
  clientId: '{clientId}'
};
The OktaAuthModule will use that configuration. Import the module first:
import { OktaAuthModule } from '@okta/okta-angular';
Then add the initialization to the imports array.
OktaAuthModule.initAuth(config);
We will also create AuthInterceptor and add it to the AppModule providers array. AuthInterceptor is used to append the authorization header to our requests.
Inside of our shared folder we will create a new folder called interceptors, and there we will create our auth.interceptor.ts file:
import { Injectable } from '@angular/core';
import {
  HttpEvent,
  HttpHandler,
  HttpInterceptor,
  HttpRequest
} from '@angular/common/http';
import { Observable } from 'rxjs/Observable';
import 'rxjs/add/observable/fromPromise';
import { OktaAuthService } from '@okta/okta-angular';

@Injectable()
export class AuthInterceptor implements HttpInterceptor {
  constructor(private oktaAuth: OktaAuthService) {}

  intercept(
    request: HttpRequest<any>,
    next: HttpHandler
  ): Observable<HttpEvent<any>> {
    return Observable.fromPromise(this.handleAccess(request, next));
  }

  private async handleAccess(
    request: HttpRequest<any>,
    next: HttpHandler
  ): Promise<HttpEvent<any>> {
    const accessToken = await this.oktaAuth.getAccessToken();
    request = request.clone({
      setHeaders: {
        Authorization: 'Bearer ' + accessToken
      }
    });
    return next.handle(request).toPromise();
  }
}
Then wire up the interceptor to intercept requests as they go out by adding it to the app module so that the import for common http looks like:
import { HTTP_INTERCEPTORS, HttpClientModule } from '@angular/common/http';
And then add the interceptor to the providers:
On AppComponent and HomeComponent initialization we use Okta’s authentication state and provide a callback that will be executed any time state is updated. If our app isn’t authenticated HomeComponent will render Login button with a link to redirect URL for us to authenticate. If the user is authenticated our HomeComponent will redirect the user to SugarLevelListComponent.
Generate the home component as before:
ng g c home
Then add the code for home.component.ts:
import { Component, OnInit } from '@angular/core';
import { OktaAuthService } from '@okta/okta-angular';

@Component({
  selector: 'app-home',
  templateUrl: './home.component.html',
  styleUrls: ['./home.component.css']
})
export class HomeComponent implements OnInit {
  isAuthenticated: boolean;

  constructor(private oktaAuth: OktaAuthService) {}

  async ngOnInit() {
    this.isAuthenticated = await this.oktaAuth.isAuthenticated();
    // Subscribe to authentication state changes
    this.oktaAuth.$authenticationState.subscribe(
      (isAuthenticated: boolean) => (this.isAuthenticated = isAuthenticated)
    );
  }
}
Also, the code for home.component.html:
<mat-card>
  <mat-card-content>
    <button mat-raised-button color="warn" *ngIf="!isAuthenticated"
            (click)="oktaAuth.loginRedirect()">
      Login
    </button>
    <button mat-raised-button color="warn" *ngIf="isAuthenticated"
            [routerLink]="['/sugarlevel-list']">
      Sugar Level List
    </button>
    <button mat-raised-button color="warn" *ngIf="isAuthenticated"
            (click)="oktaAuth.logout()">
      Login
    </button>
  </mat-card-content>
</mat-card>
Replace all the code in the app.component.html with this:
<router-outlet></router-outlet>
This tells Angular where to put the output from the components that are handling routing.
Then replace the component handling the ‘’ path with the home component in the routing array in app.component.ts:
{ path: '', component: HomeComponent, pathMatch: 'full' },
Also, import the OktaCallbackComponent from Okta’s Angular SDK and add the callback route to the app component:
{ path: 'implicit/callback', component: OktaCallbackComponent }
So the final app.module.ts looks like:
import { BrowserModule } from '@angular/platform-browser';
import { NgModule } from '@angular/core';
import { HTTP_INTERCEPTORS, HttpClientModule } from '@angular/common/http';
import {
  MatButtonModule,
  MatCardModule,
  MatInputModule,
  MatListModule,
  MatToolbarModule
} from '@angular/material';
import { Routes, RouterModule } from '@angular/router';
import { FormsModule } from '@angular/forms';
import { OwlDateTimeModule, OwlNativeDateTimeModule } from 'ng-pick-datetime';
import { OktaAuthModule, OktaCallbackComponent } from '@okta/okta-angular';

import { AppComponent } from './app.component';
import { SugarLevelListComponent } from './sugarlevel-list/sugarlevel-list.component';
import { SugarLevelEditComponent } from './sugarlevel-edit/sugarlevel-edit.component';
import SugarLevelService from './shared/api/sugar-level.service';
import { HomeComponent } from './home/home.component';
import { AuthInterceptor } from './shared/interceptors/auth.interceptor';

const appRoutes: Routes = [
  { path: '', component: HomeComponent, pathMatch: 'full' },
  {
    path: 'sugarlevel-list',
    component: SugarLevelListComponent
  },
  {
    path: 'sugarlevel-add',
    component: SugarLevelEditComponent
  },
  {
    path: 'sugarlevel-edit/:id',
    component: SugarLevelEditComponent
  },
  { path: 'implicit/callback', component: OktaCallbackComponent }
];

const config = {
  issuer: 'https://{yourOktaDomain}/oauth2/default',
  redirectUri: 'http://localhost:4200/implicit/callback',
  clientId: '{clientId}'
};

@NgModule({
  declarations: [
    AppComponent,
    SugarLevelListComponent,
    SugarLevelEditComponent,
    HomeComponent
  ],
  imports: [
    BrowserModule,
    HttpClientModule,
    MatButtonModule,
    MatCardModule,
    MatInputModule,
    MatListModule,
    MatToolbarModule,
    FormsModule,
    RouterModule.forRoot(appRoutes),
    OwlDateTimeModule,
    OwlNativeDateTimeModule,
    OktaAuthModule.initAuth(config)
  ],
  providers: [
    SugarLevelService,
    { provide: HTTP_INTERCEPTORS, useClass: AuthInterceptor, multi: true }
  ],
  bootstrap: [AppComponent]
})
export class AppModule {}
By using Okta to handle authorization we don’t need to keep auth state ourselves, which makes building app much simpler.
And now you’re done! You have a secure ASP.NET Web API with an Angular frontend to track sugar levels (or whatever else you might want to track!). The complete and working sample that backs this tutorial is available on GitHub as ASPNET MVC Angular CRUD Example.
Learn More About ASP.NET Core and Angular
If you enjoyed building this ASP.NET Core API with Angular, check out more full-stack CRUD posts from Okta.
- Angular 6 – What’s New and Why Upgrade?
- Token Authentication in ASP.NET Core – A Complete Guide
- Build a Secure CRUD App with ASP.NET Core and React
As always if you have any questions, comments, or concerns about this post feel free to leave a comment below. For other great content from the Okta Dev Team, follow us on Twitter @OktaDev, Facebook, and watch us on YouTube!
Okta Developer Blog Comment Policy
We welcome relevant and respectful comments. Off-topic comments may be removed.