Add Social Login to Your Spring Boot 2.0 App
We’ve all seen social login. It’s the “Log in with Facebook” or “Log in with Twitter” buttons we see below every username and password field on the Internet. But why do these exist?
The primary benefits of social login are ease of use and security. It’s easier for your users to log into your app if they can use credentials they’ve already created on a a service they trust. They don’t have to come up with YET ANOTHER password, which they’ll likely name after their dog, to which they’ll add an exclamation point and/or a number to get past the password strength filter, and then scrawl it on a sticky note and slap it on their desk or computer monitor or email it to themselves, a process they’ve now repeated more than 200 hundred times. Ridiculous, and not really desirable user behavior, right?
So, if you allow your users to register and authenticate with a social media account, and everyone will be happier (except perhaps Russian hackers). Just encourage them to turn on 2-factor authentication if your website deals with particularly sensitive data. (Okta can can help you with that too!)
OK, so, social login is awesome! Right? Do you know what’s not awesome? Having to re-implement the login API every time Facebook or Google decides to update their specifications. Not to mention having to implement different login specs for different social providers, and style and manage all of the different login buttons. That’s where Okta steps in.
Note: In May 2025, the Okta Integrator Free Plan replaced Okta Developer Edition Accounts, and the Okta CLI was deprecated.
We preserved this post for reference, but the instructions no longer work exactly as written. Replace the Okta CLI commands by manually configuring Okta following the instructions in our Developer Documentation.
Why Okta for Social Login in Spring Boot?
If you deploy Okta to handle your social login, when Linkedin decides to update their login API spec for the third time in a week to combat Russian hackers, you won’t even know about it. It’ll already be handled.
In this tutorial we’re going to demonstrate how to use Okta social login with a Spring app written in Java. In particular, we’re going to use Google and Facebook. We’re also going to demonstrate how to use a custom, self-hosted login page.
The default application settings are fine to get us started. We’ll need to make a few changes.
Get Started: Download and Configure Your Spring Boot Example App
Happily, Okta has an example Spring Boot app configured for you. Go ahead and download it from the repo.
git clone https://github.com/oktadeveloper/okta-spring-social-example.git
cd okta-spring-social-example
Before you begin, you’ll need a free Okta developer account. Install the Okta CLI and run okta register to sign up for a new account. If you already have an account, run okta login.
Then, run okta apps create. Select the default app name, or change it as you see fit.
Choose Web and press Enter.
Select Other.
Then, change the Redirect URI to http://localhost:8080/authorization-code/callback and use http://localhost:8080 for the Logout Redirect URI.
What does the Okta CLI do?
The Okta CLI will create an OIDC Web App in your Okta Org. It will add the redirect URIs you specified and grant access to the Everyone group. You will see output like the following when it’s finished:
Okta application configuration has been written to: /path/to/app/.okta.env
Run cat .okta.env (or type .okta.env on Windows) to see the issuer and credentials for your app.
export OKTA_OAUTH2_ISSUER="https://dev-133337.okta.com/oauth2/default"
export OKTA_OAUTH2_CLIENT_ID="0oab8eb55Kb9jdMIr5d6"
export OKTA_OAUTH2_CLIENT_SECRET="NEVER-SHOW-SECRETS"
Your Okta domain is the first part of your issuer, before /oauth2/default.
NOTE: You can also use the Okta Admin Console to create your app. See Create a Web App for more information.
The first thing you’ll want to do is to copy the src/main/resources/application.template.yml to src/main/resources/application.yml and fill in the necessary information from the generated .okta.env file.
Then, you should be able to run ./mvnw from the terminal to run the app (you only need to type ./mvnw because the pom.xml specifies a default goal of spring-boot:run, so typing ./mvnw is the same as typing ./mvnw spring-boot:run).
To test the app, log out of your Okta developer account and go to http://localhost:8080 (or open an incognito window).
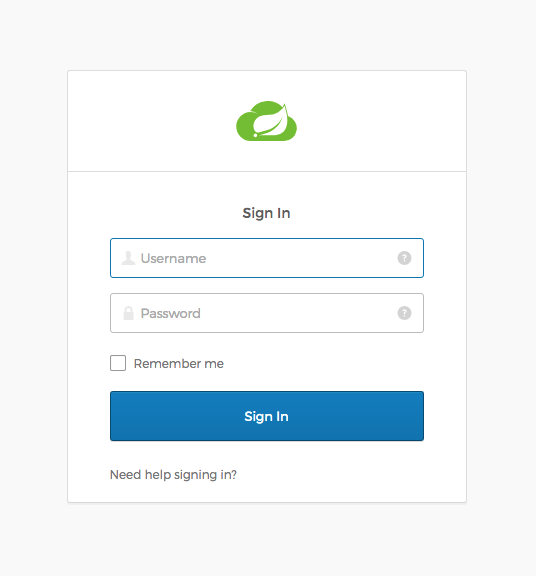
If all goes well, you’ll be redirected to the example app welcome screen that says: “Social Login, Custom Login, and Spring Boot Example”.
Click the Login button and you will be taken to a custom, locally hosted login page.
Once you log in you’ll see a welcome message with your email address and a bit that says:
You have successfully authenticated against your Okta org…
Now we’re ready to configure Google and Facebook for social login!
Configure Google and Facebook for Social Login in Your Spring Boot App
Okta has some great documentation on configuring social login, including some tips for specific social providers.
Here are the steps you need to follow to configure Facebook for Okta social login:
- Go to https://developers.facebook.com and register for a developer account if you haven’t already done so.
- Head over to the Facebook App Dashboard: https://developers.facebook.com/apps.
- Create a Facebook app. Instructions for creating a Facebook application can be found here: https://developers.facebook.com/docs/apps/register.
- Once you’ve created your facebook app, go to the app dashboard, click the Settings link on the left-hand side, and select the Basic submenu.
- Save the App ID and App Secret values. You’ll need them later.
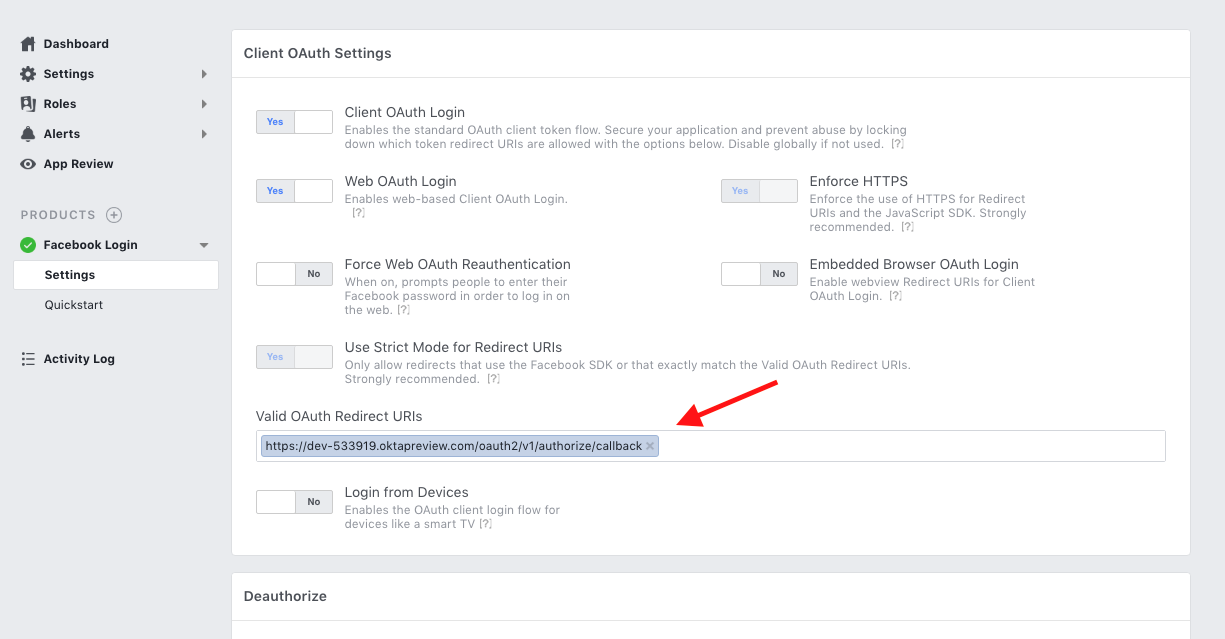
- You’ll also need to add a Facebook Login product. From the left menu, click the + sign next to products and add a Facebook Login product.
- Configure the Valid OAuth Redirect URIs to include your redirect URI with your Okta org URL:
https://{yourOktaDomain}/oauth2/v1/authorize/callback - Save changes
Here are the steps you need to follow to configure Google for Okta social login:
- Go to https://console.developers.google.com/ and register for a developer account.
- Create a Google API Console project.
- Once your Google App is open, click on the Credentials menu and then Create Credentials followed by OAuth client ID.
- Select Web Application type for the OAuth client type.
- Give the client a name.
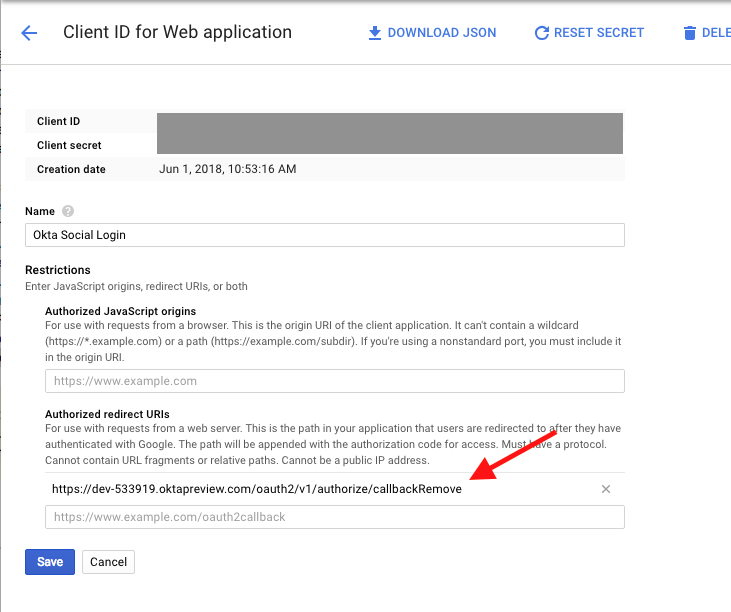
- Fill in your redirect URL in the Authorized redirect URIs. It’s the same one you used for Facebook and ends with
/oauth2/v1/authorize/callback. - Click Create.
- Copy the client ID and client secret, as you’ll need them later.
Configure Okta to use Facebook and Google for Social Login
Log into your developer.okta.com dashboard. Under the Users top menu, select the Social Identity and Providers item.
From the Add Identity Providers dropdown, select Facebook.
Give it a name, something clever like “Log in with Facebook”, and enter your client ID and client secret values (you did save those, right?). Everything else can stay the same.
Click Add Identity Provider
Repeat this process for Google, using the client ID and client secret from your Google OAuth 2.0 client IDs.
Your Okta Identity Providers page should now have two “IdP IDs” - you’ll need these in a moment.
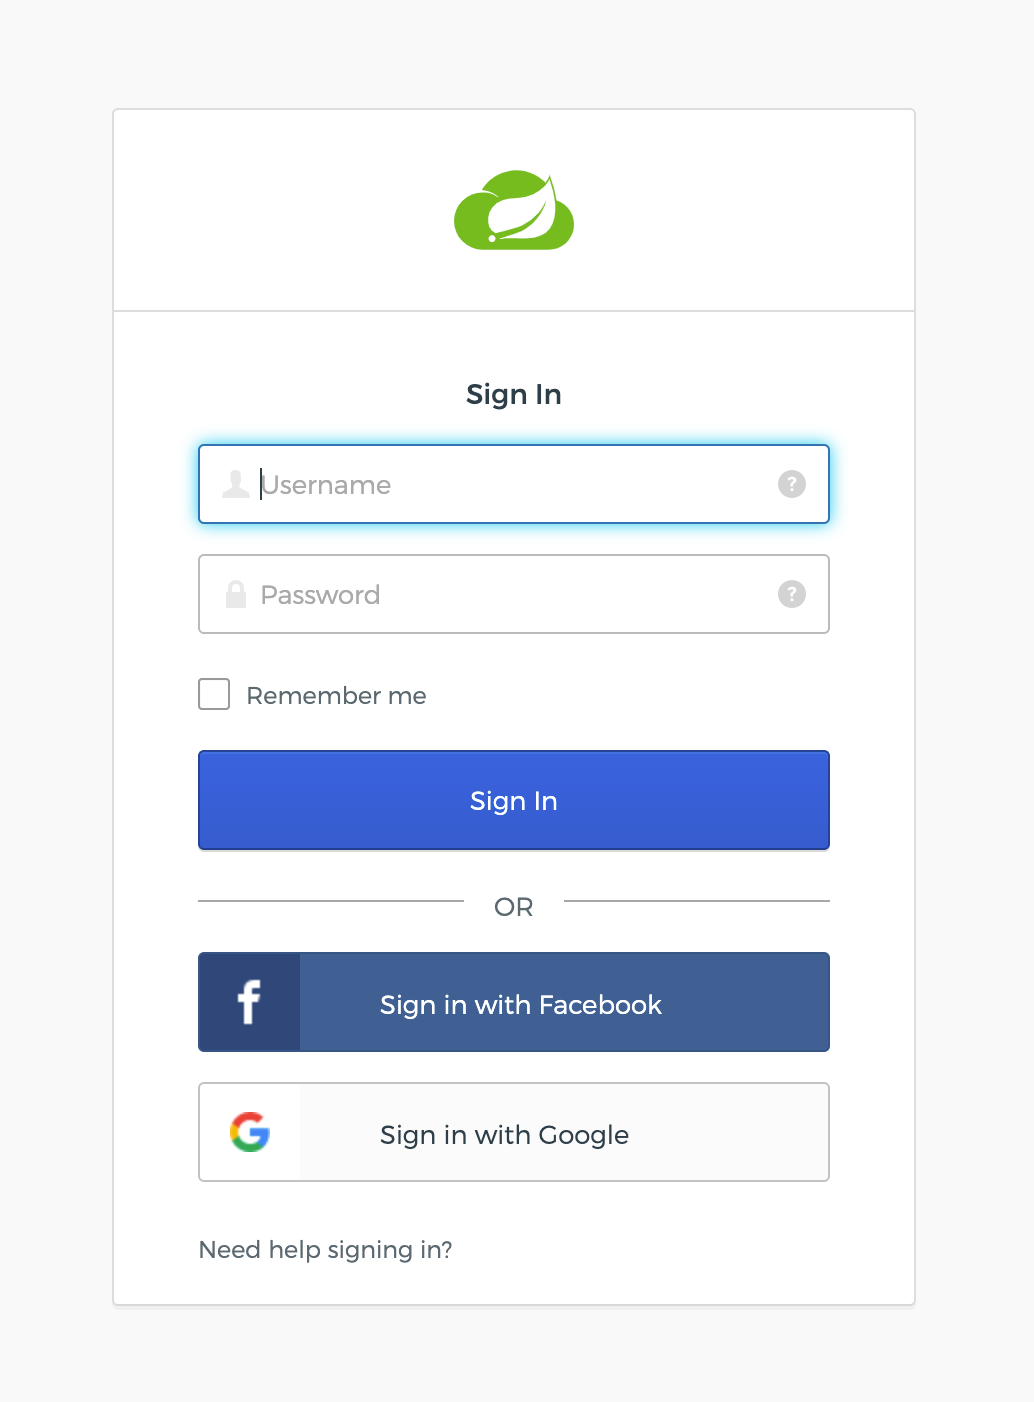
Customize the Self-Hosted Sign-In Page for Your Spring Boot App
The final step is to update the Okta Sign-in Widget on your customized sign-in page. This part is ridiculously easy. You’ll need the IdP IDs from above.
Open the src/main/resources/templates/login.html file and take a look at the JavaScript block at the bottom of the page. You configure the identity providers in the Okta Sign-In Widget’s config using the idps property.
See the commented section of code below.
config.baseUrl = /*[[${oktaBaseUrl}]]*/ 'https://{yourOktaDomain}';
config.clientId = /*[[${oktaClientId}]]*/ '{clientId}';
config.redirectUri = /*[[${redirectUri}]]*/ '{redirectUri}';
config.logo = '/img/icon-spring-cloud.svg';
config.authParams = {
  issuer: /*[[${issuerUri}]]*/ '{issuerUri}',
  responseType: 'code',
  pkce: false,
  state: /*[[${state}]]*/ '{state}' || false,
  nonce: /*[[${nonce}]]*/ '{nonce}',
  scopes: /*[[${scopes}]]*/ '[scopes]',
  display: 'page'
};

/*********************************************************/
/* ADD ME TO CONFIGURE SOCIAL LOGIN!!!                   */
config.idps = [
   {type: 'FACEBOOK', id: '<< Your Facebook IdP ID >>'},
   {type: 'GOOGLE', id: '<< Your Google IdP ID >>' }
];
/*********************************************************/

new OktaSignIn(config).renderEl(
  { el: '#sign-in-widget' },
  function (res) {
    console.log(res)
  },
  function (err) {
    console.log(err)
  }
);
That’s it! Pretty cool, huh?
The Okta Sign-In Widget has a lot of great configuration options, and you can check out the docs for them on the GitHub page.
Try Out Your New Spring Boot App with Social Login
Sign out of the developer.okta.com dashboard, and restart your spring boot app using ./mvnw.
Once the app has started, navigate to http://localhost:8080 and click the Login button.
You should see the new social login buttons and should be able to log in using Google and Facebook.
NOTE: If your social accounts use an email address different than what you’re using for your Okta developer account, you may need to add a user to the Okta application.
Learn More about Spring Boot and Secure User Management
To learn more about Spring Boot, secure user management, and other topics related to modern development, I encourage you to follow our developer blog. Here are some selected posts that you may find particularly valuable:
- Deploy Your Secure Spring Boot + Angular PWA as a Single Artifact
- Build a Basic CRUD App with Angular 5.0 and Spring Boot 2.0
- Add CI/CD to Your Spring Boot App with Jenkins X and Kubernetes
- Secure Your Spring Boot App with MFA
- What Happens if Your JWT is Stolen?
And as always, we’d love your feedback on this post or anything we’re working on! Hit us up in the comments below, or on Twitter @oktadev.
Changelog:
- Apr 15, 2021: Updated to use Spring Boot 2.4 and the Okta CLI for OIDC app creation. See changes to this blog post in okta-blog#765; changes in the example can be viewed in okta-spring-social-example#1.
Okta Developer Blog Comment Policy
We welcome relevant and respectful comments. Off-topic comments may be removed.