Secure Your Spring Boot Application with Multi-Factor Authentication
OAuth 2.0 has quickly become an industry standard for third party authentication for web applications. It’s a super secure strategy, when implemented properly, but getting it right can be hard. Fortunately, you don’t have to go it alone. Okta has done it for you. This is one place where it’s definitely not worth re-inventing the wheel.
And further, with all of the cybersecurity attacks today, just using a password, even a hard password, is not always enough. To truly secure your data and accounts, you need to use multi-factor authentication (or MFA).
The most common factor used in MFA is an email or a text (SMS). This type of MFA is also called two-factor authentication, a subtype of MFA, because it uses two factors: a password and an email or an SMS.
In this tutorial, we are going to show you how easy Okta makes setting up a Spring Boot application with two-factor authentication using SMS.
Note: In May 2025, the Okta Integrator Free Plan replaced Okta Developer Edition Accounts, and the Okta CLI was deprecated.
We preserved this post for reference, but the instructions no longer work exactly as written. Replace the Okta CLI commands by manually configuring Okta following the instructions in our Developer Documentation.
Why Okta?
Well, we’re biased, we know… But, we think Okta makes identity management easier, more secure, and more scalable than what you’re used to. Okta is an API service that allows you to create, edit, and securely store user accounts and user account data, and connect them with one or more applications. Our API enables you to:
- Authenticate and authorize your users
- Store data about your users
- Perform password-based and social login
- Secure your application with multi-factor authentication
- And much more! Check out our product documentation for more information
Register for a forever-free developer account, and when you’re done, come back to learn more about building MFA in Spring Boot!
Create a Spring Boot Application
Spring used to have a reputation among developers for being obscure, complex, and incredibly powerful. Wandering into its depths was a bit like peering into the opening of a dark cave, wondering what pitfalls and dead ends awaited you as you valiantly fought to extract its many rewards from its labyrinthine depths. Occasionally you ran into seasoned Spring developers that, armed with their hard-won wisdom, gave you bits of wisdom and put you on the right path, saving you from wandering amid the ruins of dependency management and conflicting versions and annotations and XML syntax forever.
Obviously, that wasn’t ideal. Over the past few years, Spring has really worked hard to make life easier for developers. They moved to YAML files and Gradle as alternatives to Maven and XML. They created the Spring Boot framework, a web application framework that gets a server up and running in only a few lines of code. They also created things like the Spring Boot CLI and a handy Spring Initializer website.
The Spring Boot CLI is great, and Okta already has a fantastic tutorial showing how that works. Check out Matt Raible’s tutorial.
In this tutorial, as an alternative to the CLI, we’re going to use the Spring Initializer. It’s a great website that generates pre-configured starter projects for you.
Open the Spring Initializer link and do the following:
- Change Maven Project to Gradle Project
- Change the Group to
com.okta.springmfa - Change the Artifact to
spring-mfa - Add two dependencies:
SecurityandWeb
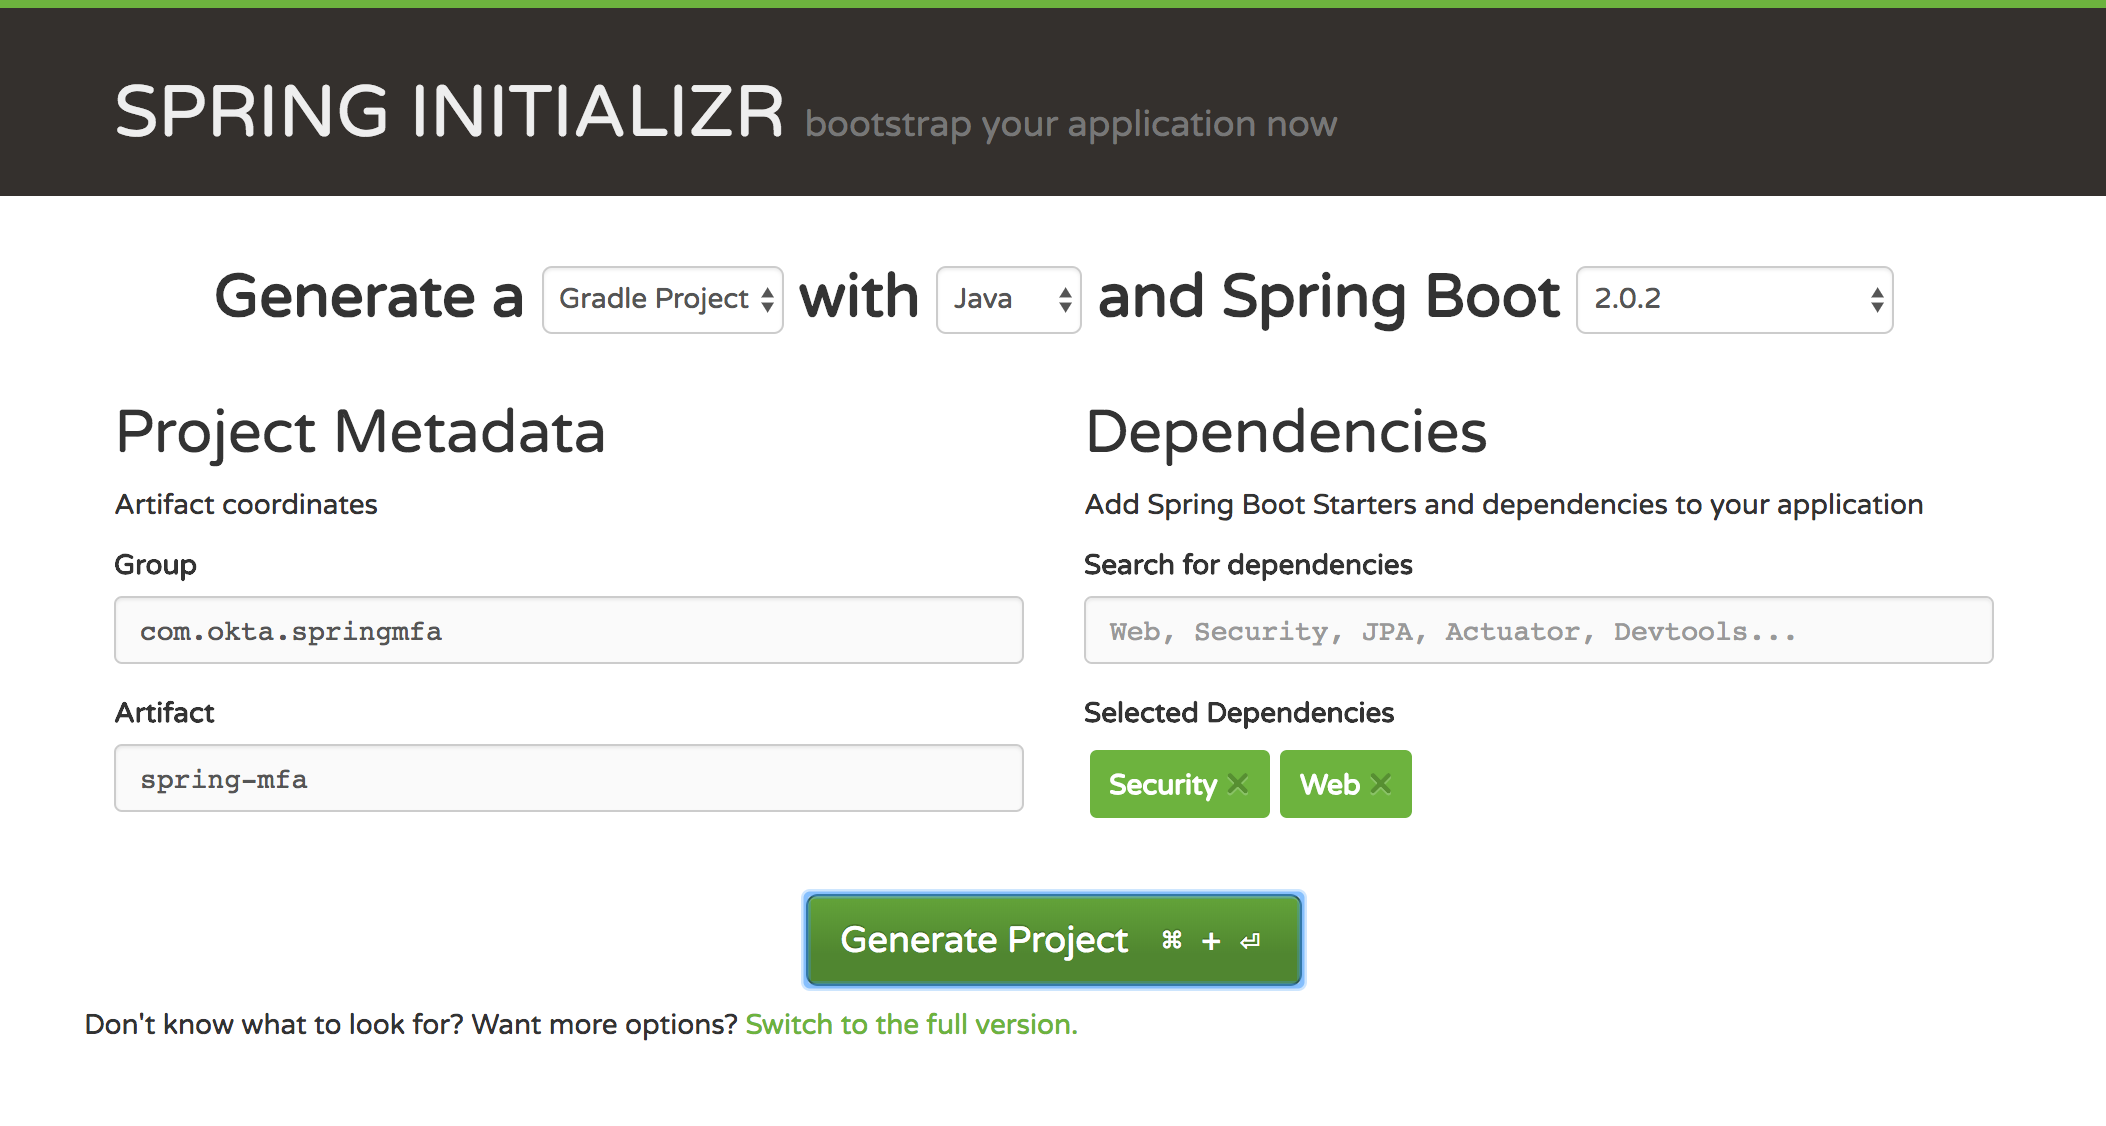
Click Generate Project and download the project. Copy the folder to your preferred location and open it in your IDE or editor of choice.
If you want to, you can go ahead and run the app from the command line now. From the project directory, use the command ./gradlew bootRun. This will launch the application at http://localhost:8080.
If you do this, you will see a very basic login screen. The username for this defaults to “user” and the password will be buried in the terminal output. Look for a line like the following:
Using generated security password: 28540ed8-f3b8-4557-a5f3-620b7990fcbe

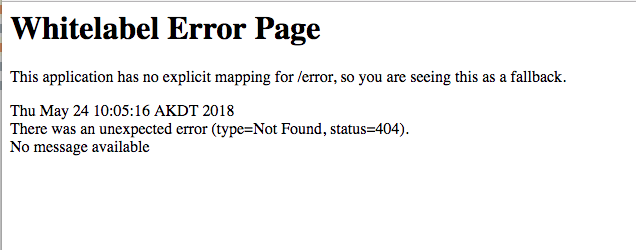
If you enter these credentials at this point, you’ll be taken to an error page because there are no mappings or endpoints specified yet.
Let’s fix that!
Add a Rest Controller to Your Spring Boot App
Now we want to add a simple rest controller to the project. This will provide a mapping for the root URL.
Create a file called “MFARestController” in the src/main/java/com/okta/springmfa/springmfa directory and add the following contents:
package com.okta.springmfa.springmfa;

import org.springframework.web.bind.annotation.RequestMapping;
import org.springframework.web.bind.annotation.RestController;

@RestController
class MFARestController {

    @RequestMapping("/")
    String home(java.security.Principal user) {
        return "Hello " + user.getName();
    }
}
Use ./gradlew bootRun to run the application. This time, if you enter the default generated credentials, you will see a screen that says:
Hello user
Pretty exciting, I know.
If you had any idea how much work it used to take to get a servlet up and running, you’d be excited. We had to code uphill both ways in the rain and snow and wade through endless fields of XML just to get Tomcat running.
Add Okta OAuth 2.0 Support to Your Spring Boot App
Here’s the exciting part. Now we’re going to add Okta Auth 2.0 support. It’s unlikely you’ve ever had to implement the OAuth spec manually - but if you had, you’re realize how freaking easy and cool Okta makes it.
To do this, we first need to configure out Okta application and then we’ll need to update our application.
This tutorial assumes that you already have a free developer.okta.com account. If not, please sign up for one!
Get the Default Authorization Server Settings
You will need your default authorization server settings. From the top menu in the developer.okta.com dashboard, go to API -> Authorization Servers and click on the default server.

You’ll need the Metadata URI in a moment.
Create an Okta Application
From the top menu, go to Applications and click the Add Application button. Click on the Web button to create a Java server application and click Next
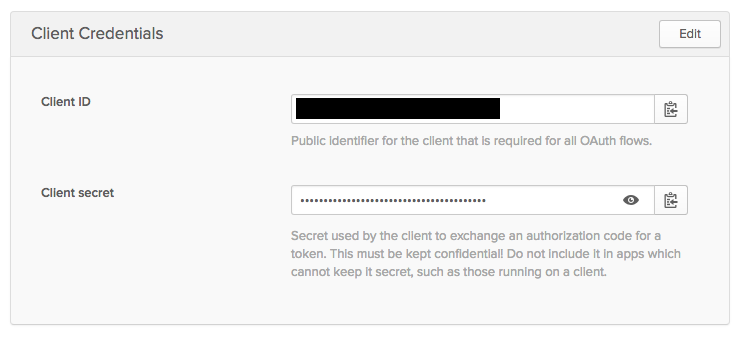
Name your app whatever you like. I named mine “SpringMFA”. Otherwise the default settings are fine. Click Done.
You will need the Client ID and Client secret from the final screen.
Update Your Spring Boot Application
Now we need to update the Spring Boot application so that it can use OAuth 2.0 to “talk” to Okta.
To add OAuth support, we can use the super easy @EnableOAuth2Sso annotation. Add this annotation to your MFARestController class, and add the following import statement:
import org.springframework.boot.autoconfigure.security.oauth2.client.EnableOAuth2Sso;
Your MFARestController should now look like this:
package com.okta.springmfa.springmfa;

import org.springframework.boot.autoconfigure.security.oauth2.client.EnableOAuth2Sso;
import org.springframework.web.bind.annotation.RequestMapping;
import org.springframework.web.bind.annotation.RestController;

@EnableOAuth2Sso
@RestController
class MFARestController {

    @RequestMapping("/")
    String home(java.security.Principal user) {
        return "Hello " + user.getName();
    }
}
Next we need to update the build.gradle file. Add the following to the dependencies section.
compile ('org.springframework.security.oauth.boot:spring-security-oauth2-autoconfigure:2.0.1.RELEASE')
Note: this annotation used to be included in the spring-boot-starter-security but was taken out in Spring Boot 2.0.0 M5, so now we have to add it in manually. You may see older tutorials that don’t include the dependency for this annotation.
Now we need to update our application.properties file. The first update is to change it to an application.yml file. Then you need to fill in the OAuth settings. Remember all those things I said you’d need “in a moment?” Well, the moment has come.
security:
    oauth2:
        client:
            # From Okta application
            clientId: < your client ID >
            clientSecret: < your client secret >
            # From Authorization Server's metadata
            accessTokenUri: https://{yourOktaDomain}/oauth2/default/v1/token
            userAuthorizationUri: https://{yourOktaDomain}/oauth2/default/v1/authorize
            scope: openid profile email
        resource:
            # from your Auth Server's metadata, check .well-known/openid-configuration if not in .well-known/oauth-authorization-server
            userInfoUri: https://{yourOktaDomain}/oauth2/default/v1/userinfo
        sso:
            loginPath: /authorization-code/callback
Try the Okta OAuth 2.0 Integration
At this point, you should be able to go to http://localhost:8080 and log in using your Okta account. Because you are probably already logged into Okta, you may be taken directly to the rest endpoint and see the following line:
Hello <Your Name>
If you want to see the whole flow in action, sign out of the Okta dashboard (or use an incognito window) and try again. You will be redirected to the Okta login screen before being sent back to the root mapping in the MFARestController
Add SMS-Based Multi-Factor Authentication
Now for the really exciting part! Let’s add a second factor to our authentication.
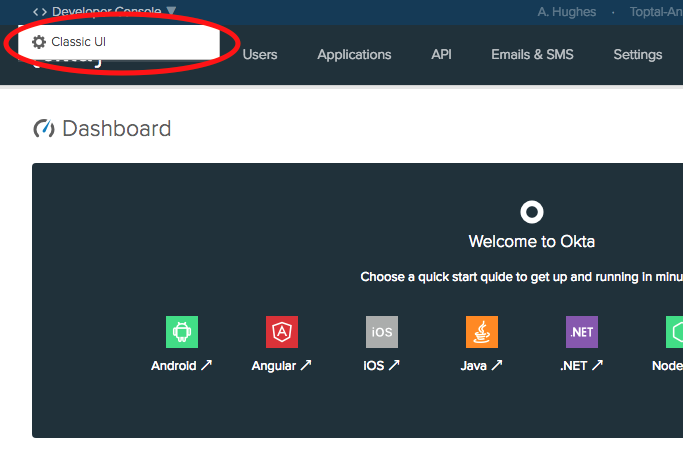
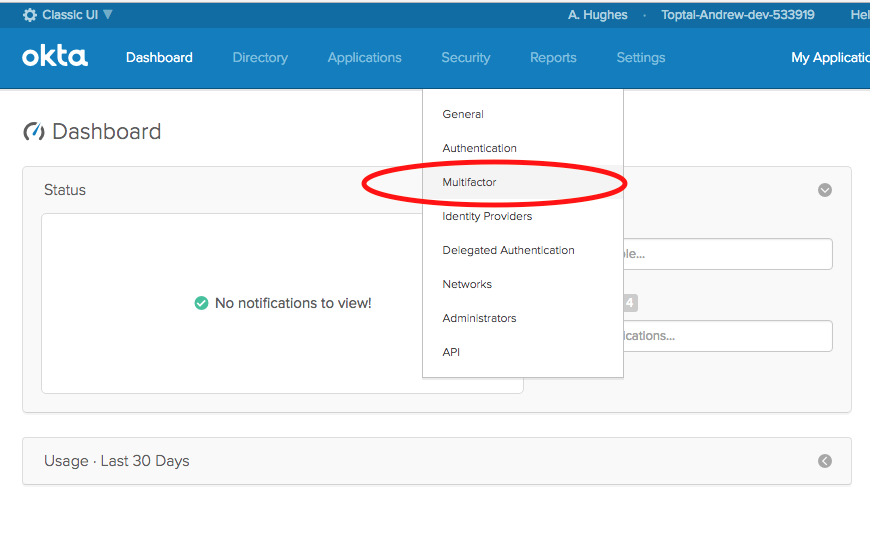
Sign back into your developer.okta.com dashboard. The MFA options are only available in the Classic UI (for free accounts). Switch to the Classic UI by hovering over the Developer Console menu in the upper left corner and click on the Classic UI button.
From the top menu, go to Security -> Multifactor. Click Edit and then click the checkbox for SMS Authentication.
Notice that there are a TON of factors that you can select.
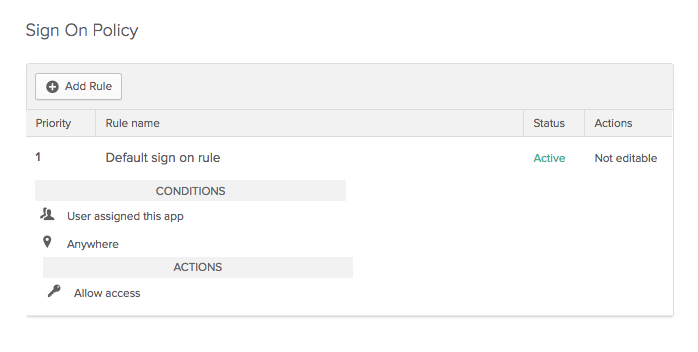
Now click on Applications in the top menu click on your application and go to the Sign-On panel. At the bottom you’ll see a Sign On Policy settings panel.
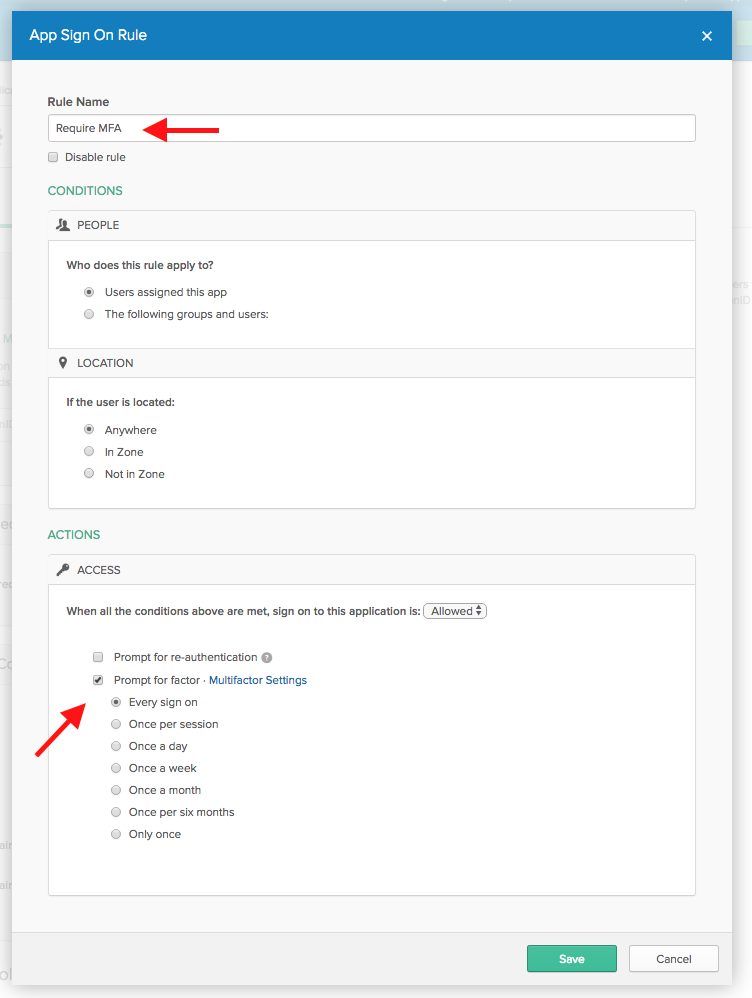
We need to add a rule that tells Okta when to use MFA. Click Add Rule. Give the new rule a name, something like “Require MFA”, and at the bottom, check the Prompt for factor checkbox and select Every sign on.
Give Your New Spring Boot App a Whirl!
That’s it. Log out of developer.okta.com and restart your Spring Boot app from the command line if it’s still running.
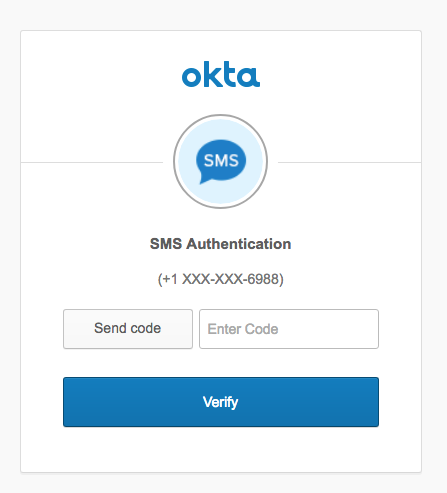
This time when you go to http://localhost:8080 you’ll be directed to the Okta SMS Authentication page!
Hopefully this post has shown you that setting up SMS-based MFA in your Spring Boot apps with Okta can be simple and painless, and add excellent level of security. Okta has a lot more to offer in regards to securing your applications. If you’d like to read more about Spring Boot, Okta, and OAuth 2.0, please check out some of these other resources or browse the rest of the Okta developer blog:
- Bootiful Development with Spring Boot and Angular
- Build and Secure Microservices with Spring Boot 2.0 and OAuth 2.0
- Get Started with Spring Boot, OAuth 2.0, and Okta
- Add Authentication to Any Web Page in 10 Minutes
- Okta’s Java product documentation
As always, you can hit us up in the comments below with feedback or questions, or on Twitter @oktadev. We look forward to hearing from you!
Okta Developer Blog Comment Policy
We welcome relevant and respectful comments. Off-topic comments may be removed.