Add Authentication to Any Web Page in 10 Minutes
Heads up... this blog post is old!
For updated instructions on adding authentication using the Okta Sign-in Widget, see Embedded Okta Sign-In Widget fundamentals.
Adding authentication to web pages can be pretty annoying.
While I’d like to say that over the course of my programming tenure I’ve learned to easily add authentication to any app I create, my attempts tend to devolve into me bickering with myself endlessly over a User schema and the most efficient way to share my user data between components.
One of the greatest things that’s happened in recent years, however, is the proliferation of identity and user management API services like Okta, which handle many of the typical authentication woes for you, including:
- User registration
- User login
- Multi-factor authentication
- Authorization (groups, permissions, etc.)
- Social login
Okta essentially handles all the bullshit you typically need to build when you need to start managing user accounts for your app.
So, with that in mind, today I’m going to show you how to easily add authentication to any web page in 10 minutes.
You can also watch this tutorial as a video on YouTube.
Note: In May 2025, the Okta Integrator Free Plan replaced Okta Developer Edition Accounts, and the Okta CLI was deprecated.
We preserved this post for reference, but the instructions no longer work exactly as written. Replace the Okta CLI commands by manually configuring Okta following the instructions in our Developer Documentation.
Create an Okta Account
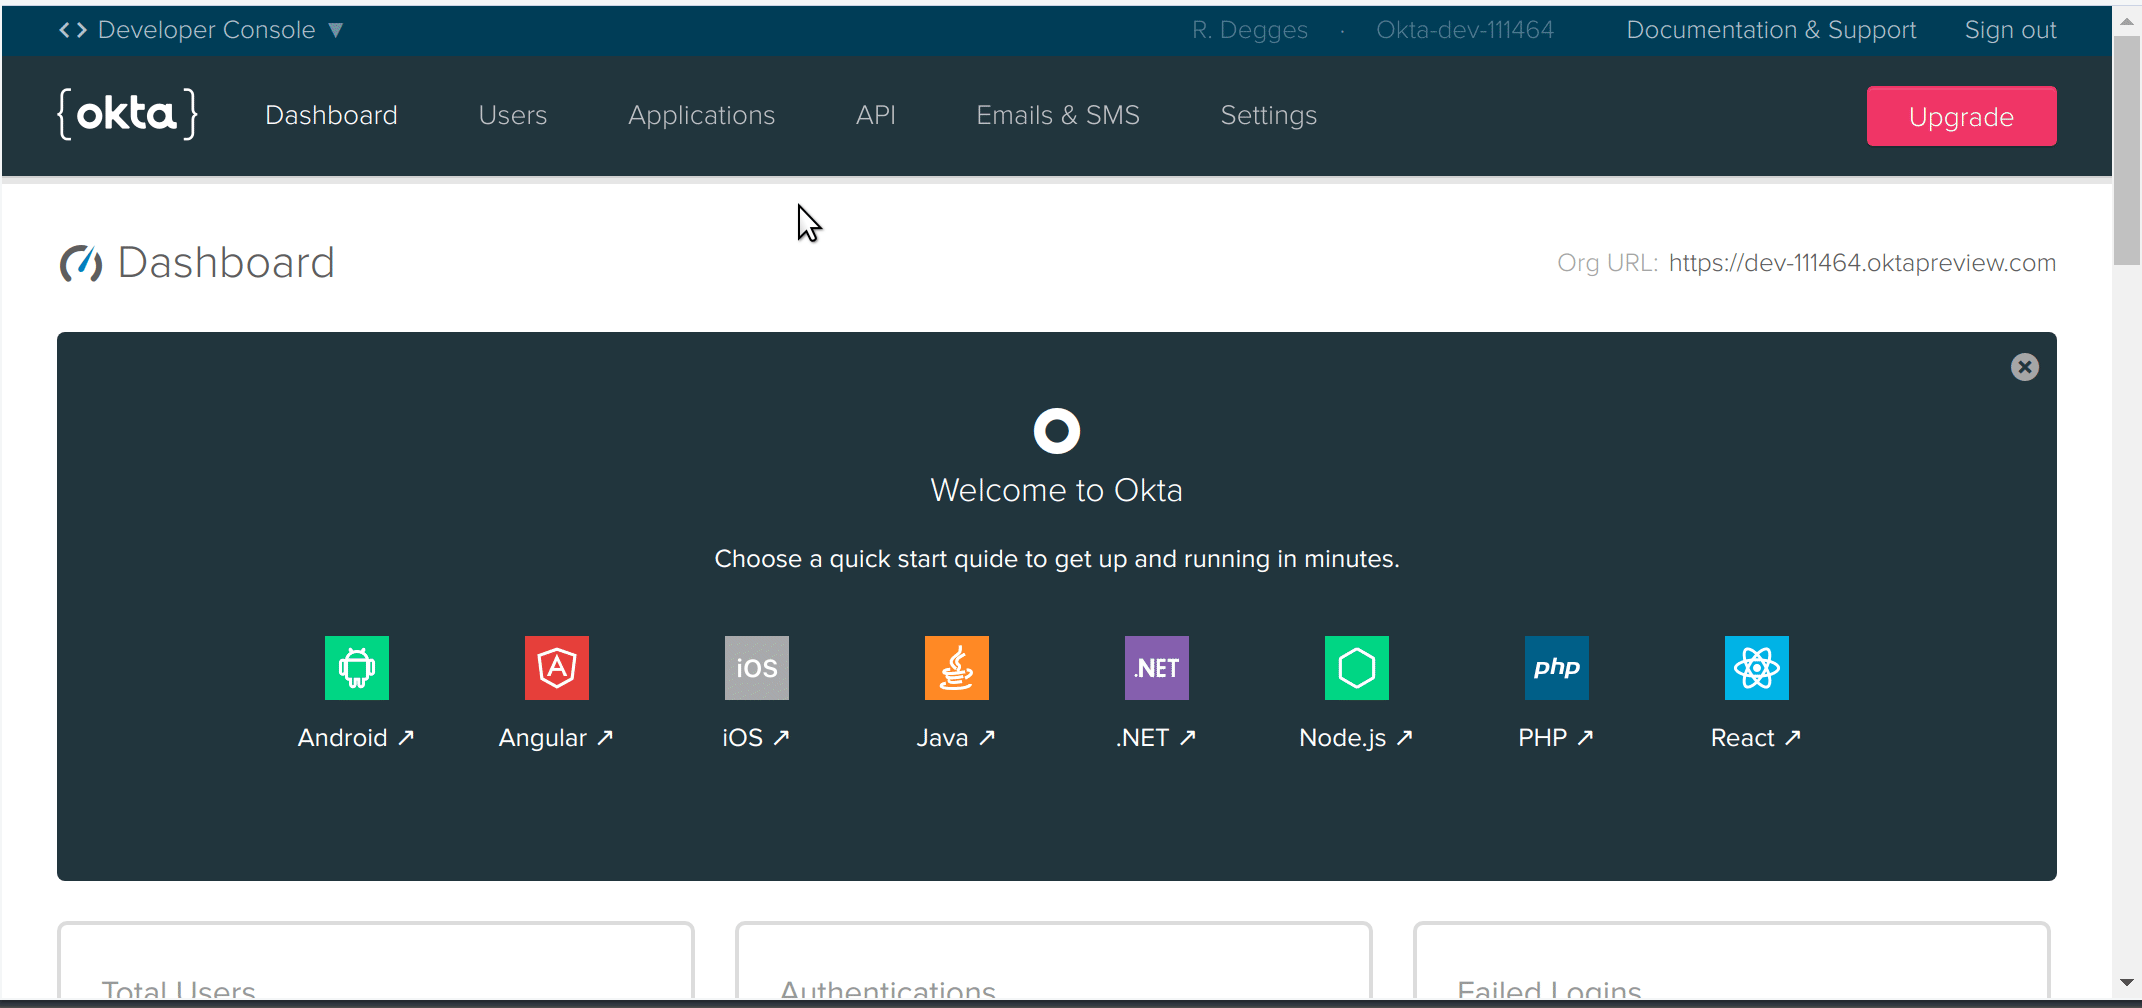
The first thing you’ll need to do is create a free Okta developer account.
Once you’ve got your shiny new Okta account and you’ve logged into the dashboard, you need to open a new file and copy down the Org URL from the top-right portion of the page.

NOTE: If you were curious about how I was going to teach you to add authentication to any web page in 10 minutes: I’m going to cheat. I’m going to show you how to do it using Okta which makes the entire process thoughtless. If I wanted to show you how to add authentication into any web page without using something like Okta, it would take me about two full days. I’d have to explain sessions, JSON Web Tokens, OpenID Connect, database schema design, database management, API patterns (to expose the users), and much more.
Create an Okta Application
The next thing you need to do is create an Okta application. Okta allows you to secure as many different websites, mobile apps, and API services as you want, so you’ll need to create an application for each so you know which users can log into which apps. To do this, click the Applications tab at the top of the screen and then create Add Application.
Once you’ve reached the app creation page, you’ll want to select the Single-Page App box (because I’m going to show you how to quickly add authentication to a single-page web app), then click Next. To finish creating the app, you’ll want to then fill in the following values:
- Name: The name of your app.
- Base URIs: The URLs that your app will run under. For instance, the app I’m going to secure in this guide will run on localhost port 8080, so I’ll leave the default value of
http://localhost:8080alone. If my website were running ashttps://www.coolsite.com, I’d use that value instead. You can have as many Base URI values as you need (you can have multiple URIs in there for development, staging, production, etc.). - Login Redirect URIs: The URLs that your app should redirect back to once a user has authenticated. For 99% of you, this should be the same value as the Base URI (e.g.,
http://localhost:8080). If you do change this from the default value, you will need to go to the API -> Trusted Origins dropdown and add your new URI as a trusted origin. This lets your browser-based app access the Okta API from this location. - Grant type allowed: Select Implicit. To use authorization code flow with PKCE, see the Sign-In Widget’s documentation.
Once you’ve got all the settings specified, click Done to create your new app.
Now, scroll down to the bottom of your newly created app page and copy down the Client ID value. This is your app’s unique OpenID Connect client identifier. It isn’t important that you understand what that is yet, but it is important that you copy that value down for later.
Create a Web Page
Now that you’ve got the Okta stuff out of the way, go ahead and create a web page, any web page! You can use an existing page, create a new one, or use the one that I’ve provided below.
To use the one below, create an index.html file on your hard drive, and copy/paste the HTML below into it.
<!doctype html>
<html lang="en">
  <head>
    <meta charset="utf-8">
    <meta name="viewport" content="width=device-width, initial-scale=1, shrink-to-fit=no">
    <link rel="stylesheet" href="https://stackpath.bootstrapcdn.com/bootstrap/4.1.0/css/bootstrap.min.css" integrity="sha384-9gVQ4dYFwwWSjIDZnLEWnxCjeSWFphJiwGPXr1jddIhOegiu1FwO5qRGvFXOdJZ4" crossorigin="anonymous">
    <title>Simple Web Page</title>
    <style>
      h1 {
        margin: 2em 0;
      }
    </style>
  </head>
  <body>
    <div class="container">
      <h1 class="text-center">Simple Web Page</h1>
      <div id="messageBox" class="jumbotron">
        You are not logged in. Get outta here! Shoo! >:S
      </div>
    </div>
  </body>
</html>
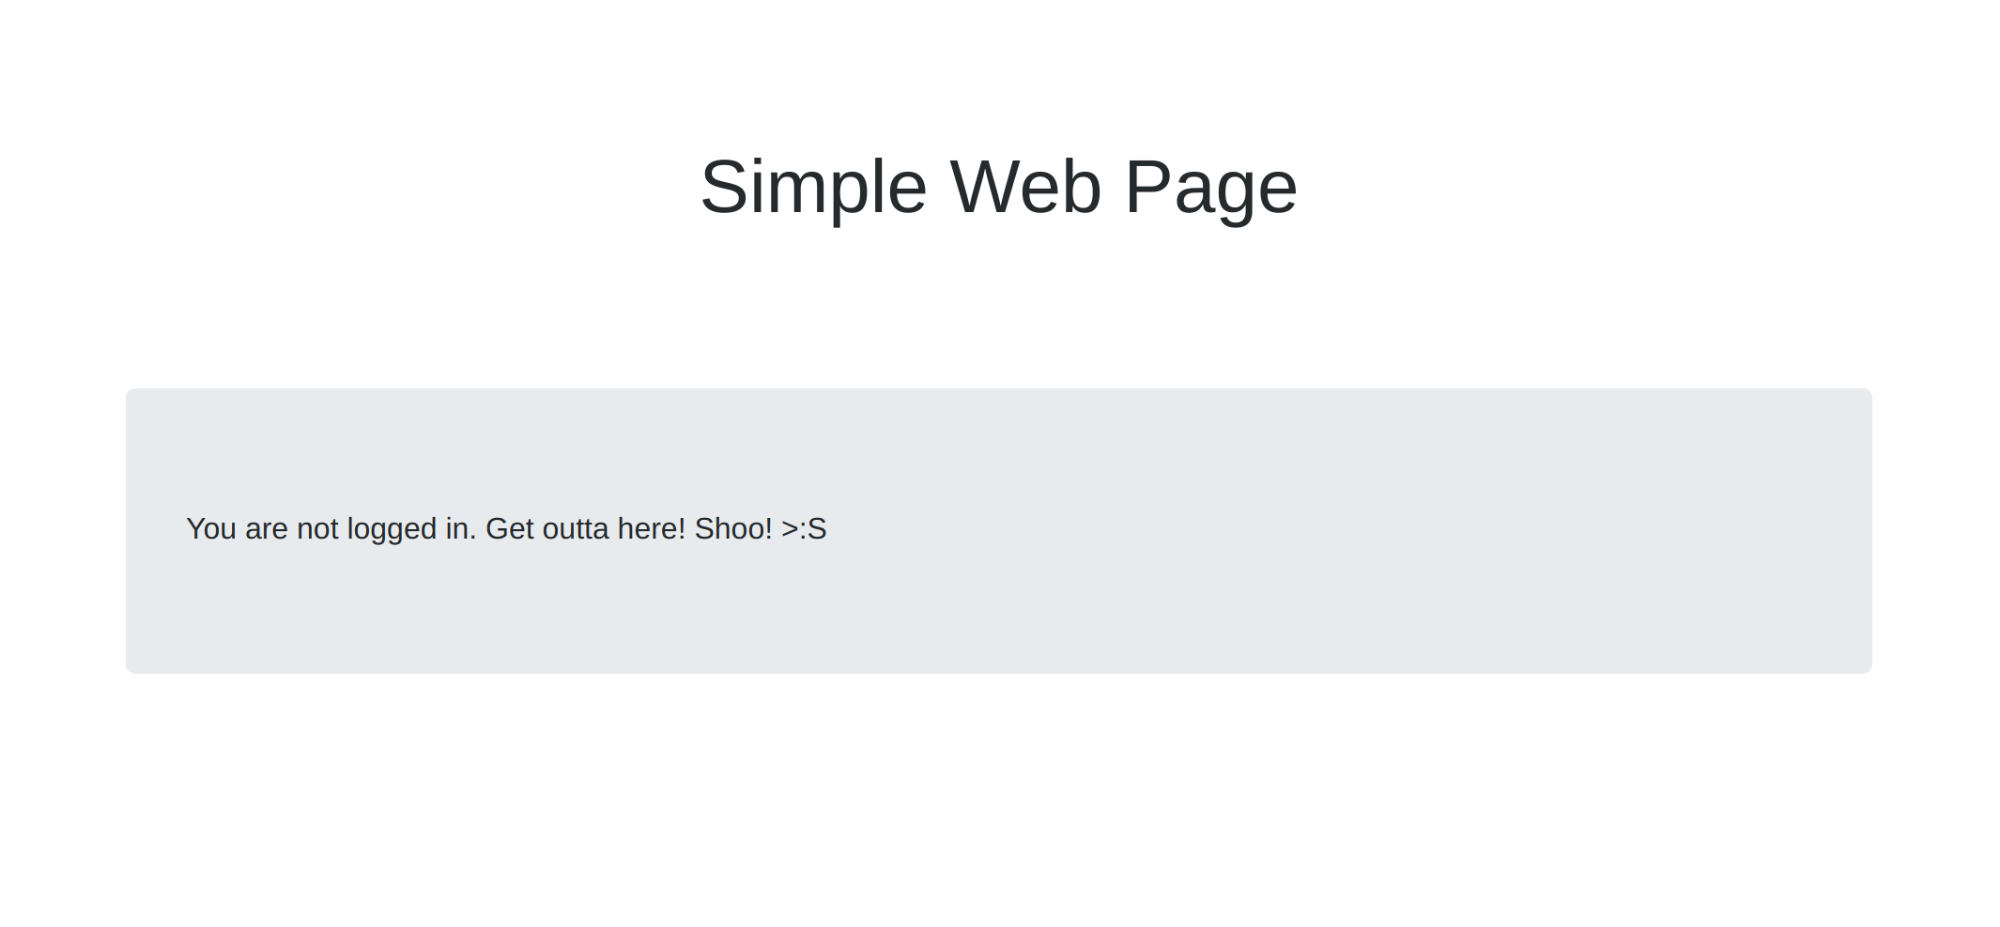
If you open this page in your browser, you’ll see the incredibly simple web page below:
NOTE: I like to run my test servers on port 8080. When I test my page out, I visit http://localhost:8080 in my browser. To do this, if you have Python 3 installed, you can simply run the command python -m http.server 8080 in your project directory (if you’re on a Mac, you can use python -m SimpleHTTPServer 8080). This will open a web server on the specified port. In my case, I named my HTML file index.html so that when I visit http://localhost:8080 it will display by default.
Add Authentication to Your Web Page
Now that you’ve got a simple web page, let’s add authentication to it!
The first thing you need to do is define a div in your HTML page that will eventually be transformed into a super stylish login form.
You can do this by simply defining a <div id="okta-login-container"></div> anywhere in your page. In my case, I’m going to modify the simple web page above and drop the box in right below the big jumbotron element:
<!doctype html>
<html lang="en">
  <head>
    <meta charset="utf-8">
    <meta name="viewport" content="width=device-width, initial-scale=1, shrink-to-fit=no">
    <link rel="stylesheet" href="https://stackpath.bootstrapcdn.com/bootstrap/4.1.0/css/bootstrap.min.css" integrity="sha384-9gVQ4dYFwwWSjIDZnLEWnxCjeSWFphJiwGPXr1jddIhOegiu1FwO5qRGvFXOdJZ4" crossorigin="anonymous">
    <title>Simple Web Page</title>
    <style>
      h1 {
        margin: 2em 0;
      }
    </style>
  </head>
  <body>
    <div class="container">
      <h1 class="text-center">Simple Web Page</h1>
      <div id="messageBox" class="jumbotron">
        You are not logged in. Get outta here! Shoo! >:S
      </div>
      <!-- where the sign-in form will be displayed -->
      <div id="okta-login-container"></div>
    </div>
  </body>
</html>
After that, you’ll need to copy the following JavaScript code into the <head> element towards the top of your page. This code will load the Okta widget, which is what makes all this fancy authentication functionality work:
<!-- widget stuff here -->
<script src="https://ok1static.oktacdn.com/assets/js/sdk/okta-signin-widget/2.16.0/js/okta-sign-in.min.js" type="text/javascript"></script>
<link href="https://ok1static.oktacdn.com/assets/js/sdk/okta-signin-widget/2.16.0/css/okta-sign-in.min.css" type="text/css" rel="stylesheet"/>
<link href="https://ok1static.oktacdn.com/assets/js/sdk/okta-signin-widget/2.16.0/css/okta-theme.css" type="text/css" rel="stylesheet"/>
Once you’ve got the Okta widget loaded up, the last thing you need to do is initialize the widget, give it some configuration data, and tell it what to do. Copy the code below into the bottom of your HTML page, directly above the closing </body> tag:
<!-- use the Okta widget to power authentication! -->
<script type="text/javascript">
  var oktaSignIn = new OktaSignIn({
    baseUrl: "{{ YOUR_ORG_URL }}",
    clientId: "{{ YOUR_APP_CLIENT_ID }}",
    authParams: {
      issuer: "default",
      responseType: ['token', 'id_token'],
      display: 'page'
    }
  });

  if (oktaSignIn.token.hasTokensInUrl()) {
    oktaSignIn.token.parseTokensFromUrl(
      // If we get here, the user just logged in.
      function success(res) {
        var accessToken = res[0];
        var idToken = res[1];

        oktaSignIn.tokenManager.add('accessToken', accessToken);
        oktaSignIn.tokenManager.add('idToken', idToken);

        window.location.hash='';
        document.getElementById("messageBox").innerHTML = "Hello, " + idToken.claims.email + "! You just logged in! :)";
      },
      function error(err) {
        console.error(err);
      }
    );
  } else {
    oktaSignIn.session.get(function (res) {
      // If we get here, the user is already signed in.
      if (res.status === 'ACTIVE') {
        document.getElementById("messageBox").innerHTML = "Hello, " + res.login + "! You are *still* logged in! :)";
        return;
      }
      oktaSignIn.renderEl(
        { el: '#okta-login-container' },
        function success(res) {},
        function error(err) {
          console.error(err);
        }
      );
    });
  }
</script>
NOTE: Don’t forget to replace {{ YOUR_ORG_URL }} and {{ YOUR_APP_CLIENT_ID}} with your Org URL and Client ID values that you copied down earlier when you set up Okta.
Your final web page should look like this:
<!doctype html>
<html lang="en">
  <head>
    <meta charset="utf-8">
    <meta name="viewport" content="width=device-width, initial-scale=1, shrink-to-fit=no">
    <link rel="stylesheet" href="https://stackpath.bootstrapcdn.com/bootstrap/4.1.0/css/bootstrap.min.css" integrity="sha384-9gVQ4dYFwwWSjIDZnLEWnxCjeSWFphJiwGPXr1jddIhOegiu1FwO5qRGvFXOdJZ4" crossorigin="anonymous">
    <title>Simple Web Page</title>
    <style>
      h1 {
        margin: 2em 0;
      }
    </style>
    <!-- widget stuff here -->
    <script src="https://ok1static.oktacdn.com/assets/js/sdk/okta-signin-widget/2.16.0/js/okta-sign-in.min.js" type="text/javascript"></script>
    <link href="https://ok1static.oktacdn.com/assets/js/sdk/okta-signin-widget/2.16.0/css/okta-sign-in.min.css" type="text/css" rel="stylesheet"/>
    <link href="https://ok1static.oktacdn.com/assets/js/sdk/okta-signin-widget/2.16.0/css/okta-theme.css" type="text/css" rel="stylesheet"/>
  </head>
  <body>
    <div class="container">
      <h1 class="text-center">Simple Web Page</h1>
      <div id="messageBox" class="jumbotron">
        You are not logged in. Get outta here! Shoo! >:S
      </div>
      <!-- where the sign-in form will be displayed -->
      <div id="okta-login-container"></div>
    </div>
    <script type="text/javascript">
      var oktaSignIn = new OktaSignIn({
        baseUrl: "{{ YOUR_ORG_URL }}",
        clientId: "{{ YOUR_APP_CLIENT_ID }}",
        authParams: {
          issuer: "default",
          responseType: ['token', 'id_token'],
          display: 'page'
        }
      });

      if (oktaSignIn.token.hasTokensInUrl()) {
        oktaSignIn.token.parseTokensFromUrl(
          // If we get here, the user just logged in.
          function success(res) {
            var accessToken = res[0];
            var idToken = res[1];

            oktaSignIn.tokenManager.add('accessToken', accessToken);
            oktaSignIn.tokenManager.add('idToken', idToken);

            window.location.hash='';
            document.getElementById("messageBox").innerHTML = "Hello, " + idToken.claims.email + "! You just logged in! :)";
          },
          function error(err) {
            console.error(err);
          }
        );
      } else {
        oktaSignIn.session.get(function (res) {
          // If we get here, the user is already signed in.
          if (res.status === 'ACTIVE') {
            document.getElementById("messageBox").innerHTML = "Hello, " + res.login + "! You are *still* logged in! :)";
            return;
          }
          oktaSignIn.renderEl(
            { el: '#okta-login-container' },
            function success(res) {},
            function error(err) {
              console.error(err);
            }
          );
        });
      }
    </script>
  </body>
</html>
If you now go ahead and view the page again, you’ll see a shiny new login form on your page:
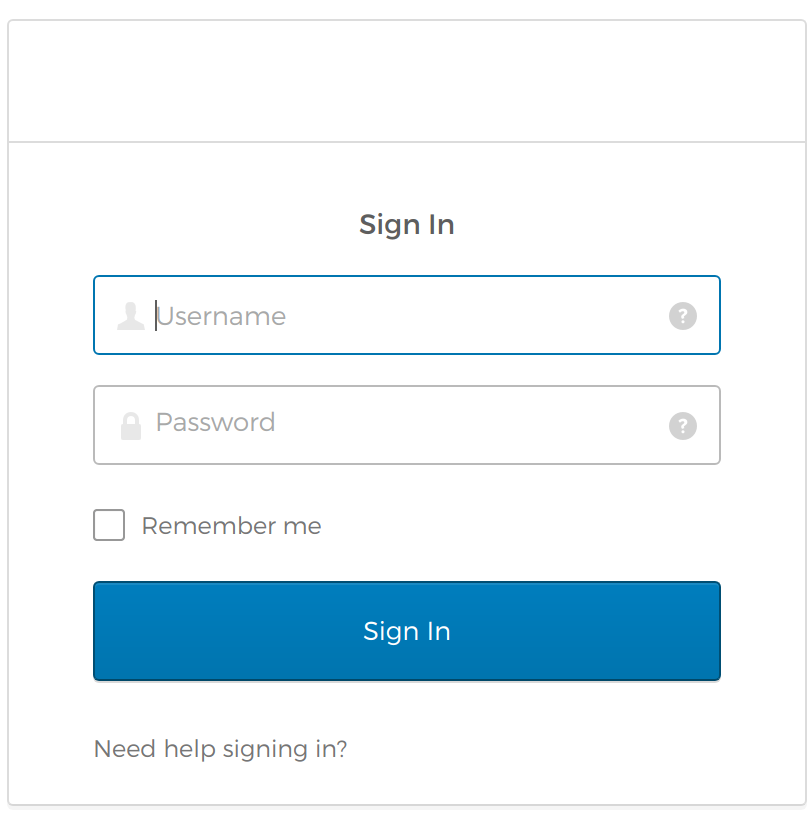
It looks pretty snazzy! Your simple web page now has way more pizazz.
Now go ahead and enter your Okta credentials into the login form and see what happens. You’ll notice that you will now be logged into the page and the message you saw before will be gone! It was replaced by a message telling you you’ve authenticated:
How the Okta Widget Works
You might be thinking to yourself, “Wow, that really was easy! But how does it all work?” Good question!
The way the Okta widget works is by looking in HTML Local Storage for authentication tokens that determine whether or not there is an active user session. If there’s no session, the widget knows you aren’t logged in, so it displays a login form.
Once you’ve entered your user credentials, your login data will be sent to the Okta API service which will securely log you in using the OpenID Connect protocol (which, FYI, is the recommended way to handle modern web authentication).
After you’ve been logged in with Okta, the widget will then store your authentication tokens (JSON Web Tokens) in HTML Local Storage for later retrieval.
If you needed to securely communicate from your web page to a backend API, for example, you could extract your accessToken out of HTML Local Storage and use it to hit your API service securely. For example:
function callMessagesApi() {
  var accessToken = oktaSignIn.tokenManager.get("accessToken");

  if (!accessToken) {
    return;
  }

  // Make the request using jQuery
  $.ajax({
    url: "{{ YOUR_API_URI }}",
    headers: {
      Authorization : "Bearer " + accessToken.accessToken
    },
    success: function(response) {
      console.log('Messages', response);
    },
    error: function(response) {
      console.error(response);
    }
  });
}
Want More Authentication Awesomeness?
I hope you enjoyed learning how you can quickly add authentication to any web page in just 10 minutes using Okta. What I showed you in this article was just the tip of the iceberg, however. There’s a lot more you can do using services like Okta to quickly bootstrap the authentication component of your web apps:
- Add multi-factor authentication to your app
- Support social login with Google, Facebook, LinkedIn, etc.
- Add user registration
- Protect your API endpoints
- And lots more…
If you liked this, you might want to follow @oktadev on Twitter and check out some other interesting articles that walk you through building interesting apps:
- Simple Node Authentication
- Add Auth to your PWA with Okta and Stencil.js
- Build a React Native Application and Authenticate with OAuth 2.0
- Build a Basic CRUD App with Vue.js and Node
Until next time!
Changelog:
- Apr 4, 2023: Adding an outdated notice with up-to-date information to follow.
- Aug 5, 2020: Specify implicit flow as a grant type that needs to be allowed. Implicit is required for v2.x of the Sign-In Widget. The latest version supports authorization code flow with PKCE. See okta-blog#363 for changes.
- Nov 16, 2019: Added screencast of this tutorial. See okta-blog#85 for changes.
- Oct 31, 2019: Removed Trusted Origin (CORS) section since it’s no longer needed. Changes to this post can be viewed in okta-blog#69.
Randall Degges runs Evangelism at Okta where he works on security research, development, and education. In his spare time, Randall writes articles and gives talks advocating for security best practices. Randall also builds and contributes to various open-source security tools.
Randall's realm of expertise include Python, JavaScript, and Go development, web security, cryptography, and infrastructure security. Randall has been writing software for ~20 years and has built some of the most-used API services on the internet.
Okta Developer Blog Comment Policy
We welcome relevant and respectful comments. Off-topic comments may be removed.