Build a Simple CRUD App with Flask and Python
Today I’m going to walk you through building a simple Flask web app (a blog) complete with user management (login, registration, etc.), database models, and everything else that goes along with it.
In this post I’ll walk you through the code piece-by-piece, explaining everything you need to know along the way. By the end of this tutorial, you’ll know how to build simple Flask web apps and have a good understanding of how to create database models, add user registration and login to your sites, etc.
Through this post you’ll learn about and use the following tools:
- Flask — my favorite Python web framework. It’s small, minimal, and simple.
- Flask-SQLAlchemy — an extremely popular ORM for Flask. It allows you to interact with relational database servers like Postgres, MySQL, SQLite, etc. In this tutorial, we’ll be using SQLite as our database, but any of the others would work equally well with no code changes.
- Flask-OIDC — an OpenID Connect library for Flask. OpenID Connect is an open protocol that handles user authentication and authorization. It’s the “modern” way to handle authentication on the web.
- Okta — a free-to-use API service that acts as an OpenID Connect authorization server. Okta will store user accounts for your app and make it possible to handle user registration, login, etc. in a simple way.
- python-slugify — a simple Python library that generates web-friendly URLs. We’ll use this to convert blog post titles into URLs that look nice.
If you’d like to skip the tutorial and check out the fully built project, you can go view it on GitHub.
Note: In May 2025, the Okta Integrator Free Plan replaced Okta Developer Edition Accounts, and the Okta CLI was deprecated.
We preserved this post for reference, but the instructions no longer work exactly as written. Replace the Okta CLI commands by manually configuring Okta following the instructions in our Developer Documentation.
Initialize Authentication for Your Flask + Python App with Okta
Okta is a free-to-use API service that stores user accounts and makes handling user authentication, authorization, social login, password reset, etc. — simple. Okta utilizes open standards like OpenID Connect to make integration seamless.
In this tutorial, you’ll use Okta to store the user accounts for your web app, and you’ll use OpenID Connect to talk to Okta to handle the logistics around authentication and authorization.
To get started, you first need to create a free Okta developer account: https://developer.okta.com/signup/. Once you’ve created your account and logged in, follow the steps below configure Okta, and then you’ll be ready to write some code!
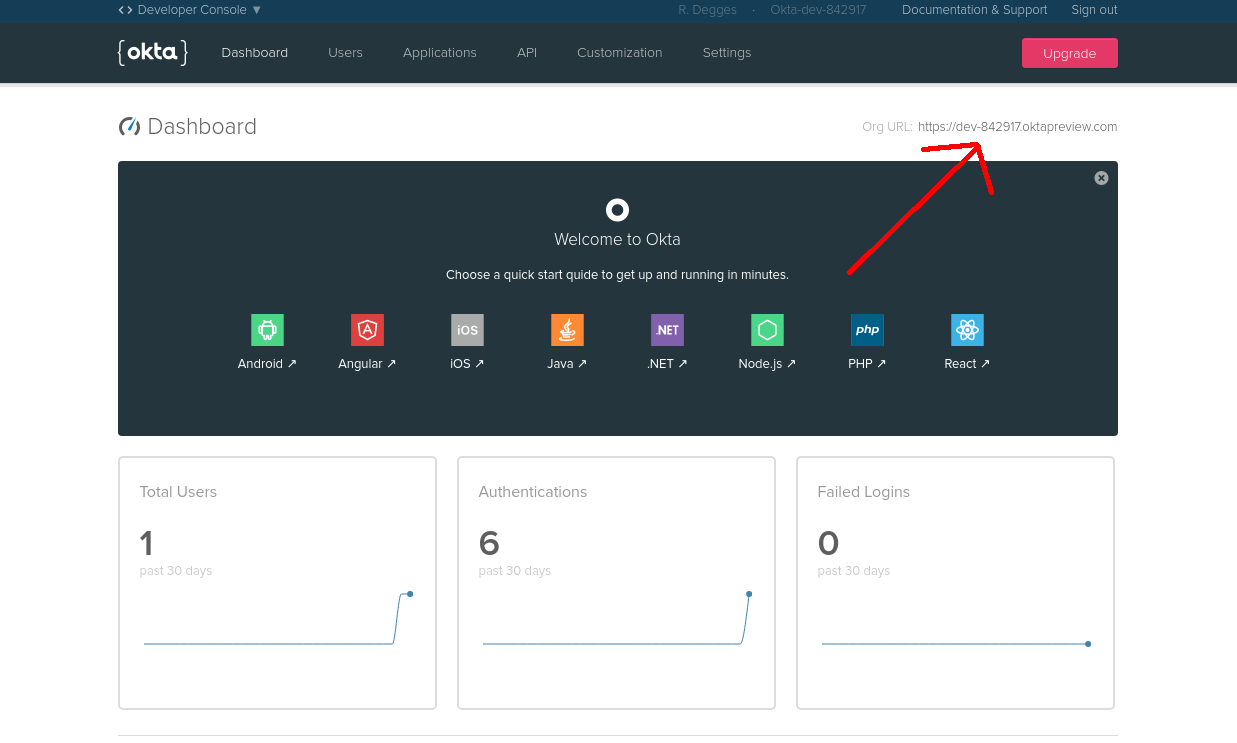
Step 1: Store Your Org URL
The first thing you need to do is copy down the Org URL from the top-right portion of your Okta dashboard page. This URL will be used to route to your authorization server, communicate with it, and much more. You’ll need this value later, so don’t forget it.
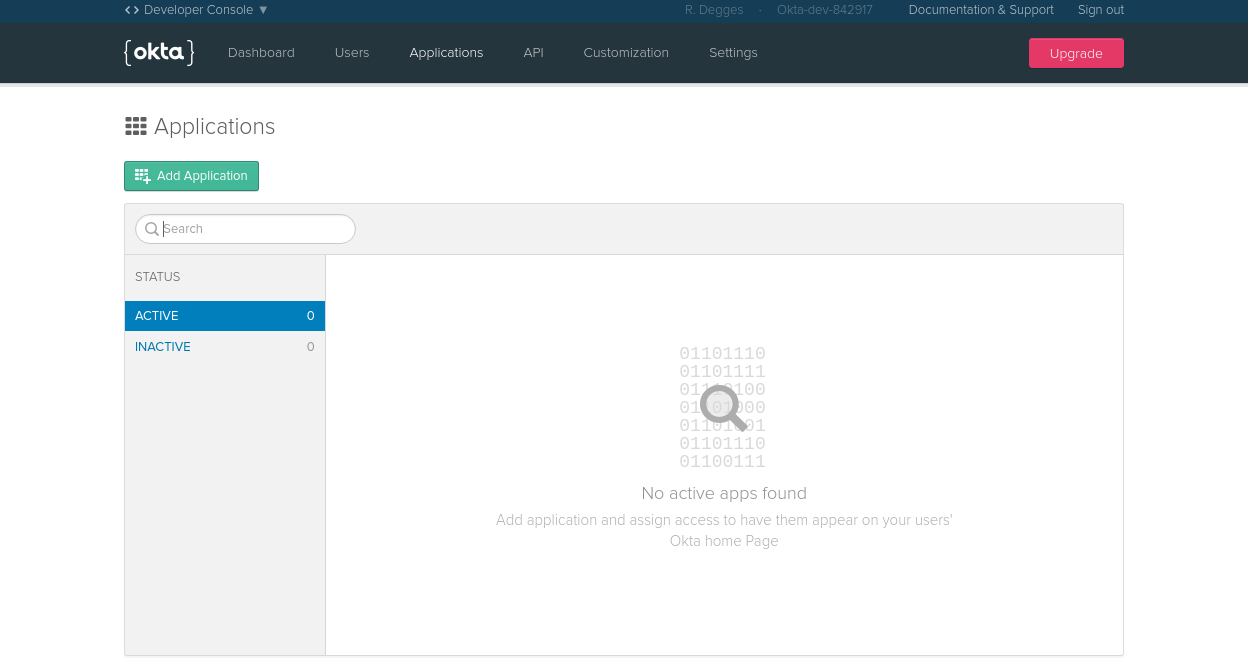
Step 2: Create an OpenID Connect Application
Okta allows you to store and manage users for multiple applications you might be creating. This means that before we can go any further, you need to create a new OpenID Connect application for this project.
Applications in OpenID Connect have a username and password (referred to as a client ID and client secret) that allow your authorization server to recognize which application is talking to it at any given time.
To create a new application browse to the Applications tab and click Add Application.
Next, click the Web platform option (since this project is a web app).
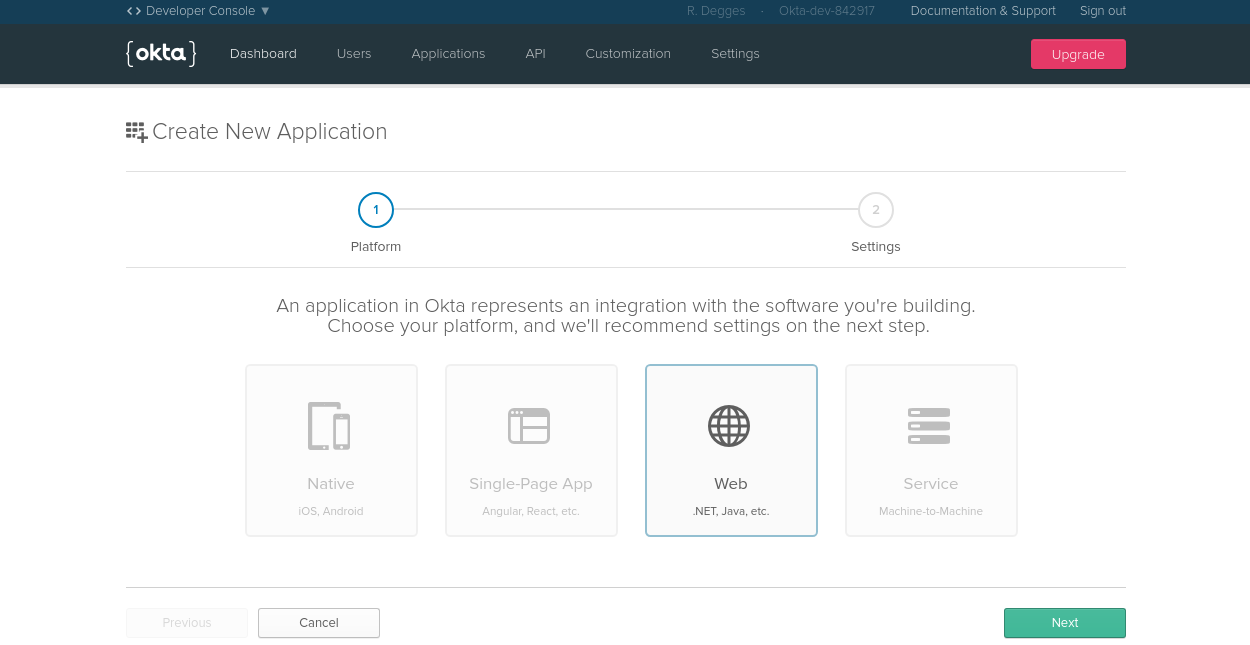
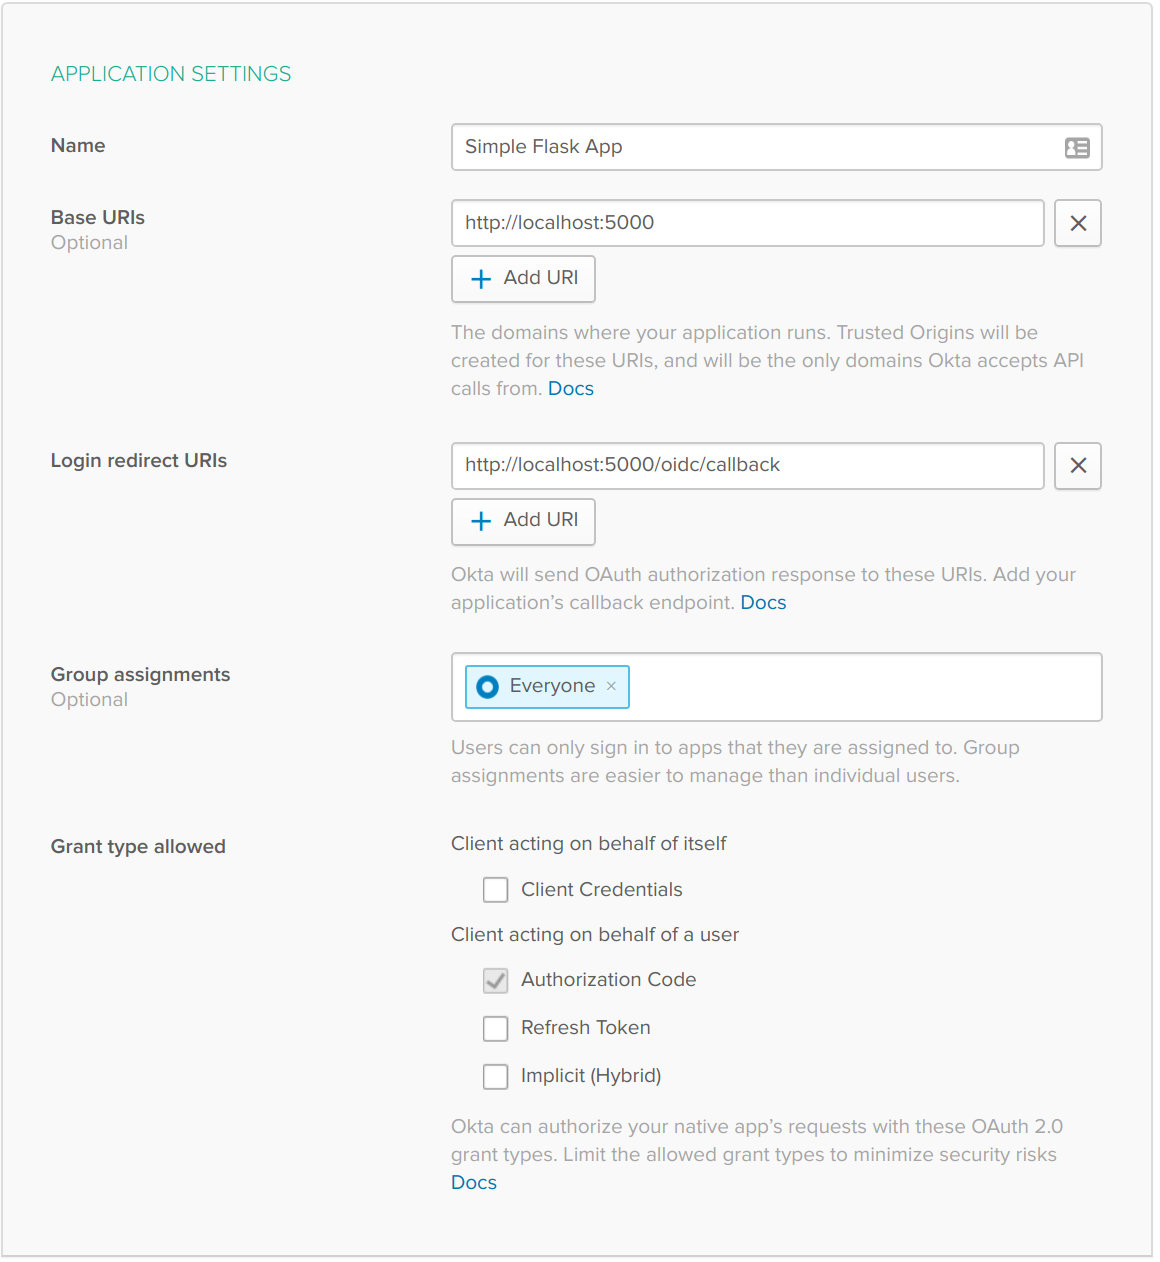
On the settings page, enter the following values:
- Name: Simple Flask App
- Base URIs:
http://localhost:5000 - Login redirect URIs:
http://localhost:5000/oidc/callback
You can leave all the other values unchanged.
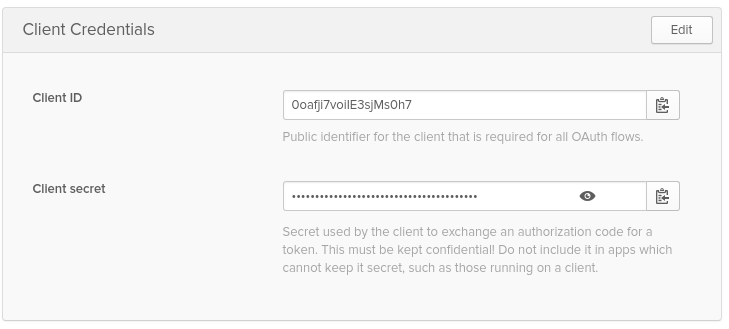
Now that your application has been created, copy down the Client ID and Client secret values on the following page, you’ll need them later when we start writing code.
Step 3: Create an Authentication Token
To access the Okta APIs and be able to manage your user accounts with a great deal of granularity, you’ll also need to create an Okta authentication token. This is an API key that will be used later on communicate with the Okta APIs and allows you to do things like:
- Create, update, and delete users
- Create, update, and delete groups
- Manage application settings
- Etc.
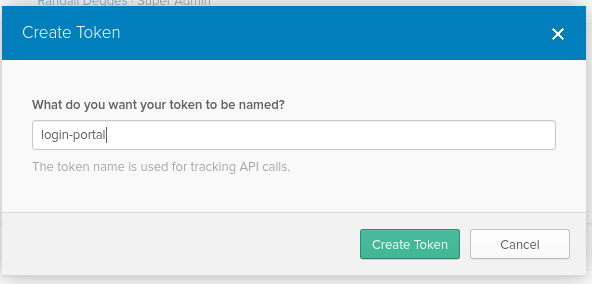
To create an authentication token click the API tab at the top of the page followed by the Create Token button. Give your token a name, preferably the same name as your application, then click Create Token. Once your token has been created, copy down the token value as you will need it later.
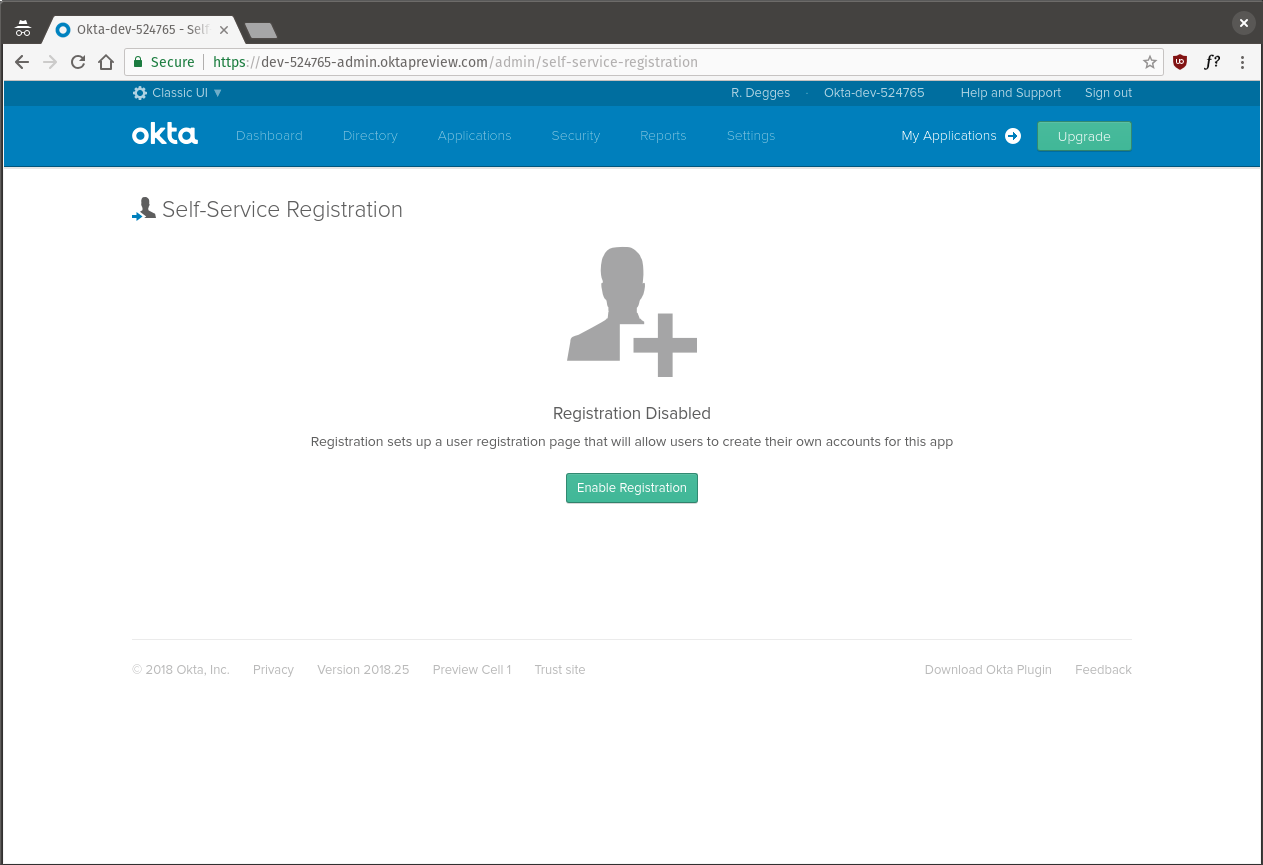
Step 4: Enable User Registration
The last piece of setup you need to complete is to enable user registration functionality for the authorization server. Typically, authorization servers only support login, logout, and stuff like that. But Okta’s authorization server also supports self-service registration, so that users can create accounts, log into them, reset passwords, and basically do everything without you writing any code for it.
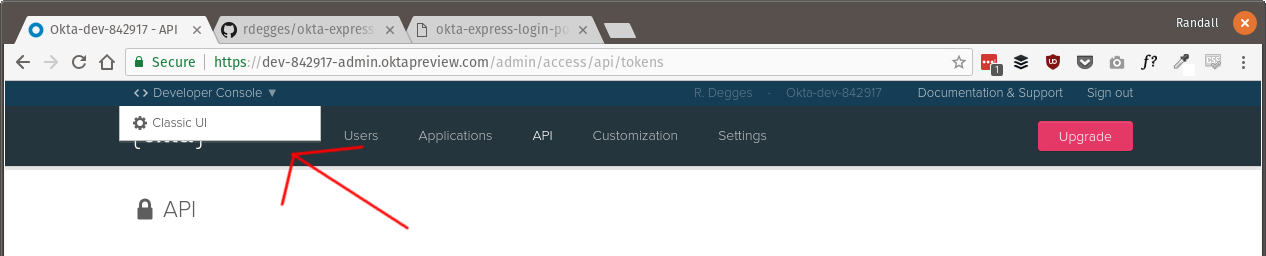
In your Okta dashboard, you’ll notice a small button labeled < > Developer Console at the top-left of your page. Hover over that button and select the Classic UI menu option that appears.
Next, hover over the Directory tab at the top of the page then select the Self-Service Registration menu item. On this page click the Enable Registration button.
On the configuration page, leave all the settings as their default values, except for two:
- Disable the User must verify email address to be activated. checkbox. This setting removes the requirement for new users to verify their email address before being allowed to access your web app.
- Set the Default redirect option by clicking the Custom URL radio box and entering
http://localhost:5000/dashboardas the value. This setting tells the authorization server where to redirect users after they’ve successfully created a new account on your site.
Once you’ve clicked Save, the last thing you need to is switch back to the developer console.

Hover over the Classic UI button at the top right of the page and select the < > Developer Console menu item from the drop-down.
Install Python and Flask Dependencies
The first thing you need to do to initialize your Flask app is install all of the required dependencies. If you don’t have Python installed on your computer already, please go install it now. Be sure to use the latest Python 3+ release.
NOTE: I also strongly recommend you get familiar with pipenv when you get some time. It’s a great tool that makes managing Python dependencies very simple.
Now install the dependencies required for this application.
pip install Flask==1.0.2
pip install Flask-SQLAlchemy==2.3.2
pip install flask-oidc==1.4.0
pip install python-slugify==1.2.5
pip install okta==0.0.4
Initialize Your Flask App
Now that the dependencies are installed, let’s start by creating a simple Flask app. We’ll build on this simple “hello, world!” app until we’ve got all our functionality included.
First, create a new directory for your project.
mkdir simple-flask-app
cd simple-flask-app
Next, create a directory inside your project to hold your Flask application code. This folder will hold all the project source code.
mkdir blog
Create a blog/__init__.py file and enter the following code. This file will hold your Flask app’s initialization code.
from flask import Flask

app = Flask(__name__)

@app.route("/")
def index():
    return "hello, world!"
Open the terminal and run the following code to start up your new Flask app.
FLASK_APP=blog flask run
Once your Flask app is running, visit http://localhost:5000 in the browser to see the hello world message!
As you can see from the small file above, building a minimalist app with Flask can be really simple. All you need to do is:
- Import the Flask library
- Create a Flask app object
- Define a function (called a view) that runs when a particular URL is requested by a user (in this case, the
/URL)
Not bad, right?
Create the Flask Templates
I’m primarily a back-end developer. I do some basic front-end work, but it isn’t my strong suit. Because of this, I like to get the tough stuff out of the way first, and in my case, that tough stuff is templating.
When building a website with Flask, you’ll usually use the built-in Jinja2 templating language.
You can think of Jinja2 as HTML with a little bit of extra stuff: variables, filters, and some other tools that make building large websites simpler. I find Jinja2 simple to work with, and once you get the hang of it, I’m sure you’ll like it too.
To get started creating the templates, let’s create the necessary template files which we’ll fill in.
mkdir -p blog/static
touch simple-flask-app/blog/static/style.css
mkdir -p blog/templates/blog
touch blog/templates/{403.html,404.html,layout.html}
touch blog/templates/blog/{dashboard.html,edit.html,index.html,post.html}
You should now have the following directory structure.
simple-flask-app
└── blog
    ├── __init__.py
    ├── static
    │   └── style.css
    └── templates
        ├── 403.html
        ├── 404.html
        ├── blog
        │   ├── dashboard.html
        │   ├── edit.html
        │   ├── index.html
        │   └── post.html
        └── layout.html
The templates folder holds all of the project’s templates. Within that folder there are some “top-level” templates:
layout.html— this template is the base for all other templates. It contains all the boilerplate HTML code, etc. that all the other pages will share in common with each other.403.html— this template will be shown to the user if they get a 403 error404.html— this template will be shown to the user if they get a 404 errorstatic/— this folder holds all the static files for the site (images, CSS, etc.)static/style.css— this file holds all the website stylesblog/— this folder holds all the blog-related templatesblog/index.html— the blog homepageblog/dashboard.html— the user dashboardblog/edit.html— the post edit pageblog/post.html— the page that shows a single post
Next, copy the following CSS into the blog/static/style.css file.
footer {
  text-align: center;
  font-style: italic;
  margin-top: 1em;
}

.nav {
  float: right;
}

h2 {
  margin-bottom: 2em;
}

.posts ul {
  list-style-type: none;
}

.posts a {
  font-size: 1.3em;
  text-decoration: underline;
  color: #212529;
}

.posts span {
  font-size: 1.1em;
  float: right;
}

.empty {
  font-size: 2em;
  margin-bottom: 5em;
}

.container {
  padding-top: 2em;
}

.unauthenticated p {
  font-size: 1.3em;
  text-align: center;
}

hr.bottom {
  margin-top: 4em;
}

.submit-btn {
  float: right;
}

.alert p {
  font-size: 1.1em;
}

.author {
  font-size: 1.2em;
  margin-top: 2em;
}

.body {
  margin-top: 2em;
  font-size: 1.2em;
}

.edit {
  padding-left: 0;
}

.edit a {
  text-decoration: underline;
  color: #212529;
  font-size: 1.5em;
}

.edit li {
  list-style-type: none;
  line-height: 2.5em;
}

.edit button {
  float: right;
}

.delete {
  margin-left: 1em;
}

.your-posts {
  margin-top: 2em;
}

.hidden {
  display: inline;
}
I won’t explain this as I assume you’re familiar with CSS. I’ve basically just defined some simple styles that will come into play later.
Next, let’s create the blog/templates/layout.html template. This template contains reusable HTML that all the other pages of the site will share.
<!doctype html>
<html lang="en">
  <head>
    <meta charset="utf-8">
    <meta name="viewport" content="width=device-width, initial-scale=1, shrink-to-fit=no">
    <link rel="stylesheet" href="https://stackpath.bootstrapcdn.com/bootstrap/4.1.0/css/bootstrap.min.css" integrity="sha384-9gVQ4dYFwwWSjIDZnLEWnxCjeSWFphJiwGPXr1jddIhOegiu1FwO5qRGvFXOdJZ4" crossorigin="anonymous">
    <link rel="stylesheet" href="{{ url_for('static', filename='style.css') }}">
    <title>Blog | {% block title %}{% endblock %}</title>
  </head>
  <body>
    <div class="d-flex flex-column flex-md-row align-items-center p-3 px-md-4 mb-3 bg-white border-bottom box-shadow">
      <h5 class="my-0 mr-md-auto font-weight-normal">Blog</h5>
      <nav class="my-2 my-md-0 mr-md-3">
        <a class="p-2 text-dark" href="/" title="Home">Home</a>
        {% if not g.user %}
          <a class="p-2 text-dark" href="/login">Log In / Register</a>
        {% else %}
          <a class="p-2 text-dark" href="/dashboard">Dashboard</a>
          <a class="p-2 text-dark" href="/logout">Logout</a>
        {% endif %}
      </nav>
    </div>
    <div class="container">
      {% block body %}{% endblock %}
    </div>
    <footer class="text-center">Created by <a href="https://twitter.com/rdegges">@rdegges</a>, built using <a href="https://twitter.com/okta">@okta</a>.
  </body>
</html>
Most of this page is just standard HTML. You can see with a quick glance that there’s a head tag that includes the Bootstrap UI library (to make things look decent), a navbar that will show on all the pages of the site, and a footer. Other than that, there are a couple of key elements that make this template special. Let’s analyze them.
<link rel="stylesheet" href="{{ url_for('static', filename='style.css') }}">
The link tag in the head section above uses a special function, url_for, to properly link to the style.css file you created above. This is a built-in Flask function that figures out what URL the static files will be served at based on your Flask configuration. This is a lot nicer than if you would have hardcoded something like /static/style.css, since at any point in the future you can change a Flask setting and move all your static files to a new URL.
You may have also noticed the special blog tags:
<title>Blog | {% block title %}{% endblock %}</title>

<!-- ... -->

{% block body %}{% endblock %}
These special block tags act as a placeholder for future values. Since this template will be reused across every page of our site, it would be silly if each page of the site had to have the exact same title or same body content. To work around this, you can use the block tag shown above. Child templates will be able to insert their own titles and body content into this template to generate a full page without duplicating code!
Lastly, take a look at the navbar code and the if/else statement it contains.
{% if not g.user %}
  <a class="p-2 text-dark" href="/login">Log In / Register</a>
{% else %}
  <a class="p-2 text-dark" href="/dashboard">Dashboard</a>
  <a class="p-2 text-dark" href="/logout">Logout</a>
{% endif %}
This is a Jinja2 conditional block, which works intuitively. If the variable g.user does not exist, then the user will be shown a button in the navbar that prompts them to login or register. Otherwise, the user will be shown a Dashboard and Logout button instead.
In the future, the g.user variable will contain a logged-in user account (if one exists), which is what this conditional will be checking against. But more on that later!
Next, go ahead and copy the following code into the blog/templates/403.html file.
{% extends "layout.html" %}
{% block title %}Insufficient Permissions{% endblock %}
{% block body %}
<h1 class="text-center">Insufficient Permissions</h1>
<p class="text-center">Mind your own business >:S</p>
{% endblock %}
This is what a child template looks like. It uses the special extends tag to literally “extend” the layout.html template you just created.
In this template, the content between the block tags is inserted into the parent template (layout.html) as specified. This template, when rendered, will now display a full page without needing to duplicate any code. Pretty neat!
Next, copy the following code into the blog/templates/404.html file. This page will be shown to a user when they visit a page that isn’t found.
{% extends "layout.html" %}

{% block title %}Page Not Found{% endblock %}

{% block body %}
  <h1 class="text-center">Page Not Found</h1>
  <p class="text-center">Whatever you did, it's not working :(</p>
{% endblock %}
Now copy the following code into the blog/templates/blog/index.html file. This template will be the homepage for the blog app we’re creating. It will list the blog posts so readers can view them.
{% extends "layout.html" %}
{% block title %}Home{% endblock %}
{% block body %}
<h2 class="text-center">Recent Posts</h2>
{% if posts %}
<div class="posts">
<ul>
{% for post in posts %}
<div class="row">
<div class="offset-sm-2 col-sm-8">
<li>
<a href="/{{ post.slug }}" title="{{ post.title }}">{{ post.title }} <span> by {{ post.author_name }}</span></a>
</li>
</div>
</div>
{% endfor %}
</ul>
</div>
{% else %}
<p class="empty text-center">Uh-oh. There are no posts to view.</p>
{% endif %}
{% endblock %}
Note that this template uses the for tag to loop through an array of post objects, and then generates links to each of the blog posts by using the post object properties, e.g. post.author_name, post.title, etc. Using the {{ ... }} syntax allows you to output a variable’s value into the HTML of the page.
Now copy the following code into the blog/templates/blog/dashboard.html file. This will be the dashboard that authors can use to manage their articles. It will allow them to create articles, edit articles, and delete articles.
{% extends "layout.html" %}

{% block title %}Dashboard{% endblock %}

{% block body %}
  <div class="row">
    <div class="offset-sm-2 col-sm-8">
      <h2>Create a Post</h2>
    </div>
  </div>

  {% if post %}
    <div class="row">
     <div class="offset-sm-2 col-sm-8">
       <div class="alert alert-successful text-center" role="alert">
         <p>Your new post was created successfully! <a href="/{{ post.slug }}">View it?</a>
        </div>
      </div>
    </div>
  {% endif %}

   <div class="row">
    <div class="offset-sm-2 col-sm-8">
      <form method="post">
        <div class="form-group">
          <label for="title">Post Title</label>
          <input class="form-control" id="title" type="text" name="title" placeholder="Title" required>
        </div>
        <div class="form-group">
          <label for="title">Post Body</label>
          <textarea class="form-control" id="post" name="body" rows="6" required></textarea>
        </div>
        <button class="btn btn-primary submit-btn" type="submit">Update</button>
      </form>
    </div>
  </div>

  <div class="row">
    <div class="offset-sm-2 col-sm-8">
      <h2 class="your-posts">Your Posts</h2>
      <ul class="edit">
        {% for post in posts %}
          <li>
            <a href="/{{ post.slug }}" title="{{ post.title }}">{{ post.title }}</a>
            <form class="hidden" method="post" action="/{{ post.slug }}/delete">
              <button class="btn btn-outline-danger delete">Delete</button>
            </form>
            <a href="/{{ post.slug }}/edit" title="{{ post.title }}">
              <button class="btn btn-outline-secondary">Edit</button>
            </a>
          </li>
        {% endfor %}
      </ul>
    </div>
  </div>
{% endblock %}
Let’s continue by copy the following code into the blog/templates/blog/edit.html file. This template will be displayed to the user when they want to edit one of their articles.
{% extends "layout.html" %}

{% block title %}{{ post.title }}{% endblock %}

{% block body %}
  <h2 class="text-center">Edit Post</h2>
  <div class="row">
    <div class="offset-sm-2 col-sm-8">
      <form method="post">
        <div class="form-group">
          <label for="title">Post Title</label>
          <input class="form-control" id="title" type="text" name="title" value="{{ post.title }}" required>
        </div>
        <div class="form-group">
          <label for="title">Post Body</label>
          <textarea class="form-control" id="post" name="body" rows="6" required>{{ post.body }}</textarea>
        </div>
        <button class="btn btn-primary submit-btn" type="submit">Update</button>
      </form>
    </div>
  </div>
{% endblock %}
And finally, copy the code below into the blog/templates/blog/post.html file. This template will be shown to the user when they attempt to view a blog post.
{% extends "layout.html" %}

{% block title %}{{ post.title }}{% endblock %}

{% block body %}
  <h2 class="text-center">{{ post.title }}</h2>
  <div class="row">
    <div class="offset-sm-2 col-sm-8">
      <div class="body">{{ post.body|safe }}</div>
      <p class="author">Written by {{ post.author_name }}</p>
    </div>
  </div>
{% endblock %}
And with that, we’re now done creating the templates! Yey!
Now you can’t test this out just yet (we haven’t written any code to make this stuff work), but don’t worry, we’ll get there soon.
Create the Database Models for Your Flask + Python App
The next thing we’ll do is create the necessary database models for the application.
Once the front-end templates have been built, the next complex part of an application is the data model. What data will your app be storing and referencing? I like to define these models early, so I know how to plug things together later on as the application evolves.
For this app, we’ll be building a simple blog. This means we’ll primarily be storing two pieces of data: user account data and blog post data. Because we’ll be using OpenID Connect and Okta to store our user account data, that leaves just the blog post data for us to store and manage.
A blog post in our application will require several critical pieces of data:
- An
idfield, so we can assign each blog post a unique identifier in the database - An
author_idfield, so we can see what author created a blog post - A
createdfield, so we can see at what date and time a blog post was created - A
titlefield, so we can see what the title of each blog post is - A
bodyfield, so we can see what the content of each blog post is (this will be HTML) - A
slugfield, so we can determine what URL to display each blog post as (for example, a blog post titled “My Favorite Post” might be available at the URL https://ourblog.com/my-favorite-post, so “my-favorite-post” would be the slug)
Now that we know what pieces of data are critical to store, let’s set up Flask-SQLAlchemy (the ORM library we’ll use to manage the database) as well as our database model.
Initialize Flask-SQLAlchemy
To get our database hooked up, the first step is getting Flask-SQLAlchemy working.
Create a new file, blog/db.py and copy in the following code. This file will hold all of our database related code.
from datetime import datetime

from click import command, echo
from flask_sqlalchemy import SQLAlchemy
from flask.cli import with_appcontext


# Initialize SQLAlchemy with no settings
db = SQLAlchemy()


@command("init-db")
@with_appcontext
def init_db_command():
    """Initialize the database."""
    db.create_all()
    echo("Initialized the database.")


def init_app(app):
    """Initialize the Flask app for database usage."""
    db.init_app(app)
    app.cli.add_command(init_db_command)
Let’s take a look at what’s happening here.
First, we’re creating a db global object. This is what will be used to create our database models later and manage our relationship with the database. When we initialize the db object, we’re initializing the Flask-SQLAlchemy extension without actually giving it any settings or configuration. We’ll get to that soon.
Next, the init_db_command function. This is a special command that you will be able to run on the command line when you type the following.
FLASK_APP=blog flask init-db
This command runs a special method SQLAlchemy provides called create_all, which will initialize any database tables and configuration specified. Right now this won’t do anything, but once we define database models in a moment, this will become useful.
The init_db_command function is built using the click library which ships with Flask. click is a very popular library for building command line applications, like this one.
Next, the init_app function. This is meant to run from the main application initialization code, and it will properly configure the Flask-SQLAlchemy extension as well as hook up the init_db_command function to the app in the correct way.
Now that our database code has been written, copy the following code into the blog/__init__.py file, overwriting what was there before.
from os.path import dirname, join

from flask import Flask

from . import db


app = Flask(__name__)
app.config.from_mapping(
    SQLALCHEMY_DATABASE_URI="sqlite:///" + join(dirname(dirname(__file__)), "database.sqlite"),
)

db.init_app(app)
What we’re doing here, in the “main” part of our application, is importing the newly created database model we built a moment ago (blog/db.py), specifying some application configuration data (to tell Flask-SQLAlchemy what sort of database we’re using), and finally, calling the special db.init_app() function we defined in the blog/db.py file, which initializes Flask-SQLAlchemy properly.
For almost all Flask apps, you’ll at some point need to specify some configuration information that gets used by extensions or helper libraries. The way you do this is via the app.config.from_mapping call above. This method allows you to define configuration data and settings that can be shared across your Flask app.
In this case, we’re specifying a setting that Flask-SQLAlchemy requires, SQLALCHEMY_DATABASE_URI, which basically tells it what type of database we’re using and how to access it. In this case, we’re going to be storing the SQLite database in a file called database.sqlite in the root of our project folder.
For this blog app, we’ll be using the SQLite database. SQLite is an incredibly popular database that stores all of its data in a single file on the disk. This makes it ideal for building portable applications. If you are building something that requires high levels of throughput and data processing, SQLite may not be the best fit… But for just about everything else, it’s not only simple — it’s very convenient, as you don’t even need a database server!
Now, if you go back and re-run your Flask application, you’ll notice that it should run fine. The only problem is that we still haven’t accomplished anything yet other than initializing the database.
Create the SQLAlchemy Database Models
Now that our database is initialized, let’s create the actual data model we need. This model will allow us to store blog post data as previously described into the SQLite database.
Open up blog/db.py and insert the following code, overwriting what was there before.
from datetime import datetime

from click import command, echo
from flask_sqlalchemy import SQLAlchemy
from flask.cli import with_appcontext


# Initialize SQLAlchemy with no settings
db = SQLAlchemy()


class Post(db.Model):
    """A blog post."""
    id = db.Column(db.Integer, primary_key=True)
    author_id = db.Column(db.Text, nullable=False)
    created = db.Column(db.DateTime, default=datetime.utcnow)
    title = db.Column(db.Text, nullable=False)
    body = db.Column(db.Text, nullable=False)
    slug = db.Column(db.Text, nullable=False, unique=True)


@command("init-db")
@with_appcontext
def init_db_command():
    """Initialize the database."""
    db.create_all()
    echo("Initialized the database.")


def init_app(app):
    """Initialize the Flask app for database usage."""
    db.init_app(app)
    app.cli.add_command(init_db_command)
What we’ve added here is the new Post class. This is a database model that tells SQLAlchemy what sort of data we’re storing (a blog post), and what fields it contains. To do this, we’re using typical relational database column types (Integer, Text, DateTime, etc.). If you aren’t familiar with SQL, you might want to check out this fantastic Khan Academy course on the subject.
Now that the database model has been defined, all we need to do is initialize the database so we can start writing and reading data from it. To do this, let’s use the new init-db command we created earlier.
FLASK_APP=blog flask init-db
If you look in the root of your project folder, you’ll now see a file called database.sqlite. This is where all of your application data will now be stored!
Set Up User Registration, User Login, etc. in Flask
Your database is now ready for action, but you still have a problem: how do you allow users to log into your website, create accounts, etc.? The answer is simple: OpenID Connect and Okta!
Step 1: Create an OpenID Connect Config File
Create a new file named client_secrets.json in the root of your project folder and insert the following code.
{
  "web": {
    "client_id": "{{ OKTA_CLIENT_ID }}",
    "client_secret": "{{ OKTA_CLIENT_SECRET }}",
    "auth_uri": "{{ OKTA_ORG_URL }}/oauth2/default/v1/authorize",
    "token_uri": "{{ OKTA_ORG_URL }}/oauth2/default/v1/token",
    "issuer": "{{ OKTA_ORG_URL }}/oauth2/default",
    "userinfo_uri": "{{ OKTA_ORG_URL }}/oauth2/default/userinfo",
    "redirect_uris": [
      "http://localhost:5000/oidc/callback"
    ]
  }
}
Be sure to replace the placeholder variables with your actual Okta information.
Replace {{ OKTA_ORG_URL }} with the Org URL on your dashboard page
Replace {{ OKTA_CLIENT_ID }} with the Client ID on your application page
Replace {{ OKTA_CLIENT_SECRET }} with the Client secret on your application page
This file will be used by the Flask-OIDC library which we’ll be configuring in a moment. These settings essentially tell the OpenID Connect library what OpenID Connect application you’re using to authenticate against, and what your authorization server API endpoints are.
The URIs above point to your newly created Okta resources so that the Flask library will be able to talk to it properly.
Step 2: Configure Flask-OIDC
Open up blog/__init__.py and paste in the following code.
from os.path import dirname, join

from flask import Flask, g

from . import auth, db


app = Flask(__name__)
app.config.from_mapping(
    SECRET_KEY={{ LONG_RANDOM_STRING }},
    OIDC_CLIENT_SECRETS=join(dirname(dirname(__file__)), "client_secrets.json"),
    OIDC_COOKIE_SECURE=False,
    OIDC_CALLBACK_ROUTE="/oidc/callback",
    OIDC_SCOPES=["openid", "email", "profile"],
    OIDC_ID_TOKEN_COOKIE_NAME="oidc_token",
    SQLALCHEMY_DATABASE_URI="sqlite:///" + join(dirname(dirname(__file__)), "database.sqlite"),
)

auth.oidc.init_app(app)
db.init_app(app)

app.register_blueprint(auth.bp)


@app.before_request
def before_request():
    """
    Load a user object into `g.user` before each request.
    """
    if auth.oidc.user_loggedin:
        g.user = auth.okta_client.get_user(auth.oidc.user_getfield("sub"))
    else:
        g.user = None
What we’re doing here is specifying settings for the Flask-OIDC library:
- The
OIDC_CLIENT_SECRETSsetting tells Flask-OIDC where your OpenID Connect configuration file is located (the one you created in the previous section). - The
OIDC_COOKIE_SECUREsetting allows you to test out user login and registration in development without using SSL. If you were going to run your site publicly, you would remove this option and use SSL on your site. - The
OIDC_CALLBACK_ROUTEsetting tells Flask-OIDC what URL on your site will handle user login. This is a standard part of the OpenID Connect flows. This is out of scope for this article, but if you want to learn more, read our OpenID Connect primer. - The
OIDC_SCOPESsetting tells Flask-OIDC what data to request about the user when they log in. In this case, we’re requesting basic user information (email, name, etc.). - The
SECRET_KEYsetting should be set to a long, random string. This is used to secure your Flask sessions (cookies) so that nobody can tamper with them. Make sure this variable stays private. It should never be publicly exposed.
Once that configuration data has been created, we also use a (currently) undefined auth module (which we’ll get to in a moment) to initialize the Flask-OIDC library.
We then register a Blueprint (which will be discussed in the next section).
Finally, we define a special function called before_request. This function will run automatically before each user request (hence the @app.before_request decorator), and load up a user object is it is available.
Here’s how this works.
- Once a user has logged in using OpenID Connect, they’ll have a session created and stored in a server-side cookie
- The
if auth.oidc.user_loggedincode will check to see whether or not this cookie exists and is valid. If it is, then we’ll use the okta Python library to retrieve the user’s account as aUserobject that we can easily work with, and assign it to the special variableg.user. - If no user is logged in, then
g.userwill be set toNone.
The special g.user value is something that we can use to store important data our application needs, like the current user, for example. This variable is available to us to use in templates, server-side code, etc. which makes it very handy.
Step 3: Create User Login and Logout Views in Flask
Create a new file, blog/auth.py and paste in the following code. This file will hold all of our authentication related code.
from os import environ

from flask import Blueprint, redirect, url_for
from flask_oidc import OpenIDConnect
from okta import UsersClient


bp = Blueprint("auth", __name__, url_prefix="/")
oidc = OpenIDConnect()
okta_client = UsersClient("{{ OKTA_ORG_URL }}", "{{ OKTA_AUTH_TOKEN }}")


@bp.route("/login")
@oidc.require_login
def login():
    """
    Force the user to login, then redirect them to the dashboard.
    """
    return redirect(url_for("blog.dashboard"))


@bp.route("/logout")
def logout():
    """
    Log the user out of their account.
    """
    oidc.logout()
    return redirect(url_for("blog.index"))
Be sure to substitute OKTA_ORG_URL and OKTA_AUTH_TOKEN with the appropriate Okta values.
What this file does is:
- Define a special
authBlueprint. Blueprints in Flask are ways to modularize code to make it reusable in large systems. Each Blueprint has a name, a URL prefix (in this case that isn’t relevant, however), and it’s own mini application object. - Define an
okta_clientobject. This allows us to talk to the Okta API to retrieve user data. While this isn’t strictly necessary, it allows us to more easily work with our users. - Define a
loginview to handle user login functionality. What these view functions do is this: when a user visits/login, if the user is already logged in (via the@oidc.require_logindecorator), they’ll then be redirected to the dashboard page via theredirect(...)function call. If the user isn’t logged in, the@oidc.require_logindecorator will redirect the user to the Okta authorization server and prompt them to either create a new account (user registration), or log into an existing account. - Define a
logoutview to handle logout functionality. If a user visits the/logoutURL, their session cookie will be deleted (via theoidc.logout()call), and they’ll then be redirected to the homepage of the site.
Congratulations, you’ve now fully integrated user registration, login, and user management into your application! Not bad, right?
Define the Blog Views in Flask
So far, we’ve built the front-end templates, created the database models, and wired up user authentication. The one thing we haven’t done, however, is define the core behavior for our application: the views!
In Flask, views are functions that run when a user visits a particular URL. If a user visits /dashboard, for example, Flask needs to know what function to run and what to do to display the dashboard page to the user.
Now that we’ve figured everything else out, let’s get the views built!
First off, however, we need to update our app initialization code so our soon-to-be created blog views will work! Open blog/__init__.py and copy in the following code.
from os.path import dirname, join

from flask import Flask, g

from . import auth, blog, db


app = Flask(__name__)
app.config.from_mapping(
    SECRET_KEY='LONG_RANDOM_STRING',
    OIDC_CLIENT_SECRETS=join(dirname(dirname(__file__)), "client_secrets.json"),
    OIDC_COOKIE_SECURE=False,
    OIDC_CALLBACK_ROUTE="/oidc/callback",
    OIDC_SCOPES=["openid", "email", "profile"],
    OIDC_ID_TOKEN_COOKIE_NAME="oidc_token",
    SQLALCHEMY_DATABASE_URI="sqlite:///" + join(dirname(dirname(__file__)), "database.sqlite"),
)

auth.oidc.init_app(app)
db.init_app(app)

app.register_blueprint(auth.bp)
app.register_blueprint(blog.bp)


@app.before_request
def before_request():
    """
    Load a user object into `g.user` before each request.
    """
    if auth.oidc.user_loggedin:
        g.user = auth.okta_client.get_user(auth.oidc.user_getfield("sub"))
    else:
        g.user = None

@app.errorhandler(404)
def page_not_found(e):
    """Render a 404 page."""
    return render_template("404.html"), 404


@app.errorhandler(403)
def insufficient_permissions(e):
    """Render a 403 page."""
    return render_template("403.html"), 403
We haven’t changed much here, except to import a blog module and register it as a Blueprint. We’ve also defined two additional functions: one that will be run if a user visits a non-existent page (a 404), or if a user visits a page they don’t have permission to access (a 403).
Next, create the file blog/blog.py and paste in the following code.
from flask import Blueprint, abort, g, render_template, redirect, request, url_for
from slugify import slugify

from .auth import oidc, okta_client
from .db import Post, db


bp = Blueprint("blog", __name__, url_prefix="/")


def get_posts(author_id):
    """
    Return all of the posts a given user created, ordered by date.
    """
    return Post.query.filter_by(author_id=author_id).order_by(Post.created.desc())


@bp.route("/")
def index():
    """
    Render the homepage.
    """
    posts = Post.query.order_by(Post.created.desc())
    posts_final = []

    for post in posts:
        u = okta_client.get_user(post.author_id)
        post.author_name = u.profile.firstName + " " + u.profile.lastName
        posts_final.append(post)

    return render_template("blog/index.html", posts=posts_final)


@bp.route("/dashboard", methods=["GET", "POST"])
@oidc.require_login
def dashboard():
    """
    Render the dashboard page.
    """
    if request.method == "GET":
        return render_template("blog/dashboard.html", posts=get_posts(g.user.id))

    post = Post(
        title=request.form.get("title"),
        body=request.form.get("body"),
        author_id = g.user.id,
        slug = slugify(request.form.get("title"))
    )

    db.session.add(post)
    db.session.commit()

    return render_template("blog/dashboard.html", posts=get_posts(g.user.id))


@bp.route("/<slug>")
def view_post(slug):
    """View a post."""
    post = Post.query.filter_by(slug=slug).first()
    if not post:
        abort(404)

    u = okta_client.get_user(post.author_id)
    post.author_name = u.profile.firstName + " " + u.profile.lastName

    return render_template("blog/post.html", post=post)


@bp.route("/<slug>/edit", methods=["GET", "POST"])
def edit_post(slug):
    """Edit a post."""
    post = Post.query.filter_by(slug=slug).first()

    if not post:
        abort(404)

    if post.author_id != g.user.id:
        abort(403)

    post.author_name = g.user.profile.firstName + " " + g.user.profile.lastName
    if request.method == "GET":
        return render_template("blog/edit.html", post=post)

    post.title = request.form.get("title")
    post.body = request.form.get("body")
    post.slug = slugify(request.form.get("title"))

    db.session.commit()
    return redirect(url_for(".view_post", slug=post.slug))


@bp.route("/<slug>/delete", methods=["POST"])
def delete_post(slug):
    """Delete a post."""
    post = Post.query.filter_by(slug=slug).first()

    if not post:
        abort(404)

    if post.author_id != g.user.id:
        abort(403)

    db.session.delete(post)
    db.session.commit()

    return redirect(url_for(".dashboard"))
I realize that’s a lot to take in, so let’s go through it one function at a time.
The get_posts Helper Function
def get_posts(author_id):
    """
    Return all of the posts a given user created, ordered by date.
    """
    return Post.query.filter_by(author_id=author_id).order_by(Post.created.desc())
This function is designed as a helper. What it does is query the database, looking for any posts written by a specific author, and returns them in descending order by date.
This will be useful later when displaying the user dashboard page, as we’ll only want to show users blog posts they’ve created on their dashboard page. This function allows us to easily get a list of those posts without duplicating code.
The index View
@bp.route("/")
def index():
    """
    Render the homepage.
    """
    posts = Post.query.order_by(Post.created.desc())
    posts_final = []

    for post in posts:
        u = okta_client.get_user(post.author_id)
        post.author_name = u.profile.firstName + " " + u.profile.lastName
        posts_final.append(post)

    return render_template("blog/index.html", posts=posts_final)
This view function is the homepage of the site. This function will run each time a user visits the / URL. What it does is:
- Get a list of all blog posts on the site, ordered by date descending
- Loops through each post and extracts the author’s ID
- Uses the Okta Python library to retrieve the corresponding user’s first name and last name (this will allow us to display the author’s information to blog readers)
- Renders the
blog/index.htmltemplate we created much earlier, which displays a list of all blog posts, and who wrote them
The dashboard View
@bp.route("/dashboard", methods=["GET", "POST"])
@oidc.require_login
def dashboard():
    """
    Render the dashboard page.
    """
    if request.method == "GET":
        return render_template("blog/dashboard.html", posts=get_posts(g.user.id))

    post = Post(
        title=request.form.get("title"),
        body=request.form.get("body"),
        author_id = g.user.id,
        slug = slugify(request.form.get("title"))
    )

    db.session.add(post)
    db.session.commit()

    return render_template("blog/dashboard.html", posts=get_posts(g.user.id))
This view function is the user dashboard page. This function will run each time a user visits the /dashboard URL. What it does is:
- If the user is viewing the dashboard, it just renders the
blog/dashboard.htmltemplate we defined earlier. This template shows the user a list of their previously created blog posts, and also allows the user to create new blog posts if they want by filling out a form. - If the user is submitting a form (trying to create a new post), this view will create a new
Postobject and save it to the database. Along the way, it will use the python-slugify library mentioned earlier to convert the title of the post into a URL-friendly format.
The view_post View
@bp.route("/<slug>")
def view_post(slug):
    """View a post."""
    post = Post.query.filter_by(slug=slug).first()
    if not post:
        abort(404)

    u = okta_client.get_user(post.author_id)
    post.author_name = u.profile.firstName + " " + u.profile.lastName

    return render_template("blog/post.html", post=post)
This view function renders the post page. This function will run each time a user visits the /<some-blog-slug-here> URL. What it does is:
- Look in the database for a blog post with the slug specified in the URL. If one can be found, it’ll render that page and show the blog to the user.
- If no matching blog post can be found, the user will see a 404 page and nothing more
The edit_post View
@bp.route("/<slug>/edit", methods=["GET", "POST"])
def edit_post(slug):
    """Edit a post."""
    post = Post.query.filter_by(slug=slug).first()

    if not post:
        abort(404)

    if post.author_id != g.user.id:
        abort(403)

    post.author_name = g.user.profile.firstName + " " + g.user.profile.lastName
    if request.method == "GET":
        return render_template("blog/edit.html", post=post)

    post.title = request.form.get("title")
    post.body = request.form.get("body")
    post.slug = slugify(request.form.get("title"))

    db.session.commit()
    return redirect(url_for(".view_post", slug=post.slug))
This view function allows users to edit a post. This function will run each time a user visits the /<some-blog-slug-here>/edit URL. What it does is:
- Look in the database for a blog post with the slug specified in the URL. If one can be found, it’ll update the post accordingly (assuming the user has the correct permissions). If the user doesn’t have the correct permissions, they’ll be shown a 403 page.
- If no matching blog post can be found, the user will see a 404 page and nothing more
The delete_post View
@bp.route("/<slug>/delete", methods=["POST"])
def delete_post(slug):
    """Delete a post."""
    post = Post.query.filter_by(slug=slug).first()

    if not post:
        abort(404)

    if post.author_id != g.user.id:
        abort(403)

    db.session.delete(post)
    db.session.commit()

    return redirect(url_for(".dashboard"))
This view function allows users to delete a post. This function will run each time a user visits the /<some-blog-slug-here>/delete URL. What it does is:
- Look in the database for a blog post with the slug specified in the URL. If one can be found, it’ll delete the post from the database (assuming the user has the correct permissions). If the user doesn’t have the correct permissions, they’ll be shown a 403 page.
- If no matching blog post can be found, the user will see a 404 page and nothing more
And… That’s it!
Test Your New Flask + Python App
Now that your app is fully built, go test it out! Open up http://localhost:5000, create an account, log in, etc.

As you can see, building a Flask app with user registration, login, databases, templates, etc. doesn’t have to be hard!
If you’re interested in learning more about web authentication and security, you may also want to check out some of our other articles, or follow us on Twitter — we write a lot about interesting web development topics.
Here are three of my favorites:
Randall Degges runs Evangelism at Okta where he works on security research, development, and education. In his spare time, Randall writes articles and gives talks advocating for security best practices. Randall also builds and contributes to various open-source security tools.
Randall's realm of expertise include Python, JavaScript, and Go development, web security, cryptography, and infrastructure security. Randall has been writing software for ~20 years and has built some of the most-used API services on the internet.
Okta Developer Blog Comment Policy
We welcome relevant and respectful comments. Off-topic comments may be removed.