Authentication Patterns for PHP Microservices
Microservices are an increasingly popular architecture, as they allow you to split application development into smaller, easier-to-manage pieces. However, microservices introduce complexity when it comes to implementing authentication. Generally, you only need to worry about one point of ingress for auth with a traditional monolithic application. Still, there are multiple ways to set things up with microservices and just as many authentication patterns to suit.
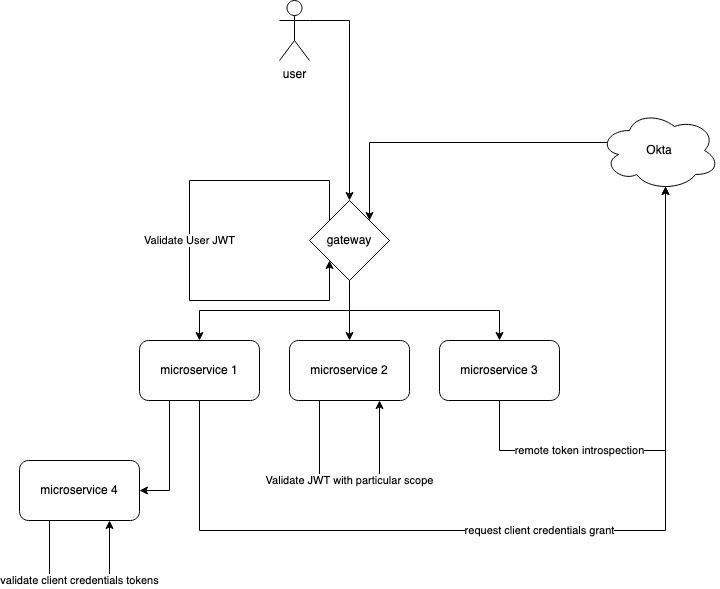
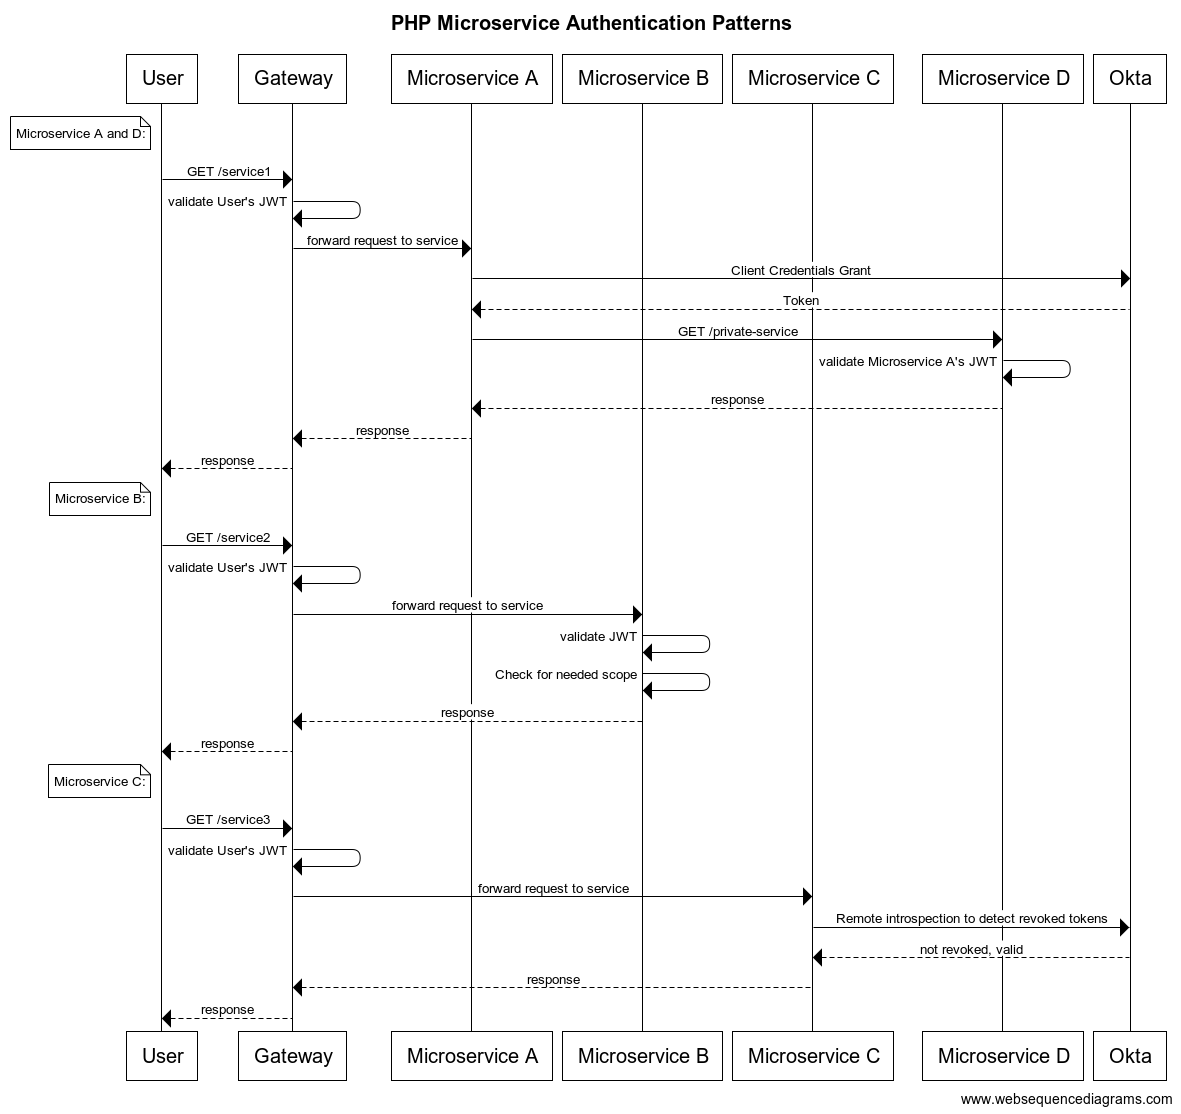
In this tutorial, you’ll see how to build a small demo application consisting of four microservices and a simple API gateway. I’ll share some handy patterns for securing access to the microservices. Here is a rough diagram of the intended architecture and a sequence diagram showing the flow of communication between components.
Rough architecture:
Sequence diagram:
Note: In May 2025, the Okta Integrator Free Plan replaced Okta Developer Edition Accounts, and the Okta CLI was deprecated.
We preserved this post for reference, but the instructions no longer work exactly as written. Replace the Okta CLI commands by manually configuring Okta following the instructions in our Developer Documentation.
Implementation
Before you get started, there are some dependencies you will need to install in order to follow along. First, you’ll need Docker and Docker Compose, as this tutorial relies heavily on containers to run the microservices. If you do not already have Docker installed on your machine, please follow Docker’s setup instructions for your OS of choice.
This tutorial also heavily utilizes Okta for the various authentication patterns you will implement. As such, you will need to create an Okta Developer account. For now, create a free account. The tutorial will cover any operations you need to perform as they come up later.
Finally, for testing the APIs and authentication methods, make sure you have the latest version of Postman installed. Postman dramatically simplifies the process of getting OAuth tokens and calling the APIs.
As this tutorial primarily focuses on the authentication patterns themselves, the actual microservices are not overly significant as long as you have an API to call. You can create some Laravel projects to get a few microservices up and running. Though Laravel is a bit on the heavy side for such simple use cases, it is quick and easy to set up, comes with most of the libraries you will need out-of-the-box, and has a sound middleware system that you can use to implement these auth patterns. To create the Laravel projects, the official documentation suggests using the laravel.build site, which serves as a Bash script for you to run. It is a good idea to read the script yourself before piping it into Bash, so be sure to review the script before executing it if you are uncertain. It works by taking the path parameter and using that as the project name.
Getting started with microservices
To begin, create a directory to hold all of the microservices for this tutorial named something like php-microservices-demo. cd into this directory, and execute the following command: curl -s "https://laravel.build/api-gateway?with=redis" | bash. This will create a directory containing a Laravel project named api-gateway. Once this step is done, you will need to run it four more times like so; once for each of the microservices you will create:
# service a
curl -s "https://laravel.build/microservice-a?with=redis" | bash

# service b
curl -s "https://laravel.build/microservice-b?with=redis" | bash

# service c
curl -s "https://laravel.build/microservice-c?with=redis" | bash

# service d
curl -s "https://laravel.build/microservice-d?with=redis" | bash
Now our directory should contain five projects in total. These projects are intended to run with Laravel Sail, but it isn’t optimal for running five of them simultaneously. Use Sail to install dependencies and execute artisan commands, but for running the APIs, create a new docker-compose.yml file in the tutorial directory. This file will allow you to start all the containers together. Luckily, because the APIs will be simple, you don’t even need databases for this, only the PHP containers. In your newly created docker-compose.yml, add the following content:
version: '2.1'
networks:
 php_microservices_demo:
   external: true
services:
 api_gateway:
   build:
     context: ./api-gateway/vendor/laravel/sail/runtimes/8.0
     dockerfile: Dockerfile
     args:
       WWWGROUP: '${GID}'
   image: sail-8.0/app
   extra_hosts:
     - 'host.docker.internal:host-gateway'
   ports:
     - '8080:80'
   environment:
     WWWUSER: '${UID}'
   volumes:
     - './api-gateway/:/var/www/html'
   networks:
     - php_microservices_demo
 microservice-a:
   build:
     context: ./microservice-a/vendor/laravel/sail/runtimes/8.0
     dockerfile: Dockerfile
     args:
       WWWGROUP: '${GID}'
   image: sail-8.0/app
   extra_hosts:
     - 'host.docker.internal:host-gateway'
   environment:
     WWWUSER: '${UID}'
   volumes:
     - './microservice-a/:/var/www/html'
   networks:
     - php_microservices_demo
 microservice-b:
   build:
     context: ./microservice-b/vendor/laravel/sail/runtimes/8.0
     dockerfile: Dockerfile
     args:
       WWWGROUP: '${GID}'
   image: sail-8.0/app
   extra_hosts:
     - 'host.docker.internal:host-gateway'
   environment:
     WWWUSER: '${UID}'
   volumes:
     - './microservice-b/:/var/www/html'
   networks:
     - php_microservices_demo
 microservice-c:
   build:
     context: ./microservice-c/vendor/laravel/sail/runtimes/8.0
     dockerfile: Dockerfile
     args:
       WWWGROUP: '${GID}'
   image: sail-8.0/app
   extra_hosts:
     - 'host.docker.internal:host-gateway'
   environment:
     WWWUSER: '${UID}'
   volumes:
     - './microservice-c/:/var/www/html'
   networks:
     - php_microservices_demo
 microservice-d:
   build:
     context: ./microservice-d/vendor/laravel/sail/runtimes/8.0
     dockerfile: Dockerfile
     args:
       WWWGROUP: '${GID}'
   image: sail-8.0/app
   extra_hosts:
     - 'host.docker.internal:host-gateway'
   environment:
     WWWUSER: '${UID}'
   volumes:
     - './microservice-d/:/var/www/html'
   networks:
     - php_microservices_demo
This file specifies the network that the containers will share as php_microservices_demo, which you will need to create. Do this now by running docker network create php_microservices_demo in your terminal. Next, expose your current User and Group IDs as environment variables for Bash, so Bash can map the correct permissions when it builds the images. To do this, run the following commands in your terminal:
export UID=${UID:-$(id -u)}
export GID=${GID:-$(id -g)}
The above command may return a warning about read-only variables depending on your OS. You can safely ignore this if it happens.
Now, if you run docker-compose up -d from the tutorial root directory, after a moment, you should be able to access the api-gateway Laravel project at http://localhost:8080.
Before you implement authentication, you’ll need to make some simple mock APIs so that you have something to test. To do this, you can define a single route for each of the four microservice applications—something like api/service/—and have this route return a string indicating which microservice it is. Then, the API gateway can define multiple routes that will forward requests appropriately to the microservices. Because the API gateway is the only container with port mapping in the docker-compose file, this will be the only way for you to access the internal microservices. To do this, add the following routes for each corresponding Laravel instance’s routes/api.php file:
API Gateway:
Route::get('/service1', function(Request $request) {
   $response = \Illuminate\Support\Facades\Http::get('http://microservice-a/api/service');
   return new \Illuminate\Http\Response($response->body(), $response->status());
});

Route::get('/service2', function(Request $request) {
   $bearer = $request->bearerToken();
   $response = \Illuminate\Support\Facades\Http::withToken($bearer)->get('http://microservice-b/api/service');
   return new \Illuminate\Http\Response($response->body(), $response->status());
});

Route::get('/service3', function(Request $request) {
   $bearer = $request->bearerToken();
   $response = \Illuminate\Support\Facades\Http::withToken($bearer)->get('http://microservice-c/api/service');
   return new \Illuminate\Http\Response($response->body(), $response->status());
});
Microservice A:
Route::get('/service', function (Request $request) {
return \Illuminate\Support\Facades\Http::get('http://microservice-d/api/service');
});
Microservice B:
Route::get('/service', function (Request $request) {
   return new \Illuminate\Http\Response('success response from microservice b');
});
Microservice C:
Route::get('/service', function (Request $request) {
return new \Illuminate\Http\Response('success response from microservice c');
});
Microservice D:
Route::get('/service', function (Request $request) {
   return new \Illuminate\Http\Response('success response from microservice d');
});
Now, if you navigate to http://localhost:8080/api/service1 in your browser or Postman, you should see the response from one of your microservices via the API gateway. With this out of the way, you can implement your first authentication pattern.
JWT verification at the gateway
The first pattern is a simple JWT verification at the API gateway. All API requests going through the gateway will require a valid JWT access token. To do this, you can use Laravel middleware. A middleware refers to code you can configure to run when a request is received but before the Controller or function that the route definition specifies can handle it. In practice, this means that you can have a middleware component that checks for valid access tokens and returns an unauthorized response if no valid token is found.
As mentioned previously, you can use Laravel Sail to execute php artisan commands inside your containers. To do this, navigate to the directory containing the codebase you want to run the command on—api-gateway, in this case—and run ./vendor/bin/sail up. You’ll create some more containers running on your system. While they don’t matter much for the actual API, the containers provide a convenient way of executing PHP commands without custom tooling. At this point, you should also create an alias for Sail: alias sail=./vendor/bin/sail. The rest of the Sail commands in this tutorial will assume you have an alias like this configured for brevity.
After running sail up in another terminal, navigate back to the same api-gateway directory and run sail php artisan make:middleware VerifyJwt. This action will create the middleware used by the gateway to check the access tokens for incoming requests. While you are here, you will also need to install two composer dependencies to verify the JWTs. To do this, run the following command: sail composer require okta/jwt-verifier firebase/php-jwt. Before fleshing out your newly created middleware, you will need to make a quick detour to the Okta Developer Portal to create an application so that your middleware has the details it needs to verify incoming JWTs.
Go to https://developer.okta.com and either sign in or set up a new account. Next, navigate to applications on the sidebar and click Create App Integration.
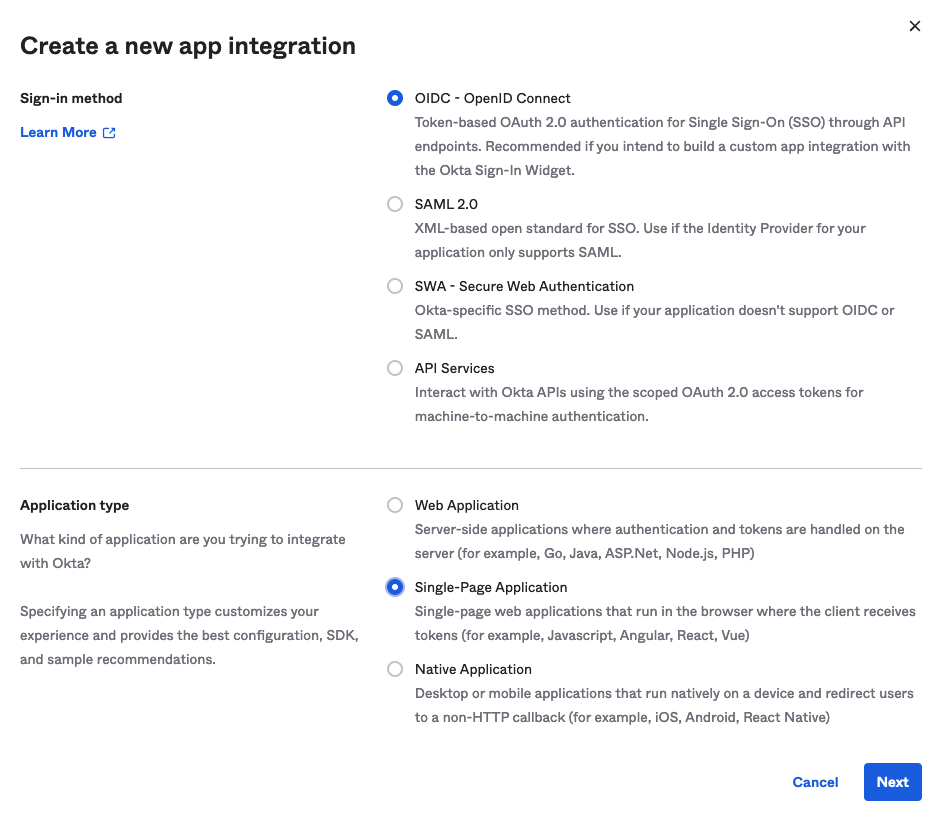
Select a new OIDC integration with a “single-page application” application type and then click Next. Fill out the details of your new app integration by choosing a name to help you identify it, setting the “Grant type” to “Authorization code” and the “Controlled access” to “Allow everyone in your organization to access.”
Note: We’re keeping things simple for now by using a single client ID throughout this whole tutorial. In practice, you’d probably want to use separate client IDs for your front-end application and each of your microservices so that you have better audit logs and can better control access.
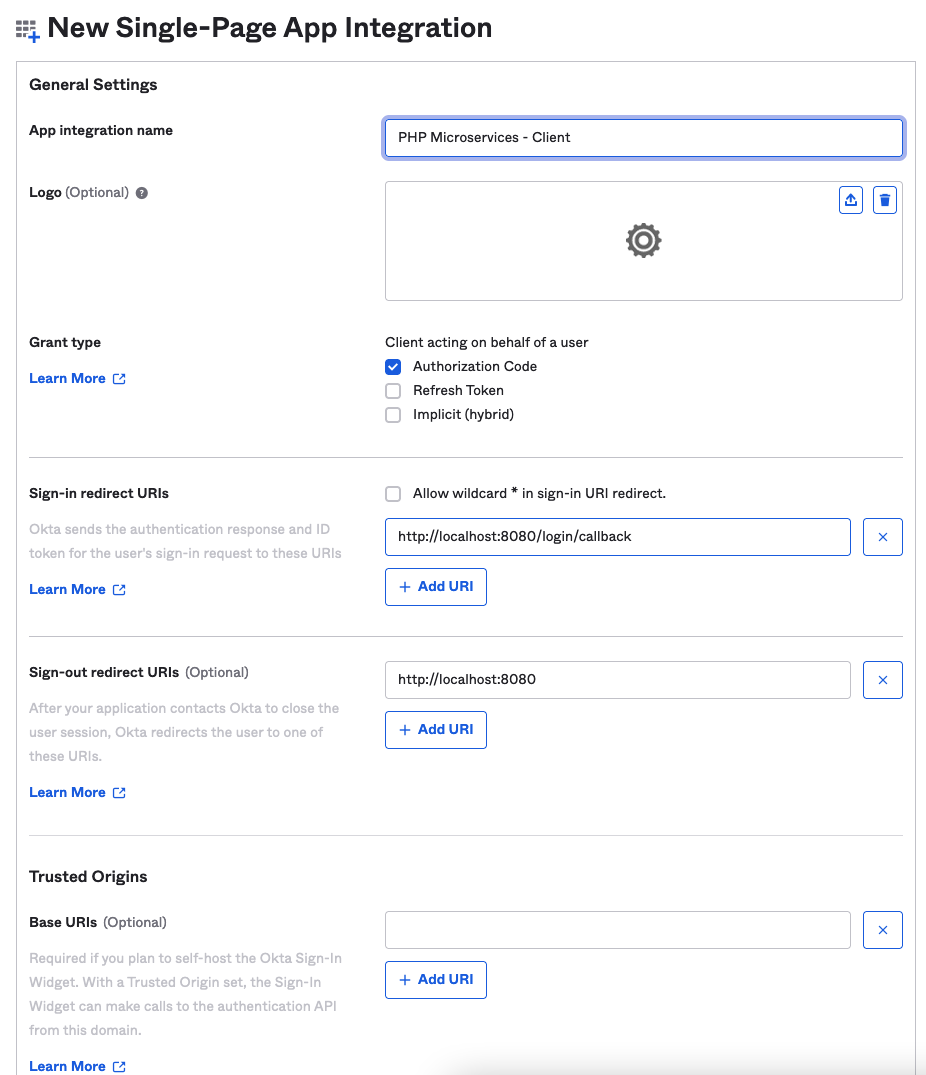
Once these steps are complete, you’ll receive a page showing your client ID and Okta domain. Make a note of both of these for later.
Next, navigate to the middleware you created—api-gateway/app/Http/Middleware/VerifyJwt.php—and set its content as follows:
<?php

namespace App\Http\Middleware;

use Closure;
use Illuminate\Http\Request;
use Illuminate\Support\Facades\Log;
use Okta\JwtVerifier\Adaptors\FirebasePhpJwt;
use Okta\JwtVerifier\JwtVerifierBuilder;

class VerifyJwt
{
   /**
      * Handle an incoming request.
      *
      * @param  \Illuminate\Http\Request  $request
      * @param  \Closure  $next
      * @return mixed
      */
   public function handle(Request $request, Closure $next)
   {

      $jwtVerifier = (new JwtVerifierBuilder())
       	->setAdaptor(new FirebasePhpJwt())
       	->setAudience(env('OKTA_AUDIENCE'))
       	->setClientId(env('OKTA_CLIENT_ID'))
       	->setIssuer(env('OKTA_ISSUER_URI'))
       	->build();

      try {
       	$jwt = $jwtVerifier->verify($request->bearerToken());
       	return $next($request);
      } catch (\Exception $exception) {
       	Log::error($exception);
      }

      return response('Unauthorized', 401);
   }
}
Then go to the.env file for the gateway, and add the following values:
OKTA_AUDIENCE=api://default
OKTA_ISSUER_URI=https://{your okta domain}/oauth2/default
OKTA_CLIENT_ID={your client id}
Next, navigate to api-gateway/app/Http/Kernel.php and find the $middlewareGroups array. There should be a key of 'api' with a corresponding array. In this array, add \App\Http\Middleware\VerifyJwt::class as a new item. This action will cause the middleware to run for any routes in the API group, including the ones you created earlier, to allow users to access the microservices. You can verify this by using Postman or your browser to access the same route from earlier—http://localhost:8080/api/service1 —except you should now be met with an unauthorized error, as you do not have a JWT yet.
To get a JWT, open Postman and create a new GET request. Open the Authorization tab, change the type to “OAuth 2.0,” and set Add authorization data to Request Header. Next, scroll down to the “Configure New Token” section and give it a name like “PHP microservices.” This name doesn’t affect anything besides how Postman displays it. Set the rest of the values as follows:
- Grant Type: Authorization Code (With PKCE)
- Callback URL: http://localhost:8080/login/callback
- Auth URL: https://{{your okta domain}}/oauth2/default/v1/authorize
- Access Token URL: https://{{your okta domain}}/oauth2/default/v1/token
- Client ID: {{Your client ID}}
- Scope: openid email
- State: 1234
- Client Authentication: Send client credentials in body
With these details set, when you click Get New Access Token, you should be presented with an Okta login window. Log in with your Okta Developer account details, and when the process completes, you should see your new token. Click Use Token to set it for this request.

If you have not already done so, finish creating the request by setting the URL as http://localhost:8080/api/service1, and click Send. After a short delay, you should get a response from the API gateway forwarded from one of your microservices. Bravo! You’ve implemented the first auth pattern successfully. With this pattern, the gateway verifies the JWT, and Microservice A does no further verification. It assumes that the gateway has already handled verification. This approach is only viable when the underlying microservice is not publicly accessible via the internet. It works well enough when the microservice must be accessed via a gateway, as is the case here.
JWT Scope Validation
The next pattern to implement will be for Microservice B. Microservice B will perform its own local JWT token validation and look for a particular scope on the token. If this scope is not present, it will reject the token, even if the gateway has already accepted it.
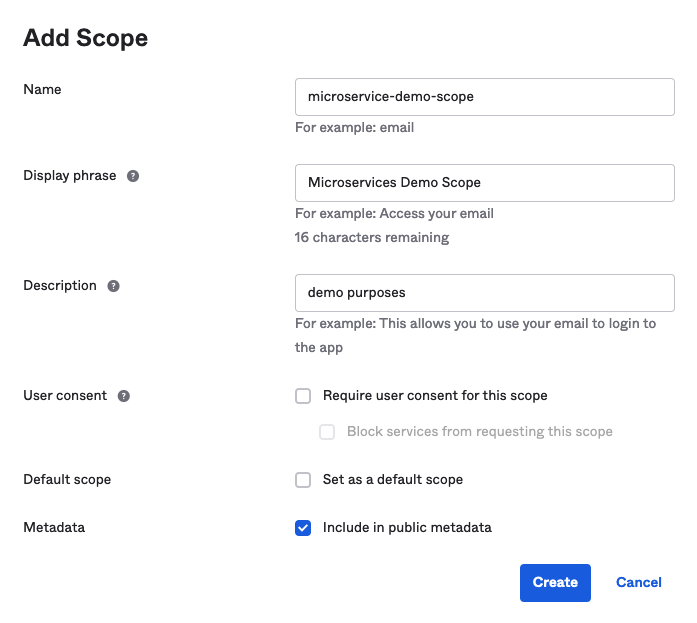
Your first step is to add a custom scope for Microservice B to seek. On the Okta portal, navigate to Security > API on the sidebar, and select the default auth server from the list. Go to the Scopes tab and click Add Scope. Give it a name like microservice-demo-scope and fill out the rest of the details like so:
In the next step, you’ll add the Microservice B middleware. If sail up is still running for the gateway, terminate this command (Control + C on macOS) and change the directory to Microservice B. Run sail up again. In another terminal, navigate to Microservice B’s directory. Now run the following:
sail composer require okta/jwt-verifier firebase/php-jwt
sail php artisan make:middleware VerifyJwtWithScope
Once you’ve run these commands, open the new middleware located at microservice-b/app/Http/Middleware/VerifyJwtWithScope.php and set the contents as follows:
<?php

namespace App\Http\Middleware;

use Closure;
use Illuminate\Http\Request;
use Illuminate\Support\Arr;
use Illuminate\Support\Facades\Log;
use Okta\JwtVerifier\Adaptors\FirebasePhpJwt;
use Okta\JwtVerifier\JwtVerifierBuilder;
use Symfony\Component\HttpKernel\Exception\UnauthorizedHttpException;

class VerifyJwtWithScope
{
   /**
      * Handle an incoming request.
      *
      * @param  \Illuminate\Http\Request  $request
      * @param  \Closure  $next
      * @return mixed
      */
   public function handle(Request $request, Closure $next)
   {

      $jwtVerifier = (new JwtVerifierBuilder())
       	->setAdaptor(new FirebasePhpJwt())
       	->setAudience(env('OKTA_AUDIENCE'))
       	->setClientId(env('OKTA_CLIENT_ID'))
       	->setIssuer(env('OKTA_ISSUER_URI'))
       	->build();

   	// Microservice B verifies the token itself, and looks for a specific scope
      try {
       	$jwt = $jwtVerifier->verify($request->bearerToken());

       	$scopes = Arr::get($jwt->claims, 'scp', []);
       	$requiredScope = 'microservice-demo-scope';

       	if (!in_array($requiredScope, $scopes)) {
           throw new UnauthorizedHttpException('missing required scope');
       	}

       	return $next($request);
      } catch (\Exception $exception) {
       	Log::error($exception);
      }

      return response('Unauthorized', 401);
   }
}
Note that after verifying the JWT, you can extract its claims. The scp claim will contain the scopes, which you can then check for the presence of your newly created scope.
Register this middleware in the Kernel.php file for Microservice B, just like you did with the API gateway, and add the following to Microservice B’s .env file:
OKTA_AUDIENCE=api://default
OKTA_ISSUER_URI=https://{your okta domain}/oauth2/default
OKTA_CLIENT_ID={your client id}
If you go to Postman and change your request’s URL to point to /service2 instead of /service1 when you fire the request, it should fail, as your token is missing the needed scope. Go back to the Auth tab in Postman and scroll down to where you specified your scopes. Add your new one so that it is now “openid email microservice-demo-scope” and request a new token. Once you select Use Token, your request to Microservice B should now succeed.
Remote token introspection
The third pattern to implement is for Microservice C. In this pattern, the microservice will again perform its own validation of the token. This time it will call the Okta /introspect endpoint to assert that the token has not been revoked. If this endpoint says the token is OK, the request will proceed; otherwise, it will be blocked.
Stop the running sail up job from the previous pattern, and change the directory to Microservice C before running sail up again. In your other terminal, run the following command from Microservice C: sail php artisan make:middleware VerifyJwtWithIntrospection. Open the newly created middleware file and set its contents as follows:
<?php

namespace App\Http\Middleware;

use Closure;
use Illuminate\Http\Request;
use Illuminate\Http\Response;
use Illuminate\Support\Facades\Http;
use Illuminate\Support\Facades\Log;
use Illuminate\Validation\UnauthorizedException;

class VerifyJwtWithIntrospection
{
   /**
      * Handle an incoming request.
      *
      * @param  \Illuminate\Http\Request  $request
      * @param  \Closure  $next
      * @return mixed
      */
   public function handle(Request $request, Closure $next)
   {

      $accessToken = $request->bearerToken();
      $accessTokenType = 'access_token';

      $oktaDomain = env('OKTA_DOMAIN');
      $oktaClientId = env('OKTA_CLIENT_ID');

      try {
       	// make api call to introspect endpoint
       	$introspectionResponse = Http::asForm()->post("$oktaDomain/oauth2/default/v1/introspect?client_id=$oktaClientId", [
           	'token' => $accessToken,
           	'token_type_hint' => $accessTokenType
       	]);

       	$isTokenActive = $introspectionResponse->json('active');

       	if (!$isTokenActive) {
           throw new UnauthorizedException('token is invalid');
       	}

      } catch (\Exception $exception) {
       	Log::error($exception);
       	return new Response('Unauthorized - Token failed Introspection', 401);
      }

      return $next($request);
   }
}
Register this middleware in Microservice C’s kernel and add the following to .env for this microservice:
OKTA_DOMAIN=https://{your okta domain}
OKTA_CLIENT_ID={your client id}
Now, when you call the gateway’s /service3 endpoint, it will forward the request to Microservice C, which will subsequently perform an introspection to see if the token has been revoked. You can see this in action by taking your access token from Postman and revoking it with Okta’s revoke endpoint. This will cause subsequent requests to /service3 to fail when using that token. If you use this same token to call /service1, you will find that it still works, as this service only does local JWT validation and is not aware that the token has been revoked elsewhere.
Client Credentials Grant
The final pattern to implement is for Microservice D. Here, you will implement the Client Credentials flow. Microservice D will validate its own tokens, but the user-supplied token will not be adequate. Microservice D is not accessible directly via the gateway; instead, it is called by Microservice A. For this flow to work, Microservice A will need to request a token using the Client Credentials grant and use this token to make the request to Microservice D.
As before, stop any running sail up commands, navigate to Microservice D, and run sail up. In the other terminal, navigate to Microservice D and run these commands:
sail composer require okta/jwt-verifier firebase/php-jwt
sail php artisan make:middleware VerifyClientCredentialsToken
Set the contents of the new middleware as follows, and then register it in the Microservice D kernel:
<?php
namespace App\Http\Middleware;
use Closure;
use Illuminate\Http\Request;
use Illuminate\Support\Facades\Log;
use Okta\JwtVerifier\Adaptors\FirebasePhpJwt;
use Okta\JwtVerifier\JwtVerifierBuilder;
class VerifyClientCredentialsToken
{
/**
* Handle an incoming request.
*
* @param \Illuminate\Http\Request $request
* @param \Closure $next
* @return mixed
*/
public function handle(Request $request, Closure $next)
{
$jwtVerifier = (new JwtVerifierBuilder())
->setAdaptor(new FirebasePhpJwt())
->setAudience(env('OKTA_AUDIENCE'))
->setClientId(env('OKTA_CLIENT_ID'))
->setIssuer(env('OKTA_ISSUER_URI'))
->build();
try {
$jwtVerifier->verify($request->bearerToken());
return $next($request);
} catch (\Exception $exception) {
Log::error($exception);
}
return response('Unauthorized', 401);
}
}
Next, head back to the Okta Developer portal, and go to Applications on the sidebar. Create another app integration and select API services as the sign-in method. Give it a name and click Save.
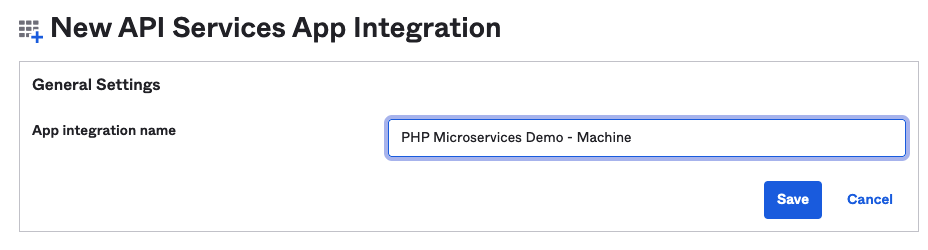
The new integration will provide a new client ID and secret. Make a note of these. Next, go back to Security > API, select the default auth server, and add another scope—this time calling it something like “machine-scope.” This will become the custom scope when Microservice A requests its token.
In the .env file of Microservice D, add the following:
OKTA_CLIENT_ID={your new client id from the API services integration}
OKTA_AUDIENCE=api://default
OKTA_ISSUER_URI=https://{your okta domain}/oauth2/default
You should now find that Postman calls to /service1 will fail, as Microservice A cannot authenticate with Microservice D yet. To solve this, you need to update the API route in Microservice A to use the Client Credentials grant to get a fresh token. Open microservice-a/routes/api.php and change the content as follows:
Route::get('/service', function (Request $request) {

   // Microservice A needs to request a new token using the Client Credentials flow, and use that to authenticate with Microservice D.

   $customScope = 'machine-scope'; // This is the scope we created in Okta for our default auth server.

   // The details for our machine-to-machine application integration
   $clientId = env('OKTA_CLIENT_ID');
   $secret = env('OKTA_SECRET');

   $oktaDomain = env('OKTA_DOMAIN');

   $tokenResponse = \Illuminate\Support\Facades\Http::withBasicAuth($clientId, $secret)
   	->asForm()
   	->post("$oktaDomain/oauth2/default/v1/token", [
       	'grant_type' => 'client_credentials',
       	'scope' => $customScope
   	]);

   $token = $tokenResponse->json('access_token');

   return \Illuminate\Support\Facades\Http::withToken($token)->get('http://microservice-d/api/service');
});
Next, update the .env file for Microservice A to include these details:
OKTA_CLIENT_ID={your new client credentials client Id}
OKTA_SECRET={your new client credentials secret}
OKTA_DOMAIN=https://{your okta domain}
With these details in place, /service1 should once again work, as it will get a token of its own and use it to communicate with Microservice D.
Conclusion
If you have followed along in code, you should now have an API gateway with three endpoints, supported by four underlying microservices, with four unique authentication patterns. You’ve seen the basic local JWT validation used by the API gateway. This is the fastest method, but it is unable to catch revoked tokens. Next, there is Microservice B, which checks for a specific scope. This pattern is similar to the first method but gives more granular control around which users can perform specific actions based on the scopes attached to their tokens. Finally, you saw how to validate a token with remote introspection. This approach is more robust, as it is able to catch revoked tokens, but it has the drawback of requiring an additional HTTP call when compared to the local JWT validation.
The complete code for this tutorial can be found in the public GitHub Repo.
Hopefully, this tutorial has given you some idea of the different ways you can handle authentication with PHP microservices. All of these patterns are well supported by Okta, along with many others. Okta offers a vast selection of authentication tools and services to make adding world-class authentication to your apps as easy as can be.
If you enjoyed exploring authentication for microservices and creating a demo app, stay in touch. You can keep up with our content for developers by following us on @OktaDev Twitter and subscribing to the OktaDev YouTube channel. If you have any questions, or you want to add suggestions for future tutorials, please add a comment below.
Cameron is a full-stack dev living and working in Melbourne. He's committed himself to the never-ending journey of understanding the intricacies of quality code, developer productivity, and job satisfaction.
Okta Developer Blog Comment Policy
We welcome relevant and respectful comments. Off-topic comments may be removed.