Build Native Java Apps with Micronaut, Quarkus, and Spring Boot

Java has been able to invoke native programs on an operating system for decades. Invoking native programs is often done using JNI (Java Native Interface) and JNA (Java Native Access). In the last few years, Java has also gained the ability to run JVM apps as native apps. That is, they’re binary executables that have no dependency on the Java runtime.
This is huge! Mostly because it gives Java apps the ability to start up in milliseconds (as opposed to seconds). If you’re scaling up to handle millions of requests and using a serverless environment to save costs, this is a game-changer. Developers have enjoyed using Node.js, Python, and Go on serverless environments for years. The ability to use Java (or Kotlin) opens this world up to a massive swath of the developer community.
This post will show you how to run a secure, OAuth 2.0-protected, Java REST API that allows JWT authentication. I’ll showcase the three leading Java frameworks: Micronaut, Quarkus, and Spring Boot. First, I’ll show you how to run them with Java and access their data. Then, I’ll show you how to build and test native images with each framework. I’ll mention a few gotchas I ran into along the way.
Note: In May 2025, the Okta Integrator Free Plan replaced Okta Developer Edition Accounts, and the Okta CLI was deprecated.
We preserved this post for reference, but the instructions no longer work exactly as written. Replace the Okta CLI commands by manually configuring Okta following the instructions in our Developer Documentation.
Prerequisites
-
HTTPie (a better version of cURL)
-
An Okta Developer Account
If you’re more of a visual learner, you can watch a screencast of this tutorial.
Get Started with Native Java Frameworks
I created a GitHub repository you can clone and run to get started with all three frameworks quickly.
git clone https://github.com/oktadev/native-java-examples.gitThis project has directories with the latest versions of Micronaut, Quarkus, and Spring Boot (at the time of this writing). I’ll show you how I created them in individual sections below.
Open the native-java-examples directory in your favorite IDE, so you have easy access to each framework’s project files.
| If you want to see how to build native images in each framework, skip to the build native images for Micronaut, Quarkus, and Spring Boot section. |
Install a JDK with GraalVM
You will need a JDK with GraalVM and its native-image compiler. Using SDKMAN, run the following command and set it as the default:
sdk install java 22.1.0.r17-grlLaunch a Micronaut Java API
In a terminal window, cd into the micronaut directory and run mn:run to start it.
cd micronaut
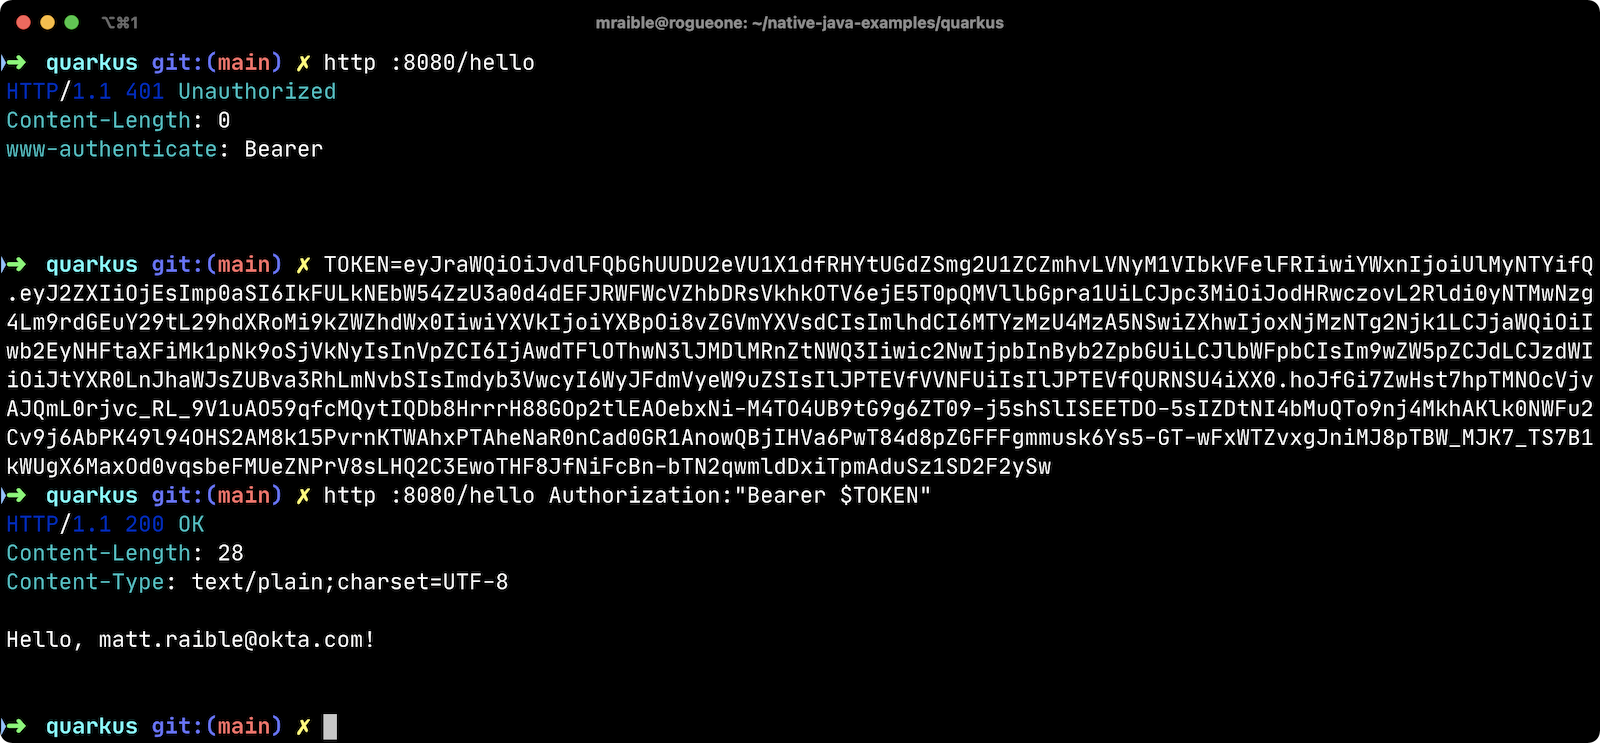
./mvnw mn:runIf you open another terminal window and try to access it with HTTPie, you’ll get a 401 Unauthorized error.
$ http :8080/hello

HTTP/1.1 401 Unauthorized
connection: keep-alive
date: Mon, 6 Jun 2022 00:21:54 GMT
transfer-encoding: chunked
To make it so you can access this endpoint, you’ll need to generate an OAuth 2.0 access token and update the JWKS (JSON Web Key Sets) URL to yours (in this project’s application.yml).
| If you’re unsure what OIDC and OAuth 2.0 are, see our Illustrated Guide to OAuth and OpenID Connect. |
Before you begin, you’ll need a free Okta developer account. Install the Okta CLI and run okta register to sign up for a new account. If you already have an account, run okta login.
Then, run okta apps create. Select the default app name, or change it as you see fit.
Choose Single-Page App and press Enter.
Use https://oidcdebugger.com/debug for the Redirect URI and set the Logout Redirect URI to https://oidcdebugger.com.
What does the Okta CLI do?
The Okta CLI will create an OIDC Single-Page App in your Okta Org. It will add the redirect URIs you specified and grant access to the Everyone group. It will also add a trusted origin for https://oidcdebugger.com. You will see output like the following when it’s finished:
Okta application configuration:
Issuer:    https://dev-133337.okta.com/oauth2/default
Client ID: 0oab8eb55Kb9jdMIr5d6
NOTE: You can also use the Okta Admin Console to create your app. See Create a Single-Page App for more information.
Take note of the clientId and issuer values. You’ll need those to get an access token and to configure each framework for JWT authentication.
Open micronaut/src/main/resources/application.yml and change the Okta URL to match yours.
micronaut:
  application:
    name: app
  security:
    enabled: true
    token:
      jwt:
        enabled: true
        claims-validators:
          issuer: https://{yourOktaDomain}/oauth2/default
        signatures:
          jwks:
            okta:
              url: https://{yourOktaDomain}/oauth2/default/v1/keys
Stop your Micronaut app with Ctrl+C and restart it with ⬆️+Return.
./mvnw mn:runGenerate an OAuth 2.0 Access Token
An easy way to get an access token is to generate one using OpenID Connect Debugger. Open the site in a new window or tab. Fill in your client ID, and use https://{yourOktaDomain}/oauth2/default/v1/authorize for the Authorize URI. Select code for the response type and Use PKCE.
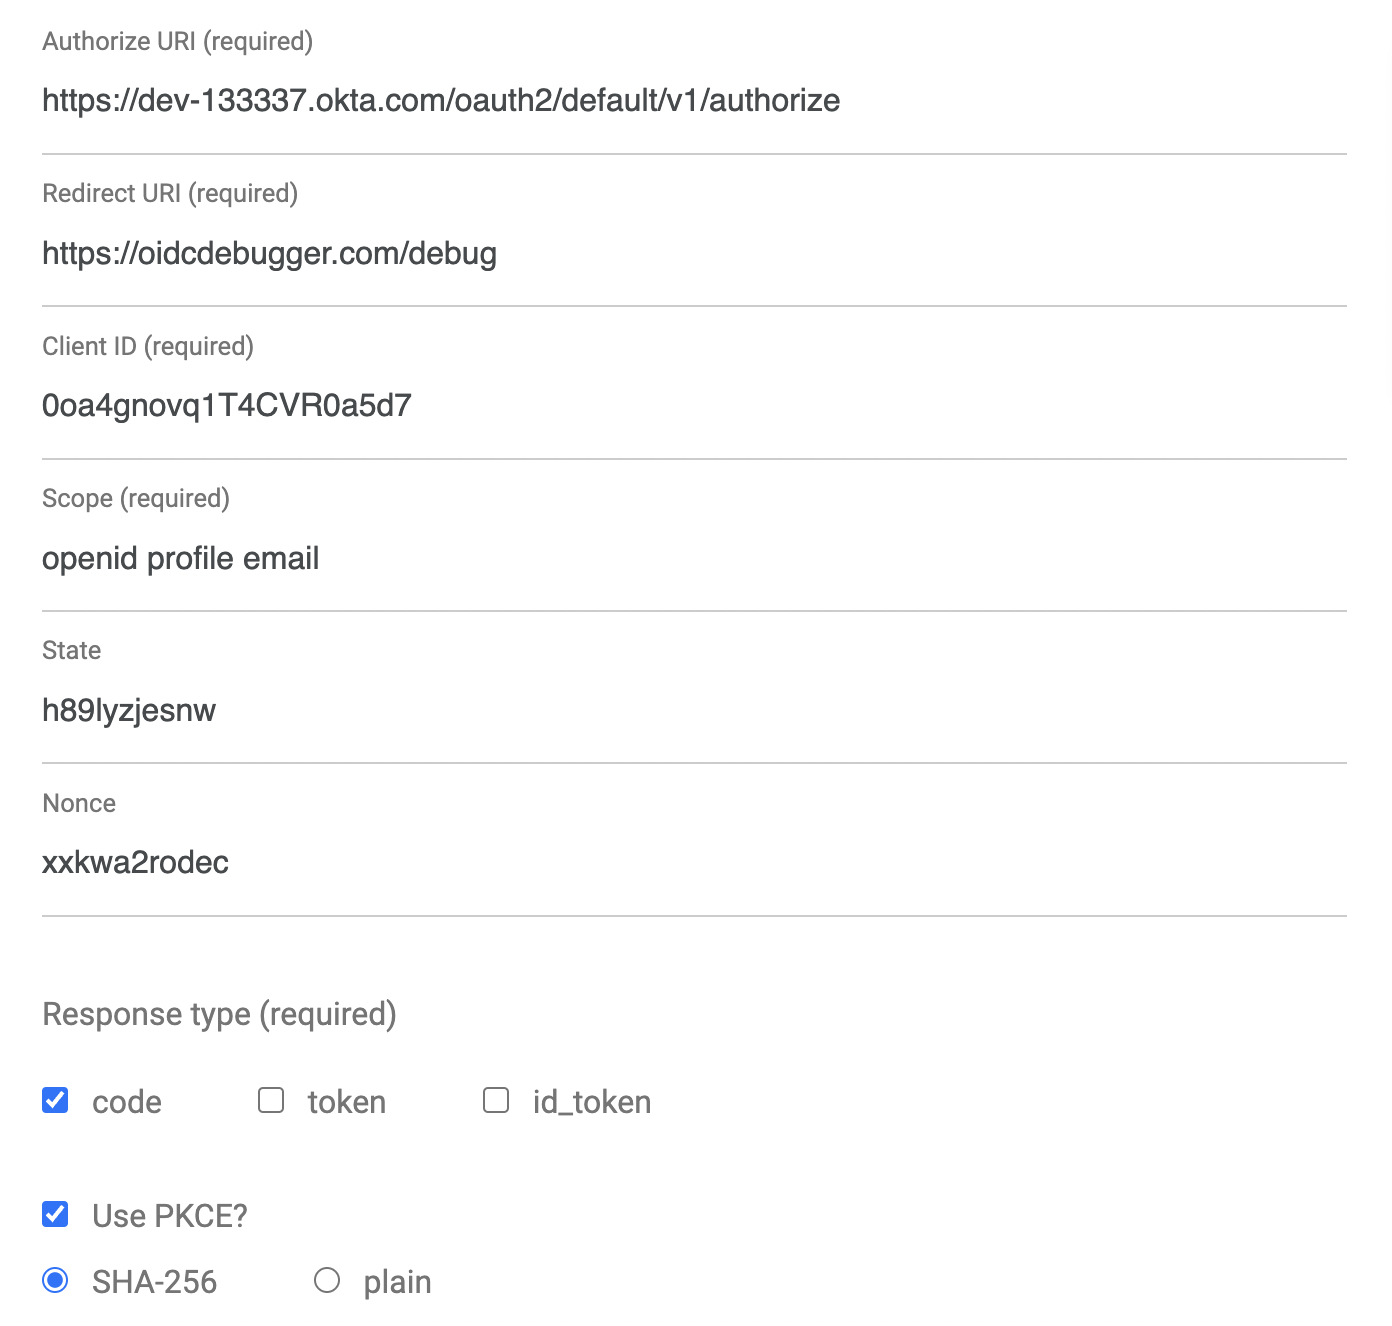
Click Send Request to continue.
Once you have an access token, set it as a TOKEN environment variable in a terminal window.
TOKEN=eyJraWQiOiJYa2pXdjMzTDRBYU1ZSzNGM...| You might want to keep OpenID Connect <debugger/> open to copy your access tokens. It allows you to quickly start over and regenerate a new access token if it expires. |
Test Your Micronaut API with HTTPie
Use HTTPie to pass the JWT in as a bearer token in the Authorization header.
http :8080/hello Authorization:"Bearer $TOKEN"You should get a 200 response with your email in it.

Build a Native Micronaut App
To compile this Micronaut app into a native binary, run:
./mvnw package -Dpackaging=native-imageThis command will take a few minutes to complete. My 2019 MacBook Pro with a 2.4 GHz 8-Core Intel Core i9 processor and 64 GB of RAM took 1 min. 9 s. to finish.
Start it with ./target/app:
$ ./target/app
 __  __ _                                  _
|  \/  (_) ___ _ __ ___  _ __   __ _ _   _| |_
| |\/| | |/ __| '__/ _ \| '_ \ / _` | | | | __|
| |  | | | (__| | | (_) | | | | (_| | |_| | |_
|_|  |_|_|\___|_|  \___/|_| |_|\__,_|\__,_|\__|
  Micronaut (v3.5.1)

18:35:09.758 [main] INFO  io.micronaut.runtime.Micronaut - Startup completed in 24ms. Server Running: http://localhost:8080
You can see it starts pretty darn quick (24ms)! Test it with HTTPie and an access token. You may have to generate a new JWT with oidcdebugger.com if yours has expired.
http :8080/hello Authorization:"Bearer $TOKEN"Make a Micronaut App from Scratch
You might be wondering, "how did you build a secure Micronaut app"? Did I just hide the complexity? No, it only takes five steps to create the same app.
-
Use SDKMAN! to install Micronaut’s CLI:
sdk install micronaut
-
Create an app using the
mn create-appcommand and rename the project’s directory:mn create-app com.okta.rest.app --build maven -f security-jwt -f micronaut-aot mv app micronaut
-
Add a
HelloControllerinsrc/main/java/com/okta/rest/controller:package com.okta.rest.controller; import io.micronaut.http.MediaType; import io.micronaut.http.annotation.Controller; import io.micronaut.http.annotation.Get; import io.micronaut.http.annotation.Produces; import io.micronaut.security.annotation.Secured; import io.micronaut.security.rules.SecurityRule; import java.security.Principal; @Controller("/hello") public class HelloController { @Get @Secured(SecurityRule.IS_AUTHENTICATED) @Produces(MediaType.TEXT_PLAIN) public String hello(Principal principal) { return "Hello, " + principal.getName() + "!"; } } -
Enable and configure JWT security in
src/main/resources/application.yml:micronaut: ... security: enabled: true token: jwt: enabled: true claims-validators: issuer: https://{yourOktaDomain}/oauth2/default signatures: jwks: okta: url: https://{yourOktaDomain}/oauth2/default/v1/keys
That’s it! Now you can start the app or build the native image as shown above.
Now let’s take a look at Quarkus.
Run a Quarkus Java API
Open a terminal, cd into the quarkus directory, and run quarkus:dev to start the app.
cd quarkus
./mvnw quarkus:dev
Update the URLs in quarkus/src/main/resources/application.properties to use your Okta domain.
mp.jwt.verify.publickey.location=https://{yourOktaDomain}/oauth2/default/v1/keys
mp.jwt.verify.issuer=https://{yourOktaDomain}/oauth2/default
Test Your Quarkus API with HTTPie
Generate or copy an access token from OpenID Connect <debugger/> and use it to test your Quarkus API.
http :8080/hello Authorization:"Bearer $TOKEN"You should see your email in the response.
Did you notice that Quarkus hot-reloaded your application.properties file updates? Pretty slick, eh?!
Build a Native Quarkus App
To compile this Quarkus app into a native binary, run:
./mvnw package -PnativeThe native compilation step will take a bit to complete. On my 2019 MacBook Pro, it took 53 s.
Start it with ./target/quarkus-1.0.0-SNAPSHOT-runner:
$ ./target/quarkus-1.0.0-SNAPSHOT-runner
__  ____  __  _____   ___  __ ____  ______
 --/ __ \/ / / / _ | / _ \/ //_/ / / / __/
 -/ /_/ / /_/ / __ |/ , _/ ,< / /_/ /\ \
--\___\_\____/_/ |_/_/|_/_/|_|\____/___/
2022-06-05 18:37:35,741 INFO  [io.quarkus] (main) quarkus 1.0.0-SNAPSHOT native (powered by Quarkus 2.9.2.Final) started in 0.017s. Listening on: http://0.0.0.0:8080
2022-06-05 18:37:35,743 INFO  [io.quarkus] (main) Profile prod activated.
2022-06-05 18:37:35,743 INFO  [io.quarkus] (main) Installed features: [cdi, reactive-routes, resteasy-reactive, security, smallrye-context-propagation, smallrye-jwt, vertx]
Supersonic Subatomic Java (in 17ms)! Test it with HTTPie and an access token.
http :8080/hello Authorization:"Bearer $TOKEN"Create a Quarkus App from Scratch
You can create the same Quarkus app used in this example in five steps.
-
Use Maven to generate a new Quarkus app with JWT support:
mvn io.quarkus:quarkus-maven-plugin:2.9.2.Final:create \
    -DprojectGroupId=com.okta.rest \
    -DprojectArtifactId=quarkus \
    -DclassName="com.okta.rest.quarkus.HelloResource" \
    -Dpath="/hello" \
    -Dextensions="smallrye-jwt,resteasy-reactive"
You might wonder why
resteasy-reactiveis used here. I added it because Quarkus team member, Georgios Andrianakis, recommended it and it will eventually be the default. -
Edit
src/java/com/okta/rest/quarkus/HelloResource.javaand add user information to thehello()method:package com.okta.rest.quarkus; import io.quarkus.security.Authenticated; import javax.ws.rs.GET; import javax.ws.rs.Path; import javax.ws.rs.Produces; import javax.ws.rs.core.Context; import javax.ws.rs.core.MediaType; import javax.ws.rs.core.SecurityContext; import java.security.Principal; @Path("/hello") public class HelloResource { @GET @Authenticated @Produces(MediaType.TEXT_PLAIN) public String hello(@Context SecurityContext context) { Principal userPrincipal = context.getUserPrincipal(); return "Hello, " + userPrincipal.getName() + "!"; } } -
Add your Okta endpoints to
src/main/resources/application.properties:mp.jwt.verify.publickey.location=https://{yourOktaDomain}/oauth2/default/v1/keys mp.jwt.verify.issuer=https://{yourOktaDomain}/oauth2/default -
Modify the
HelloResourceTestto expect a 401 instead of a 200:package com.okta.rest.quarkus; import io.quarkus.test.junit.QuarkusTest; import org.junit.jupiter.api.Test; import static io.restassured.RestAssured.given; @QuarkusTest public class HelloResourceTest { @Test public void testHelloEndpoint() { given() .when().get("/hello") .then() .statusCode(401); } }
Last but certainly not least, let’s look at Spring Boot.
Start a Spring Boot Java API
In your IDE, update the issuer in spring-boot/src/main/resources/application.properties to use your Okta domain.
spring.security.oauth2.resourceserver.jwt.issuer-uri=https://{yourOktaDomain}/oauth2/defaultThen, start your app from your IDE or using a terminal:
./mvnw spring-boot:runTest Your Spring Boot API with HTTPie
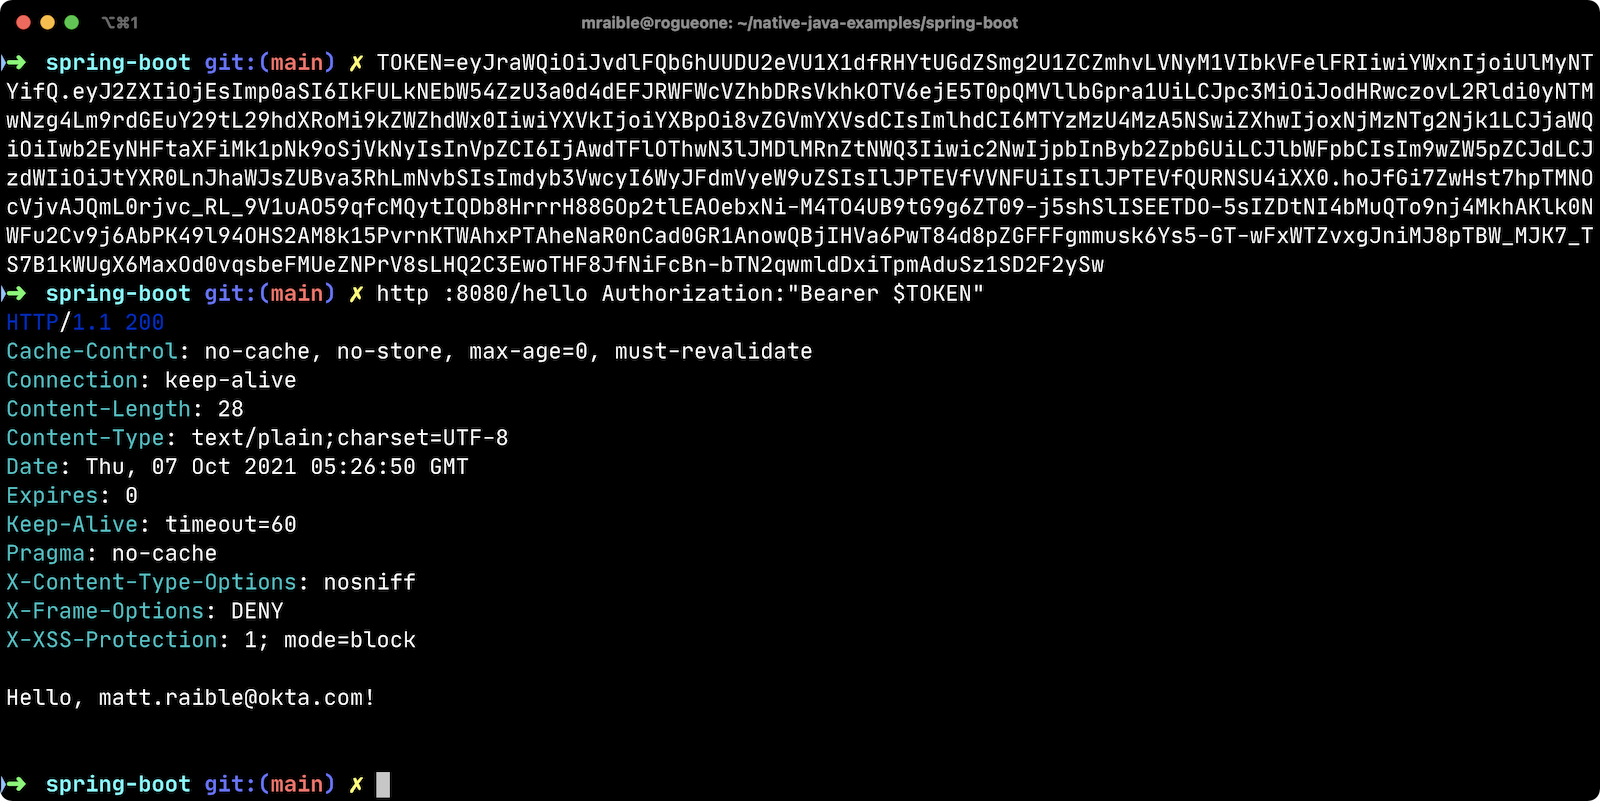
Generate an access token using oidcdebugger.com and use it to test your Spring Boot API.
http :8080/hello Authorization:"Bearer $TOKEN"You should see a response like the following.
But wait, doesn’t Okta have a Spring Boot starter? Yes, we do! When this post was first written, it didn’t work with GraalVM. This was fixed in Okta Spring Boot v2.1.1. Unfortunately, it broke again with Spring Native 0.11+ because EnvironmentPostProcessor implementations are not invoked at build-time. This should be fixed in Spring Boot 3. Please use Spring Security’s OAuth libraries if you need native support in the meantime. You can still use the Okta Spring Boot starter in JVM mode. See this pull request for the required changes.
If you’re curious to learn more about our experience making the starter work, see our Spring Native in Action blog post. It contains the video from our Twitch stream with Josh Long. You can watch it to see what we discovered and how we fixed things at that time.
Build a Native Spring Boot App
To compile this Spring Boot app into a native executable, you can use the native profile:
./mvnw package -Pnative
To build a native app and a Docker container, use the Spring Boot Maven plugin and ./mvnw spring-boot:build-image.
|
The native compilation step will take a bit to complete. On my 2019 MacBook Pro, it took 2 min. 24 s.
Start it with ./target/demo:
$ ./target/demo
2022-06-05 18:42:31.055  INFO 47209 --- [           main] o.s.nativex.NativeListener               : AOT mode enabled

  .   ____          _            __ _ _
 /\\ / ___'_ __ _ _(_)_ __  __ _ \ \ \ \
( ( )\___ | '_ | '_| | '_ \/ _` | \ \ \ \
 \\/  ___)| |_)| | | | | || (_| |  ) ) ) )
  '  |____| .__|_| |_|_| |_\__, | / / / /
 =========|_|==============|___/=/_/_/_/
 :: Spring Boot ::                (v2.7.0)
...
2022-06-05 18:42:31.100  INFO 47209 --- [           main] o.s.b.w.embedded.tomcat.TomcatWebServer  : Tomcat started on port(s): 8080 (http) with context path ''
2022-06-05 18:42:31.100  INFO 47209 --- [           main] com.okta.rest.Application                : Started Application in 0.062 seconds (JVM running for 0.065)
Bootiful! Test your API with HTTPie and an access token.
http :8080/hello Authorization:"Bearer $TOKEN"Start a Spring Boot App from Scratch
To create the Spring Boot app used in this example, it’s just five steps.
-
Use HTTPie to generate a new Spring Boot app with OAuth 2.0 support:
http https://start.spring.io/starter.zip \ bootVersion==2.7.0 \ dependencies==web,oauth2-resource-server,native \ packageName==com.okta.rest \ name==spring-boot \ type==maven-project \ baseDir==spring-boot | tar -xzvf - -
Modify
pom.xmlto usetomcat-embed-programmaticinstead of the default Tomcat.<dependency> <groupId>org.springframework.boot</groupId> <artifactId>spring-boot-starter-web</artifactId> <exclusions> <exclusion> <groupId>org.apache.tomcat.embed</groupId> <artifactId>tomcat-embed-core</artifactId> </exclusion> <exclusion> <groupId>org.apache.tomcat.embed</groupId> <artifactId>tomcat-embed-websocket</artifactId> </exclusion> </exclusions> </dependency> <dependency> <groupId>org.apache.tomcat.experimental</groupId> <artifactId>tomcat-embed-programmatic</artifactId> <version>${tomcat.version}</version> </dependency> -
Add a
HelloControllerclass that returns the user’s information:package com.okta.rest.controller; import org.springframework.web.bind.annotation.GetMapping; import org.springframework.web.bind.annotation.RestController; import java.security.Principal; @RestController public class HelloController { @GetMapping("/hello") public String hello(Principal principal) { return "Hello, " + principal.getName() + "!"; } } -
Configure the app to be an OAuth 2.0 resource server by adding an issuer to
application.properties:spring.security.oauth2.resourceserver.jwt.issuer-uri=https://{yourOktaDomain}/oauth2/default -
Add a
SecurityConfigurationclass to configure JWT authentication:package com.okta.rest; import org.springframework.security.config.annotation.web.builders.HttpSecurity; import org.springframework.security.config.annotation.web.configuration.EnableWebSecurity; import org.springframework.security.config.annotation.web.configuration.WebSecurityConfigurerAdapter; import org.springframework.security.config.annotation.web.configurers.oauth2.server.resource.OAuth2ResourceServerConfigurer; @EnableWebSecurity public class SecurityConfiguration extends WebSecurityConfigurerAdapter { @Override protected void configure(HttpSecurity http) throws Exception { http .authorizeRequests(request -> request.anyRequest().authenticated()) .oauth2ResourceServer(OAuth2ResourceServerConfigurer::jwt); } }
You can build and test a Spring Boot native image using the steps I outlined above.
Build Native Images for Micronaut, Quarkus, and Spring Boot
To recap, Micronaut, Quarkus, and Spring Boot all support building native executables with GraalVM. Yes, there are other frameworks, but these three seem to be the most popular.
The commands to build each app are similar but not quite the same.
-
Micronaut:
./mvnw package -Dpackaging=native-image -
Quarkus:
./mvnw package -Pnative -
Spring Boot:
./mvnw package -Pnative
Of course, they all support Gradle too.
Startup Time Comparison
Performance comparisons are complex, but I’m going to do one anyway. Since this post is all about native Java, below is the data I gathered that shows the average milliseconds to start each native executable. I ran each image three times before I started recording the numbers. I then ran each command five times.
These numbers are from a 2019 MacBook Pro with a 2.4 GHz 8-Core Intel Core i9 processor and 64 GB of RAM. I think it’s important to note that my WiFi connection was 72.5 Mbps down and 10.1 Mbps up (according to the Speedtest app).
| Framework | Command executed | Milliseconds to start |
|---|---|---|
Micronaut |
|
29.8 |
Quarkus |
|
19.2 |
Spring Boot |
|
61 |
The chart below should help you visualize this comparison.
|
When I first wrote this post with Spring Boot 2.5, the startup startup times looked a little long, so I contacted my friend Josh Long. We did a debugging session over Zoom and discovered the longer startup times were because Spring Security is doing OIDC discovery with the issuer. Josh filed an issue and Spring Security 5.6.0 made issuer checks lazy by default. Spring Boot 2.6 includes Spring Security 5.6.0. You can also avoid issuer checks by just using the JWKS URI. For example: I tried this and didn’t see any startup performance difference. |
I also tested the memory usage in MB of each app using the command below. I made sure to send an HTTP request to each one before measuring.
ps -o pid,rss,command | grep --color <executable> | awk '{$2=int($2/1024)"M";}{ print;}'I substituted <executable> as follows:
| Framework | Executable | Megabytes before request | Megabytes after 1 request | Megabytes after 5 requests |
|---|---|---|---|---|
Micronaut |
|
31 |
49 |
59 |
Quarkus |
|
23 |
34 |
36 |
Spring Boot |
|
51 |
61 |
62 |
The chart below shows the memory usage after the first request.
| If you disagree with these numbers and think X framework should be faster, I encourage you to clone the repo and run these tests yourself. If you get faster startup times for Spring Boot, do you get faster startup times for Micronaut and Quarkus too? |
Testing Native Images
When building native images, it’s essential to test them as part of an integration testing process. This post is already long enough, so I won’t explain how to test native images in this post. We’ll publish a post in the future that covers this topic.
I do like how Quarkus generates a HelloResourceIT that’s designed specifically for this, though.
package com.okta.rest.quarkus;

import io.quarkus.test.junit.QuarkusIntegrationTest;

@QuarkusIntegrationTest
public class HelloResourceIT extends HelloResourceTest {

    // Execute the same tests but in native mode.
}
However, this test did not help me detect an issue with my Quarkus native image when writing this post. That’s because I was lazy in writing my test and changed it to confirm a 401 instead of testing it with Quarkus' OIDC testing support.
In the meantime, see Gradle and Maven Plugins for Native Image with Initial JUnit 5 Testing Support.
Learn More About Java and GraalVM
In this post, you learned how to develop, build, and run native Java apps with Micronaut, Quarkus, and Spring Boot. You learned how to secure them with OpenID Connect and access them with a JWT access token.
If you’re a Spring Boot aficionado, I recommend you watch Josh Long’s Spring Tips: Spring Native 0.11.0 video.
You can find the source code for all the examples used in this post on GitHub in the native-java-examples repository.
Server-side apps that serve up REST APIs aren’t the only thing that’s gone native in Java. Gluon has done a lot of work in recent years to make JavaFX apps work on iOS and Android using GraalVM. See Gail Anderson's Creating Mobile Apps with JavaFX – Part 1 to learn more about this emerging technology.
In the beginning, I mentioned JNI and JNA. Baeldung has some tutorials about both:
If you liked this post, chances are you’ll like others we’ve published:
Got questions? Leave them in the comments below! You can also hit us up on our social channels: @oktadev on Twitter, Okta for Developers on LinkedIn, Twitch, and YouTube.
Changelog:
- Jun 6, 2022: Updated to use Micronaut 3.5.1, Quarkus 2.9.2, Spring Boot 2.7.0, and Spring Native 0.12.0. See this post’s changes in okta-blog#1185 and the example app changes in native-java-examples#28.
- May 11, 2022: Updated to use GraalVM 22.1, Micronaut 3.4.3, Quarkus 2.9.0, Spring Boot 2.6.7, and Spring Native 0.11.5. See this post’s changes in okta-blog#1165 and the example app changes in native-java-examples#25.
- Apr 19, 2022: Updated to use Micronaut 3.4.2, Quarkus 2.8.1, Spring Boot 2.6.6, and Spring Native 0.11.4. See this post’s changes in okta-blog#1142 and the example app changes in native-java-examples#22.
- Mar 31, 2022: Updated to use GraalVM 22.0, Micronaut 3.4.1, Quarkus 2.7.5, Spring Boot 2.6.5, and Spring Native 0.11.3. See this post’s changes in okta-blog#1123 and the example app changes in native-java-examples#16.
- Jan 4, 2022: Updated to use Micronaut 3.2.4, Quarkus 2.6.1, Spring Boot 2.6.2, and Spring Native 0.11.3. See this post’s changes in okta-blog#1016 and the example app changes in native-java-examples#11.
- Dec 9, 2021: Updated to use Micronaut 3.2.1 and Spring Native 0.11.0. See this post’s changes in okta-blog#993 and the example app changes in native-java-examples#10.
- Dec 2, 2021: Updated to use Java 17, Micronaut 3.2.0, Quarkus 2.5.1, and Spring Boot 2.6.1. See this post’s changes in okta-blog#986 and the example app changes in native-java-examples#9.
- Oct 7, 2021: Updated to use Micronaut 3.0.3, Quarkus 2.3.0.Final, and Spring Boot 2.5.5. Changed Spring Boot to create binary instead of Docker image and updated startup performance stats. See this post’s changes in okta-blog#913 and the example app changes in native-java-examples#7.
- Sep 16, 2021:
Updated to use macOS binary (
./mvnw package -Pnative) when calculating memory usage for Spring Boot. See the updates in okta-blog#887. - Sep 16, 2021: Updated to use Micronaut 3.0.1, Quarkus 2.2.2.Final, and Spring Boot 2.5.4. Also added memory usage comparison. See this post’s changes in okta-blog#885 and the example app changes in native-java-examples#6.
Matt Raible is a well-known figure in the Java community and has been building web applications for most of his adult life. For over 20 years, he has helped developers learn and adopt open source frameworks and use them effectively. He's a web developer, Java Champion, and Developer Advocate at Okta. Matt has been a speaker at many conferences worldwide, including Devnexus, Devoxx Belgium, Devoxx France, Jfokus, and JavaOne. He is the author of The Angular Mini-Book, The JHipster Mini-Book, Spring Live, and contributed to Pro JSP. He is a frequent contributor to open source and a member of the JHipster development team. You can find him online @mraible and raibledesigns.com.
Okta Developer Blog Comment Policy
We welcome relevant and respectful comments. Off-topic comments may be removed.