How to Docker with Spring Boot
Those of you reading this have certainly heard of Docker. After years of hype, it has become the somewhat standard technology for everyday DevOps operations. It greatly helped to simplify deployments and testing by creating efficient, immutable images of the applications which are working in their own silo. More efficient placement of applications has made this technology central for cloud applications which is why it has gotten so much attention in recent years.
Docker has enabled a new, unified way of application deployment. The basic idea is simple: instead of preparing a target environment on each machine, bring it as a part of your application in the form of a container. This means no conflicting library versions or overlapping network ports. Built images are immutable - your application works the same way locally, on your teammate’s computer, or in the cloud. Also, it’s possible to run multiple instances of the container on the same machine, and that helps to increase the density of deployment, bringing down costs.
In this tutorial, you will build and run a simple web application into the Docker-compatible image using Cloud Native Buildpacks support, introduced in Spring Boot 2.3.0.
Prerequisites:
Table of Contents
- Bootstrap a Secure Spring Boot Application
- Build a Spring Boot Docker Image
- Secure Your Spring Boot Application in Docker
- Deploy Spring Boot + Docker to Heroku
- Learn More About Docker, Spring Boot, and Buildpacks
If you’d rather watch a video of this tutorial, check out the screencast below from our YouTube channel.
Note: In May 2025, the Okta Integrator Free Plan replaced Okta Developer Edition Accounts, and the Okta CLI was deprecated.
We preserved this post for reference, but the instructions no longer work exactly as written. Replace the Okta CLI commands by manually configuring Okta following the instructions in our Developer Documentation.
Bootstrap a Secure Spring Boot Application
Start by creating a Spring Boot application using Spring Boot Initializr. This can be done via the web interface or using a handy curl command:
curl https://start.spring.io/starter.tgz -d dependencies=web,okta \
   -d bootVersion=2.5.4 \
   -d groupId=com.okta \
   -d artifactId=demospringboot \
   -d type=gradle-project \
   -d language=kotlin \
   -d baseDir=springboot-docker-demo | tar -xzvf -
This command requests that Spring Boot Initializr generate an application that uses the Gradle build system and Kotlin programming language. It also configures dependencies on Spring Web and Okta. The created project is automatically unpacked to the springboot-docker-demo directory.
Update your main application class to allow unauthenticated access in WebSecurityConfigurerAdapter. While in there, add a controller that welcomes the user. It’s safe to put everything in a single file src/main/kotlin/com/okta/demospringboot/DemoApplication.kt:
package com.okta.demospringboot

import org.springframework.boot.autoconfigure.SpringBootApplication
import org.springframework.boot.runApplication
import org.springframework.security.config.annotation.web.builders.HttpSecurity
import org.springframework.security.config.annotation.web.configuration.WebSecurityConfigurerAdapter
import org.springframework.context.annotation.Configuration
import org.springframework.web.bind.annotation.RequestMapping
import org.springframework.web.bind.annotation.RestController
import java.security.Principal

@SpringBootApplication
class DemoApplication

fun main(args: Array<String>) {
    runApplication<DemoApplication>(*args)
}

@Configuration
class OktaOAuth2WebSecurityConfigurerAdapter: WebSecurityConfigurerAdapter() {
    override fun configure(http: HttpSecurity) {
        http.authorizeRequests().anyRequest().permitAll()
    }
}

@RestController
class WebController {
    @RequestMapping("/")
    fun home(user: Principal?) = "Welcome, ${user?.name ?: "guest"}!"
}
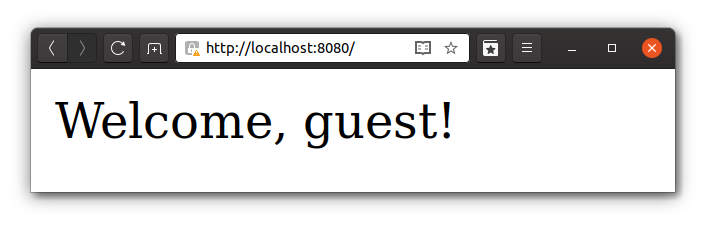
Run Your Spring Boot Application
Start your application in the project folder via the command line:
./gradlew bootRun
Then, open a browser at http://localhost:8080. Your web application greets the guest user:
Build a Spring Boot Docker Image
Since version 2.3.0, Spring Boot has supported Cloud Native Buildpacks. It has become straightforward to deploy a web service to the popular clouds using Buildpacks due to the mass adoption of this technology.
Build your application and send the image to the local Docker daemon:
./gradlew bootBuildImage --imageName=springbootdemo
Next, start your containerized web application with Docker:
docker run -it -p8080:8080 springbootdemo
As expected, your web application will be available on http://localhost:8080.
Secure Your Spring Boot Application in Docker
User management is never an easy task and, most certainly, is not the main objective of your application. Okta is an identity provider that helps you to take care of routine work such as implementing OAuth 2.0, social login, and SSO (Single Sign-On). It’s very developer-friendly, and it has excellent integration with different frameworks, including Spring Boot.
Before you begin, you’ll need a free Okta developer account. Install the Okta CLI and run okta register to sign up for a new account. If you already have an account, run okta login.
Then, run okta apps create. Select the default app name, or change it as you see fit.
Choose Web and press Enter.
Select Other.
Then, change the Redirect URI to http://localhost:8080/login/oauth2/code/okta and use http://localhost:8080 for the Logout Redirect URI.
What does the Okta CLI do?
The Okta CLI will create an OIDC Web App in your Okta Org. It will add the redirect URIs you specified and grant access to the Everyone group. You will see output like the following when it’s finished:
Okta application configuration has been written to: /path/to/app/.okta.env
Run cat .okta.env (or type .okta.env on Windows) to see the issuer and credentials for your app.
export OKTA_OAUTH2_ISSUER="https://dev-133337.okta.com/oauth2/default"
export OKTA_OAUTH2_CLIENT_ID="0oab8eb55Kb9jdMIr5d6"
export OKTA_OAUTH2_CLIENT_SECRET="NEVER-SHOW-SECRETS"
Your Okta domain is the first part of your issuer, before /oauth2/default.
NOTE: You can also use the Okta Admin Console to create your app. See Create a Web App for more information.
You’ll need to run source .okta.env to set these values as environment variables. If you’re on Windows, rename the file to .okta.bat and change export to set. These parameters need to be injected into the application to enable OAuth flows for authentication and authorization.
⚠️ NOTE: Make sure you never check in credentials to your source control system. ⚠️
Configure Spring Security to Lock Down Access
Previously, your webpage was accessible for everyone. To allow access for authorized users only, update the Spring Security configuration in src/main/kotlin/com/okta/demospringboot/DemoApplication.kt:
@Configuration
class OktaOAuth2WebSecurityConfigurerAdapter: WebSecurityConfigurerAdapter() {
    override fun configure(http: HttpSecurity) {
        http.authorizeRequests().anyRequest().authenticated();
    }
}
That’s it. The Okta Spring Boot Starter takes care of the rest!
Rebuild the application again:
./gradlew bootBuildImage --imageName=springbootdemo
The --imageName parameter allows specifying an image name. Without it, the name would be something like appName:0.0.1-SNAPSHOT.
Start Spring Boot Application in Docker
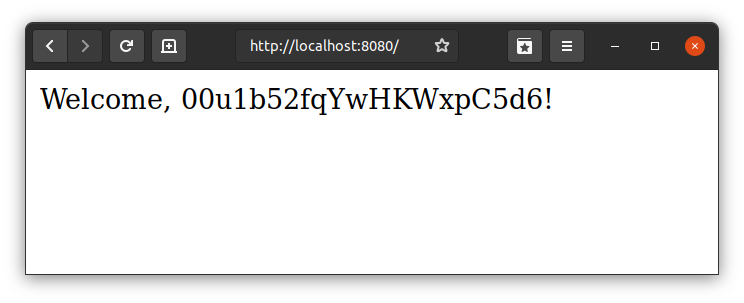
When your application starts, the Okta module reads environment variables to configure security in your application. Start your application with your values set:
docker run -it -p8080:8080 \
    -e OKTA_OAUTH2_ISSUER="https://dev-xxxxxx.okta.com/oauth2/default" \
    -e OKTA_OAUTH2_CLIENT_SECRET="yyyyyyyyyyyyyyyyyyy" \
    -e OKTA_OAUTH2_CLIENT_ID="zzzzzzzzzzzzzzzz" \
    springbootdemo
The argument -e allows to set an environment variable for the application running inside your container and -p maps container’s ports to localhost ports.
Now, head over to http://localhost:8080, and you’ll be asked to log in using Okta’s standard form. Enter your login credentials and, upon successful sign-in, your web browser will be redirected to the main page, displaying a welcoming message.
TIP: If you want to print the user’s name, use @AuthenticatedPrincipal and OidcUser:
fun home(@AuthenticationPrincipal user: OidcUser?) = "Welcome, ${user?.fullName ?: "guest"}!"
Congratulations, you have created a simple Spring Boot application contextualized with Docker and secured with Spring Security + Okta.
Bonus - Use a dotenv File
While providing a few environment variables in the command-line might be acceptable, it’s not very convenient and can leave unwanted traces of the secrets in your terminal history. Docker supports dotenv file format, which makes it easier to set multiple environment parameters.
- Create a
.envfile in the root of the project and set desirable environment variables:OKTA_OAUTH2_ISSUER=https://{yourOktaDomain}/oauth2/default OKTA_OAUTH2_CLIENT_SECRET={yourClientSecret} OKTA_OAUTH2_CLIENT_ID={yourClientId} - Always be extra careful with credentials - avoid leaking them to the version control system even for the pet project. Add
.envto.gitignore.echo ".env" >> .gitignore - Run Docker providing your
.envfile via--env-fileargumentdocker run -it -p8080:8080 --env-file .env springbootdemoLooks much cleaner, doesn’t it?
Deploy Spring Boot + Docker to Heroku
If you’d like to deploy your dockerized Spring Boot app to Heroku, you’ll need to use Heroku Buildpacks. This is because the Paketo buildpacks refuse to allocate heap on containers smaller than 1GB of RAM. A free Heroku dyno has 512MB.
First, you’ll need to add the following to src/main/resources/application.properties so Spring Boot uses Heroku’s PORT environment variable.
server.port=${PORT:8080}
Then, build your image with --builder heroku/spring-boot-buildpacks:
./gradlew bootBuildImage --imageName=springbootdemo --builder heroku/spring-boot-buildpacks
Install the Heroku CLI and create an app on Heroku:
heroku create
Log in to Heroku’s container registry and push your app:
heroku container:login
docker tag springbootdemo registry.heroku.com/<your-app-name>/web
docker push registry.heroku.com/<your-app-name>/web
Set your Okta app settings as environment variables:
heroku config:set \
  OKTA_OAUTH2_ISSUER="https://{yourOktaDomain}/oauth2/default" \
  OKTA_OAUTH2_CLIENT_ID="{clientId}" \
  OKTA_OAUTH2_CLIENT_SECRET="{clientSecret}"
Next, release your container and tail the logs.
heroku container:release web
heroku logs --tail
You’ll need to update your Okta OIDC app to have your Heroku app’s redirect URIs as well.
- Login redirect URI:
https://<your-app-name>.herokuapp.com/login/oauth2/code/okta - Logout redirect URI:
https://<your-app-name>.herokuapp.com
Run heroku open to open your app and sign in.
Learn More About Docker, Spring Boot, and Buildpacks
In this brief tutorial, you created a secure Spring Boot application and packaged it with Docker. You configured Okta as an OAuth 2.0 provider, built an image into your local Docker daemon, and learned how to run your app in Docker. This bootstrap project is a great starting point for your next cloud-native project.
You can find the source code for this example on GitHub.
See other relevant tutorials:
- Deploy a Secure Spring Boot App to Heroku
- OAuth 2.0 Java Guide: Secure Your App in 5 Minutes
- Angular + Docker with a Big Hug from Spring Boot
- A Quick Guide to OAuth 2.0 with Spring Security
Follow us for more great content and updates from our team! You can find us on Twitter, Facebook, subscribe to our YouTube Channel or start the conversation below!
Changelog:
- Sep 22, 2021: Updated to use Spring Boot 2.5.4. Changes to this post can be viewed in oktadev/okta-blog#893; example app changes are in oktadev/okta-spring-boot-docker-buildpacks-example#4
- Dec 31, 2020: Updated post to add Heroku instructions, since it requires another buildpack. Thanks for the idea, Maurizio! See the code changes in the example on GitHub. Changes to this post can be viewed in oktadev/okta-blog#514.
Okta Developer Blog Comment Policy
We welcome relevant and respectful comments. Off-topic comments may be removed.