How to Write Secure SQL Common Table Expressions
Common table expressions are a powerful feature of Microsoft SQL Server. They allow you to store a temporary result and execute a statement afterward using that result set. These can be helpful when trying to accomplish a complicated process that SQL Server isn’t well suited to handle. CTEs allow you to perform difficult operations in two distinct steps that make the challenge easier to solve.
In this article, you will learn how to write common table expressions using Microsoft SQL Server. You will then learn how to use that statement in a .NET Core MVC web application that is secured using Okta. Okta is a powerful yet easy to use single sign-on provider. By making use of Okta’s Okta.AspNetCore package from Nuget, you will learn how to secure your application and any data from your CTEs properly.
Note: In May 2025, the Okta Integrator Free Plan replaced Okta Developer Edition Accounts, and the Okta CLI was deprecated.
We preserved this post for reference, but the instructions no longer work exactly as written. Replace the Okta CLI commands by manually configuring Okta following the instructions in our Developer Documentation.
Secure Your SQL CTE with an Okta Application
The first thing you want to do is set up your Okta application to handle your authentication. If you haven’t done so yet, you can sign up for a free developer account here.
Log in to your Okta Developer console and click on Add Application. Select Web and click Next. On the next page, give your Okta application a meaningful name. You will also want to replace your URIs’ ports from 8080 to 3000. Finally, set your Logout redirect URIs to http://localhost:3000/signout/callback.
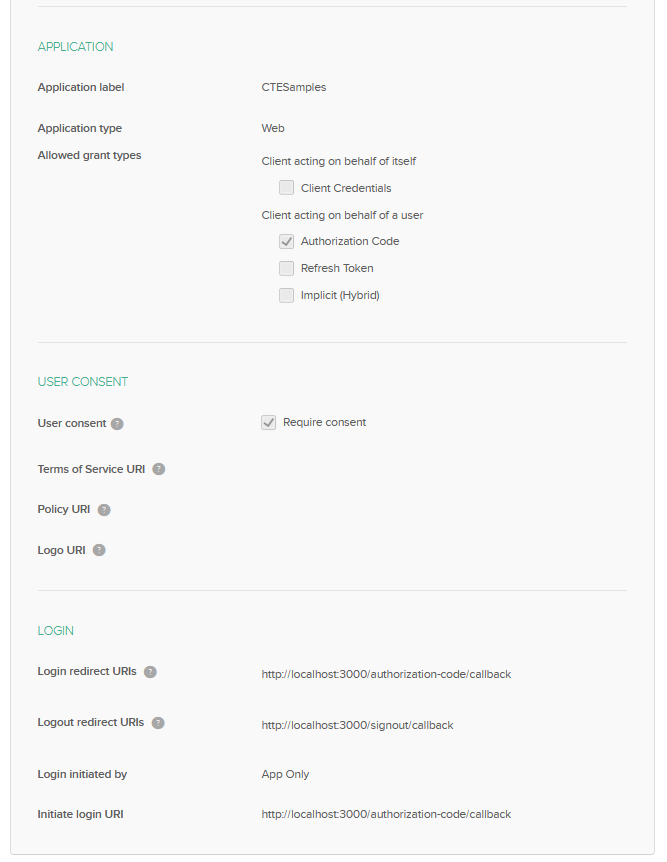
Click on Done, and you will be taken to your application home screen. Make note of your Client ID, Client secret, and Okta domain, as you will need these in your web application.
Prepare the SQL Database to Use with Your CTE
To work on your database, you will need to have a database first. Microsoft provides several samples via GitHub. For this project, I used the Wide World Importers sample database v1.0. To use this, you will need to have at least SQL 2016 installed. Microsoft provides .bak and .bacpac files for you to use.
Common Table Expressions (CTEs)
Common table expressions are a temporary result set created by a simple query. Once this result set is obtained, you can perform SELECT, INSERT, DELETE, or MERGE operations on it. CTEs can be used in place of a complicated query - one with difficult joins and logic in it. By operating on a temporary result set, you can simplify the process, making it more readable, easier to optimize, and easier to debug. Let’s take a look at how CTEs work, and how they can make your life easier.
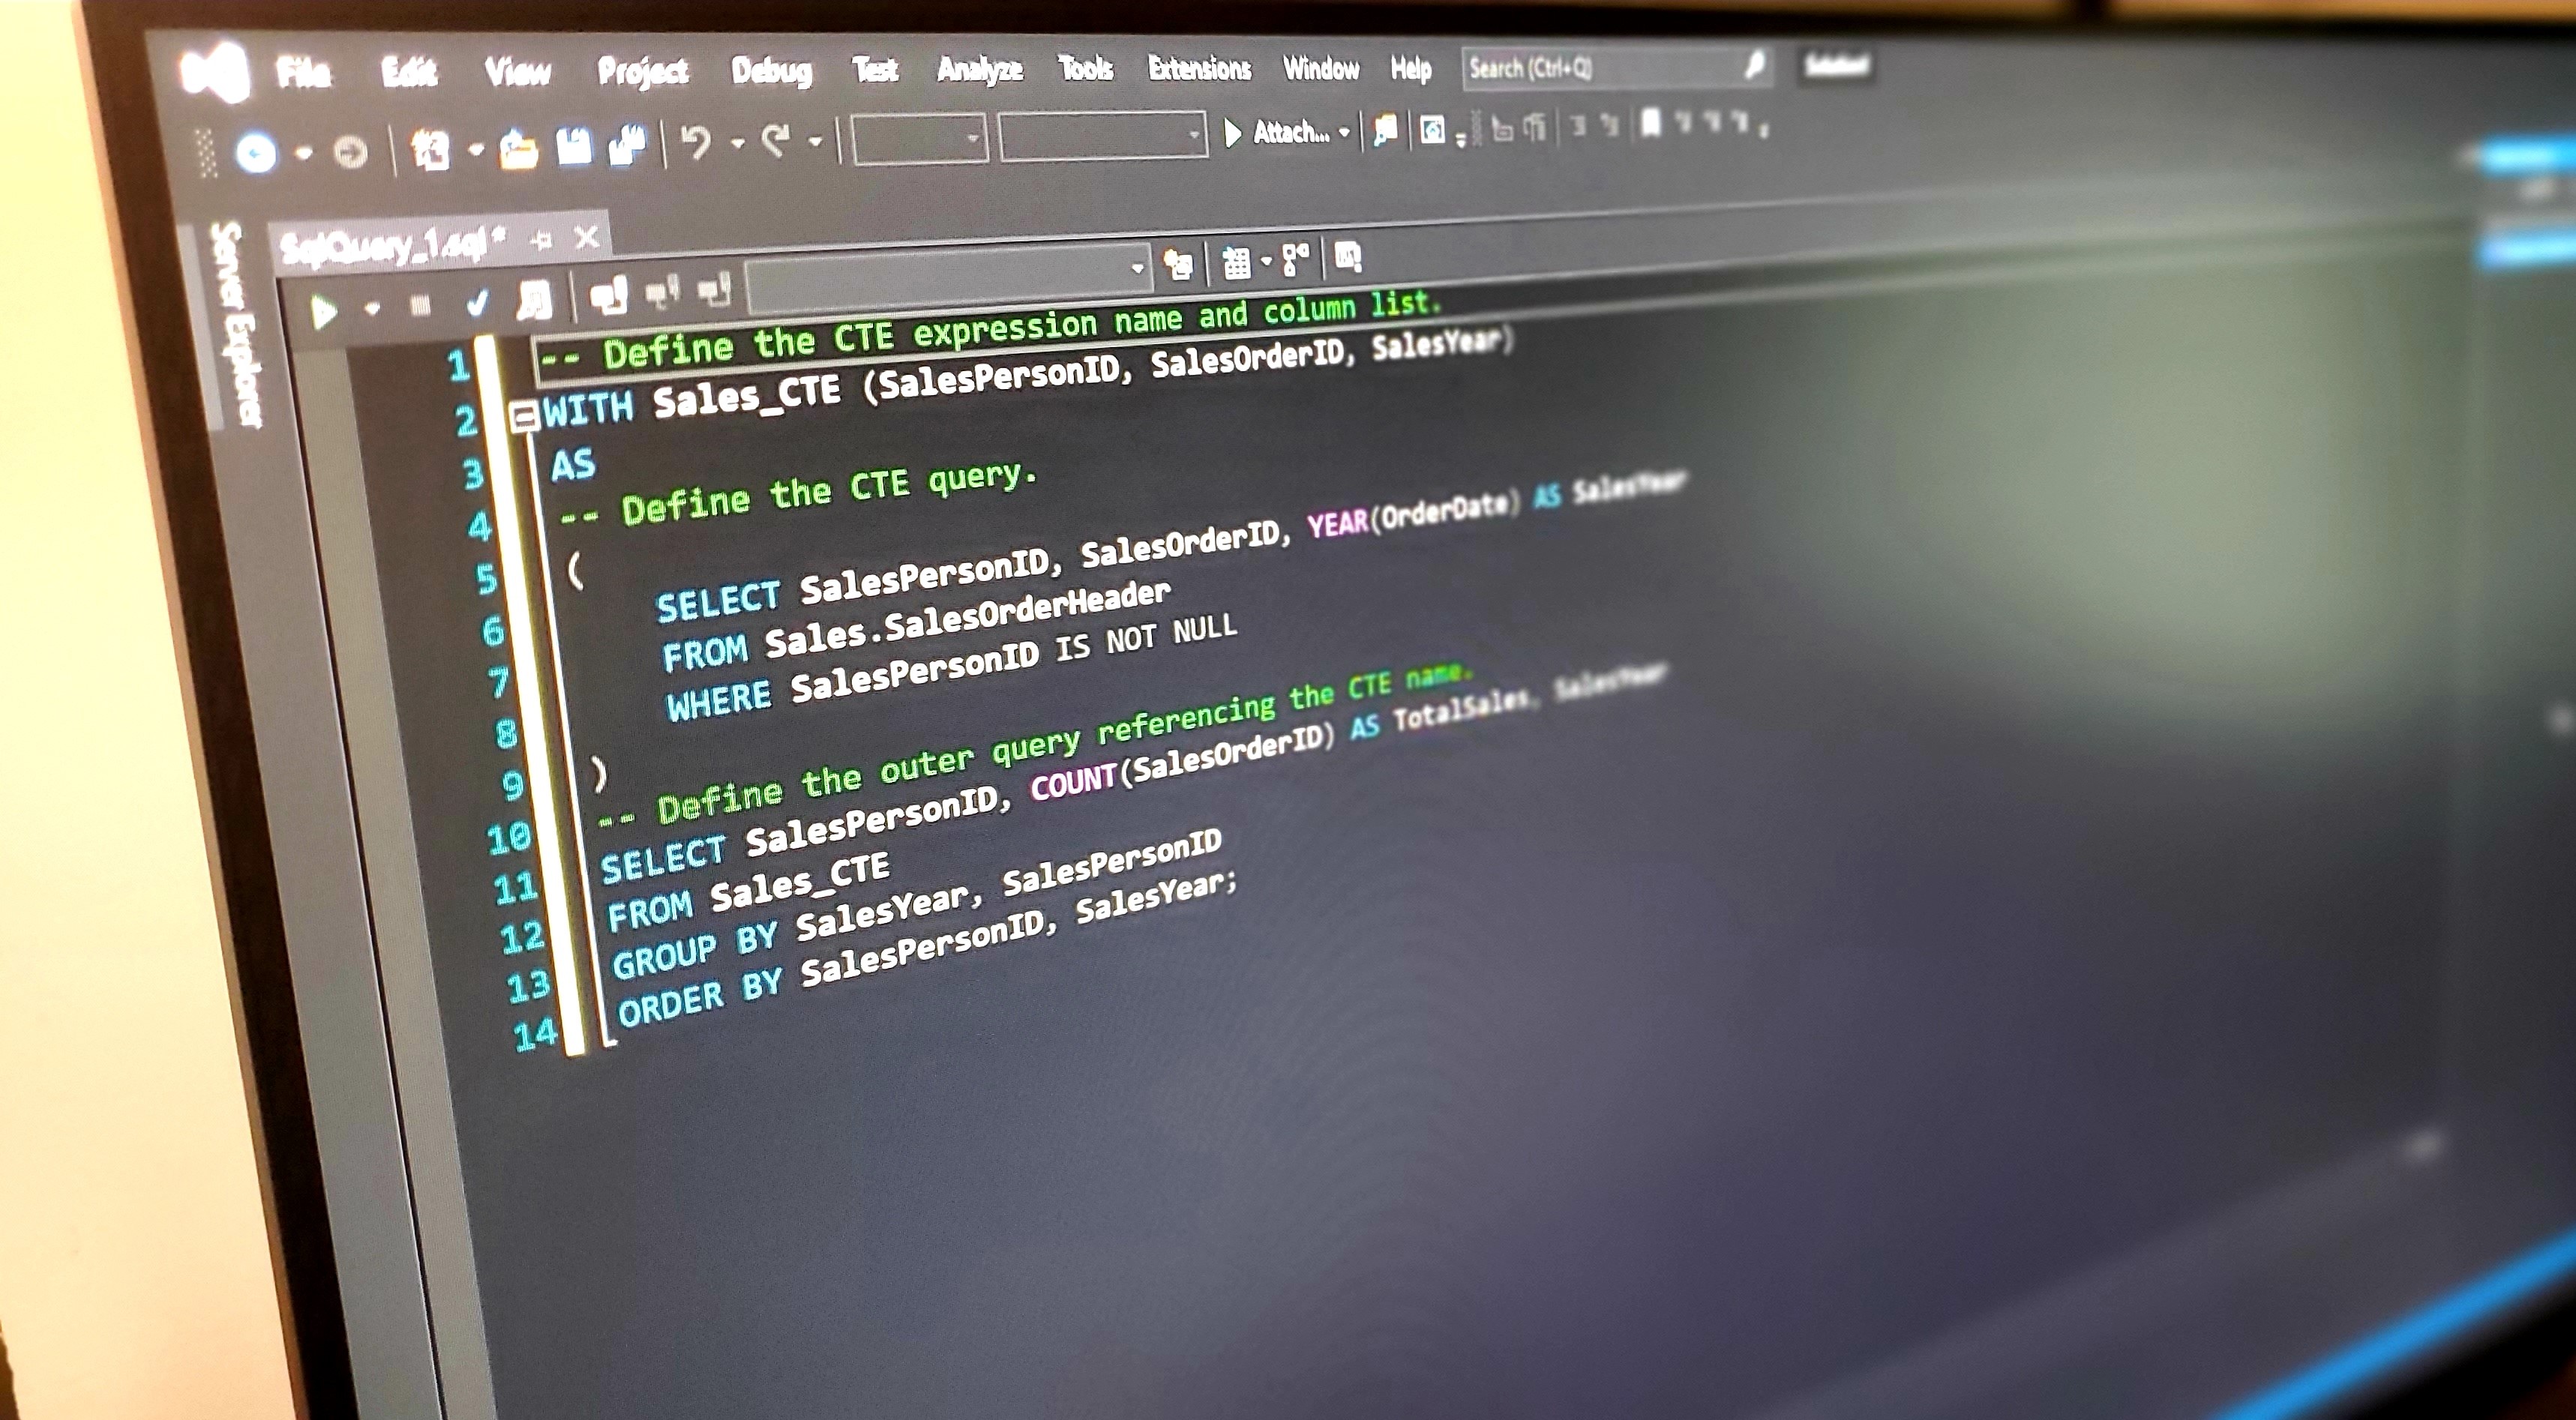
The first thing you notice is that the tax rates are all wrong. You aren’t supposed to charge tax unless the DeliveryPostalCode is 90490. So, you’ll need to update each line item in the InvoiceLines table. But, to get the DeliveryPostalCode, you need a join from the InvoiceLines table to the Invoices table; then, a join to the Customers table. You can round up the DeliveryPostalCode and associate it to the InvoiceID with SELECT, using the common table expression below. Next, you can run one statement using the temporary results set tax_update. After creating your results set of InvoiceID and DeliveryPostalCode, you can update the InvoiceLines table with the new TaxRate, and then you can update the TaxAmount and ExtendedPrice with ease.
--****************************
--BEGIN CTE
--****************************
WITH tax_update (InvoiceID, DeliveryPostalCode) AS (    SELECT
        [WideWorldImporters].[Sales].[Invoices].InvoiceID,
        DeliveryPostalCode
    FROM
        [WideWorldImporters].[Sales].[Invoices]
        INNER JOIN [WideWorldImporters].[Sales].[InvoiceLines] ON [Invoices].[InvoiceID] = [InvoiceLines].[InvoiceID]
        INNER JOIN [Sales].[Customers] ON [WideWorldImporters].[Sales].[Invoices].CustomerID = [Sales].[Customers].CustomerID
)
UPDATE
    [WideWorldImporters].[Sales].[InvoiceLines]
SET
    TaxRate = CASE WHEN DeliveryPostalCode = '90490' THEN 6.00 ELSE 0 END
FROM
    tax_update
WHERE
    [WideWorldImporters].[Sales].[InvoiceLines].InvoiceID = tax_update.InvoiceId

--****************************
--END CTE
--****************************

UPDATE
    [WideWorldImporters].[Sales].[InvoiceLines]
SET
    TaxAmount = TaxRate * Quantity * UnitPrice
UPDATE
    [WideWorldImporters].[Sales].[InvoiceLines]
SET
    ExtendedPrice = TaxAmount +(Quantity * UnitPrice)
Next, you can write a select using a CTE. The example below is a bit simple for a CTE (you can accomplish this just with a join) but it serves the purpose of showing you how a CTE is written for selects.
Here, you are selecting the CustomerID to use to obtain the CustomerName from the Customers table, along with the StockItemId to obtain the StockItemName in your application.
WITH customer_items (CustomerID, StockItemId, Quantity,
LineProfit) AS (    SELECT
        CustomerID,
        StockItemId,
        SUM (Quantity) AS Quantity,
        SUM (LineProfit) AS LineProfit
    FROM
        [WideWorldImporters].[Sales].[Invoices]
        INNER JOIN [WideWorldImporters].[Sales].[InvoiceLines] ON [Invoices].[InvoiceID] = [InvoiceLines].[InvoiceID]
    GROUP BY
        CustomerID,
        StockItemID
)
SELECT
    CustomerName,
    customer_items.Quantity,
    customer_items.LineProfit,
    [Warehouse].[StockItems].[StockItemName]
FROM
    customer_items
    INNER JOIN [Sales].[Customers] ON [Sales].[Customers].[CustomerId] = customer_items.CustomerID
    INNER JOIN [Warehouse].[StockItems] ON customer_items.StockItemId = [Warehouse].[StockItems].[StockItemID]
Create Your ASP.NET Core Web Application
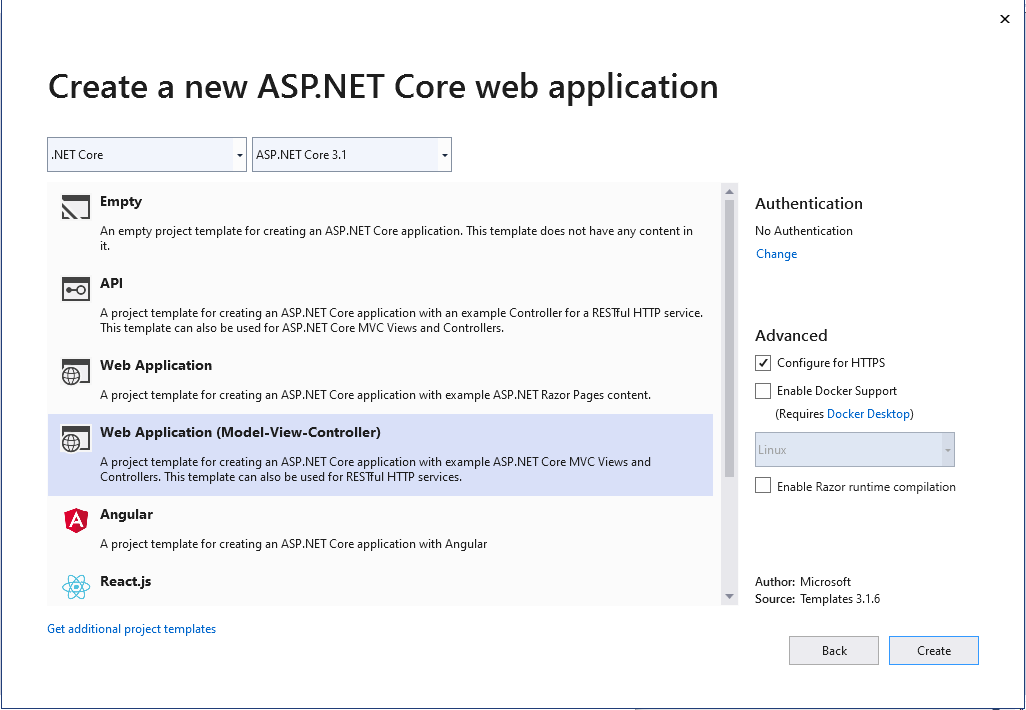
Your SQL database is now set up, and it’s time to begin working on your web application. Open Visual Studio 2019 and Create a new project. Select ASP.NET Core Web Application and press Next. Select Web Application (Model-View-Controller). Ensure your framework is set to .NET Core 3.1 and uncheck Configure for HTTPS. Press Create and wait for your application scaffold.
Once your application is created, open the project properties window and change your App URL to http://localhost:3000 to match your Okta settings. Next, import the Okta.AspNetCore package from NuGet.
Install-Package Okta.AspNetCore -Version 3.5.0
Once that is completed, you can begin to add your code. First, take a look at your appsettings.json file. This is where you will add application-specific variables such as your Okta information or any connection strings. Replace the code in this file with the following. You will need to replace the WideWorldImporters.ConnectionString information with your connection string.
{
  "Logging": {
    "LogLevel": {
      "Default": "Information",
      "Microsoft": "Warning",
      "Microsoft.Hosting.Lifetime": "Information"
    }
  },
  "Okta": {
    "OktaDomain": "https://{yourOktaDomain}",
    "ClientId": "{yourClientId}",
    "ClientSecret": "{yourClientSecret}"
  },
  "WideWorldImporters": {
    "ConnectionString": "{yourConnectionString}"
  }
}
Next, add a file to hold the SQL Settings for WideWorldImporters. Add a new folder called Settings, and add a class file called SqlSettings.cs to it. Add the following code:
public class SqlSettings
{
    public string ConnectionString { get; set; }
}
This very simple class will be populated at start-up and injected into your controllers as needed. You can see that process by opening your Startup.cs file and replacing the code with the following:
public class Startup
{
    public Startup(IConfiguration configuration)
    {
        Configuration = configuration;
    }

    public IConfiguration Configuration { get; }

    // This method gets called by the runtime. Use this method to add services to the container.
    public void ConfigureServices(IServiceCollection services)
    {
        services.AddAuthentication(options =>
        {
            options.DefaultScheme = CookieAuthenticationDefaults.AuthenticationScheme;
            options.DefaultChallengeScheme = OpenIdConnectDefaults.AuthenticationScheme;
        })
       .AddCookie()
       .AddOktaMvc(new OktaMvcOptions
       {
           OktaDomain = Configuration.GetValue<string>("Okta:OktaDomain"),
           ClientId = Configuration.GetValue<string>("Okta:ClientId"),
           ClientSecret = Configuration.GetValue<string>("Okta:ClientSecret"),
           Scope = new List<string> { "openid", "profile", "email" },
       });

        services.Configure<Settings.SqlSettings>(Configuration.GetSection("WideWorldImporters"));

        services.AddControllersWithViews();
    }

    // This method gets called by the runtime. Use this method to configure the HTTP request pipeline.
    public void Configure(IApplicationBuilder app, IWebHostEnvironment env)
    {
        if (env.IsDevelopment())
        {
            app.UseDeveloperExceptionPage();
        }
        else
        {
            app.UseExceptionHandler("/Home/Error");
            // The default HSTS value is 30 days. You may want to change this for production scenarios, see https://aka.ms/aspnetcore-hsts.
            app.UseHsts();
        }
        app.UseHttpsRedirection();
        app.UseStaticFiles();

        app.UseRouting();

        app.UseAuthentication();
        app.UseAuthorization();

        app.UseEndpoints(endpoints =>
        {
            endpoints.MapControllerRoute(
                name: "default",
                pattern: "{controller=Home}/{action=Index}/{id?}");
        });
    }
}
Most of this code is boilerplate, but there are a few things you should note. First, the Configure method doesn’t pre-populate with app.UseAuthentication(), so you will need to add it here.
Next, you set up your Okta middleware in the ConfigureServices method. You also register your WideWorldImporters SQL configuration in this method.
To consume the WideWorldImporters in your controller, you will need to let .NET Core inject it, and then use it. You can see how this is done in the DashboardController. Add a file to your Controllers folder called DashboardController.cs, and replace the code with the following:
public class DashboardController : Controller
{
    IOptions<Settings.SqlSettings> _sqlSettings;

    public DashboardController(IOptions<Settings.SqlSettings> sqlSettings)
    {
        _sqlSettings = sqlSettings;
    }

    [Authorize]
    public IActionResult Index()
    {
        return View(getDashboardIndexModel());
    }

    protected Models.DashboardIndexViewModel getDashboardIndexModel()
    {
        DataTable dt = new DataTable();

        string cmdText =
            @"WITH customer_items (CustomerID, StockItemId, Quantity,
            LineProfit) AS (    SELECT
                    CustomerID,
                    StockItemId,
                    SUM (Quantity) AS Quantity,
                    SUM (LineProfit) AS LineProfit
                 FROM
                    [WideWorldImporters].[Sales].[Invoices]
                    INNER JOIN [WideWorldImporters].[Sales].[InvoiceLines] ON [Invoices].[InvoiceID] = [InvoiceLines].[InvoiceID]
                GROUP BY
                    CustomerID,
                    StockItemID
            )
            SELECT
                CustomerName,
                customer_items.Quantity,
                customer_items.LineProfit,
                [Warehouse].[StockItems].[StockItemName]
            FROM
                customer_items
                INNER JOIN [Sales].[Customers] ON [Sales].[Customers].[CustomerId] = customer_items.CustomerID
                INNER JOIN [Warehouse].[StockItems] ON customer_items.StockItemId = [Warehouse].[StockItems].[StockItemID]";

        SqlDataAdapter da = new SqlDataAdapter(cmdText, new SqlConnection(_sqlSettings.Value.ConnectionString));

        da.Fill(dt);

        return new Models.DashboardIndexViewModel(dt);
    }
}
The application is injecting the IOptions<Settings.SqlSettings> object into this controller. You can reference it later to obtain the connection string for your database. Speaking of your database, this controller also contains the logic for building the model for your view. You will add the model momentarily, but for now, you notice that you are using ADO.Net to call the CTE you wrote earlier. This works just as well with Dapper or Entity Framework; ADO.Net was chosen here because it’s the simplest to set up.
Add a new class to the Models folder called DashboardIndexViewModel and add the following code to it:
public class DashboardIndexViewModel
{
    public List<DashboardLineItem> Items { get; set; }

    public DashboardIndexViewModel(System.Data.DataTable items)
    {
        Items = new List<DashboardLineItem>();

        foreach (System.Data.DataRow row in items.Rows)
        {
            Items.Add(
                new DashboardLineItem(
                    row["CustomerName"].ToString(),
                    Convert.ToInt32(row["Quantity"]),
                    Convert.ToDecimal(row["LineProfit"]),
                    row["StockItemName"].ToString()
                    )
                );
        }
    }
}

public class DashboardLineItem
{
    public string CustomerName { get; set; }
    public string StockItemName { get; set; }
    public int Quantity { get; set; }
    public decimal LineProfit { get; set; }

    public DashboardLineItem(string customerName, int quantity, decimal lineProfit, string stockItemName)
    {
        CustomerName = customerName;
        Quantity = quantity;
        LineProfit = lineProfit;
        StockItemName = stockItemName;
    }
}
This model is just taking the items from the query you ran earlier and injecting them into a nice view-model for your view.
Next, add a controller to your Controllers folder called AccountController if one does exist. Replace the code with the following.
public class AccountController : Controller
{
    public IActionResult SignIn()
    {
        if (!HttpContext.User.Identity.IsAuthenticated)
        {
            return Challenge(OktaDefaults.MvcAuthenticationScheme);
        }

        return RedirectToAction("Index", "Dashboard");
    }

    [HttpPost]
    public IActionResult SignOut()
    {
        return new SignOutResult
        (
            new[]
            {
                    OktaDefaults.MvcAuthenticationScheme,
                    CookieAuthenticationDefaults.AuthenticationScheme,
            },
            new AuthenticationProperties { RedirectUri = "/Home/" }
        );
    }
}
This code will set your application to use Okta authentication. In the SignIn method, you look to see if the user is already logged in. If they aren’t, you return a challenge which will redirect them to Okta for authentication. Once the user is logged in, they will be directed to the Dashboard/Index page. The signout method will redirect users back to the home page.
Finally, you need to add your views. First, open your Shared/_Layout.cshtml file and replace the code with the following.
<!DOCTYPE html>
<html lang="en">
<head>
<meta charset="utf-8" />
<meta name="viewport" content="width=device-width, initial-scale=1.0" />
<title>@ViewData["Title"] - CTEsDemo</title>
<link rel="stylesheet" href="~/lib/bootstrap/dist/css/bootstrap.min.css" />
<link rel="stylesheet" href="~/css/site.css" />
</head>
<body>
<header>
<nav class="navbar navbar-expand-sm navbar-toggleable-sm navbar-light bg-white border-bottom box-shadow mb-3">
<div class="container">
<a class="navbar-brand" asp-area="" asp-controller="Home" asp-action="Index">CTEsDemo</a>
<button class="navbar-toggler" type="button" data-toggle="collapse" data-target=".navbar-collapse" aria-controls="navbarSupportedContent"
aria-expanded="false" aria-label="Toggle navigation">
<span class="navbar-toggler-icon"></span>
</button>
<div class="navbar-collapse collapse d-sm-inline-flex flex-sm-row-reverse">
<ul class="navbar-nav flex-grow-1">
<li class="nav-item">
<a class="nav-link text-dark" asp-area="" asp-controller="Dashboard" asp-action="Index">Dashboard</a>
</li>
</ul>
</div>
@if (User.Identity.IsAuthenticated)
{
<ul class="nav navbar-nav navbar-right">
<li>
<form class="form-inline" asp-controller="Account" asp-action="SignOut" method="post">
<button type="submit" class="nav-link btn btn-link text-dark" id="logout-button">Sign Out</button>
</form>
</li>
</ul>
}
else
{
<ul class="nav navbar-nav navbar-right">
<li><a asp-controller="Account" asp-action="SignIn" id="login-button">Sign In</a></li>
</ul>
}
</div>
</nav>
</header>
<div class="container">
<main role="main" class="pb-3">
@RenderBody()
</main>
</div>
<footer class="border-top footer text-muted">
<div class="container">
© 2020 - CTEsDemo - <a asp-area="" asp-controller="Home" asp-action="Privacy">Privacy</a>
A small demo app by <a href="https://profile.fishbowlllc.com">Nik Fisher</a>
</div>
</footer>
<script src="~/lib/jquery/dist/jquery.min.js"></script>
<script src="~/lib/bootstrap/dist/js/bootstrap.bundle.min.js"></script>
<script src="~/js/site.js" asp-append-version="true"></script>
@RenderSection("Scripts", required: false)
</body>
</html>
This view has some logic that detects if the user is logged in or not. If the user isn’t logged in, you will display a Login button to them; if they are already logged in, you’ll display a Logout button.
Next, open your home page and add the following code to it:
@{
ViewData["Title"] = "Home Page";
}
<div class="jumbotron">
<div class="container">
<h1 class="display-3">Common Table Expressions</h1>
<p>A small demonstration application for writing Common Table Expressions in <a href="https://www.microsoft.com/en-us/sql-server/sql-server-downloads" target="_blank" rel="noreferrer">Microsoft SQL Server</a> and securing them with <a href="https://www.okta.com/" target="_blank" rel="noreferrer">Okta</a> on .NET Core 3.1.</p>
</div>
</div>
<div class="container">
<!-- Example row of columns -->
<div class="row">
<div class="col-md-4">
<h2>SQL Server</h2>
<p><a class="btn btn-secondary" href="https://www.microsoft.com/en-us/sql-server/sql-server-downloads" role="button">View details »</a></p>
</div>
<div class="col-md-4">
<h2>.NET Core</h2>
<p>.NET Core is a free, cross-platform, open-source developer platform for building many different types of applications.</p>
<p><a class="btn btn-secondary" href="https://dotnet.microsoft.com/download/dotnet-core" role="button">View details »</a></p>
</div>
<div class="col-md-4">
<h2>Okta</h2>
<p>The Okta Identity Cloud gives you one trusted platform to secure every identity in your organization and connect with all your customers.</p>
<p><a class="btn btn-secondary" href="https://www.okta.com/" role="button">View details »</a></p>
</div>
</div>
<hr>
</div> <!-- /container -->
There is nothing critical to the application here; it simply provides some extra links for you to read for further learning.
Finally, add or update your Dashboard/Index.cshtml view with the following code:
@{
    ViewData["Title"] = "Index";
}

@model CTEsDemo.Models.DashboardIndexViewModel

<table class="table table-striped">
    <thead>
        <tr>
            <th>Customer Name</th>
            <th>Quantity</th>
            <th>Line Profit</th>
            <th>Stock Item Name</th>
        </tr>
    </thead>
    <tbody>
        @foreach(var item in Model.Items)
        {
        <tr>
            <td>@item.CustomerName</td>
            <td>@item.Quantity</td>
            <td>@item.LineProfit.ToString("C")</td>
            <td>@item.StockItemName</td>
        </tr>
        }
    </tbody>
</table>
This view displays the data in a nice table for your users to see.
Test Your Application
Your application is now ready to start. Press F5 to begin debugging. You should be presented with the home page. From there, you can click on Login or Dashboard. Either should bring you to the Okta login screen. Log in with your Okta account, and you will be presented with the Dashboard.
Check out this project’s repo on GitHub.
Learn More About .NET & Okta
If you are interested in learning more about security and .NET check out these other great articles:
- ASP.NET Core 3.0 MVC Secure Authentication
- Migrate Your ASP.NET Framework to ASP.NET Core with Okta
- Build an Incredibly Fast Website with Dapper + C#
Make sure to follow us on Twitter, subscribe to our YouTube Channel and check out our Twitch channel so that you never miss any awesome content!
Okta Developer Blog Comment Policy
We welcome relevant and respectful comments. Off-topic comments may be removed.