Deploy a Secure Spring Boot App to Heroku
Developers have cool ideas for pet projects all the time. I often have quite a clear picture of what I want to build and am ready to spend next weekend making the Next Big Thing. The weekend comes finally, and instead of building it, I find myself doing the same repetitive things - deployment, user sign in, registration, deployment, etc. Starting a new project with user registration and a login form is fun! - said no one, ever.
The first hundred user sign-up forms I made were fun, kind of. As I move forward, I see more and more boilerplate, mostly copypasta between projects with some minor tweaks.
Luckily, we are living in the era of PaaS, IaaS, and open source. Most of the typical components are already built for us, and we simply need to connect them in order to focus on unique features and delivery for the end-user.
While there are many options available to bootstrap a new project, sometimes it can be challenging to mix and match the right components.
Prerequisites
- Java 11
- A free Heroku account and the Heroku CLI
- 15 minutes of your time
Table of Contents
- Build a Secure Spring Boot Application
- Scaffold a New Spring Boot Project
- Say Hello World with Spring Boot and Kotlin
- Use Kotlin’s Statically-typed HTML Builder
- Deploy Spring Boot to Heroku
- Protect Your Spring Boot Application
- (Bonus) Enable Self-Registration
- Learn More about Spring Boot and Heroku
Build a Secure Spring Boot Application
In this tutorial, you’re going to build a single page (no JavaScript, I promise!), secure web application, and deploy it in Heroku’s cloud. It could be a good foundation for the next project or just something on the side. Most importantly, it doesn’t cost a penny.
Your website will invite a user to log in and then will present them with some meaningful information, for example, give The Answer.
Tools you’ll be using:
- Spring Boot - agile and time-tested all-in-one suite for the web and REST API development framework with countless integrations and much more.
- Spring Security - swiss knife for the various security setups which provides great flexibility and control all over the application. You’ll be using its OAuth 2.0 module.
- Kotlin - fastest-growing statically typed language which is gaining adoption in different applications.
- kotlinx.html - an HTML-like DSL (domain-specific language) helping developers to build type-safe applications.
- Okta - easy to use authentication and authorization service provider, you’ll offload user management to this service
- Heroku - PaaS provider making deployment process as smooth as possible.
Since you won’t handle authentication and won’t store any personal data, that significantly helps to be compliant with GDPR, CCPA, and other government regulations, as Okta already takes care of that.
Spring Boot has first-class support for Kotlin, easing out potential challenges in some corner cases. Okta provides a very handy autoconfiguration okta-spring-boot-starter, similar to spring-boot-starter-web which automagically sets up most of the components for you. With Heroku, you’ll be able to deploy the whole application with a simple git push.
Scaffold a New Spring Boot Project
You can create a project skeleton with a standard directory layout and basic dependencies configured. However, configuring Spring manually can be convoluted, and leave you with cryptic errors just because a dependency was or wasn’t included. Fortunately, Spring Initializr can help with that. It’s a neat online tool giving you an option to set up all dependencies of the project automatically. I prepared a magic link which preselects project’s components.
Should you prefer to select the dependencies yourself, choose options as displayed in the screenshot below:
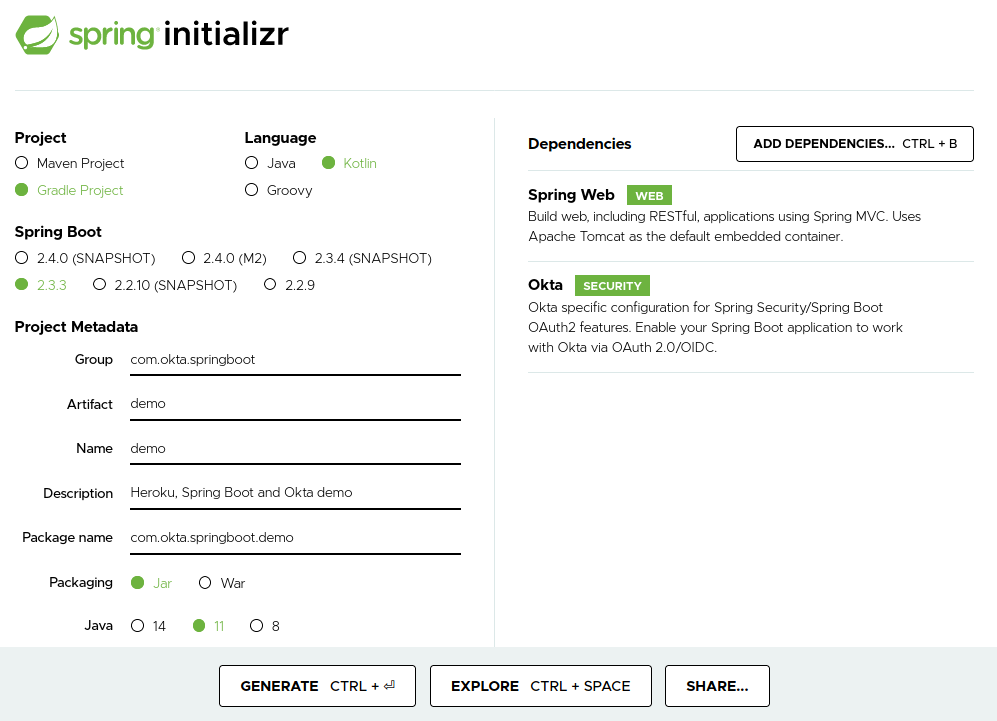
The Spring Initializr website will generate a zip archive that you’ll need to download, decompress, and import in your favorite IDE.
Touch up Gradle Dependencies
Although most of the required dependencies are there, you’ll need to add the kotlinx.html library and the jcenter repository to build.gradle.kts.
Also, please temporarily exclude the Okta Spring Boot starter to see the application working:
...

repositories {
    mavenCentral()
    // add this repository for kotlinx.html library
    jcenter()
}

dependencies {
    implementation("org.springframework.boot:spring-boot-starter-web")
    implementation("com.fasterxml.jackson.module:jackson-module-kotlin")
    //  temporarily exclude the Okta Spring Boot starter
    //  implementation("com.okta.spring:okta-spring-boot-starter:1.4.0")
    implementation("org.jetbrains.kotlin:kotlin-reflect")
    implementation("org.jetbrains.kotlin:kotlin-stdlib-jdk8")
    // add kotlin html dsl
    implementation("org.jetbrains.kotlinx:kotlinx-html-jvm:0.7.1-1.4.0-rc")

    testImplementation("org.springframework.boot:spring-boot-starter-test") {
        exclude(group = "org.junit.vintage", module = "junit-vintage-engine")
    }
}
Re-import your Gradle configuration and run the project from your IDE, or from the command line using ./gradlew bootRun.
The application should start successfully, but a 404 page will be returned when accessing http://localhost:8080. This is expected behaviour if you didn’t define a handler for the root endpoint.
Prepare a Git Repository for Heroku
To enable Heroku deployments you need to create a new Git repository and commit your application skeleton generated by Spring Initializr. Open you favorite terminal, navigate to your project’s folder, then run the following commands:
git init && git checkout -b main
git add -A && git commit -a -m "Initial commit"
These commands will initialise a new Git repository with a default main branch and create the first commit.
Say Hello World with Spring Boot and Kotlin
One of the best things about the controlled magic of Spring Boot is that it makes complex things plain, and helps to write very concise and easy to read code, especially when teamed up with Kotlin.
Create a HelloController.kt class that returns “Hello, World”.
package com.okta.springboot.demo

import org.springframework.http.MediaType
import org.springframework.web.bind.annotation.GetMapping
import org.springframework.web.bind.annotation.RestController

@RestController
class HelloController {

    @GetMapping("/", produces = [MediaType.TEXT_HTML_VALUE])
    fun theAnswer(): String = "<h1>Hello, World</h1>"
}
A lot of things are happening under the hood. This controller has a @RestController annotation because instead of returning a name of view, you want to return a response body. In this example, it will be rendered as an HTML string.
Using @GetMapping annotation you declare a GET endpoint bound to /, and indicate that return mime type is text/html. Finally, the HTML string <h1>Hello, World</h1> is returned.
Re-start the application and open your browser to http://localhost:8080. You should see “Hello, World”.

Use Kotlin’s Statically-typed HTML Builder
Kotlin provides great syntactic sugar for creating statically-typed DSLs. HTML builder is one of the many practical applications and is implemented as kotlinx.html library. It allows you to create web pages with plain Kotlin code which resembles HTML.
Your web application contains only one page. The corresponding HTML-generating render function indexPage() has all the HTML boilerplate including basic HTML document layout, Bootstrap CSS inclusion, and styles. The indexPage() function produces a horizontally and vertically centered ‘hero’ block with content.
Start building your HTML page by adding the following code in a new views.kt file alongside the controller you just added:
import kotlinx.html.*
import kotlinx.html.stream.createHTML

fun indexPage() = createHTML().html {
    head {
        link("https://stackpath.bootstrapcdn.com/bootstrap/4.5.1/css/bootstrap.min.css", rel = "stylesheet")
    }
    body("h-100") {
        div("container lead text-center") {
            div("h-100 align-items-center") {
                style = "display: grid"
                div("jumbotron jumbotron-fluid") {
                    // meaningful content goes here
                    guestView()
                }
            }
        }
    }
}

private fun FlowContent.guestView() {
    h1 { +"Hello, Guest" }
}
The function producing meaningful content is FlowContent.guestView(). Note that it is an extension function because HTML DSL components are available only within FlowContent objects. You can read more about creating a DSL in Kotlin.
Update your controller’stheAnswer() method to call indexPage():
import indexPage
...

@RestController
class HelloController {

    @GetMapping("/", produces = [MediaType.TEXT_HTML_VALUE])
    fun theAnswer(): String = indexPage() // call your render function
}
After you restart your app and refresh your browser, you should see the output from your template:

Deploy Spring Boot to Heroku
I know that feeling, you can’t wait to put ‘The Thing’ out there on the Internet and share it with your friends. It’s a good time to start deploying as you’ve built a welcoming page.
Please ensure that you have Heroku CLI installed.
Log in to Heroku. You can skip this step if it was done previously:
heroku login
Then, create a new app with heroku apps:create:
heroku apps:create
You should see output like the following:
Creating ⬢ okta-springboot-heroku-demo... done
https://okta-springboot-heroku-demo.herokuapp.com/ | https://git.heroku.com/okta-springboot-heroku-demo.git
You’ll find Heroku automatically configures a remote origin called heroku. Running a git push will trigger the build and deploy process automatically. It’s as simple as that!
At the moment, the default JVM Heroku uses is 1.8. You’ll need to create a system.properties file in your application root to provide the desired version:
java.runtime.version=11
Then commit your changes:
git add . && git commit -m "Added system.properties with target jvm version"
Then, deploy to Heroku:
git push --set-upstream heroku main
Heroku will build from source once your code is pushed.
Enumerating objects: 4, done.
Counting objects: 100% (4/4), done.
Delta compression using up to 4 threads
Compressing objects: 100% (2/2), done.
Writing objects: 100% (3/3), 319 bytes | 319.00 KiB/s, done.
Total 3 (delta 1), reused 0 (delta 0)
remote: Compressing source files... done.
remote: Building source:
remote:
remote: -----> Gradle app detected
remote: -----> Spring Boot detected
remote: -----> Installing JDK 11... done
remote: -----> Building Gradle app...
remote: -----> executing ./gradlew build -x test
remote:        To honour the JVM settings for this build a new JVM will be forked. Please consider using the daemon: https://docs.gradle.org/6.4.1/userguide/gradle_daemon.html.
remote:        Daemon will be stopped at the end of the build stopping after processing
remote:        > Task :compileKotlin
remote:        > Task :compileJava NO-SOURCE
remote:        > Task :processResources
remote:        > Task :classes
remote:        > Task :bootJar
remote:        > Task :inspectClassesForKotlinIC
remote:        > Task :jar SKIPPED
remote:        > Task :assemble
remote:        > Task :check
remote:        > Task :build
remote:
remote:        BUILD SUCCESSFUL in 37s
remote:        4 actionable tasks: 4 executed
remote: -----> Discovering process types
remote:        Procfile declares types     -> (none)
remote:        Default types for buildpack -> web
remote:
remote: -----> Compressing...
remote:        Done: 77.8M
remote: -----> Launching...
remote:        Released v4
remote:        https://okta-springboot-heroku-demo.herokuapp.com/ deployed to Heroku
remote:
remote: Verifying deploy... done.
To https://git.heroku.com/okta-springboot-heroku-demo.git
  5780603..a1a1ae0  main -> main
Branch 'main' set up to track remote branch 'main' from 'heroku'.
Once your application is deployed, it can be easily accessed by running heroku open. This command opens a new web browser window and navigates to its URL.
Every time you want to deploy your web application, simply push your source code by running git push heroku main.
Protect Your Spring Boot Application
Many services have a “user’s area” - part of the website or content visible only to the members. In this application, the content of the index page depends on the user login state. Logged in users can see The Answer while guests are invited to sign in. This user registration and login bit might sound trivial but in fact, it causes a number of very serious questions not easy to find answers:
- Where do I store user’s personal data such as name, email, etc.? Is it another table, another database, another type of database, or as a microservice?
- Do I encrypt data, if so what algorithm should I use? Where do I keep encryption keys? Ask yourself if you understand cryptography enough to make the right decision.
- How do I hash passwords? Do I need salt and pepper to cook it right?
- What if I want to add more authentication providers, for instance, social networks? Shall I spend time writing those abstractions I might never use?
- How would I design access management and access token revocation? Does it sound like a very generic thing which must have been implemented by somebody?
- Do I have a good understanding of how to keep user’s PII (Personal Identifiable Information) in compliance with GDPR/CCPA/DPA/other regulations?
Those are just a few questions off the top of my head. I’m certain you’ve got a cool bar story about authentication to tell.
It’s easy to build authentication and authorisation but it’s hard to do it right.
You’ll be using Okta, a software-as-service identity access provider which has excellent integration with Spring Boot and Heroku. Combining Okta with Spring Security makes the sign-in/sign up process as easy as it could be. Yes, you’ll have a user sign up right out of the box. (See bonus section).
Enable the Okta Spring Boot Starter
Update your build.gradle.kts to include okta-spring-boot-starter artifact and don’t forget to re-import the Gradle model in your IDE.
dependencies {
    ...
    implementation("com.okta.spring:okta-spring-boot-starter:1.4.0")
    ...
}
Add the Okta Add-on to Your Heroku Application
Okta provides an official Okta Heroku Add-on which expedites the development process. You’ll create an Okta account linked to your Heroku app, and automatically configure Okta right from the command line.
Run heroku addons:create okta to begin. You should see output like the following:
➜ heroku addons:create okta
Creating Okta on ⬢ okta-springboot-heroku-demo... free
Provisioning Okta Org
okta-opaque-28728 is being created in the background. The app will restart when complete...
Use heroku addons:info okta-opaque-28728 to check creation progress.
Use heroku addons:docs okta to view documentation.
This add-on creates a user and configured Okta application for you. The configuration settings will be specified for your service via environment variables. You can lookup these settings with heroku config.
This command will return all the environment variables for your app on Heroku.
=== okta-springboot-heroku-demo Config Vars
OKTA_ADMIN_EMAIL:              dcc8cf18-198b-4395-81b7-f96a6adc9463@heroku.okta.com
OKTA_ADMIN_PASSWORD:           A$8278eb57-6af7-4ef4-2713-b0d6ba3ff36d
OKTA_CLIENT_ORGURL:            https://dev-995757.okta.com
OKTA_CLIENT_TOKEN:             <okta api token>
OKTA_OAUTH2_CLIENT_ID_SPA:     0aap37r2m33P2eEPbbx6
OKTA_OAUTH2_CLIENT_ID_WEB:     0aap529m06mVIIidR4x6
OKTA_OAUTH2_CLIENT_SECRET_WEB: <okta oauth2 client secret>
OKTA_OAUTH2_ISSUER:            https://dev-995757.okta.com/oauth2/default
If you see an empty output you need to wait a minute or two while the setup process is completed.
Note that OKTA_ADMIN_EMAIL and OKTA_ADMIN_PASSWORD are actual credentials you can use to log in to your application.
Provide Environment Variables for Okta Spring Boot
For OpenID Connect (OIDC) authentication and OAuth 2.0 authorization, only three variables are important to you: OKTA_OAUTH2_ISSUER, OKTA_OAUTH2_CLIENT_ID_WEB, and OKTA_OAUTH2_CLIENT_SECRET_WEB.
You’ll need to update application.properties file to provide them for Okta’s Spring Boot starter:
okta.oauth2.issuer=${OKTA_OAUTH2_ISSUER}
okta.oauth2.clientId=${OKTA_OAUTH2_CLIENT_ID_WEB}
okta.oauth2.clientSecret=${OKTA_OAUTH2_CLIENT_SECRET_WEB}
Although the idea of hardcoding secrets into the properties file might look very tempting, especially for a pet project, you should never do that! It’s good hygiene practice to never store secrets in your source control.
Configure IntelliJ IDEA to Run Your Spring Boot App
You probably want to play with the application locally as well, but at the moment it expects environment variables to be set. IntelliJ IDEA allows providing a custom configuration.
In Run Actions(Ctrl-Shift-A) dialogue search for Edit Configurations or use your mouse to edit the current run configuration in dropdown.
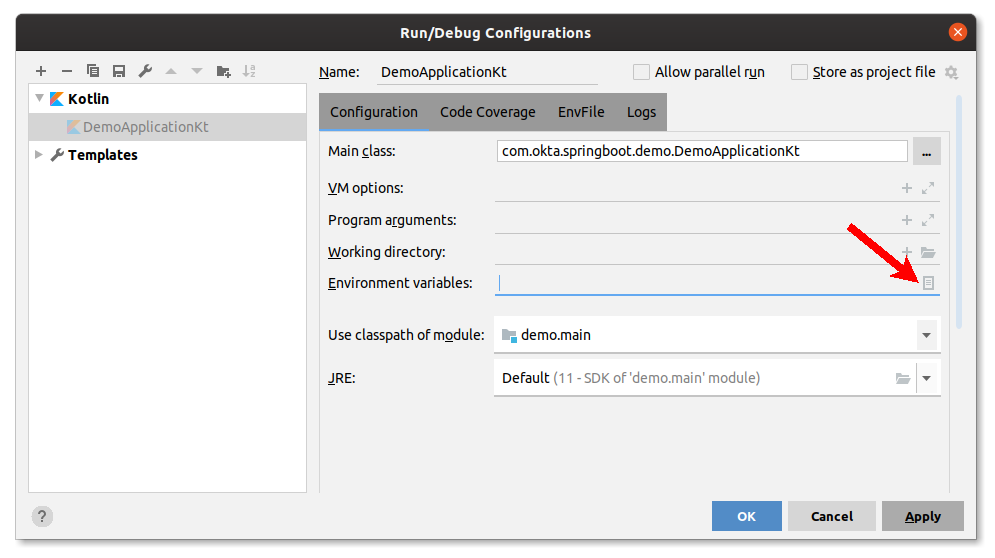
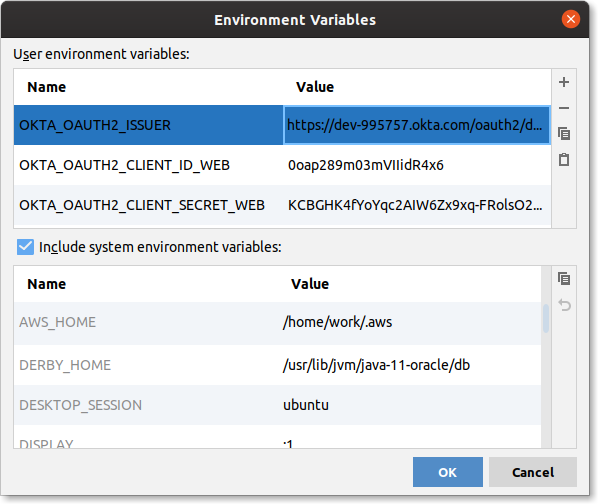
Provide the OKTA_OAUTH2_ISSUER, OKTA_OAUTH2_CLIENT_ID_WEB, OKTA_OAUTH2_CLIENT_SECRET_WEB keys and values from the heroku config output:
Configure Spring Security
One last step to make the application secure is to configure Spring Security. Create a WebSecurityConfig class in the same package as your other classes and fill it with the code below.
package com.okta.springboot.demo

import org.springframework.context.annotation.Configuration
import org.springframework.security.config.annotation.web.builders.HttpSecurity
import org.springframework.security.config.annotation.web.configuration.EnableWebSecurity
import org.springframework.security.config.annotation.web.configuration.WebSecurityConfigurerAdapter

@Configuration
@EnableWebSecurity
class WebSecurityConfig : WebSecurityConfigurerAdapter() {
    override fun configure(http: HttpSecurity): Unit = with(http) {
        authorizeRequests().run {
            antMatchers("/").permitAll()
            anyRequest().authenticated()
        }
        oauth2Login().run {
            defaultSuccessUrl("/")
        }
        logout().run {
            logoutSuccessUrl("/")
        }
    }
}
This configuration allows anyone to access / but always authenticates each request; allowing logged in users and guests to access the same URL. In the event of successful login or logout, users will be redirected to the index page /.
Redirect Users to the Okta Login Page
Spring Security automatically registers an endpoint for Okta at /oauth2/authorization/okta. This allows you to redirect the user to the right location to start the OIDC authentication process.
To enable login flow for the user add a link to your guestView() in views.kt:
private fun FlowContent.guestView() {
    h1 { +"Hello, Guest" }
    a(href = "/oauth2/authorization/okta") {
        +"Login to get The Answer"
    }
}
Handle an Authenticated User
Upon successful login, you can extract information provided by the authentication service. Spring Boot can inject it straight in to your controller’s handler:
import org.springframework.security.core.annotation.AuthenticationPrincipal
import org.springframework.security.oauth2.core.oidc.user.OidcUser
...

@RestController
class HelloController {

    @GetMapping("/", produces = [MediaType.TEXT_HTML_VALUE])
    fun theAnswer(@AuthenticationPrincipal user: OidcUser?): String = indexPage(user)
}
OidcUser contains a variety of fields you might find useful, among them are: name, email, claims, etc.
When OidcUser? is null user is not authorized, it effectively makes them a guest.
Update the indexPage() method in views.kt to match the code below. Now when a user is logged in, they’ll see a warm welcome message:
import kotlinx.html.*
import kotlinx.html.stream.createHTML
import org.springframework.security.oauth2.core.oidc.user.OidcUser

fun indexPage(user: OidcUser?) = createHTML().html {
    head {
        link("https://stackpath.bootstrapcdn.com/bootstrap/4.5.1/css/bootstrap.min.css", rel = "stylesheet")
    }
    body("h-100") {
        div("container lead text-center") {
            div("h-100 align-items-center") {
                style = "display: grid"
                div("jumbotron jumbotron-fluid") {
                    // choose the right view depending on login status
                    if (user == null) guestView()
                    else enlightenedUserView(user)
                }
            }
        }
    }
}

private fun FlowContent.enlightenedUserView(user: OidcUser) {
    h1 { +"Hello, ${user.fullName}" }
    p {
        +"The answer you were looking for is"
        h1("badge-dark display-1") {
            +"42"
        }
    }
    hr { }
    p("text-right text-muted small") {
        +"Your email ${user.email} is ${"not".takeIf { !user.emailVerified }.orEmpty()} verified"
    }
}

private fun FlowContent.guestView() {
    h1 { +"Hello, Guest" }
    a(href = "/oauth2/authorization/okta") {
        +"Login to get The Answer"
    }
}
Run your application via IntelliJ and you should be able to complete the sign-in process:
(Bonus) Enable Self-Registration
Okta can also take care of the registration process, which can be easily enabled in the settings. Head on over to your Heroku dashboard and choose your project. Find the Installed add-ons section and click on okta to open your Okta dashboard.
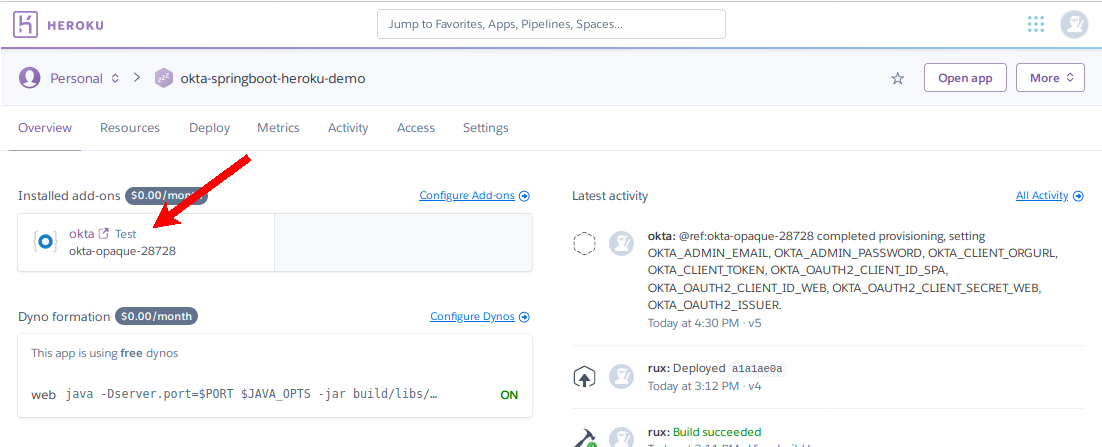
Navigate to Directory > Self-Service Registration and click Enable Registration. A registration configuration form allows some level of flexibility. For example, you can require new users to provide their first and last name.
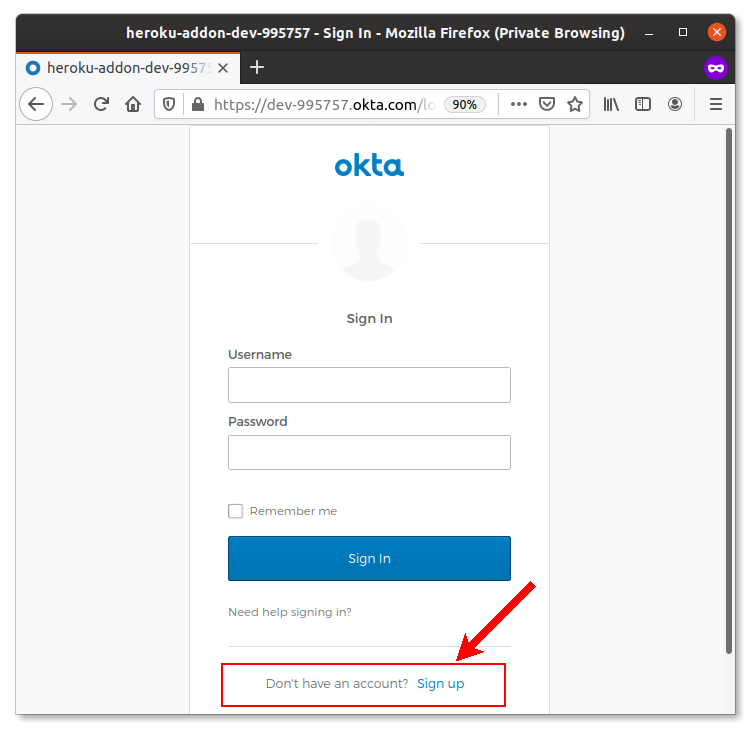
After you save the configuration, open a new incognito browser window and try to log in. This time, the Okta login form will have a link for user registration:
You can push all your changes to Heroku after committing them.
git add .
git commit -m "Add Okta for Auth"
git push heroku main
Learn More about Spring Boot and Heroku
In this tutorial, you learnt how to quickly bootstrap secured web applications for your ‘pet project’ ideas using Spring Boot with Spring Security, Kotlin, and Okta. You deployed a web application to the Heroku cloud using Heroku CLI and Git command-line tools. It’s always a good idea to use existing frameworks and tools instead of focusing on repetitive tasks such as deployment, authentication, and authorization.
The source code for this tutorial and the examples in it are available on GitHub in the oktadeveloper/okta-spring-boot-heroku-example repository.
If you liked this post, you might like these others too:
- What the Heck is OAuth?
- Guide to OAuth 2.0 with Spring Security
- OpenID Connect Logout Options with Spring Boot
- Angular + Docker with a Big Hug from Spring Boot
- Hashing and salting and why it’s crucial
If you have any questions about this post, please add a comment below. For more awesome content, follow @oktadev on Twitter, like us on Facebook, or subscribe to our YouTube channel.
Okta Developer Blog Comment Policy
We welcome relevant and respectful comments. Off-topic comments may be removed.