One Identity Across Salesforce.com and Mulesoft

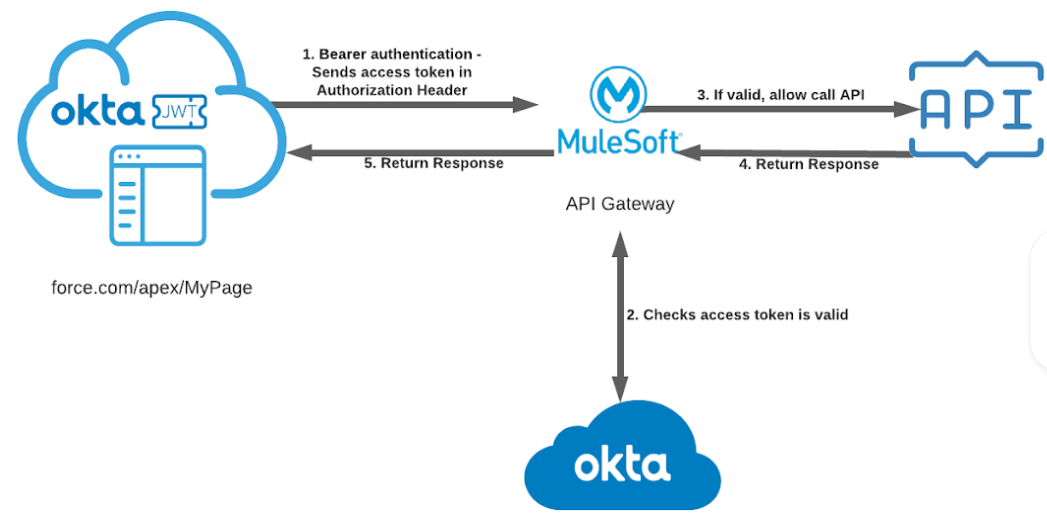
Today, I’m going to show you how to plug Okta into a Force.com application (along with Mulesoft’s API gateway) using the OpenID Connect protocol (aka ‘OIDC’).
By the end of this tutorial, your Force.com application will have user authentication backed by Okta and will be able to securely call your backend APIs through Mulesoft’s API gateway. Sound good? Let’s get to it!
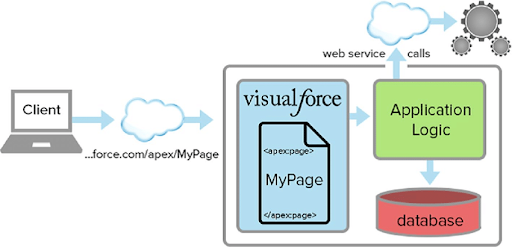
What’s Force.com?
Force.com is Salesforce’s Platform-as-a-Service (aka ‘PaaS’) which allows you to develop and build custom applications.
In this tutorial, you’ll be using the Visualforce framework to build your front end and the APEX development framework to build your back end.
What’s an API Gateway?
An API gateway is a firewall that sits between your API and your users. They range from the simplest proxies which apply throttling and white/blacklisting to fully configurable platforms with fine-grained access mapping individual permissions to specific HTTP verbs and endpoints. Realistically, using an API gateway is not necessary, but it makes some things faster, easier, and more reliable, which allows you to focus on your API.
~Keith Casey, API Problem Solver
In this tutorial, you’ll be using the MuleSoft API Gateway to protect your API and will use an access token to securely call this API through Salesforce application.
Set Up Your Okta Developer Instance
To continue, you’ll need a free Okta account. Head on over to developer.okta.com and create an Okta account if you haven’t already.
For this example, I’ll be using my own Okta tenant, https://phdemo.oktapreview.com.
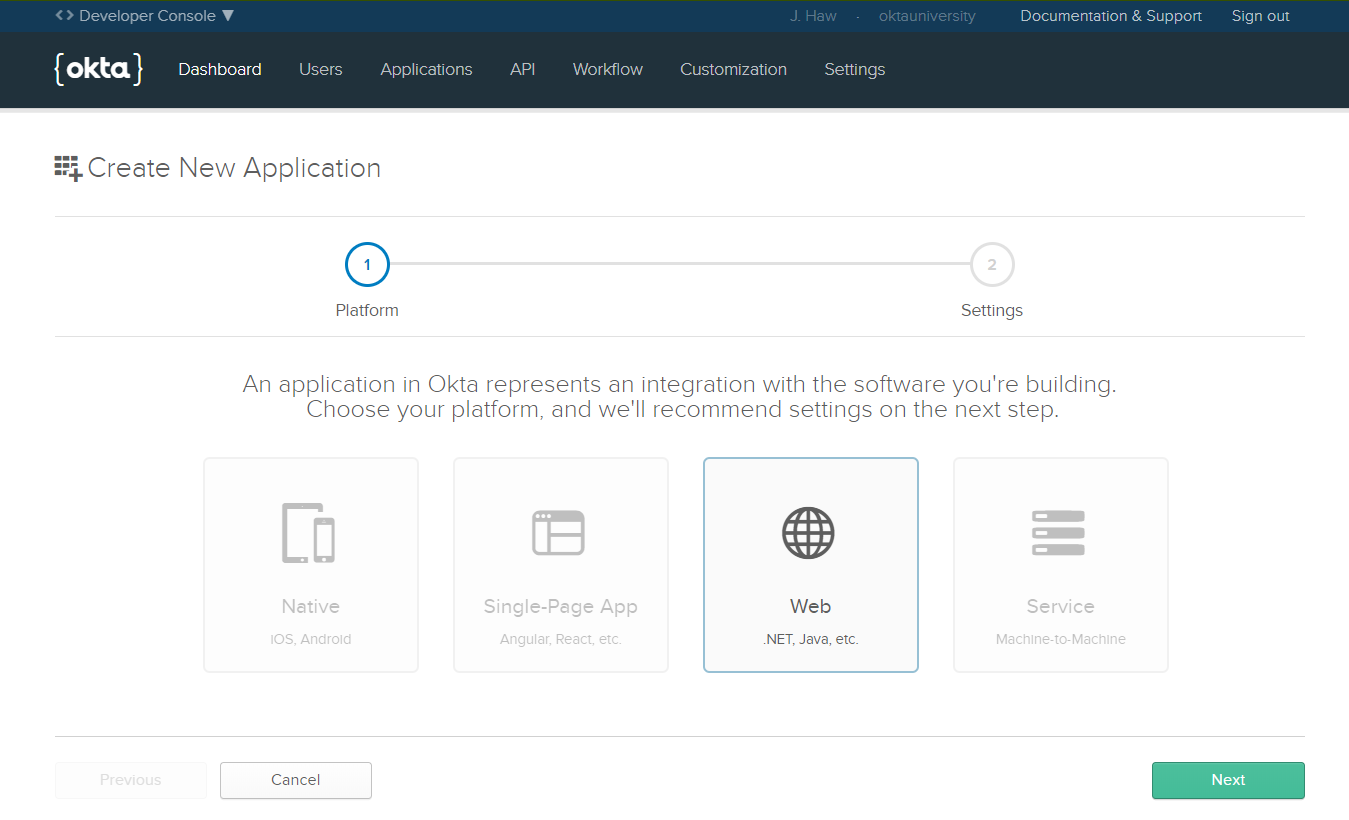
Once you’ve got an acount, log into the dashboard and click Applications -> Add Application. Select Web and click Next.
This will create an OIDC application that represent your Salesforce application. Change Name to “Salesforce Custom Application” and, within the Grant Type allowed section, make sure you have Authorization Code and Implicit (Hybrid) checked. As for the others fields, leave them alone for now.
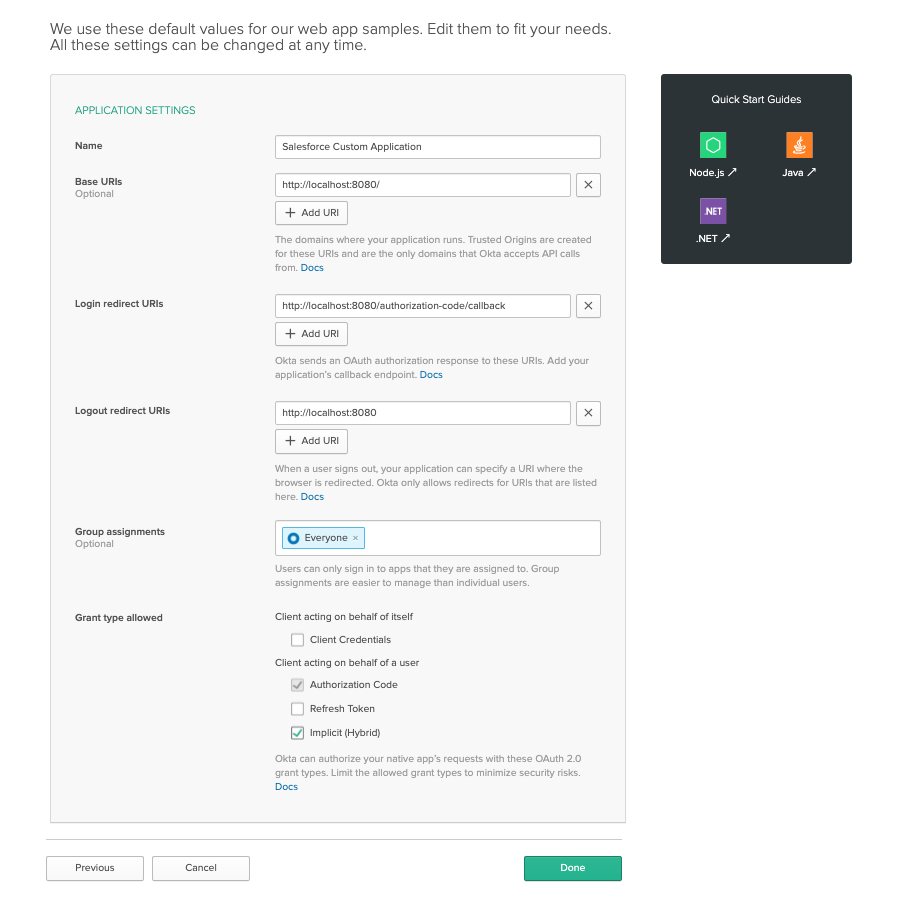
Click Done.
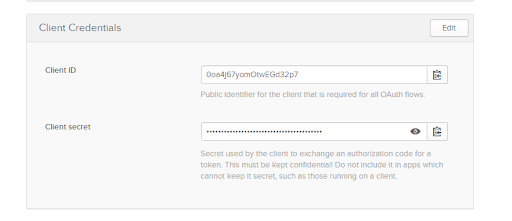
Take note of the Client ID and Secret as you will use these values shortly.
Set Up a Salesforce Developer Instance
You can sign up for a free Saleforce developer edition instance through this link.
Once you have signed up and successfully created your instance, you should be able to navigate to your Salesforce admin console. This will usually look something like: https://ap5.salesforce.com/lightning/setup/SetupOneHome/home.
Configure a Custom Domain for Your Salesforce Instance
From your Salesforce dashboard, navigate to Setup -> Settings > Company Settings -> My Domain.
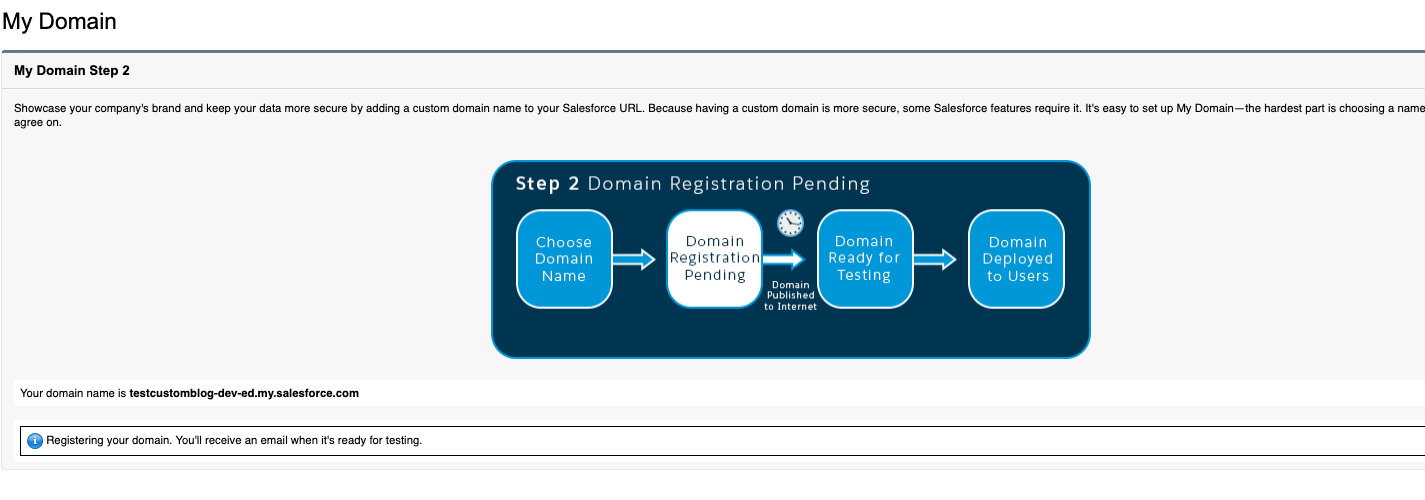
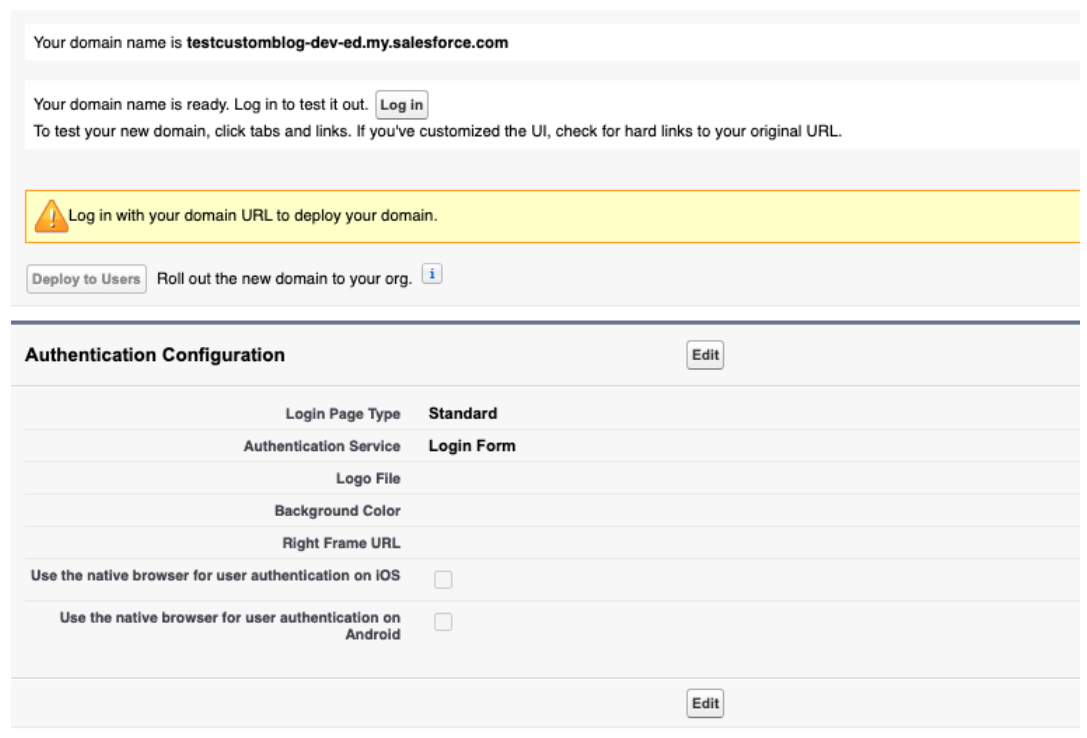
Enter the custom domain you wish to use and click Check Availability. If the domain you’ve chosen is still available, you should get a green check saying the domain is available. Then click Register Domain. You should see the message below:
Once the custom domain configuration has been successfully applied, navigate back to the main screen and you should see some updates on the displayed page:
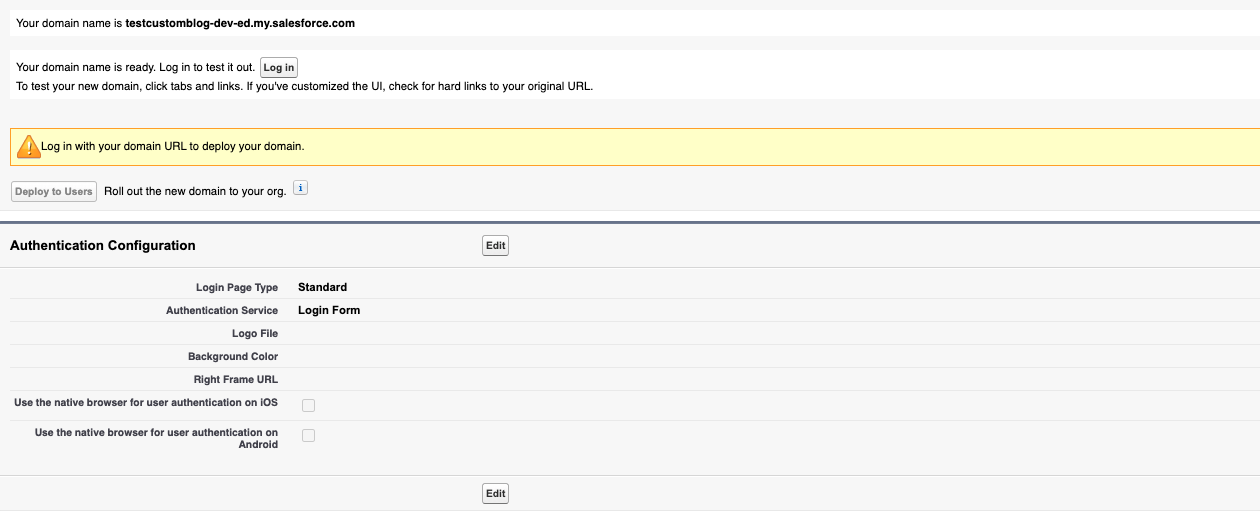
Make sure you click the Login button so you can test your access to the custom domain once available. Click Deploy to Users to leverage the custom domain for all your users in Salesforce.
We will revisit this page later to allow users to log into Salesforce using OIDC. We’ll do this later.
Integrate Okta as an OIDC Provider Within Salesforce
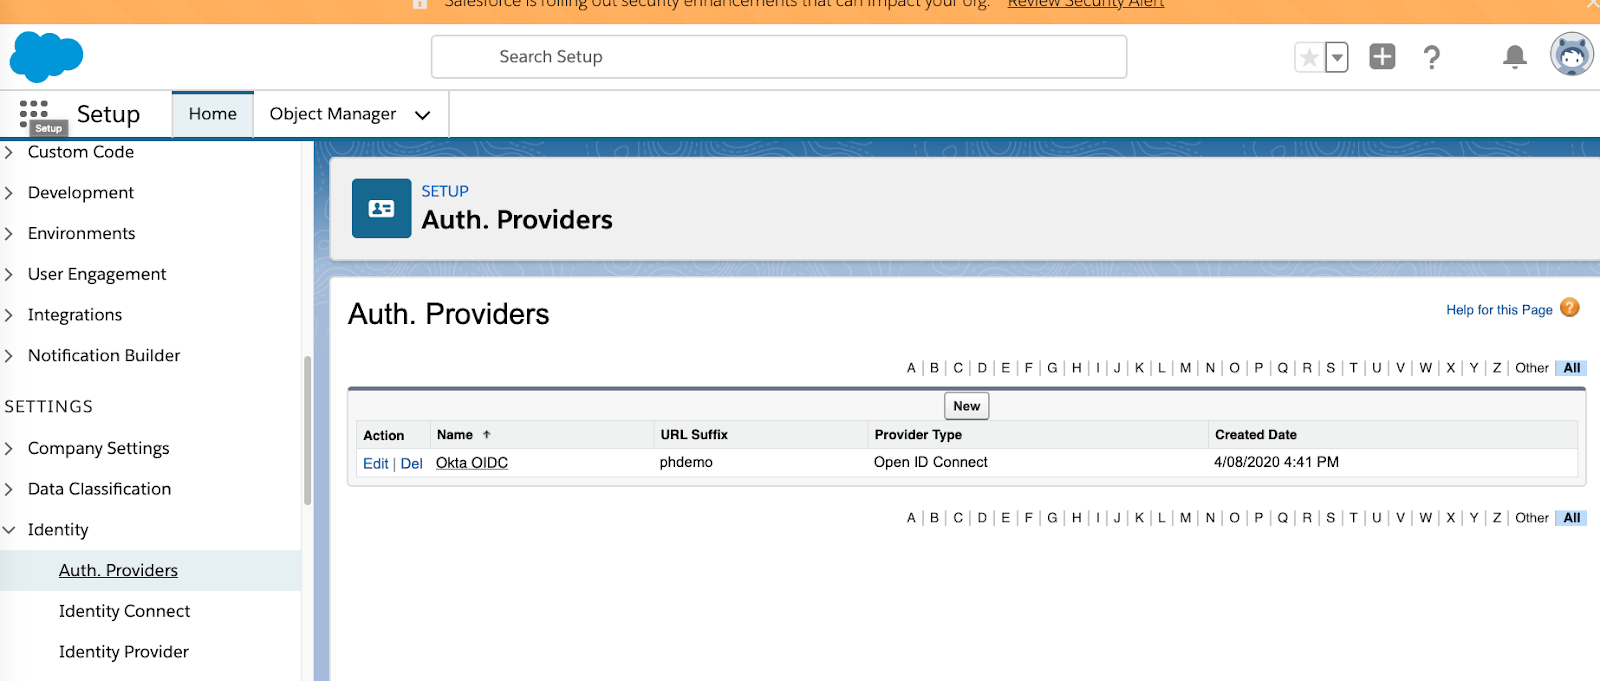
To configure Okta as an OIDC provider within Salesforce, click Setup -> Settings -> Identity -> Auth Providers from the Salesforce “Setup Admin” console.
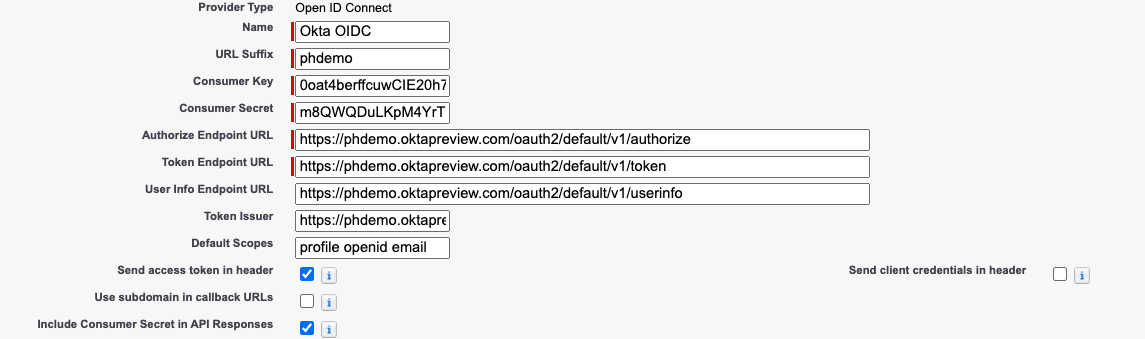
Click New and select Open ID Connect as the Provider Type. Then fill in the fields with the red marker.
- Name can be any name you wish
- Set URL suffix to your Okta subdomain name. In my environment, this will be
phdemo. - Set Consumer Key to the Client ID of the application you created earlier
- Set Consumer Secret to the Client Secret of the application you created earlier
For the following endpoints, we’ll be using the default authorization server that is enabled for every Okta instance.
You should be able to get your OAuth server settings from the .well-known endpoint. This URL is of the format https://<yourdomain>.okta.com/oauth2/default/.well-known/oauth-authorization-server (e.g., https://phdemo.oktapreview.com/oauth2/default/.well-known/oauth-authorization-server).
- Set the Authorize Endpoint URL to
https://<your domain>.okta.com/oauth2/default/v1/authorize(e.g.,https://phdemo.oktapreview.com/oauth2/default/v1/authorize) - Set the Token Endpoint URL to
https://<your domain>.okta.com/oauth2/default/v1/token(e.g.,https://phdemo.oktapreview.com/oauth2/default/v1/token) - Set the User Info Endpoint URL to
https://<your domain>.okta.com/oauth2/default/v1/userinfo(e.g.,https://phdemo.oktapreview.com/oauth2/default/v1/userinfo) - Set the Token Issuer Endpoint URL to
https://<your domain>.okta.com/oauth2/default(e.g.,https://phdemo.oktapreview.com/oauth2/default) - Set the Default Scopes to
profile openid email
Once completed, it should look like this:
Next, you need to set a registration handler as part of the process. Luckily, Salesforce allows us to click a link that will automatically create the registration handler. Click it.

Once clicked, you should have something like this:

Make sure you set the field Execute Registration As to your account:

Once done with the above, click Save and you should end up with this:

Notice after saving the OIDC configuration that Salesforce has generated URLs below the OIDC config. You need to copy these values for the following fields:
- Set the Test-Only Initialization URL - e.g.,
https://oktaoidc-dev-ed.my.salesforce.com/services/auth/test/phdemo - Set the OAuth-Only Initialization URL - e.g.,
https://oktaoidc-dev-ed.my.salesforce.com/services/auth/oauth/phdemo - Set the Callback URL - e.g.,
https://login.salesforce.com/services/authcallback/00D2v000002F7VWEA0/phdemo
Modify the Okta OIDC Application Redirect URI
Go back to the application instance you created in the Okta dashboard and update the Login redirect URIs with the values provided above.
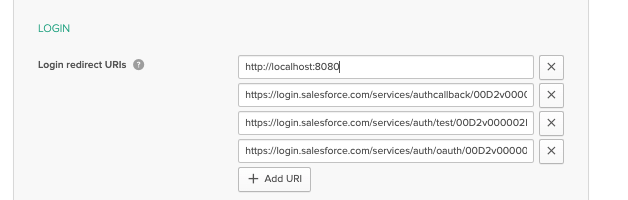
Once done, click Save to make sure your changes reflect in the OIDC application within Okta.
Enable Login via Okta Within Salesforce
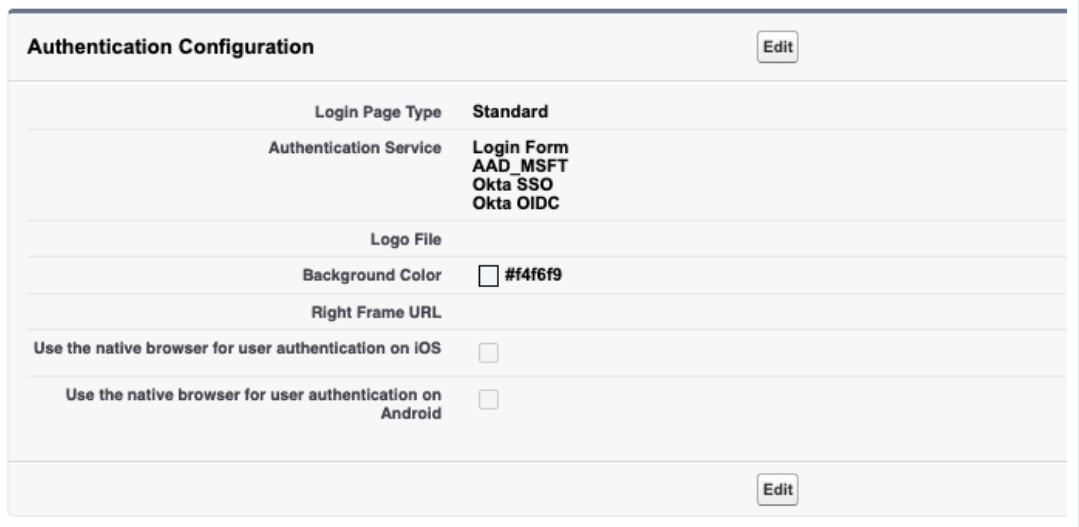
Navigate back to Setup -> Settings -> Company Settings -> My Domain.
Click the Edit button under Authentication Configuration. You should be able to see the OIDC configuration as a checkbox option under Authentication Service. Check this so users can log in to Salesforce using Okta via OIDC.
Click Save once you are done. It should look like this:
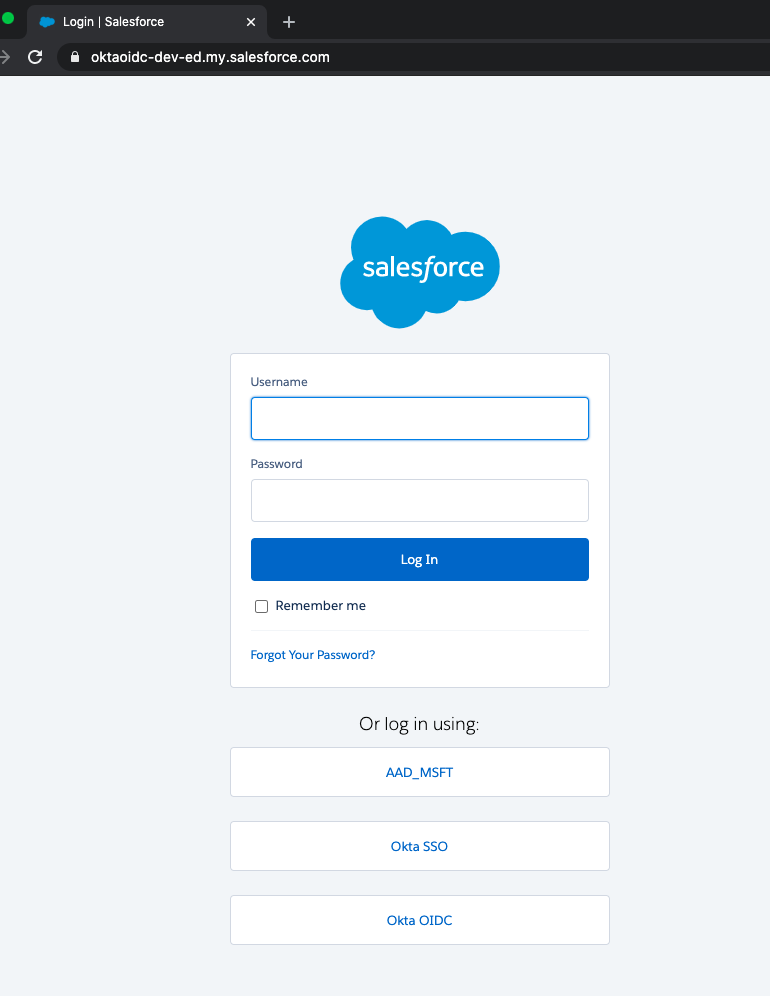
You should be able to see additional buttons as a way to login once you navigate to your custom salesforce domain URL. I’m using oktaoidc-dev-ed.my.salesforce.com.
Set Up Your Mulesoft Gateway
You should be able to sign up for a free 30 day trial of Mulesoft through this link. Once you’ve signed up, you should be able to log into the Mulesoft Anypoint Platform.
Deploy a Sample API in Mulesoft
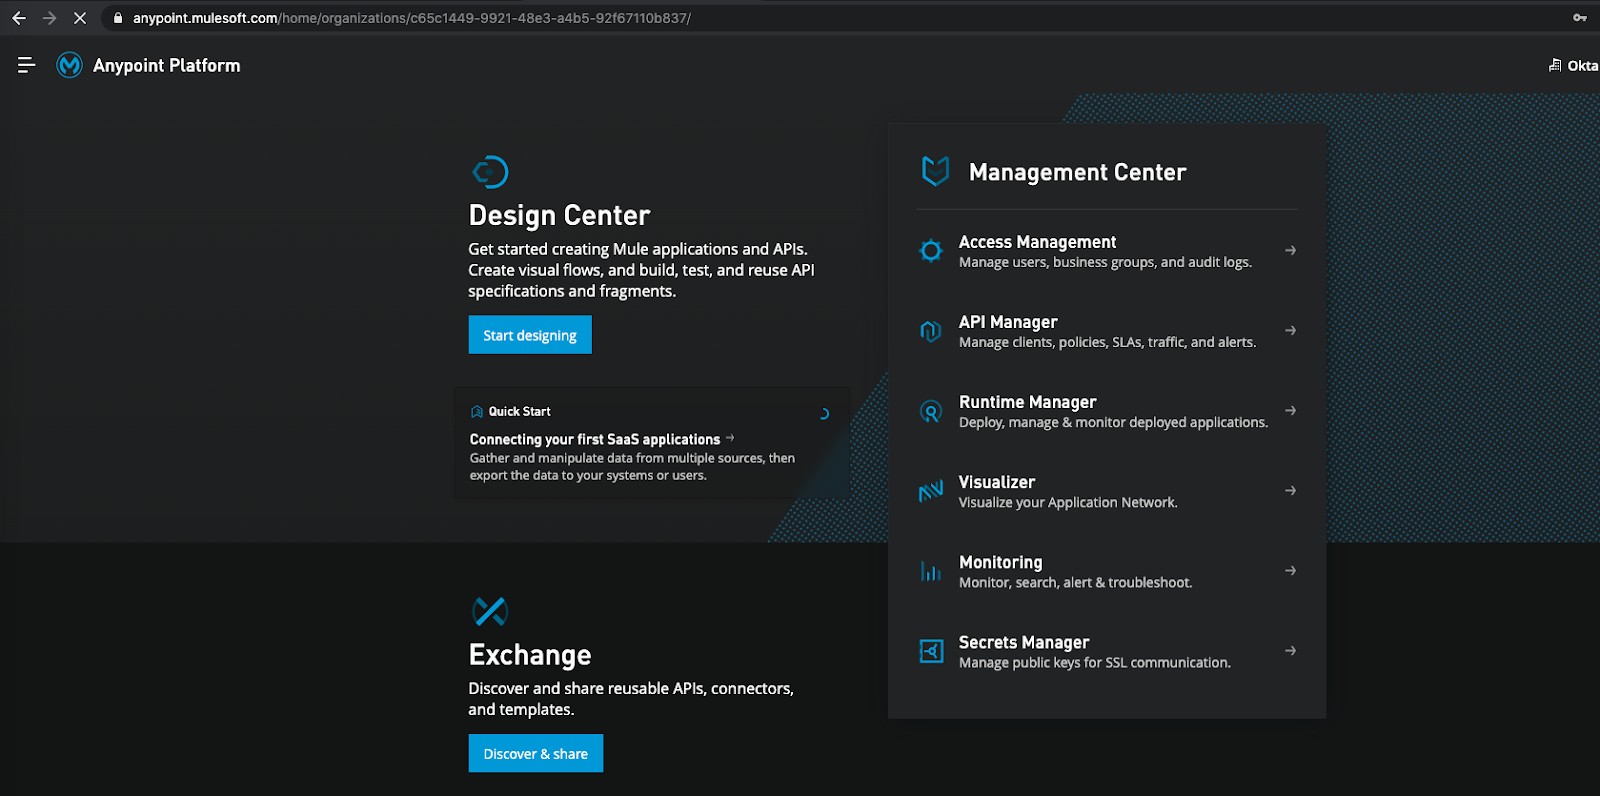
Once you are logged into Mulesoft, navigate to the Design Center from the sidebar navigation.
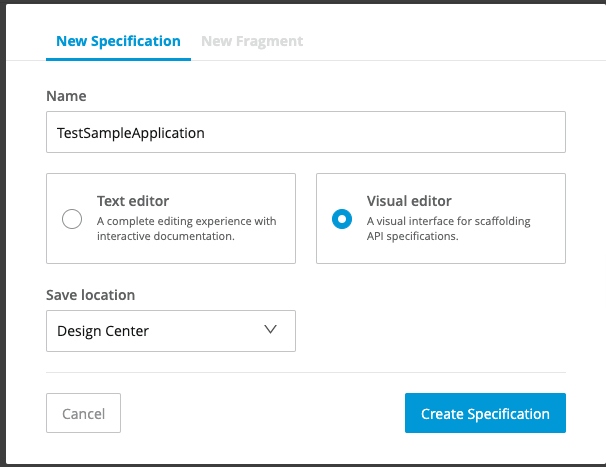
- Click Create new
- Click Create API specification
- Provide any name you wish to use
- Select the Visual Editor radio button
- Click Create specification
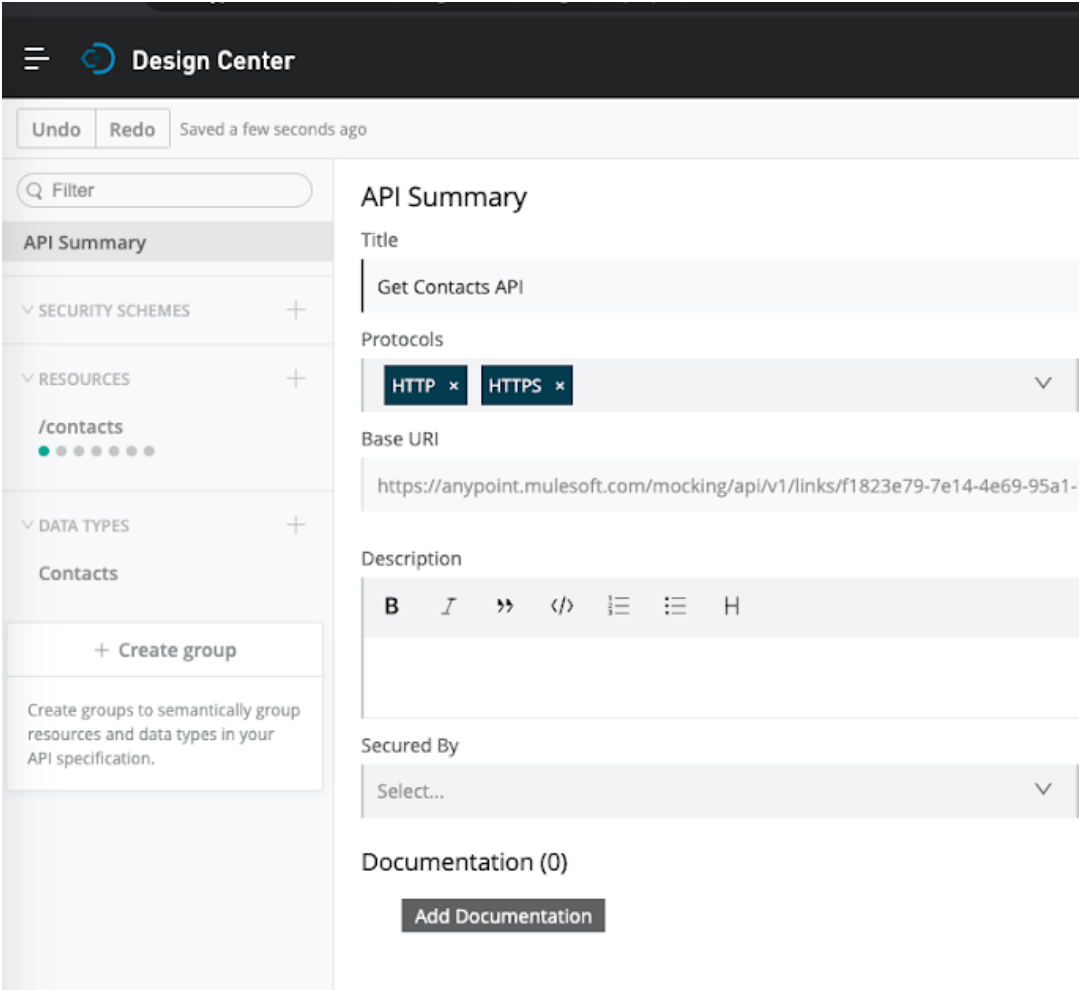
You should be taken to a new page within the Design Center. Click Import Example then check the Contact API Tutorial option. Now, click the Import Asset button.
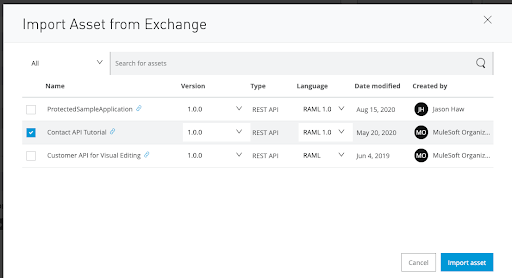
Then click Import & Replace. On the left-side of the page, there is one resource already available and this resource is called /contacts.
Click Publish -> Publish to Exchange. Provide a version number and click Publish to Exchange.
Set Up Mulesoft as OAuth as a Service Application in Okta
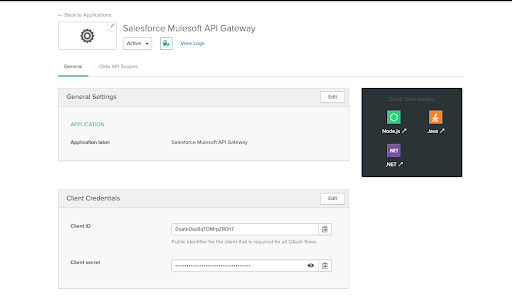
Return back to your Okta dashboard. Click Applications -> Add Application. Select Service and click Next.
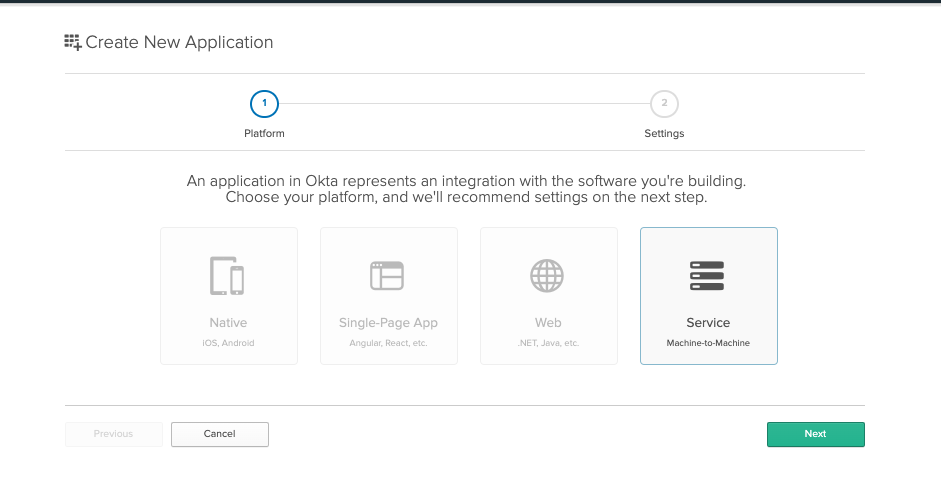
Provide a name then click Done.
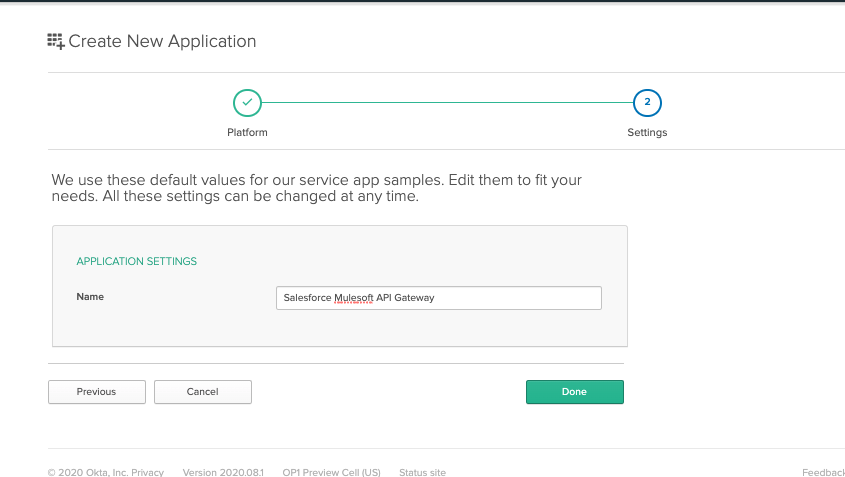
Take note of the Client ID and Client secret here as you will use this later on in the step below.
Integrate Okta as an OIDC Client Provider in Mulesoft
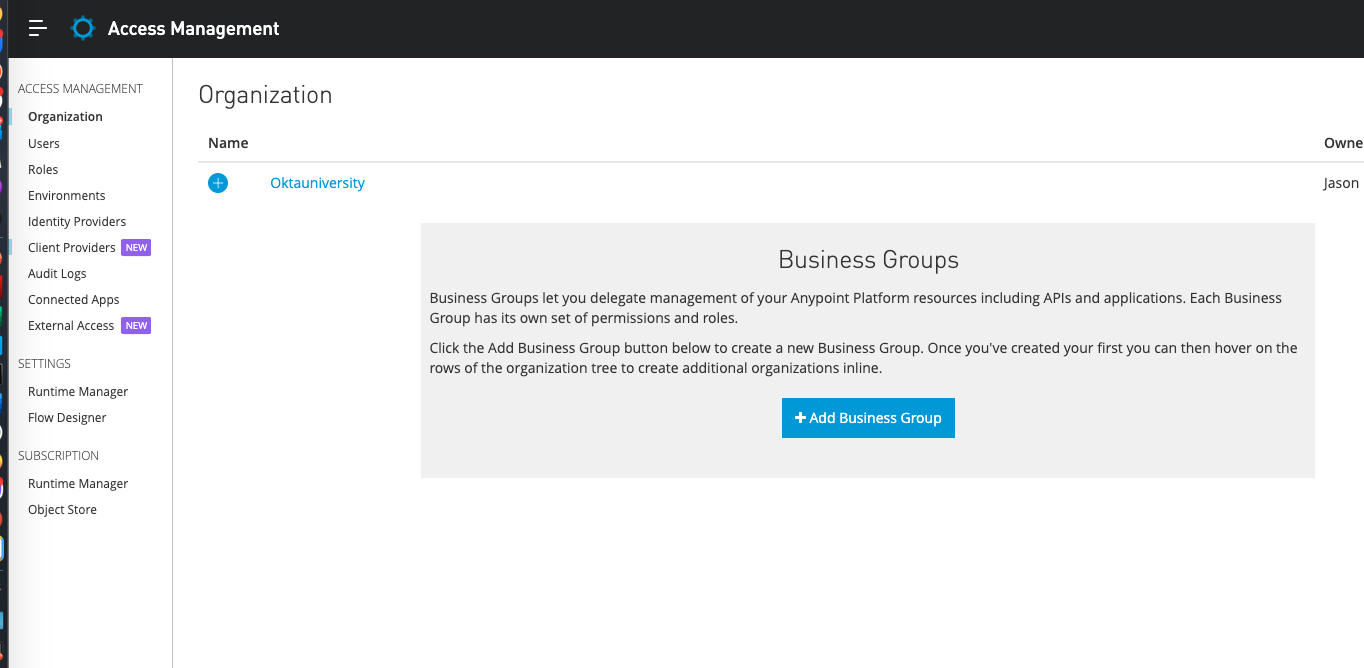
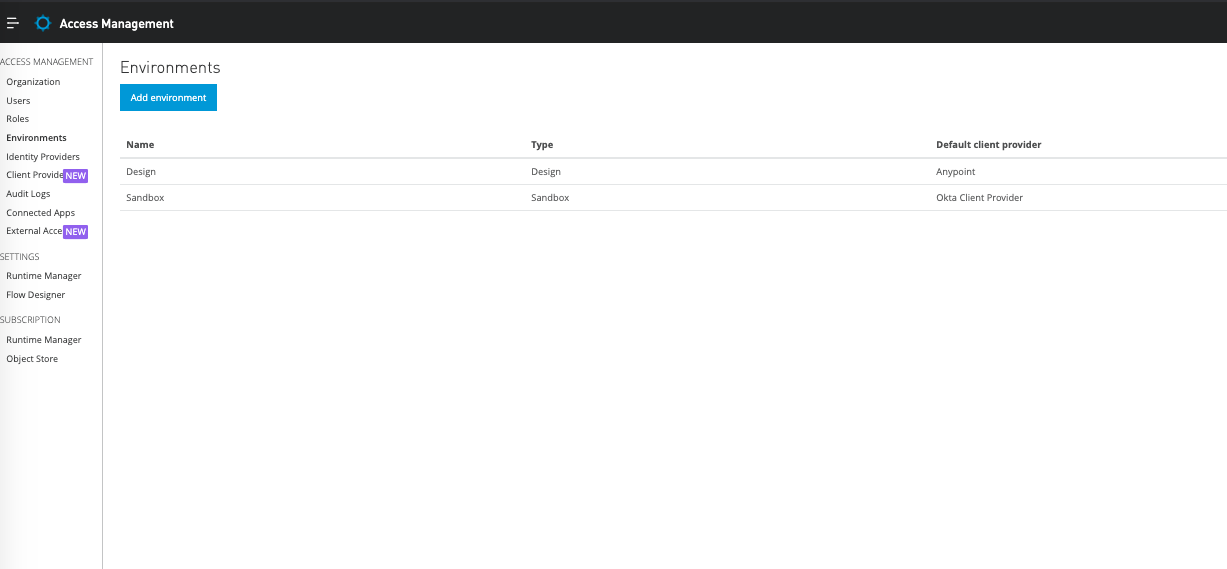
Return to the home page of the Anypoint Platform and navigate to Management Center -> Access Management.
Navigate to Access Management -> Client Providers.
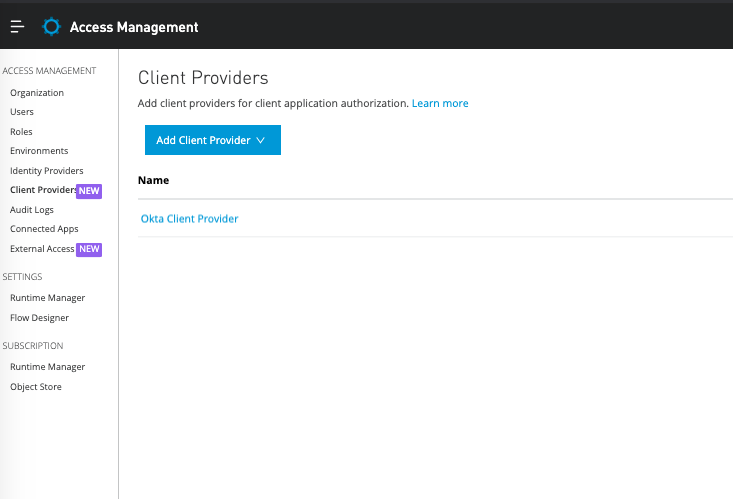
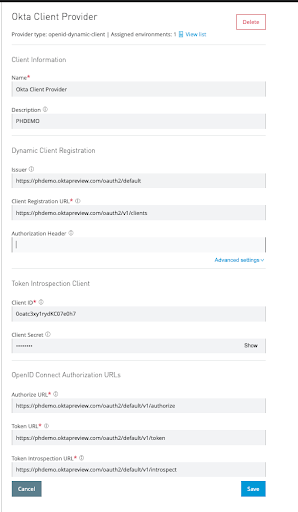
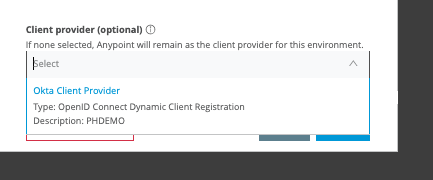
Click Add Client Provider -> Open ID Connect Dynamic Client Registration and provide the following:
- Name: Any name you wish
- Description: Any description you wish
- Under Dynamic Client Registration:
- The Issuer should be:
https://<your domain>.okta.com/oauth2/default(e.g.,https://phdemo.oktapreview.com/oauth2/default) - The Client Registration URL should be:
https://<your domain>.okta.com/oauth2/v1/clients(e.g.,https://phdemo.oktapreview.com/oauth2/v1/clients) - Leave the Authorization Header blank
- The Issuer should be:
- Under Token Introspection Client:
- Client ID: The client ID generated from the last step
- Client Secret: The client secret generated from the last step.
- Under OpenID Connect Authorization URLs:
- The Authorize URL should be:
https://<your domain>.okta.com/oauth2/default/v1/authorize(e.g.,https://phdemo.oktapreview.com/oauth2/default/v1/authorize) - The Token URL should be:
https://<your domain>.okta.com/oauth2/default/v1/token(e.g.,https://phdemo.oktapreview.com/oauth2/default/v1/token) - The Token Introspection URL should be:
https://<your domain>.okta.com/oauth2/default/v1/introspect(e.g.,https://phdemo.oktapreview.com/oauth2/default/v1/introspect)
- The Authorize URL should be:
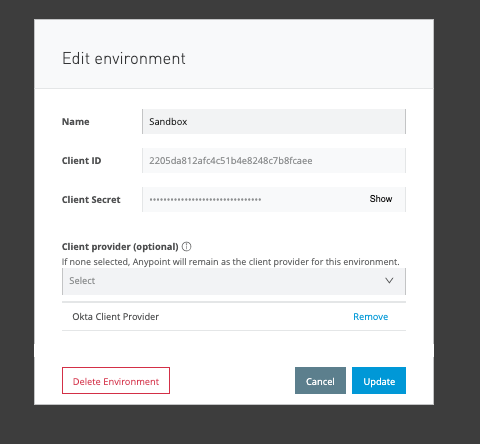
Next, click Save then navigate to Access Management -> Environments.
Click Sandbox and make sure you add the client-provider you created earlier within the environment.
Click Update.
Set Up a Proxy and Apply a Security Policy in Mulesoft
Return to the Anypoint Platform home page and navigate to Management Center -> API Manager. Then click Manage API > Manage API from Exchange.
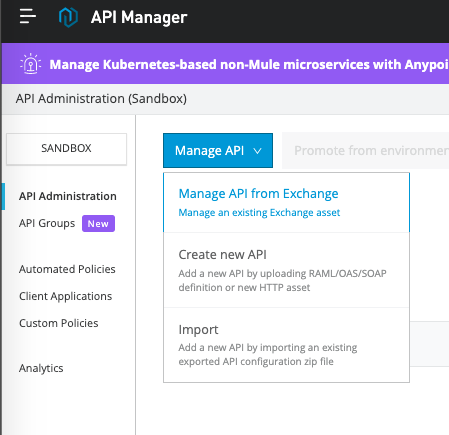
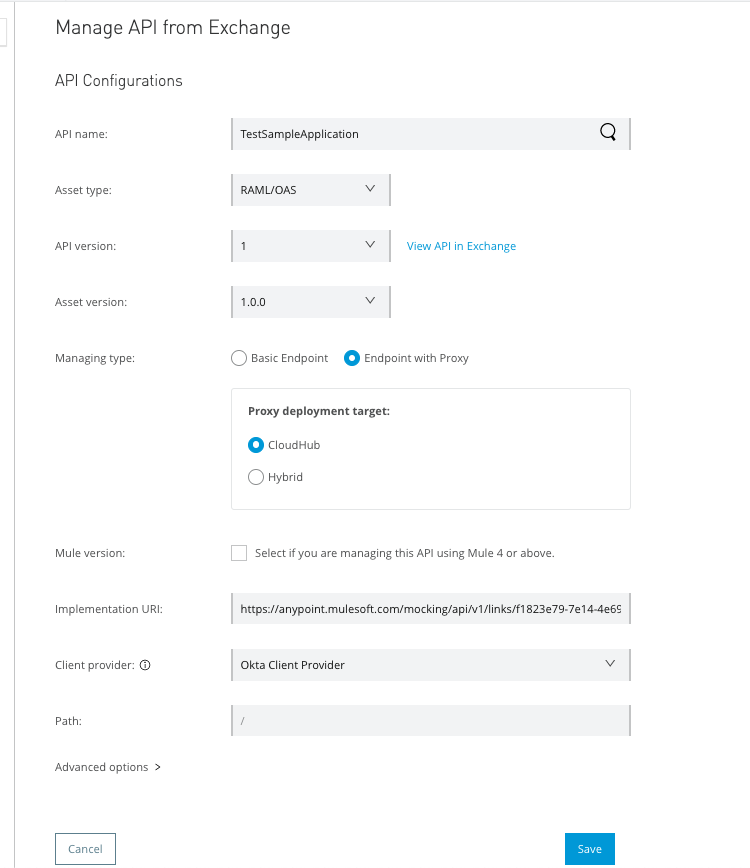
Search for the Mulesoft API you created earlier.
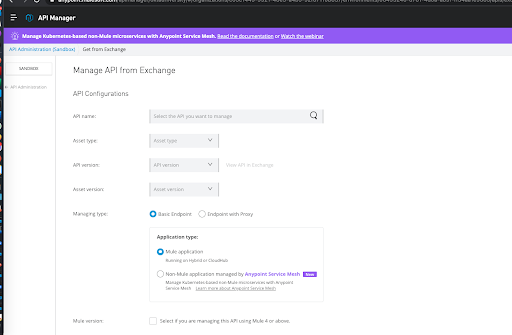
Within the Managing type, check the Endpoint with the Proxy radio button.

Select CloudHub as the default option and click Save.
You’ll be redirected to a new page. Under Deployment Configuration, set the Runtime version to 3.9.x and provide any name you wish to use for your proxy.
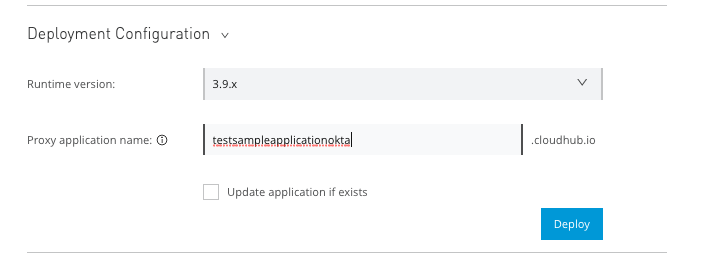
Take note of the Proxy Application URL as you will use that shortly.
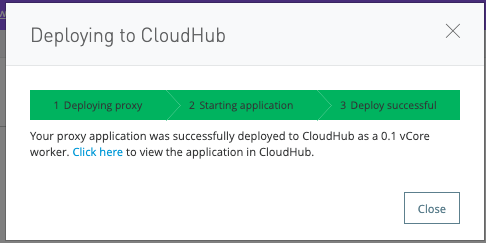
Once the deployment is successful, you should see this screen:
On the left-hand side, click Policies.
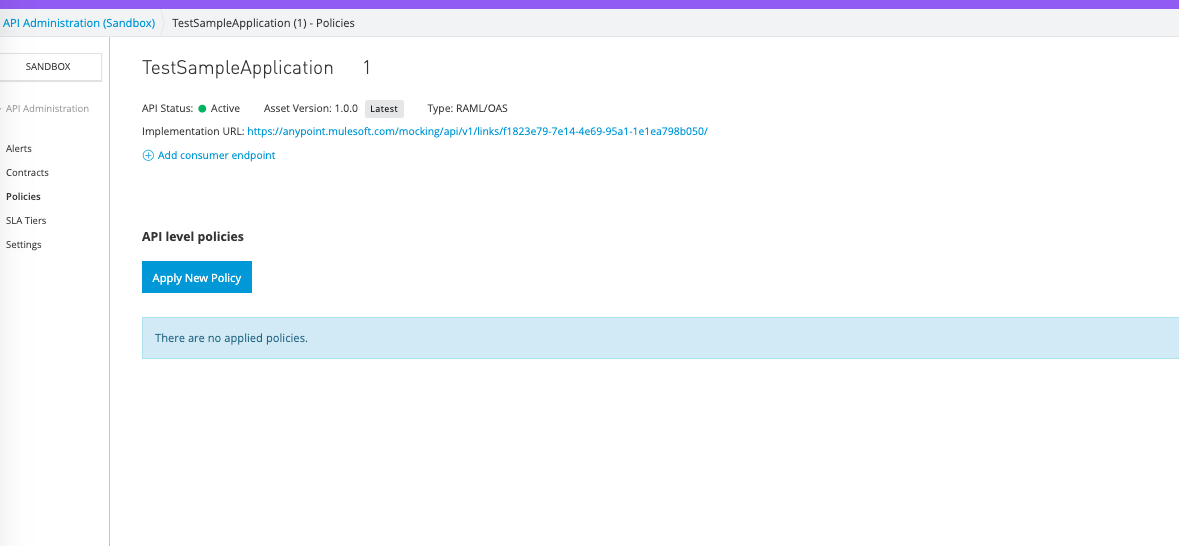
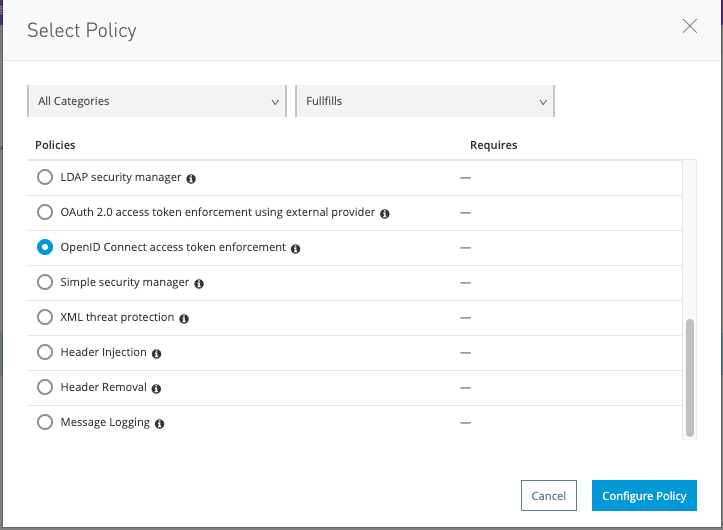
Click Apply New Policy. Search for Open ID Connect access token enforcement and tick the box.
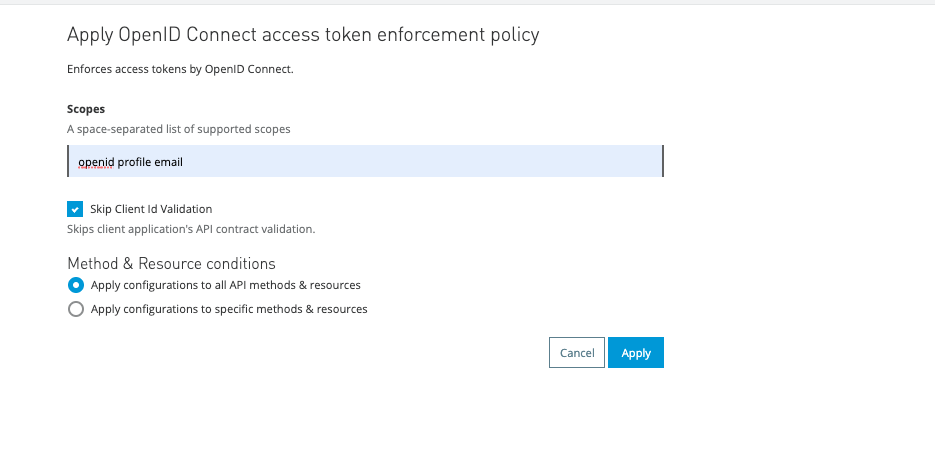
Click Configure Policy.
Enter openID profile email as scopes and select Skip Client ID validation. Click Apply.
You should now see a new record within the API level policies.
You have completed the configuration setup with Mulesoft. In the next step, you will integrate the Mulesoft protected API with Salesforce.
Get the Auth Provider ID from Salesforce
As per Salesforce documentation, you need to provide an 18-character identifier to get the access token from your 3rd party identity provider,
If you noticed, in the earlier steps where we created an auth provider in Salesforce, the ID only had 15-characters, meaning it is missing three.
To get the 18-character full value, you can go through the steps below.
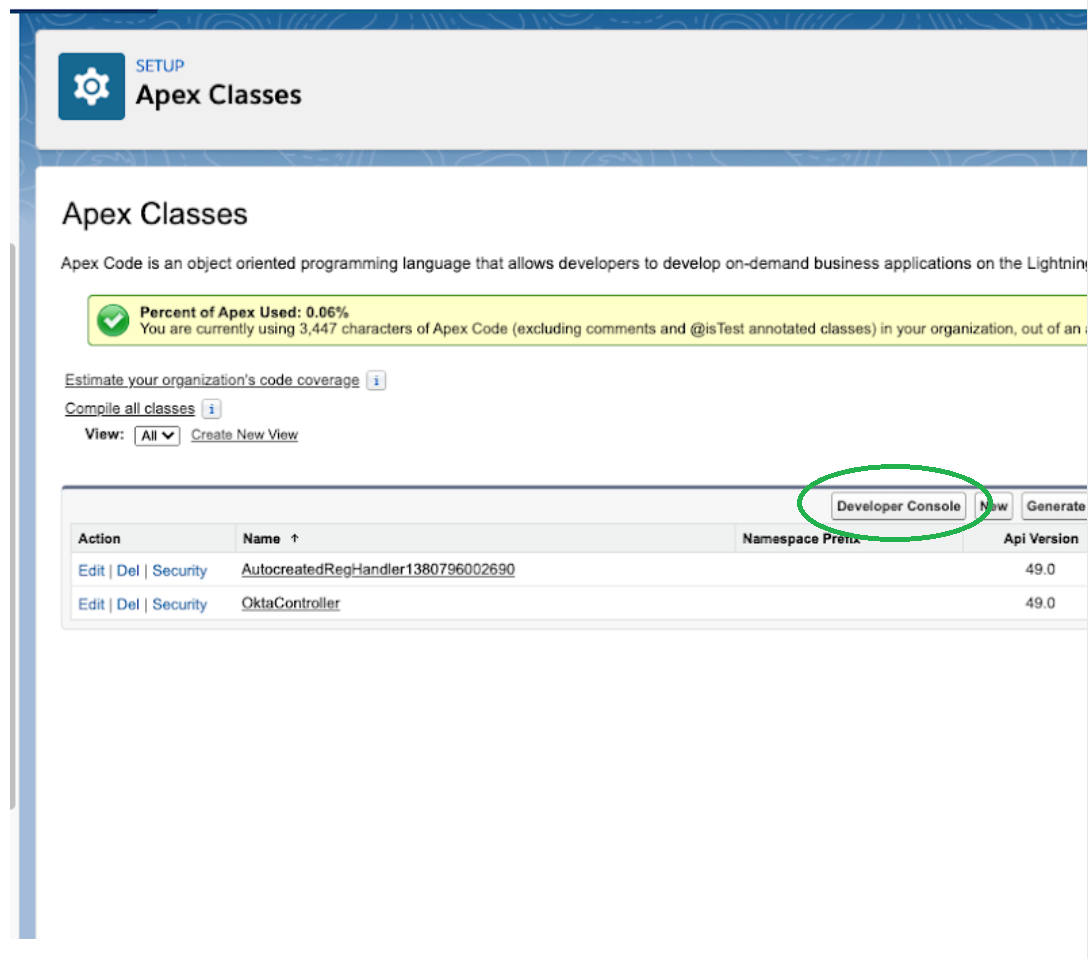
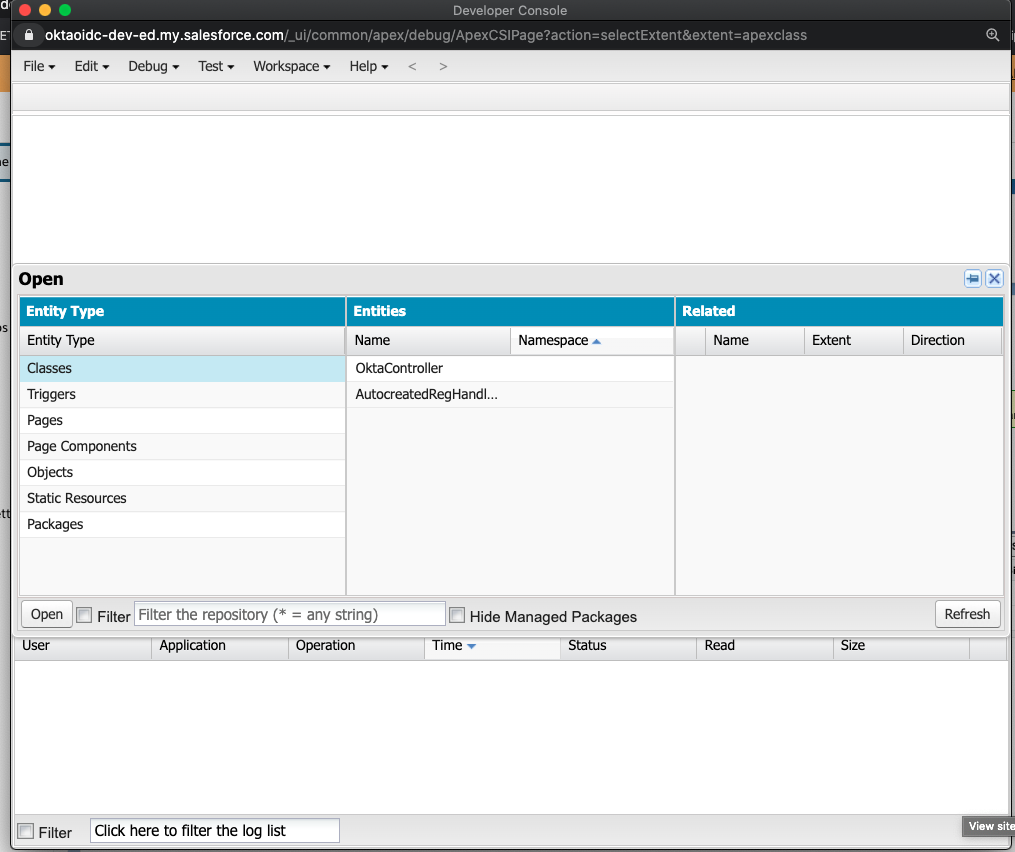
Navigate to Setup -> Platform Tools -> Custom Code -> Apex Classes then select the Developer Console.
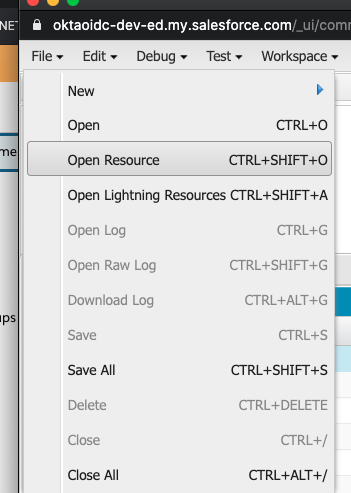
Navigate to File -> Open Resource.
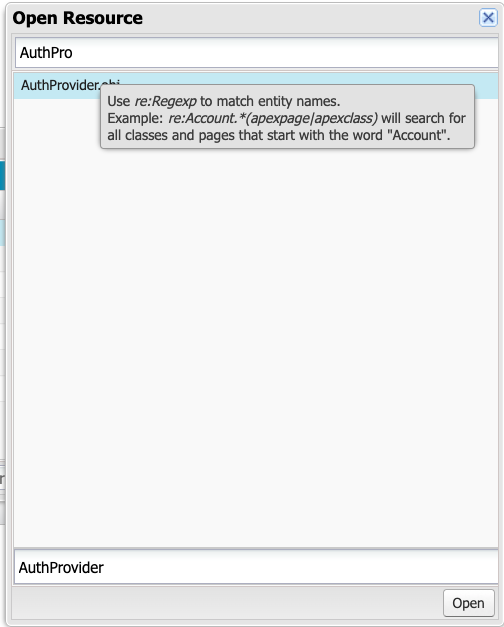
Search for AuthProvider.obj then click Open.
Select Id and click Query twice.
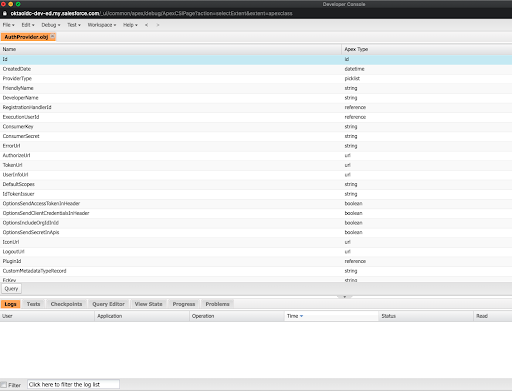
You should now see a new text area. Click Execute. You should now see query results.
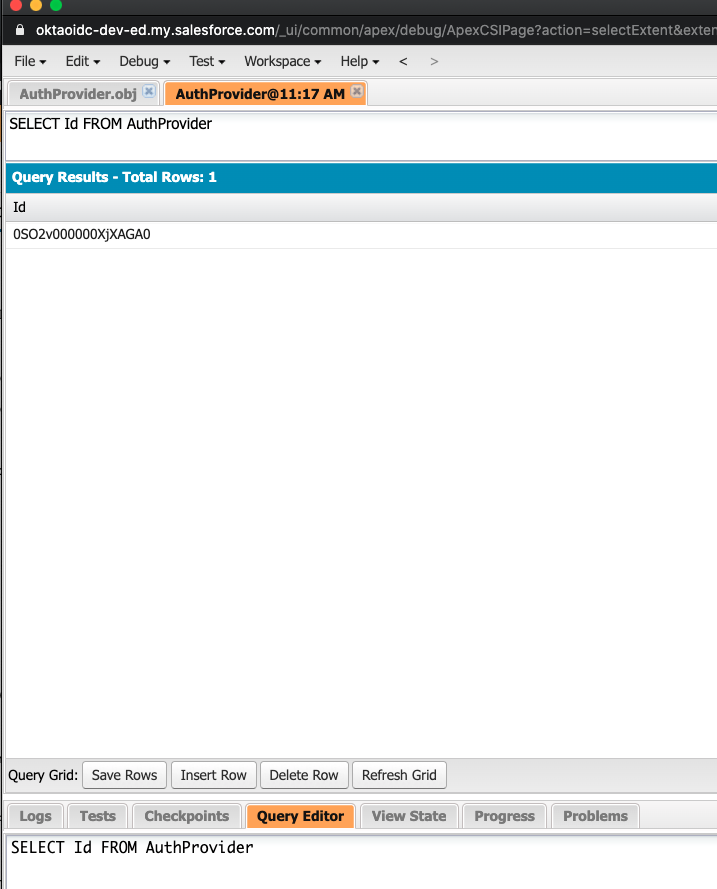
Take note of the Auth Provider ID value, as you will use this later on within the code snippet of the Auto-created Registration Handler.
Modify Logic for the Auto-Generated Registration Handler in Salesforce
Now, return to Salesforce. Remember the Autogenerated Registration Handler which was created earlier? You’ll need to modify it so it can do the following:
- Show the access token obtained from Okta
- Call the Okta userinfo API endpoint to show all the user details using the access token
- Add the access token in the Authorization header of an HTTP request such that Mulesoft API Gateway can verify if the user is allowed to call the API protected by Mulesoft
Navigate to Setup -> Platform Tools -> Custom Code -> Apex Classes.
You should be able to see the auto-created registration handler earlier. Click the Edit link. You should be able to access an in-line code editor. Overwrite the existing code with the following code inside your class:
public String accessToken;
public String callOut { get; set; }
public String sub { get; set; }
public String name { get; set; }
public String email { get; set; }
public String firstName { get; set; }
public String lastName { get; set; }
public String userName { get; set; }

public String getAccessToken() {
    HttpRequest req = new HttpRequest();
    Http http = new Http();
    String url = ' https://<yourOktaDomain>/oauth2/default/v1/userinfo'; //change this to your Okta developer instance userinfo url

    req.setEndpoint(url);
    req.setMethod('GET');
    req.setHeader('Accept', 'application/json');
    req.setHeader('Authorization', 'Bearer '+ Auth.AuthToken.getAccessToken('0SO2v000000XjXAGA0', 'Open ID Connect'));//change the first parameter to the Auth. Provider ID obtained earlier.
    HTTPResponse resp = http.send(req);

    if(resp.getBody() != null) {
        Map<String, String> values = (Map<String, String>)JSON.deserialize(resp.getBody(), Map<String, String>.class);
        sub = values.get('sub');
        name = values.get('name');
        email = values.get('email');
        userName = values.get('preferred_username');
        firstName = values.get('given_name');
        lastname = values.get('family_name');
    }

    return Auth.AuthToken.getAccessToken('0SO2v000000XjXAGA0', 'Open ID Connect'); //change the first parameter to the Auth. Provider ID obtained earlier.
}

public PageReference fetch_data() {
    HttpRequest req = new HttpRequest();
    Http http = new Http();
    String url = ' http://protectedmulesoftapi.us-e2.cloudhub.io/contacts'; //change this to your Mulesoft API proxy endpoint you've created earlier

    req.setEndpoint(url);
    req.setMethod('GET');
    req.setHeader('Accept', 'application/json');
    req.setHeader('Authorization', 'Bearer '+ Auth.AuthToken.getAccessToken('0SO2v000000XjXAGA0', 'Open ID Connect')); //change the first parameter to the Auth. Provider ID obtained earlier.

    HTTPResponse resp = http.send(req);
    system.debug('INSIDE CALLOUT:'+resp.getBody());

    if (resp.getBody() != null) {
        Map<String, String> values = (Map<String, String>)JSON.deserialize(resp.getBody(), Map<String, String>.class);
        String append ='';
        append = values.get('FirstName') + ':' + values.get('LastName') + ':' + values.get('Email') + ':' + values.get('Company');
        callOut = append;
    }

    return null;
}

global boolean canCreateUser(Auth.UserData data) {
    //TODO: Check whether we want to allow the creation of a user with this data
    return true;
}

global User createUser(Id portalId, Auth.UserData data) {
    if (!canCreateUser(data)) {
        //Returning null or throwing an exception fails the SSO flow
        return null;
    }

    //The user is authorized, so create their Salesforce user
    User u = new User();
    Profile p = [SELECT Id FROM profile WHERE name='Standard Platform User'];

    //TODO: Customize the username. Also, check that the username doesn't already exist and
    //possibly ensure there are enough org licenses to create a user. Must be 80 characters
    //or less.
    u.username = data.username;
    u.email = data.email;
    u.lastName = data.lastName;
    u.firstName = data.firstName;

    String alias = data.username;
    //Alias must be 8 characters or less
    if (alias.length() > 8) {
        alias = alias.substring(0, 8);
    }

    u.alias = alias;
    u.languagelocalekey = 'en_US';
    u.localesidkey = 'en_US';
    u.emailEncodingKey = 'UTF-8';
    u.timeZoneSidKey = 'America/Los_Angeles';
    u.profileId = p.Id;
    insert u;

    return u;
}

global void updateUser(Id userId, Id portalId, Auth.UserData data) {
    User u = new User(id=userId);
    u.email = data.email;
    u.lastName = data.lastName;
    u.firstName = data.firstName;
}
Click Save.
Navigate back to the Apex Class home page.
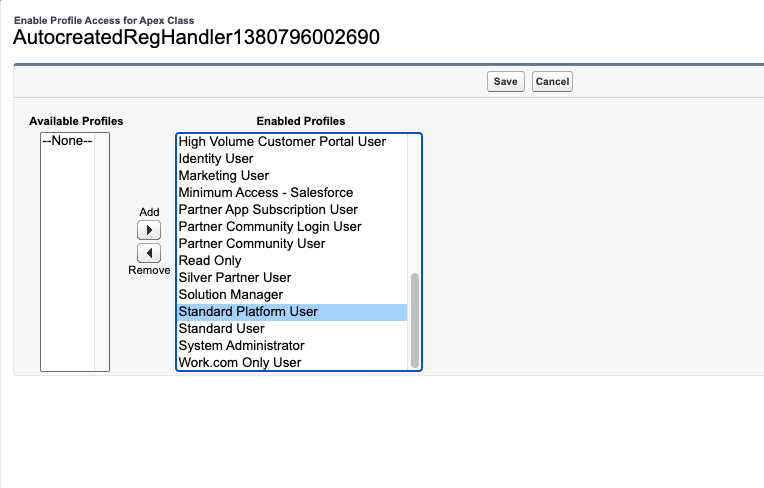
Click Security on the AutocreatedRegHandler.
Make sure you add Standard Platform User as an enabled Profile. Click Save.
Configure Trust Over the Remote URL Called Within Salesforce
Navigate to Setup -> Settings -> Security -> Remote Site Settings. Then click New Remote Site.
Add your Okta URL (e.g.: https://{yourDomainHere}.okta.com) and click Save & New.
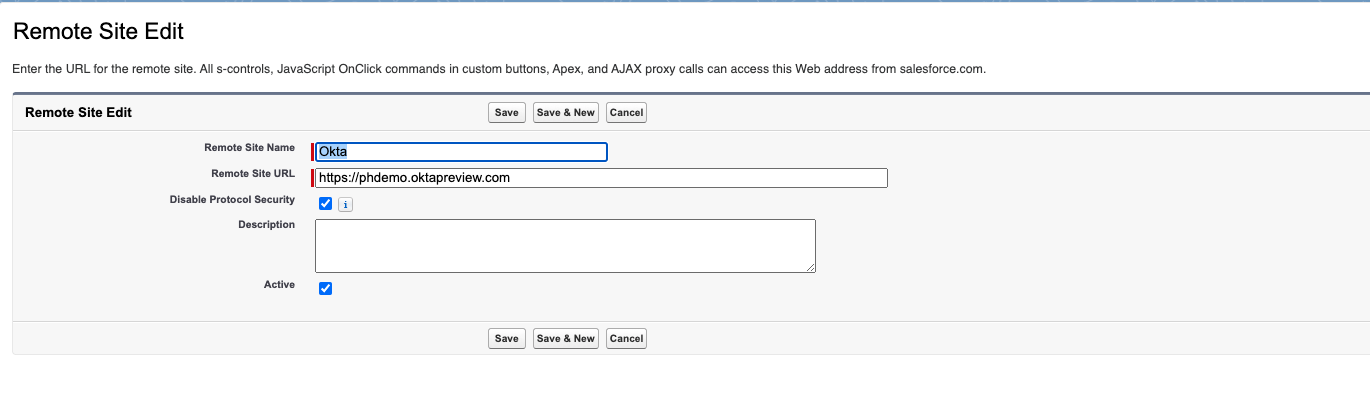
Add your Salesforce Mulesoft Proxy Endpoint URL (e.g., https://domain.cloudhub.io).
Click Save. You have now successfully added your Okta domain and Mulesoft Proxy Endpoint URL as trusted remote URLs.
Create a Visualforce Page to Tie Everything Together
Within Salesforce, navigate to Platform Tools -> Custom Code -> Visualforce Pages.
Click New. Provide a Label, Name, and Description.
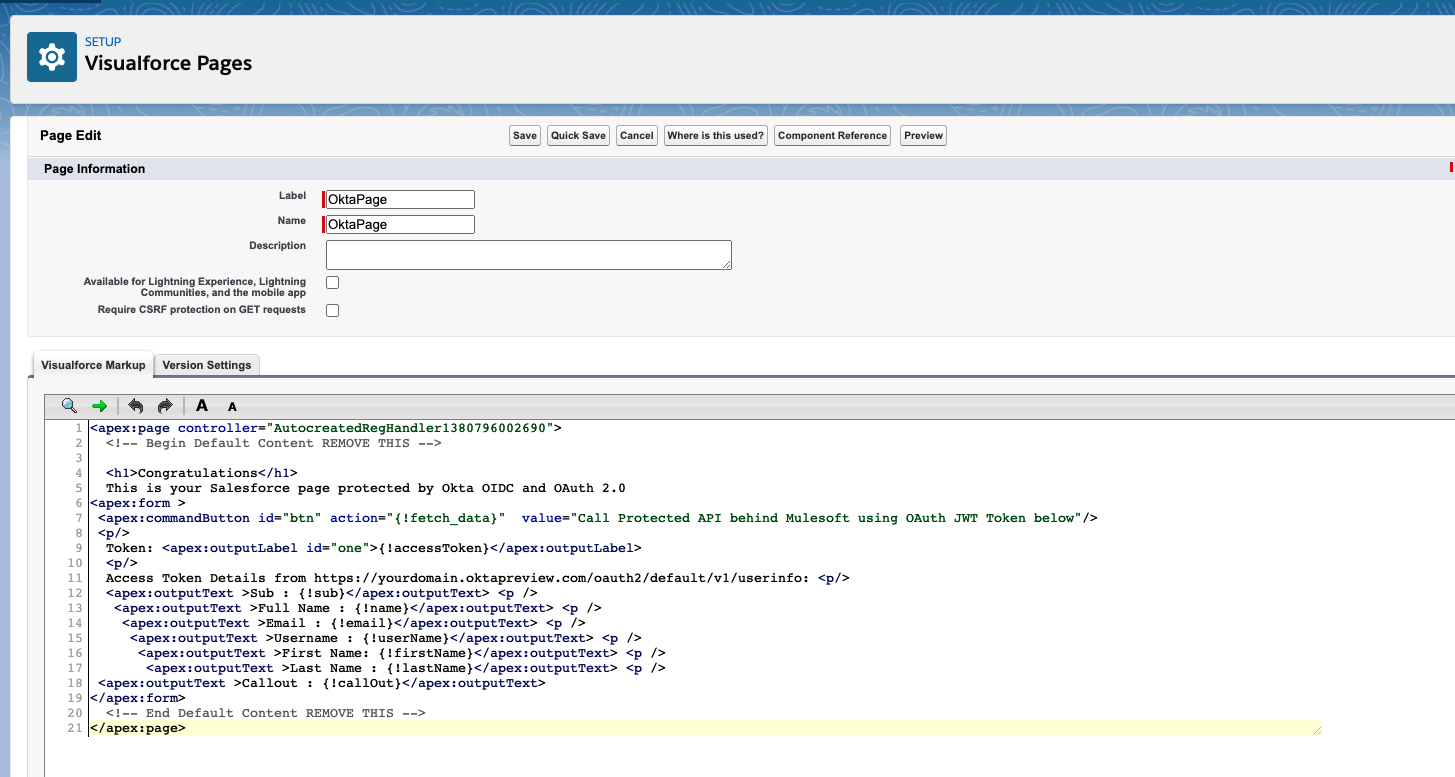
Generally, as per best practice, you would want to create a separate controller or APEX handler for your Visualforce custom page. For this tutorial, you’ll re-use the same one you have modified earlier. Overwrite and paste the following code below:
<!-- change the control value with the class name of your controller -->
<apex:page controller="AutocreatedRegHandler1380796002690">

  <!-- Begin Default Content REMOVE THIS -->
  <h1>Congratulations</h1>
  This is your Salesforce page protected by Okta OIDC and OAuth 2.0
  <apex:form >
    <apex:commandButton id="btn" action="{!fetch_data}" value="Call Protected API behind Mulesoft using OAuth JWT Token below"/>
    Token: <apex:outputLabel id="one">{!accessToken}</apex:outputLabel>
    Access Token Details from https://yourdomain.oktapreview.com/oauth2/default/v1/userinfo: <p/>

    <apex:outputText >Sub : {!sub}</apex:outputText> <p />
    <apex:outputText >Full Name : {!name}</apex:outputText> <p />
    <apex:outputText >Email : {!email}</apex:outputText> <p />
    <apex:outputText >Username : {!userName}</apex:outputText> <p />
    <apex:outputText >First Name: {!firstName}</apex:outputText> <p />
    <apex:outputText >Last Name : {!lastName}</apex:outputText> <p />
    <apex:outputText >Callout : {!callOut}</apex:outputText>
  </apex:form>
  <!-- End Default Content REMOVE THIS -->

</apex:page>
Click Save.
You’re now done with the Salesforce Configuration and setup.
Testing Out Your Integration
To access or test the Visualforce page you’ve created, use the URL: https://salesforce-custom-domain-name-ed--c.visualforce.com/apex/pageName (e.g., https://oktaoidc-dev-ed--c.visualforce.com/apex/OktaPage).
In this tutorial, you integrated Okta into your custom Salesforce application using Force.com (APEX & Visualforce) as well as the Mulesoft API Gateway.
Credits and Shout out to my colleague Ewan Thomas for helping me troubleshoot the Salesforce APEX handler.
If you have more questions, feel free to leave a comment below!
Learn More About Okta and Development
If you are interested in learning more about security and .NET check out these other great articles:
- Test in Production with Spring Security and Feature Flags
- Deploy a .NET Container with AWS Fargate
- The Most Exciting Promise of .NET 5
- Create a CI/CD pipeline for .NET with the Azure DevOps Project
Make sure to follow us on Twitter, subscribe to our YouTube Channel and check out our Twitch channel so that you never miss any awesome content!
Okta Developer Blog Comment Policy
We welcome relevant and respectful comments. Off-topic comments may be removed.