Creating a TypeScript React Application with Vite

Front-end applications are becoming ever bigger and more complex. It is not uncommon for a React app to have hundreds or even thousands of components. As the project size increases, build times become increasingly important. In large projects, you may have to wait up to a minute for the code to be translated and bundled into a production package run in the browser. The compile and load times for the development server are also a big issue for these projects. Changes in the code may only show up in the browser after a few seconds. These wait times have become a bottleneck that slows down development.
Vite addresses this problem by providing a development server and a lightning-fast build command. Vite, pronounced /vit/, is French for “quick,” and this name describes the goal for this tool. The build command uses Rollup under the hood, which is preconfigured to create highly optimized code. The development server makes use of browser support for ES modules. Hot Module Replacement will instantly load any codebase changes into the browser.
Vite was originally developed for Vue, but you can also create React and Svelte projects out of the box. In this tutorial, I will show you how to create a TypeScript-based React application using Vite. The application will be a simple number conversion tool that converts decimal numbers to hexadecimal and binary. I won’t assume any prior knowledge apart from a familiarity with JavaScript.
Prerequisites:
Table of Contents
- Using Vite to create the TypeScript React application
- Start it up and watch it run
- Adding authentication with Okta to the application
- Learn more about React, TypeScript, and Okta
Note: In May 2025, the Okta Integrator Free Plan replaced Okta Developer Edition Accounts, and the Okta CLI was deprecated.
We preserved this post for reference, but the instructions no longer work exactly as written. Replace the Okta CLI commands by manually configuring Okta following the instructions in our Developer Documentation.
Using Vite to create the TypeScript React application
Before you start, you should have recent versions of Node and npm installed on your system. The first step is to use the Vite command to create a new application. This can be done using the npm init command without installing any additional software. Open a terminal in a folder of your choice and run the following command.
npm init vite@latest vite-number-conversion -- --template react-ts
If you are using an older version of npm (below version 7), you’ll need to modify the command slightly.
npm init vite@2.8.0 vite-number-conversion --template react-ts
This command will generate a new folder vite-number-conversion and initialize it with the react-ts template. If you are asked to agree to install the create-vite package, simply answer with yes. This template creates a React project using TypeScript and all the configuration for tooling required to develop and build the project. Next, navigate into the new project folder and run the command below to install all the dependencies.
npm install
You will be using the React Router to manage navigation through your single-page app. Run the following command to install the additional dependency.
npm install -E react-router-dom@5.3.0 @types/react-router-dom@5.3.3
Now open your favorite IDE in the project folder. Feel free to browse around a little to get familiar with the code that Vite has generated. If you are familiar with create-react-app, you will notice that the differences are not that big on the surface. There is a Vite-specific configuration file, vite.config.ts, to tweak Vite’s behavior. For now, leave it as it is, but we will get back to this file later.
Your React components are saved as .tsx files in the src/ folder. To keep things organized, create a new folder src/components and add a new file src/components/Home.tsx. This will be the component to show the application’s home page. Paste the following contents into the file.
function Home() {
    return <div>
        <h1>Number Converter</h1>
    </div>
}

export default Home;
Next, create the component that contains the number conversion tool. Create another file src/components/Converter.tsx with the contents below.
import { useState } from 'react';

function Converter() {
    const [value, setValue] = useState<number>();
    const [origin, setOrigin] = useState<string>();
    const isDisabled = (base: string) => (origin !== undefined && origin !== base);

    const updateValue = (baseName: string, base: number) =>
        (e: React.ChangeEvent<HTMLInputElement>) => {
            if (e.target.value === "") {
                setValue((oldValue) => undefined);
                setOrigin((oldOrigin) => undefined);
            } else {
                setValue((oldValue) => {
                    const newValue = parseInt(e.target.value, base);
                    return isNaN(newValue) ? oldValue : newValue;
                });
                setOrigin((oldOrigin) => baseName);
            }
        }

    return <div className="Converter">
        <label>
            Decimal:
            <input type="string"
                value={value?.toString(10) || ""}
                name="decimal"
                onChange={updateValue("decimal", 10)}
                disabled={isDisabled("decimal")}/>
        </label>
        <label>
            Hexadecimal:
            <input type="string"
                value={value?.toString(16) || ""}
                name="hex"
                onChange={updateValue("hex", 16)}
                disabled={isDisabled("hex")}/>
        </label>
        <label>
            Binary:
            <input type="string"
                value={value?.toString(2) || ""}
                name="binary"
                onChange={updateValue("binary", 2)}
                disabled={isDisabled("binary")}/>
        </label>
    </div>
}

export default Converter;
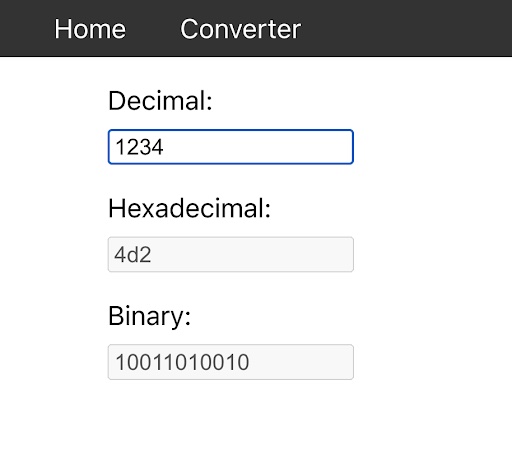
The Converter component contains three input fields, one for the decimal value, one for the hexadecimal value, and one for the binary value. It also uses two state variables. value contains the number that should be converted to the different formats, and origin includes the input field’s name in which the user has entered a number. The idea is to disable the input elements filled automatically with the converted values—the isDisabled() callback controls which elements are disabled.
The updateValue() function is a little bit more tricky. It is a function that returns a callback configured with the name and the number-base of the input field. The callback takes the ChangeEvent and updates the component state according to the value in the input field. In the functional programming style, higher-order functions like updateValue() can provide a mechanism to implement configurable code without creating code repetition.
Next, open src/main.tsx and add the Router to the application. At the top of the file, add the following import.
import { BrowserRouter } from 'react-router-dom';
Then, modify the render function to look like the code below.
ReactDOM.render(
  <React.StrictMode>
    <BrowserRouter>
      <App />
    </BrowserRouter>
  </React.StrictMode>,
  document.getElementById('root')
)
To add the routes to the application, open src/App.tsx and replace its contents with the following code.
import './App.css'
import { Link, Route, Switch } from 'react-router-dom';
import Home from './components/Home';
import Converter from './components/Converter';

function App() {
  return (
    <div className="App">
      <nav>
        <div className="menu">
          <Link to="/">Home</Link>
          <Link to="/converter">Converter</Link>
        </div>
      </nav>
      <Switch>
        <Route exact path="/" component={Home} />
        <Route path="/converter" component={Converter} />
      </Switch>
    </div>
  )
}

export default App
The application is mostly complete, but it needs some styling. Open src/App.css and edit it to match the CSS below.
.App {
  text-align: center;
}

.App nav {
  display: flex;
  justify-content: space-between;
  background-color: #333333;
  color: #ffffff;
  padding: 0.5rem 1rem;
}

.App nav a {
  color: #ffffff;
  text-decoration: none;
  margin-left: 1rem;
  margin-right: 1rem;
}

.Converter {
  text-align: left;
  margin: 1rem 4rem;
}

.Converter label {
  display: block;
  margin-bottom: 1rem;
}

.Converter input {
  display: block;
  margin-top: 0.5rem;
}
Start it up and watch it run
Now, the fun begins! You are ready to start the application. Open the terminal in the project folder and run the following command.
npm run dev
If you are used to React applications built with create-react-app, you might expect to wait a few seconds before the development server starts. With Vite, I see the following message in less than a second.
  vite v2.8.4 dev server running at:

  > Local: http://localhost:3000/
  > Network: use `--host` to expose

  ready in 461ms.
You can now open your browser at http://localhost:3000/ and test the application. When I click the Converter link in the navigation bar, I see something like this.
I opened up the Developer Tools in Chrome to understand how Vite achieves these fast starting-up times. When you open up the Network tab and filter by JS requests, you will see many requests to individual JavaScript sources. You will even see the .tsx sources you just edited.
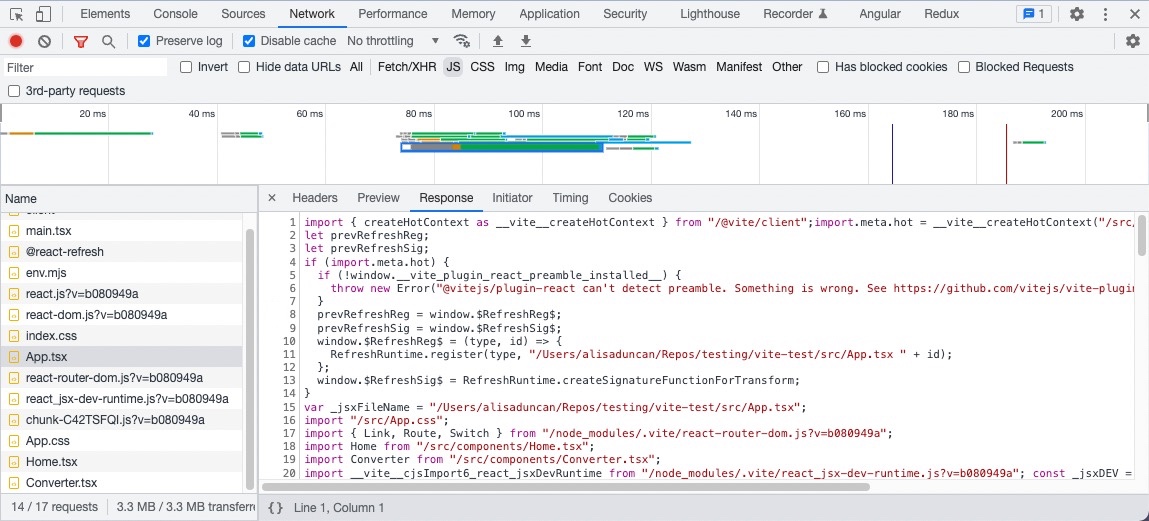
I then looked closer at App.tsx, and saw what is shown in the above image. When the development server is asked to serve a .tsx file, it will compile it on the fly into browser-compatible code. But it keeps all the import statements in place and uses the support for ES modules in the newer browsers. This way, the bundling stage is eliminated, and the loading times are significantly reduced.
Adding authentication with Okta to the application
A secure application needs user authentication to keep unauthorized users out of restricted areas. With Okta, it is easy to add authentication to your Vite application in just a few steps.
Before you begin, you’ll need a free Okta developer account. Install the Okta CLI and run okta register to sign up for a new account. If you already have an account, run okta login.
Then, run okta apps create. Select the default app name, or change it as you see fit.
Choose Single-Page App and press Enter.
Use http://localhost:3000/callback for the Redirect URI and set the Logout Redirect URI to http://localhost:3000.
What does the Okta CLI do?
The Okta CLI will create an OIDC Single-Page App in your Okta Org. It will add the redirect URIs you specified and grant access to the Everyone group. It will also add a trusted origin for http://localhost:3000. You will see output like the following when it’s finished:
Okta application configuration:
Issuer:    https://dev-133337.okta.com/oauth2/default
Client ID: 0oab8eb55Kb9jdMIr5d6
NOTE: You can also use the Okta Admin Console to create your app. See Create a React App for more information.
Now you are ready to add the Okta libraries for React into your project. Open the terminal in the project folder and run the following command.
npm install -E @okta/okta-react@6.4.2 @okta/okta-auth-js@6.1.0
Vite needs some help resolving import aliases used by the Okta libraries. To make things work, open vite.config.ts and add the following entry to the configuration object.
resolve: {
  alias: [
    {
      find: "@okta/okta-auth-js",
      replacement: require.resolve("@okta/okta-auth-js/dist/okta-auth-js.umd.js"),
    },
  ],
}
If your IDE or build can’t resolve require, you may need to add the @types/node library for the require method. In the terminal, add the library by running the following command:
npm i –save-dev @types/node
Now, open src/main.tsx and add the following code immediately after the import statements.
import { Security } from '@okta/okta-react';
import { OktaAuth, toRelativeUrl } from '@okta/okta-auth-js';

const oktaAuth = new OktaAuth({
  issuer: `https://{yourOktaDomain}/oauth2/default`,
  clientId: '{yourClientID}',
  redirectUri: `${window.location.origin}/callback`,
});

function restoreOriginalUri(oktaAuth: OktaAuth, originalUri: string) {
  window.location.replace(
    toRelativeUrl(originalUri || "/", window.location.origin)
  );
}
Here {yourClientID} is the client ID that you obtained earlier and {yourOktaDomain} is your Okta domain. Next, surround the BrowserRouter component with the Security component, passing in oktaAuth and restoreOriginalUri as parameters. The call to the render function should look something like this.
ReactDOM.render(
  <React.StrictMode>
    <Security oktaAuth={oktaAuth} restoreOriginalUri={restoreOriginalUri}>
      <BrowserRouter>
        <App />
      </BrowserRouter>
    </Security>
  </React.StrictMode>,
  document.getElementById('root')
)
Now that you have made the OktaAuth object available to your application, you are ready to create a secured route and configure the login process. Open src/App.tsx and add the following import.
import { LoginCallback, SecureRoute } from '@okta/okta-react';
Finally, convert the route that serves the Converter component to a secured route and add another route that handles the login callback from Okta. The code inside the Switch component should resemble the code below.
<Switch>
  <Route exact path="/" component={Home} />
  <SecureRoute path="/converter" component={Converter} />
  <Route path="/callback" component={LoginCallback} />
</Switch>
Congratulations, you are ready to power up the application again. If it is still not running, run the command below in the terminal.
npm run dev
Now, whenever you navigate to the Converter route, the application checks if you are authenticated. If not, it will redirect you to the Okta sign-in page, where you can enter your user credentials. After successfully logging in, you are able to access the application page you requested.
Learn more about React, TypeScript, and Okta
In this tutorial, I guided you through creating a TypeScript React application using Vite. Vite is a lightning-fast development server and package bundler that leverages modern ES module browser support and Hot Module Replacement—speeding up refresh times after changes to the codebase can significantly improve development productivity.
As an example, I showed you how to implement a number conversion utility that converts between decimal, hexadecimal, and binary formats. The application was secured using Okta authentication, and you have seen how this can be achieved in just a few lines of code.
If you want to learn more about React, TypeScript, or Okta authentication in JavaScript, please follow the links below.
- Build a Secure SPA with React Routing
- How to Create a React App with Storybook
- Build a Simple React Application Using Hooks
- Develop Secure Apps with WebSockets and Node.js
You can find the code for this tutorial on GitHub at https://github.com/oktadev/okta-react-vite-number-converter-example.
If you liked this tutorial, chances are you like others we publish. Please follow @oktadev on Twitter and subscribe to our YouTube channel to get notified when we publish new developer tutorials.
Okta Developer Blog Comment Policy
We welcome relevant and respectful comments. Off-topic comments may be removed.