Cloud Native Java Microservices with JHipster and Istio

Microservices are not everyone’s cup of tea, and they shouldn’t be. Not every problem can or should be solved by microservices. Sometimes building a simple monolith is a far better option. Microservices are solutions for use cases where scale and scalability are important. A few years ago, microservices were all the rage, made popular, especially by companies like Netflix, Spotify, Google, etc. While the hype has died down a bit, genuine use cases still exist. With ongoing advances in cloud computing technologies, building microservices as cloud-native services is the way to go due to many benefits.
Today we will look at building a cloud-native Java microservice stack that utilizes a service mesh to provide most of the distributed system needs and we’ll deploy it to the cloud using Kubernetes.
So here is what we will do today:
- Build a Java microservice stack using JHipster, Spring Boot, and Spring Cloud
- Create a Google Kubernetes Engine (GKE) cluster
- Deploy Istio service mesh to the cluster
- Set up monitoring and observability
- Deploy and monitor the microservices to the cluster
Let’s get started!
Prerequisites
- A Google Cloud Platform account
- Docker installed on your machine
- Node.js installed on your machine
- JHipster installed on your machine
- Google Cloud SDK installed and configured on your machine
- kubectl or KDash
- Basic understanding of Java, Spring, Containers, and Kubernetes
Table of Contents
- Why build cloud-native microservices using a service mesh?
- Build a Java Microservices Stack using JHipster
- Create a GKE cluster and install Istio
- Deploy the microservice stack to GKE
- Learn more about Java Microservices, Istio, Kubernetes, and JHipster
If you prefer to follow along by watching a video, see [How to Build Low-Code Microservices on the Cloud Using Istio, JHipster, and Kubernetes] on the OktaDev YouTube channel.
Why build cloud-native microservices using a service mesh?
Before we dive into building a cloud-native microservice stack, let’s look at what a service mesh is and the benefits of using one.
A service mesh provides features to help with common distributed microservice challenges. Like service discovery, routing, load balancing, and so on. Today we will be using Istio, one of the most popular service mesh solutions available. Istio is tailored for distributed application architectures, especially those you might run in Kubernetes. Istio plays nicely with Kubernetes, so nicely that you might think that it’s part of the Kubernetes platform itself. Istio isn’t the only service mesh around; we also have platforms like Linkerd and Consul, which are also quite popular.
Istio specifically provides the following features.
- Secure service-to-service communication over TLS. Of course, with support for identity-based authentication and authorization.
- Service discovery, so that your microservices can discover each other.
- Automatic load balancing for the services
- Traffic control features like routing, circuit breaking, retries, fail-overs, and fault injection.
- A pluggable policy layer that can enforce stuff like access control, rate limiting, A/B testing, traffic splits, quotas, etc.
- It also provides automatic metrics, logs, and traces for all traffic within the cluster from Ingress to Egress and between pods.
What is Istio Service Mesh?
Let’s take a quick look at Istio internals. The Istio architecture can be classified into two distinct planes.
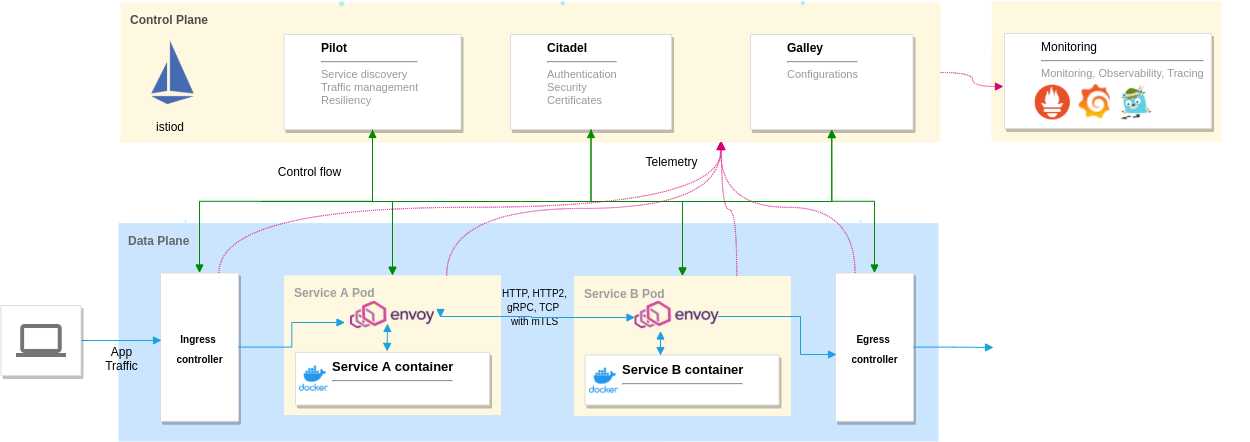
Control plane: It consists of the istiod demon, and it manages and configures the envoy proxies to route traffic. The control plane also enforces policies and collects telemetry, and includes components like Pilot for traffic management, Citadel to manage security, and Galley to manage configurations.
Data plane: It’s made of Envoy proxies deployed as sidecars to our application containers. Envoy is a high-performance, lightweight distributed proxy. It controls all the incoming and outgoing traffic to the container it is attached to.
We can use tools like Grafana, Prometheus, Kiali and Zipkin for monitoring and observability as they work well with the telemetry provided by Istio. You can use these or use your existing monitoring stack as well.
Build a Java Microservices Stack using JHipster
Before you proceed, ensure you have installed JHipster. If not, install it using the command npm -g install generator-jhipster. At the moment of writing, I’m using JHipster version 7.8.1.
We will be using the JHipster Domain Language (JDL) to define our microservices, entities, and deployment options. But first, let’s take a look at the architecture we will be building today.
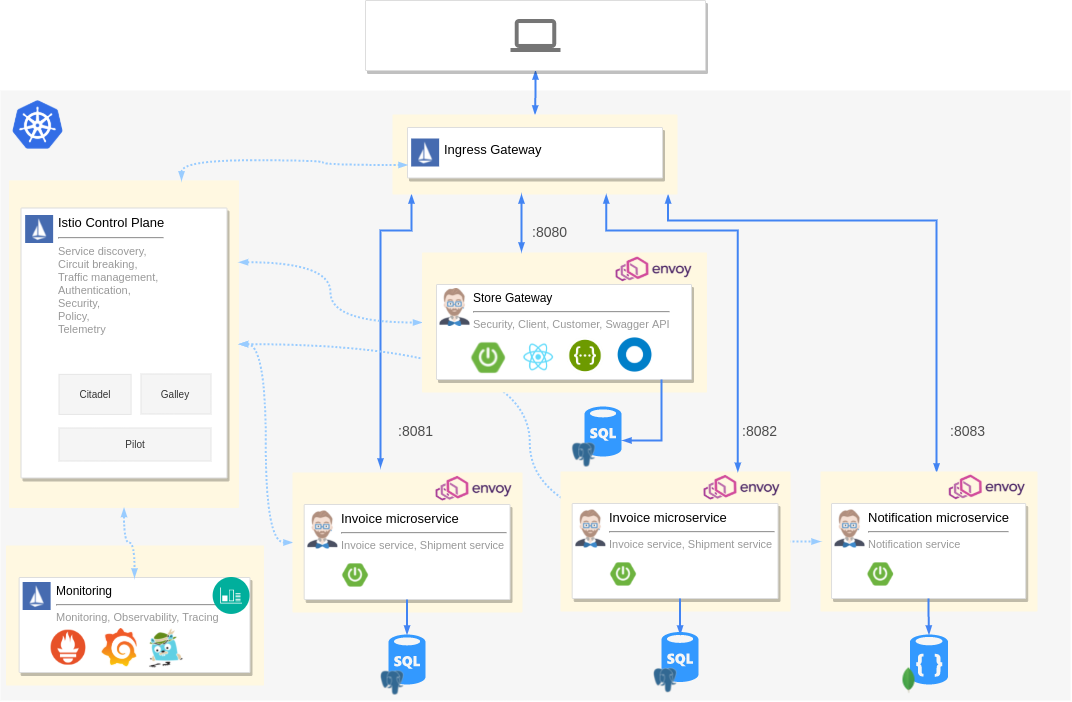
We have the Istio control plane taking care of policy, load balancing, etc. We also have the Istio Ingress gateway to route all external traffic to our applications. We have four microservices. First is a gateway application created by JHipster that acts as our React GUI and authentication layer. The remaining are services that provide APIs. Each of our containers will have an envoy proxy as an auto-injected sidecar. We hook up Grafana, Prometheus, Zipkin, and Kiali to the telemetry provided by Istio so that we have monitoring and observability for our cluster. Each microservice also has its own database.
If you would prefer not to build the application yourself, clone the example from GitHub.
git clone https://github.com/oktadev/okta-java-spring-k8s-istio-microservices-example.git
It’s not an overly complex architecture, but it’s also not that simple. First, let us define our microservice using JDL. Create a file called app.jdl and paste the following content into it.
application {
  config {
    baseName store
    applicationType gateway
    packageName com.okta.developer.store
    serviceDiscoveryType no
    authenticationType jwt
    prodDatabaseType postgresql
    cacheProvider hazelcast
    buildTool gradle
    clientFramework react
  }
  entities *
}

application {
  config {
    baseName product
    applicationType microservice
    packageName com.okta.developer.product
    serviceDiscoveryType no
    authenticationType jwt
    prodDatabaseType postgresql
    cacheProvider hazelcast
    buildTool gradle
    serverPort 8081
  }
  entities Product, ProductCategory, ProductOrder, OrderItem
}

application {
  config {
    baseName invoice
    applicationType microservice
    packageName com.okta.developer.invoice
    serviceDiscoveryType no
    authenticationType jwt
    prodDatabaseType postgresql
    buildTool gradle
    serverPort 8082
  }
  entities Invoice, Shipment
}

application {
  config {
    baseName notification
    applicationType microservice
    packageName com.okta.developer.notification
    serviceDiscoveryType no
    authenticationType jwt
    databaseType mongodb
    cacheProvider no
    enableHibernateCache false
    buildTool gradle
    serverPort 8083
  }
  entities Notification
}
Each application defines its name, package name, authentication type, database, etc. For all supported options and configurations, please refer to the JDL applications documentation. Each application also defines the applicationType and the entities it serves. Next, add the entity definitions to the app.jdl you just created.
/**
 * Entities for Store Gateway
 */
// Customer for the store
entity Customer {
  firstName String required
  lastName String required
  gender Gender required
  email String required pattern(/^[^@\s]+@[^@\s]+\.[^@\s]+$/)
  phone String required
  addressLine1 String required
  addressLine2 String
  city String required
  country String required
}

enum Gender {
  MALE, FEMALE, OTHER
}

relationship OneToOne {
  Customer{user(login) required} to User
}

service Customer with serviceClass
paginate Customer with pagination

/**
 * Entities for product microservice
 */
// Product sold by the Online store
entity Product {
  name String required
  description String
  price BigDecimal required min(0)
  itemSize Size required
  image ImageBlob
}

enum Size {
  S, M, L, XL, XXL
}

entity ProductCategory {
  name String required
  description String
}

entity ProductOrder {
  placedDate Instant required
  status OrderStatus required
  code String required
  invoiceId Long
  customer String required
}

enum OrderStatus {
  COMPLETED, PENDING, CANCELLED
}

entity OrderItem {
  quantity Integer required min(0)
  totalPrice BigDecimal required min(0)
  status OrderItemStatus required
}

enum OrderItemStatus {
  AVAILABLE, OUT_OF_STOCK, BACK_ORDER
}

relationship ManyToOne {
  OrderItem{product(name) required} to Product
}

relationship OneToMany {
  ProductOrder{orderItem} to OrderItem{order(code) required}
  ProductCategory{product} to Product{productCategory(name)}
}

service Product, ProductCategory, ProductOrder, OrderItem with serviceClass
paginate Product, ProductOrder, OrderItem with pagination
microservice Product, ProductOrder, ProductCategory, OrderItem with product

/**
 * Entities for Invoice microservice
 */
// Invoice for sales
entity Invoice {
  code String required
  date Instant required
  details String
  status InvoiceStatus required
  paymentMethod PaymentMethod required
  paymentDate Instant required
  paymentAmount BigDecimal required
}

enum InvoiceStatus {
  PAID, ISSUED, CANCELLED
}

entity Shipment {
  trackingCode String
  date Instant required
  details String
}

enum PaymentMethod {
  CREDIT_CARD, CASH_ON_DELIVERY, PAYPAL
}

relationship OneToMany {
  Invoice{shipment} to Shipment{invoice(code) required}
}

service Invoice, Shipment with serviceClass
paginate Invoice, Shipment with pagination
microservice Invoice, Shipment with invoice

/**
 * Entities for notification microservice
 */
entity Notification {
  date Instant required
  details String
  sentDate Instant required
  format NotificationType required
  userId Long required
  productId Long required
}

enum NotificationType {
  EMAIL, SMS, PARCEL
}

microservice Notification with notification
We define entities for each service and mark the entities as microservice entities. We also define relationships between entities, enums, and other options like pagination, service layer, etc. Please refer to JDL Entities and relationships documentation for more possibilities.
Now, we are ready to run JHipster. Open a terminal window on the folder where you saved the JDL and run the following command.
mkdir jhipster-istio
cd jhipster-istio

jhipster jdl app.jdl --fork
This will create the applications with all their entities and specified configurations. You should be able to see the gateway application in action by running the following command on the store folder.
./gradlew # starts the Spring Boot application
You can see everything that’s generated in the example application on GitHub.
Create a GKE cluster and install Istio
To deploy the stack to Google Kubernetes Engine, we need to create a cluster and install Istio. So let’s begin by creating a cluster using Google Cloud SDK.
Create a cluster
Ensure you are logged into the gcloud CLI from the command-line and run the following command to create a GKE cluster.
# set region and zone
gcloud config set compute/region europe-west1
gcloud config set compute/zone europe-west1-b
# Create a project and enable container APIs
gcloud projects create jhipster-demo-okta # You need to also enable billing via GUI
gcloud config set project jhipster-demo-okta
gcloud services enable container.googleapis.com

# Create GKE Cluster
gcloud container clusters create hello-hipster \
   --num-nodes 4 \
   --machine-type n1-standard-2
This could take anywhere from 5 to 15 minutes. --machine-type is important as we need more CPU than available in the default setup. Once the cluster is created, it should be set automatically as the current Kubernetes context. You can verify that by running kubectl config current-context. If the new cluster is not set as the current context, you can set it by running gcloud container clusters get-credentials hello-hipster.
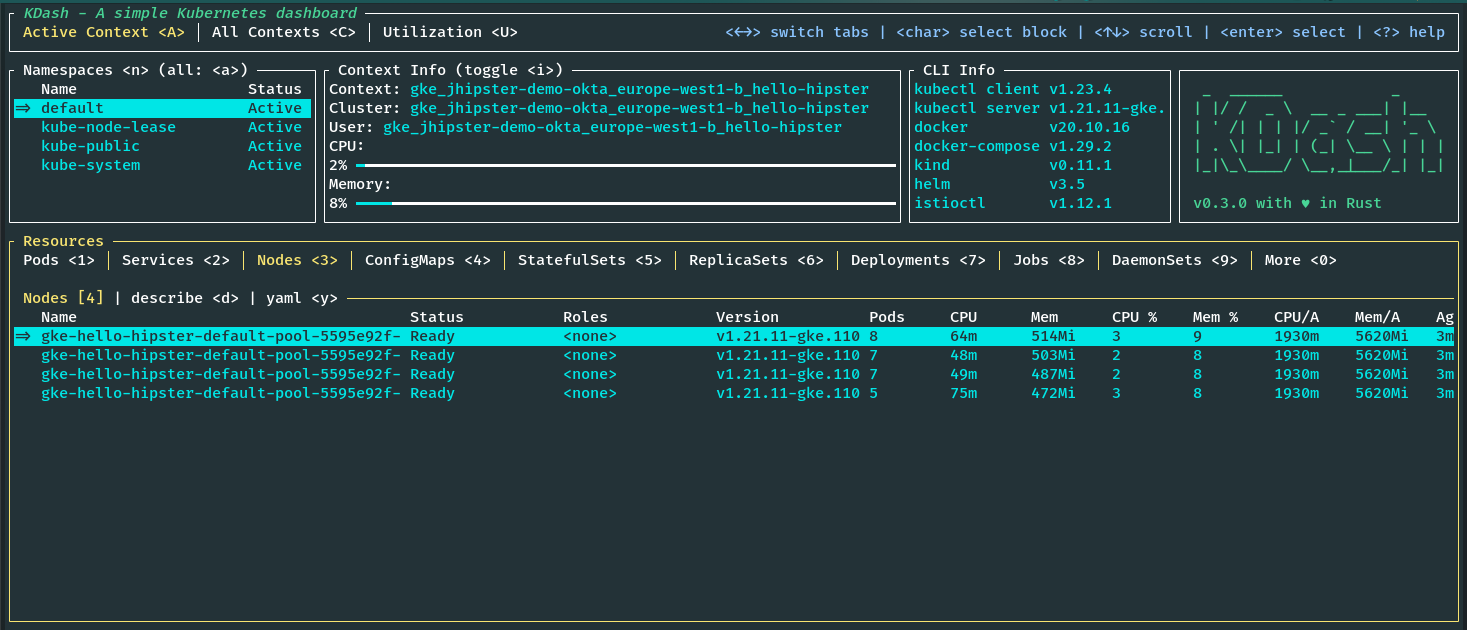
Note: I’m using KDash to monitor the cluster; you can try it or use kubectl, k9s, and so on as you prefer.
Install Istio to cluster
As of writing this, I’m using Istio version 1.13.4. You can install istioctl by running the following command, preferably from your home directory.
export ISTIO_VERSION=1.13.4
curl -L https://istio.io/downloadIstio | sh -
cd istio-$ISTIO_VERSION
export PATH=$PWD/bin:$PATH
You should now be able to run istioctl from the command line. Now, we can use the CLI to Install Istio to the GKE cluster. Istio provides a few Helm profiles out of the box. We will use the demo profile for demo purposes. You can choose the production or dev profile as well. The command should install Istio and set up everything required on our cluster.
istioctl install --set profile=demo -y
Note: If you run into any trouble with firewall or user privilege issues, please refer to GKE setup guide from Istio.
Once the installation is complete, we need to fetch the External IP of the Istio Ingress Gateway. If you are using KDash, you can see it on the services tab, or you can run the following command to get it using kubectl.
kubectl get svc istio-ingressgateway -n istio-system
Install observability tools
Istio also provides addons for most of the popular monitoring and observability tools. Let’s install Grafana, Prometheus, Kiali and Zipkin on our cluster. These are preconfigured to work with the telemetry data provided by Istio. Ensure you are in the folder where you installed Istio, like istio-1.13.4.
cd istio-$ISTIO_VERSION
kubectl apply -f samples/addons/grafana.yaml
kubectl apply -f samples/addons/prometheus.yaml
kubectl apply -f samples/addons/kiali.yaml
kubectl apply -f samples/addons/extras/zipkin.yaml
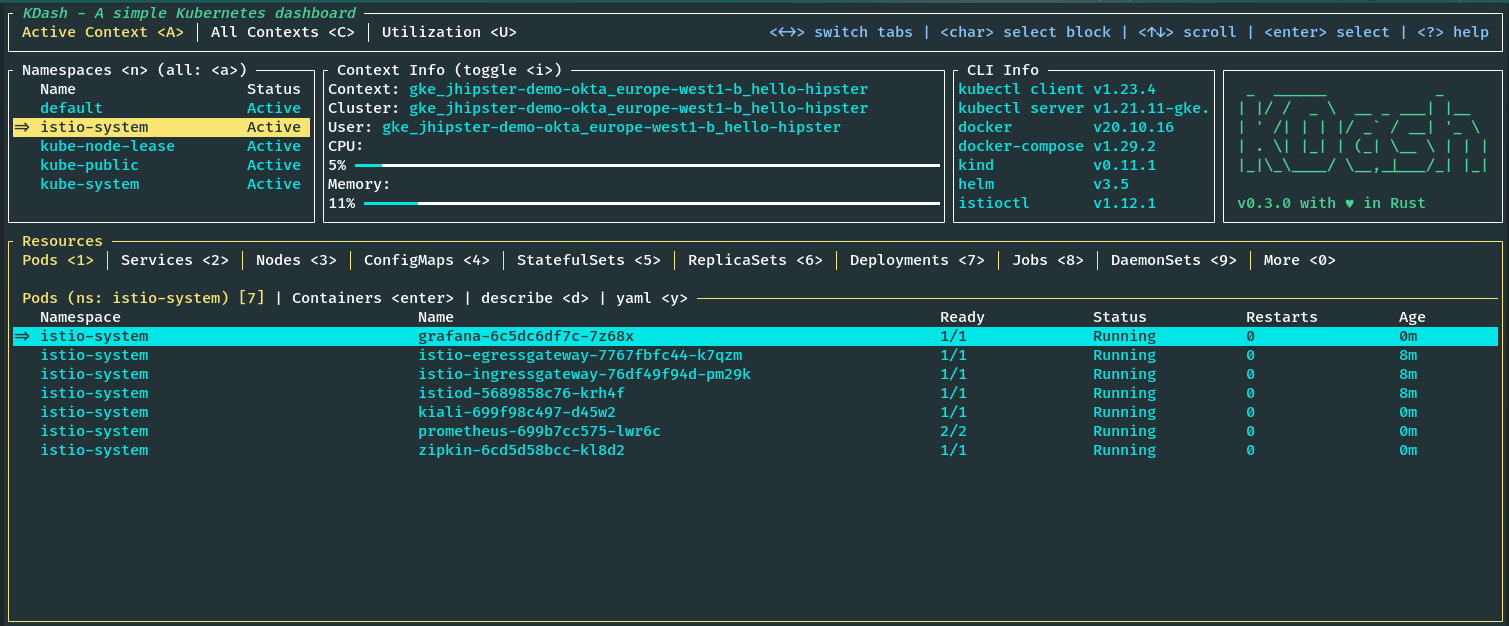
If we look at the istio-system namespace, we can see all the Istio components along with Grafana, Prometheus, Kiali, and Zipkin running. You can also see this by running the following command .
kubectl get pods -n istio-system
Deploy the microservice stack to GKE
Our cluster is ready, and we have Istio installed. Now, we can deploy our microservice stack to the cluster. First, we need to create Kubernetes manifests for our deployments and services and configurations for Istio. And once again, JHipster comes to the rescue. We can use the JDL deployment configurations to generate Kubernetes setup for our stack with one command easily.
Create Kubernetes manifests
Create a new JDL file, say deployment.jdl, and add the following content.
// will be created under 'kubernetes' folder
deployment {
  deploymentType kubernetes
  appsFolders [store, invoice, notification, product]
  dockerRepositoryName "<your-docker-repository-name>"
  serviceDiscoveryType no
  istio true
  kubernetesServiceType Ingress
  kubernetesNamespace jhipster
  ingressDomain "<istio-ingress-gateway-external-ip>.nip.io"
  ingressType gke
}
I hope it’s self-explanatory. You can refer to the JDL deployment documentation for all the available options. We have enabled Istio and set the ingress domain to the Istio Ingress Gateway’s external IP that we noted earlier. Now we need a DNS for our IP. For real use cases, you should map a DNS for the IP using a service provided by your cloud vendor like Google Cloud DNS. For testing and demo purposes, we can use a wildcard DNS service like nip.io to resolve our IP. Append nip.io to our IP and use that as the ingressDomain. Make sure to use a docker repo where you have push rights.
Now run the following command from the root folder where you ran the previous jhipster jdl command.
jhipster jdl deployment.jdl
This will create a new folder, kubernetes, with all the required Kubernetes manifests like deployments, services, Istio virtual services, gateways, and so on, for all the applications, databases, and monitoring.
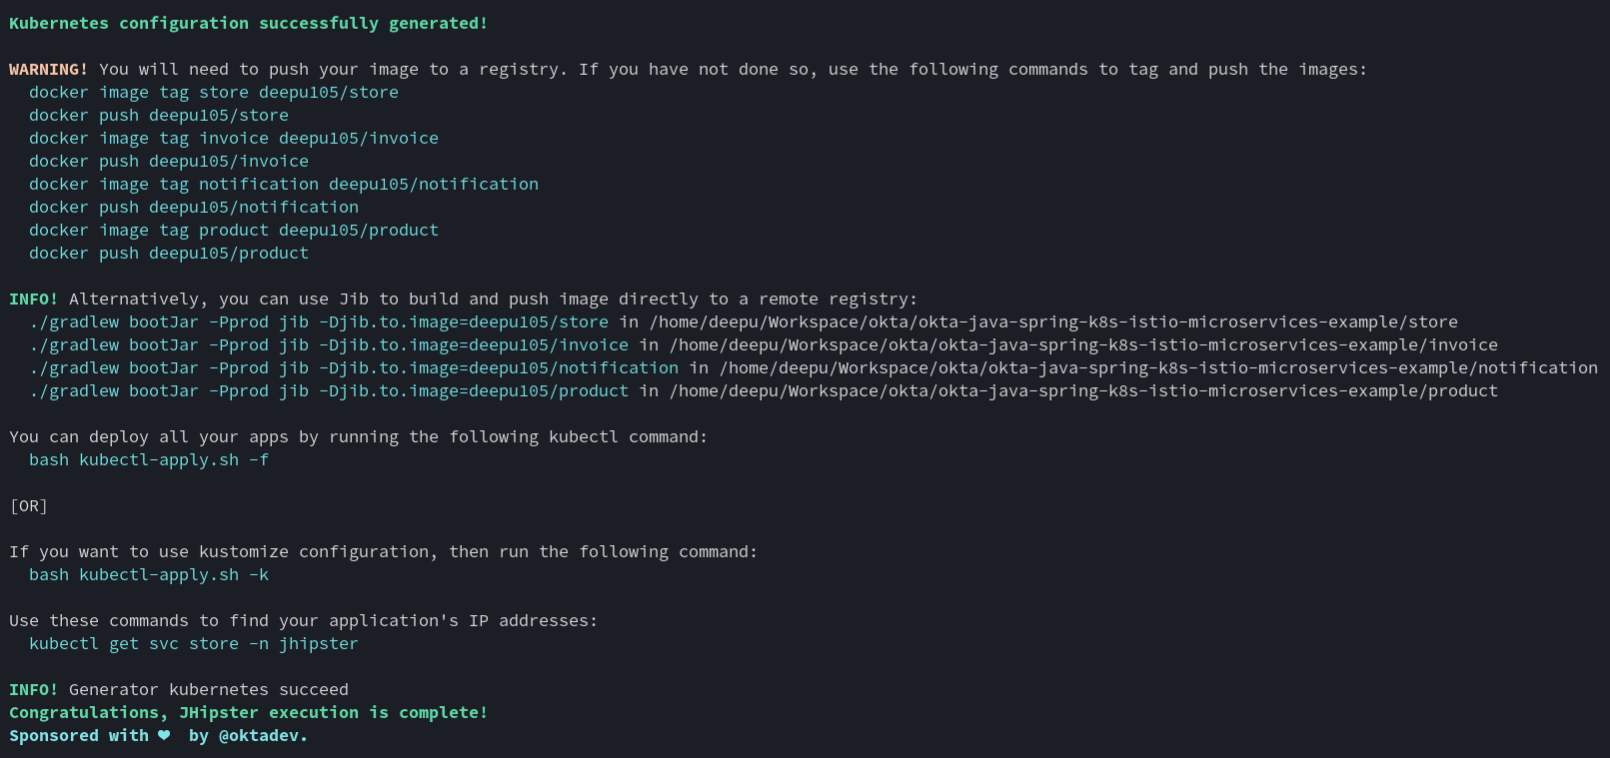
Each of the services will also have an Istio virtual service and destination rule. For example, the invoice service will have the following destination rule defining traffic policies.
apiVersion: networking.istio.io/v1beta1
kind: DestinationRule
metadata:
  name: invoice-destinationrule
  namespace: jhipster
spec:
  host: invoice
  trafficPolicy:
    loadBalancer:
      simple: RANDOM
    connectionPool:
      tcp:
        maxConnections: 30
        connectTimeout: 100ms
      http:
        http1MaxPendingRequests: 10
        http2MaxRequests: 100
        maxRequestsPerConnection: 10
        maxRetries: 5
    outlierDetection:
      consecutive5xxErrors: 5
      interval: 30s
      baseEjectionTime: 60s
  subsets:
    - name: v1
      labels:
        version: "v1"
It also includes the following virtual service that defines the route. You could also use virtual services to do traffic split between two versions of the same app, among other things.
apiVersion: networking.istio.io/v1beta1
kind: VirtualService
metadata:
  name: invoice-virtualservice
  namespace: jhipster
spec:
  hosts:
    - invoice
  http:
    - route:
        - destination:
            host: invoice
            subset: "v1"
          weight: 100
      retries:
        attempts: 3
        perTryTimeout: 2s
The gateway is defined for the store application as it is our GUI as well.
apiVersion: networking.istio.io/v1beta1
kind: Gateway
metadata:
  name: store-gateway
  namespace: jhipster
  labels:
    gateway: store-gateway
    istio: ingressgateway
spec:
  selector:
    istio: ingressgateway
  servers:
    - port:
        number: 80
        name: http
        protocol: HTTP
      hosts:
        - store.jhipster.34.76.233.160.nip.io
    - port:
        number: 80
        name: http2
        protocol: HTTP2
      hosts:
        - store.jhipster.34.76.233.160.nip.io
---
apiVersion: networking.istio.io/v1beta1
kind: VirtualService
metadata:
  name: store-gw-virtualservice
  namespace: jhipster
  labels:
    service: store-gw-virtualservice
spec:
  hosts:
    - store.jhipster.34.76.233.160.nip.io
  gateways:
    - store-gateway
  http:
    - match:
        - uri:
            prefix: /services/invoice/
      rewrite:
        uri: /
      route:
        - destination:
            host: invoice
    - match:
        - uri:
            prefix: /services/notification/
      rewrite:
        uri: /
      route:
        - destination:
            host: notification
    - match:
        - uri:
            prefix: /services/product/
      rewrite:
        uri: /
      route:
        - destination:
            host: product
    - route:
        - destination:
            host: store
As you can see, there are also many useful commands printed on the console that you can use to do the deployment.
Deploy to GKE
We are ready to deploy now. First, we need to build and push the images to the registry. We can use the handy Jib commands provided by JHipster. Navigate to each of the microservice folders and run the commands below.
cd store && ./gradlew bootJar -Pprod jib -Djib.to.image=yourDockerRepository/store
cd invoice && ./gradlew bootJar -Pprod jib -Djib.to.image=yourDockerRepository/invoice
cd notification && ./gradlew bootJar -Pprod jib -Djib.to.image=yourDockerRepository/notification
cd product && ./gradlew bootJar -Pprod jib -Djib.to.image=yourDockerRepository/product
Once the images are pushed to the Docker registry, we can deploy the stack using the handy script provided by JHipster. Navigate to the kubernetes folder created by JHipster and run the following command.
cd kubernetes
./kubectl-apply.sh -f
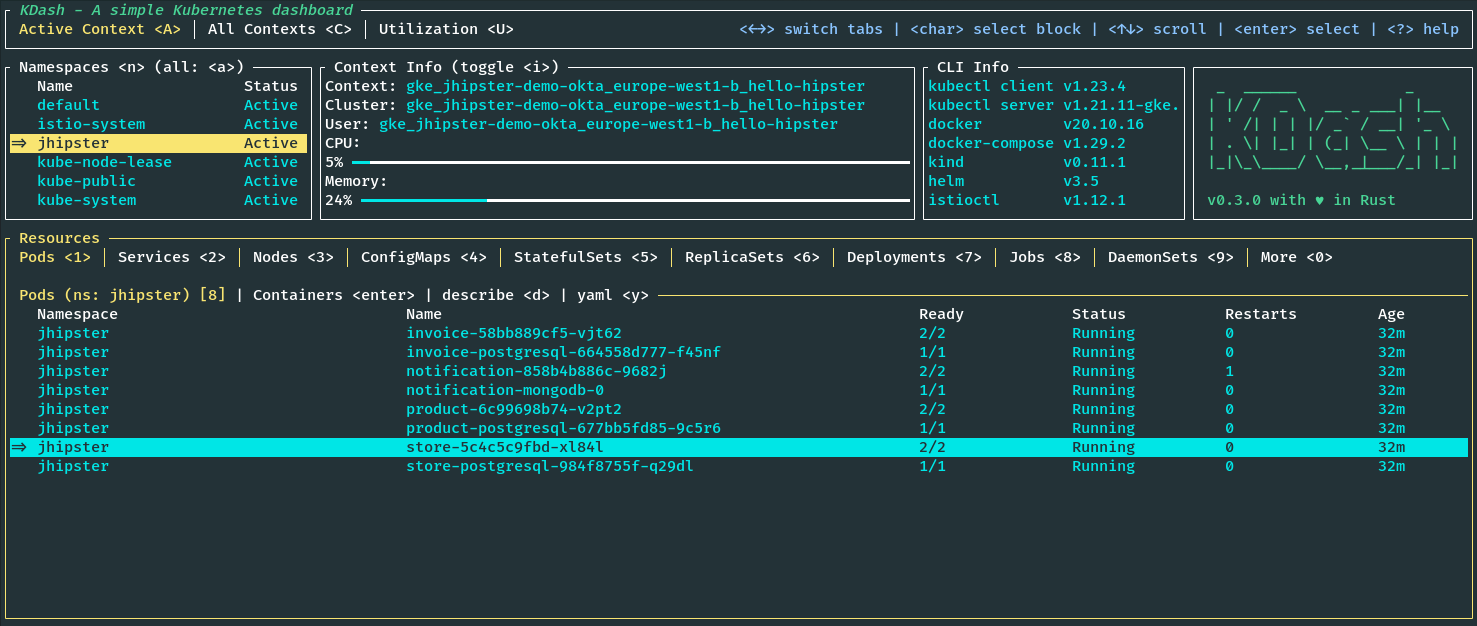
Once the deployments are done, we must wait for the pods to be in RUNNING status. Useful links will be printed on the terminal; make a note of them.
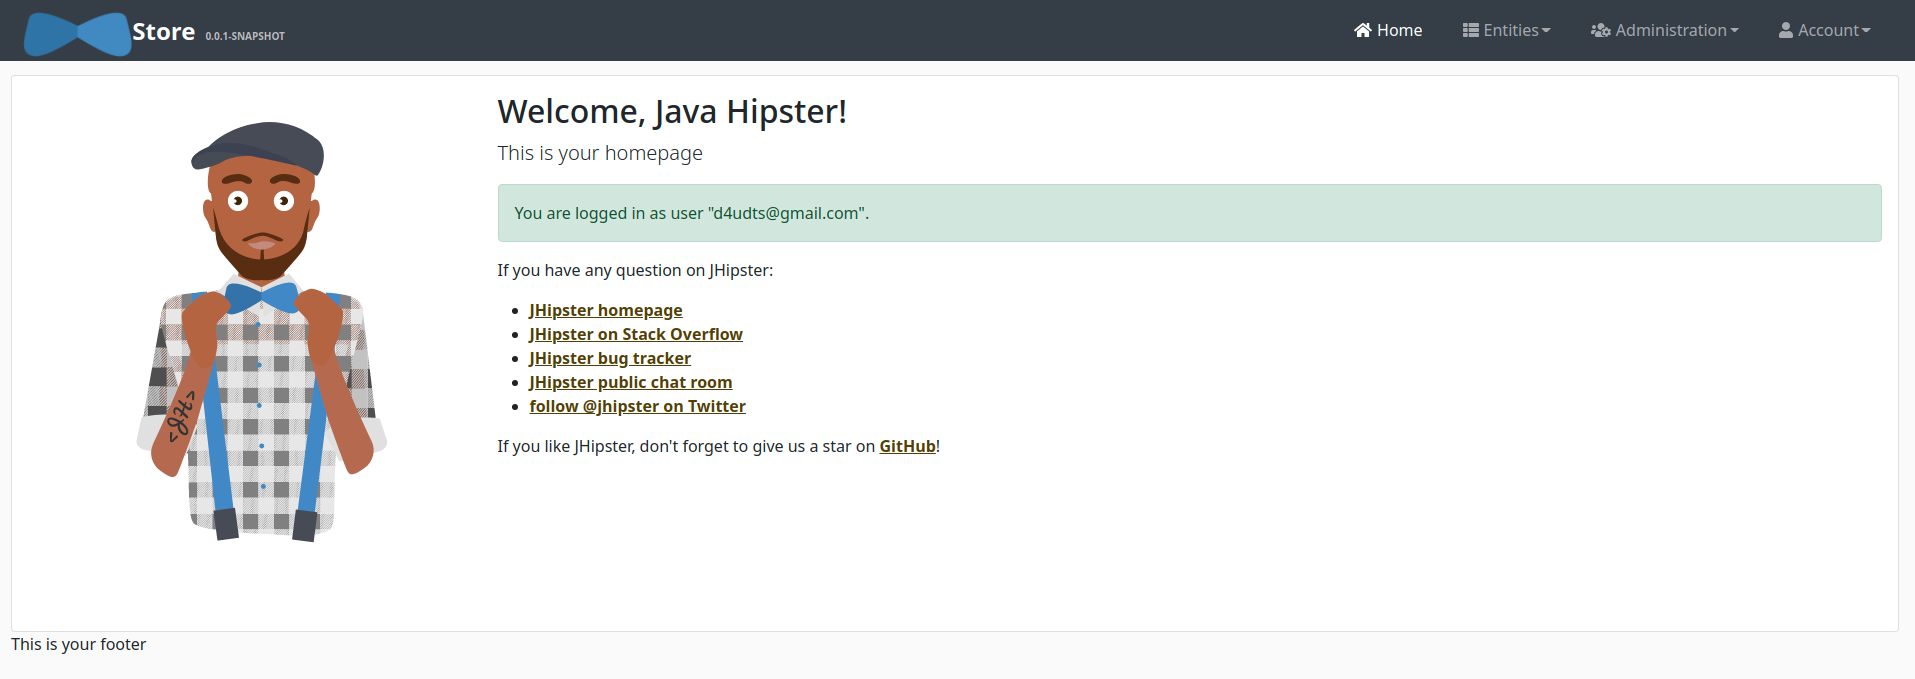
You can now access the application at the given http://store.jhipster.<istio-ingress-gateway-external-ip>.nip.io URI and log in with the default credentials.
Note: Currently, the JHipster OIDC setup does not work with Istio and there is an open issue in JHipster issue tracker for this. Alternative solutions would be to use an external authorization server with something like Open Policy Agent. We will cover this in a later blog post.
Monitoring and observability
Since we deployed tools for observability, let’s see what we have.
Grafana
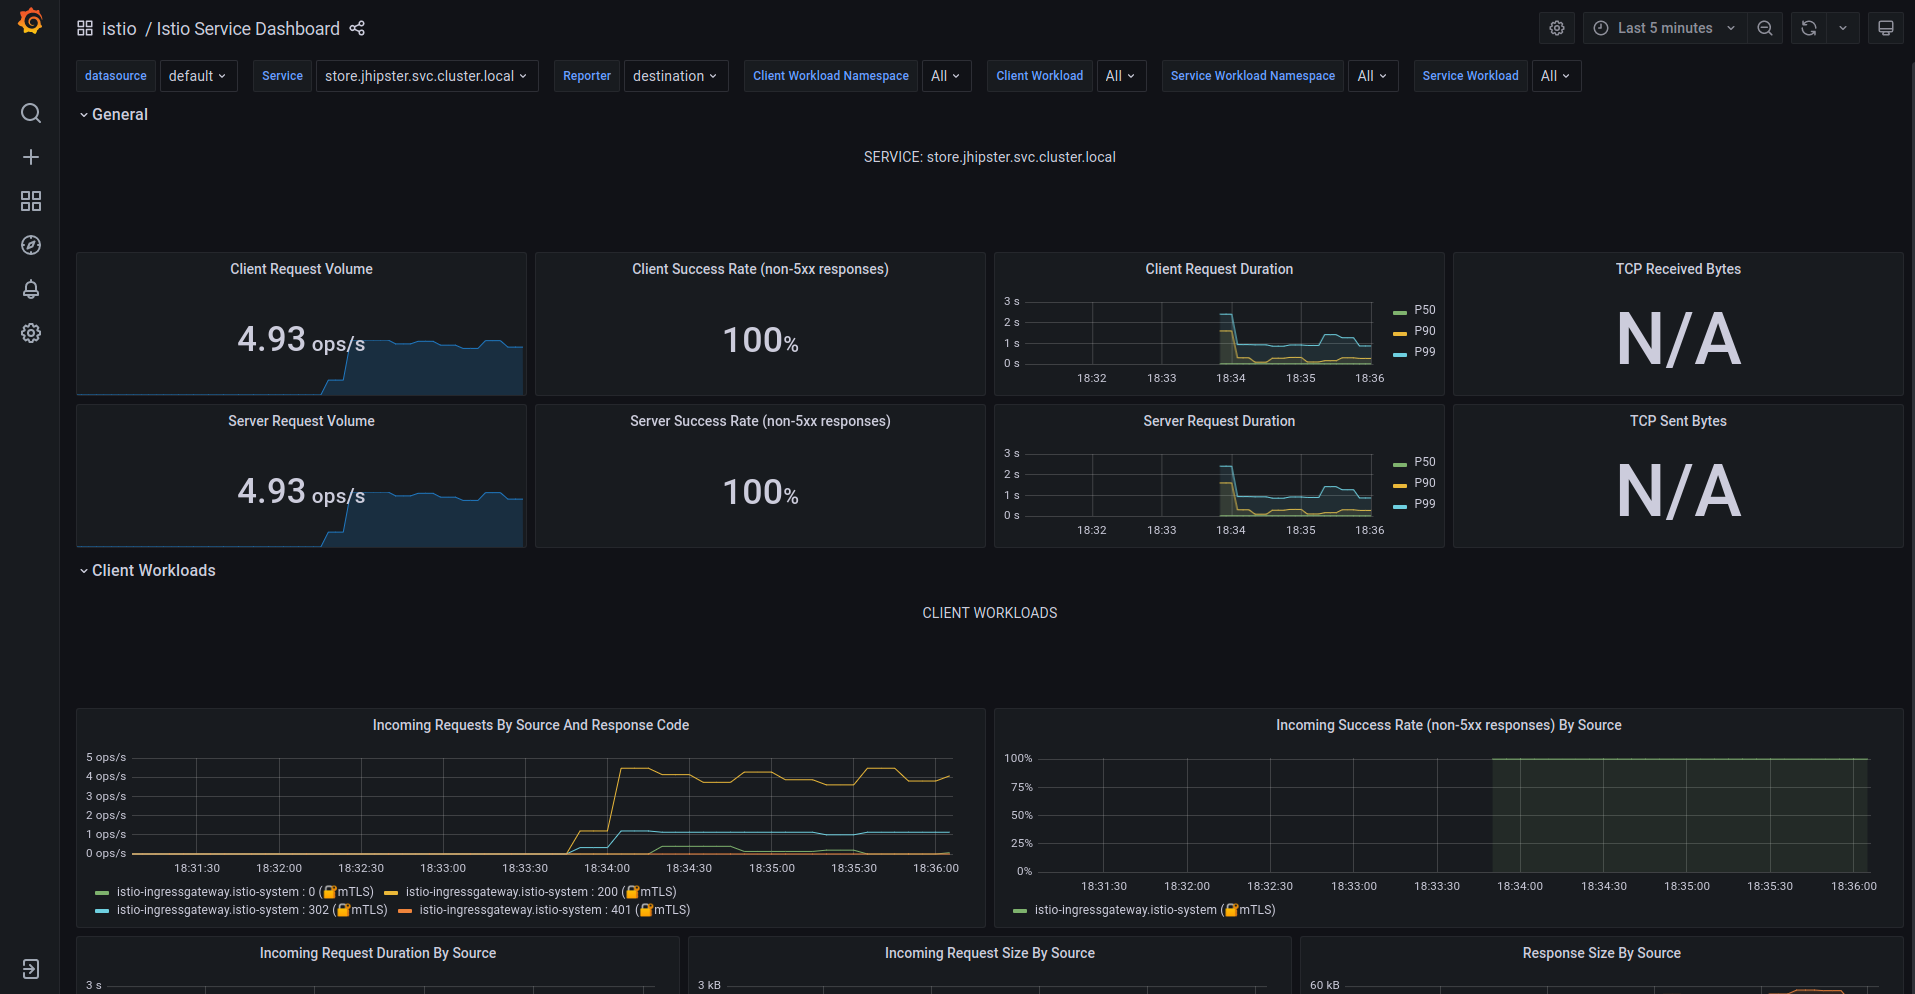
First up are Grafana and Prometheus for metrics and dashboards. Click the URI for Grafana from the previous deployment step. Click General at the top left corner and click the istio folder. You should see multiple preconfigured dashboards. You can monitor the performance of the workloads and the istio system itself here. You can also create your own dashboards if you like. Prometheus provides the data visualized on Grafana.
Kiali
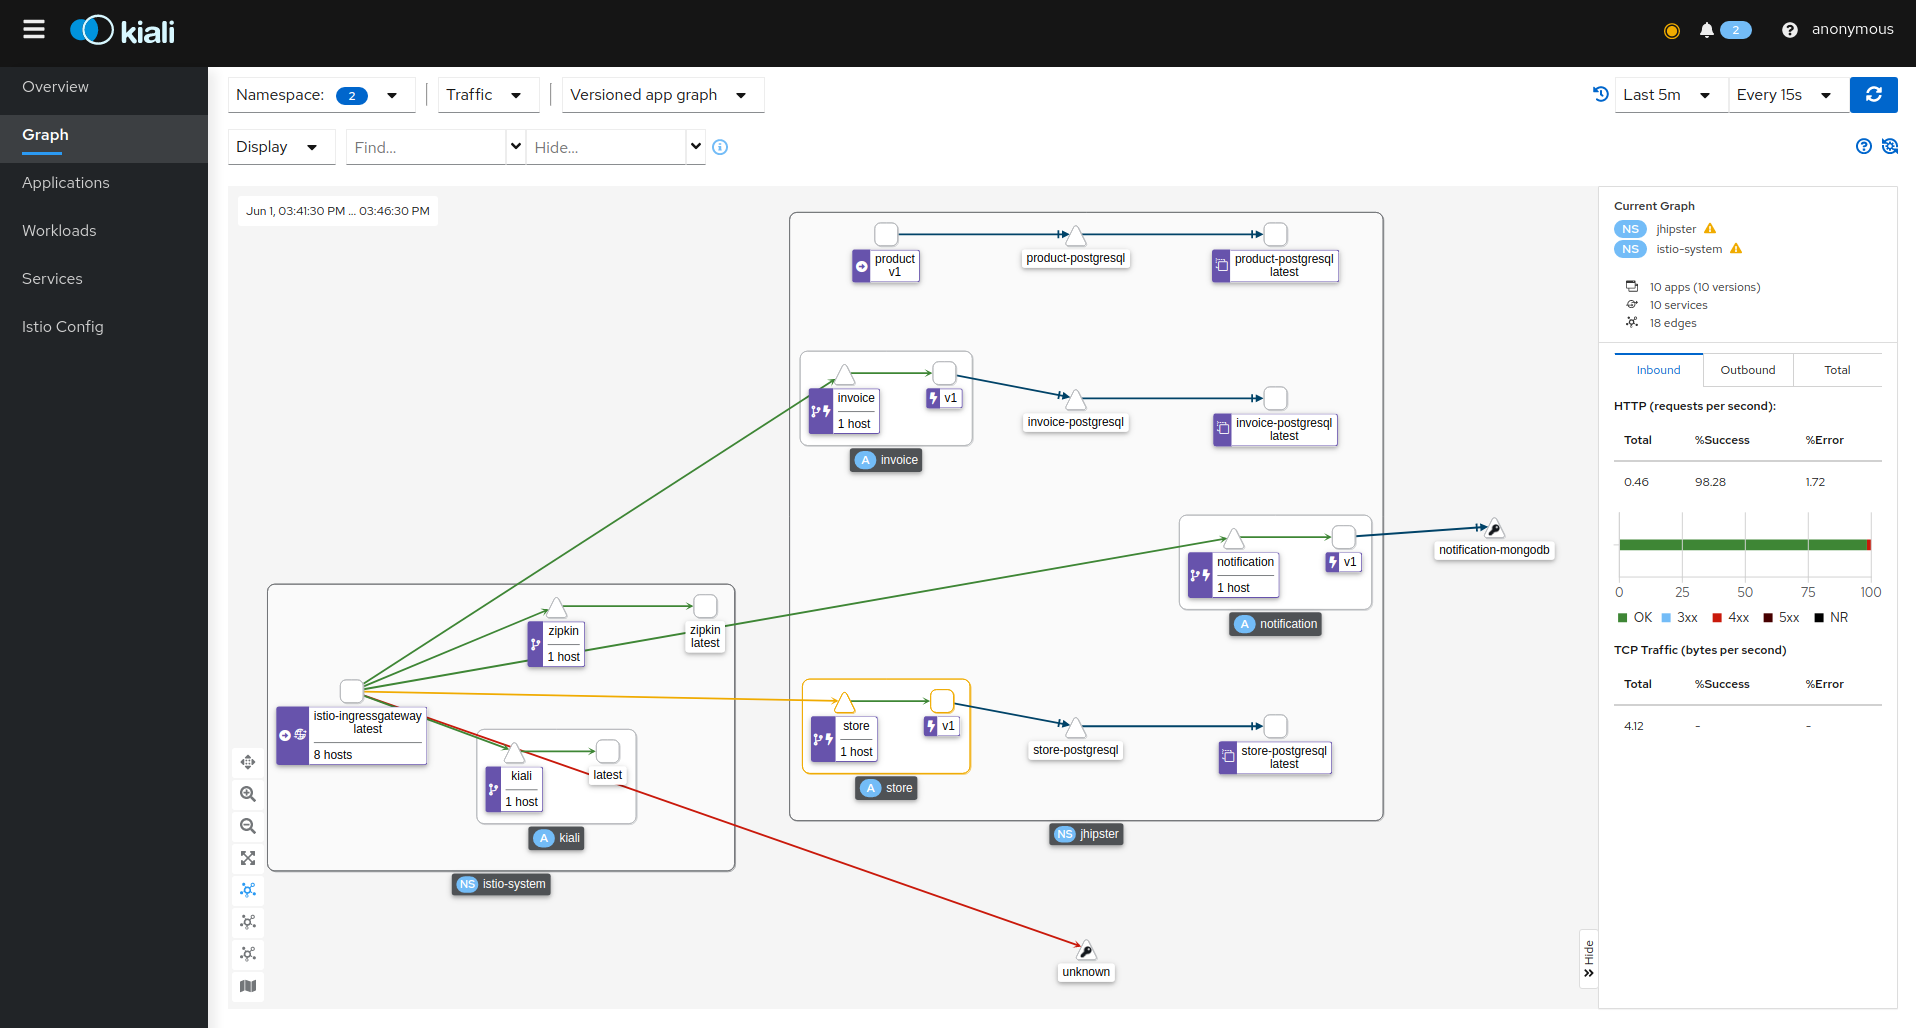
Kiali is a management console for Istio service mesh, and it provides a web interface for visualizing the network topology of your service mesh. You can use it to explore the network topology of your cluster and see the network traffic flowing through it. Click Graph on the left side menu to see the network topology.
Zipkin
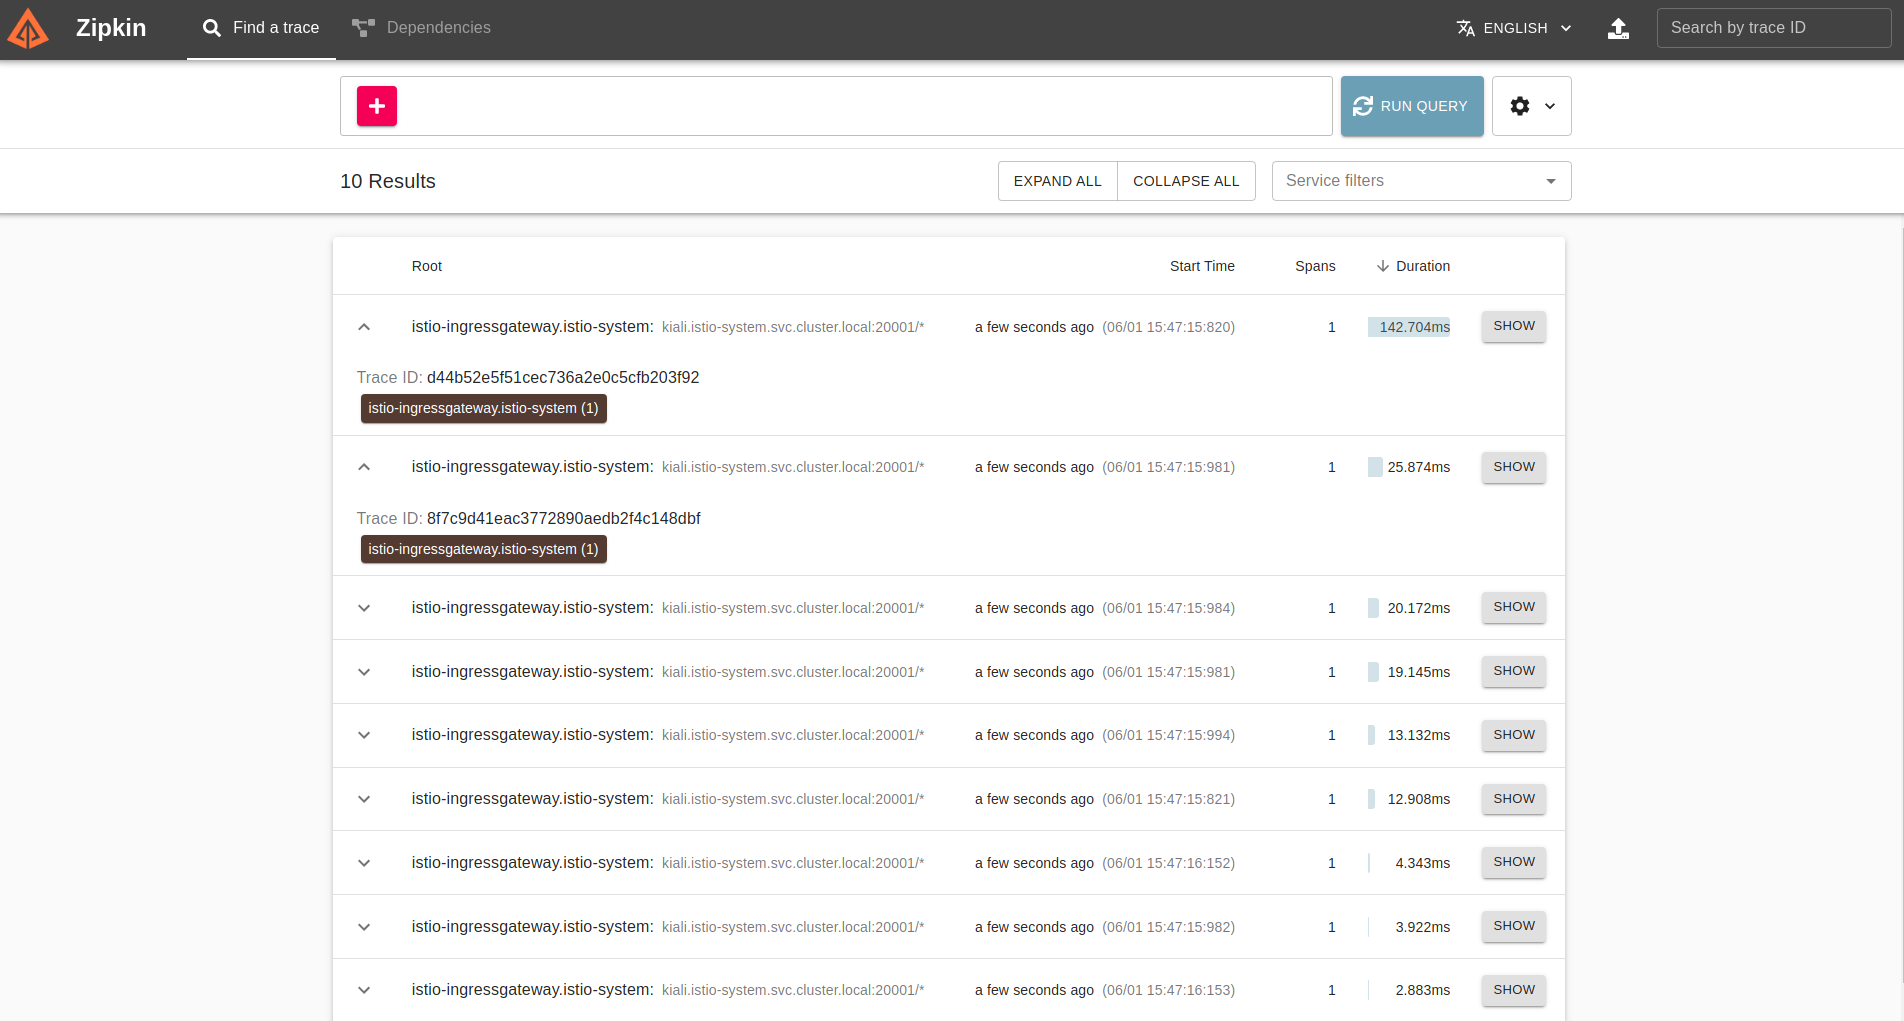
Zipkin is a distributed tracing solution for distributed systems. It is a tool for capturing distributed traces and providing a centralized view of the traces. This is essential for a microservice setup where a request could span multiple services, and debugging would require tracing them. Click RUN QUERY on the home screen to fetch recent traces, and click SHOW on one of them.
Cleanup the GCP cluster
Once you are done with experiments, make sure to delete the cluster you created so that you don’t end up with a big bill from Google. You can delete the cluster from the Google Cloud Console GUI or via the command line using the following command.
gcloud container clusters delete hello-hipster
Learn more about Java Microservices, Istio, Kubernetes, and JHipster
If you want to learn more about Kubernetes, OIDC, or using OIDC with Kubernetes, and security in general, check out these additional resources.
- How to Deploy Java Microservices on Amazon EKS Using Terraform and Kubernetes
- How to Secure Your Kubernetes Cluster with OpenID Connect and RBAC
- Kubernetes Microservices on Azure with Cosmos DB
- How to Secure Your Kubernetes Clusters With Best Practices
- OAuth 2.0 and OpenID Connect Overview
- Secure Access to AWS EKS Clusters for Admins
You can find all the code from this example on GitHub.
If you liked this tutorial, chances are you’ll enjoy the others we publish. Please follow @oktadev on Twitter and subscribe to our YouTube channel to get notified when we publish new developer tutorials.
Okta Developer Blog Comment Policy
We welcome relevant and respectful comments. Off-topic comments may be removed.