Secure Access to AWS EKS Clusters for Admins
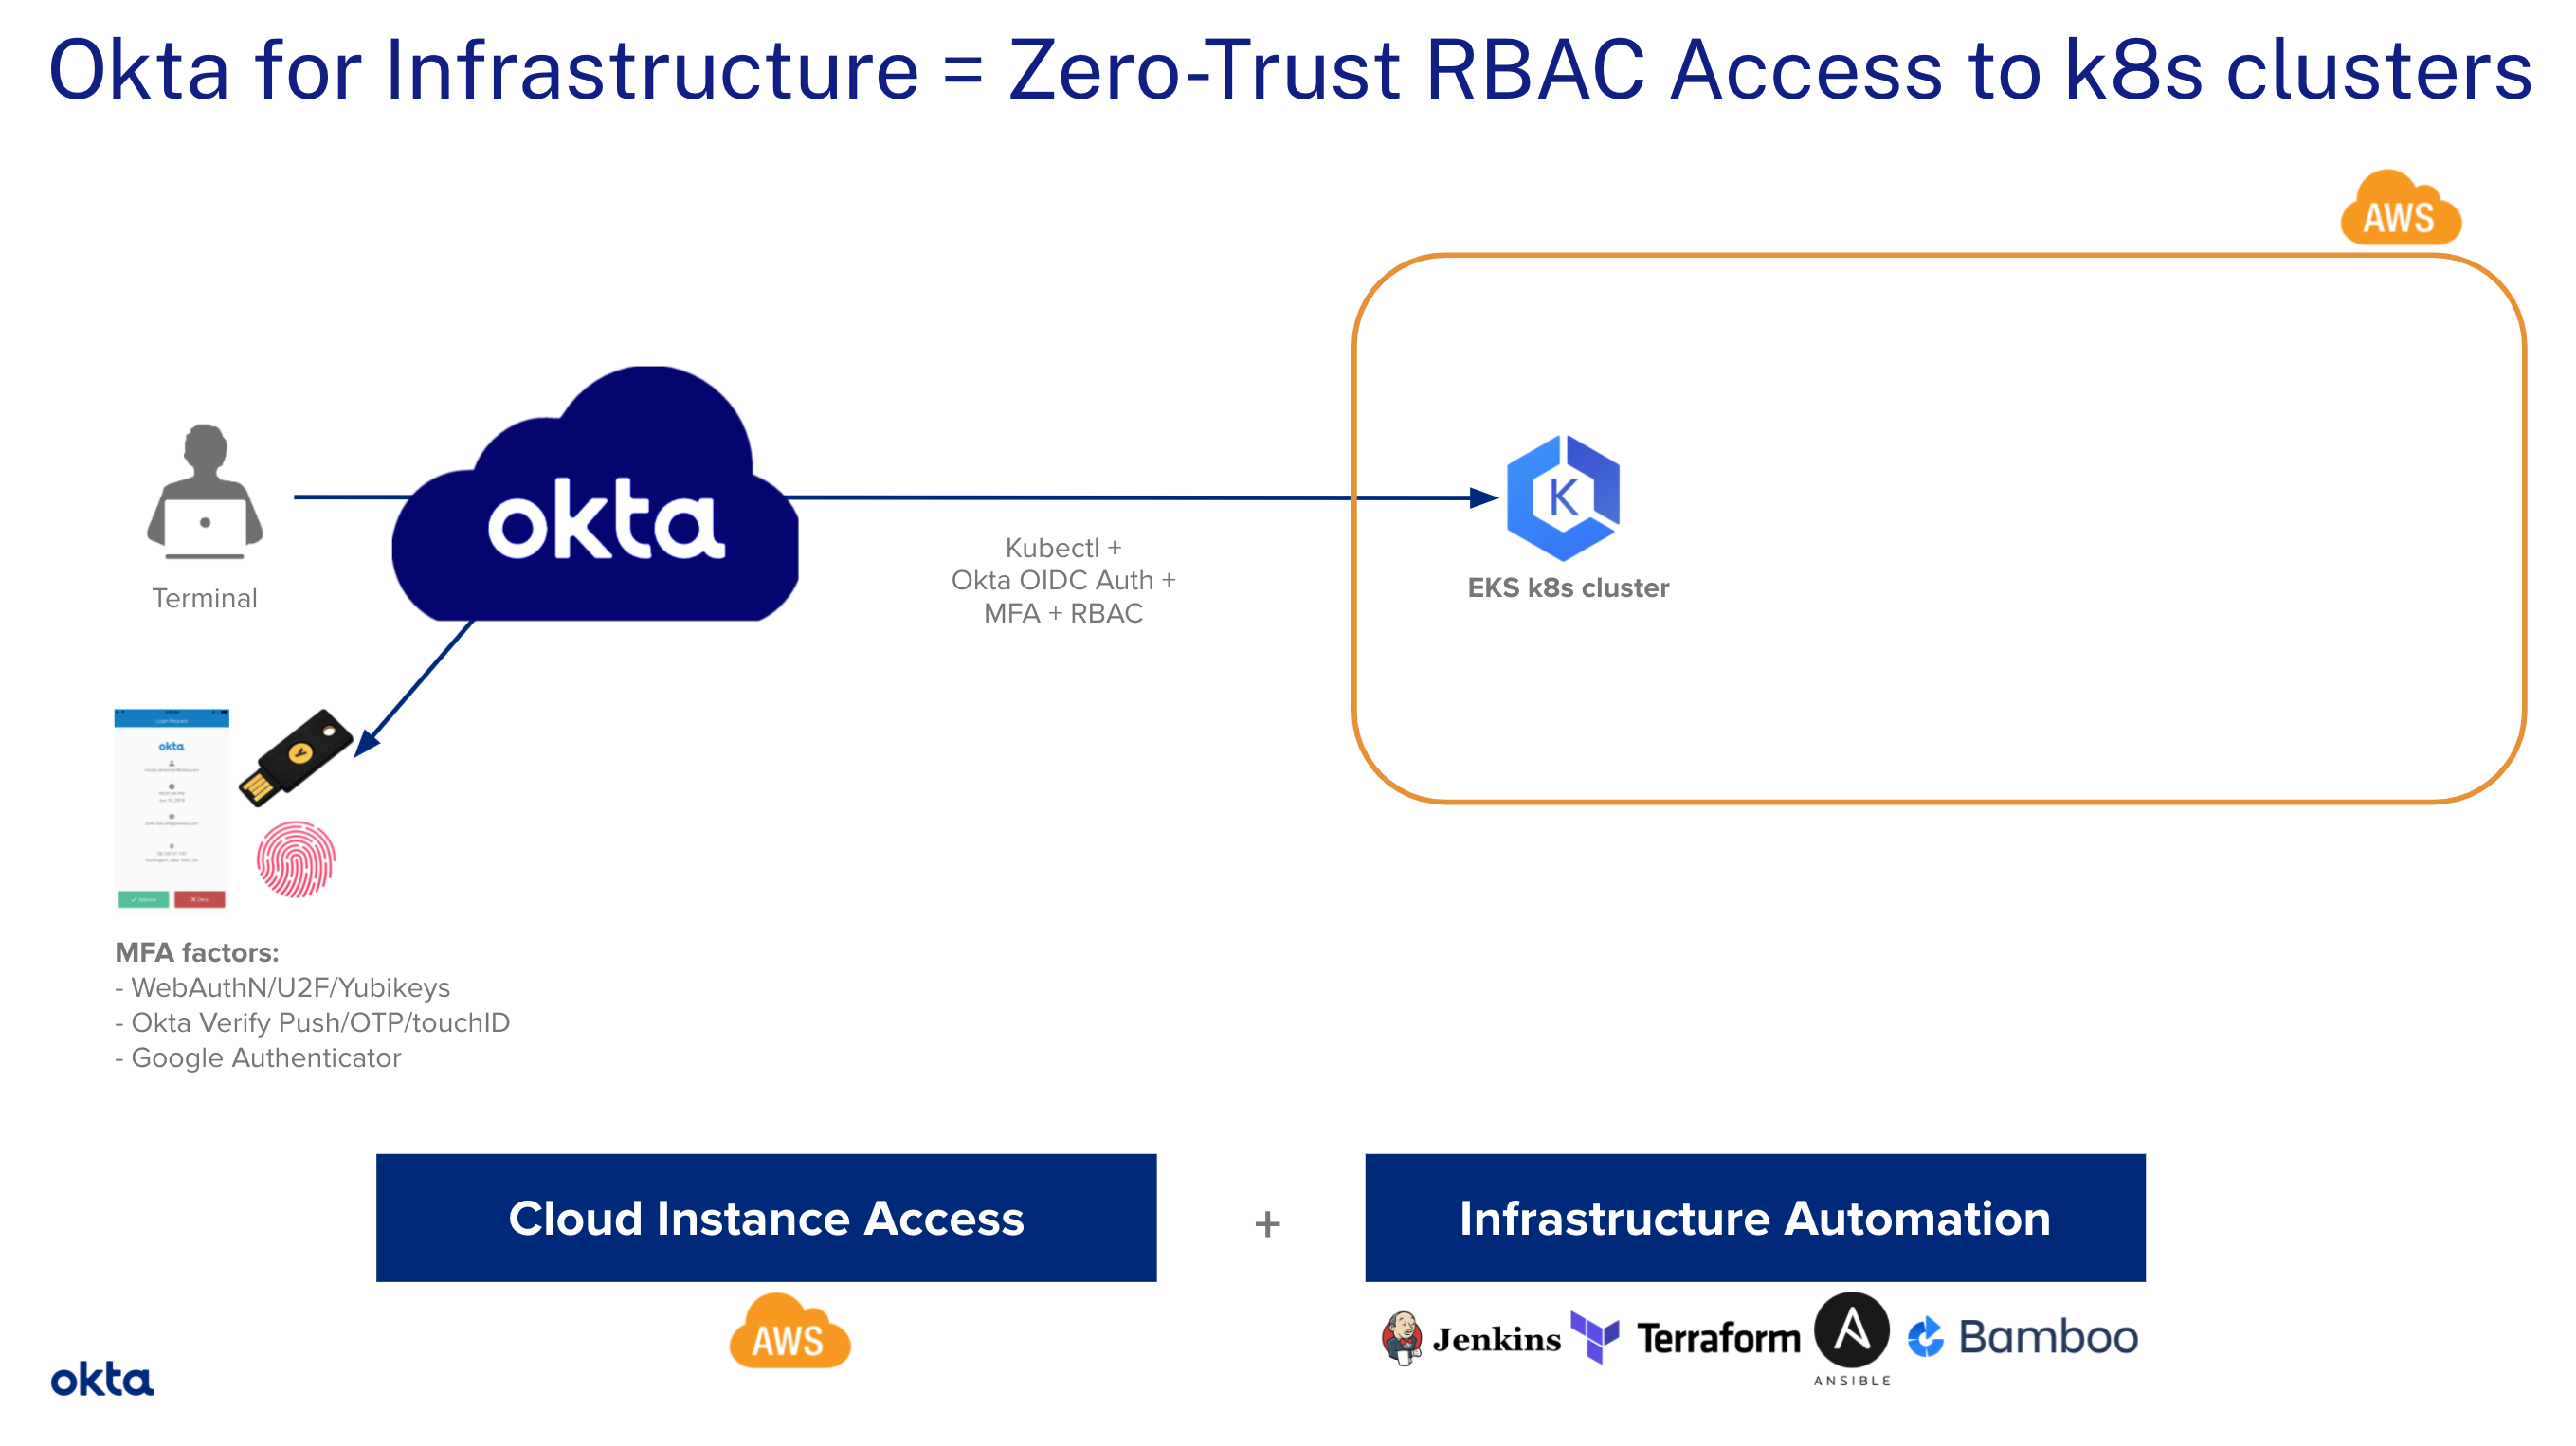
In this tutorial, we will leverage OpenID Connect (OIDC) to allow our DevOps team to securely access their EKS clusters on AWS. We use Role Based Access Control (RBAC)] to enforce the least privilege required without the need to configure AWS IAM roles. 😎
We’ll highlight the steps to manually enable an OIDC provider on your EKS clusters. At the end of this tutorial, we’ll point to resources you can leverage to automate all those steps.
Below is the target architecture you’ll be deploying:

Table of Contents
- Who This Quick-Start Guide Is For
- What You’ll Need to Get Started
- Okta + EKS: How Do They Work Together?
- Configuration
- Automation for Your AWS EKS Workflow
- Learn More About Identity Security
Who This Quick-Start Guide Is For
This tutorial is intended to show AWS DevOps and Identity Security administrator teams how to securely access Amazon Elastic Kubernetes Service (EKS) clusters. Anyone with an interest in Identity Security best practices can learn from this guide, but it assumes at least some knowledge of:
- Kubernetes (k8s), k8s API Server, k8s RBAC Authorization, and k8s role binding
- AWS Console, EKS, AWS CloudShell
- Terminal on a end-user workstation (e.g. macOS, Windows, Linux)
What You’ll Need to Get Started
The prerequisites to complete this tutorial are:
- The tutorial assumes that you’re already using Okta as your identity and authorization solution. However, if you don’t have an existing Okta tenant, you can create a new one here and follow along.
- One or more Okta administrative user(s)
- One or more Okta test user(s)
- Okta administrator rights
- Workstation(s) running a supported version of macOS, Windows, or Linux
- Installation permissions
- SSH terminal application
- HTTPS web browser (recommended)
What is Okta?
Okta, Inc. is an identity and access management company, providing cloud software that helps companies manage and secure user authentication into applications, and for developers to build identity controls into applications, websites, web services, and devices. You get scalable authentication built right into your application without the development overhead, security risks, and maintenance that come from building it yourself.
What is Kubernetes?
Kubernetes, also known by the abbreviation k8s, is an open-source container orchestration platform for automating deployment, scaling, and management of containerized applications. See https://kubernetes.io/.
What is AWS EKS?
Amazon Elastic Kubernetes Service (Amazon EKS) is a managed container service to run and scale Kubernetes applications in the cloud or on-premises. See https://aws.amazon.com/eks/.
To deploy k8s clusters on your own infrastructure, you can use EKS Anywhere. See https://aws.amazon.com/eks/eks-anywhere/
Okta + EKS: How Do They Work Together?
Let’s take an EKS cluster deployed in AWS. We’ll perform the following steps:
- add Okta as an OIDC provider to the EKS cluster
- configure the k8s API server so it prompts the user for Authentication (AuthN)
- configure RBAC Authorization (AuthZ), mapping Okta groups with given k8s roles
- leverage an OIDC plugin that 1) prompts the user for AuthN in the web browser and 2) retrieves the JSON Web Token (JWT)
id_tokenfrom Okta and passes it to our kubectl (Kubernetes command-line tool) commands
Ready? Let’s get started!
Configuration
Let’s first deploy a brand new EKS cluster. We’ll do it manually from the AWS Console.
Note: We recommend configuring access to the AWS Console using Okta SSO+MFA.
Create a New Cluster Service Role
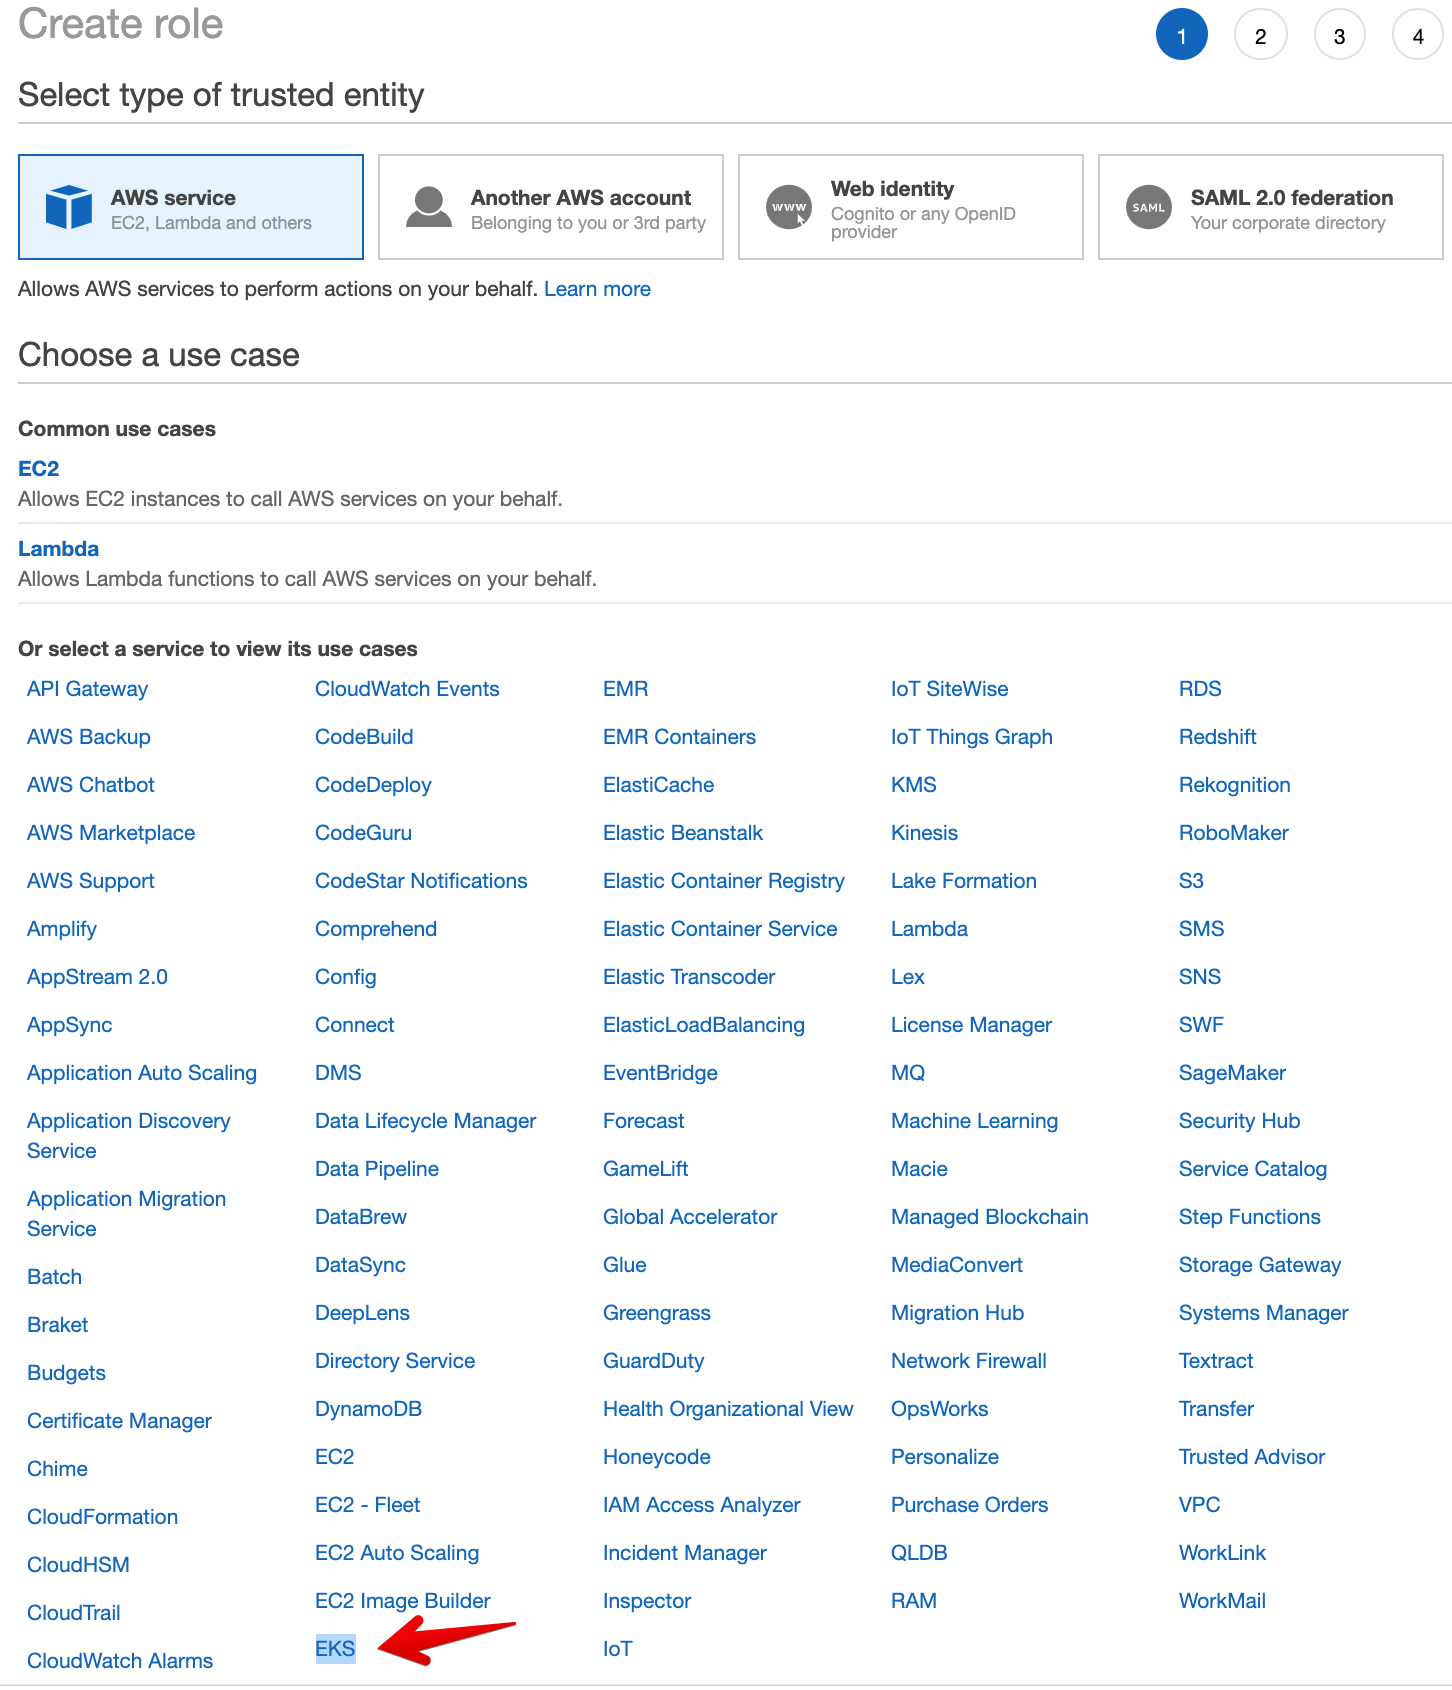
- Go to https://console.aws.amazon.com/iamv2/home?#/roles > Create role

- Select trusted entity = AWS service, and click on the EKS service
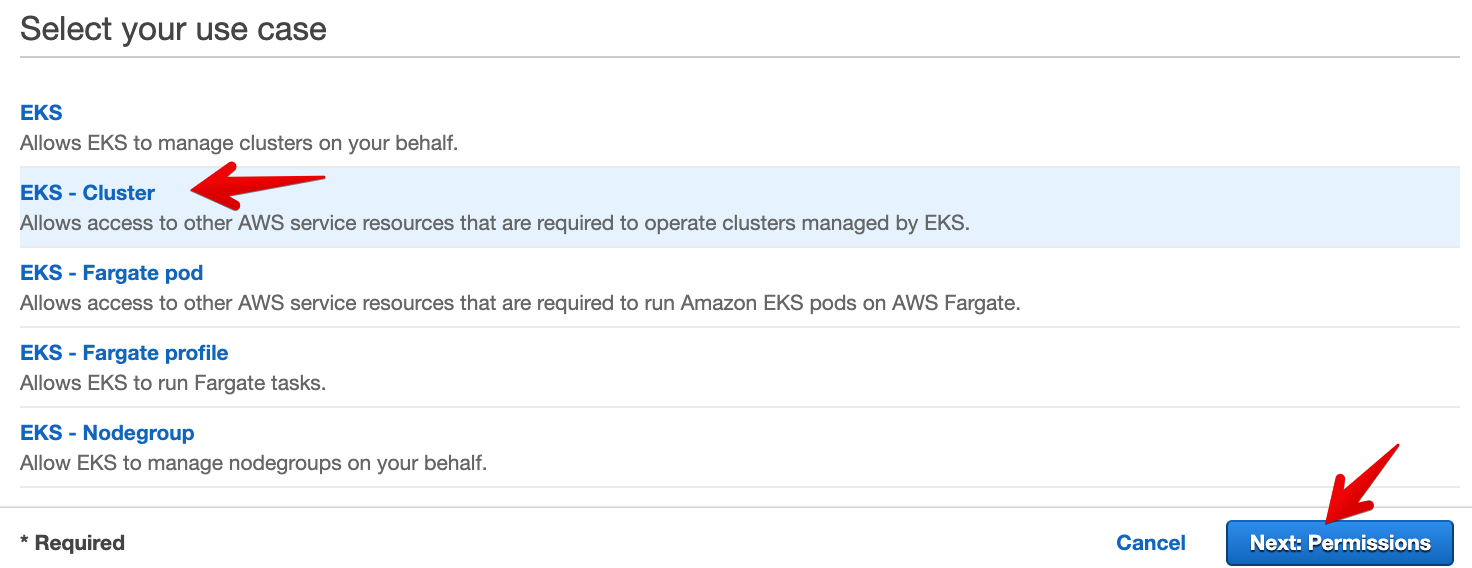
- Click on use case = EKS - Cluster, then Next: Permission.
- Verify that AmazonEKSClusterPolicy is included in the attached permissions policies. Click on Next: Tags.
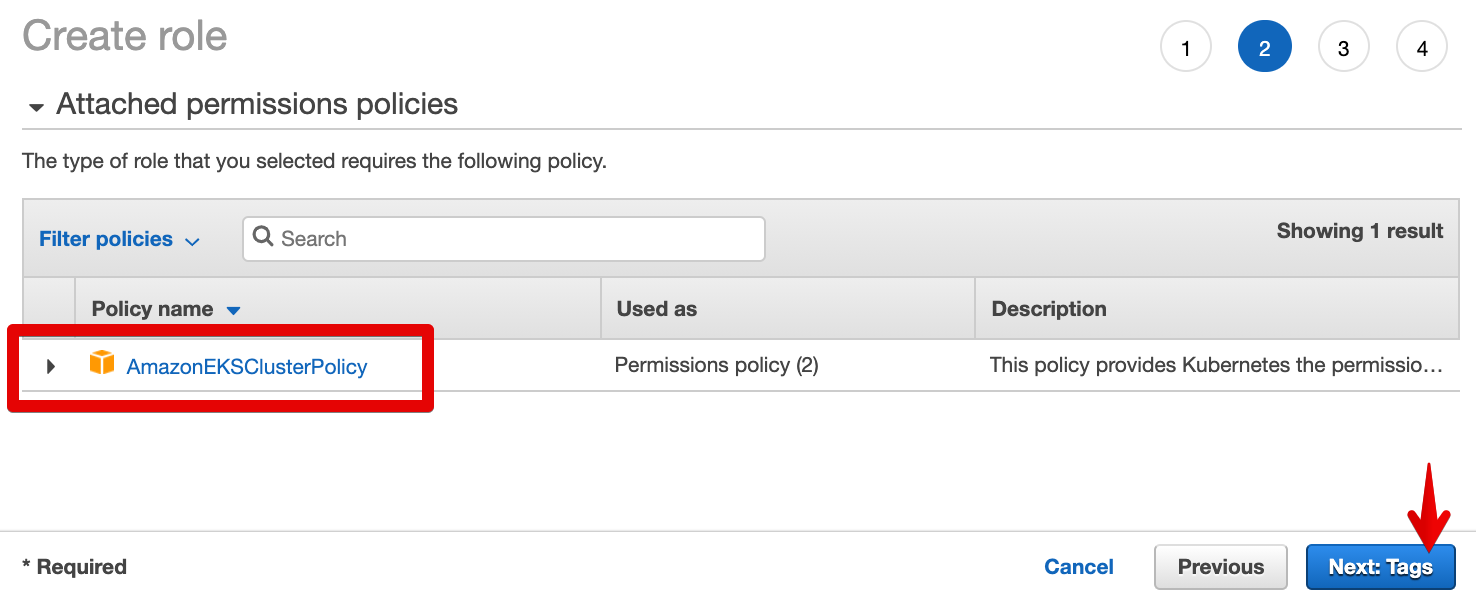
- Click on Next: Review.

- Enter EKSCluster as Role name.
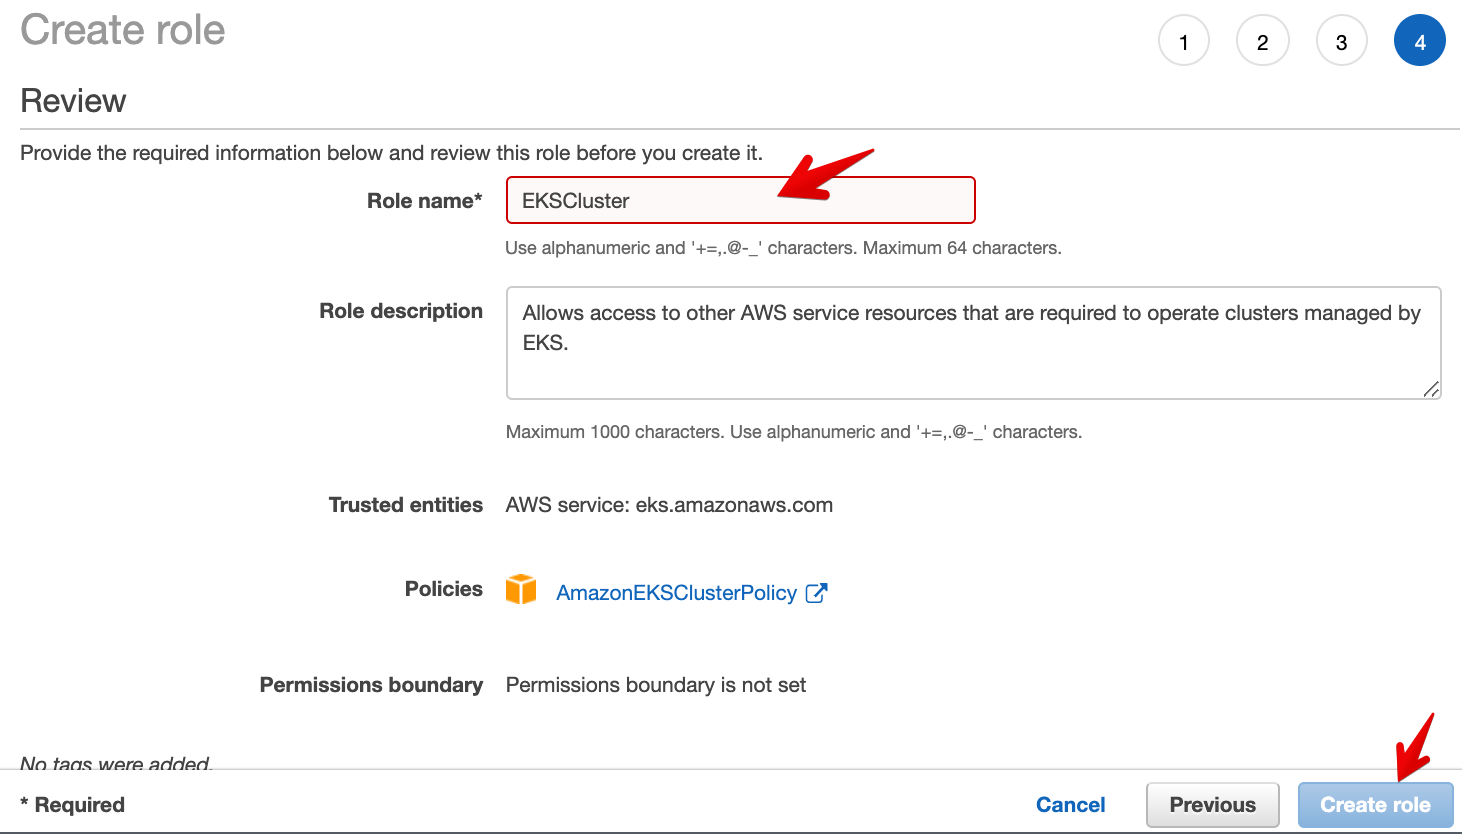
- Once your role is created, go back to the list of roles and open EKSCluster to double-check it’s properly configured:
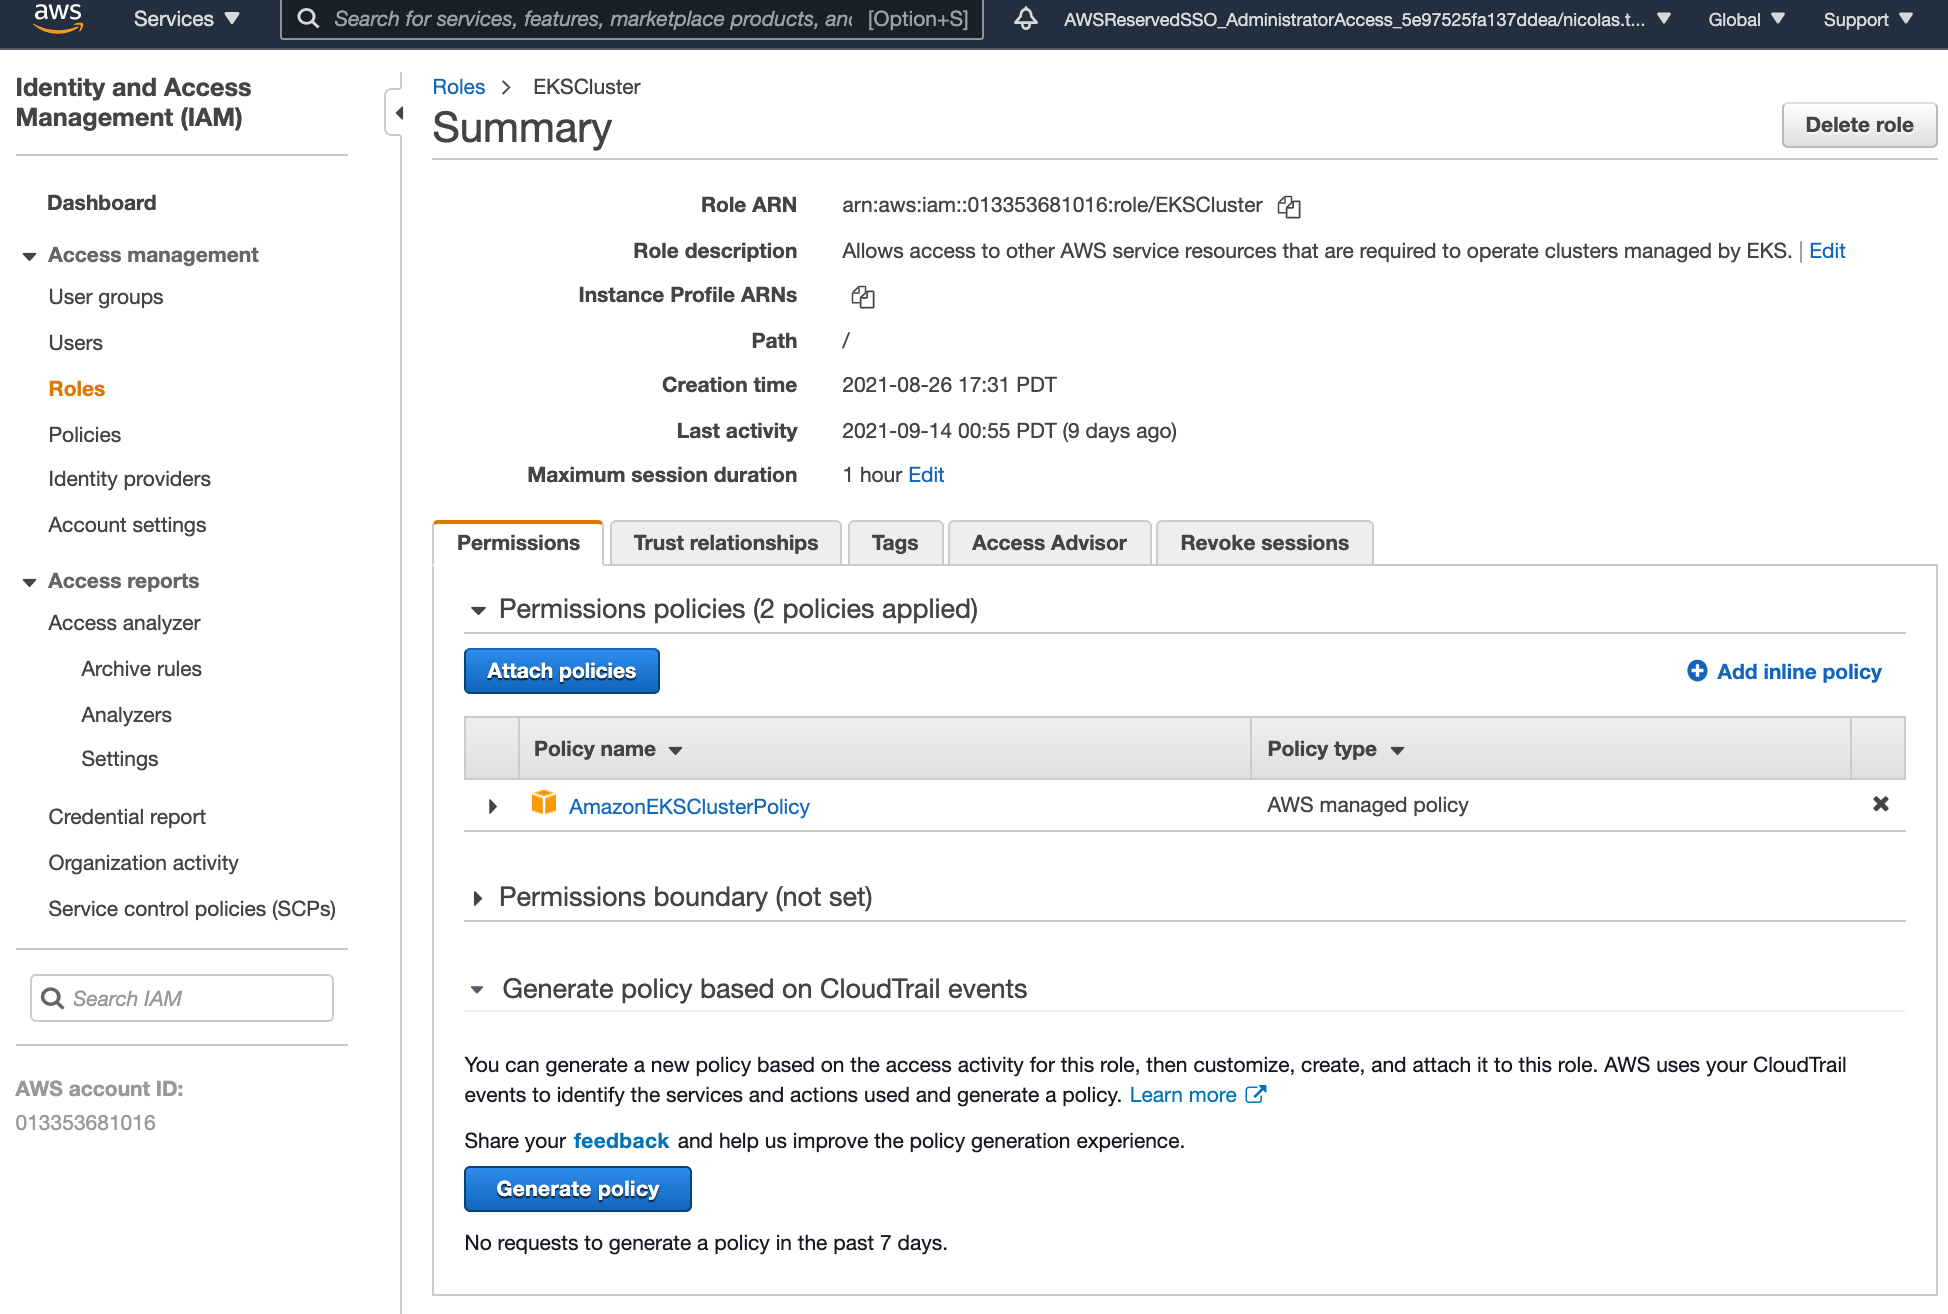
Create a New EKS Cluster
Let’s create a brand new EKS cluster.
- Go to EKS
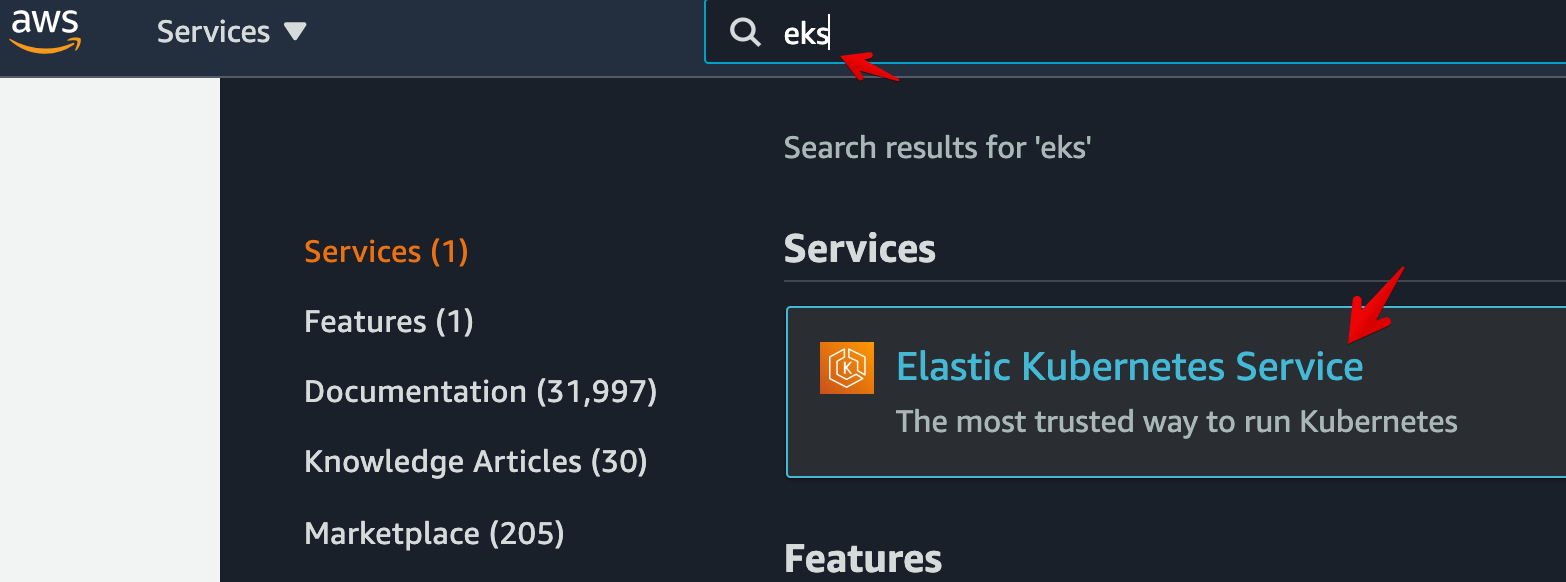
- Click on Clusters > Add cluster > Create.

- Enter a name: eks-cluster. Select the Cluster Service Role created in the previous section EKSCluster. Then click on Next.
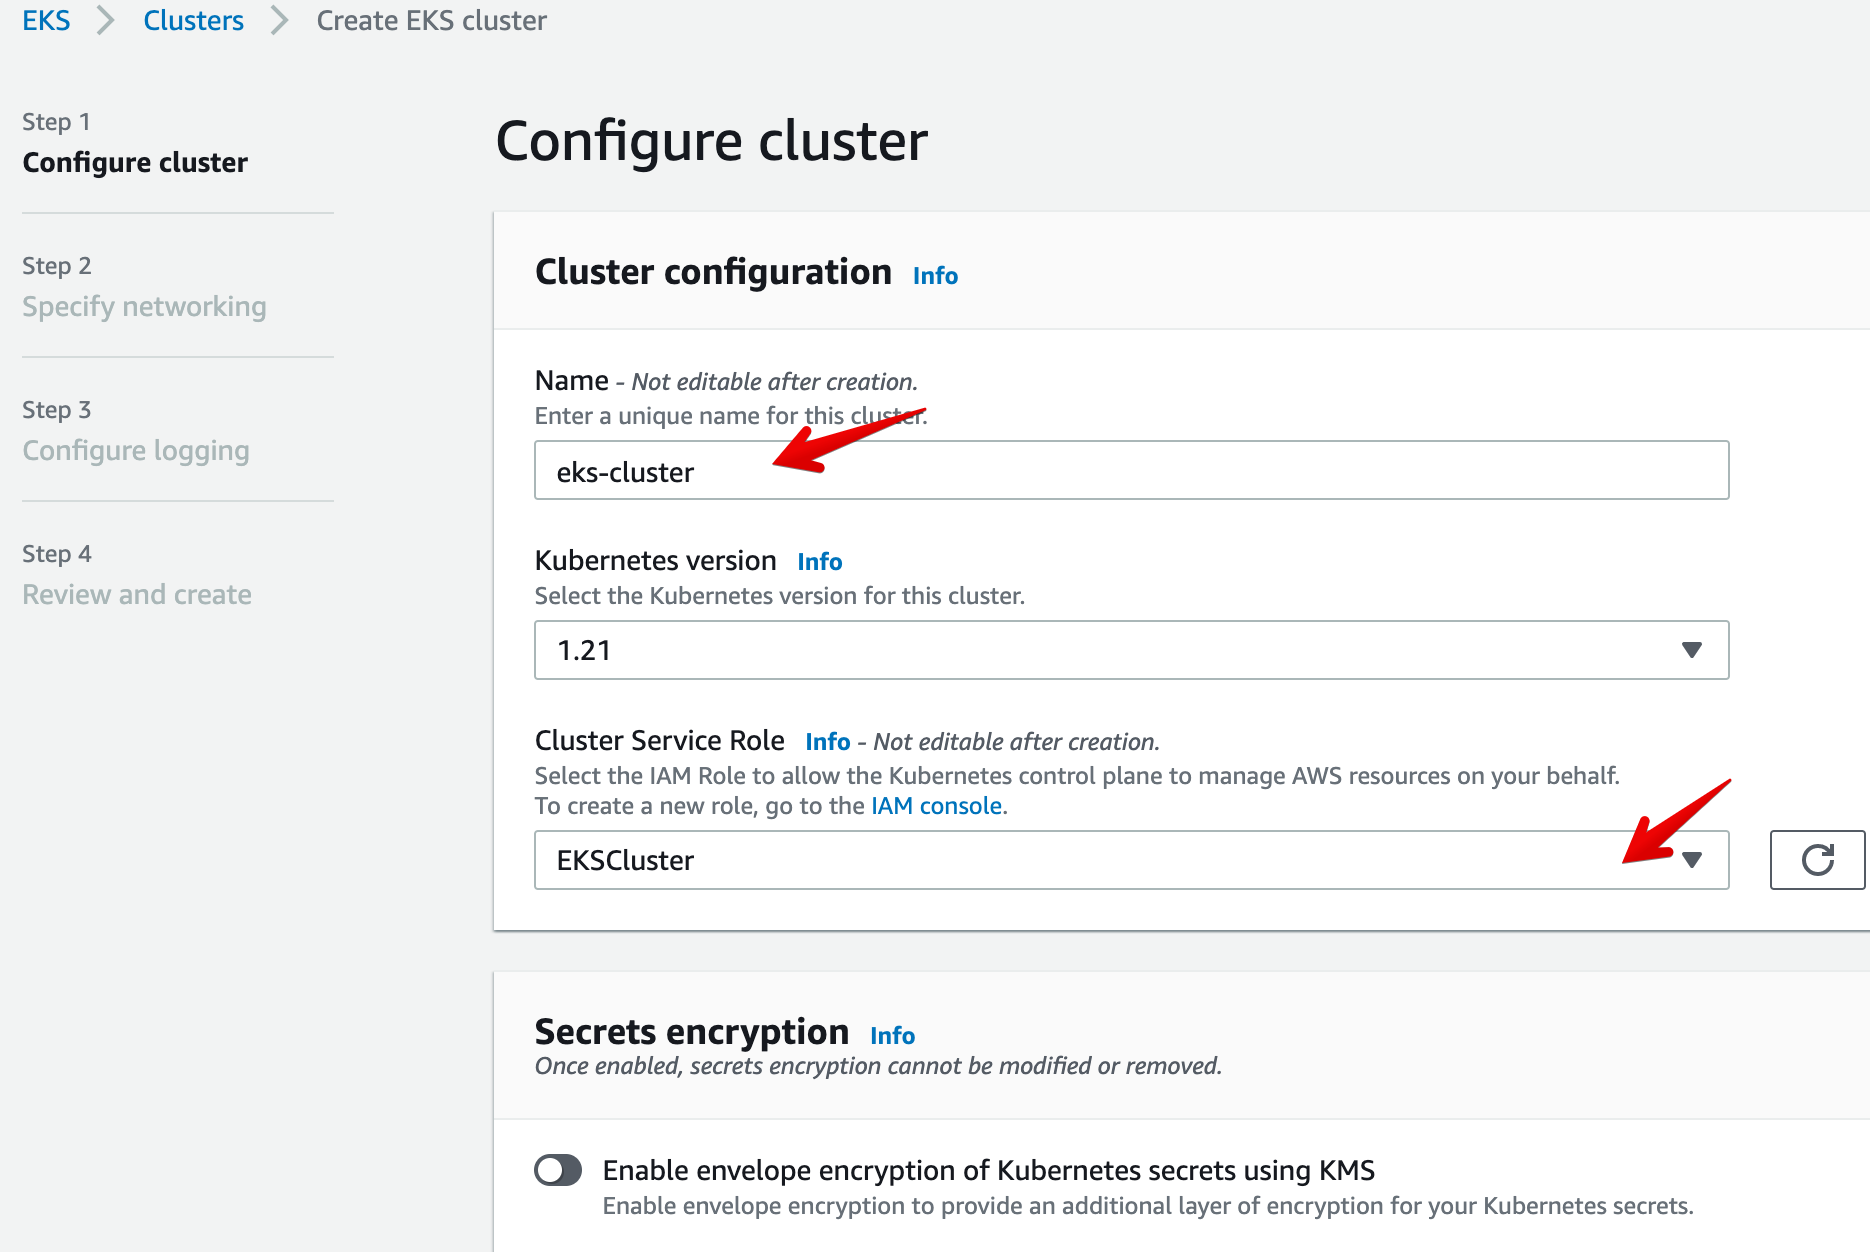
- On the next Networking screen, keep the default options and click on Next:
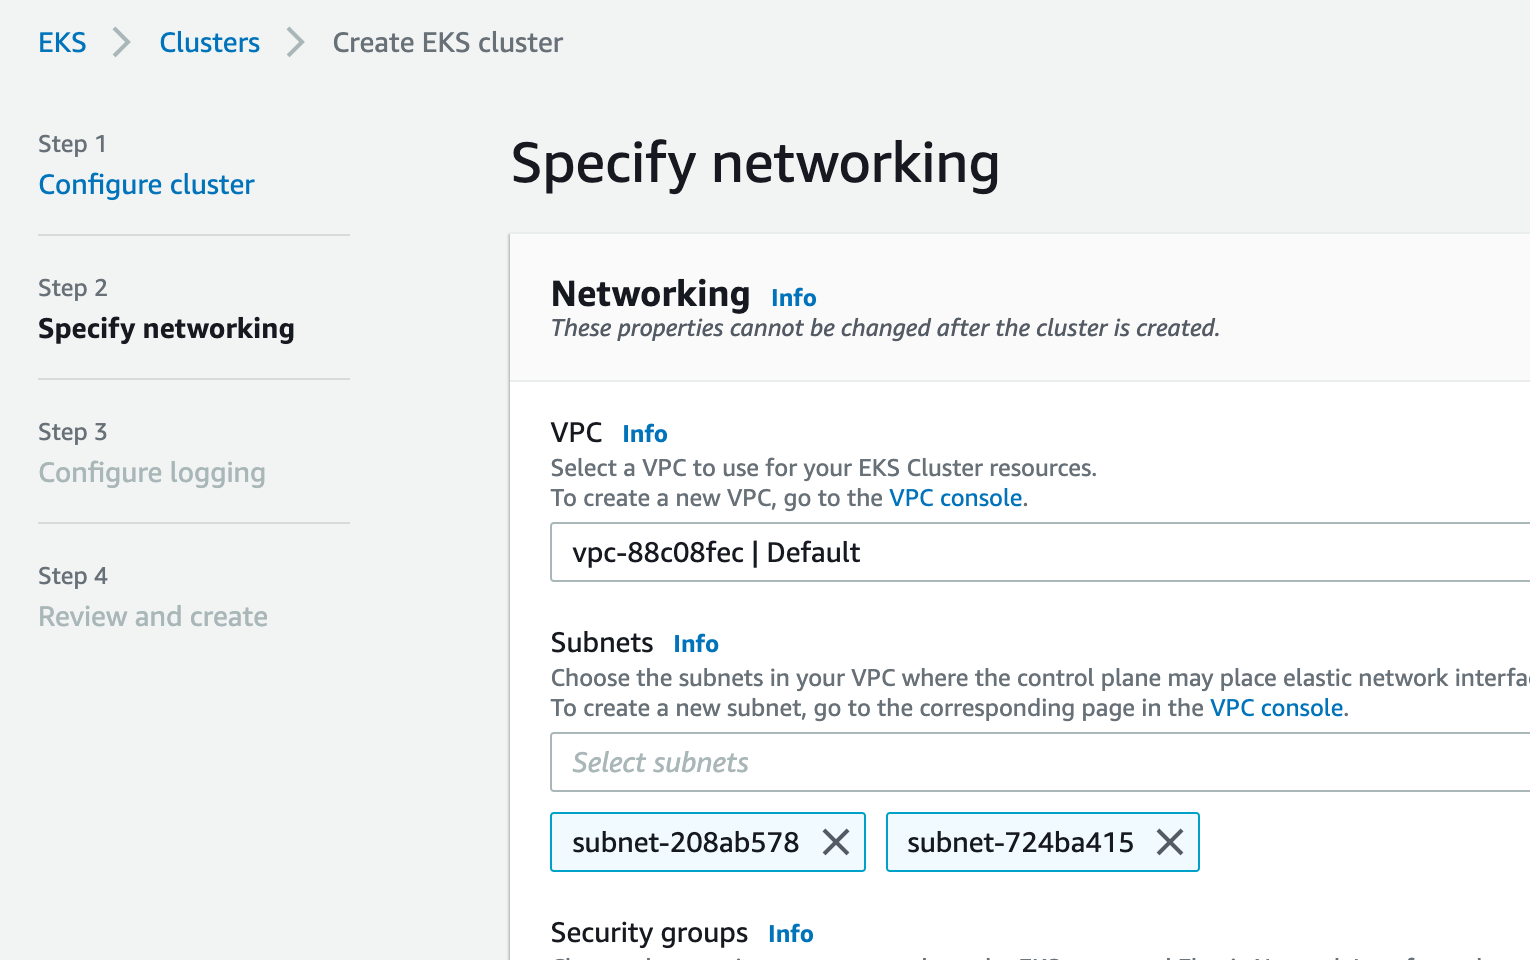
- On the Logging screen, keep the default options and click on Next:
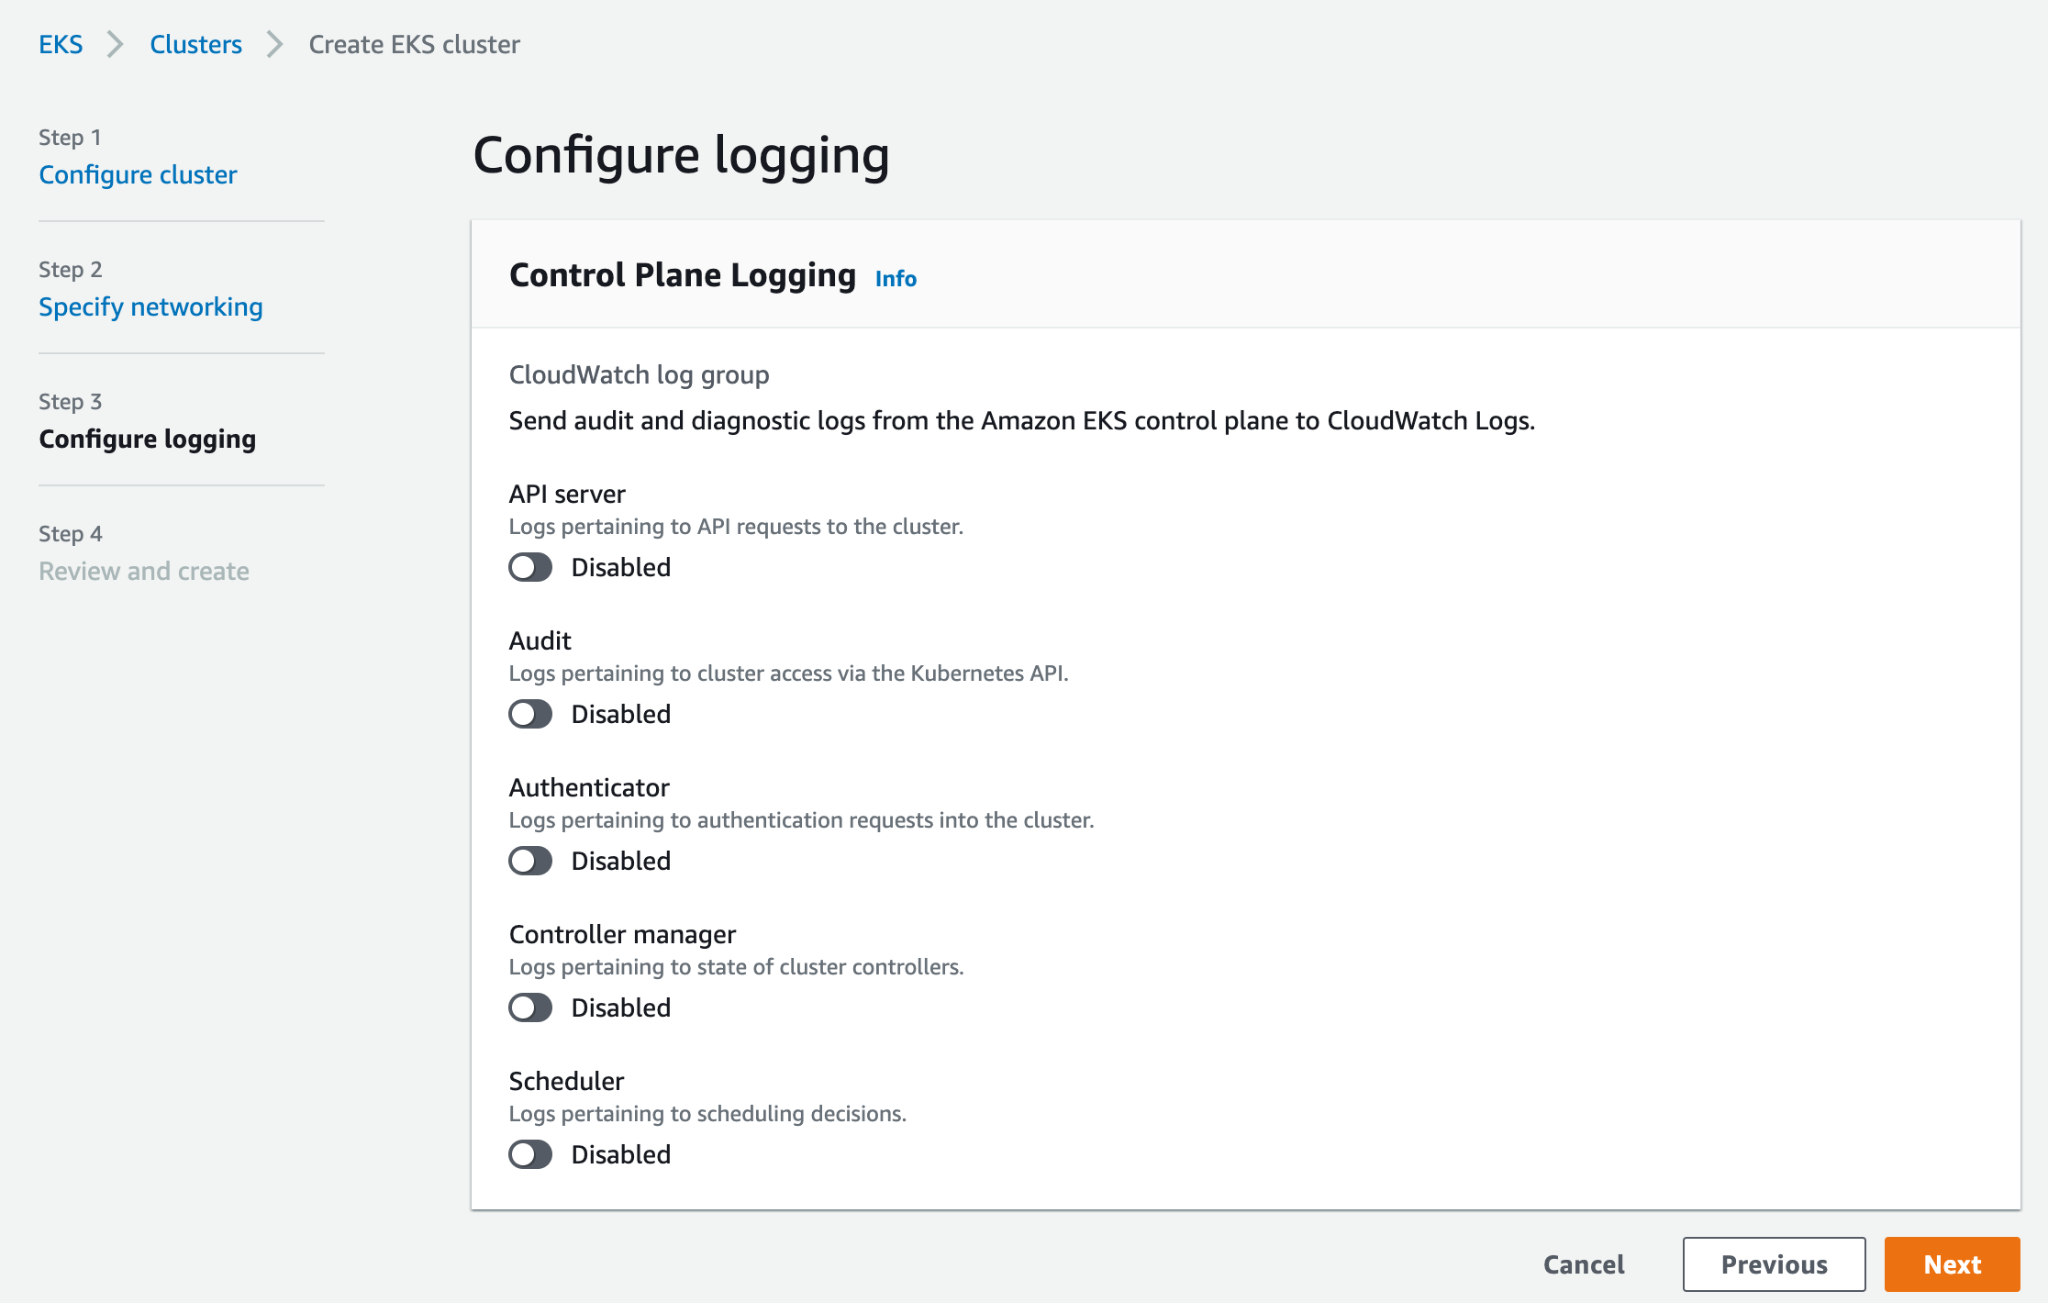
- On the Review and create screen, click on Create:
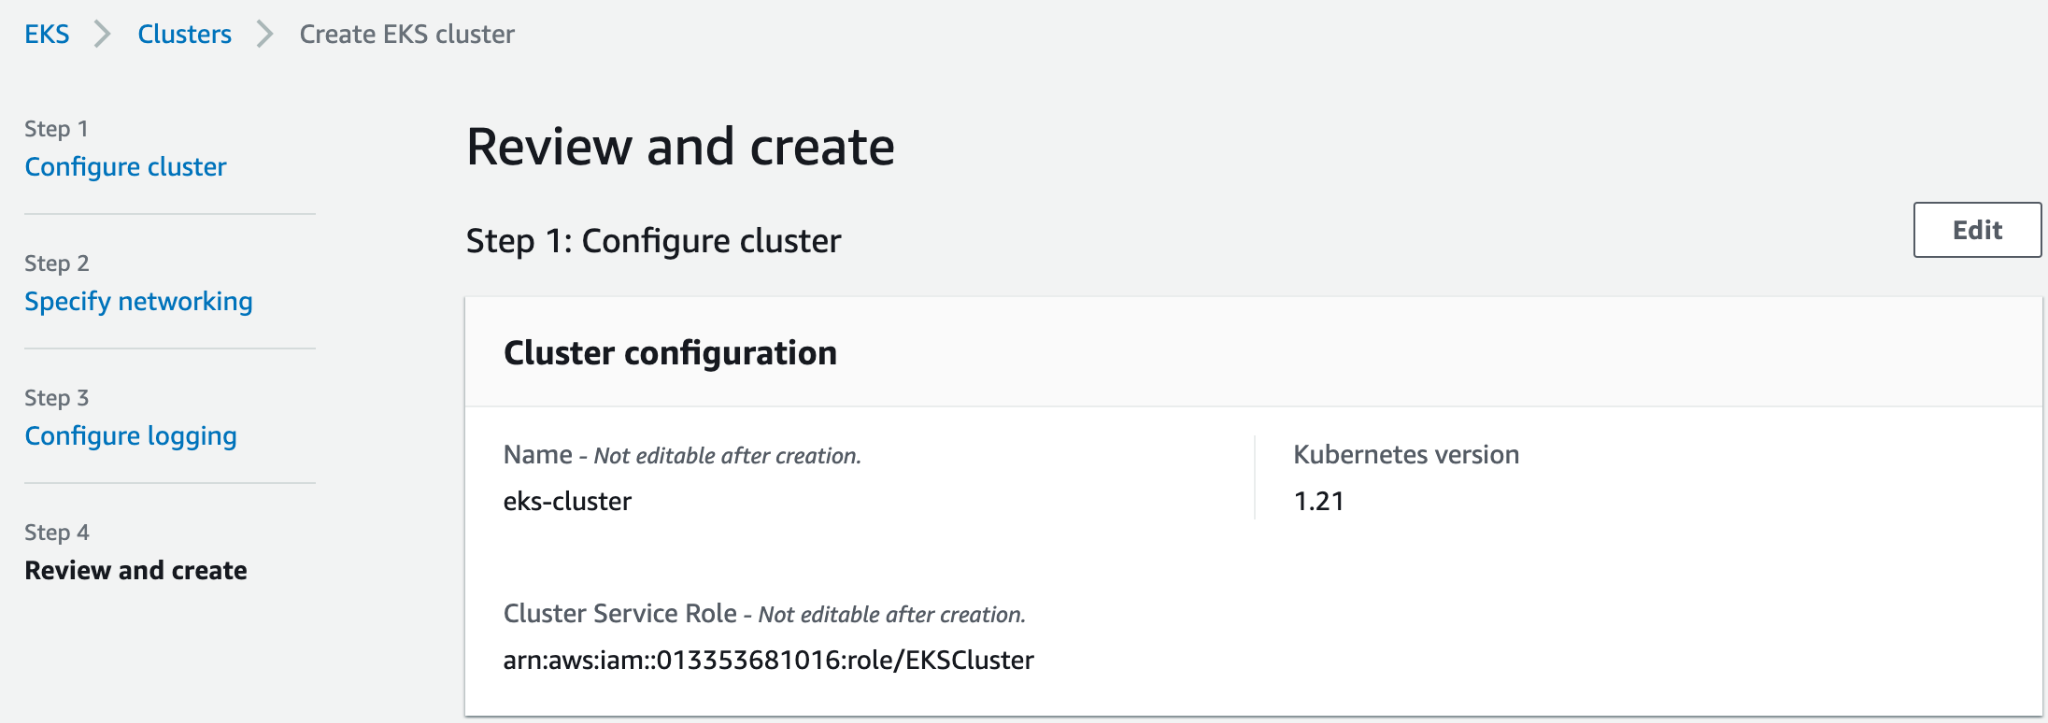
Your EKS cluster will take a couple of minutes to start. In the meantime, let’s do the configuration on the Okta side. Then we’ll come back to the AWS Console to configure Okta as the OIDC provider for the EKS cluster.
Configure Your Okta Org
In the Okta admin console, we’ll create a group of users that we’ll assign to a OIDC client, and we’ll configure the AuthZ Server to inject the list of groups into the id_token.
- Go to your Okta admin console
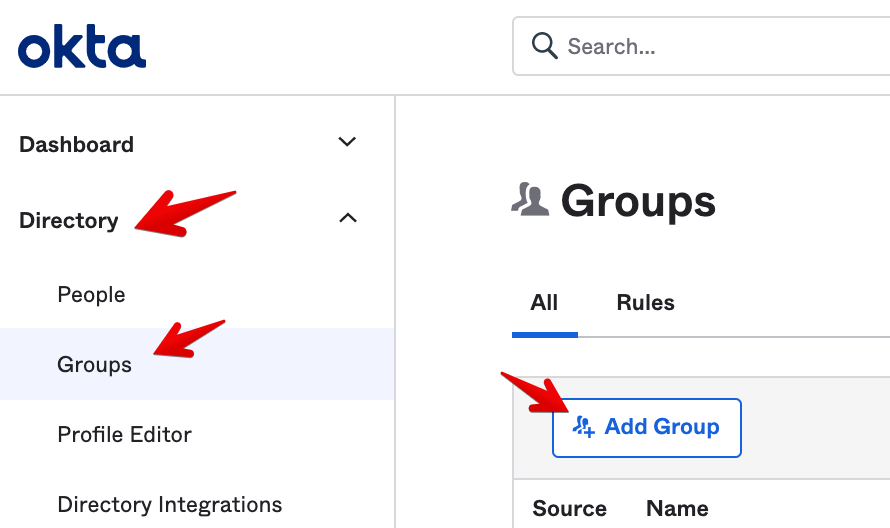
- Let’s create a group. Go to the sidebar menu and select Directory > Groups > Add Group.
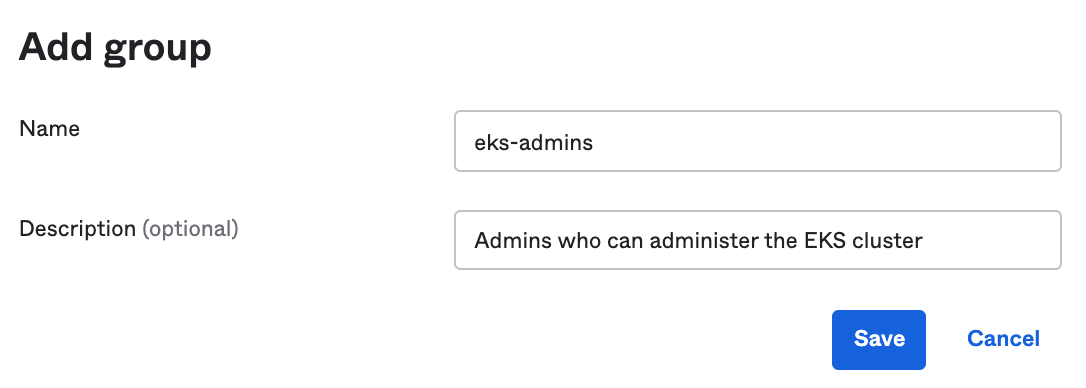
- Then enter eks-admins in the Name field, and in the Description field enter Admins who can administer the EKS cluster:
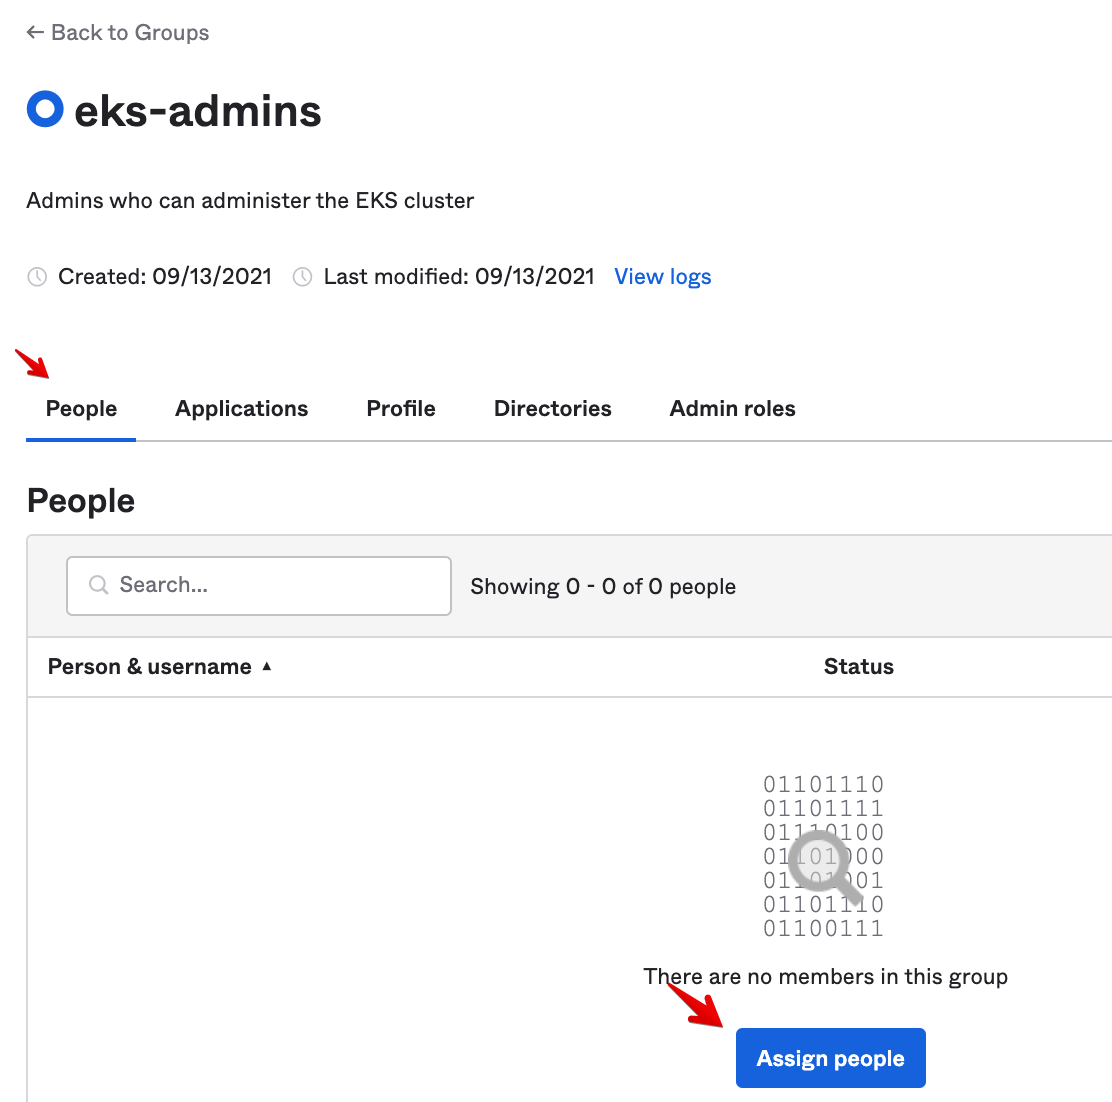
- Click Save. Then assign yourself to this group. From the Group screen, go to the People tab and click on Assign people:
- Search for your user and click on the +:

You should see that your user is now assigned to the eks-admins group:

Now we’ll create a new OIDC client. We’ll leverage the AuthCode + PKCE grant type since the terminal to access EKS clusters will be running on the laptops of DevOps team members, and like any native app, it can’t host any secrets.
- While still in your Okta admin console, go to the sidebar menu and select Applications > Applications. On the Applications screen select Create App Integration:

- Select Sign-in method OIDC - OpenID Connect, Application type Native Application, then click Next:
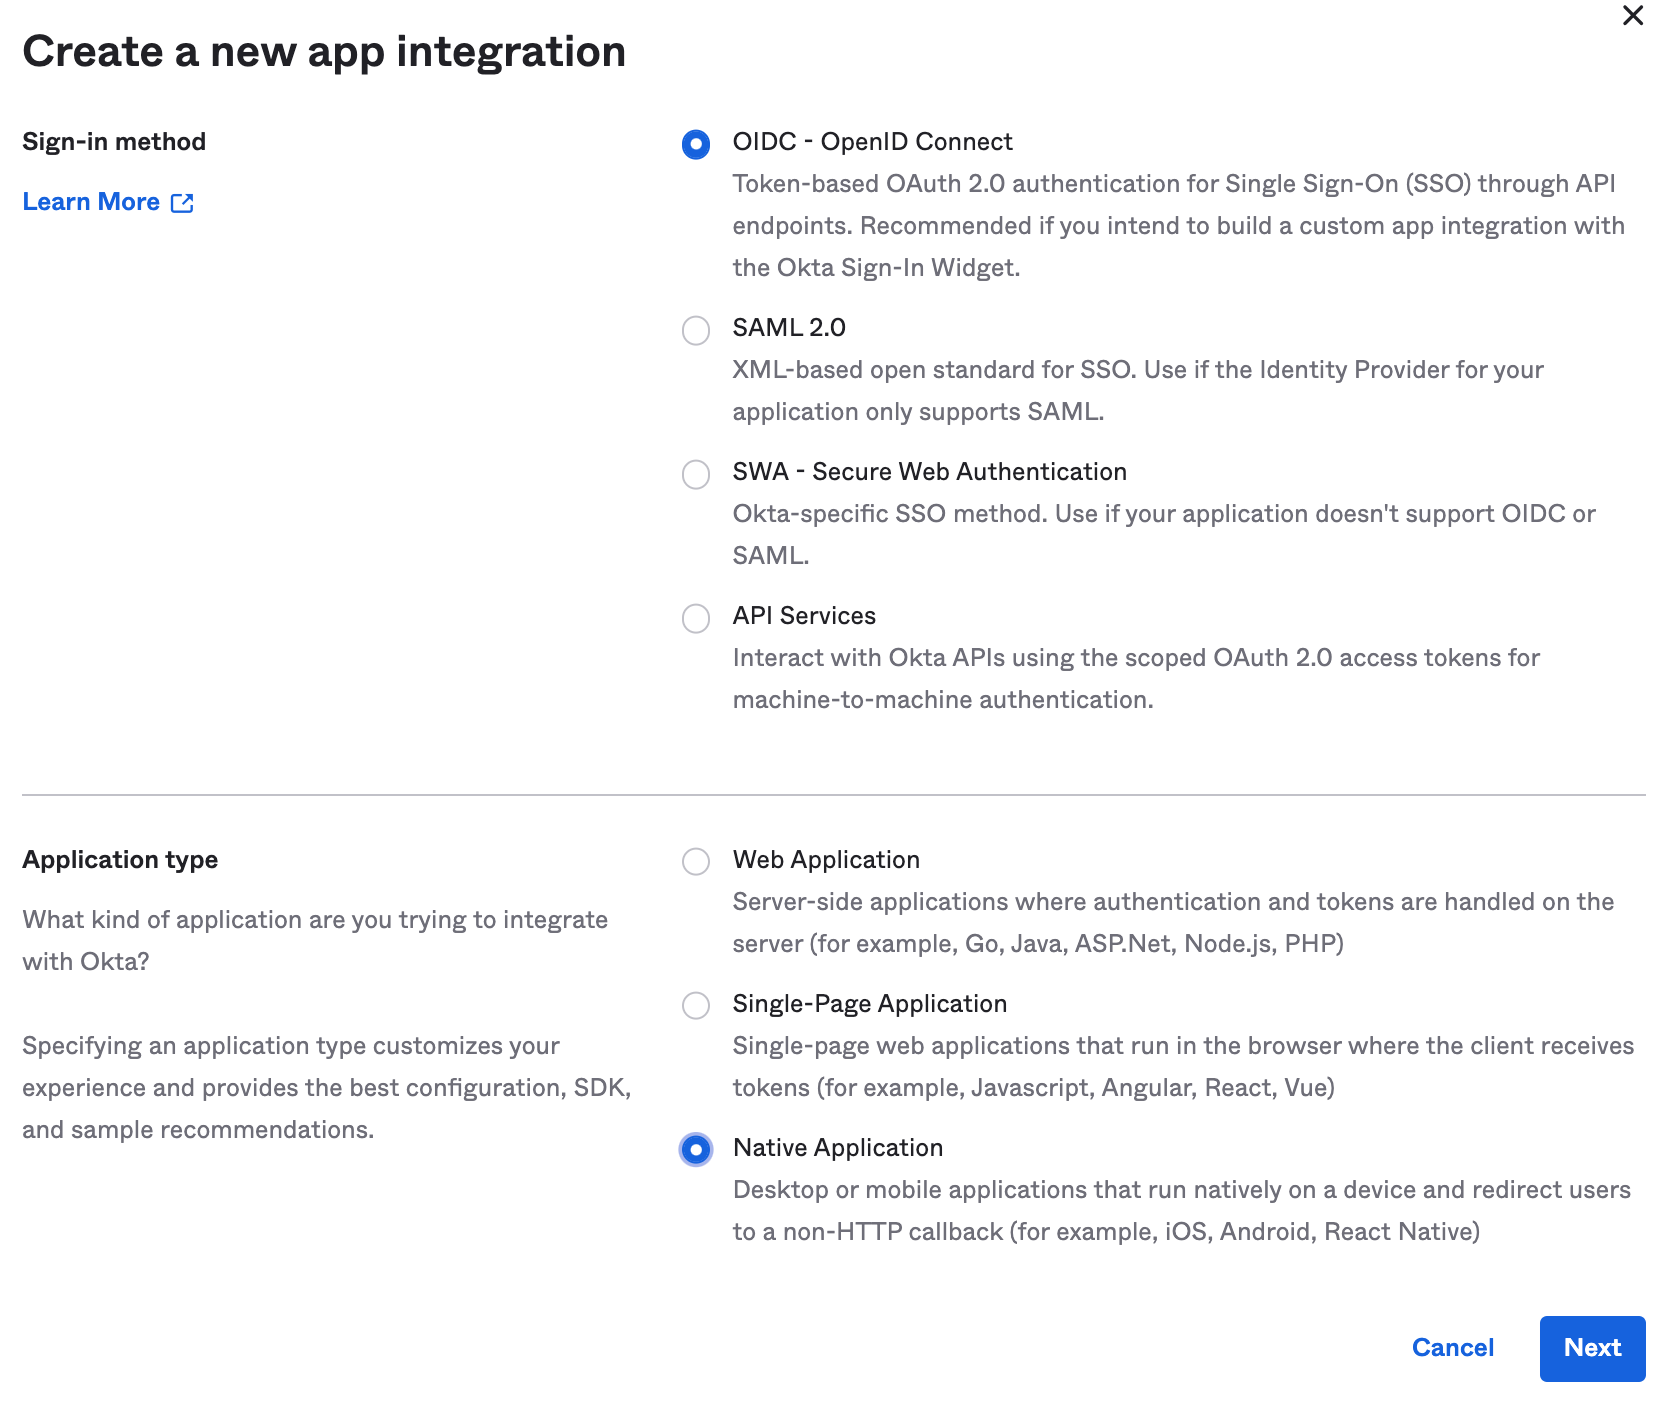
-
Enter the following settings:
- App integration name: EKS
- Grant type: Authorization Code only
- Set the Sign-in redirect URIs to http://localhost:8000 (Eventually, we’ll run the kubectl commands from our laptop.)
- For Controlled access select Allow everyone in your organization to access
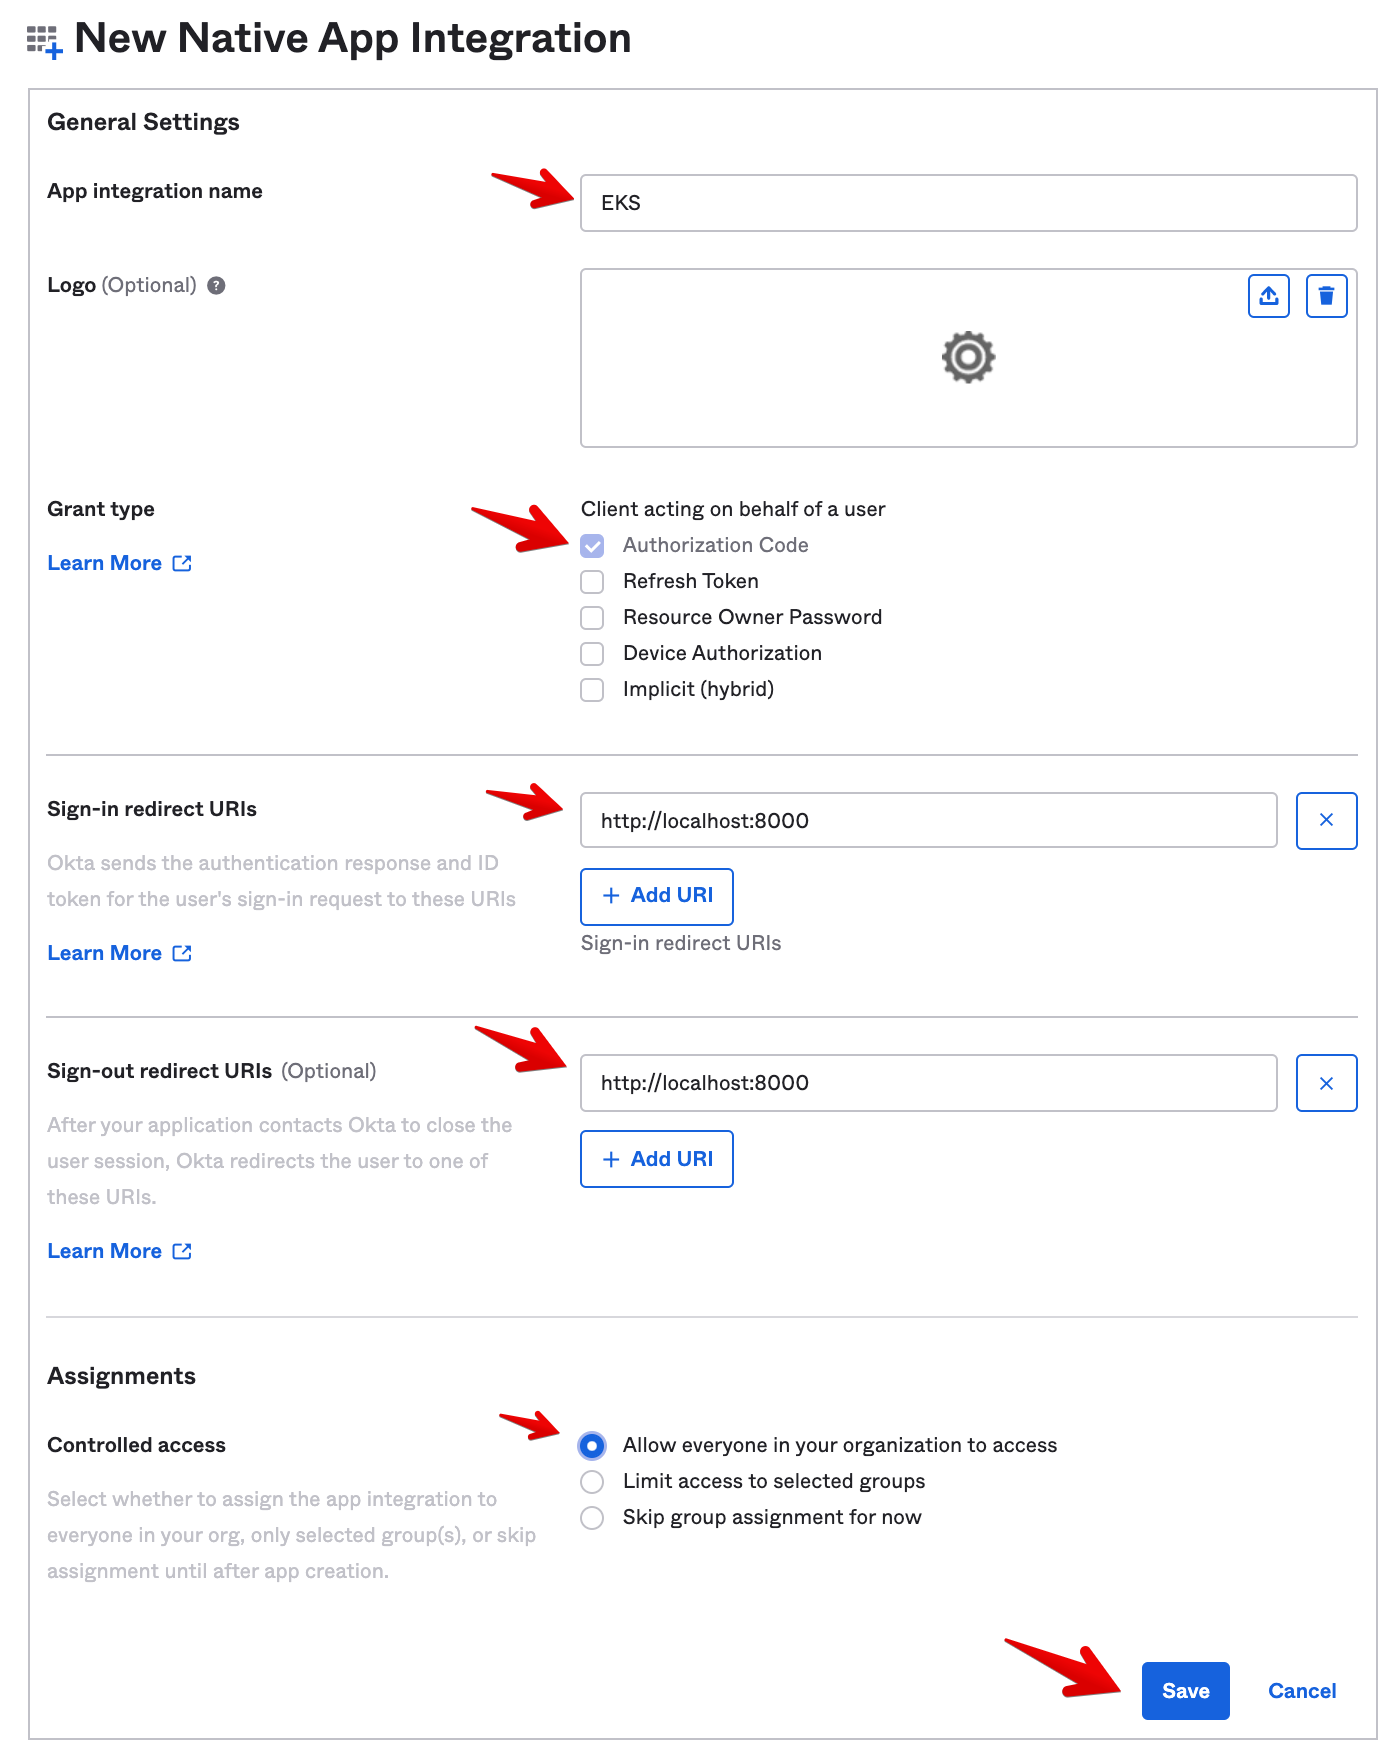
- Then Save.
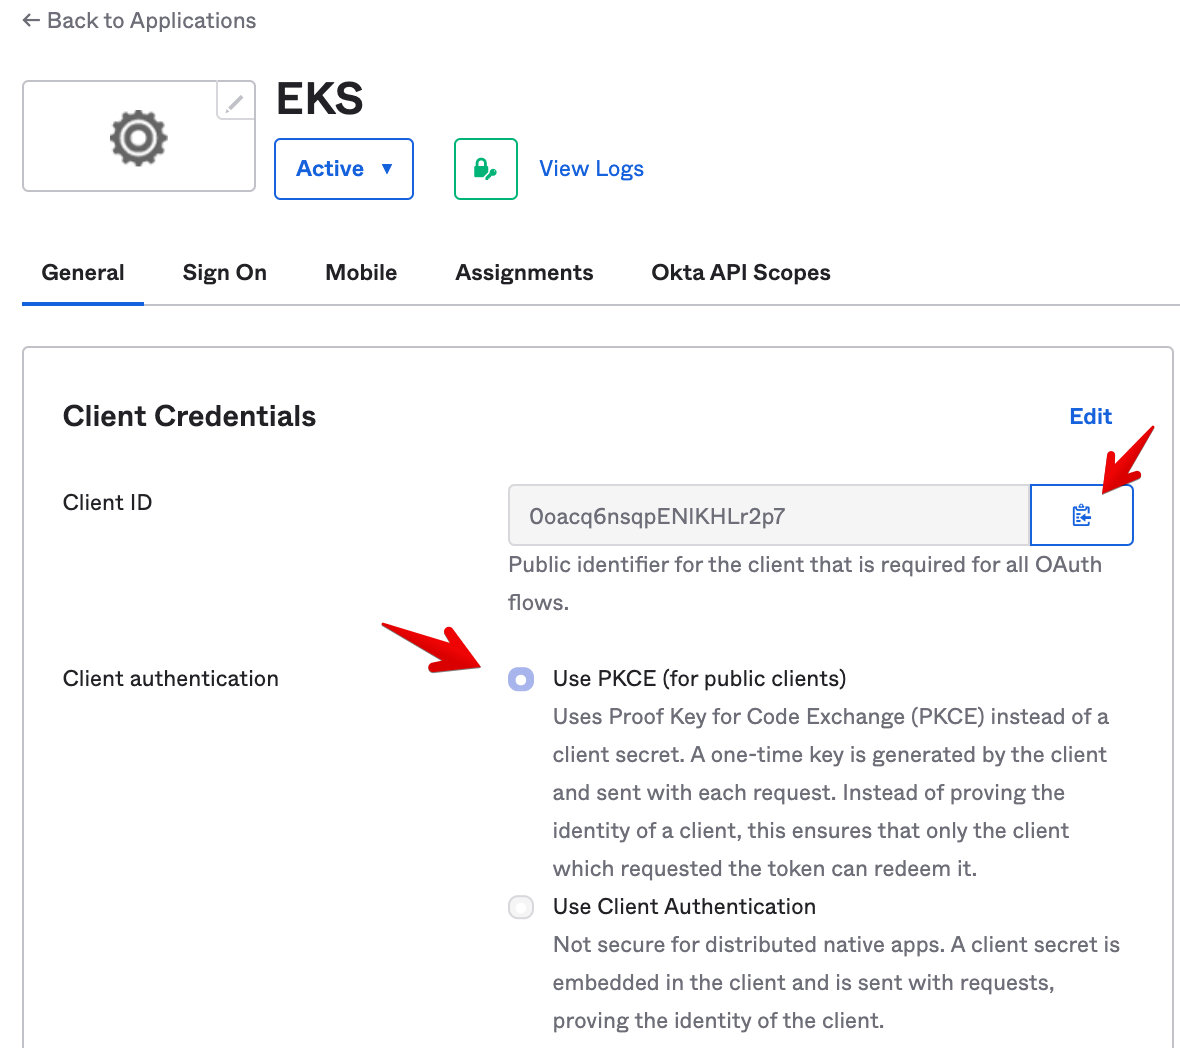
- In the General tab, be sure to select Use PKCE. Then copy the Client ID, we’ll need it later:
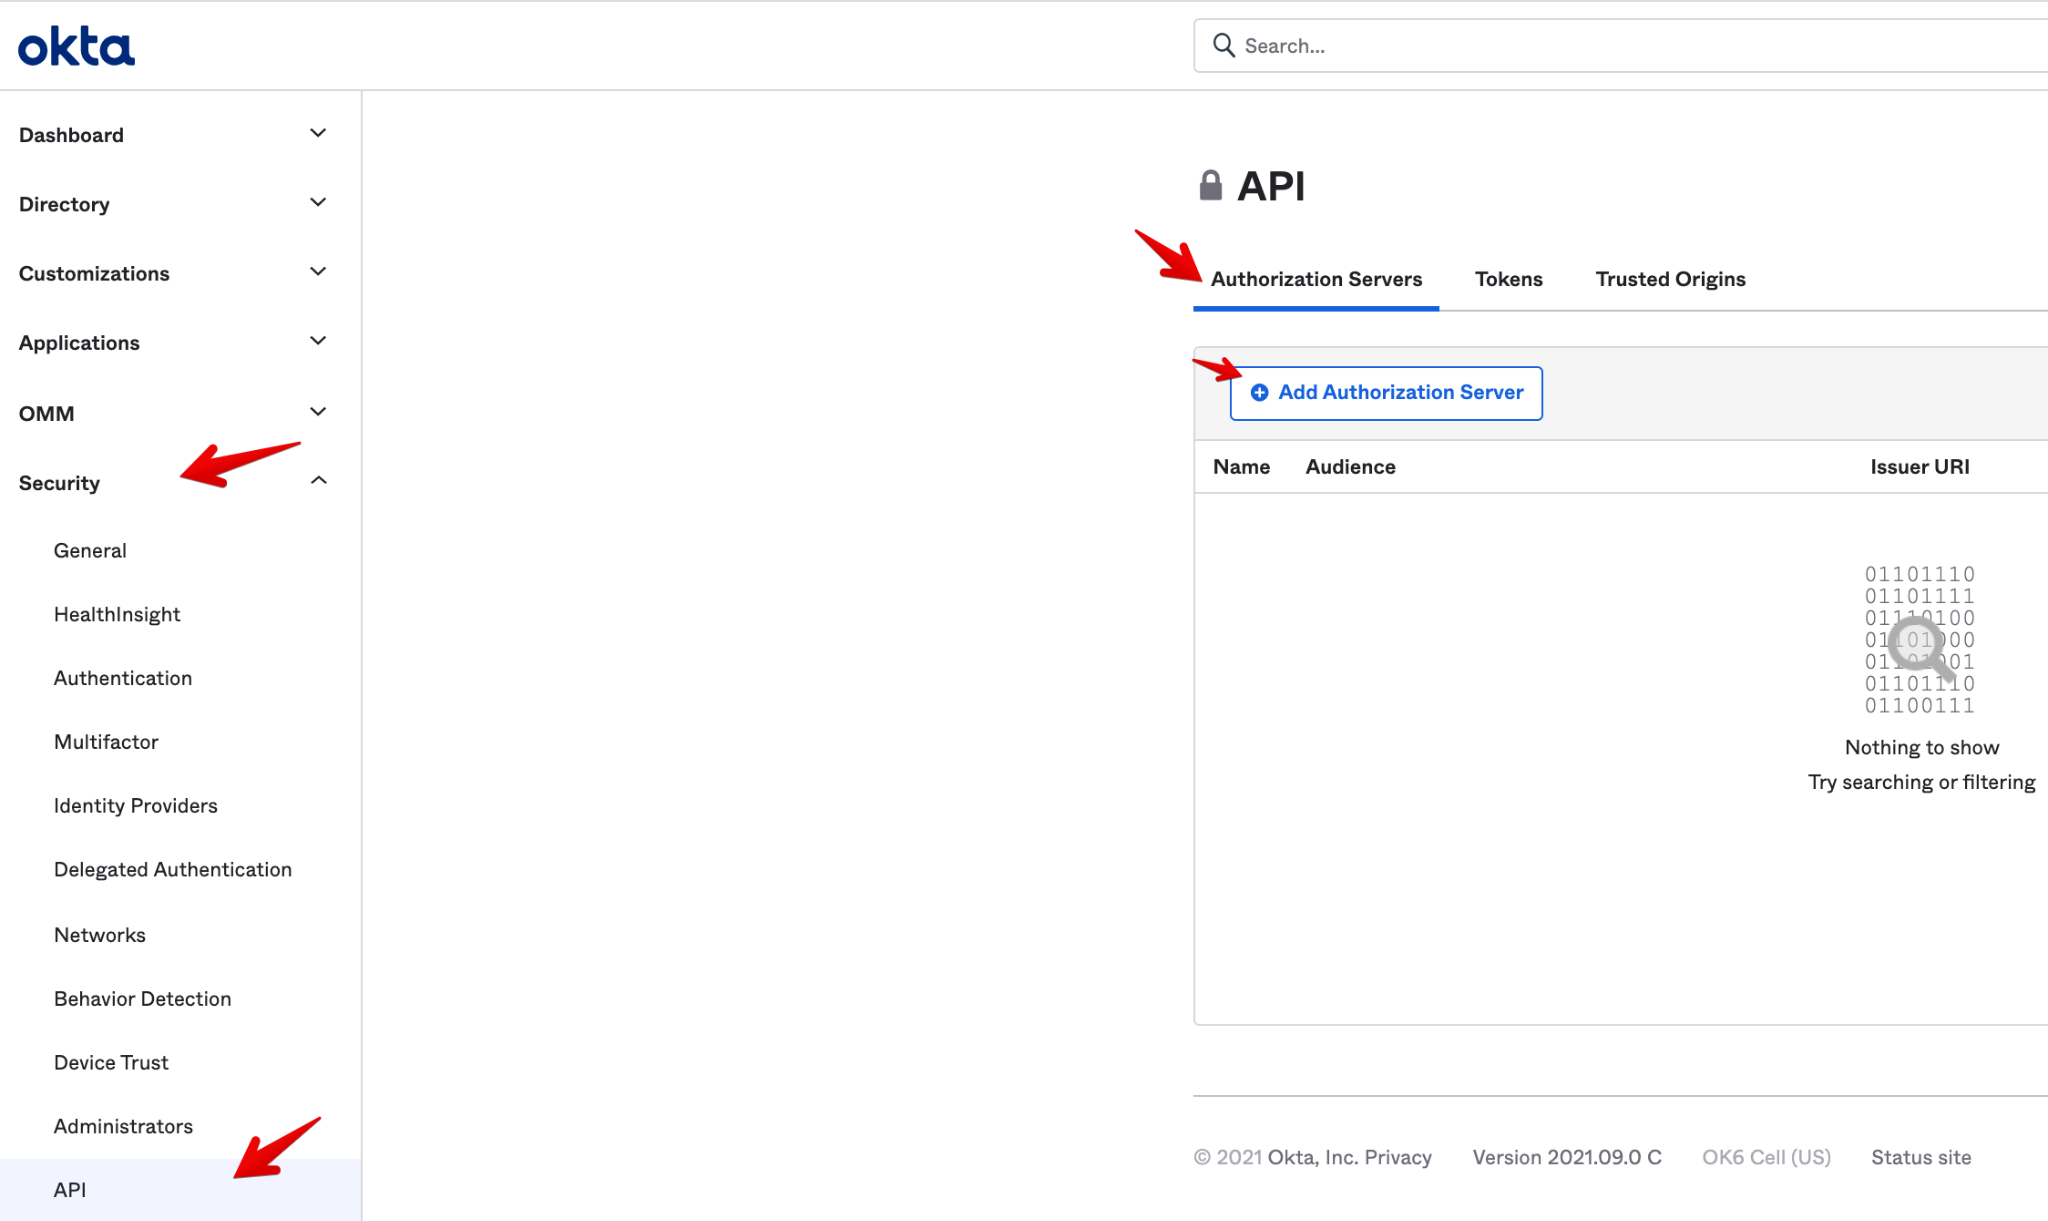
- Now let’s create an Authorization Server. Go to the sidebar menu, select Security > API. Then go to Authorization Servers tab and select Add Authorization Server.
-
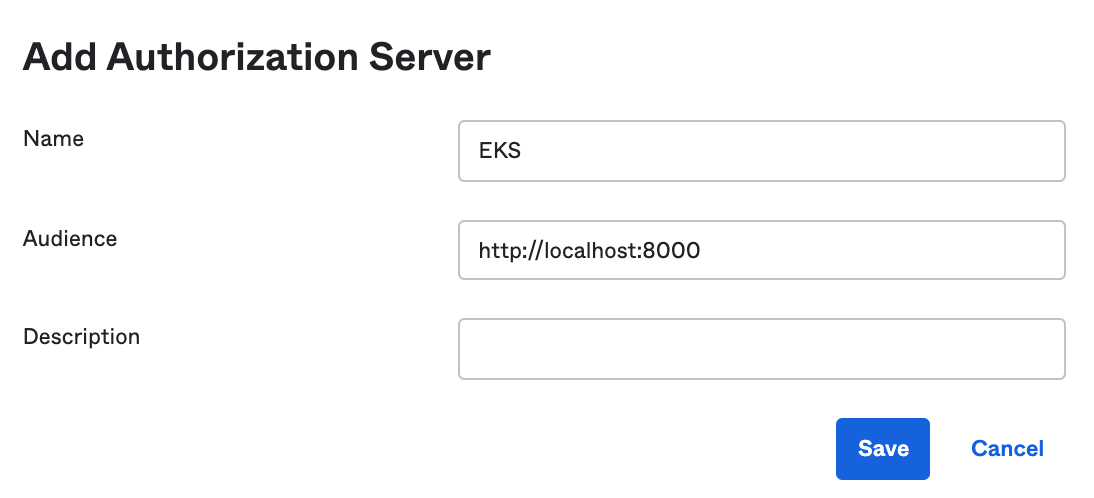
Enter the following settings:
- Name: EKS
- Audience: http://localhost:8000
-
Click on Save.
- On the next screen, copy the Issuer URL from the Settings tab. We’ll need it later:
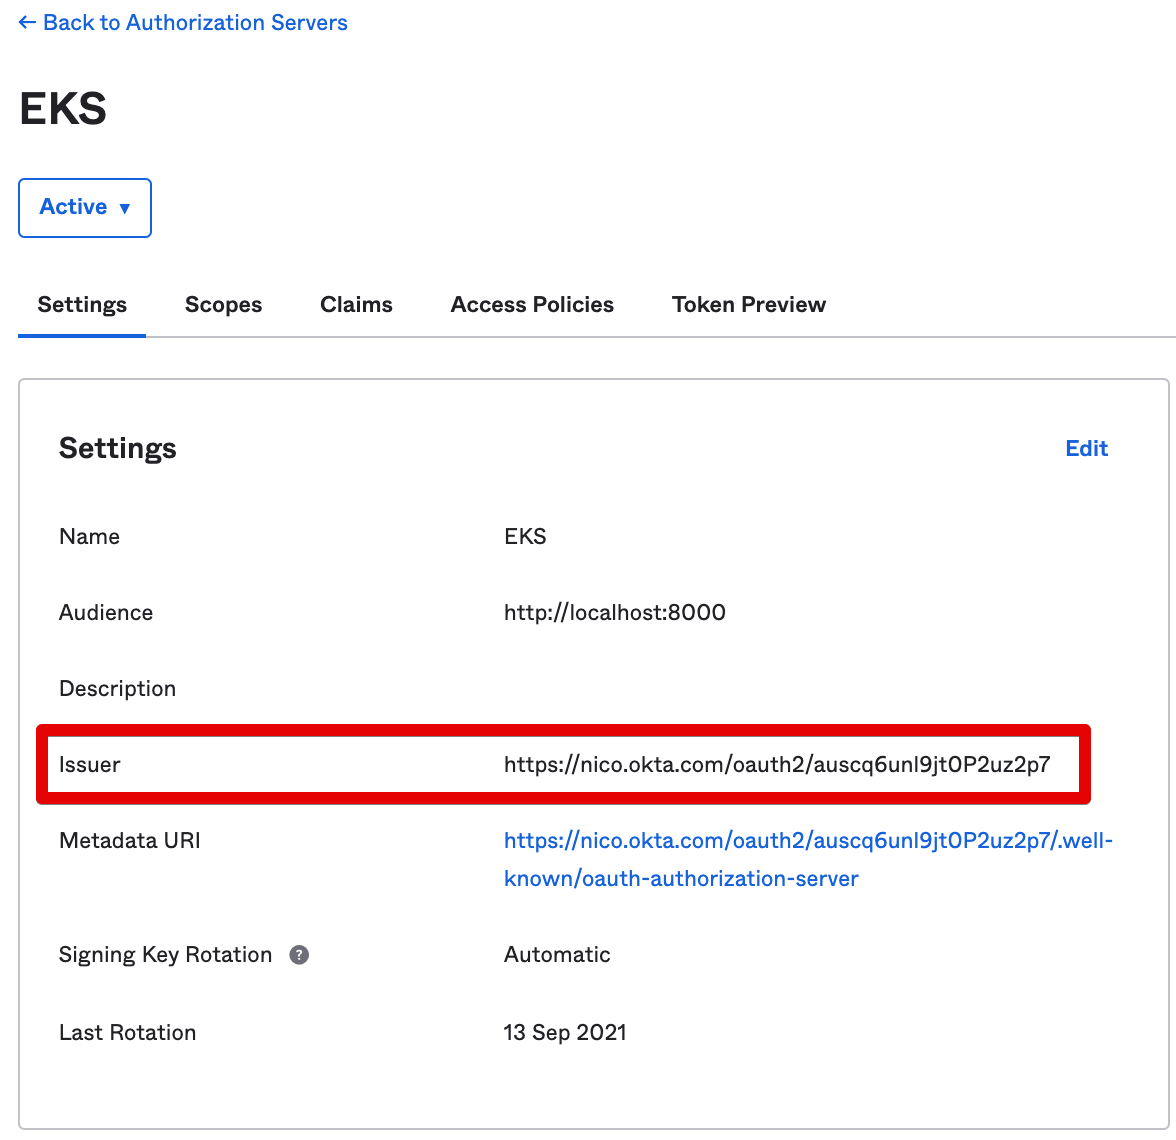
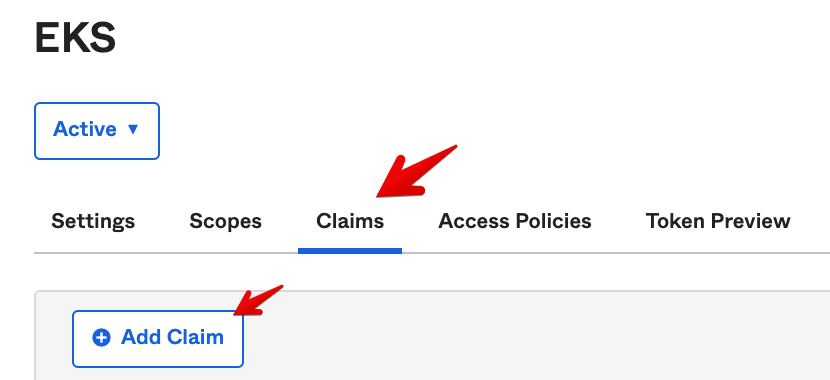
Now let’s add a custom claim “groups” in the id_token that Okta will generate, to list the groups of the connected user.
- Go to the Claims tab and select Add Claim.
-
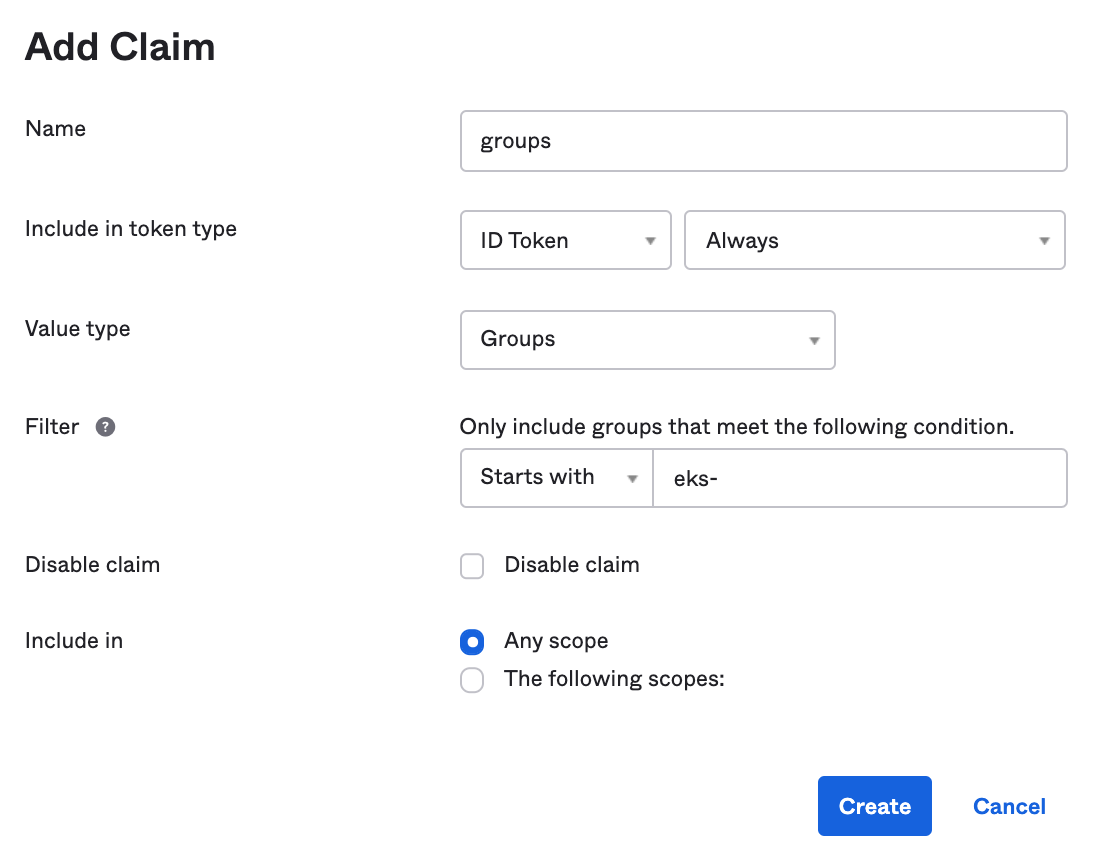
Use the following settings to add the groups claim in the
id_token:- Name: groups
- Include in token type: ID Token - Always
- Value type: Groups.
- Filter: Starts with eks- (This means we’ll only list the connected user’s groups whose names start with “eks-“)
- Include in: Any scope
-
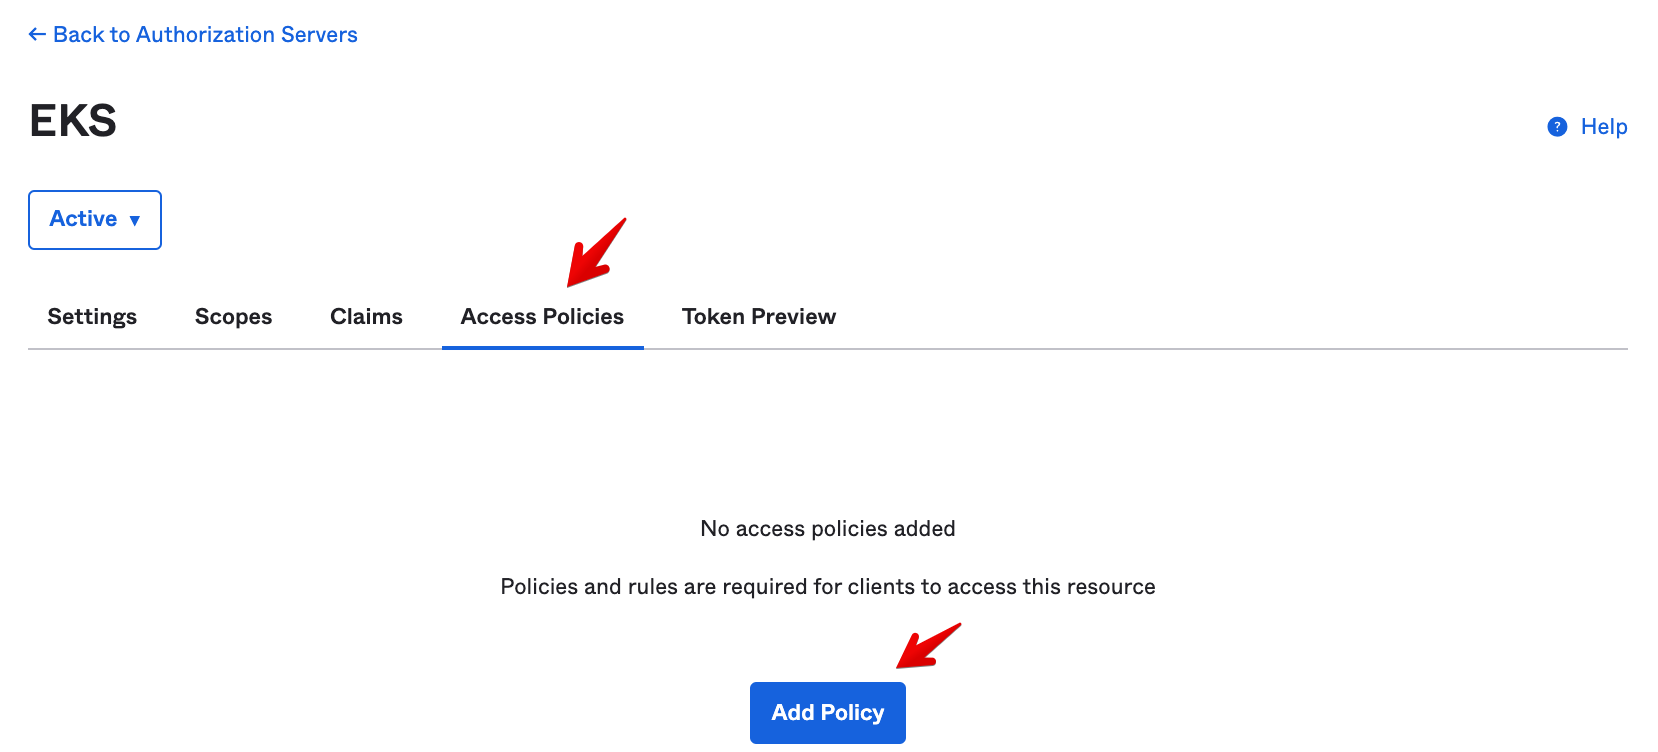
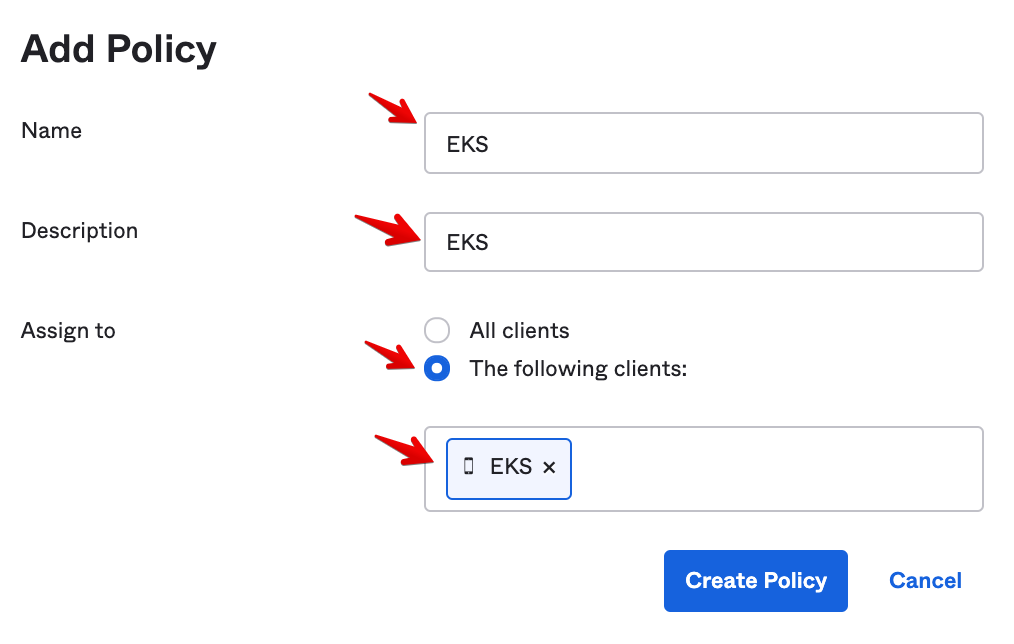
Now let’s create an access policy on this AuthZ Server to drive when the AuthZ Server should mint the
id_token.- Go to the Access Policies tab and select Add Policy
-
Enter the following Policy settings:
- Policy name: EKS
- Description: EKS
- Assign to: The following clients
- Clients: EKS (Look for the OIDC client you created earlier.)
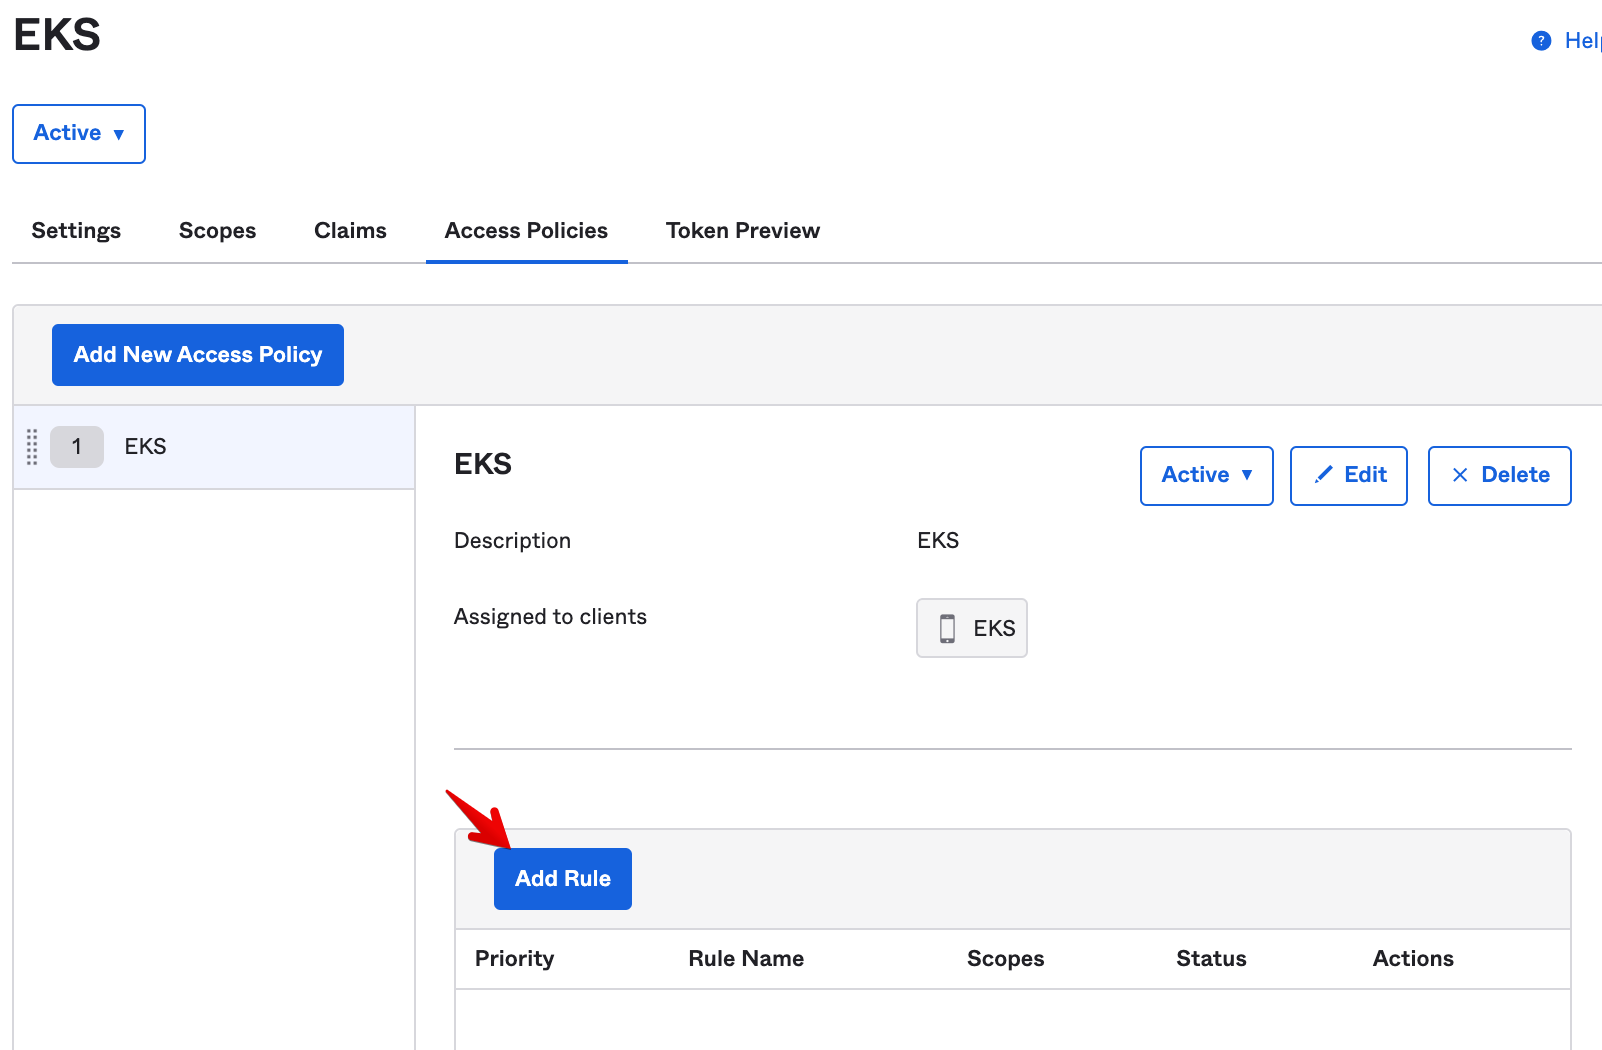
- Once you Create Policy, add a rule. Click on Add Rule:
-
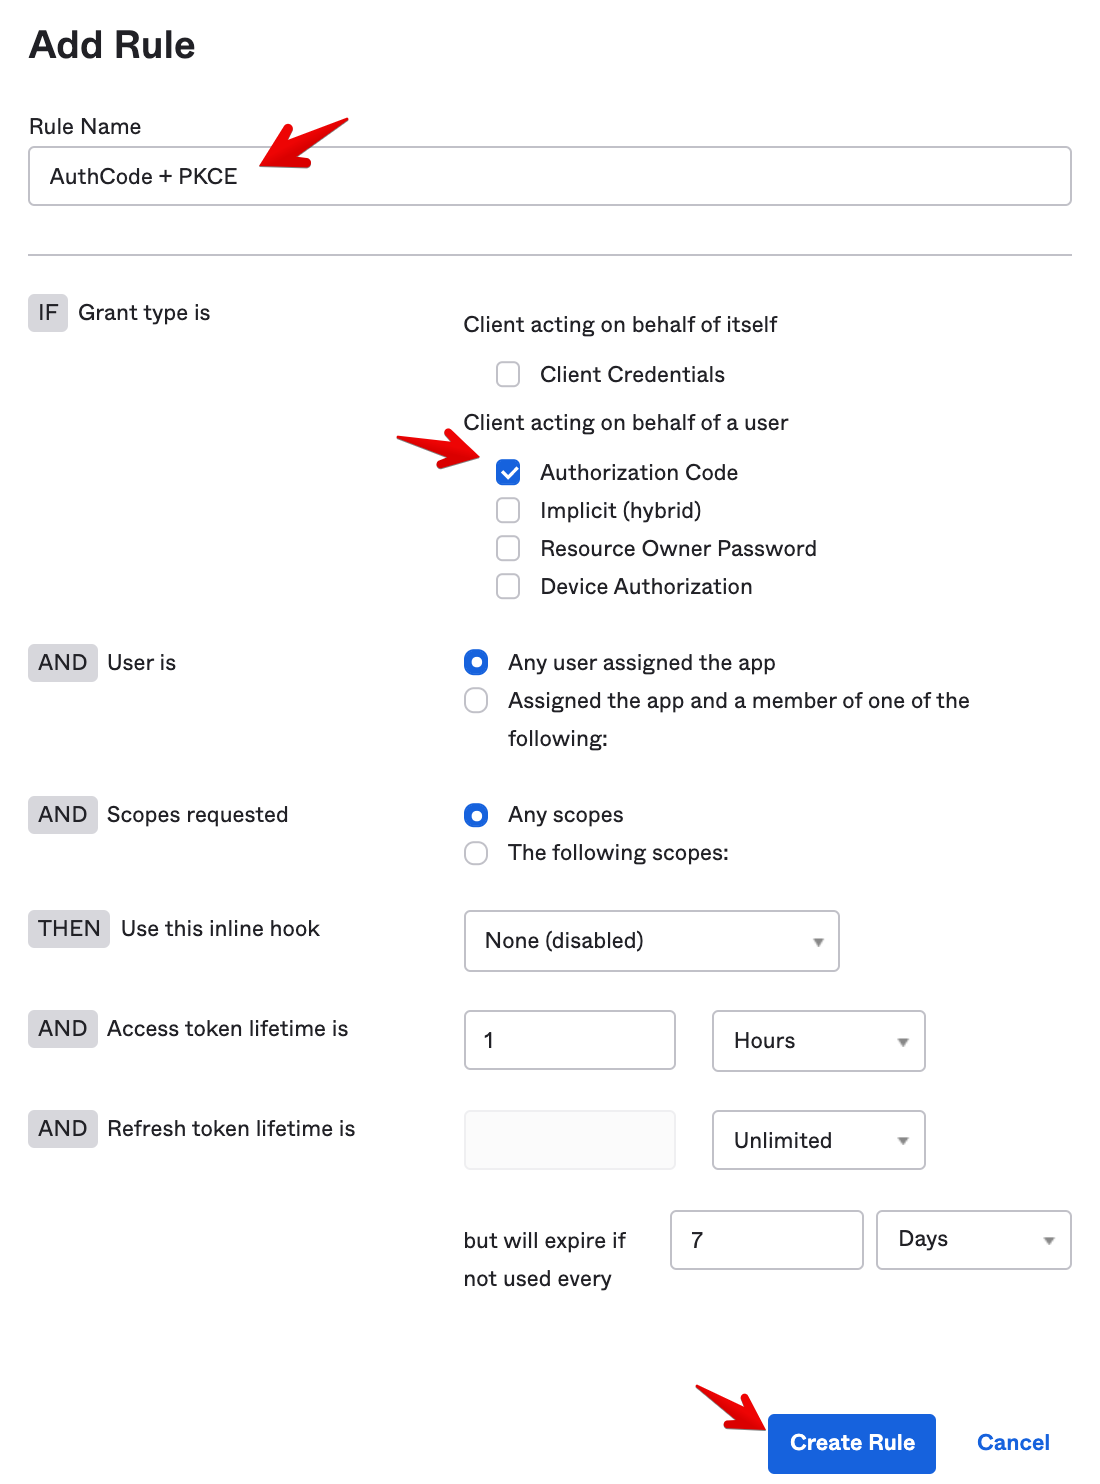
Enter the following Rule settings:
- Rule Name: AuthCode + PKCE
- Grant type is: Authorization Code
- User is: Any user assigned the app
- Scopes requested: Any scopes
-
Then click on Create Rule.
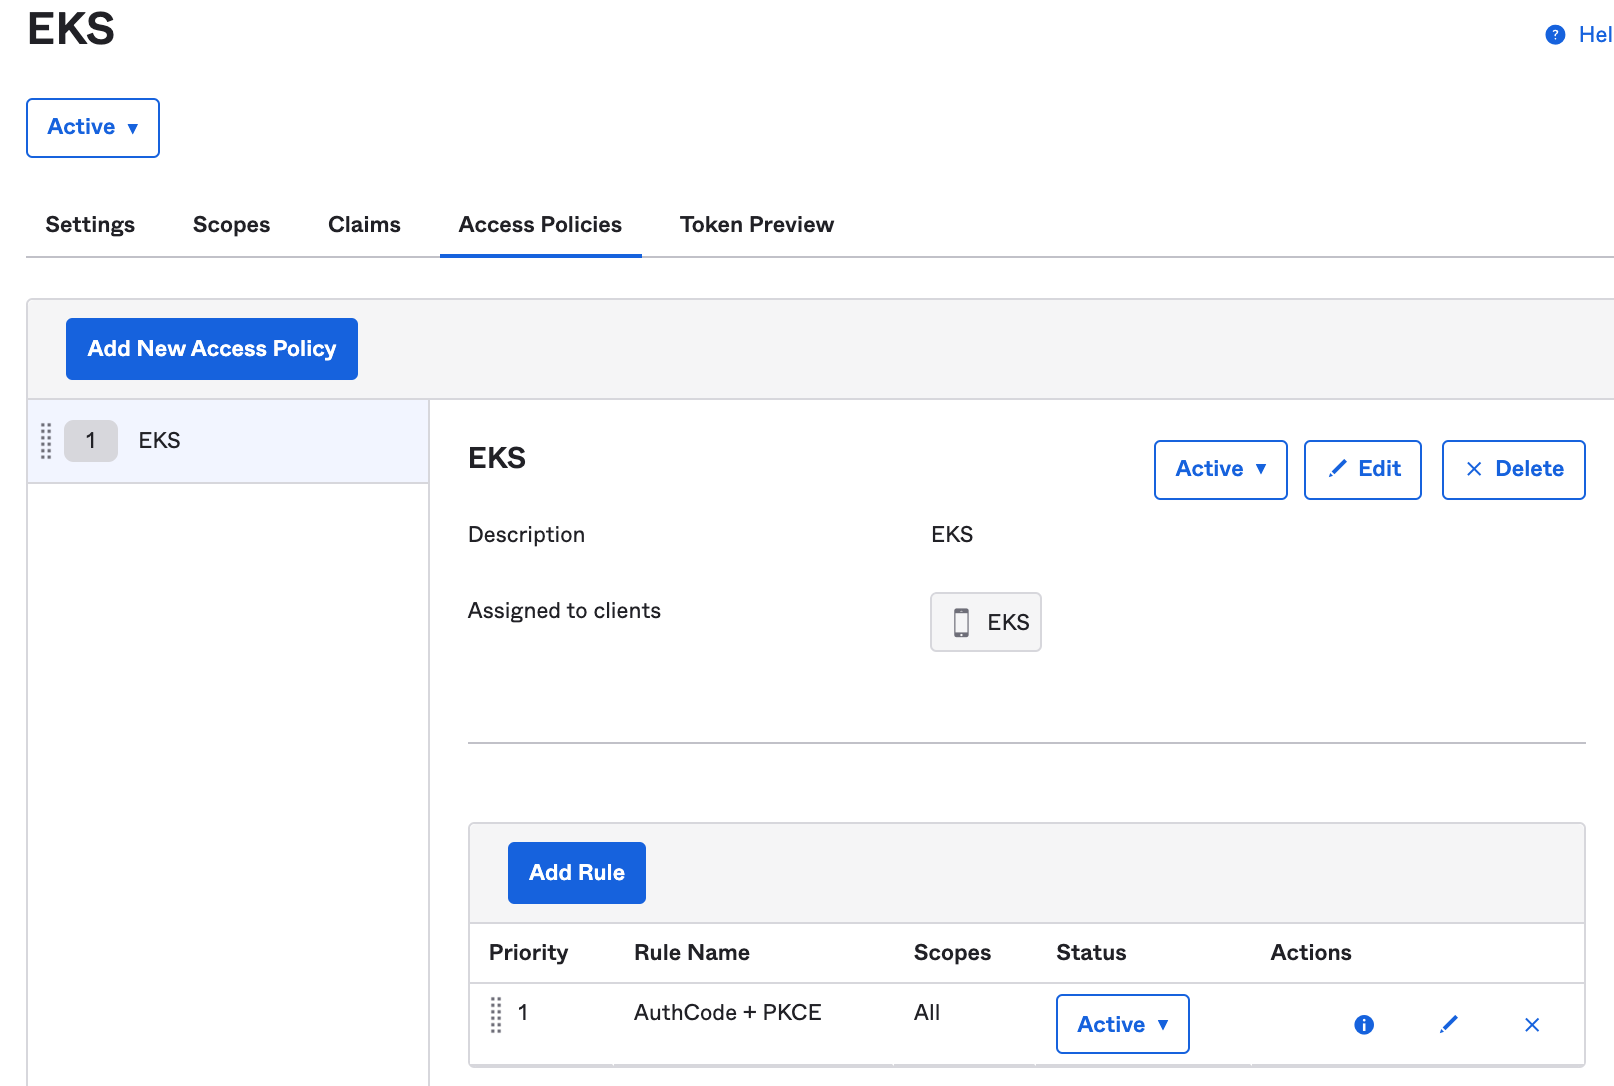
You should see this view:
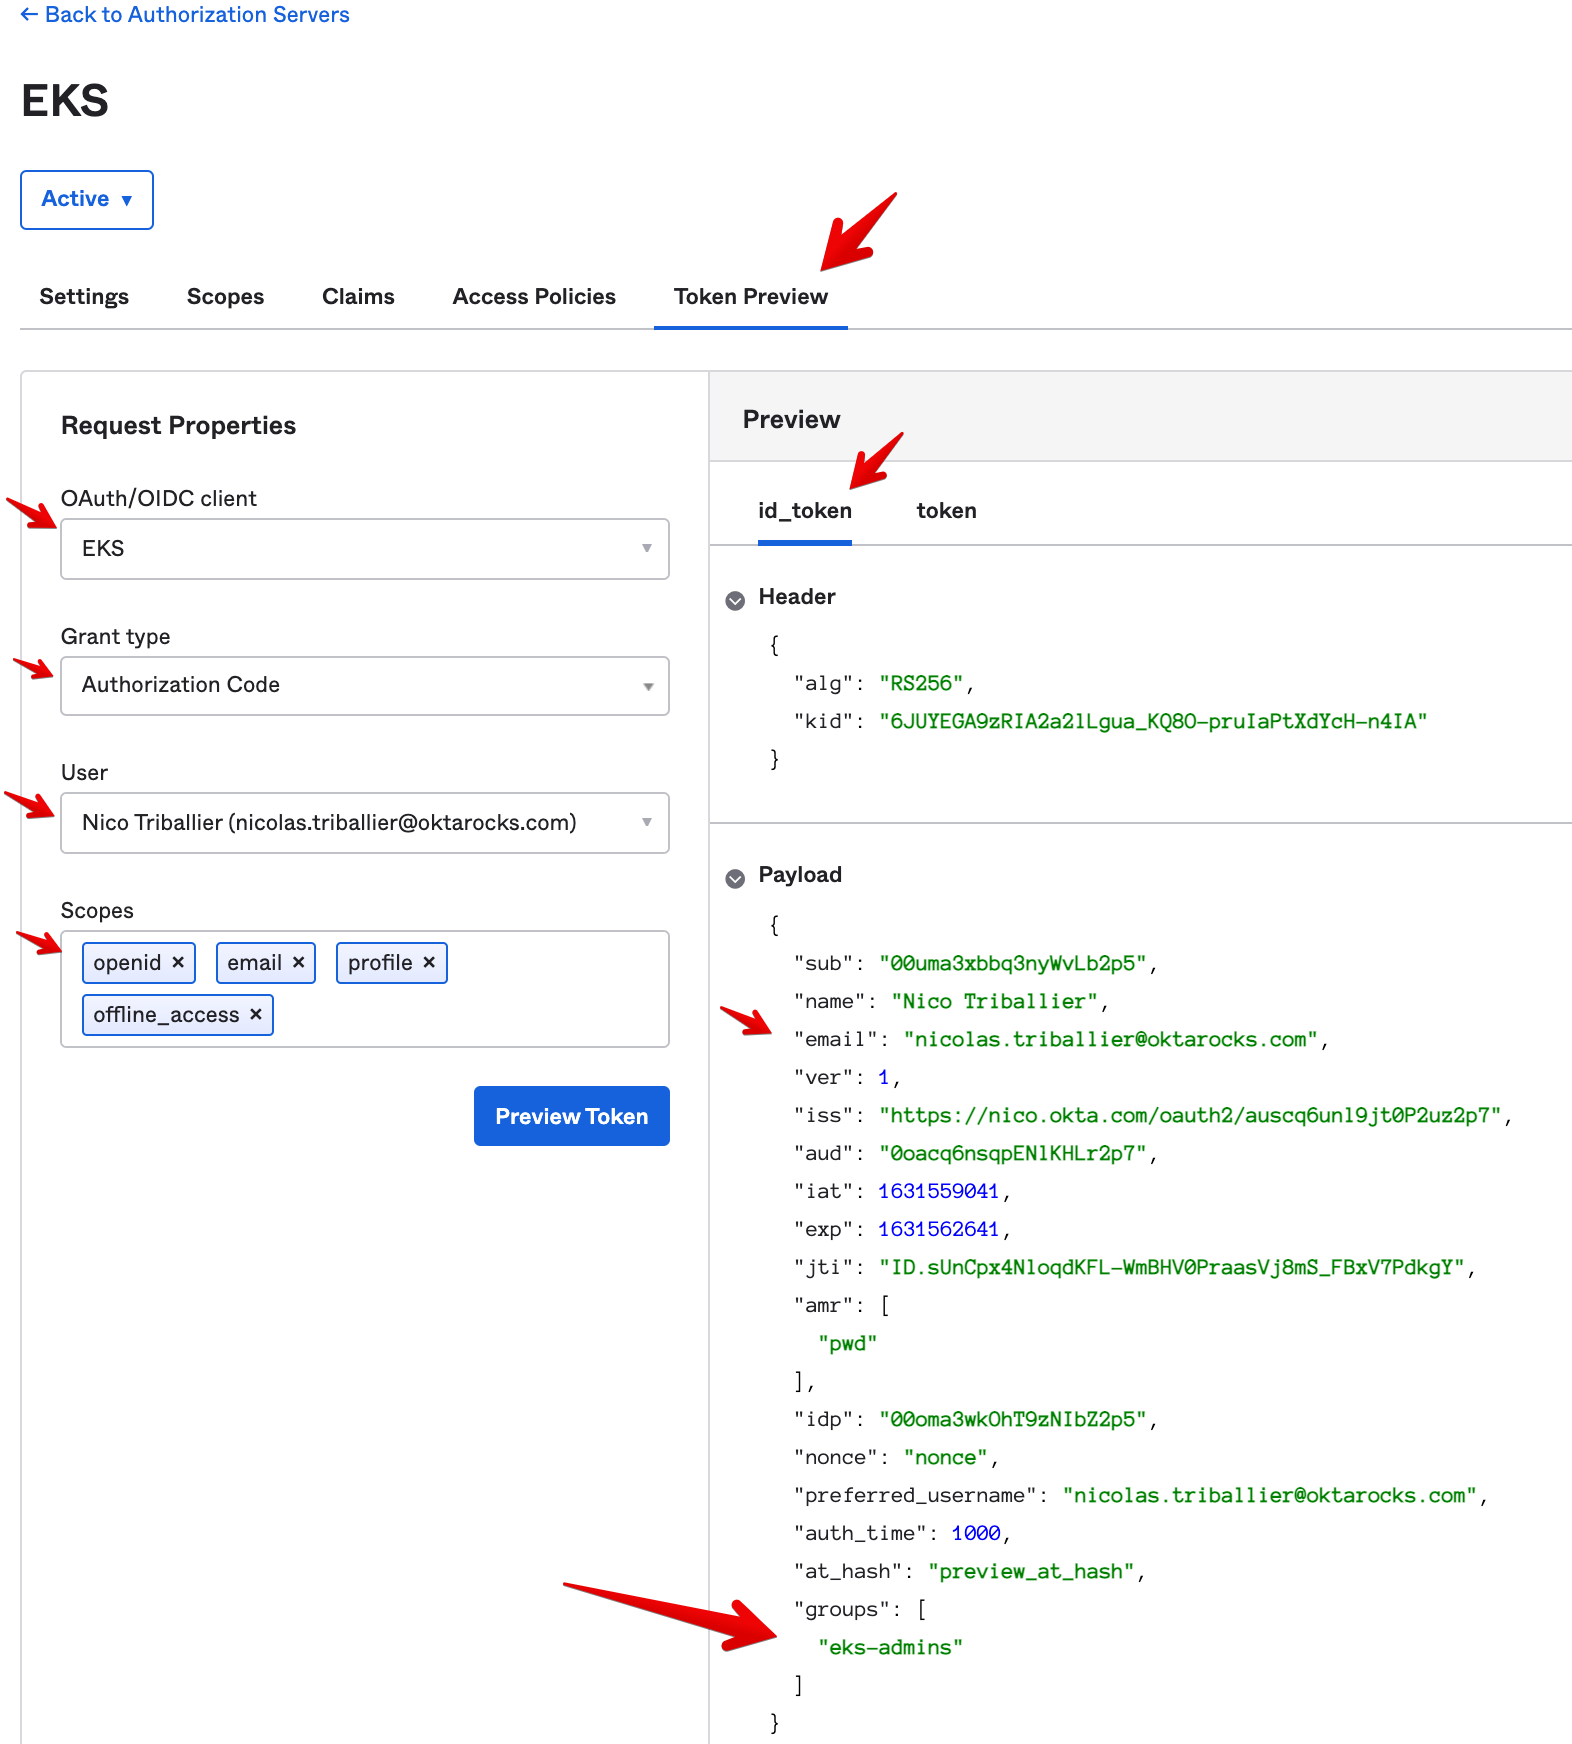
Now let’s run a test to see what our id_token will look like when the Okta AuthZ Server mints it.
- Go to the Token Preview tab and enter the following Request Properties:
- OAuth/OIDC client: EKS
- Grant type: Authorization Code
- User: your user
- Under Scopes, enter openid, email, profile, offline_access
-
Then click on Token Preview. On the right side of the screen, you’ll see a preview of your
id_token. So far it has all the claims we’re looking for, including:- “email”: typically matches your Okta username
- “groups”: contains an array of groups the user is a member of, including “eks-admins”
The configuration on the Okta side is complete.
Add Okta as an OIDC Provider on Your EKS Cluster
Now let’s get back to the AWS Console:
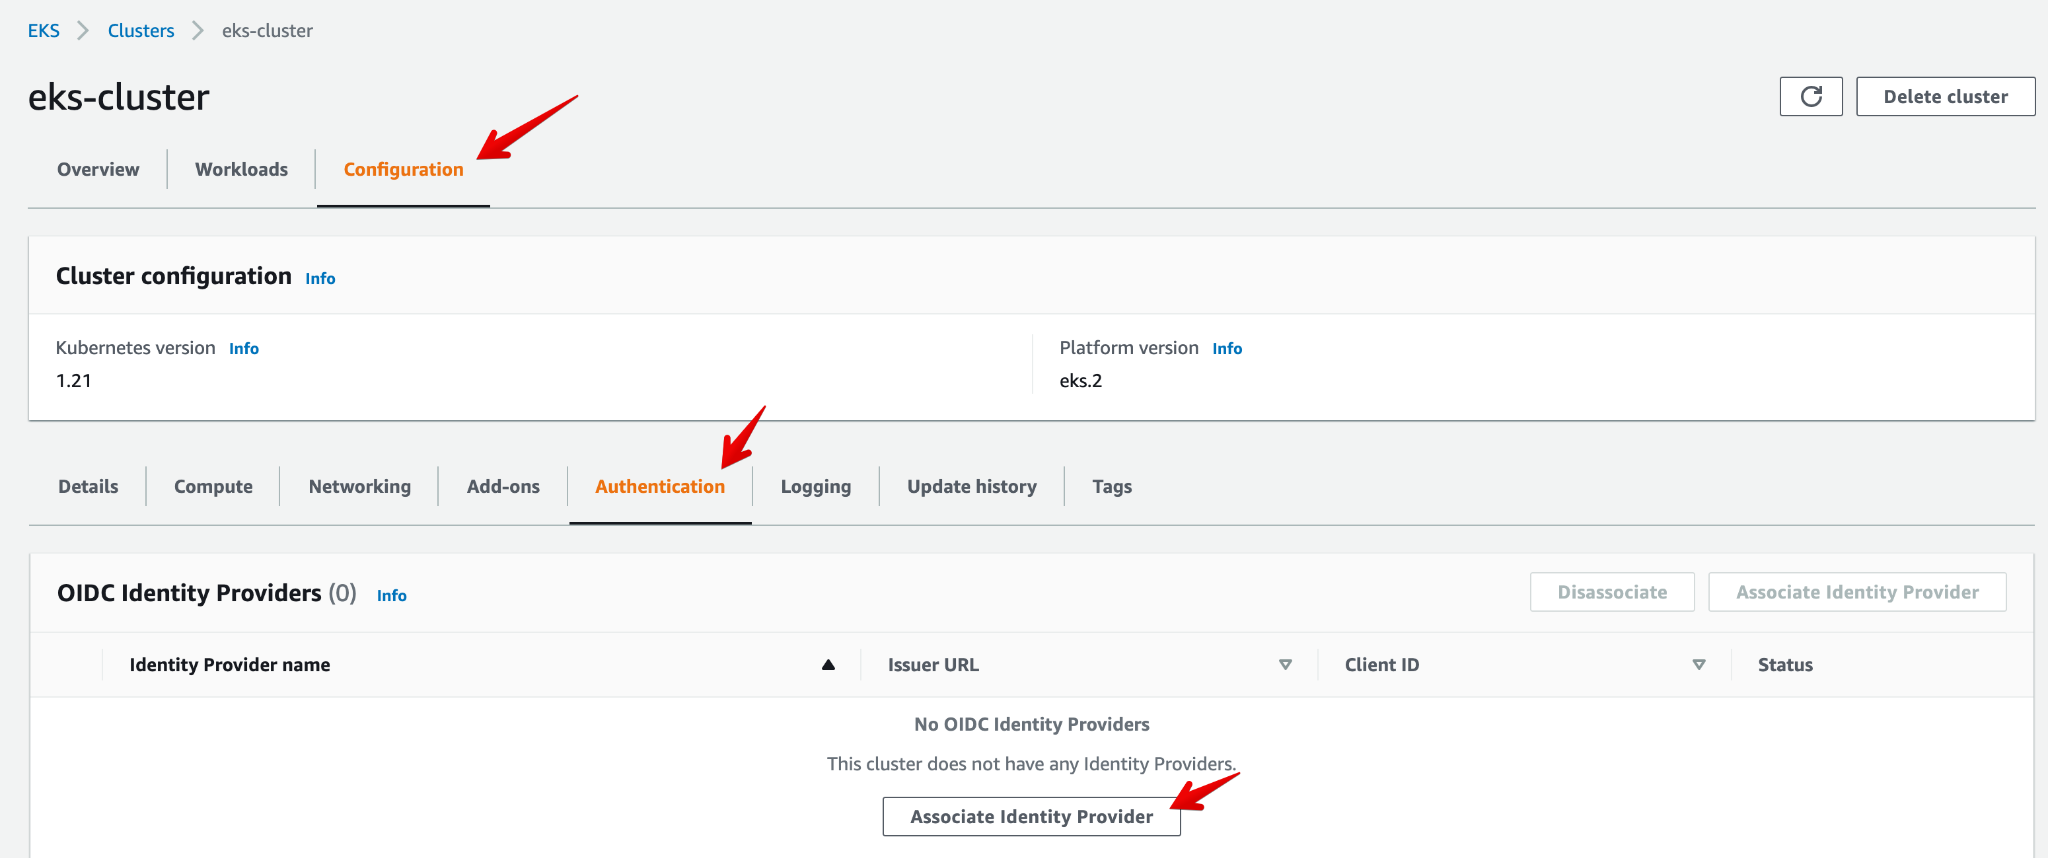
- Open the eks-cluster view. Go to the Configuration tab, then select Authentication, and click on Associate Identity Provider.
-
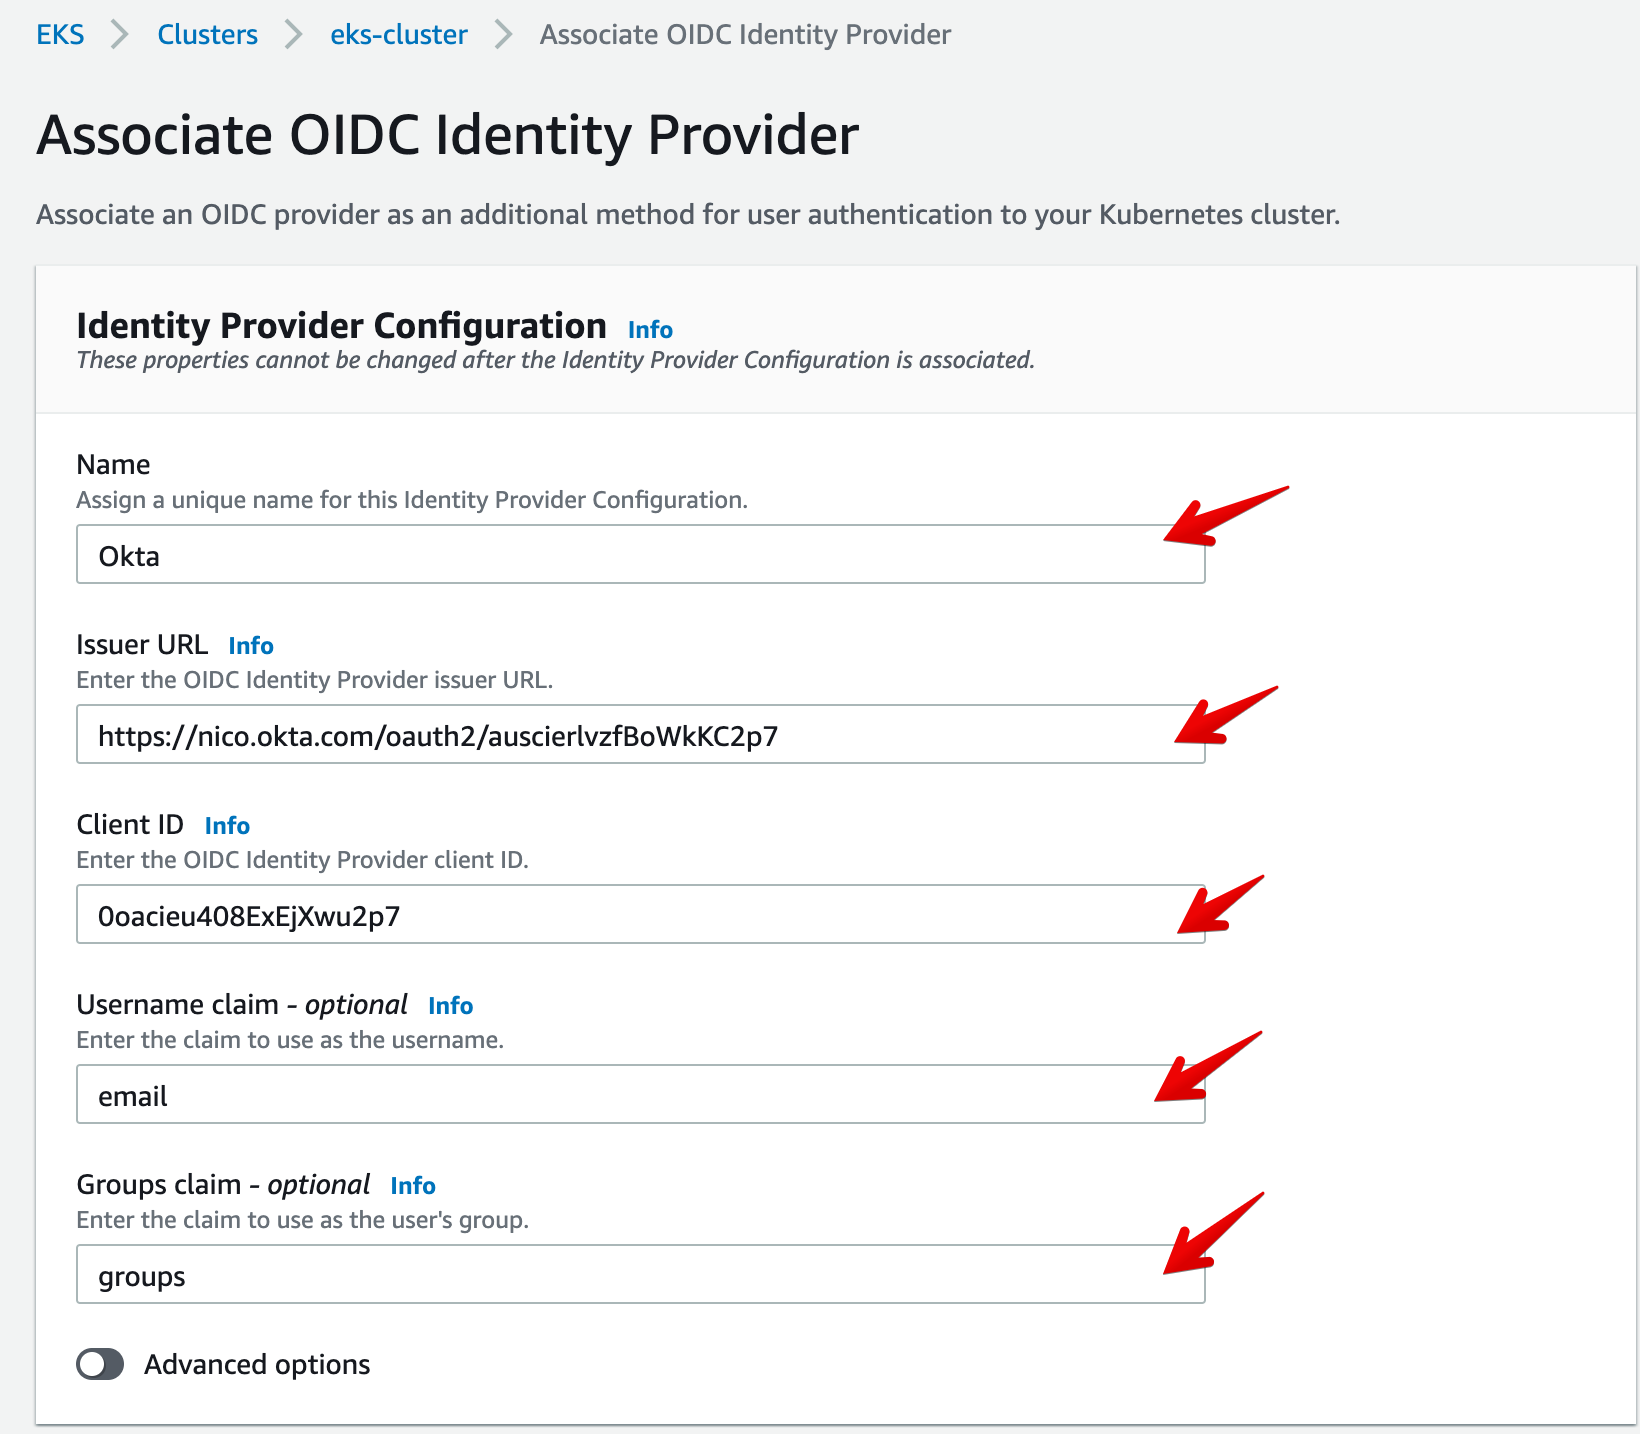
Enter the following parameters:
- Name: Okta
- Issuer URL: This is the URL you copied earlier from your Okta AuthZ Server.
- Client ID: This is the value you copied earlier from your Okta OIDC client.
- Username claim: email
- Groups claim: groups
-
Then Save.
Note: Your EKS cluster configuration may take 5-10 minutes to update after you add the OIDC provider.
Now let’s update the kubeconfig of the EKS cluster so the API server prompts for authentication whenever there’s an inbound kubectl request. We’ll also add an RBAC control stating that a user part of the eks-admins Okta group will have the k8s ClusterRole cluster-admin.
To update the EKS kubeconfig we’ll use AWS CloudShell. It’s particularly convenient to make quick updates if you access the AWS Console with Okta SSO and assume a given role, as we did earlier in this tutorial:

- Go to AWS CloudShell using the search field in the AWS Console.

You should land on this view:

Let’s install kubectl (source):
- Download the latest release:
curl -LO "https://dl.k8s.io/release/$(curl -L -s https://dl.k8s.io/release/stable.txt)/bin/linux/amd64/kubectl"
- Download the kubectl checksum file
curl -LO "https://dl.k8s.io/$(curl -L -s https://dl.k8s.io/release/stable.txt)/bin/linux/amd64/kubectl.sha256"
- Validate the kubectl binary against the checksum file
echo "$(<kubectl.sha256) kubectl" | sha256sum --check
If valid, the output should be:

- Install
kubectl
sudo install -o root -g root -m 0755 kubectl /usr/local/bin/kubectl
- Test to ensure that we installed an up-to-date version.
kubectl version --client

- Now, let’s retrieve the list of EKS clusters in the specified region (us-west-1):
aws eks --region us-west-1 list-clusters

- Add a new context for the eks-cluster in the
kubeconfigfile:
aws eks --region us-west-1 update-kubeconfig --name eks-cluster

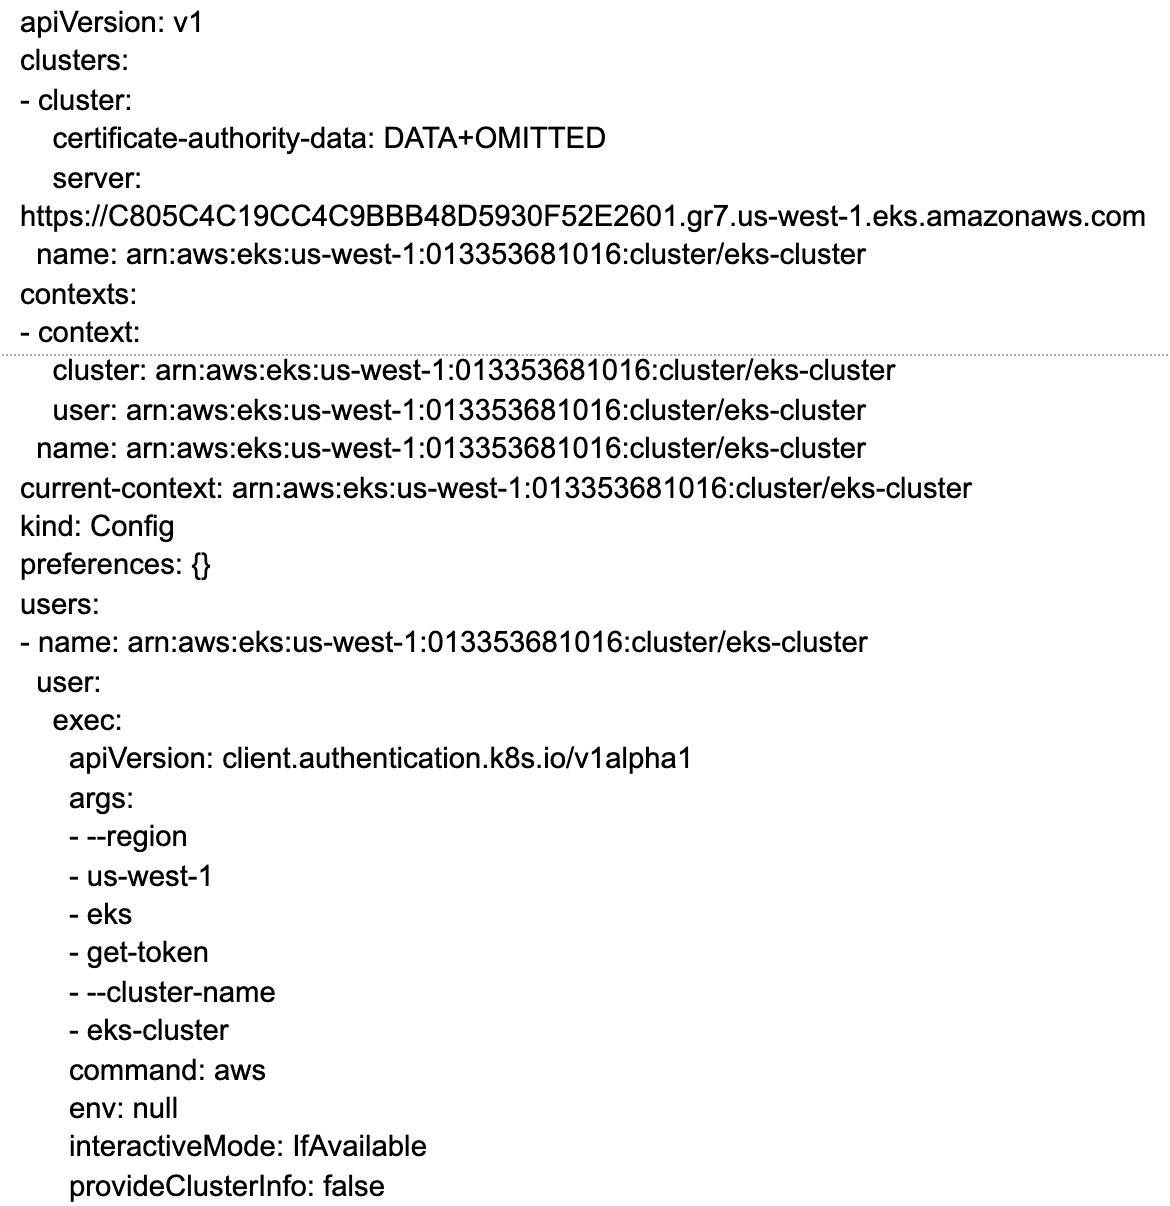
- Let’s see what our
kubeconfigfile looks like.
kubectl config view
- Let’s double-check the current context:
kubectl config current-context

- Install nano (text editor)
sudo yum install -y nano
-
Create a cluster role binding:
- Create a new yaml file
nano oidc-cluster-admin-by-group.yaml
- Paste the following content:
kind: ClusterRoleBinding
apiVersion: rbac.authorization.k8s.io/v1
metadata:
    name: oidc-cluster-admin
roleRef:
    apiGroup: rbac.authorization.k8s.io
    kind: ClusterRole
    name: cluster-admin
subjects:
- kind: Group
    name: eks-admins
- enter CTRL-O to save the file
- then CTRL-X to close the file
- Create the cluster role binding from the yaml file
kubectl create -f oidc-cluster-admin-by-group.yaml
- Apply the cluster role binding:
kubectl apply -f oidc-cluster-admin-by-group.yaml
- Edit the local kubeconfig file and add the OIDC config
nano $HOME/.kube/config
- Insert the part in red below:
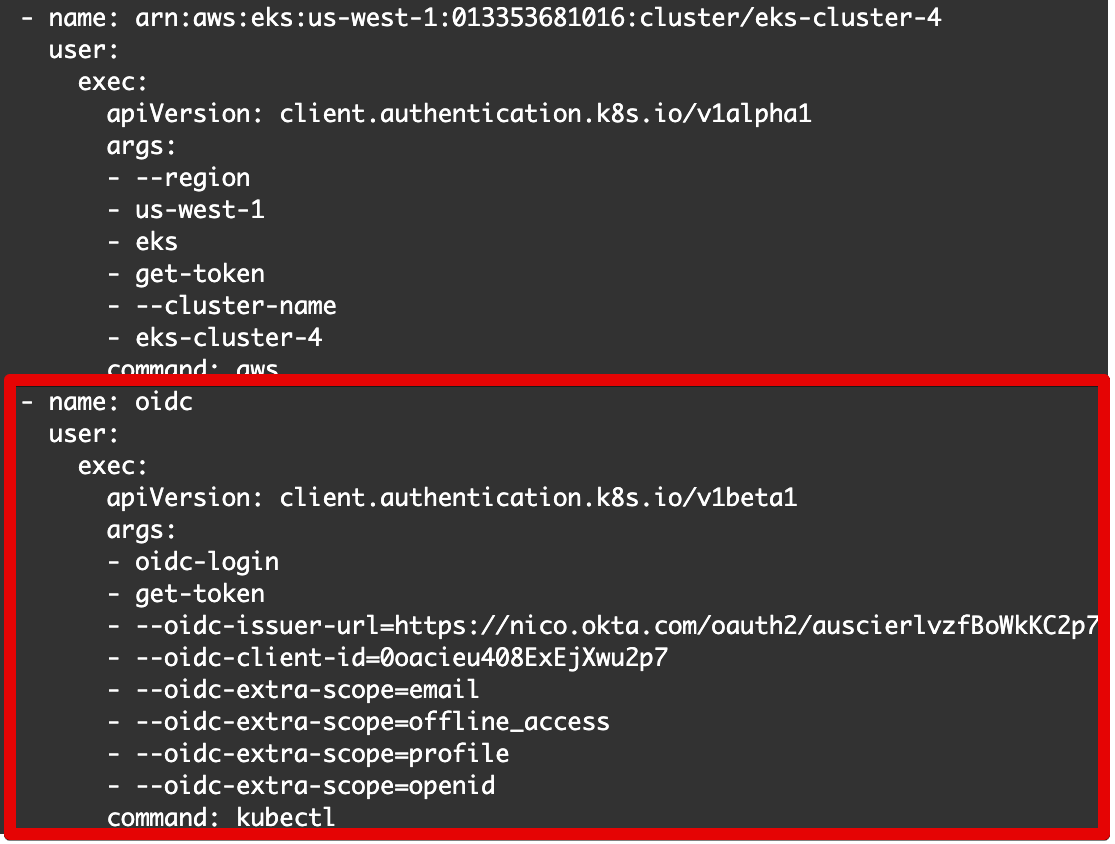
Below is the text to include:
- name: oidc
  user:
    exec:
        apiVersion: client.authentication.k8s.io/v1beta1
        args:
        - oidc-login
        - get-token
        - --oidc-issuer-url=https://nico.okta.com/oauth2/auscierlvzfBoWkKC2p7
        - --oidc-client-id=0oacieu408ExEjXwu2p7
        - --oidc-extra-scope=email
        - --oidc-extra-scope=offline_access
        - --oidc-extra-scope=profile
        - --oidc-extra-scope=openid
        command: kubectl
This basically specifies the config of the OIDC provider. Note: Replace the oidc-issuer-url and oidc-client-id with Issuer URL and Client ID we copied earlier.
Once you’re done editing the file:
- enter CTRL-O to save the file.
- then enter CTRL-X to close the file.
At this point the EKS cluster is properly configured to use Okta as an OIDC provider.
From CloudShell, we can retrieve the list of pods in our cluster with our current assumed role.
kubectl get pods --all-namespaces

Let’s now look into how we can run a similar command from the terminal on our local machine.
There are two things we need to configure:
-
Export the
kubeconfigfile and import it to your laptop. -
Configure a kubectl OIDC plugin to prompt the user for AuthN and request an
id_token. We’ll use kubelogin.
From your CloudShell, enter the command:
echo $HOME

The path to our kubeconfig file is /home/cloudshell-user/.kube/config, as shown above.
- Let’s download that file. Click on Actions at the top right of CloudShell, then click on Download file.
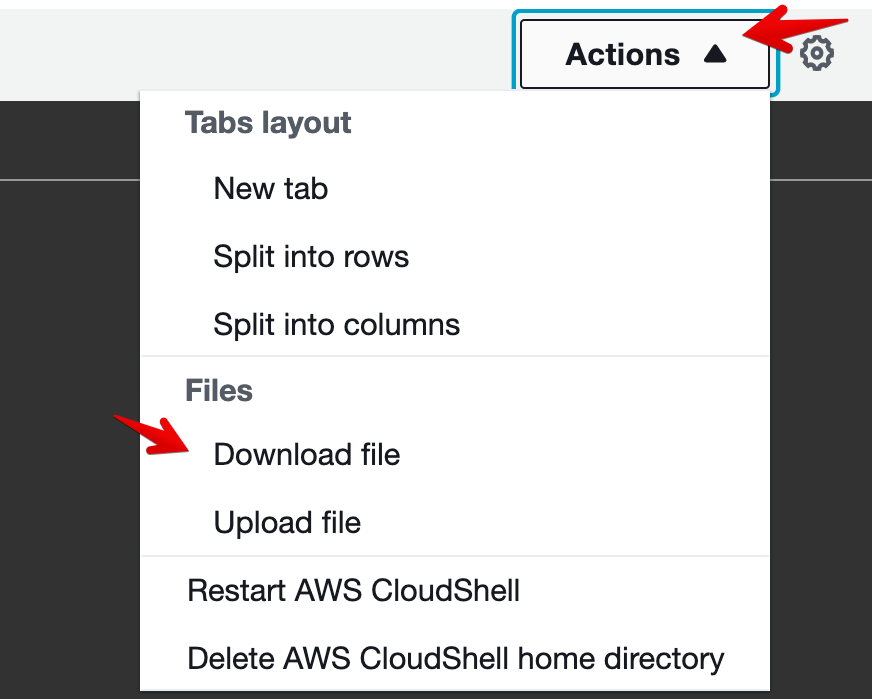
- Paste the path to your
kubeconfigfile and click on Download.
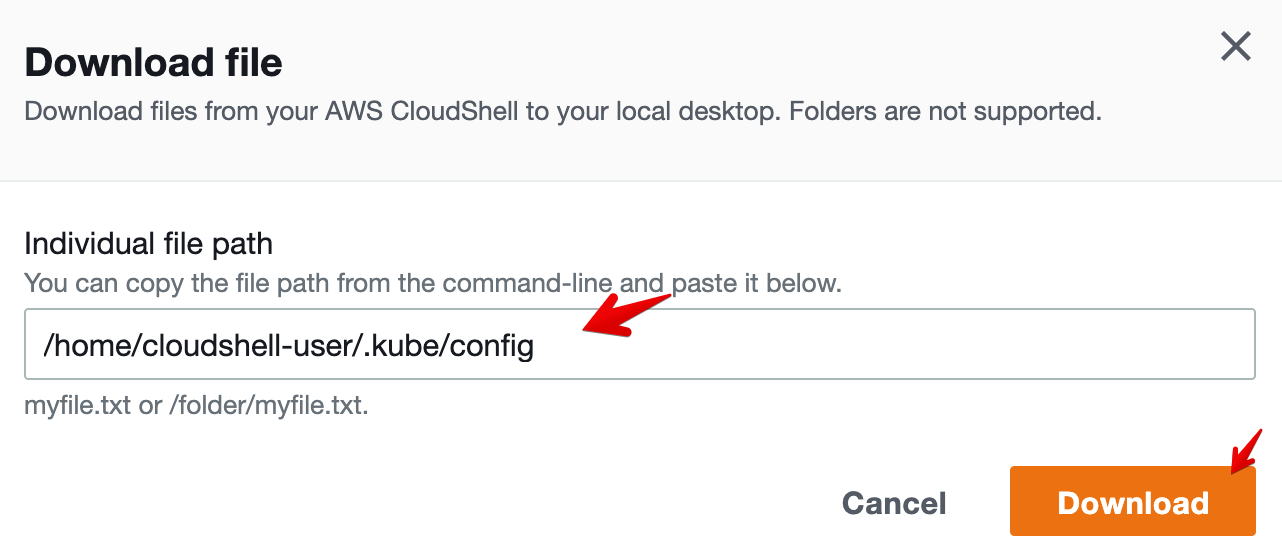
You should now have a copy of the config file in your Downloads folder.
-
Install kubectl on your local machine. (See the instructions to install kubectl on macOS).
-
Double-check that kubectl is properly installed.
kubectl version --client

-
On your Mac, replace the existing kubeconfig file with the one you downloaded from CloudShell:
- Open your Finder on your Mac, then CMD-SHIFT-G.
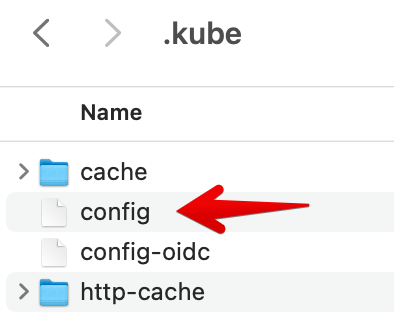
- Enter ~/.kube/config then click Go.
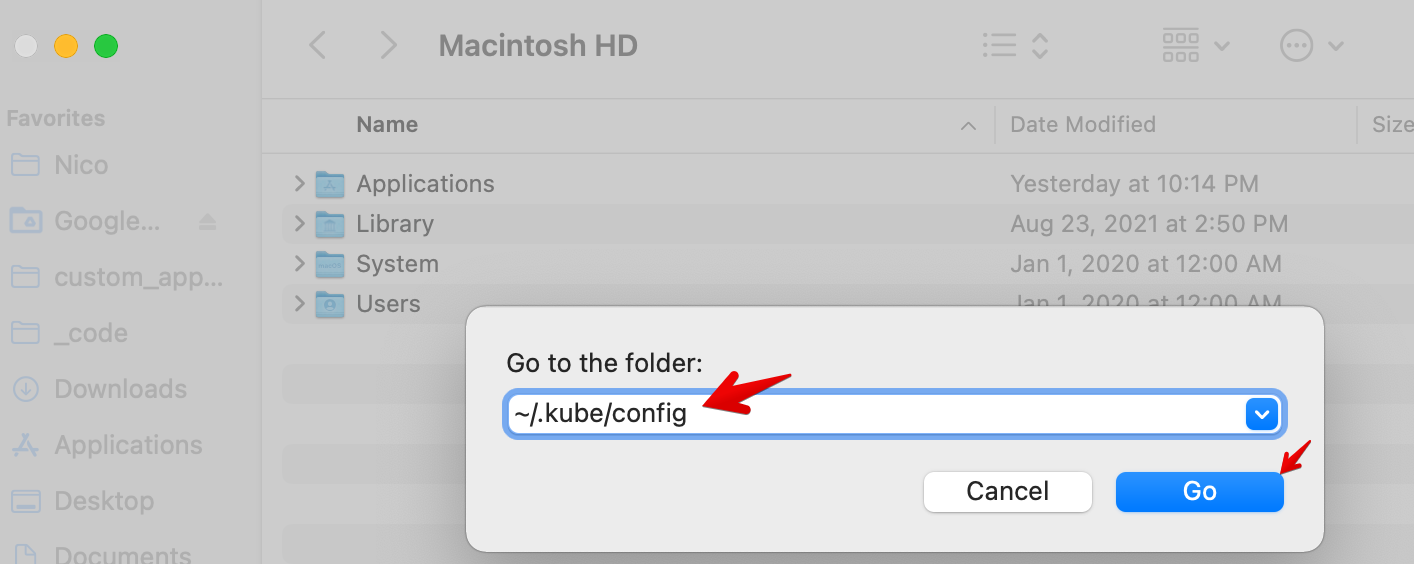
- Rename any existing config files as a backup and add the one from CloudShell:
- Open a terminal on your laptop and run:
kubectl config get-contexts

- If you don’t see a “*” in front of the desired context, run:
kubectl config use-context arn:aws:eks:us-west-1:013353681016:cluster/eks-cluster
You may want to adjust the context name in the above command based on the context name in your own config file.
You may want to adjust the context name in the above command based on the context name in your own config file.
You may want to adjust the context name in the above command based on the context name in your own config file.
- Double-check that the current context is properly set.
kubectl config get-contexts

- Install kubelogin (the OIDC helper for kubectl). Run this for mac/Linux:
brew install int128/kubelogin/kubelogin
- Now let’s try to test the first part of the AuthN flow. Run the following command. (Be sure to replace the
oidc-issuer-urlandoidc-client-idwith your own values.):
kubectl oidc-login setup --oidc-issuer-url=https://nico.okta.com/oauth2/auscierlvzfBoWkKC2p7 --oidc-client-id=0oacieu408ExEjXwu2p7
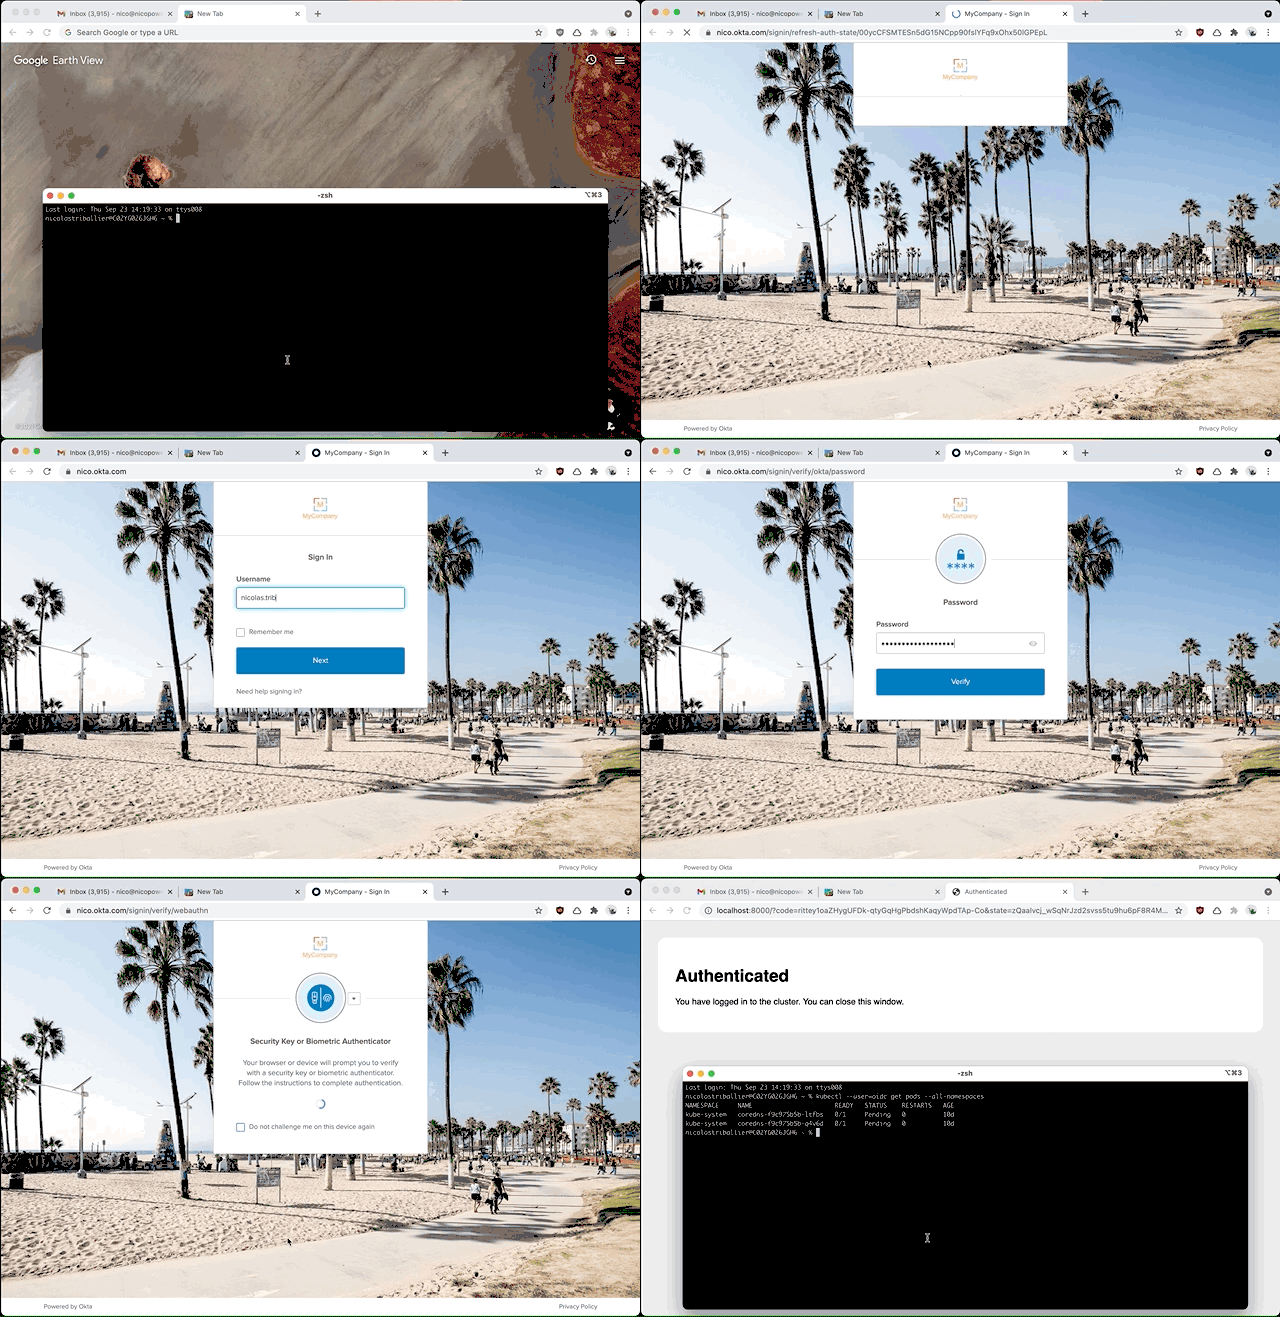
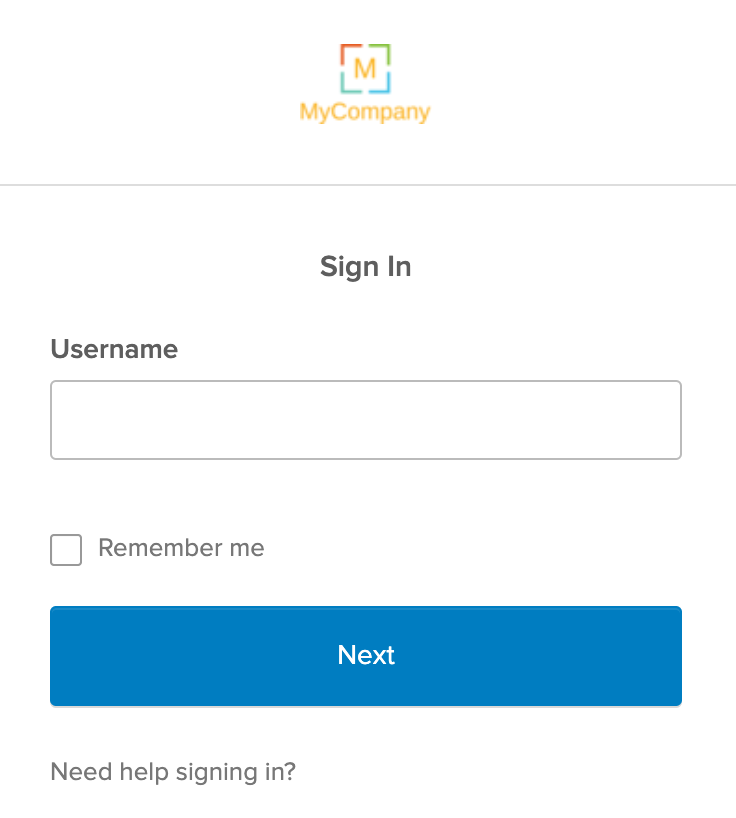
You should be prompted to authenticate in your web browser against your Okta org.
- After authenticating, you should be redirected to localhost:8000 in your web browser, with an OK response.

-
You can close this tab.
-
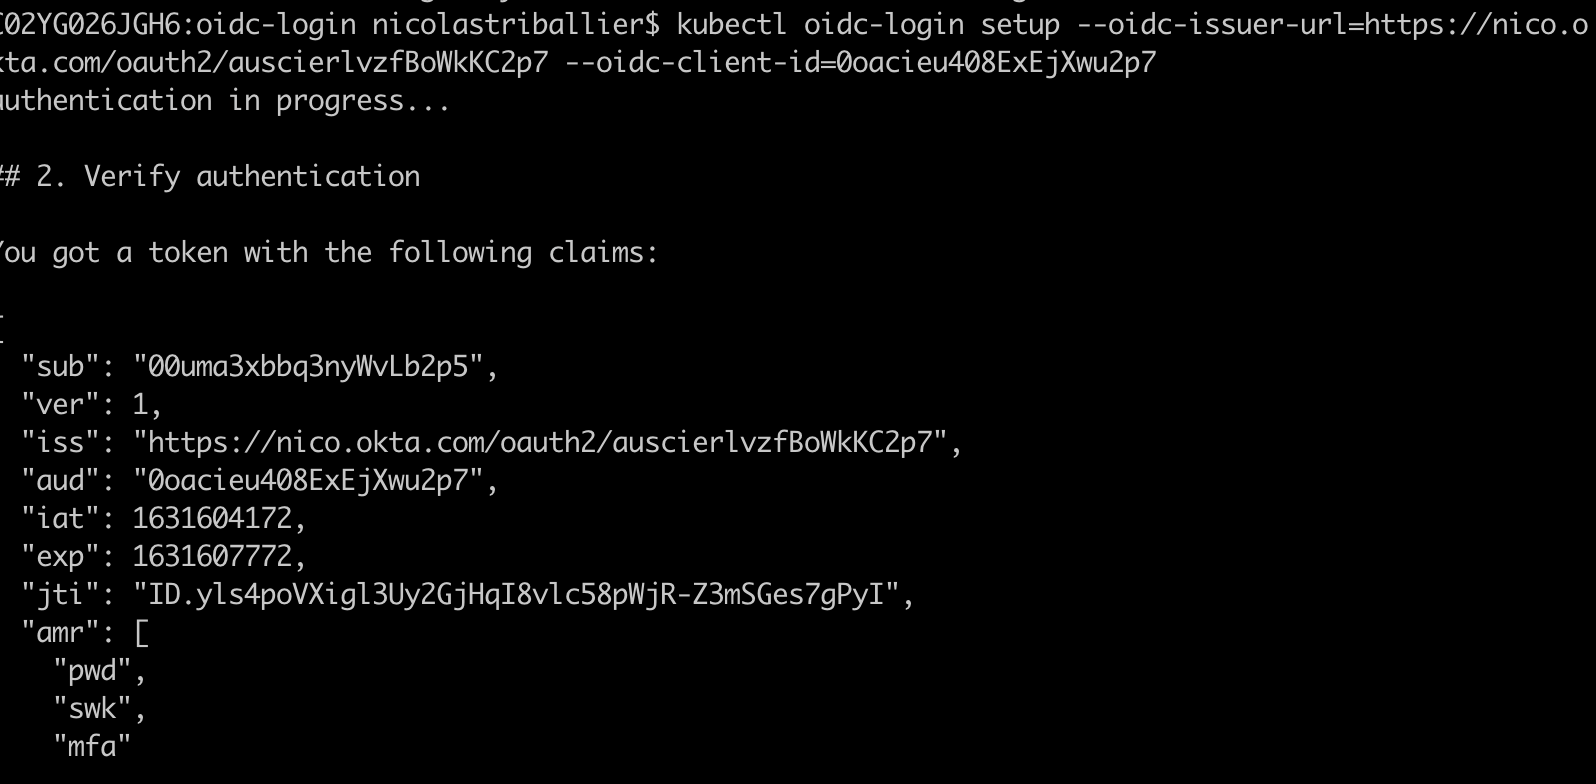
Check your terminal. You should see a confirmation that you’ve received an
id_tokenfrom Okta:
- We’re ready to make a final test. Run:
kubectl --user=oidc get pods --all-namespaces
If you’re not already Okta-authenticated you’ll be prompted for AuthN. You should be able to see your list of pods:

Congratulations! You’ve successfully configured Okta as an OIDC provider to access your EKS cluster! 🎉
Some Extra Checks
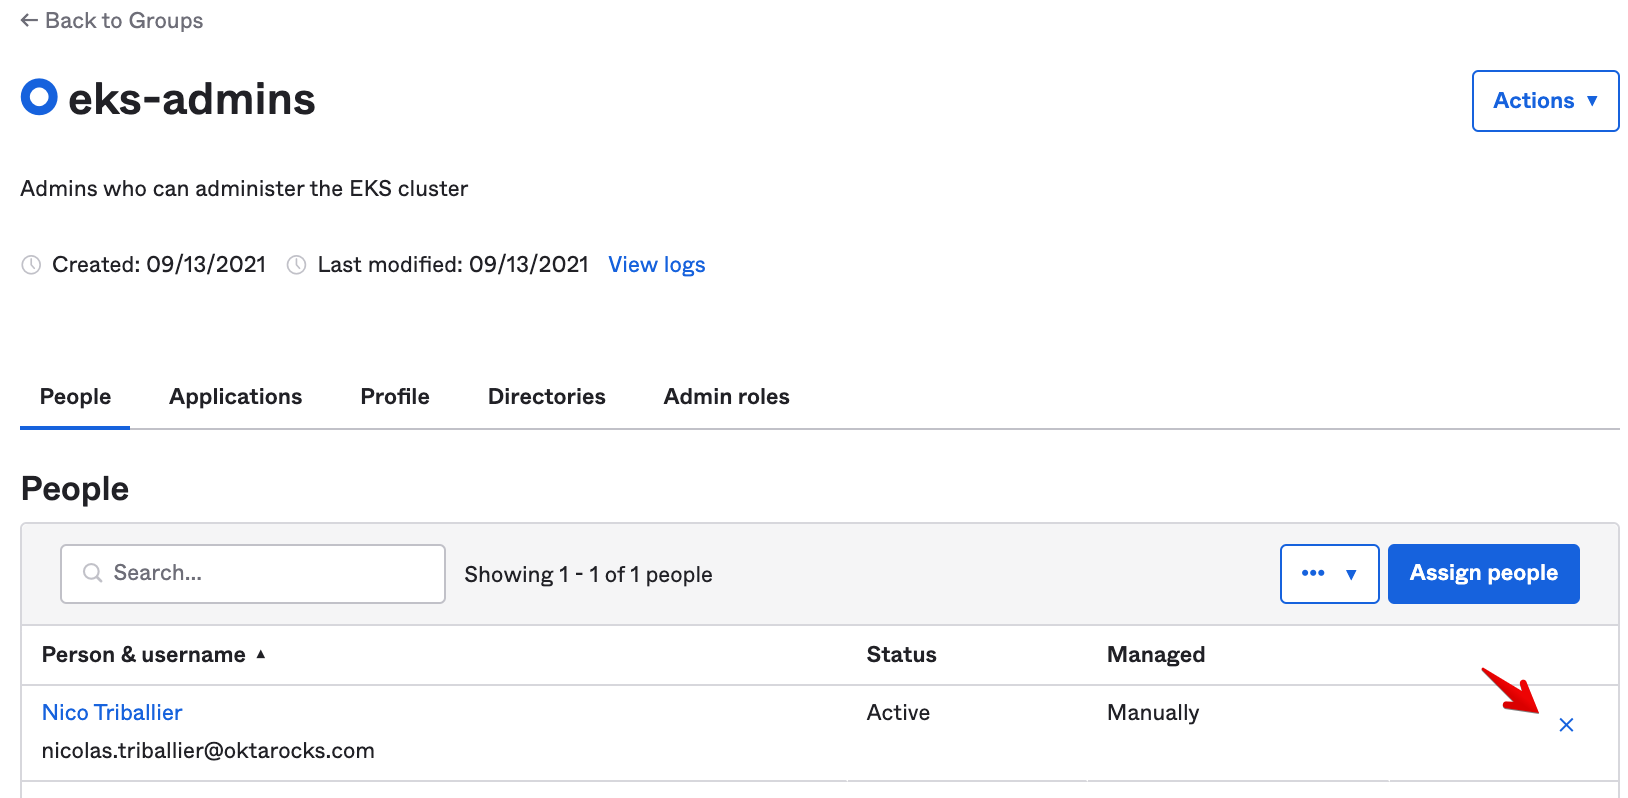
Let’s double-check that our RBAC controls are working as expected. Currently we’re a member of the eks-admins Okta group in the Universal Directory.
- Let’s remove ourselves from the eks-admins group in the Okta admin console.
-
Then, let’s delete the cached
id_tokenon our laptop.- In your terminal, run:
cd ~/.kube/cache/oidc-login
- List files in your cache folder.
ls

- That first file contains the
id_tokenOkta minted. Let’s delete it.
rm 8ead66f63afa81d7300257989c391d035f386b80758a2847c99d37ecdd5610e0
- Double-check that your cache folder is empty.
ls

- Ok, now let’s try again to retrieve the list of pods.
kubectl --user=oidc get pods --all-namespaces

As expected, we’re not authorized. Since we’re no longer a member of the eks-admins Okta group, the group is no longer injected in the id_token, and the Kubernetes API Server no longer applies the cluster-admin role.
- Once again, let’s delete the cached
id_tokenin the~/.kube/cache/oidc-loginfolder. - Let’s add ourselves again to the eks-admins Okta group.
We should now be able to access the list of pods as before:

Pretty cool right? 😎
Automation for Your AWS EKS Workflow
All the manual steps in this tutorial can be automated:
- AWS exposes REST APIs and a Terraform Provider.
- Okta exposes REST APIs and a Terraform Provider
Learn More About Identity Security
You successfully configured Okta as a third party OIDC provider on your EKS cluster, and applied RBAC to enforce least privilege without the need to configure AWS IAM roles. This allows you to have a very generic AuthN/AuthZ framework, for all your Kubernetes (k8s) clusters, regardless of where they run (public cloud, private cloud, or on-prem).
To learn more about OAuth 2.0 and OIDC, check out these blog posts
- Easy Single Sign-On with Spring Boot and OAuth 2.0
- Add Social Login to Your Spring Boot 2.0 App
- Build a CRUD App with Vue.js, Spring Boot, and Kotlin
- Use PKCE with OAuth 2.0 and Spring Boot for Better Security
- Migrate Your Spring Boot App to the Latest and Greatest Spring Security and OAuth 2.0
Follow Okta Developers for more great content and updates from the team! You can find us on Twitter, Facebook, subscribe to our YouTube Channel, or start the conversation below.
Okta Developer Blog Comment Policy
We welcome relevant and respectful comments. Off-topic comments may be removed.