The Hitchhiker's Guide to Testing Spring Boot APIs and Angular Components with WireMock, Jest, Protractor, and Travis CI
Writing apps with Spring Boot and Ionic (which is built on Angular) can be fun because both frameworks offer a good developer experience (DX). You change a file, save it, and the app automatically reloads with your changes. This feature is often called hot-reload and it’s a blissful way to develop. It’s so nice, it can cause you to forget about automating your tests.
I’ll admit, writing tests is difficult to do. Writing the test often isn’t difficult, it’s just code after all. However, writing a test first is a habit that’s tricky to form. However, if you do test-driven development (TDD), chances are that you’ll develop a nicer API. After all, your test will act as a client to your API, and you’ll see what code looks like for your users.
A couple of months ago, I wrote posts about developing a cryptocurrency wealth tracking PWA and storing your holdings as Okta custom profile attributes. To show you how to write tests for the back-end and front-end components, I recruited Brian Demers to help me. Brian is the lead developer on Okta’s Java SDKs and a fun guy to hang out with.
Brian wrote the sections of this article that pertain to the backend code (Java + Spring Boot), while I wrote the sections that pertain to the frontend (TypeScript + Angular). When you see “I” in each section, it’s either Brian or myself, depending on context.
In this tutorial, you’ll see how to implement many aspects of testing a modern application:
- Add Unit Tests for Your Spring Boot Controllers
- Mock Okta’s API with WireMock
- Add Unit Tests for Your Ionic / Angular Components
- Drive and Test Your Ionic PWA with Protractor
- Add Continuous Integration with Travis CI
- Add Code Coverage Reports
I like to call this a hitchhiker’s guide because you can jump into any section of this guide and learn how to test those particular components. If you have any suggestions for improving a specific part, please let us know so we can improve it! We try to keep our blog posts up-to-date as much as possible.
To begin, you’ll want to clone the GitHub repository that contains the Ionic PWA and Spring Boot API and check out the testing-start branch.
git clone -b testing-start https://github.com/oktadeveloper/okta-ionic-crypto-java-sdk-example.git
The instructions below assume you’re operating from the okta-ionic-crypto-java-sdk-example directory of this cloned project.
Note: In May 2025, the Okta Integrator Free Plan replaced Okta Developer Edition Accounts, and the Okta CLI was deprecated.
We preserved this post for reference, but the instructions no longer work exactly as written. Replace the Okta CLI commands by manually configuring Okta following the instructions in our Developer Documentation.
Set Up Okta
First off, what is Okta? Simply put, we’re an API service that allows developers to create, edit, and securely store user accounts and user account data, and connect them with one or multiple applications. Our API enables you to:
- Authenticate and authorize your users
- Store and maintain all your users in one place
- Perform password-based and social login
- Secure your application with multi-factor authentication
- And much more! Check out our product documentation
In short: we make user account management a lot easier, more secure, and more scalable than what you’re probably used to.
To get started with this tutorial, you’ll first need to log into your forever-free Okta developer account,or sign up if you don’t already have one.
Once you’re signed up and logged in, you’ll need to add a holdings attribute to your organization’s user profiles. Log in to the Okta Developer Console, then navigate to Users > Profile Editor. Click on Profile for the first profile in the table. You can identify it by its Okta logo. Click Add Attribute and use the following values:
- Display name:
Holdings - Variable name:
holdings - Description:
Cryptocurrency Holdings
You will need to create an API Token and OIDC App to get values to perform authentication and store data in Okta.
Navigate to Applications > Add Application. Click Single-Page App, click Next, and give the app a name you’ll remember. Click Done.
For the Okta Java SDK to talk to Okta’s API, you’ll need to create an API token. The abbreviated steps are as follows:
- Log in to your Developer Console
- Navigate to API > Tokens and click Create Token
- Give your token a name, then copy its value
Server Configuration for Your Spring Boot API
Open holdings-api/src/main/resources/application.properties and add your API token as a property. While you’re there, set the issuer and clientId to match your OIDC application.
okta.oauth2.issuer=https://{yourOktaDomain}/oauth2/default
okta.oauth2.clientId={clientId}
okta.client.token=XXX
Replace {yourOktaDomain} with your Okta org URL, which you can find on the Dashboard page in the Developer Console. Make sure you don’t include -admin in the value!
NOTE: If you don’t want these values specified in your source code, you can set them as environment variables. For example,
OKTA_CLIENT_TOKENis the name of the environment variable that will override theokta.client.tokenproperty. See Spring Boot’s externalized configuration documentation to learn more.
Client Configuration for Your Ionic PWA
For the client, set the issuer and copy the clientId into crypto-pwa/src/pages/login/login.ts.
const config = {
 issuer: 'https://{yourOktaDomain}/oauth2/default',
 redirectUri: window.location.origin + '/implicit/callback',
 clientId: '{clientId}'
};
Add Unit Tests for Your Spring Boot Controllers
Everyone has opinions on what unit testing is and what it means. To me, unit tests focus on executing the smallest block of code possible. In simple terms, exercising your code’s public methods.
The tests in the following sections were added in a pull-request. In addition to adding tests, I also changed the Holding bean’s setters to be fluent, so the methods can be chained together as you will see below.
Spring has a lot of helper test infrastructure to help set up the context of your application. When possible, I avoid using it, this allows for more focused and faster running tests. How you inject your dependencies into your code changes the option you have for testing. For example, if class we are testing HoldingsController was written with field injection it would look something like this:
public class HoldingsController {

    @Autowired
    private Client client;

    public HoldingsController() {}
    ...
}
The above implementation can only be run inside a Spring container. Instead, the same code can be refactored to use constructor injection:
public class HoldingsController {
    private final Client client;

    public HoldingsController(Client client) {
        this.client = client;
    }
    ...
}
The differences between the two might may or may not be obvious to you. The second example is just plain ol’ Java code: Client field is final, once the object is constructed is it ready to be used, and, to me most significantly, it can be used without a Spring. Constructor injection makes it much easier to write tests; you can test your code in isolation and mock out the behavior you are testing for. You can read on the topic from Oliver Gierke.
When given a choice, my preferred testing frameworks are Mockito and Hamcrest. Mockito makes it easy to stub behavior, and Hamcrest has both excellent default assertion messages, and it helps isolate your test code from the differences between JUnit and TestNG. I usually write tests in Groovy as well to help reduce some of the boilerplate, but I’ll stick with Java for today.
To refresh your memory, I’m going to write tests for the HoldingsController; this class has a single constructor and methods for @GetMapping and @PostMapping. I’ll focus on the saveHoldings(@RequestBody Holding[] holdings, Principal principal) method:
@PostMapping
public Holding[] saveHoldings(@RequestBody Holding[] holdings, Principal principal) {
    User user = client.getUser(principal.getName());
    try {
        String json = mapper.writeValueAsString(holdings);
        user.getProfile().put(HOLDINGS_ATTRIBUTE_NAME, json);
        user.update();
    } catch (JsonProcessingException e) {
        logger.error("Error saving Okta custom data: " + e.getMessage());
        e.printStackTrace();
    }
    return holdings;
}
This method saves the argument holdings to an Okta custom profile property associated with the user.
Mock Okta’s Java SDK with Mockito
Mockito and Hamcrest are both typically used with static imports, something like:
import static org.hamcrest.MatcherAssert.assertThat;
import static org.hamcrest.Matchers.*;
import static org.mockito.Mockito.*;
For those of you who don’t like wildcard imports:
import static org.hamcrest.MatcherAssert.assertThat;
import static org.hamcrest.Matchers.contains;
import static org.hamcrest.Matchers.is;

import static org.mockito.Mockito.mock;
import static org.mockito.Mockito.when;
import static org.mockito.Mockito.verify;
import static org.mockito.Mockito.eq;
I’ve defined a saveHoldingsTest in HoldingsControllerTest in which I created a few mock objects:
Client client = mock(Client.class);
User user = mock(User.class);
UserProfile userProfile = mock(UserProfile.class);
Principal principal = mock(Principal.class);
Then define the behaviour of the mocks:
String username = "joe.coder@example.com";
when(principal.getName()).thenReturn(username);
when(client.getUser(username)).thenReturn(user);
when(user.getProfile()).thenReturn(userProfile);
You can see the behavior driven Given-When-Then style of Mockito (where, in this case, the ‘given’ is the mock definition). Anytime principal.getName() is called "joe.coder@example.com" will be returned and when client.getUser("joe.coder@example.com") is called, our mocked User instance is returned.
Now for the easy part, calling HoldingsController.saveHoldings()
Holding[] inputHoldings = new Holding[] {
        new Holding()
            .setCrypto("crypto1")
            .setCurrency("currency1")
            .setAmount("amount1"),
        new Holding()
            .setCrypto("crypto2")
            .setCurrency("currency2")
            .setAmount("amount2")
};

HoldingsController holdingsController = new HoldingsController(client);
Holding[] outputHoldings = holdingsController.saveHoldings(inputHoldings, principal);
Nothing special here, but that is the point! Using constructor injection allows us to treat this object like any other Java object.
The only thing left is to validate the results. Using Hamcrest, we can verify the saveHoldings method returns a Holding[] equal to the input.
assertThat(outputHoldings, is(inputHoldings));
We also need to validate that the custom property holdings was set, and user.update() was called, for this we will use a Mockito ArgumentCaptor to capture the JSON string value of holdings:
ArgumentCaptor<String> holdingsJsonCaptor = ArgumentCaptor.forClass(String.class);
verify(userProfile).put(eq("holdings"), holdingsJsonCaptor.capture());
verify(user).update();
Finally, we can validate the JSON string. Spotify Hamcrest (yes, the same Spotify you rock out to while coding) is my new favorite testing lib and shows the power and readability of custom Hamcrest matchers.
JsonNode holdingsParsed = new ObjectMapper().readTree(holdingsJsonCaptor.getValue());
assertThat(holdingsParsed, jsonArray(contains(
        jsonObject()
            .where("crypto", jsonText("crypto1"))
            .where("currency", jsonText("currency1"))
            .where("amount", jsonText("amount1")),
        jsonObject()
            .where("crypto", jsonText("crypto2"))
            .where("currency", jsonText("currency2"))
            .where("amount", jsonText("amount2"))
)));
I mentioned above Hamcrest has great default assertion messages, hopefully you will never have to see them, but that isn’t likely, here is an example output of a failed JSON assertion:
java.lang.AssertionError:
Expected: an array node whose elements iterable containing [{
  "crypto": a text node with value that is "crypto1"
  "currency": a text node with value that is "currency1"
  "amount": a text node with value that is "amount1"
}, {
  "crypto": a text node with value that is "crypto2"
  "currency": a text node with value that is "currency2"
  "amount": a text node with value that is "amount2"
}]
     but: was an array node whose elements item 0: {
  "crypto": was a text node with value that was "wrong-crypto"
  ...
}
Mock Okta’s API with WireMock
Integration tests are a little more involved. Sometimes you spin up your full application and all of its required dependencies. Other times you mock out the external dependencies so you can focus on your code (and not worry about needing an internet connection just to run your tests). I’m a big fan of the later and try to take that approach when possible.
The HoldingsApiApplication has two external dependencies, the Okta OAuth 2.0 IdP and the Okta Management API. I’m going to use WireMock for both. For OAuth mocking, you also have another option, but it requires changes to how your application is running while testing. I prefer to make as few changes as possible to my application during integration testing. I’ll give you a link to compare the two strategies at the end of this section.
As you start to look at HoldingsApiIT you will see a few interesting things:
@RunWith(SpringRunner.class)
@ContextConfiguration(initializers = HoldingsApiIT.RandomPortInitializer.class)
@SpringBootTest(classes = {HoldingsApiApplication.class},
                webEnvironment = RANDOM_PORT,
                properties = {
                    "okta.client.token=FAKE_TEST_TOKEN",
                    "okta.oauth2.localTokenValidation=false",
                    "okta.oauth2.discoveryDisabled=true",
                    "okta.client.orgUrl=http://localhost:${wiremock.server.port}",
                    "okta.oauth2.issuer=http://localhost:${wiremock.server.port}/oauth/issuer",
                    "security.oauth2.resource.userInfoUri=http://localhost:${wiremock.server.port}/oauth/userInfoUri"
                })
public class HoldingsApiIT {
The above is a JUnit test configured to run with the SpringRunner. The ContextConfiguration annotation defines a RandomPortInitializer which will assign a random port to the property wiremock.server.port before the test runs. This is done so the auto-configured Okta Client and OAuth components will access a local WireMock server (by setting the above properties).
WireMock if you haven’t already guessed is a nifty little testing lib you can use to mock HTTP responses, it spins up an embedded Jetty instance to handle real HTTP requests/responses. For example, if you wanted to mock a response to /my/resource and return the XML content <hello>still using XML</hello>, it would be represented in the following syntax:
stubFor(get(urlEqualTo("/my/resource"))
    .withHeader("Accept", equalTo("text/xml"))
    .willReturn(aResponse()
        .withStatus(200)
        .withHeader("Content-Type", "text/xml")
        .withBody("<hello>still using XML</hello>")));
In simple cases, you can also use a JUnit rule to automatically start/stop the WireMock server. However, when coupled with the SpringRunner it doesn’t work as well, do to the order in which rules and field injection happens. To work around this we simply fall back to the time-tested @Before and @After test annotations.
private WireMockServer wireMockServer;

@Before
public void startMockServer() throws IOException {
    wireMockServer = new WireMockServer(wireMockConfig().port(mockServerPort));
    configureWireMock();
    wireMockServer.start();
}

@After
public void stopMockServer() {
    if (wireMockServer != null && wireMockServer.isRunning()) {
        wireMockServer.stop();
    }
}
I’ve also defined a method configureWireMock() which will configure how WireMock responds to requests:
private void configureWireMock() throws IOException {
     // load a JSON file from the classpath
    String body = StreamUtils.copyToString(getClass().getResourceAsStream("/its/user.json"), StandardCharsets.UTF_8);

    // respond to GET for user
    wireMockServer.stubFor(WireMock.get("/api/v1/users/" + TEST_USER_EMAIl)
            .willReturn(aResponse().withBody(body)));

    // respond to PUT for user
    wireMockServer.stubFor(WireMock.put("/api/v1/users/" + TEST_USER_ID)
            .willReturn(aResponse().withBody(body)));

    // OAuth userInfoUri
    String userInfoBody = StreamUtils.copyToString(getClass().getResourceAsStream("/its/userInfo.json"), StandardCharsets.UTF_8);
    wireMockServer.stubFor(
            WireMock.get("/oauth/userInfoUri")
                .withHeader("Authorization", WireMock.equalTo("Bearer "+ TEST_ACCESS_TOKEN))
            .willReturn(aResponse()
                    .withBody(userInfoBody)
                    .withHeader("Content-Type", MediaType.APPLICATION_JSON_VALUE)
            ));
}
The above method loads a JSON file from the classpath /its/user.json and returns its contents for GET and PUT requests for the /api/v1/users endpoints. A similar response is mocked for a GET request to /oauth/userInfoUri.
The rest of test code looks pretty simple:
@Autowired
private TestRestTemplate restTemplate;

@Test
public void testGetHoldings() {

    List<Holding> holdings = Arrays.asList(restTemplate.getForObject("/api/holdings", Holding[].class));

    // use Spotify's hamcrest-pojo to validate the objects
    assertThat(holdings, contains(
            pojo(Holding.class)
                .withProperty("crypto",   is("crypto-1"))
                .withProperty("currency", is("currency-1"))
                .withProperty("amount",   is("amount-1")),
            pojo(Holding.class)
                .withProperty("crypto",   is("crypto-2"))
                .withProperty("currency", is("currency-2"))
                .withProperty("amount",   is("amount-2"))
    ));
}
It’s worth noting that this integration test is more complicated and slower than the corresponding unit test above. I feel developers typically create integration test because these tests have fewer lines of code. The unit tests finish nearly instantly, each integration test, on the other hand, spins up two servlet containers (one for our application and another for WireMock), for every test! Having both unit and integration tests is essential, you should be writing more unit tests than integration tests. Check out The Practical Test Pyramid to read more on the topic.
Use Spring MVC Test’s MockMVC Instead
As I mentioned above, instead of using WireMock to fake an OAuth response, you can skip the OAuth validation check with a few clever tricks.
I’m not going to go into detail here, if you’re interested you can take a look how I wrote the same test with a different technique. The key areas to look at are the:
TestResourceServerConfigurationdisables stateless configuration for the resource server (NOT recommended for production)@WithMockUser(username=TEST_USER_ID)instructs the test framework to create a Spring SecurityContext for you- How
MockMvcis created withapply(springSecurity()) - Use
with(securityContext(SecurityContextHolder.getContext()))when callingMockMvc.perform()
Add Unit Tests for Your Ionic / Angular Components
Ionic 3.x is built on Angular. This means that you should be able to use Angular testing tools to verify your app works as expected. When I create Angular apps, I tend to use Angular CLI. Angular CLI has a testing framework (Jasmine) built-in, as well as facilities to test via the command line or in a continuous integration server. If you’re interested in learning more about how to write tests for an Angular app, I invite you to visit the testing section of my Angular CLI tutorial. Tip: it’s easier on the eyes to read the testing tutorial on DocGist.
Ionic CLI doesn’t contain a test command as Angular CLI does. To solve this problem, I turned to Daniel Sogl’s ionic-super-starter. It uses Jest for unit tests, mocks for many Ionic classes, and has end-to-end testing support too.
I learned how to add testing support to an Ionic app by creating an app with Daniel’s starter:
ionic start ionic-super-starter danielsogl/super
Then, I copied the configuration into the crypto-pwa project. I’ve abbreviated those steps below.
-
Add scripts in the
scriptssection of yourpackage.jsonto run unit tests and end-to-end (e2e) tests:"test": "jest", "test:watch": "jest --watch", "test:ci": "jest --runInBand", "test:coverage": "jest --coverage", "e2e": "npm run e2e-update && npm run e2e-test", "e2e-test": "protractor ./test/protractor.conf.js", "e2e-update": "webdriver-manager update --standalone false --gecko false" -
Add the following dependencies to the
devDependenciessection ofpackage.json:"typescript": "2.8.1", "@types/jest": "22.2.3", "@types/node": "9.6.5", "html-loader": "0.5.1", "ionic-mocks-jest": "1.0.3", "istanbul-instrumenter-loader": "3.0.0", "jasmine": "3.1.0", "jasmine-spec-reporter": "4.1.0", "jest": "22.4.3", "jest-preset-angular": "5.2.1", "null-loader": "0.1.1", "protractor": "5.1.1", "ts-loader": "4.2.0", "ts-node": "6.0.0" -
Add configuration for Jest, on the same level as
devDependenciesandscriptsinpackage.json:"jest": { "preset": "jest-preset-angular", "setupTestFrameworkScriptFile": "<rootDir>/test/jest.conf.ts", "transformIgnorePatterns": [ "node_modules/(?!@ngrx|@ionic-native|@ionic)" ], "coveragePathIgnorePatterns": [ "<rootDir>/e2e/" ], "collectCoverageFrom": [ "**/*.{ts}", "!**/*d.{ts}", "!**/*interface.{ts}", "!**/*module.{ts}", "!**/*main.{ts}", "!**/node_modules/**" ], "moduleFileExtensions": [ "ts", "js", "json" ], "coverageReporters": [ "json", "lcov", "text" ], "coverageDirectory": "./public/coverage" } -
Create a
crypto-pwa/testdirectory and create two files in it:jest.conf.tsandprotractor.conf.js.// test/jest.conf.ts import 'jest-preset-angular';// test/protractor.conf.js const { SpecReporter } = require('jasmine-spec-reporter'); exports.config = { allScriptsTimeout: 11000, specs: [ '../e2e/**/*.e2e-spec.ts' ], capabilities: { 'browserName': 'chrome' }, directConnect: true, baseUrl: 'http://localhost:8100/', framework: 'jasmine', jasmineNodeOpts: { showColors: true, defaultTimeoutInterval: 30000, print: function() {} }, onPrepare() { require('ts-node').register({ project: 'e2e/tsconfig.e2e.json' }); jasmine.getEnv().addReporter(new SpecReporter({ spec: { displayStacktrace: true } })); } }; -
Create
src/tsconfig.spec.jsonand populate it with the following JSON:{ "extends": "../tsconfig.json", "compilerOptions": { "outDir": "../out-tsc/spec", "module": "commonjs", "target": "es5", "allowJs": true }, "include": [ "**/*.spec.ts" ], "exclude": [ "**/*e2e-spec.ts" ] } -
Create
e2e/tsconfig.e2e.jsonand configure its settings:{ "extends": "../tsconfig.json", "compilerOptions": { "outDir": "../out-tsc/e2e", "baseUrl": "./", "module": "commonjs", "target": "es5", "typeRoots": [ "../node_modules/@types" ] } }NOTE: After making all these changes, I updated all dependencies in
crypto-pwa/package.jsonby installing npm-check-updates and runningncu -u. -
Run
npm ito install the new dependencies you added.
Add Unit Tests for Ionic Components with Jest
According to the Jest homepage, it’s used by Facebook to test all JavaScript code including React applications. Jest strives for zero-configuration, but you can tell from the files above that it still requires some configuration. It does have built-in code coverage reports, which is kinda cool.
If you’re new to Jest and want to learn the basics, I invite you to read its Getting Started guide.
Jest is similar to Karma and Jasmine. Karma is a test runner, and Jasmine is a behavior-driven development framework for testing JavaScript code. For Java developers, Jasmine is like the JUnit of the JavaScript ecosystem. A simple Jasmine test looks as follows:
describe('A suite is just a function', () => {
  let a;

  it('and so is a spec', () => {
    a = true;

    expect(a).toBe(true);
  });
});
Jest tests look very similar, but there are some slight differences. If you’re interested in learning more, I’d suggest googling “jest vs jasmine.”
After adding Jest support to your Ionic project, you have several options to run unit tests:
- Run
npm testto execute all the unit tests. - Run
npm run test:watchto execute tests and watch for changes. If anything changes, tests are automatically executed. - Run
npm test:cito execute tests in a continuous integration (CI) server. This runs all tests serially in the current process, rather than creating a worker pool of child processes that run tests. - Run
npm run test:coverageto generate a test coverage report.
These commands are great to know, but only useful if you have unit tests!
Create crypto-pwa/src/app/app.component.spec.ts and populate it the following code:
import { async, TestBed } from '@angular/core/testing';
import { IonicModule, Platform } from 'ionic-angular';
import { StatusBar } from '@ionic-native/status-bar';
import { SplashScreen } from '@ionic-native/splash-screen';
import { PlatformMock, SplashScreenMock, StatusBarMock } from 'ionic-mocks-jest';
import { MyApp } from './app.component';
import { OAuthService } from 'angular-oauth2-oidc';

describe('MyApp Component', () => {
  let fixture;
  let component;
  let oauthService = {
    hasValidIdToken() {
      return false;
    }
  };

  beforeEach(
    async(() => {
      TestBed.configureTestingModule({
        declarations: [MyApp],
        imports: [IonicModule.forRoot(MyApp)],
        providers: [
          {provide: StatusBar, useFactory: () => StatusBarMock.instance()},
          {provide: SplashScreen, useFactory: () => SplashScreenMock.instance()},
          {provide: Platform, useFactory: () => PlatformMock.instance()},
          {provide: OAuthService, useFactory: () => oauthService}
        ]
      });
    })
  );

  beforeEach(() => {
    fixture = TestBed.createComponent(MyApp);
    component = fixture.componentInstance;
  });

  it('should be created', () => {
    expect(component instanceof MyApp).toBe(true);
  });

  it('should show login page', () => {
    expect(component.rootPage).toEqual('LoginPage');
  });
});
This test will pass, but a lot is going on, so let me break it down for you. First of all, you might notice there are some imports from ionic-mocks-jest. If generate an Ionic app using ionic start and select the “tabs” starter, you’ll have a MyApp component that looks as follows:
export class MyApp {
  rootPage:any = TabsPage;

  constructor(platform: Platform, statusBar: StatusBar, splashScreen: SplashScreen) {
    platform.ready().then(() => {
      // Okay, so the platform is ready and our plugins are available.
      // Here you can do any higher level native things you might need.
      statusBar.styleDefault();
      splashScreen.hide();
    });
  }
}
Whenever a component has dependencies defined in its constructor, you need to “provide” those in your component’s test.
To make it easy to components that depend on Ionic components, Daniel Sogl forked the ionic-mocks project to create ionic-mocks-jest. This project provides many mock objects using Jasmine Spy Objects, with support for Jest. A spy can stub any function and tracks calls to it, as well as all the arguments passed in. You can imagine how this can be useful, especially when testing.
The crypto-pwa project is meant to a be a PWA, not a native app, so these dependencies don’t exist in its MyApp component. However, I thought I’d point them out in case your app uses them.
There’s a bit of boilerplate code to test an Angular component. If I were to simplify the test above only to have the essentials for a bare-bones component and test, it’d look like the following:
describe('MyApp Component', () => {
  let fixture;
  let component;

  beforeEach(
    async(() => {
      TestBed.configureTestingModule({
        declarations: [MyApp]
      });
    })
  );

  beforeEach(() => {
    fixture = TestBed.createComponent(MyApp);
    component = fixture.componentInstance;
  });

  it('should show login page', () => {
    expect(component.rootPage).toEqual('LoginPage');
  });
});
This test will fail because the MyApp component loads app.html with Ionic elements in it.
 FAIL  src/app/app.component.spec.ts
  MyApp Component
    ✕ should be created (647ms)
    ○ skipped 1 test

  ● MyApp Component › should be created

    Template parse errors:
    Can't bind to 'root' since it isn't a known property of 'ion-nav'.
    1. If 'ion-nav' is an Angular component and it has 'root' input, t
Import IonicModule and you’ll get a bit further. This is a common pattern. If you have custom components in your templates, you’ll need to import their modules in your tests, just like you do in app.module.ts.
beforeEach(
  async(() => {
    TestBed.configureTestingModule({
      declarations: [MyApp],
      imports: [IonicModule.forRoot(MyApp)]
    });
  })
);
If you try to run the test now, it’ll complain that the constructor dependency in MyApp is not available.
StaticInjectorError(DynamicTestModule)[MyApp -> OAuthService]:
  StaticInjectorError(Platform: core)[MyApp -> OAuthService]:
    NullInjectorError: No provider for OAuthService!
To fix this, create a mock instance of oauthService and specify it as a provider.
const oauthService = {
  hasValidIdToken() {
    return false;
  }
};

beforeEach(
  async(() => {
    TestBed.configureTestingModule({
      declarations: [MyApp],
      imports: [IonicModule.forRoot(MyApp)],
      providers: [
        {provide: OAuthService, useFactory: () => oauthService}
      ]
    });
  })
);
TIP: You could also use {provide: OAuthService, useValue: oauthService} to substitute your mock OAuthService for the real one. Another option is useClass, which allows you to specify a different class.
You only need to define the hasValidIdToken() in oauthService because that’s the only method that’s used in MyApp:
import { Component } from '@angular/core';
import { OAuthService } from 'angular-oauth2-oidc';

@Component({
  templateUrl: 'app.html'
})
export class MyApp {
  rootPage: any = 'HomePage';

  constructor(oauthService: OAuthService) {
    if (oauthService.hasValidIdToken()) {
      this.rootPage = 'HomePage';
    } else {
      this.rootPage = 'LoginPage';
    }
  }
}
Now you can create a test that ensures the login page is shown when no ID token exists.
it('should show login page', () => {
  expect(component.rootPage).toEqual('LoginPage');
});
Run npm test and everything should pass!
> jest

 PASS  src/app/app.component.spec.ts
  MyApp Component
    ✓ should be created (517ms)
    ✓ should show login page (330ms)

Test Suites: 1 passed, 1 total
Tests:       2 passed, 2 total
Snapshots:   0 total
Time:        4.363s, estimated 5s
Ran all test suites.
NOTE: You might experience the following test failure:
Cannot find module 'rxjs-compat/Observable' from 'Observable.js'
If this happens, it’s because running ncu -u updated RxJS from 5.5.8 to 6.x. To fix it, you can modify your package.json to revert to 5.5.10 (the latest version) or run npm i -rxjs-compat. See the version 6 migration guide for more information.
The HomeComponent loads the list of holdings a user has after they authenticate in its ionViewDidLoad method.
ionViewDidLoad(): void {
  if (!this.oauthService.hasValidIdToken()) {
    this.navCtrl.push('LoginPage');
  }
  this.holdingsProvider.loadHoldings();
}
To test that everything works as expected, create crypto-pwa/src/pages/home/home.spec.ts with stubs for its providers.
import { IonicModule, NavController } from 'ionic-angular';
import { OAuthService } from 'angular-oauth2-oidc';
import { async, ComponentFixture, TestBed } from '@angular/core/testing';
import { HomePage } from './home';
import { HoldingsProvider } from '../../providers/holdings/holdings';
import { By } from '@angular/platform-browser';

describe('HomePage', () => {
  let fixture: ComponentFixture<HomePage>;
  let component: HomePage;
  let oauthService = {
    hasValidIdToken() {
      return true;
    },
    getIdentityClaims() {}
  };
  let holdingsProvider = {
    holdings: [{crypto: 'BTC', currency: 'USD', amount: 5, value: '10000'}],
    loadHoldings() {
      return this.holdings;
    }
  };
  let loadHoldings, getIdentityClaims;

  beforeEach(async(() => {
    TestBed.configureTestingModule({
      declarations: [HomePage],
      imports: [IonicModule.forRoot(HomePage)],
      providers: [NavController,
        {provide: OAuthService, useValue: oauthService},
        {provide: HoldingsProvider, useValue: holdingsProvider}
      ]
    });
  }));

  beforeEach(() => {
    fixture = TestBed.createComponent(HomePage);
    component = fixture.componentInstance;
    loadHoldings = jest.spyOn(holdingsProvider, 'loadHoldings');
    getIdentityClaims = jest.spyOn(oauthService, 'getIdentityClaims');
  });

  it('should be created', () => {
    expect(component).toBeDefined()
  });
});
This test uses jest.spyOn to spy on the methods that should be called, and verify they were. If you want to mock functions and return fake data, you can do this with jest.fn() and mock functions.
Add tests to ensure HoldingsProvider.loadHoldings()` is called and a list of currencies is shown.
it('should call loadHoldings', () => {
  component.ionViewDidLoad();
  fixture.detectChanges();
  expect(loadHoldings).toHaveBeenCalled();
  expect(getIdentityClaims).toHaveBeenCalled();
});

it('should show list of currencies', () => {
  component.ionViewDidLoad();
  fixture.detectChanges();
  const list: HTMLDivElement = fixture.debugElement.query(By.css('ion-list')).nativeElement;
  expect(list.innerHTML).toMatch(/ion-item/);
  const amount = fixture.debugElement.query(By.css('.amount')).nativeElement;
  expect(amount.innerHTML).toMatch(/<strong>Coins:<\/strong> 5 <strong>Value:<\/strong> 10000/)
});
Run npm test and everything should pass.
Test Suites: 2 passed, 2 total
Tests:       5 passed, 5 total
Snapshots:   0 total
Time:        5.98s
Rather than showing you how to unit test every component, I’ll show you how to write one more: a provider test. To test
providers (often called services in regular Angular apps) that use HttpClient, you can use HttpTestingController. Create crypto-pwa/src/providers/holdings/holdings.spec.ts and populate it with the code below.
import { getTestBed, TestBed } from '@angular/core/testing';
import { HttpClientTestingModule, HttpTestingController } from '@angular/common/http/testing';
import { HoldingsProvider } from './holdings';
import { OAuthService } from 'angular-oauth2-oidc';

describe('HoldingsProvider', () => {
  let injector: TestBed;
  let provider: HoldingsProvider;
  let httpMock: HttpTestingController;
  let oauthService = {
    hasValidIdToken() {
      return true;
    },
    authorizationHeader() {
      return "random-string";
    }
  };

  beforeEach(() => {
    TestBed.configureTestingModule({
      imports: [HttpClientTestingModule],
      providers: [HoldingsProvider,
        {provide: OAuthService, useValue: oauthService}
      ]
    });

    injector = getTestBed();
    provider = injector.get(HoldingsProvider);
    httpMock = injector.get(HttpTestingController);
  });

  afterEach(() => {
    httpMock.verify()
  });

  it('should be created', () => {
    expect(provider).toBeTruthy();
  });

  it('should retrieve holdings', () => {
    const fakeHoldings = [
      {crypto: 'BTC', currency: 'USD', amount: 5, value: '10000'},
      {crypto: 'ETH', currency: 'USD', amount: 100, value: '700'}
    ];

    provider.loadHoldings();
    const req = httpMock.expectOne(provider.HOLDINGS_API);
    expect(req.request.method).toBe('GET');
    req.flush(fakeHoldings);

    expect(provider.holdings.length).toBe(2);
    expect(provider.holdings[0].crypto).toBe('BTC');
    expect(provider.holdings).toEqual(fakeHoldings);

    // calls to get prices
    httpMock.expectOne('https://api.cryptonator.com/api/ticker/BTC-USD');
    httpMock.expectOne('https://api.cryptonator.com/api/ticker/ETH-USD');
  });
});
The real action happens via the following steps:
- The provider’s method is called,
loadHoldings()in this case - The request is mocked using
expectOne() - Flush the request passing fake values
After this happens, you can set your expectations accordingly. If there are any extra calls (like fetchPrices()) in your provider, you’ll need to set expectations for those too. The afterEach function is used to verify there are no unanticipated HTTP calls.
HAT TIP: I learned how to test providers that use HttpClient from Ciro Nunes’ Testing with the Angular HttpClient API.
Run npm test to verify all your unit tests pass.
Now that you have unit tests, add some end-to-end tests that ensure the whole app works as expected.
Drive and Test Your Ionic PWA with Protractor
Protractor recommends using Page Objects to organize tests. Page Objects help you write cleaner tests by encapsulating information about a page’s elements in a single object.
Setup a basic e2e test of your application’s homepage with the following steps:
-
Create a generic
Pageobject atcrypto-pwa/e2e/pages/app.po.ts:import { browser } from 'protractor'; export class Page { navigateTo(destination) { return browser.get(destination); } getTitle() { return browser.getTitle(); } } -
Create
crypto-pwa/e2e/spec/app.e2e-spec.tsand define a “default screen” test suite:import { Page } from '../pages/app.po'; import { browser, ExpectedConditions as ec } from 'protractor'; describe('App', () => { let page: Page; beforeEach(() => { page = new Page(); }); describe('default screen', () => { beforeEach(() => { page.navigateTo('/#/home'); }); it('should redirect to login', () => { browser.wait(ec.urlContains('/#/login'), 5000); }); it('should have the correct title', () => { page.getTitle().then(title => { expect(title).toEqual('Cryptocurrency PWA with Authentication'); }); }); }); });
NOTE: In order for getLoginButton() to work, you’ll need to add id="login" to the login button in crypto-pwa/src/pages/login/login.html.
To execute Protractor tests, run ionic serve in one terminal and npm run e2e in another. The (silent) video below shows what should happen.
You can also configure Protractor to launch its own web server. To do this, add a devDependency on node-http-server:
npm i -D node-http-server@8.1.2
Then modify crypto-pwa/test/protractor.conf.js to serve up the www directory on port 8100.
const server = require('node-http-server');

exports.config = {
  ...
  onPrepare() {
    require('ts-node').register({
      project: 'e2e/tsconfig.e2e.json'
    });
    server.deploy({port: 8100, root: 'www'});
    jasmine.getEnv().addReporter(new SpecReporter({ spec: { displayStacktrace: true } }));
  }
};
The only drawback to this technique is you’ll have to build your project (with npm run build so the www is populated) before running it. It’s a good idea to do a prod build (npm run build --prod) before running e2e tests anyway, so this drawback can also be viewed as a good practice.
Even better, you can automate it with continuous integration! We’ll get to that in a minute. First, create a crypto-pwa/e2e/pages/login.po.ts that defines the elements and methods you’ll need to authenticate.
import { browser, by, element } from 'protractor';
import { Page } from './app.po';

export class LoginPage extends Page {
  username = element(by.name('username'));
  password = element(by.name('password'));
  oktaLoginButton = element(by.css('input[type=submit]'));
  loginButton = element(by.css('#login'));
  logoutButton = element(by.css('#logout'));
  header = element(by.css('ion-title'));

  getHeader() {
    return this.header.getText();
  }

  setUserName(username) {
    this.username.sendKeys(username);
  }

  getUserName() {
    return this.username.getAttribute('value');
  }

  clearUserName() {
    this.username.clear();
  }

  setPassword(password) {
    this.password.sendKeys(password);
  }

  getPassword() {
    return this.password.getAttribute('value');
  }

  clearPassword() {
    this.password.clear();
  }

  login(username: string, password: string) {
    // Entering non angular site, tell webdriver to switch to synchronous mode.
    browser.waitForAngularEnabled(false);
    this.username.isPresent().then(() => {
      this.username.sendKeys(username);
      this.password.sendKeys(password);
      this.oktaLoginButton.click();
    }).catch(error => {
      browser.waitForAngularEnabled(true);
    });
  }

  clickLoginButton() {
    return this.loginButton.click();
  }

  logout() {
    return this.logoutButton.click();
  }
}
Then create crypto-pwa/e2e/spec/login.e2e-spec.ts with tests that ensure a login button exists, that invalid credentials results in an error, valid credentials shows a welcome message, and that you can log out successfully.
import { browser, element, by, ExpectedConditions as ec } from 'protractor';
import { LoginPage } from '../pages/login.po';

describe('Login', () => {

  let loginPage;

  beforeAll(() => {
    loginPage = new LoginPage();
    loginPage.navigateTo('/');
    browser.waitForAngular();
  });

  it('should show a login button', () => {
    expect(loginPage.getHeader()).toMatch(/Login/);
    expect(loginPage.loginButton.isPresent());
  });

  it('should fail to log in with bad password', () => {
    loginPage.clickLoginButton();
    loginPage.login('admin', 'foo');
    const error = element.all(by.css('.infobox-error')).first();
    browser.wait(ec.visibilityOf(error), 2000).then(() => {
      expect(error.getText()).toMatch("Sign in failed!");
    });
  });

  it('should log in successfully with demo account', () => {
    loginPage.clearUserName();
    loginPage.setUserName(process.env.E2E_USERNAME);
    loginPage.clearPassword();
    loginPage.setPassword(process.env.E2E_PASSWORD);
    loginPage.oktaLoginButton.click();

    const welcome = /Welcome/; // Use /Welcome, First Last/ if you want to verify full name
    const success = element.all(by.css('h1')).first();
    browser.wait(ec.visibilityOf(success), 5000).then(() => {
      expect(success.getText()).toMatch(welcome);
    });
  });

  it('should log out successfully', () => {
    loginPage.logout();
    browser.wait(ec.urlContains('/#/login'), 2000);
    expect(loginPage.loginButton.isPresent());
  })
});
The process.env.* variables provide a convenient way to store credentials in environment variables, so you’re not exposing them in your source control system. You’ll need to define E2E_USERNAME and E2E_PASSWORD environment variables for this test to pass. The values should match valid credentials in your Okta tenant.
After you’ve defined them and verified they’re set properly, start the Spring Boot app using mvn in one terminal, then run the following commands in the crypto-pwa directory.
npm run build --prod
npm run e2e
When everything passes, pat yourself on the back; you’re well on your way to being an experience TypeScript tester!
TIP: Protractor uses Jasmine, which allows you to easily include/exclude specific tests from running. You can add an f prefix to your describe or it functions, so they become fdescribe or fit. If you want to exclude tests, you can add an x prefix to these same code blocks (e.g., xdescribe and xit).
One of the problems with the e2e tests you’ve written so far is they don’t use the API to save holdings in Okta. To create a test that exercises that functionality, create a crypto-pwa/e2e/pages/add-holding.po.ts page object for Add Holding page. This class has convenience methods to fill out the form fields and click the submit button.
import { $, by, element } from 'protractor';
import { Page } from './app.po';

export class AddHoldingPage extends Page {
  cryptoCode = element.all(by.css('input[type=text]')).first();
  displayCurrency = element.all(by.css('input[type=text]')).get(1);
  amountHolding = element.all(by.css('input[type=number]'));
  addHoldingButton = element(by.buttonText('Add Holding'));
  pageTitle = $('ion-title');

  setCryptoCode(code) {
    this.cryptoCode.sendKeys(code);
  }

  setCurrency(currency) {
    this.displayCurrency.sendKeys(currency);
  }

  setAmount(amount) {
    this.amountHolding.sendKeys(amount);
  }

  clickAddHoldingButton() {
    this.addHoldingButton.click();
  }

  getPageTitle() {
    return this.pageTitle;
  }
}
Add a crypto-pwa/e2e/pages/home.po.ts for the Home page that exposes its Add Coins button and delete button for holdings.
import { by, element } from 'protractor';
import { Page } from './app.po';

export class HomePage extends Page {
  addCoinsButton = element(by.buttonText('Add Coins'));
  deleteButton = element.all(by.css('button[color=danger]')).last();

  clickAddCoinsButton() {
    this.addCoinsButton.click();
  }
}
Now that you have these page objects in place, you can add a new e2e test that logs in, adds three Bitcoins in USD, and then deletes the holding. The hardest part in writing this test was figuring out how to swipe left with Protractor, so I’d recommend making note of how that’s done.
import { browser, by, element, ExpectedConditions as ec } from 'protractor';
import { LoginPage } from '../pages/login.po';
import { AddHoldingPage } from '../pages/add-holding.po';
import { HomePage } from '../pages/home.po';

describe('Manage Holdings', () => {

  let loginPage, homePage, addHoldingPage;

  beforeAll(() => {
    loginPage = new LoginPage();
    homePage = new HomePage();
    addHoldingPage = new AddHoldingPage();
    loginPage.navigateTo('/');
    browser.waitForAngular();
  });

  beforeEach(() => {
    loginPage.clickLoginButton();
    loginPage.login(process.env.E2E_USERNAME, process.env.E2E_PASSWORD);
    loginPage.oktaLoginButton.click();

    browser.wait(ec.urlContains('home'), 5000);
  });

  afterEach(() => {
    loginPage.logout();
  });

  it('should add and remove a holding', () => {
    homePage.clickAddCoinsButton();

    browser.wait(ec.urlContains('add-holding'), 1000);

    addHoldingPage.setCryptoCode('BTC');
    addHoldingPage.setCurrency('USD');
    addHoldingPage.setAmount(3);
    addHoldingPage.clickAddHoldingButton();

    // wait for everything to happen
    browser.wait(ec.urlContains('home'), 5000);

    // verify message is removed and holding shows up
    element.all(by.css('.message')).then((message) => {
      expect(message.length).toBe(0);
    });

    // wait for holding to show up
    const addedHolding = element.all(by.css('ion-item')).last();
    browser.wait(ec.presenceOf(addedHolding), 5000).then(() => {

      // delete the holding - https://forum.ionicframework.com/t/move-ion-item-sliding-by-protractor/106918
      browser.actions().mouseDown(addedHolding)
        .mouseMove({x: -50, y: 0})
        .mouseMove({x: -50, y: 0})
        .mouseMove({x: -50, y: 0})
        .mouseUp()
        .perform();

      homePage.deleteButton.click();
      element.all(by.css('.message')).then((message) => {
        expect(message.length).toBe(1);
      });
    });
  });
});
See okta-ionic-crypto-java-sdk-example#5 for a pull request that contains all UI tests.
Add Continuous Integration with Travis CI
Having tests is great, but you know what’s better? Running them every time a pull request (PR) is created for your project. You do use Git to store your projects in source control, don’t you?! I’ll assume you do. I mean, I know you’re a smart developer if you’re reading this. Friends don’t let friends write authentication, and you’re here, so you don’t have to, right? 😉
Two of the most popular CI servers are Travis CI and Jenkins. Since Travis doesn’t require any local setup, we’ll wrap this post up with a quick overview of how to use it.
If you’ve checked your project into GitHub, you can use Travis CI.
- Log in to Travis CI and enable builds for your project’s GitHub repo.
-
Add the following
.travis.ymlin your root directory, create a branch for it (e.g.,git branch -b ci), andgit commit/pushit.os: - linux services: - docker language: node_js node_js: - "9.8.0" addons: apt: sources: - google-chrome packages: - google-chrome-stable jdk: - oraclejdk8 sudo: false cache: directories: - crypto-pwa/node_modules before_install: - jdk_switcher use oraclejdk8 - java -version - export CHROME_BIN=/usr/bin/google-chrome - export DISPLAY=:99.0 - sh -e /etc/init.d/xvfb start - npm install -g ionic@3.20.0 script: - chmod +x holdings-api/mvnw - cd holdings-api && ./mvnw -q clean verify - cd ../crypto-pwa && npm i && npm test - cd ../holdings-api && mvnw -q spring-boot:run & - cd ../crypto-pwa && npm run build --prod - npm run e2e notifications: webhooks: on_success: always on_failure: always on_start: false - Navigate to your GitHub repo in a browser and create a pull request with the branch you just pushed. This will kick off processes in Travis to test your branch.
The .travis.yml script above will run your Spring Boot tests with Java 8, run the Jest tests, start the backend, start the frontend, and then run Protractor tests to verify everything works.
NOTE: You might notice that the Java unit tests and integration tests run with ./mvnw verify, rather than as two separate commands. This is because mvn test only runs unit tests and mvn verify runs both unit tests and integration tests.
When Travis first runs this script, you’ll likely see an error like the one below.
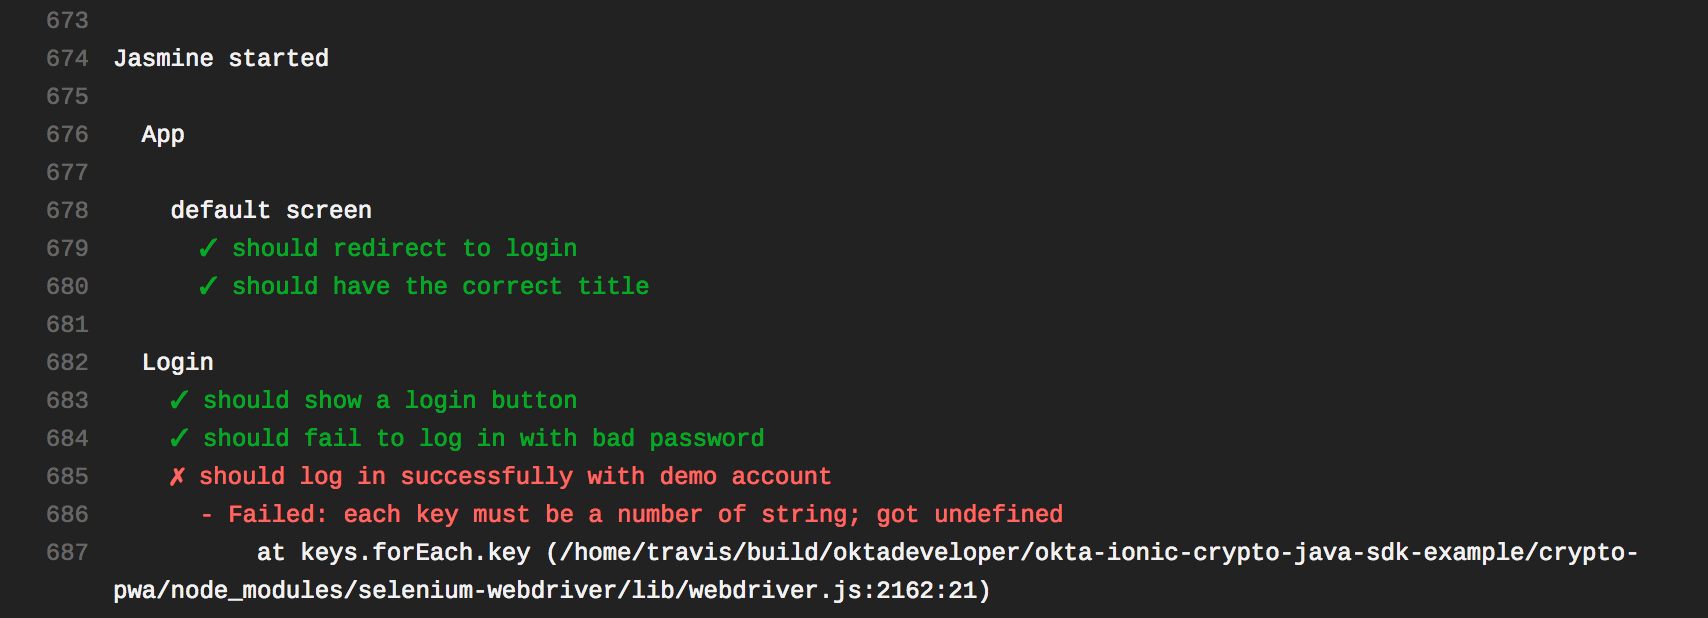
This happens because the E2E_USERNAME and E2E_PASSWORD environment variables aren’t set. Travis makes it easy to set encrypted environment variables. Perform the steps below to set these up for your build.
- Install the
travisgem usinggem install travis. -
In the root directory of your repo, run the following command to create encrypted environment variables for the username, password, and the API token. This command assumes you already have these values defined locally.
travis encrypt E2E_USERNAME=$E2E_USERNAME \ E2E_PASSWORD=$E2E_PASSWORD OKTA_CLIENT_TOKEN=$OKTA_CLIENT_TOKEN --add env.matrix - Commit and push this change, and your next build should succeed.
You can see a successful build in the screenshot below.
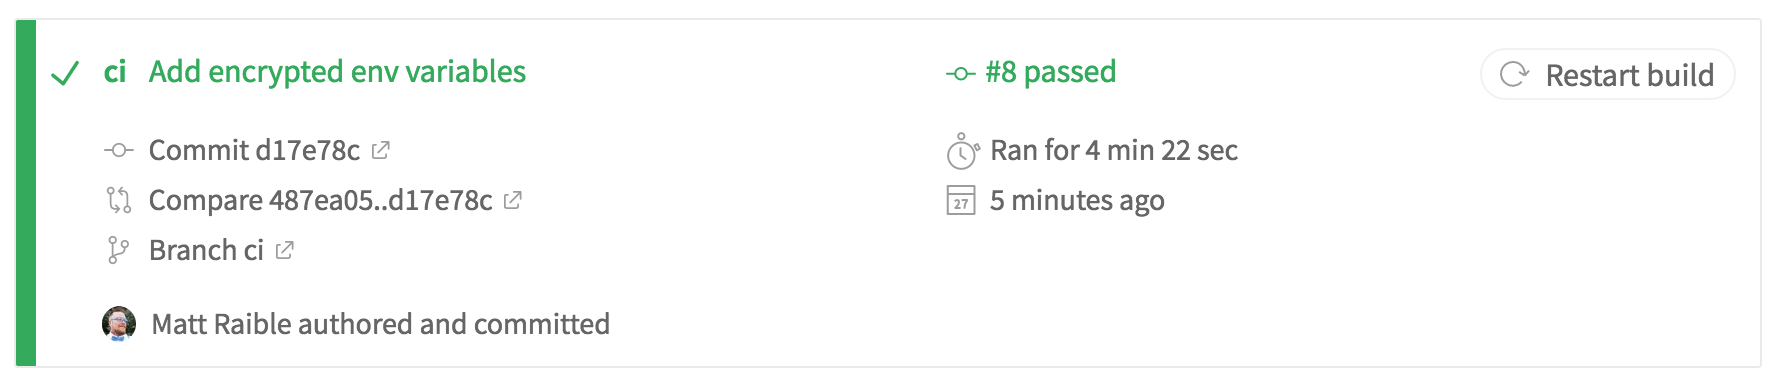
See okta-ionic-crypto-java-sdk-example#4 for a pull request that adds Travis configuration.
We encourage you to read Travis CI’s Best Practices in Securing Your Data to learn more about how to avoid leaking secrets.
Add Code Coverage Reports
Reporting how much of your code is tested is an excellent way to see how much technical debt you have and the parts of your application that need more tests.
Add the JaCoCo Java Code Coverage Library
For Java code coverage I typically use JaCoCo. It works by adding a Java agent, -javaagent:/path/to/jacocoagent.jar but since it has plugins for all of the major build tools you typically never need to do this directly. For example, I’ve configured this project to report UT, IT and total test coverage with the following pom.xml snippet.
<plugin>
    <groupId>org.jacoco</groupId>
    <artifactId>jacoco-maven-plugin</artifactId>
    <version>0.8.1</version>
    <executions>
        <execution>
            <id>prepare-agent</id>
            <phase>process-test-classes</phase>
            <goals>
                <goal>prepare-agent</goal>
            </goals>
        </execution>
        <execution>
            <id>prepare-agent-integration</id>
            <phase>pre-integration-test</phase>
            <goals>
                <goal>prepare-agent-integration</goal>
            </goals>
        </execution>
        <execution>
            <id>jacoco-report</id>
            <phase>verify</phase>
            <goals>
                <goal>report</goal>
                <goal>report-integration</goal>
            </goals>
        </execution>
        <execution>
            <id>jacoco-merge-report</id>
            <phase>verify</phase>
            <goals>
                <goal>merge</goal>
                <goal>report</goal>
            </goals>
            <configuration>
                <dataFile>${project.build.directory}/jacoco-merge.exec</dataFile>
                <outputDirectory>${project.reporting.outputDirectory}/jacoco-merge</outputDirectory>
                <destFile>${project.build.directory}/jacoco-merge.exec</destFile>
                <fileSets>
                  <fileSet>
                    <directory>${project.build.directory}</directory>
                    <includes>
                      <include>*.exec</include>
                    </includes>
                  </fileSet>
                </fileSets>
            </configuration>
        </execution>
    </executions>
</plugin>
The last bit here with the id of jacoco-merge-report merges the UT, and IT reports to create a new report with the total project test coverage. If you are working with a Maven multi-module build, it is a little easier then this, and you could use the report-aggregate goal instead.
TypeScript Code Coverage with Jest and Istanbul
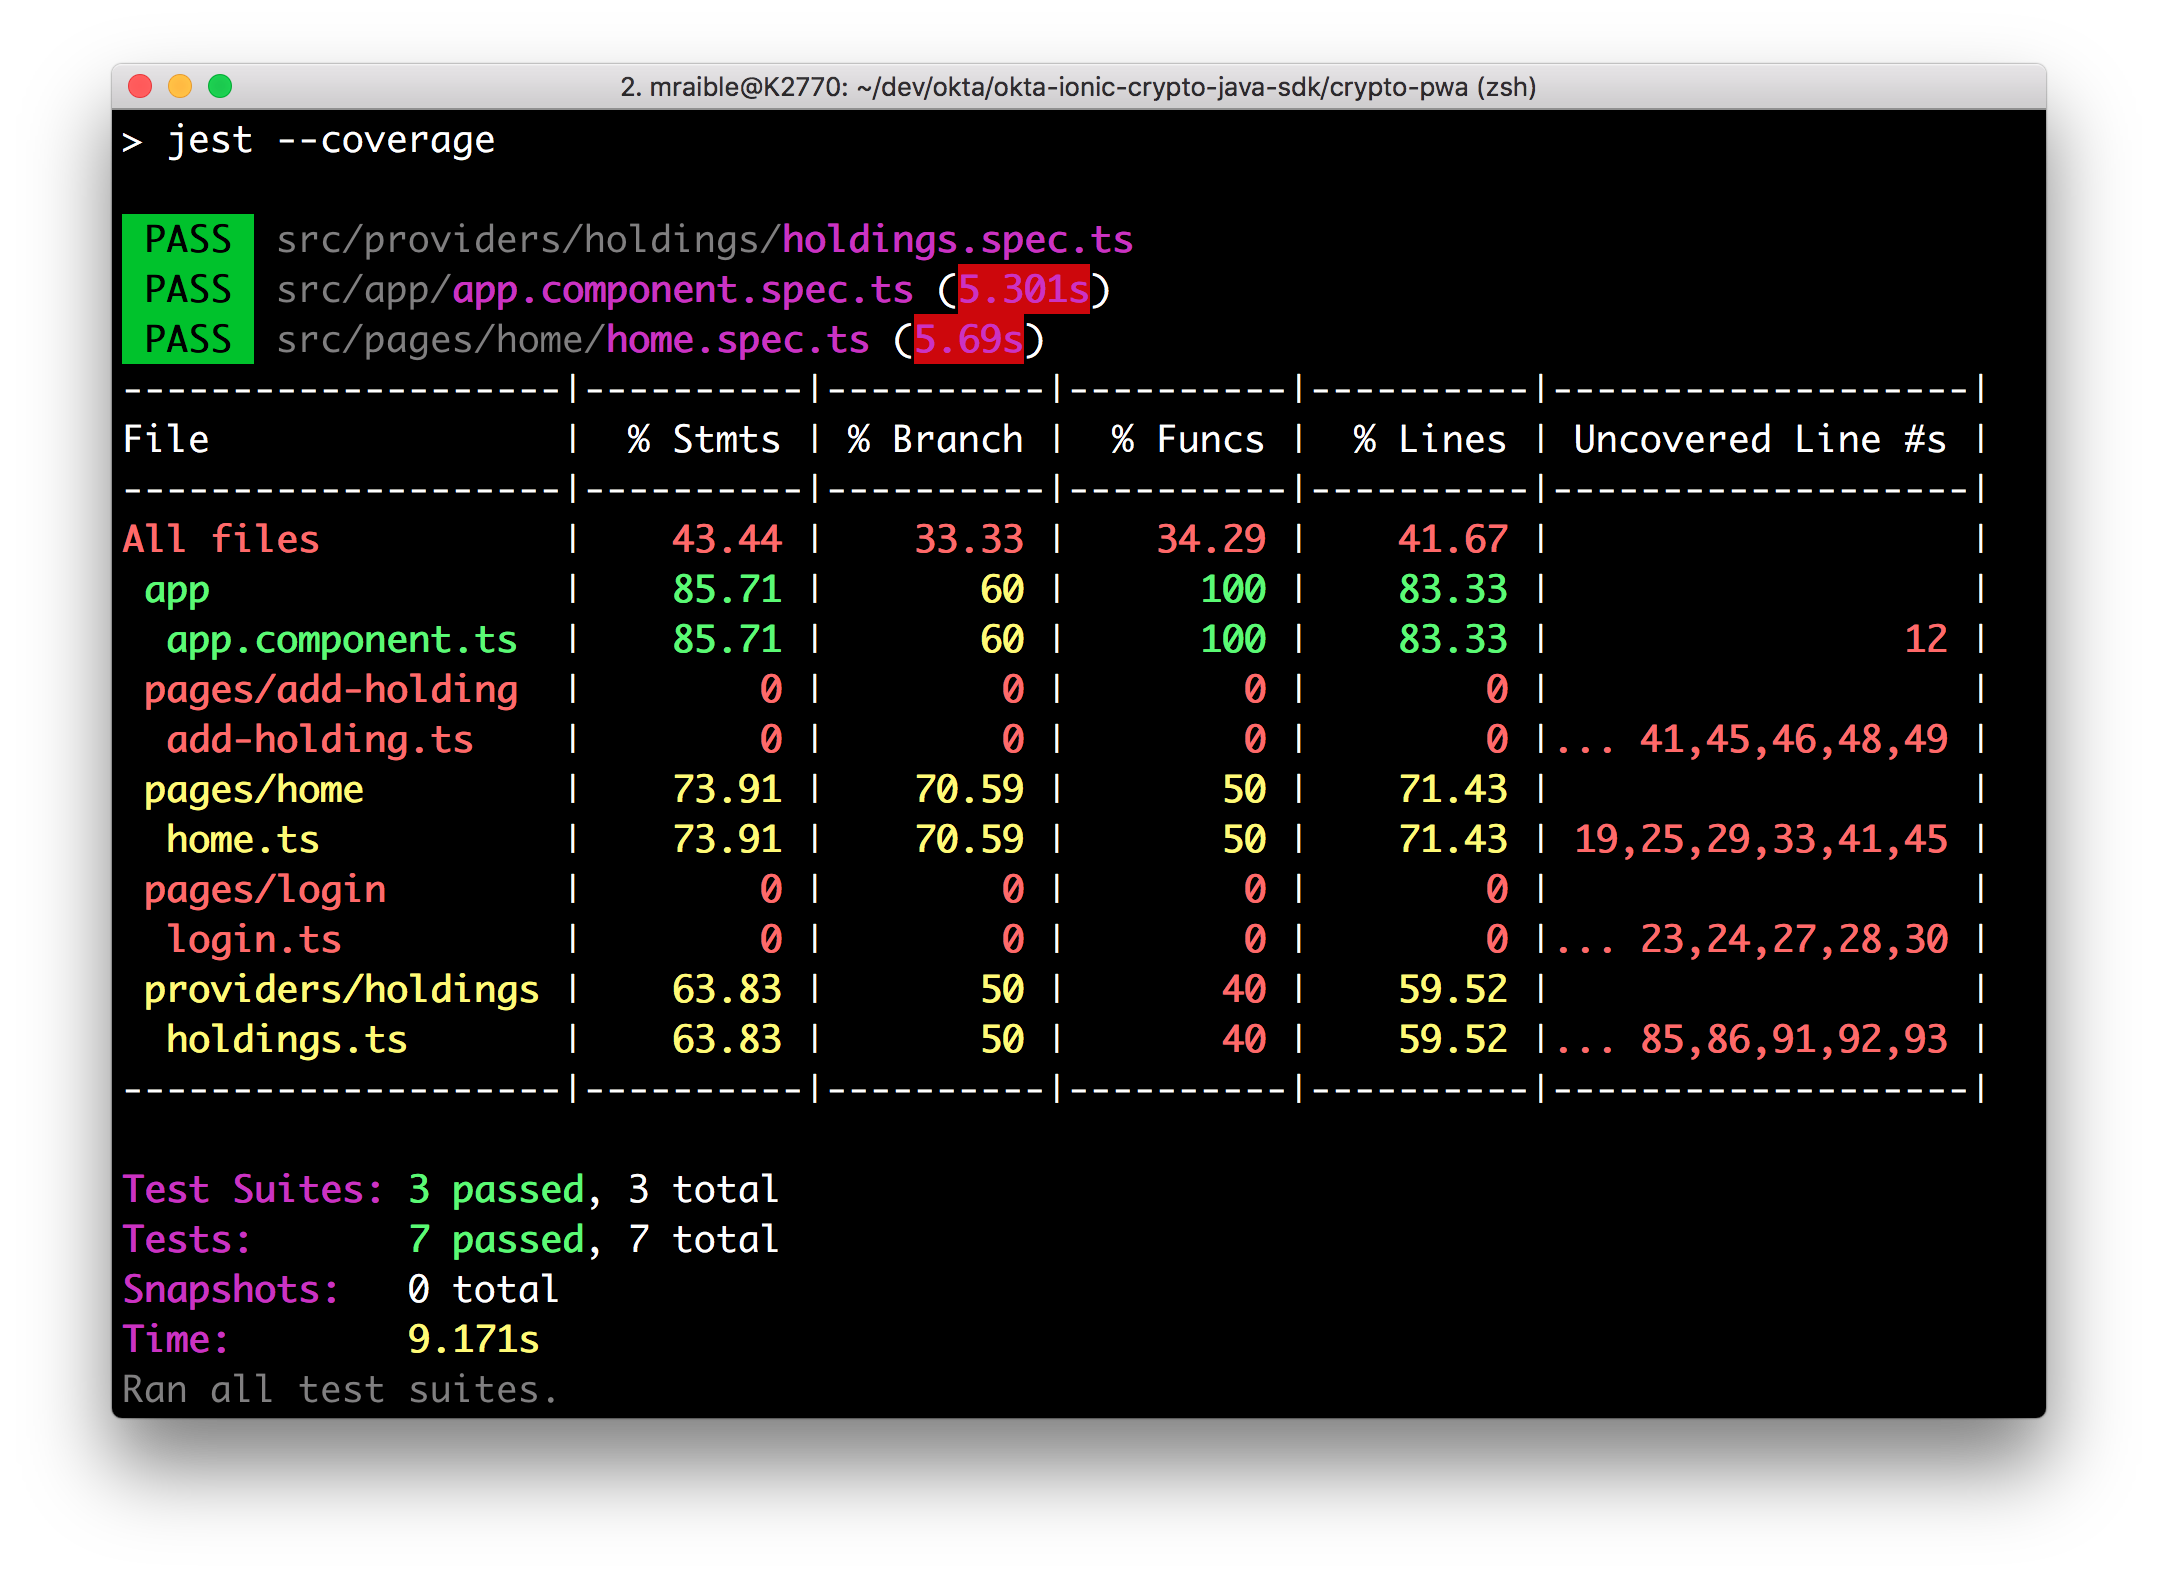
For the Angular side of things, Jest has built-in code coverage. You merely have to run npm run test:coverage. You can see from the screenshot below that there’s still a couple of pages that need more tests.
Istanbul is another favorite code coverage tool in the JavaScript ecosystem. It’s used by Angular CLI. If you’re in an Angular CLI-generated project, run ng test --sr --cc from the root of your project to generate a report in coverage/index.html.
Report Code Coverage with Travis
For Java code coverage, I’ve been using Codecov, mostly because it is so easy to use. In your travis.yml you just add a pointer to your coverage file:
after_success:
 - bash <(curl -s https://codecov.io/bash) -f holdings-api/target/site/jacoco-merge/jacoco.xml
Codecov has excellent support for JavaScript and TypeScript too! To add Codecov to Travis for Jest, you need to configure your package.json to collect coverage.
"jest": {
  "coverageDirectory": "./coverage/",
  "collectCoverage": true
}
Of course, you’ll need to configure Travis to install the codecov command line tool before you can use it. You can do that with npm i -g codecov or you can use bash <(curl -s https://codecov.io/bash) like Brian does in his example above.
install:
  - npm install -g codecov
Then you can gather coverage information after everything succeeds.
after_success:
  - cd $TRAVIS_BUILD_DIR && codecov
The codecov command is smart enough to find the jacoco.xml files on the Java side, as well as the lcov.info file created by Jest.
==> Scanning for reports
    + /home/travis/.../crypto-pwa/public/coverage/lcov.info
    + /home/travis/.../holdings-api/target/site/jacoco/jacoco.xml
    + /home/travis/.../holdings-api/target/site/jacoco-it/jacoco.xml
    + /home/travis/.../holdings-api/target/site/jacoco-merge/jacoco.xml
==> Uploading reports
    Success!
    View report at: https://codecov.io/gh/oktadeveloper/okta-ionic-crypto-java-sdk-example/tree/ee2382623ada72cd78188f4d25318dfaf3d24882
TIP: Codecov allows you to add unittests, integration, and ui flags in your code to group types of tests.
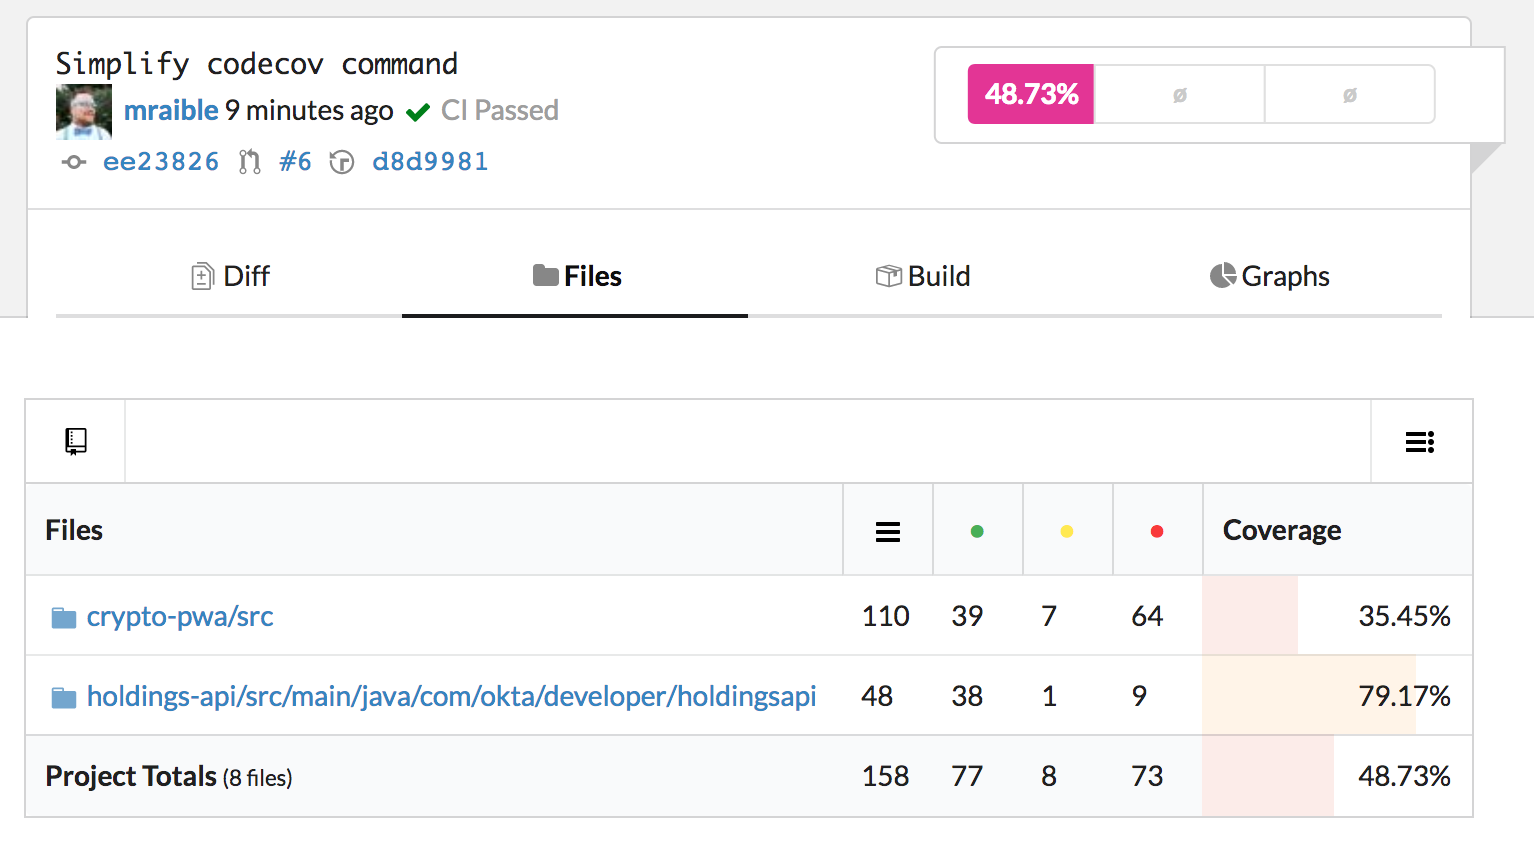
You can configure Codecov to report on your GitHub pull requests too! If you don’t see your org listed on the previous page, you should be able to navigate directly to it. For example, this project’s direct link is https://codecov.io/gh/oktadeveloper/okta-ionic-crypto-java-sdk-example.
See okta-ionic-crypto-java-sdk-example#6 for a pull request that adds code coverage.
Learn More about Testing in Spring Boot and TypeScript Apps
We hope you’ve enjoyed this hitchhiker’s guide to testing Java APIs and Ionic/Angular applications. It’s an excellent feeling when your codebase has high test coverage, and you’re able to refactor by tweaking your code and adjusting your tests.
You can find the code used in this guide on GitHub: https://github.com/oktadeveloper/okta-ionic-crypto-java-sdk-example.
If you’d like to learn more about testing Java and Spring Boot APIs, please see:
For Angular and Ionic testing here a few resources we found useful:
If you’re into Ionic and JHipster, we recently added unit and e2e testing support to the Ionic Module for JHipster and its associated Ionic JHipster Starter. Both projects have some pretty sophisticated Travis builds that ensure everything works with JWT/OIDC authentication and a JHipster backend.
Speaking of complicated builds, JHipster’s main build and additional build test over 54 combinations!
If you’re looking for a Spring Boot + Angular (or React) example app with lots of tests, look no further than JHipster. It even has a continuous integration sub-generator that supports Jenkins, Travis, CircleCI, and GitLab CI/CD.
If you’d like to learn more about topics like Spring Boot, Angular, React, and JHipster, give us a follow @oktadev. If you have any questions about this post, please leave a comment below.
Update: To see how to change this app to use OAuth 2.0’s authorization code flow and package as a JAR, see Deploy Your Secure Spring Boot + Angular PWA as a Single Artifact.
Changelog:
- Jun 13, 2018: Updated to replace serve with node-http-server and fixed typo in Travis script. See the code changes in oktadeveloper/okta-ionic-crypto-java-sdk-example#12. You can see changes to this article in oktadeveloper/okta.github.io#2123.
Matt Raible is a well-known figure in the Java community and has been building web applications for most of his adult life. For over 20 years, he has helped developers learn and adopt open source frameworks and use them effectively. He's a web developer, Java Champion, and Developer Advocate at Okta. Matt has been a speaker at many conferences worldwide, including Devnexus, Devoxx Belgium, Devoxx France, Jfokus, and JavaOne. He is the author of The Angular Mini-Book, The JHipster Mini-Book, Spring Live, and contributed to Pro JSP. He is a frequent contributor to open source and a member of the JHipster development team. You can find him online @mraible and raibledesigns.com.
Okta Developer Blog Comment Policy
We welcome relevant and respectful comments. Off-topic comments may be removed.