Protect Your Cryptocurrency Wealth Tracking PWA with Okta
Cryptocurrencies are all the rage. Over the last year, the value of Bitcoin alone has risen 1,603%, driving more and more people to wonder if they’re missing out on the “next big thing.” Because of the massive influx of money into cryptocurrencies like Bitcoin, Ethereum, Monero, and Ripple — blockchain technology (which is the foundation of all cryptocurrency) has become an area of intense technical study. At its core, blockchain technology does nothing more than maintain a decentralized log of transactions that can be easily shared across many nodes (miners).

In this post, I’ll show you how to add authentication to an Ionic progressive web app (PWA). PWAs are more developer-friendly to distribute than mobile apps. Not only that, but I’ll show you how to use cloud services like Okta and Firebase to make things even simpler.
Josh Morony is someone I’ve followed ever since I got into Ionic. After developing my first app using Ionic, I bought and read his book on Building Mobile Apps with Ionic. He’s a good marketer, and I’ve been receiving his newsletter ever since. As a developer, I get a lot of emails, and I usually delete the newsletter emails because most don’t provide value. I’ve never deleted Josh’s, and I started receiving it years ago. He does a great job of providing valuable information to developers!
About a month ago, I received an email from Josh advertising his Crypto PWA series of articles, which were excellent (as I expected). I highly recommend you check out Part 1: Building a Cryptocurrency Price Tracker PWA in Ionic.
You can also see his finished app at https://cryptopwa.com and find it on GitHub. I thought it’d be fun to add authentication to Josh’s app and show you how I did it. It wasn’t too hard thanks to the fact that Ionic uses Angular and it has excellent OIDC support — thanks to Manfred Steyer’s awesome angular-oauth2-oidc library.
Note: In May 2025, the Okta Integrator Free Plan replaced Okta Developer Edition Accounts, and the Okta CLI was deprecated.
We preserved this post for reference, but the instructions no longer work exactly as written. Replace the Okta CLI commands by manually configuring Okta following the instructions in our Developer Documentation.
Setup the Crypto PWA
To begin, clone Josh’s finished repository.
git clone https://github.com/joshuamorony/ionic-crypto-pwa.git
cd ionic-crypto-pwa
npm install
Optional: upgrade all the app’s dependencies using npm-check-updates.
npm install -g npm-check-updates
ncu -u
npm install
Install Ionic so you’ll be able to run the app.
npm install -g ionic
Run the app so you can see its basic functionality before adding authentication.
 |
 |
 |
You can verify it works offline — like a PWA should — by toggling offline mode in your browser (in Chrome: Developer Tools > Network > Offline).
NOTE: This application is designed specifically to be a PWA, not for packaging as a native app and deploying to a phone. For this reason, I don’t account for developing and deploying it as a mobile app in this post. If you’re interested in that, please see the other articles at the end of this post.
Add Okta for Authentication
Happily, the hardest part of using Okta is creating a developer account, so you’ll need to start there. Within 2-3 minutes, you should be able to log in to our developer console and create new applications. Follow the steps below to create an OpenID Connect (OIDC) application that allows you to authenticate with your Okta accounts.
- Log in to your Okta account and navigate to Applications > Add Application
- Select SPA and click Next
- Give your application a name (e.g. “Crypto PWA”)
- Add the following values for Base URI and Login redirect URI:
http://localhost:8100(for development)https://<name-of-your-choosing>.firebaseapp.com(for production)
- Click Done to continue. You should see settings like the following:
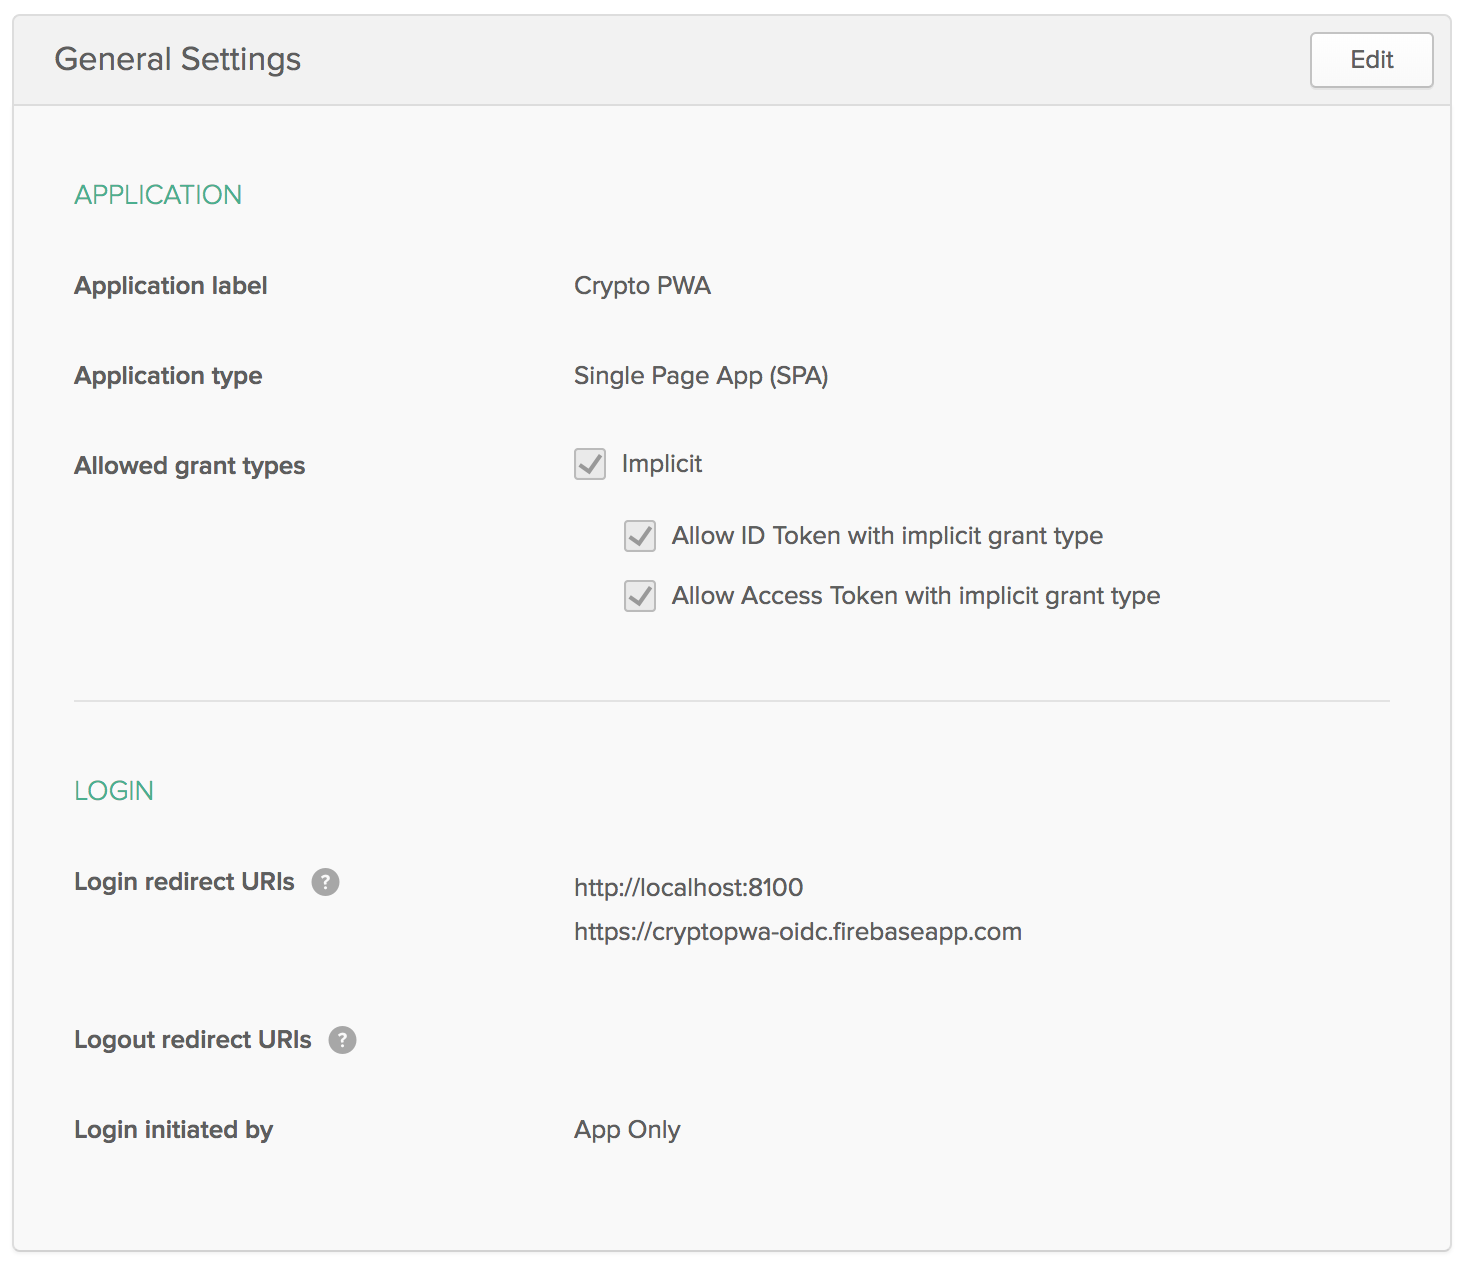
For global logout to work, you’ll need to edit your application and add http://localhost:8080 (and optionally, your production URI) as a Logout redirect URI.
Add Angular OIDC Support
At this point, I tried adding Okta’s Angular SDK using npm install @okta/okta-angular. However, I quickly discovered this library doesn’t work with Ionic because it has a dependency on Angular Router, which Ionic doesn’t use. You can track this issue on GitHub.
I knew that angular-oauth2-oidc worked based on a previous tutorial, so I installed angular-oauth2-oidc. Please do the same if you’re following along.
npm install angular-oauth2-oidc
In src/app/app.module.ts, import OAuthModule.
import { OAuthModule } from 'angular-oauth2-oidc';

@NgModule({
  ...
  imports: [
    ...
    OAuthModule.forRoot()
  ],
  ...
})
Create a Login Page
Generate a login page by running the following command:
ionic g page Login
Modify src/app/app.component.ts to use oauthService to check for a valid ID token and choose the appropriate page to display.
import { Component } from '@angular/core';
import { OAuthService } from 'angular-oauth2-oidc';

@Component({
  templateUrl: 'app.html'
})
export class MyApp {
  rootPage: any = 'HomePage';

  constructor(oauthService: OAuthService) {
    if (oauthService.hasValidIdToken()) {
      this.rootPage = 'HomePage';
    } else {
      this.rootPage = 'LoginPage';
    }
  }
}
In src/pages/login/login.ts, add your OIDC application settings in the constructor and add a login() method.
import { Component } from '@angular/core';
import { IonicPage, App } from 'ionic-angular';
import { JwksValidationHandler, OAuthService } from 'angular-oauth2-oidc';

@IonicPage({
  name: 'LoginPage'
})
@Component({
  selector: 'page-login',
  templateUrl: 'login.html'
})
export class LoginPage {

  constructor(private oauthService: OAuthService, private app: App) {
    if (this.oauthService.hasValidIdToken()) {
      this.app.getRootNavs()[0].setRoot('HomePage');
    }

    oauthService.redirectUri = window.location.origin;
    oauthService.clientId = '{clientId}';
    oauthService.scope = 'openid profile email';
    oauthService.issuer = 'https://{yourOktaDomain}/oauth2/default';
    oauthService.tokenValidationHandler = new JwksValidationHandler();
    oauthService.loadDiscoveryDocumentAndTryLogin();
  }

  login() {
    this.oauthService.initImplicitFlow();
  }
}
Populate src/pages/login/login.html with the following HTML that welcomes the user and provides a login button.
<ion-header>
  <ion-navbar>
    <ion-title>
      Login
    </ion-title>
  </ion-navbar>
</ion-header>
<ion-content padding>
  <div class="message">
    <p><strong>cryptoPWA</strong> is a <strong>P</strong>rogressive <strong>W</strong>eb <strong>A</strong>pplication
      that allows you to keep track of the approximate worth of your cryptocurrency portfolio.</p>

    <p>A PWA is like a typical application from the app store, but you can access it directly through the web. You may
      also add this page to your home screen to launch it like your other applications.</p>

    <p>Log in to start tracking your coins in whatever currency you wish!</p>
  </div>

  <button ion-button (click)="login()" color="primary">
    Login with Okta
  </button>
</ion-content>
In src/pages/home/home.html, add padding to the ion-content tag, change the <div class="message"> to welcome the user by name, and modify the welcome message. This change is necessary because the original message says no account is required.
<ion-content padding>
  <h1>Welcome, {{ name }}</h1>
  <div class="message" *ngIf="!holdingsProvider.holdings.length">
    <p><strong>cryptoPWA</strong> is a <strong>P</strong>rogressive <strong>W</strong>eb <strong>A</strong>pplication
      that allows you to keep track of the approximate worth of your cryptocurrency portfolio.</p>

    <p>Click the button below to start tracking your coins in whatever currency you wish!</p>

    <button ion-button full (click)="addHolding()" color="primary">Add Coins</button>
  </div>
...
</ion-content>
Change src/pages/home/home.ts to check for a valid access token, and to have a getter for the name referenced in the template above.
import { OAuthService } from 'angular-oauth2-oidc';

...
export class HomePage {

   constructor(private navCtrl: NavController, private holdingsProvider: HoldingsProvider,
               private oauthService: OAuthService) {
   }

  ionViewDidLoad(): void {
    if (!this.oauthService.hasValidAccessToken()) {
      this.navCtrl.push('LoginPage');
    }
    this.holdingsProvider.loadHoldings();
  }

  ...

  get name() {
    const claims: any = this.oauthService.getIdentityClaims();
    if (!claims) {
      return null;
    }
    return claims.name;
  }
}
Restart ionic serve, and you should see the login page at http://localhost:8100.
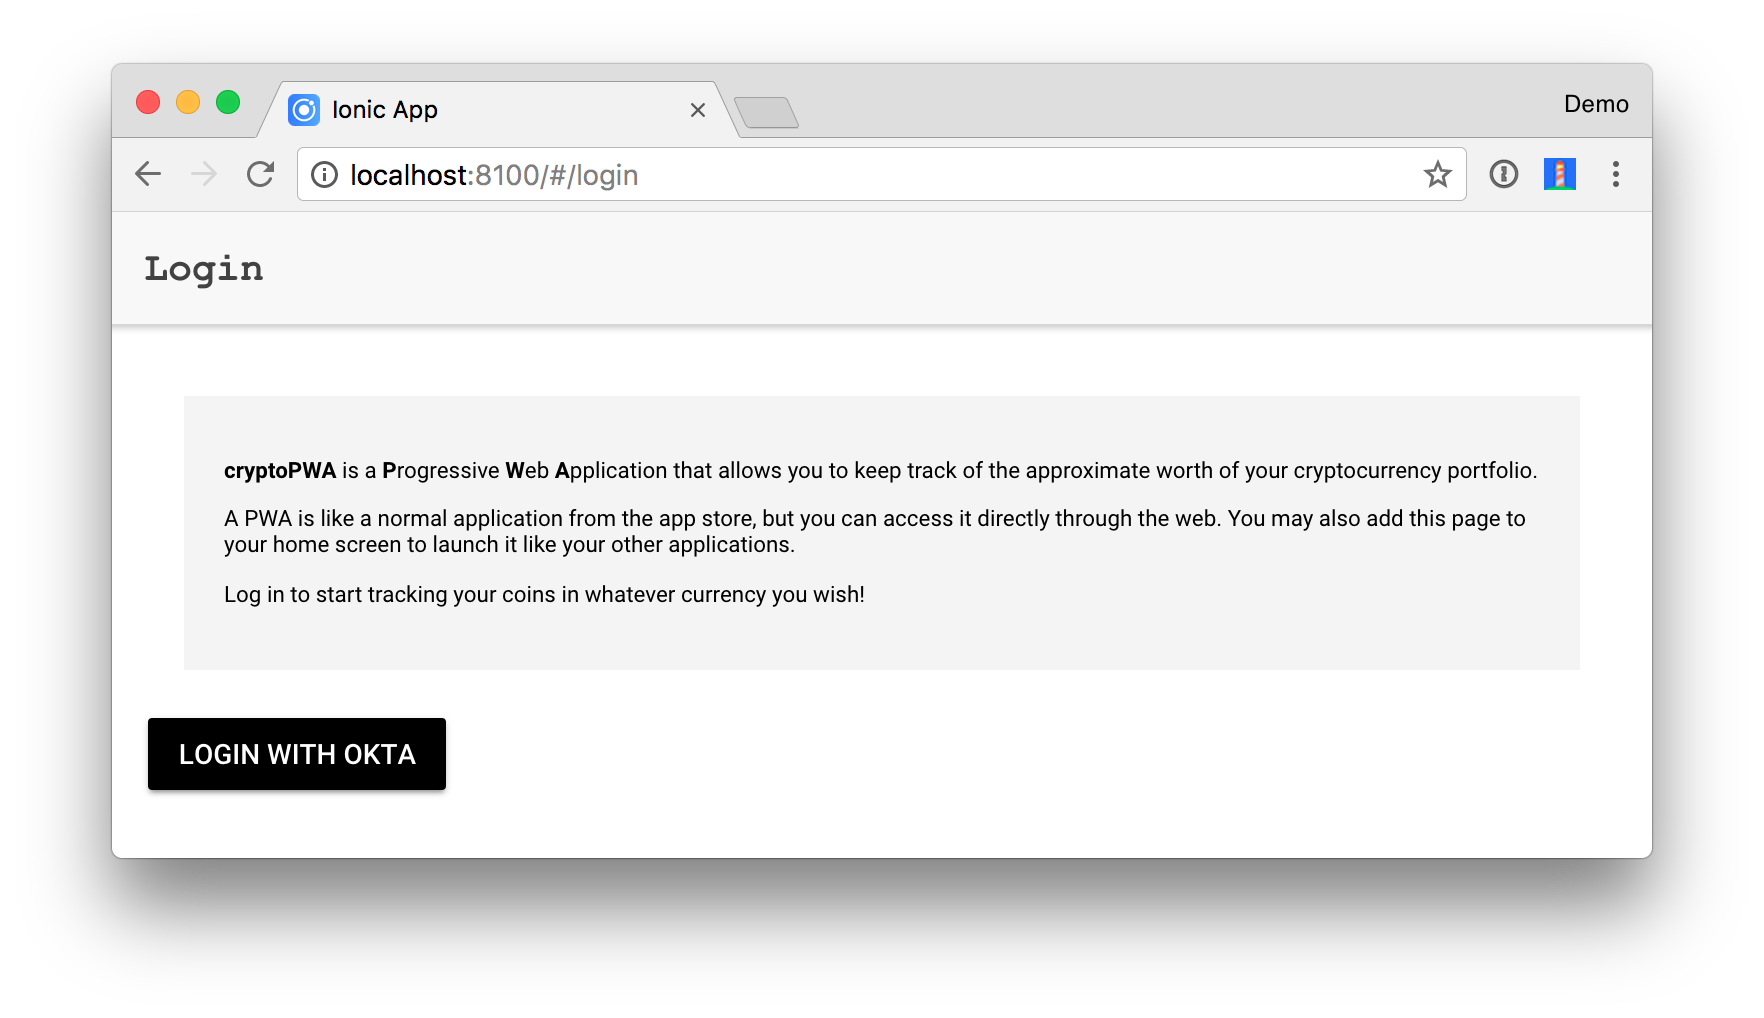
Click Login with Okta and you’ll be redirected to a login form.
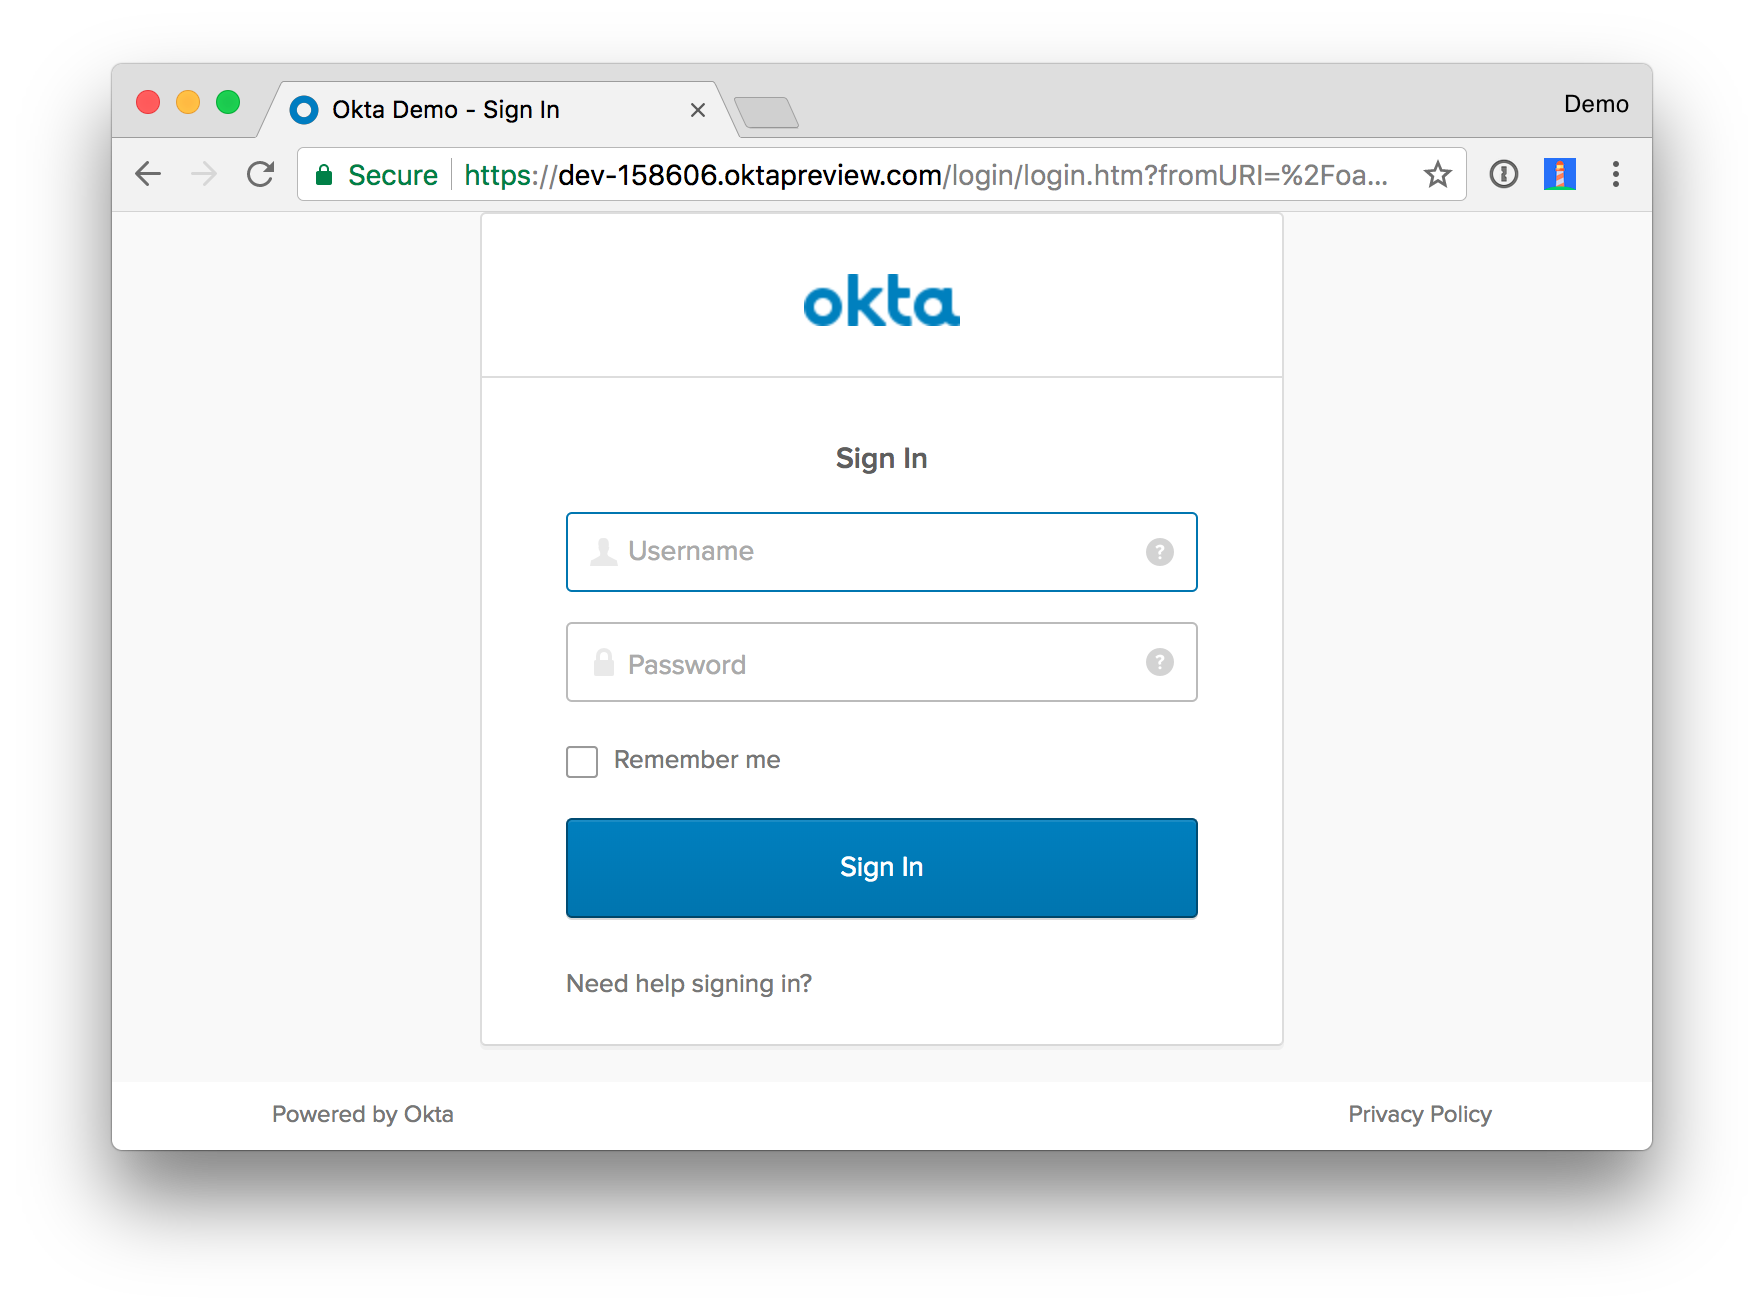
TIP: Did you know you don’t need to include @<your-email>.com for the username with Okta? Entering the first part of your email address is enough for Okta to know who you are.
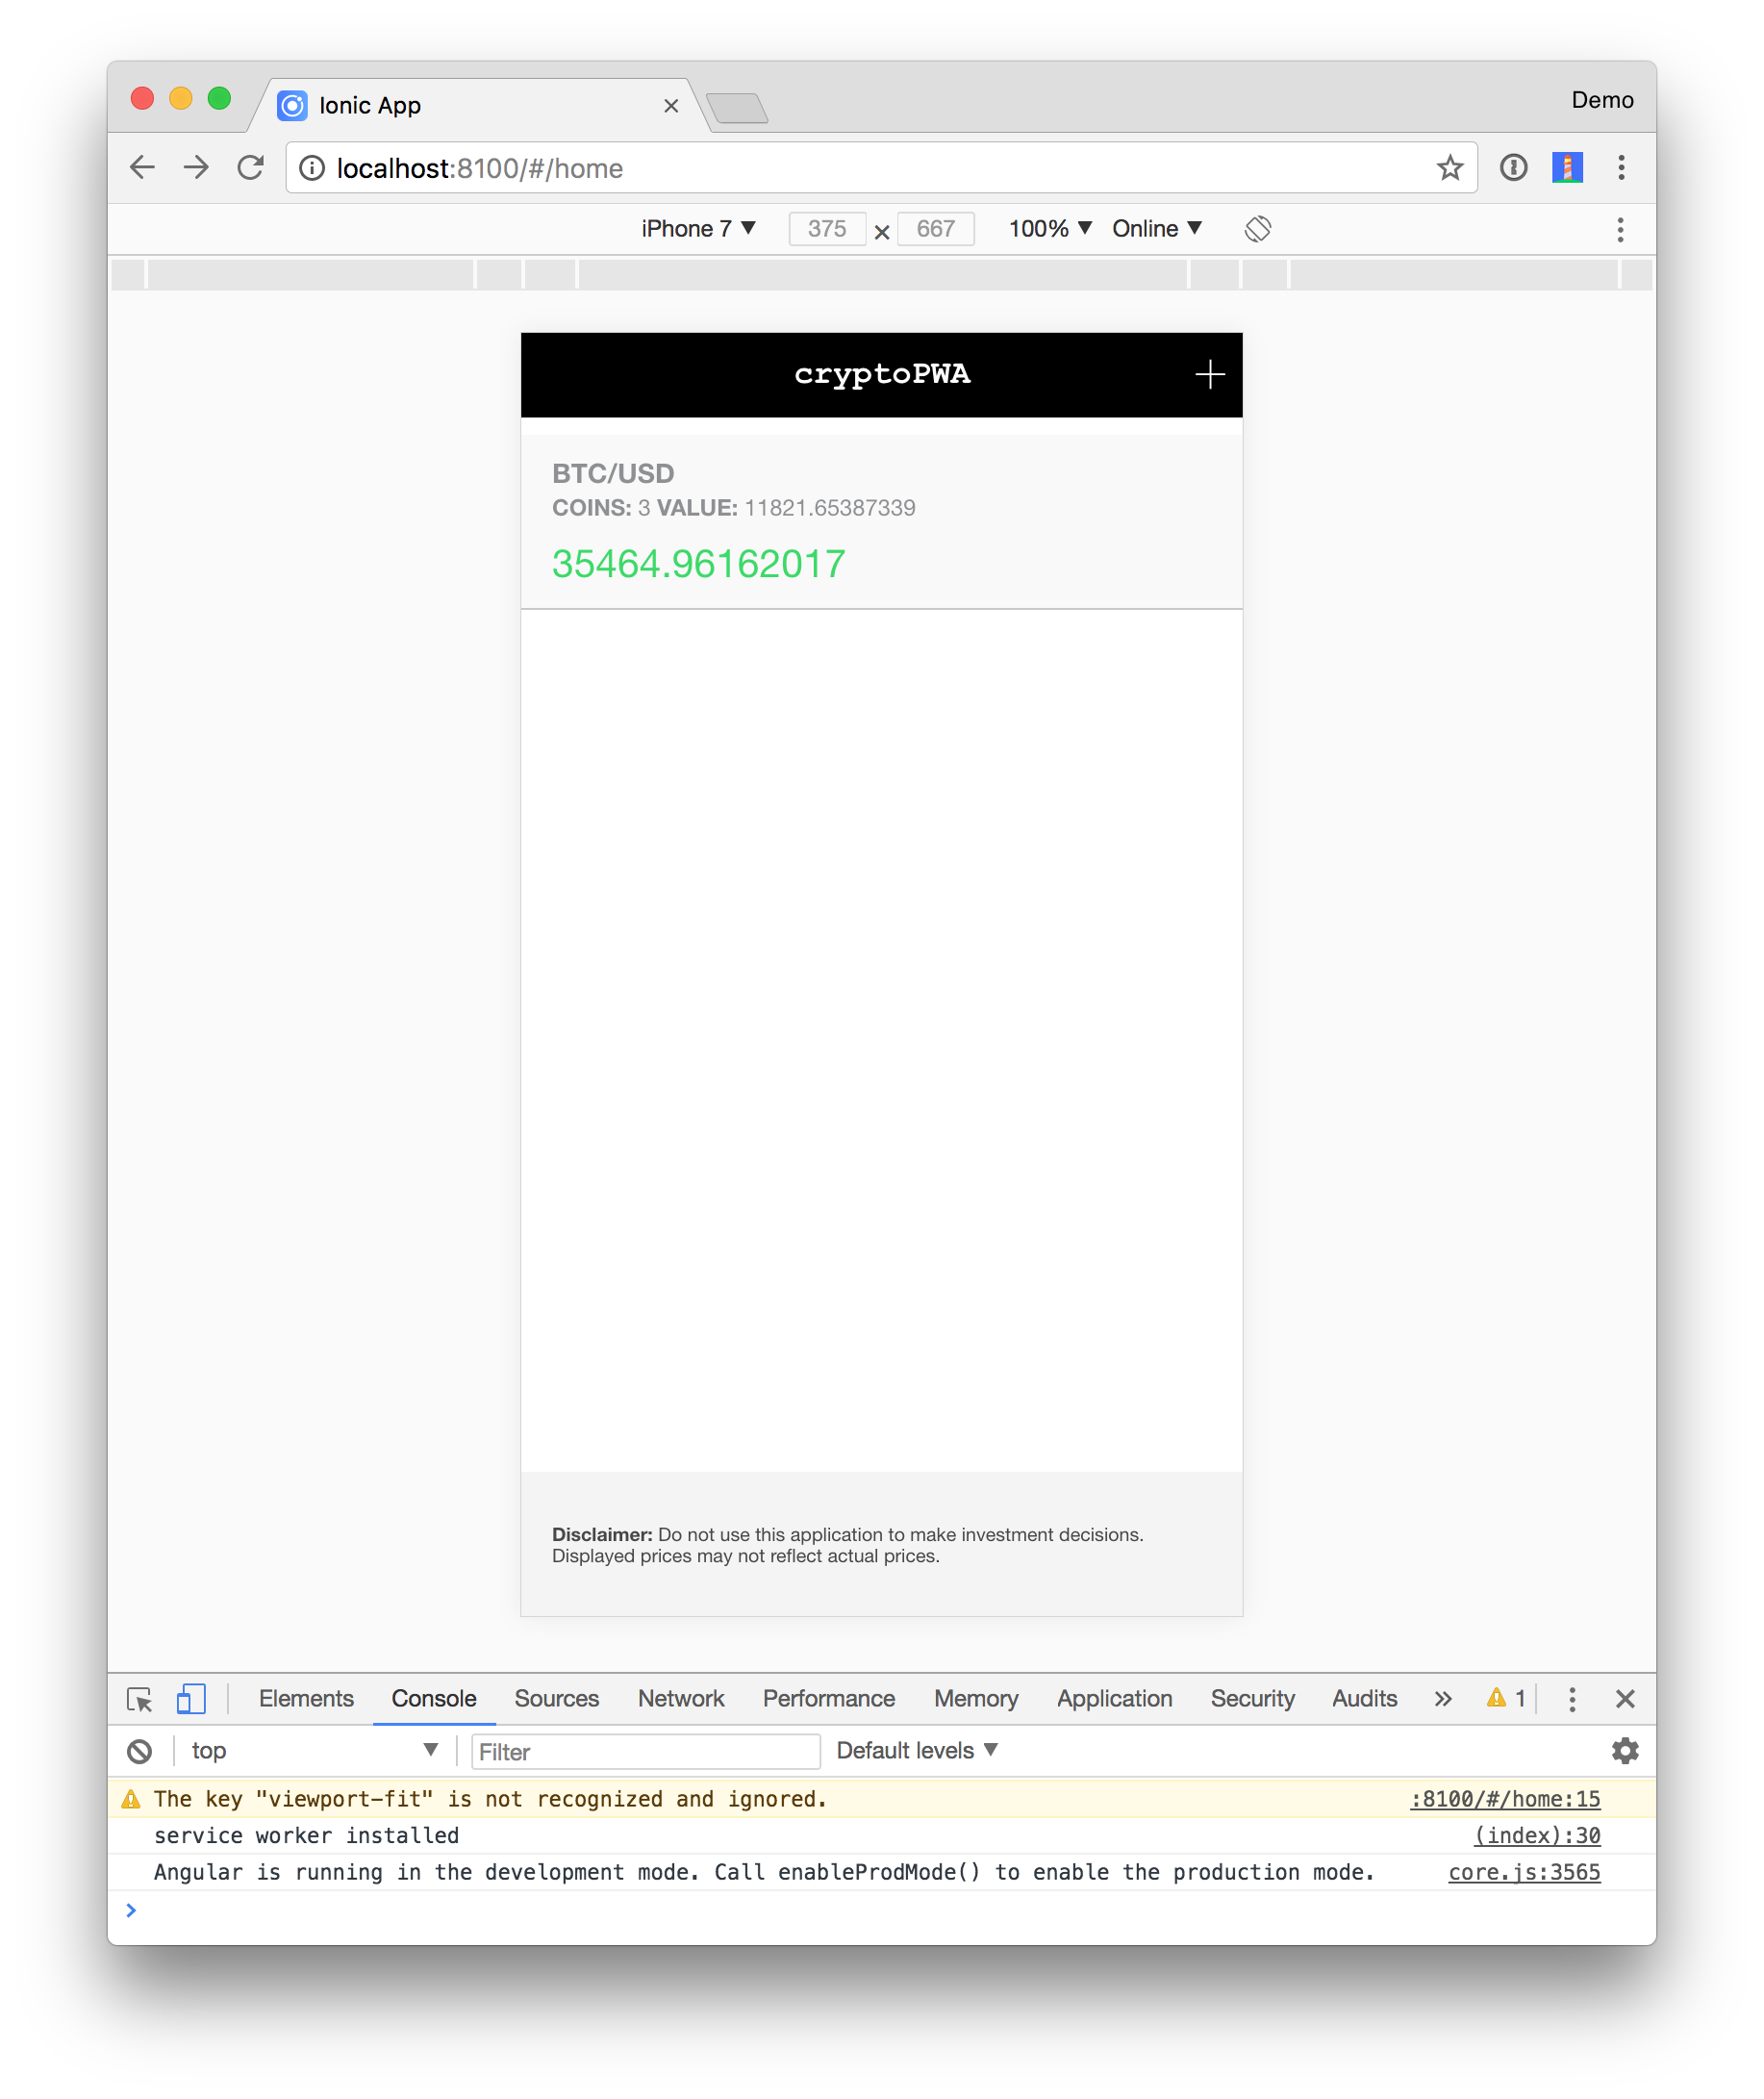
After entering valid credentials, you should be redirected back to your app and see a welcome message.
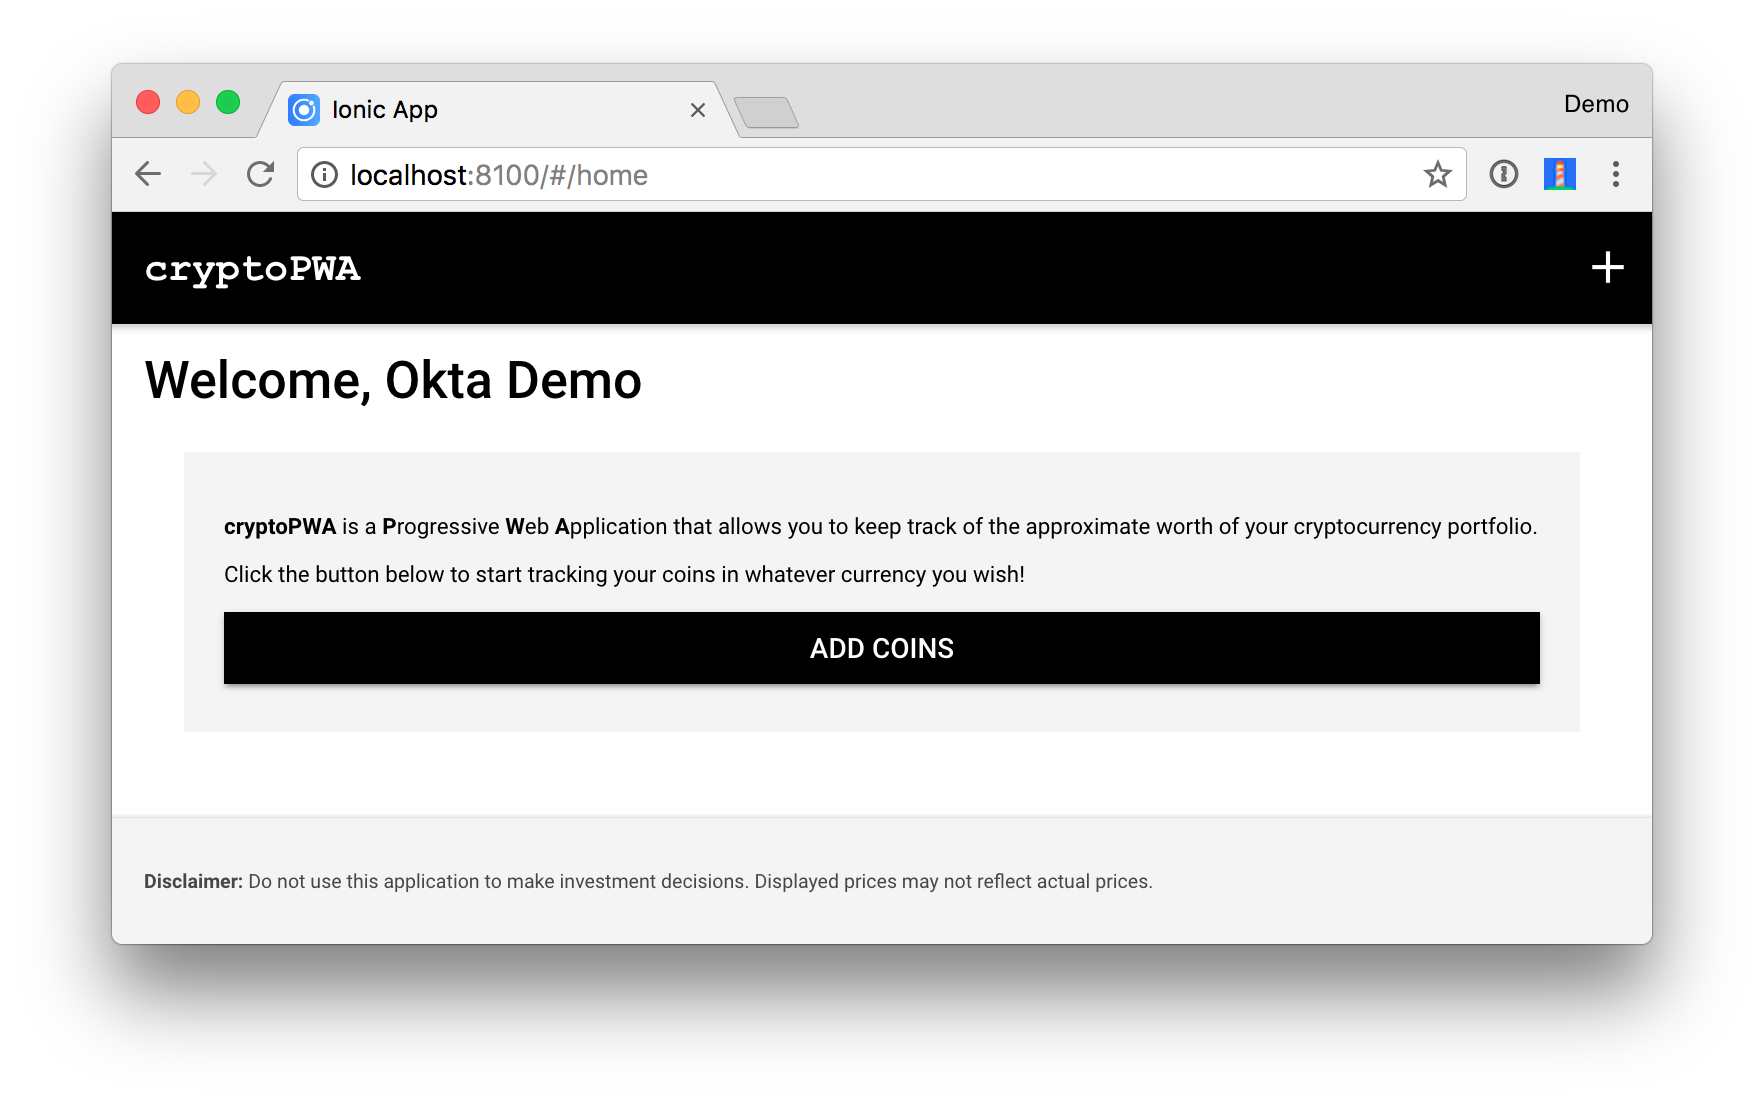
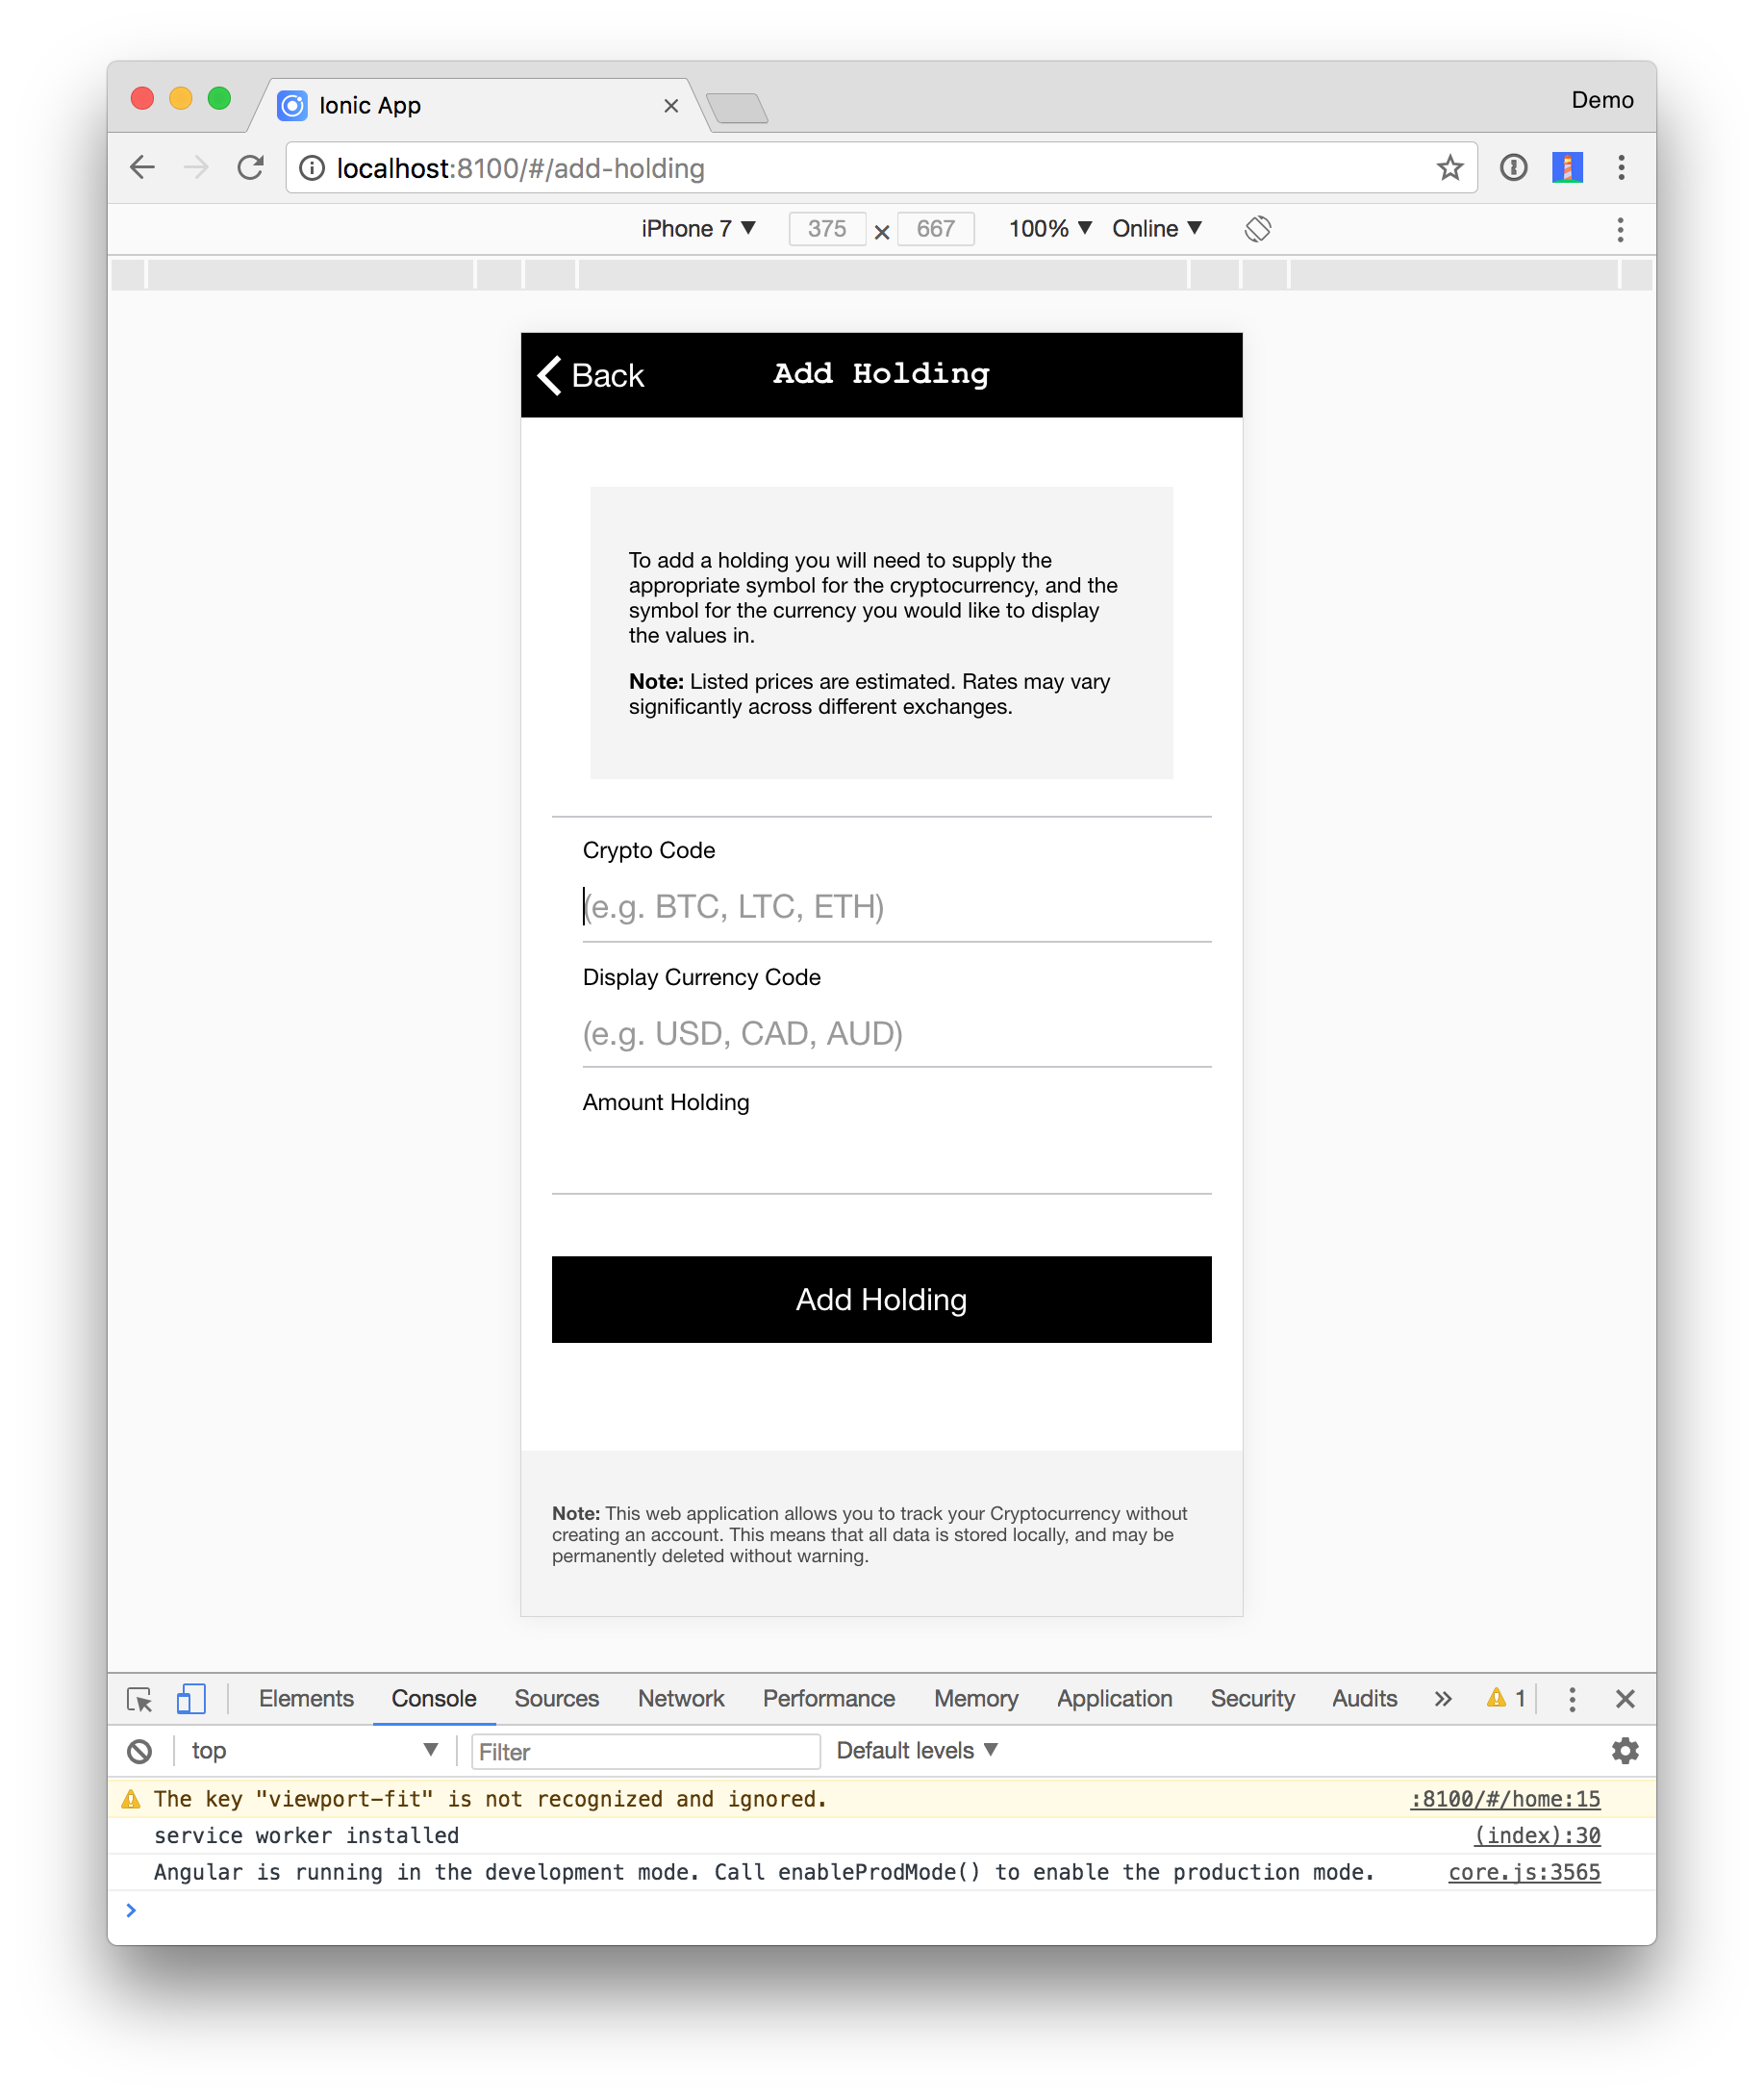
You should be able to add cryptocurrency holdings as you did before. The last thing you’ll want to do is add a logout button.
Add a Logout Button
To add a logout button, add a logout() method to src/pages/home/home.ts.
logout() {
  this.oauthService.logOut();
}
Then add a logout button just above </ion-content> in src/pages/home/home.html.
<button ion-button (click)="logout()">Logout</button>
Your home page should now look as follows.
Deploy to Firebase and Test with Lighthouse
If you’d like to deploy your app to Firebase, log in to your account, go to the console, and create a new project. On the project overview screen, scroll to Hosting card, and click Get Started. Once you’ve completed the steps, you should be able to run the following commands to deploy your app.
npm run ionic:build --prod
firebase deploy
NOTE: You will need to install the firebase-tools package globally with npm install -g firebase-tools for the firebase deploy command to work.
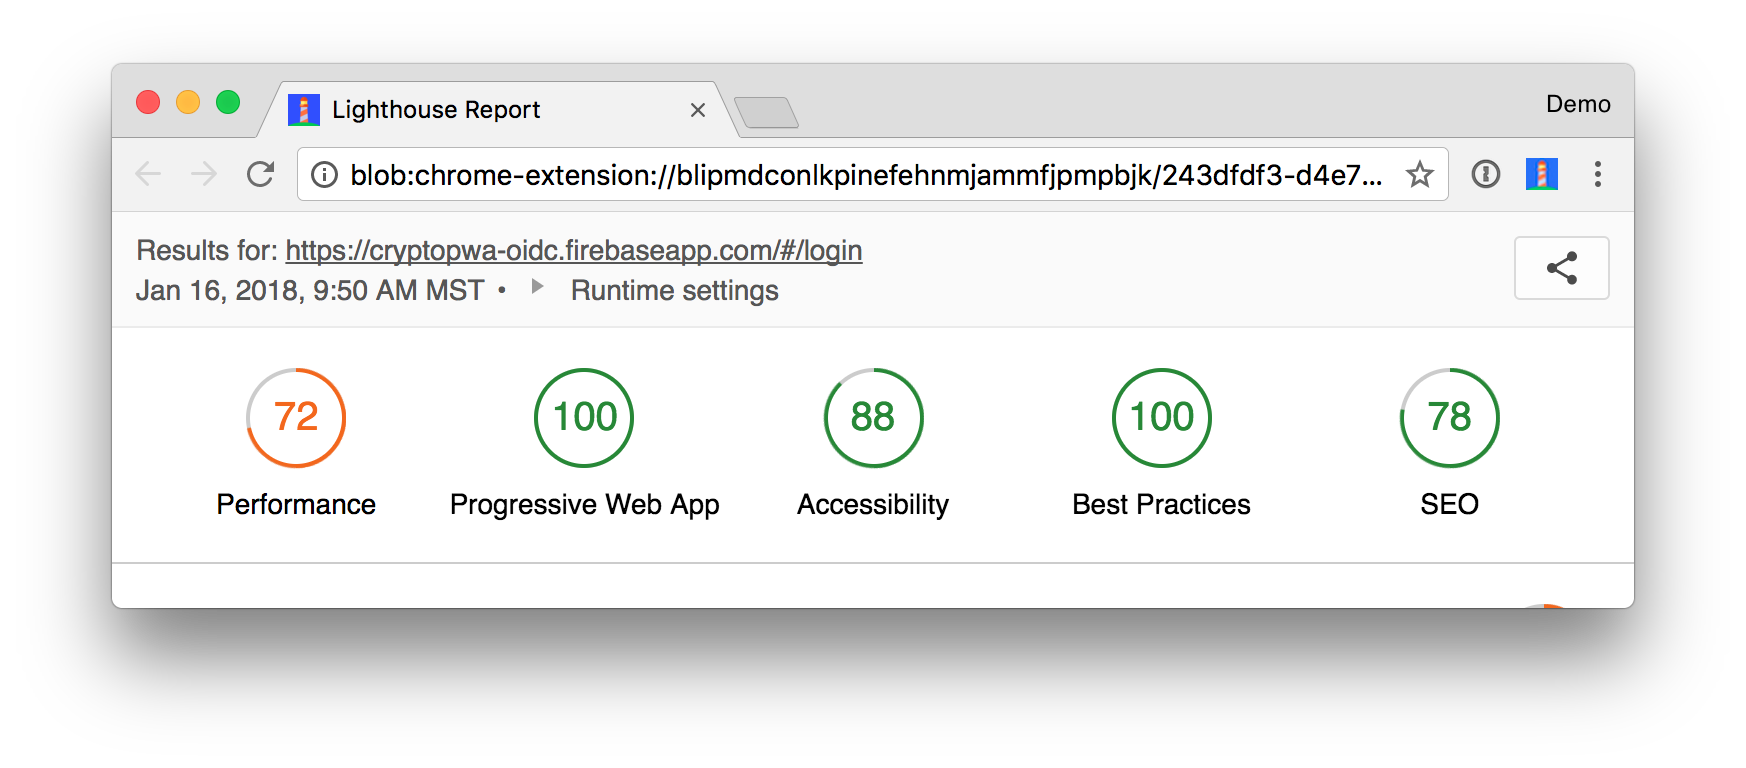
I deployed mine to https://cryptopwa-oidc.firebaseapp.com and received a Lighthouse score of 91. Lighthouse is an automated tool for auditing the quality of web pages. You can run it against any web page to see audits for performance, accessibility, progressive web apps, and more.
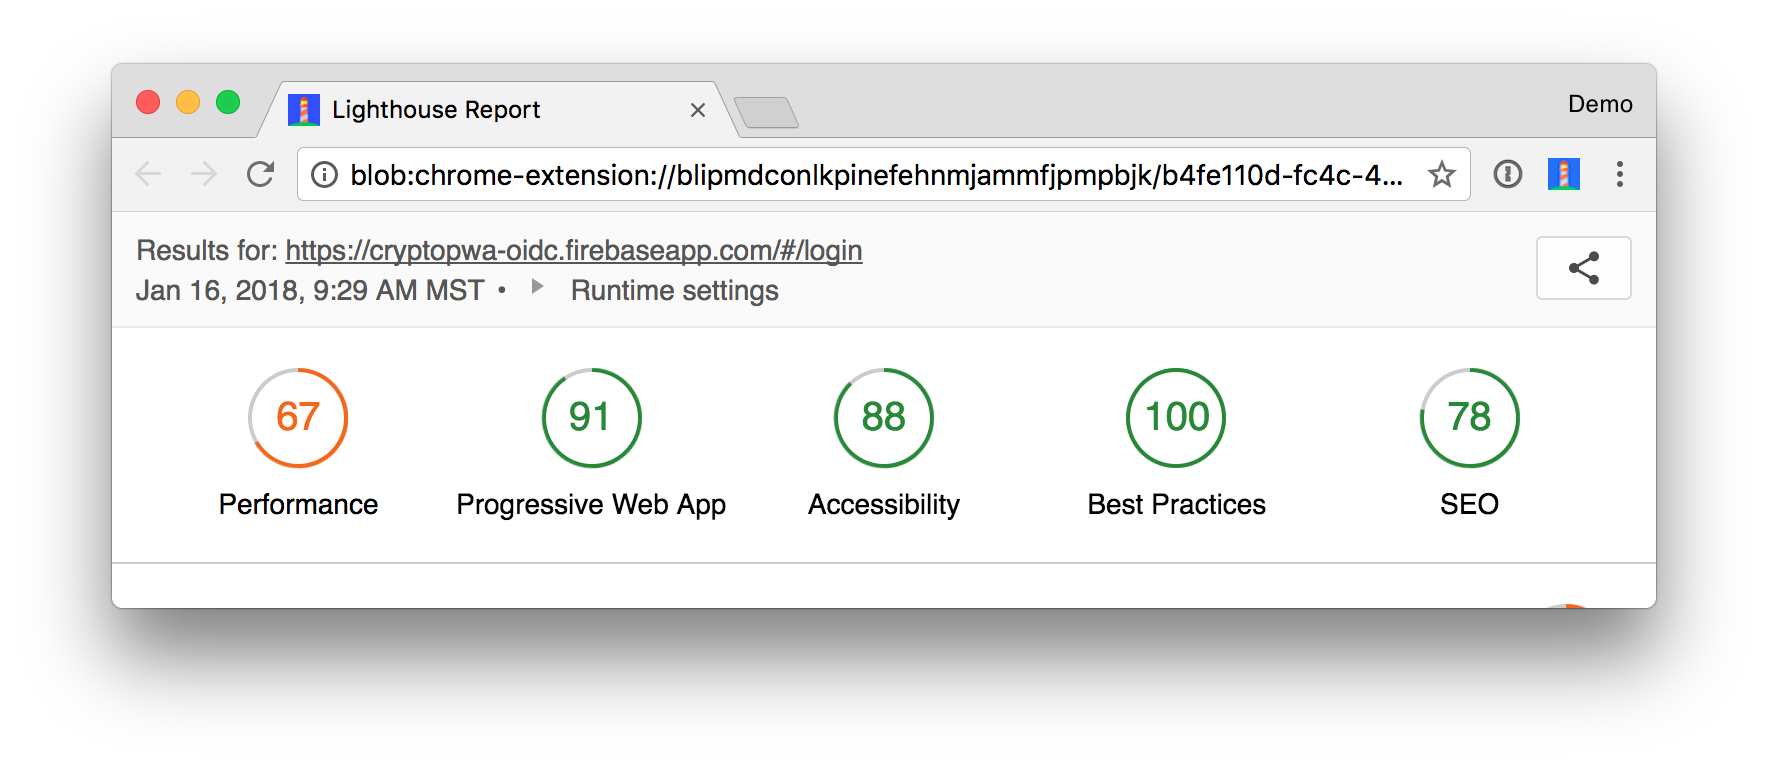
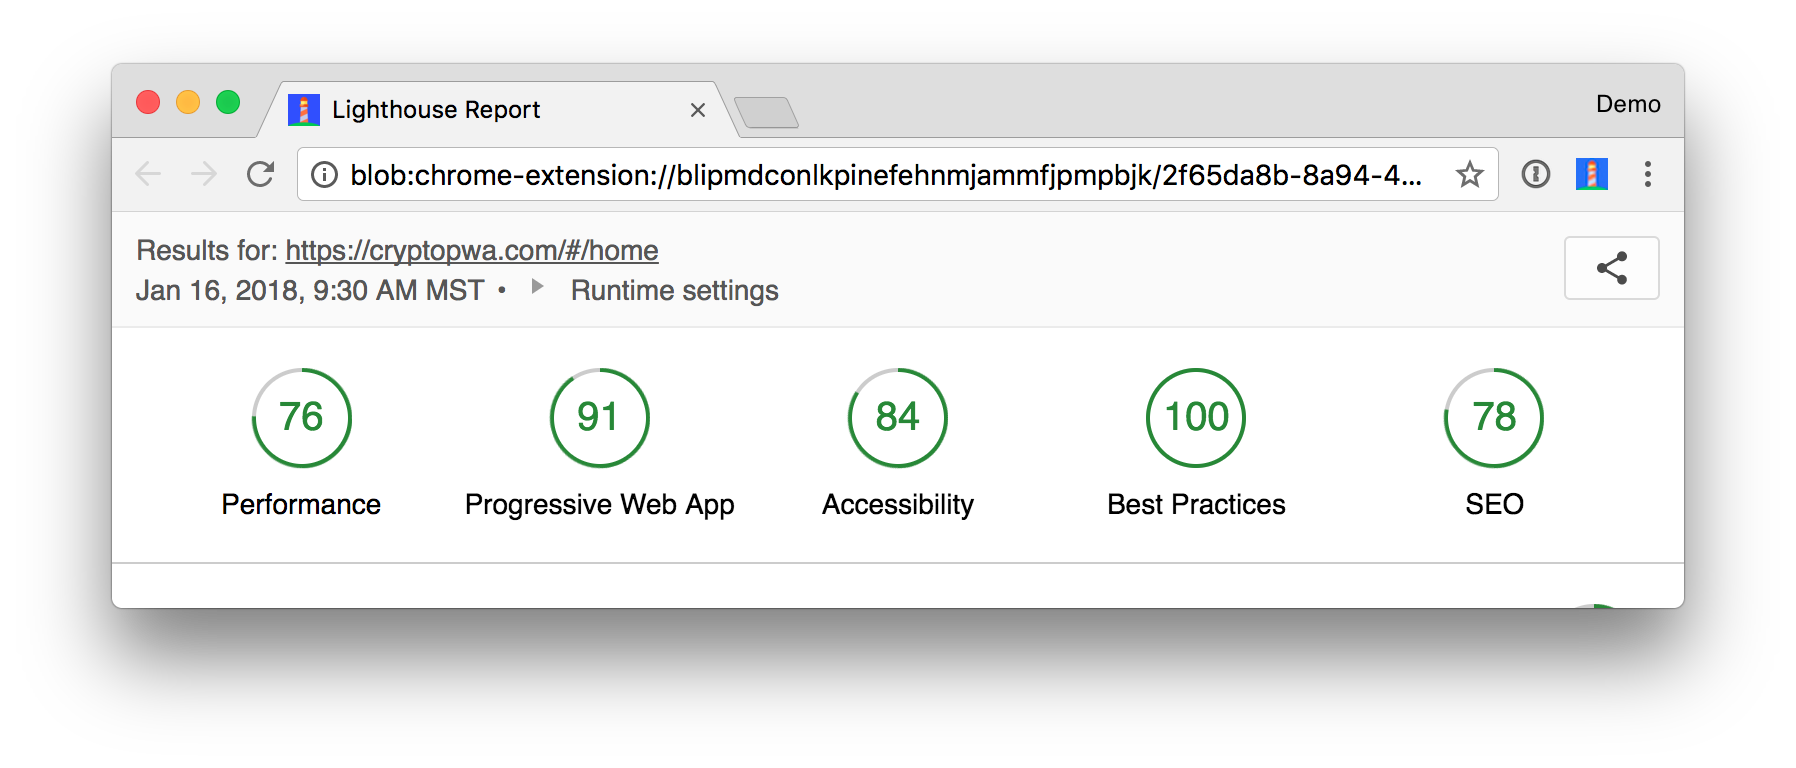
I compared this with the original tutorial’s production instance at https://cryptopwa.com and found it received the same score.
I scrolled down my report to see why I didn’t receive a perfect 💯. I had two failed audits:
- Does not provide fallback content when JavaScript is not available
- Has a
<meta name="viewport">tag withwidthorinitial-scale(Invalid properties found:"{viewport-fit":"cover"})
To fix the first issue, add the following HTML in src/index.html, just after the <body> tag.
<noscript>
  <h1>You must enable JavaScript to view this page.</h1>
</noscript>
To fix the second issue, remove viewport-fit=cover, from the <meta name="viewport"> tag’s content attribute.
<meta name="viewport" content="width=device-width, initial-scale=1.0, minimum-scale=1.0, maximum-scale=1.0, user-scalable=no">
Redeploy using the commands below:
npm run ionic:build --prod
firebase deploy
Rerunning Lighthouse should give you a perfect PWA score of 100. Huzzah!
Learn More About Ionic and PWAs
In a future tutorial, I’ll show you how to replace this app’s local storage implementation with Okta’s custom profile attributes. This enhancement will allow you to track your cryptocurrency holdings from any device, with any browser!
For now, I hope you’ve enjoyed this brief look at Ionic, PWAs, and Okta. PWAs are more straightforward to distribute than mobile apps, and cloud services like Okta and Firebase make things even simpler.
You can see the complete source code for this project on GitHub. Please contact me on Twitter @mraible, via Okta’s Developer Forums, or in the comments below if you have any questions.
To learn more about Ionic and PWAs, check out the following resources:
Changelog:
- Apr 10, 2018: Updated dependencies in the example app to their latest versions using npm-check-updates. See the code changes in the example app on GitHub. Changes to this article can be viewed in oktadeveloper/okta.github.io#1940.
Matt Raible is a well-known figure in the Java community and has been building web applications for most of his adult life. For over 20 years, he has helped developers learn and adopt open source frameworks and use them effectively. He's a web developer, Java Champion, and Developer Advocate at Okta. Matt has been a speaker at many conferences worldwide, including Devnexus, Devoxx Belgium, Devoxx France, Jfokus, and JavaOne. He is the author of The Angular Mini-Book, The JHipster Mini-Book, Spring Live, and contributed to Pro JSP. He is a frequent contributor to open source and a member of the JHipster development team. You can find him online @mraible and raibledesigns.com.
Okta Developer Blog Comment Policy
We welcome relevant and respectful comments. Off-topic comments may be removed.